This example project builds on the previous Adding a Database project by using that project to create a RESTful API. That API can be used to access and modify the data in the database. We’ll also add a suite of unit tests to explore our API and ensure that it is working correctly.
Project Deliverables
At the end of this example, we will have a project with the following features:
A RESTful API with several routes for creating, reading, updating, and deleting (CRUD) data in the database
Open API Documentation for API Routes
Full Unit Test Suite with Coverage Metrics
Prior Work
This project picks up right where the last one left off, so if you haven’t completed that one yet, go back and do that before starting this one.
There are many articles online that discuss best practices in API design. For this project, we’re going to follow a few of the most common recommendations:
Let’s start with the first one - we can easily add a version number to our API’s URL paths. This allows us to make breaking changes to the API in the future without breaking any of the current functionality.
API Versioning
Our current application contains data for both a User and a Role model. For this example, we’ll begin by adding a set of RESTful API routes to work with the Role model. In order to add proper versioning to our API, we will want these routes visible at the /api/v1/roles path.
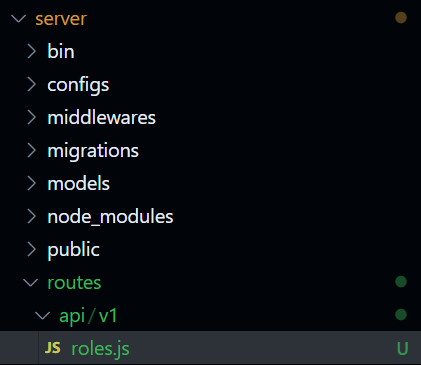
First, we should create the folder structure inside of our routes folder to match the routes used in our API. This means we’ll create an api folder, then a v1 folder, and finally a roles.js file inside of that folder:
Before we create the content in that file, let’s also create a new file in the base routes folder named api.js that will become the base file for all of our API routes:
/**
* @file API main router
* @author Russell Feldhausen <russfeld@ksu.edu>
* @exports router an Express router
*
* @swagger
* tags:
* name: api
* description: API routes
*/// Import libraries
importexpressfrom"express";
// Import v1 routers
importrolesRouterfrom"./api/v1/roles.js"// Create Express router
constrouter=express.Router();
// Use v1 routers
router.use("/v1/roles", rolesRouter);
/**
* Gets the list of API versions
*
* @param {Object} req - Express request object
* @param {Object} res - Express response object
* @param {Function} next - Express next middleware function
*
* @swagger
* /api/:
* get:
* summary: list API versions
* tags: [api]
* responses:
* 200:
* description: the list of API versions
* content:
* application/json:
* schema:
* type: array
* items:
* type: object
* properties:
* version:
* type: string
* url:
* type: string
* example:
* - version: "1.0"
* url: /api/v1/
*/router.get('/', function (req, res, next) {
res.json([
{
version:"1.0",
url:"/api/v1/" }
])
})
exportdefaultrouter
This file is very simple - it just outputs all possible API versions (in this case, we just have a single API version). It also imports and uses our new roles router. Finally, it includes some basic Open API documentation for the route it contains. Let’s quickly add some basic content to our roles router, based on the existing content in our users router from before:
/**
* @file Roles router
* @author Russell Feldhausen <russfeld@ksu.edu>
* @exports router an Express router
*
* @swagger
* tags:
* name: roles
* description: Roles Routes
*/// Import libraries
importexpressfrom"express";
// Create Express router
constrouter=express.Router();
// Import models
import { Role } from"../../../models/models.js";
// Import logger
importloggerfrom"../../../configs/logger.js"/**
* Gets the list of roles
*
* @param {Object} req - Express request object
* @param {Object} res - Express response object
* @param {Function} next - Express next middleware function
*
* @swagger
* /api/v1/roles:
* get:
* summary: roles list page
* description: Gets the list of all roles in the application
* tags: [roles]
* responses:
* 200:
* description: the list of roles
* content:
* application/json:
* schema:
* type: array
* items:
* $ref: '#/components/schemas/Role'
*/router.get("/", asyncfunction (req, res, next) {
try {
constroles=awaitRole.findAll();
res.json(roles);
} catch (error) {
logger.error(error)
res.status(500).end()
}
});
exportdefaultrouter;
Notice that we have added an additional try and catch block to the route function. This will ensure any errors that are thrown by the database get caught and logged without leaking any sensitive data from our API. It is always a good practice to wrap each API method in a try and catch block.
Get All Route Only
For this particular application’s API design, we will only be creating the get all RESTful method for the Role model. This is because we don’t actually want any users of the application modifying the roles themselves, since those roles will eventually be used in the overall authorization structure of the application (to be added in a later example). However, when creating or updating users, we need to be able to access a full list of all available roles, which can be found using this particular API endpoint.
We’ll explore the rest of the RESTful API methods in the User model later in this example.
Controllers and Services
More complex RESTful API designs may include additional files such as controllers and services to add additional structure to the application. For example, there might be multiple API routes that access the same method in a controller, which then uses a service to perform business logic on the data before storing it in the database.
For this example project, we will place most of the functionality directly in our routes to simplify our structure.
You can read more about how to use controllers and services in the MDN Express Tutorial.
Since we are creating routes in a new subfolder, we also need to update our Open API configuration in configs/openapi.js so that we can see the documentation contained in those routes:
Now that we’ve created these two basic routers, let’s get them added to our app.js file so they are accessible to the application:
// -=-=- other code omitted here -=-=-
// Import routers
importindexRouterfrom"./routes/index.js";
importusersRouterfrom"./routes/users.js";
importapiRouterfrom"./routes/api.js";
// Create Express application
varapp=express();
// Use libraries
app.use(express.json());
app.use(express.urlencoded({ extended:false }));
app.use(helmet());
app.use(compression());
app.use(cookieParser());
// Use middlewares
app.use(requestLogger);
// Use static files
app.use(express.static(path.join(import.meta.dirname, "public")));
// Use routers
app.use("/", indexRouter);
app.use("/users", usersRouter);
app.use("/api", apiRouter);
// -=-=- other code omitted here -=-=-
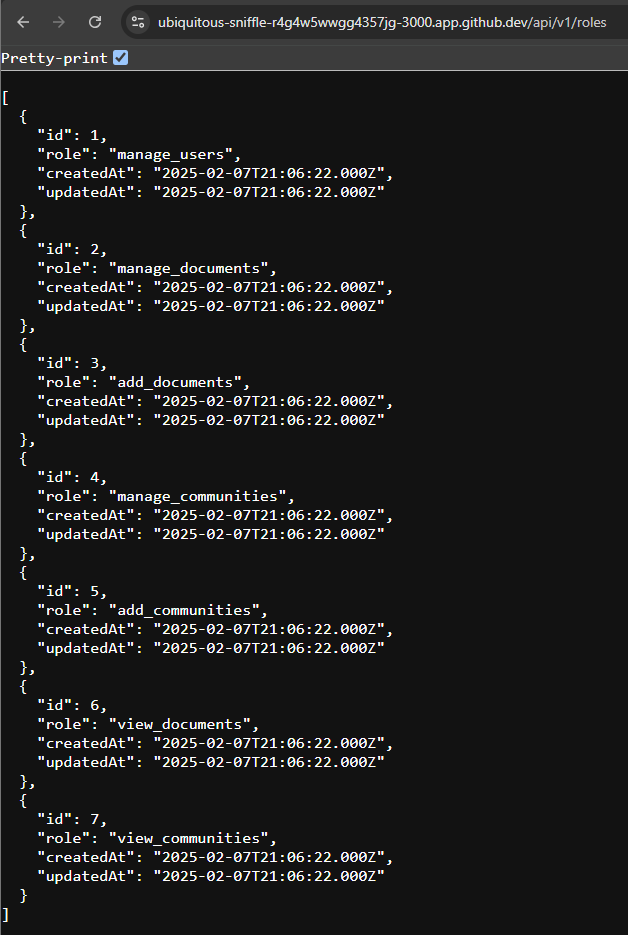
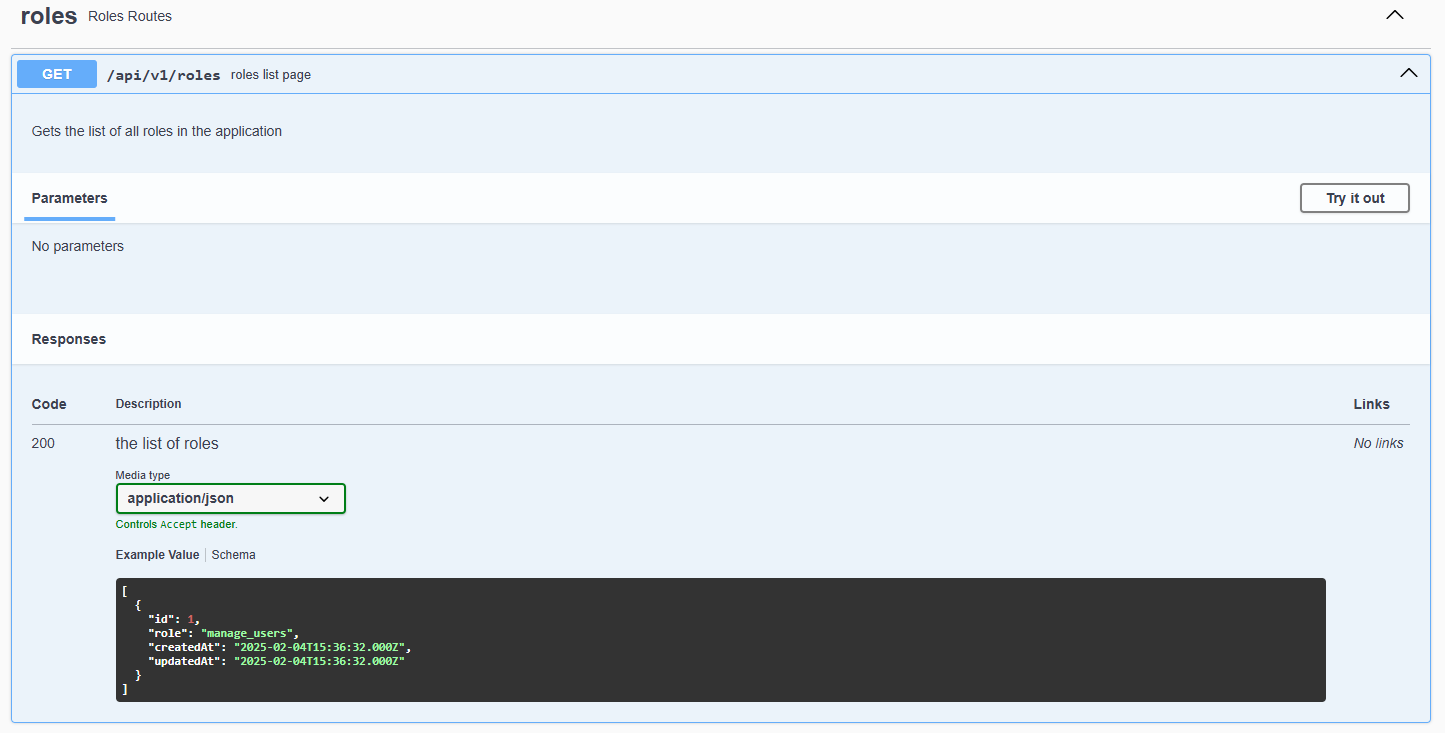
Now, with everything in place, let’s run our application and see if we can access that new route at /api/v1/roles:
$ npm run dev
If everything is working correctly, we should see our roles listed in the output on that page:
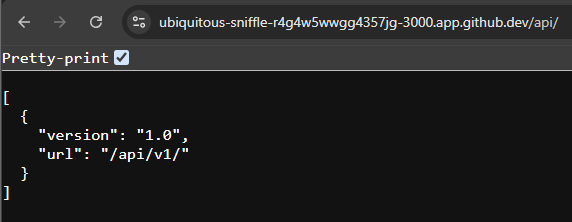
We should also be able to query the list of API versions at the path /api:
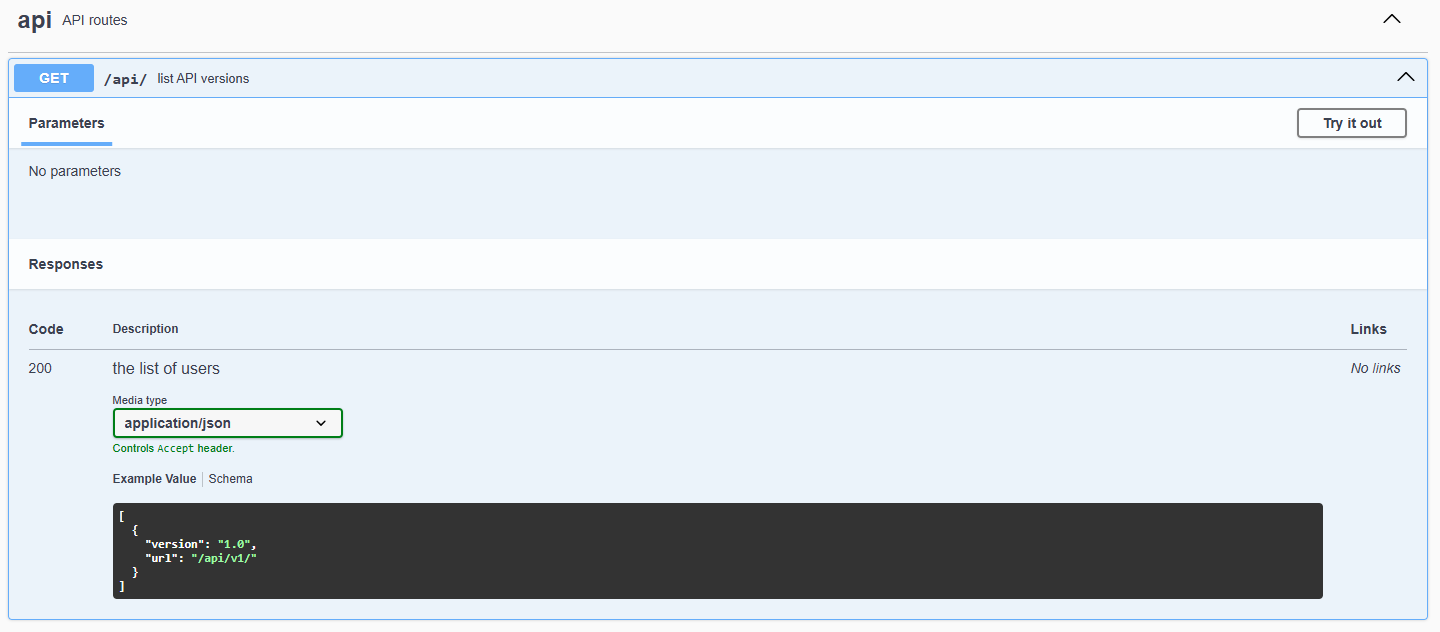
Finally, we should also check and make sure our Open API documentation at the /docs path is up to date and includes the new routes:
There! This gives us a platform to build our new API upon. We’ll continue throughout this example project to add additional routes to the API as well as related unit tests.
Now that we have created our first route in our RESTful API, we can start to write unit tests that will confirm our API works as intended. Adding unit testing early in the development process makes it much easier to keep up with unit tests as new features are added or even explore test-driven development!
There are many libraries that can be used to unit test a RESTful API using Node.js and Express. For this project, we’re going to use a number of testing libraries:
Now that we have those libraries in place, let’s make a few modifications to our project configuration to make testing more convenient.
ESLint Plugin
To help with formatting and highlighting of our unit tests, we should update the content of our eslint.config.js to recognize items from mocha as follows:
If working properly, this should also fix any errors visible in VS Code using the ESLint plugin!
Mocha Root Hooks
In testing frameworks such as mocha, we can create hooks that contain actions that should be taken before each test is executed in a file. The mocha framework also has root-level hooks that are actions to be taken before each and every test in every file. We can use a root-level hook to manage setting up a simple database for unit testing, as well as configuring other aspects of our application for testing.
First, let’s create a new test directory in our server folder, and inside of that we’ll create a file hooks.js to contain the testing hooks for our application.
/**
* @file Root Mocha Hooks
* @author Russell Feldhausen <russfeld@ksu.edu>
* @exports mochaHooks A Mocha Root Hooks Object
*/// Load environment (must be first)
importdotenvxfrom"@dotenvx/dotenvx";
dotenvx.config({path:".env.test"})
// Import configuration
importdatabasefrom"../configs/database.js";
importmigrationsfrom'../configs/migrations.js';
importseedsfrom'../configs/seeds.js';
// Root Hook Runs Before Each Test
exportconstmochaHooks= {
// Hook runs once before any tests are executed
beforeAll(done) {
// Test database connection
database.authenticate().then(() => {
// Run migrations
migrations.up().then(() => {
done()
});
});
},
// Hook runs before each individual test
beforeEach(done) {
// Seed the database
seeds.up().then(() => {
done();
})
},
// Hook runs after each individual test
afterEach(done) {
// Remove all data from the database
seeds.down({to:0}).then(() => {
done();
});
}
}
This file contains three hooks. First, the beforeAll hook, which is executed once before any tests are executed, is used to migrate the database. Then, we have the beforeEach() hook, which is executed before each individual test, which will seed the database with some sample data for us to use in our unit tests. Finally, we have an afterEach() hook that will remove any data from the database by undoing all of the seeds, which will truncate each table in the database.
Notice at the top that we are also loading our environment from a new environment file, .env.test. This allows us to use a different environment configuration when we perform testing. So, let’s create that file and populate it with the following content:
Here, the two major changes are to switch the log level to error so that we only see errors in the log output, and also to switch the database file to :memory: - a special filename that tells SQLite to create an in-memory database that is excellent for testing.
At this point, we can start writing our unit tests.
Writing Basic Unit Tests
Let’s start with a very simple case - the /api route we created earlier. This is a simple route that only has a single method and outputs a single item, but it already clearly demonstrates how complex unit testing can become.
For these unit tests, we can create a file api.js in the test folder with the following content:
These lines will import the various libraries required for these unit tests. We’ll explore how they work as we build the unit tests, but it is also recommended to read the documentation for each library (linked above) to better understand how each one works together in the various unit tests.
Now, let’s write our first unit test, which can be placed right below those lines in the same file:
// -=-=- other code omitted here -=-=-
/**
* Get all API versions
*/constgetAllVersions= () => {
it('should list all API versions', (done) => {
request(app)
.get('/api/')
.expect(200)
.end((err, res) => {
if (err) returndone(err)
res.body.should.be.an('array')
res.body.should.have.lengthOf(1)
done()
})
})
}
/**
* Test /api route
*/describe('/api', () => {
describe('GET /', () => {
getAllVersions()
})
})
This code looks quite a bit different than the code we’ve been writing so far. This is because the mocha and chai libraries use the Behavior-Driven Development, or BDD, style for writing unit tests. The core idea is that the unit tests should be somewhat “readable” by anyone looking at the code. So, it defines functions such as it and describe that are used to structure the unit tests.
In this example, the getAllVersions function is a unit test function that uses the request library to send a request to our Express app at the /api/ path. When the response is received from that request, we expect the HTTP status code to be 200, and the body of that request should be an array with a length of 1. Hopefully it is clear to see all of that just by reading the code in that function.
The other important concept is the special done function, which is provided as an argument to any unit test function that is testing asynchronous code. Because of the way asynchronous code is handled, the system cannot automatically determine when all promises have been returned. So, once we are done with the unit test and are not waiting for any further async responses, we need to call the done() method. Notice that we call that both at the end of the function, but also in the if statement that checks for any errors returned from the HTTP request.
Finally, at the bottom of the file, we have a few describe statements that actually build the structure that runs each unit test. When the tests are executed, only functions called inside of the describe statements will be executed.
Running Unit Tests
Now that we have created a simple unit test, let’s run it using the mocha test framework. To do this, we’ll add a new script to the package.json file with all of the appropriate options:
Here, we are using the mocha command with many options:
--require test/hooks.js - this requires the global hooks file to be used before each test
--recursive - this will recursively look for any tests in subdirectories
--parallel - this allows tests to run in parallel (this requires the SQLite in-memory database)
--timeout 2000 - this will stop any test if it runs for more than 2 seconds
--exit - this forces Mocha to stop after all tests have finished
So, now let’s run our tests using that script:
$ npm run test
If everything is working correctly, we should get the following output:
> lost-communities-solution@0.0.1 test
> mocha --require test/hooks.js --recursive --parallel --timeout 2000 --exit

[dotenvx@1.34.0] injecting env (6) from .env.test

[dotenvx@1.34.0] injecting env (0) from .env.test
[dotenvx@1.34.0] injecting env (0) from .env

  /api
    GET /
      ✔ should list all API versions


  1 passing (880ms)
Great! It looks like our test already passed!
Just to be sure, let’s quickly modify our test to look for an array of size 2 so that it should fail:
// -=-=- other code omitted here -=-=-
/**
* Get all API versions
*/constgetAllVersions= () => {
it('should list all API versions', (done) => {
request(app)
.get('/api/')
.expect(200)
.end((err, res) => {
if (err) returndone(err)
res.body.should.be.an('array')
res.body.should.have.lengthOf(2)
done()
})
})
}
// -=-=- other code omitted here -=-=-
Now, when we run the tests, we should clearly see a failure report instead:
> lost-communities-solution@0.0.1 test
> mocha --require test/hooks.js --recursive --parallel --timeout 2000 --exit

[dotenvx@1.34.0] injecting env (6) from .env.test

[dotenvx@1.34.0] injecting env (0) from .env.test
[dotenvx@1.34.0] injecting env (0) from .env

  /api
    GET /
      1) should list all API versions


  0 passing (910ms)
  1 failing

  1) /api
       GET /
         should list all API versions:

      Uncaught AssertionError: expected [ { version: '1.0', url: '/api/v1/' } ] to have a length of 2 but got 1
      + expected - actual

      -1
      +2

      at Test.<anonymous> (file:///workspaces/lost-communities-solution/server/test/api.js:31:30)
      at Test.assert (node_modules/supertest/lib/test.js:172:8)
      at Server.localAssert (node_modules/supertest/lib/test.js:120:14)
      at Object.onceWrapper (node:events:638:28)
      at Server.emit (node:events:524:28)
      at emitCloseNT (node:net:2383:8)
      at process.processTicksAndRejections (node:internal/process/task_queues:89:21)
Thankfully, anytime a test fails, we get a very clear and easy to follow error report that pinpoints exactly which line in the test failed, and how the assertion was not met.
Before moving on, let’s update our test so that it should pass again.
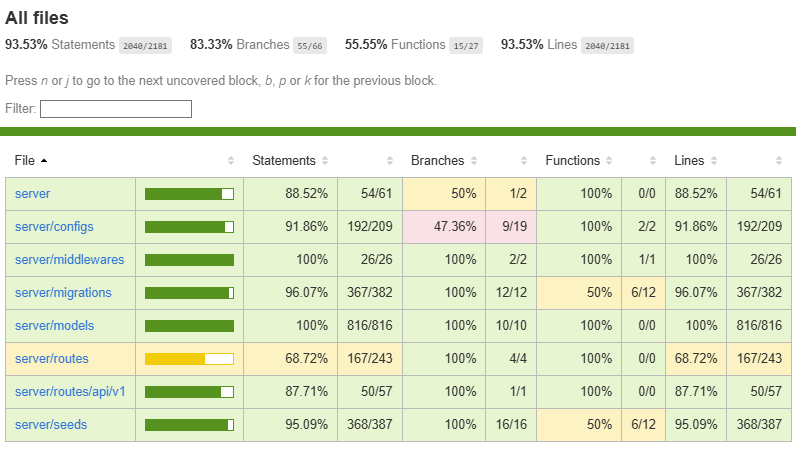
It is often helpful to examine the code coverage of our unit tests. Thankfully, there is an easy way to enable that in our project using the c8 library. So, we can start by installing it:
$ npm install --save-dev c8
Once it is installed, we can simply add it to a new script in the package.json file that will run our tests with code coverage:
Right away we see that a large part of our application achieves 100% code coverage with a single unit test! This highlights both how tightly interconnected all parts of our application are (such that a single unit test exercises much of the code) but also that code coverage can be a very poor metric for unit test quality (seeing this result we might suspect our application is already well tested with just a single unit test).
We have also enabled the html reporter, so we can see similar results in a coverage folder that appears inside of our server folder. We can use various VS Code Extensions such as Live Preview to view that file in our web browser.
Port Conflict
The Live Preview extension defaults to port 3000, so we recommend digging into the settings and changing the default port to something else before using it.
In either case, we can see that we’ve already reached 100% coverage on our routes/api.js file. However, as we’ll see in the next section, that doesn’t always mean that we are done writing our unit tests.
Let’s consider the scenario where our routes/api.js file was modified slightly to have some incorrect code in it:
// -=-=- other code omitted here -=-=-
router.get('/', function (req, res, next) {
res.json([
{
versoin:"1.0",
url:"/api/ver1/" }
])
})
In this example, we have misspelled the version attribute, and also used an incorrect URL for that version of the API. Unfortunately, if we actually make that change to our code, our existing unit test will not catch either error!
So, let’s look at how we can go about catching these errors and ensuring our unit tests are actually valuable.
JSON Schemas
First, it is often helpful to validate the schema of the JSON output by our API. To do that, we’ve installed the ajv JSON schema validator and a chai plugin for using it in a unit test. So, in our test/api.js file, we can add a new test:
// -=-=- other code omitted here -=-=-
/**
* Check JSON Schema of API Versions
*/constgetAllVersionsSchemaMatch= () => {
it('all API versions should match schema', (done) => {
constschema= {
type:'array',
items: {
type:'object',
required: ['version', 'url'],
properties: {
version: { type:'string' },
url: { type:'string' },
},
additionalProperties:false,
},
}
request(app)
.get('/api/')
.expect(200)
.end((err, res) => {
if (err) returndone(err)
res.body.should.be.jsonSchema(schema)
done()
})
})
}
/**
* Test /api route
*/describe('/api', () => {
describe('GET /', () => {
getAllVersions()
getAllVersionsSchemaMatch()
})
})
In this test, we create a JSON schema following the AJV Instructions that defines the various attributes that should be present in the output. It is especially important to include the additionalProperties: false line, which helps prevent leaking any unintended attributes.
Now, when we run our tests, we should see that this test fails:
  /api
    GET /
      ✔ should list all API versions
      1) all API versions should match schema


  1 passing (1s)
  1 failing

  1) /api
       GET /
         all API versions should match schema:
     Uncaught AssertionError: expected [ { versoin: '1.0', …(1) } ] to match json-schema
[ { instancePath: '/0', …(7) } ]
      at Test.<anonymous> (file:///workspaces/lost-communities-solution/server/test/api.js:59:28)
...
As we can see, the misspelled version attribute will not match the given schema, causing the test to fail! That shows the value of such a unit test in our code.
Protecting Attributes
Let’s update our route to include the correct attributes, but also add an additional item that shouldn’t be present in the output:
// -=-=- other code omitted here -=-=-
router.get('/', function (req, res, next) {
res.json([
{
version:"1.0",
url:"/api/ver1/",
secure_data:"This should not be shared!" }
])
})
This is an example of Broken Object Property Level Authorization, one of the top 10 most common API security risks according to OWASP. Often our database models will include attributes that we don’t want to expose to our users, so we want to make sure they aren’t included in the output by accident.
If we run our test again, it should also fail:
  /api
    GET /
      ✔ should list all API versions
      1) all API versions should match schema


  1 passing (1s)
  1 failing

  1) /api
       GET /
         all API versions should match schema:
     Uncaught AssertionError: expected [ { version: '1.0', …(2) } ] to match json-schema
[ { instancePath: '/0', …(7) } ]
      at Test.<anonymous> (file:///workspaces/lost-communities-solution/server/test/api.js:59:28)
...
However, if we remove the line additionalProperties: false from our JSON schema unit test, it will now succeed. So, it is always important for us to remember to include that line in all of our JSON schemas if we want to avoid this particular security flaw.
Checking Values
However, we still have not caught our incorrect value in our API output:
// -=-=- other code omitted here -=-=-
router.get('/', function (req, res, next) {
res.json([
{
version:"1.0",
url:"/api/ver1/",
secure_data:"This should not be shared!" }
])
})
For this, we need to write one additional unit test to check the actual content of the output. For this, we’ll use a deep equality plugin for chai:
// -=-=- other code omitted here -=-=-
/**
* Check API version exists in list
*/constfindVersion= (version) => {
it('should contain specific version', (done) => {
request(app)
.get('/api/')
.expect(200)
.end((err, res) => {
if (err) returndone(err)
constfoundVersion=res.body.find((v) => v.version===version.version)
foundVersion.should.shallowDeepEqual(version)
done()
})
})
}
/**
* Test /api route
*/describe('/api', () => {
describe('GET /', () => {
getAllVersions()
getAllVersionsSchemaMatch()
})
describe('version: 1.0', () => {
constversion= {
version:"1.0",
url:"/api/v1/" }
describe('GET /', () => {
findVersion(version)
})
})
})
The findVersion unit test will check the actual contents of the output received from the API and compare it to the version object that is provided as input. In our describe statements below, we can see how easy it is to define a simple version object that we can use to compare to the output.
Use the Source!
One common mistake when writing these unit tests is to simply copy the object structure from the code that is being tested. This is considered bad practice since it virtually guarantee that any typos or mistakes are not caught. Instead, when constructing these unit tests, we should always go back to the original source document, typically a design document or API specification, and build our unit tests using that as a guide. This will ensure that our tests will actually catch things such as typos or missing data.
With that test in place, we should once again have a unit test that fails:
  /api
    GET /
      ✔ should list all API versions
      ✔ all API versions should match schema
    version: 1.0
      GET /
        1) should contain specific version


  2 passing (987ms)
  1 failing

  1) /api
       version: 1.0
         GET /
           should contain specific version:

      Uncaught AssertionError: Expected to have "/api/v1/" but got "/api/ver1/" at path "/url".
      + expected - actual

       {
      -  "url": "/api/ver1/"
      +  "url": "/api/v1/"
         "version": "1.0"
       }

      at Test.<anonymous> (file:///workspaces/lost-communities-solution/server/test/api.js:76:29)
Thankfully, in the output we clearly see the error, and it is easy to go back to our original design document to correct the error in our code.
Reusing Tests
While it may seem like we are using a very complex structure for these tests, there is actually a very important reason behind it. If done correctly, we can easily reuse most of our tests as we add additional data to the application.
Let’s consider the scenario where we add a second API version to our output:
// -=-=- other code omitted here -=-=-
router.get('/', function (req, res, next) {
res.json([
{
version:"1.0",
url:"/api/v1/" },
{
version:"2.0",
url:"/api/v2/" }
])
})
To fully test this, all we need to do is update the array size in the getAllVersions and add an additional describe statement for the new version:
// -=-=- other code omitted here -=-=-
/**
* Get all API versions
*/constgetAllVersions= () => {
it('should list all API versions', (done) => {
request(app)
.get('/api/')
.expect(200)
.end((err, res) => {
if (err) returndone(err)
res.body.should.be.an('array')
res.body.should.have.lengthOf(2)
done()
})
})
}
// -=-=- other code omitted here -=-=-
/**
* Test /api route
*/describe('/api', () => {
describe('GET /', () => {
getAllVersions()
getAllVersionsSchemaMatch()
})
describe('version: 1.0', () => {
constversion= {
version:"1.0",
url:"/api/v1/" }
describe('GET /', () => {
findVersion(version)
})
})
describe('version: 2.0', () => {
constversion= {
version:"2.0",
url:"/api/v2/" }
describe('GET /', () => {
findVersion(version)
})
})
})
With those minor changes, we see that our code now passes all unit tests:
  /api
    GET /
      ✔ should list all API versions
      ✔ all API versions should match schema
    version: 1.0
      GET /
        ✔ should contain specific version
    version: 2.0
      GET /
        ✔ should contain specific version
By writing reusable functions for our unit tests, we can often deduplicate and simplify our code.
Before moving on, let’s roll back our unit tests and the API to just have a single version. We should make sure all tests are passing before we move ahead!
Now that we’ve created a basic unit test for the /api route, we can now expand on that to test our other existing route, the /api/v1/roles route. Once again, there is only one method inside of this route, the GET ALL method, so the unit tests should be similar between these two routes. The only difference here is this route is now reading from the database instead of just returning a static JSON array.
We can begin by creating a new api folder inside of the test folder, and then a v1 folder inside of that, and finally a new roles.js file to contain our tests. By doing this, the path to our tests match the path to the routes themselves, making it easy to match up the tests with the associated routers.
Inside of that file, we can place the first unit test for the roles routes:
/**
* @file /api/v1/roles Route Tests
* @author Russell Feldhausen <russfeld@ksu.edu>
*/// Load Libraries
importrequestfrom"supertest";
import { use, should } from"chai";
importchaiJsonSchemaAjvfrom"chai-json-schema-ajv";
importchaiShallowDeepEqualfrom"chai-shallow-deep-equal";
use(chaiJsonSchemaAjv.create({ verbose:true }));
use(chaiShallowDeepEqual);
// Import Express application
importappfrom"../../../app.js";
// Modify Object.prototype for BDD style assertions
should();
/**
* Get all Roles
*/constgetAllRoles= () => {
it("should list all roles", (done) => {
request(app)
.get("/api/v1/roles")
.expect(200)
.end((err, res) => {
if (err) returndone(err);
res.body.should.be.an("array");
res.body.should.have.lengthOf(7);
done();
});
});
};
/**
* Test /api/v1/roles route
*/describe("/api/v1/roles", () => {
describe("GET /", () => {
getAllRoles();
});
});
Just like before, this unit test will simply send an HTTP GET request to the /api/v1/roles and expect to receive a response that contains an array of 7 elements, which matches the 7 roles defined in the seeds/01_roles.js file.
Adding Additional Formats to AJV
Next, we can create a test to confirm that the structure of that response matches our expectation:
However, as we write that test, we might notice that the createdAt and updatedAt fields are just defined as strings, when really they should be storing a timestamp. Thankfully, the AJV Schema Validator has an extension called AJV Formats that adds many new formats we can use. So, let’s install it as a development dependency using npm:
$ npm install --save-dev ajv-formats
Then, we can add it to AJV at the top of our unit tests and use all of the additional types in the AJV Formats documentation in our tests:
Now we can use the iso-date-time string format to confirm that the createdAt and updatedAt fields match the expected format. The AJV Formats package supports a number of helpful formats, such as email, uri, uuid, and more.
Testing Each Role
Finally, we should also check that each role we expect to be included in the database is present and accounted for. We can write a single unit test function for this, but we’ll end up calling it several times with different roles:
// -=-=- other code omitted here -=-=-
/**
* Check Role exists in list
*/constfindRole= (role) => {
it("should contain '"+role.role+"' role", (done) => {
request(app)
.get("/api/v1/roles")
.expect(200)
.end((err, res) => {
if (err) returndone(err);
constfoundRole=res.body.find(
(r) => r.id===role.id,
);
foundRole.should.shallowDeepEqual(role);
done();
});
});
};
// List of all expected roles in the application
constroles= [
{
id:1,
role:"manage_users" },
{
id:2,
role:"manage_documents" },
{
id:3,
role:"add_documents" },
{
id:4,
role:"manage_communities" },
{
id:5,
role:"add_communities" },
{
id:6,
role:"view_documents" },
{
id:7,
role:"view_communities" }
]
/**
* Test /api/v1/roles route
*/describe("/api/v1/roles", () => {
describe("GET /", () => {
getAllRoles();
getRolesSchemaMatch();
roles.forEach( (r) => {
findRole(r)
})
});
});
Here we are creating a simple array of roles, which looks similar to the one that is already present in our seeds/01_roles.js seed file, but importantly it is not copied from that file! Instead, we should go back to the original design documentation for this application, if any, and read the roles from there to make sure they are all correctly added to the database. In this case we don’t have an original design document so we won’t worry about that here.
With all of that in place, let’s run our unit tests and confirm they are working:
$ npm run test
If everything is correct, we should find the following in our output showing all tests are successful:
  /api/v1/roles
    GET /
      ✔ should list all roles
      ✔ all roles should match schema
      ✔ should contain 'manage_users' role
      ✔ should contain 'manage_documents' role
      ✔ should contain 'add_documents' role
      ✔ should contain 'manage_communities' role
      ✔ should contain 'add_communities' role
      ✔ should contain 'view_documents' role
      ✔ should contain 'view_communities' role
There we go! We now have working unit tests for our roles. Now is a great time to lint, format, and then commit and push our work to GitHub before continuing. Below are a couple of important discussions on unit test structure and design that are highly recommended before continuing.
Unit Tests Based on Seed Data
In this application, we are heavily basing our unit tests on the seed data we created in the seeds directory. This is a design choice, and there are many different ways to approach this in practice:
Seed data for unit tests could be included as a hook that runs before each unit test
Unit tests could assume the database is completely blank and manually insert data as needed as part of the test
Different seed data files could be used for testing and production
A sample database file or connection could be used for testing instead of seed data
In this case, we believe it makes sense for the application we are testing to have a number of pre-defined roles and users that are populated via seed data when the application is tested and when it is deployed, so we chose to build our unit tests based on the assumption that the existing seed data will be used. However, other application designs may require different testing strategies, so it is always important to consider which method will work best for a given application!
Duplicated Unit Test Code
A keen-eyed observer may notice that the three unit test functions in the test/api.js file are nearly identical to the functions included in the test/api/v1/roles.js file. This is usually the case in unit testing - there is often a large amount of repeated code used to test different parts of an application, especially a RESTful API like this one.
This leads to two different design options:
Refactor the code to reduce duplication across unit tests, adding some complexity and interdependence between tests
Keep duplicated code to make unit tests more readable and independent of each other
For this application, we will follow the second approach. We feel that unit tests are much more useful if the large majority of the test can be easily seen and understood in a single file. This also means that a change in one test method will not impact other tests, both for good and for bad. So, it may mean modifying and updating the entire test suite is a bit more difficult, but updating individual tests should be much simpler.
Again, this is a design choice that we feel is best for this application, and other applications may be better off with other structures. It is always important to consider these implications when writing unit tests for an application!
Now that we have written and tested the routes for the Role model, let’s start working on the routes for the User model. These routes will be much more complex, because we want the ability to add, update, and delete users in our database.
To do this, we’ll create several RESTful routes, which pair HTTP verbs and paths to the various CRUD operations that can be performed on the database. Here is a general list of the actions we want to perform on most models in a RESTful API, based on their associated CRUD operation:
Create New (HTTP POST)
Retrieve All / Retrieve One (HTTP GET)
Update One (HTTP PUT)
Delete One (HTTP DELETE)
As we build this new API router, we’ll see each one of these in action.
Retrieve All Route
The first operation we’ll look at is the retrieve all operation, which is one we’re already very familiar with. To begin, we should start by copying the existing file at routes/users.js to routes/api/v1/users.js and modifying it a bit to contain this content:
/**
* @file Users router
* @author Russell Feldhausen <russfeld@ksu.edu>
* @exports router an Express router
*
* @swagger
* tags:
* name: users
* description: Users Routes
*/// Import libraries
importexpressfrom"express";
// Create Express router
constrouter=express.Router();
// Import models
import {
User,
Role,
} from"../../../models/models.js";
// Import logger
importloggerfrom"../../../configs/logger.js";
/**
* Gets the list of users
*
* @param {Object} req - Express request object
* @param {Object} res - Express response object
* @param {Function} next - Express next middleware function
*
* @swagger
* /api/v1/users:
* get:
* summary: users list page
* description: Gets the list of all users in the application
* tags: [users]
* responses:
* 200:
* description: the list of users
* content:
* application/json:
* schema:
* type: array
* items:
* $ref: '#/components/schemas/User'
*/router.get("/", asyncfunction (req, res, next) {
try {
constusers=awaitUser.findAll({
include: {
model:Role,
as:"roles",
attributes: ["id", "role"],
through: {
attributes: [],
},
},
});
res.json(users);
} catch (error) {
logger.error(error);
res.status(500).end();
}
});
exportdefaultrouter;
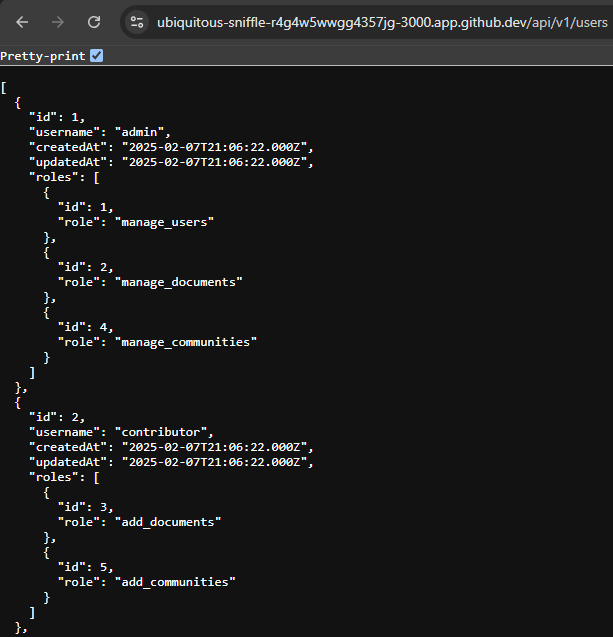
This is very similar to the code we included in our roles route. The major difference is that the users route will also output the list of roles assigned to the user. There is a lot of great information in the Sequelize Documentation for how to properly query associated records.
We’ll also need to remove the line from our app.js file that directly imports and uses that router:
// -=-=- other code omitted here -=-=-
// Import routers
importindexRouterfrom"./routes/index.js";
importusersRouterfrom"./routes/users.js"; // delete this line
importapiRouterfrom"./routes/api.js";
// -=-=- other code omitted here -=-=-
// Use routers
app.use("/", indexRouter);
app.use("/users", usersRouter); // delete this line
app.use("/api", apiRouter);
// -=-=- other code omitted here -=-=-
Instead, we can now import and link the new router in our routes/api.js file:
// -=-=- other code omitted here -=-=-
// Import v1 routers
importrolesRouterfrom"./api/v1/roles.js";
importusersRouterfrom"./api/v1/users.js";
// Create Express router
constrouter=express.Router();
// Use v1 routers
router.use("/v1/roles", rolesRouter);
router.use("/v1/users", usersRouter);
// -=-=- other code omitted here -=-=-
Before moving on, let’s run our application and make sure that the users route is working correctly:
$ npm run dev
Once it loads, we can navigate to the /api/v1/users URL to see the output:
Retrieve All Unit Tests
As we write each of these routes, we’ll also explore the related unit tests. The first three unit tests for this route are very similar to the ones we wrote for the roles routes earlier, so we won’t go into too much detail on these. As expected, we’ll place all of the unit tests for the users routes in the test/api/v1/users.js file:
The major difference to note is in the highlighted section, where we have to add some additional schema information to account for the roles associated attribute that is part of the users object. It is pretty self-explanatory; each object in the array has a set of attributes that match what we used in the unit test for the roles routes.
We also moved the schema for the User response object out of that unit test so we can reuse it in other unit tests, as we’ll see later in this example.
However, we also should add a couple of additional unit tests to confirm that each user has the correct roles assigned, since that is a major part of the security and authorization mechanism we’ll be building for this application. While we could do that as part of the findUser test, let’s go ahead and add separate tests for each of these, which is helpful in debugging anything that is broken or misconfigured.
/**
* @file /api/v1/users Route Tests
* @author Russell Feldhausen <russfeld@ksu.edu>
*/// Load Libraries
importrequestfrom"supertest";
import { use, should, expect } from"chai";
importAjvfrom"ajv";
importaddFormatsfrom"ajv-formats";
importchaiJsonSchemaAjvfrom"chai-json-schema-ajv";
importchaiShallowDeepEqualfrom"chai-shallow-deep-equal";
// -=-=- other code omitted here -=-=-
/**
* Check that User has correct number of roles
*/constfindUserCountRoles= (username, count) => {
it("user '"+username+"' should have "+count+" roles", (done) => {
request(app)
.get("/api/v1/users")
.expect(200)
.end((err, res) => {
if (err) returndone(err);
constfoundUser=res.body.find((u) => u.username===username);
foundUser.roles.should.be.an("array");
foundUser.roles.should.have.lengthOf(count);
done();
});
});
};
/**
* Check that User has specific role
*/constfindUserConfirmRole= (username, role) => {
it("user '"+username+"' should have '"+role+"' role", (done) => {
request(app)
.get("/api/v1/users")
.expect(200)
.end((err, res) => {
if (err) returndone(err);
constfoundUser=res.body.find((u) => u.username===username);
expect(foundUser.roles.some((r) => r.role===role)).to.equal(true)
done();
});
});
};
// -=-=- other code omitted here -=-=-
// List of all users and expected roles
constuser_roles= [
{
username:"admin",
roles: ["manage_users", "manage_documents", "manage_communities"]
},
{
username:"contributor",
roles: ["add_documents", "add_communities"]
},
{
username:"manager",
roles: ["manage_documents", "manage_communities"]
},
{
username:"user",
roles: ["view_documents", "view_communities"]
},
];
/**
* Test /api/v1/users route
*/describe("/api/v1/users", () => {
describe("GET /", () => {
// -=-=- other code omitted here -=-=-
user_roles.forEach((u) => {
// Check that user has correct number of roles
findUserCountRoles(u.username, u.roles.length)
u.roles.forEach((r) => {
// Check that user has each expected role
findUserConfirmRole(u.username, r)
})
});
});
});
This code uses an additional assertion, expect, from the chai library, so we have to import it at the top on the highlighted line. These two tests will confirm that the user has the expected number of roles, and also explicitly confirm that each user has each of the expected roles.
Testing Arrays for Containment
When writing unit tests that deal with arrays, it is always important to not only check that the array contains the correct elements, but also that it ONLY contains those elements and no additional elements. A great way to do this is to explicitly check each element the array should contain is present, and then also check the size of the array so that it can only contain those listed elements. Of course, this assumes that each element is only present once in the array!
If we aren’t careful about how these unit tests are constructed, it is possible for arrays to contain additional items. In this case, it might mean that a user is assigned to more roles than they should be, which would be very bad for our application’s security!
With all of these tests in place, let’s go ahead and run them to confirm everything is working properly. Thankfully, with the mocha test runner, we can even specify a single file to run, as shown below:
$ npm run test test/api/v1/users.js
If everything is correct, we should see that this file has 19 tests that pass:
  /api/v1/users
    GET /
      ✔ should list all users
      ✔ all users should match schema
      ✔ should contain 'admin' user
      ✔ should contain 'contributor' user
      ✔ should contain 'manager' user
      ✔ should contain 'user' user
      ✔ user 'admin' should have 3 roles
      ✔ user 'admin' should have 'manage_users' role
      ✔ user 'admin' should have 'manage_documents' role
      ✔ user 'admin' should have 'manage_communities' role
      ✔ user 'contributor' should have 2 roles
      ✔ user 'contributor' should have 'add_documents' role
      ✔ user 'contributor' should have 'add_communities' role
      ✔ user 'manager' should have 2 roles
      ✔ user 'manager' should have 'manage_documents' role
      ✔ user 'manager' should have 'manage_communities' role
      ✔ user 'user' should have 2 roles
      ✔ user 'user' should have 'view_documents' role
      ✔ user 'user' should have 'view_communities' role


  19 passing (1s)
Great! Now is a great time to lint, format, and then commit and push our work to GitHub before continuing.
Many RESTful web APIs also include the ability to retrieve a single object from a collection by providing the ID as a parameter to the route. So, let’s go ahead and build that route in our application as well.
Unused in Practice
While this route is an important part of many RESTful web APIs, it can often go unused since most frontend web applications will simply use the retrieve all endpoint to get a list of items, and then it will just cache that result and filter the list to show a user a single entry. However, there are some use cases where this route is extremely useful, so we’ll go ahead and include it in our backend code anyway.
In our routes/api/v1/users.js file, we can add a new route to retrieve a single user based on the user’s ID number:
// -=-=- other code omitted here -=-=-
/**
* Gets a single user by ID
*
* @param {Object} req - Express request object
* @param {Object} res - Express response object
* @param {Function} next - Express next middleware function
*
* @swagger
* /api/v1/users/{id}:
* get:
* summary: get single user
* description: Gets a single user from the application
* tags: [users]
* parameters:
* - in: path
* name: id
* required: true
* schema:
* type: integer
* description: user ID
* responses:
* 200:
* description: a user
* content:
* application/json:
* schema:
* $ref: '#/components/schemas/User'
*/router.get("/:id", asyncfunction (req, res, next) {
try {
constuser=awaitUser.findByPk(req.params.id, {
include: {
model:Role,
as:"roles",
attributes: ["id", "role"],
through: {
attributes: [],
},
},
});
// if the user is not found, return an HTTP 404 not found status code
if (user===null) {
res.status(404).end();
} else {
res.json(user);
}
} catch (error) {
logger.error(error);
res.status(500).end();
}
});
In this route, we have included a new route parameter id in the path for the route, and we also documented that route parameter in the Open API documentation comment. We then use that id parameter, which will be stored as req.params.id by Express, in the findByPk method available in Sequelize. We can even confirm that our new method appears correctly in our documentation by visiting the /docs route in our application:
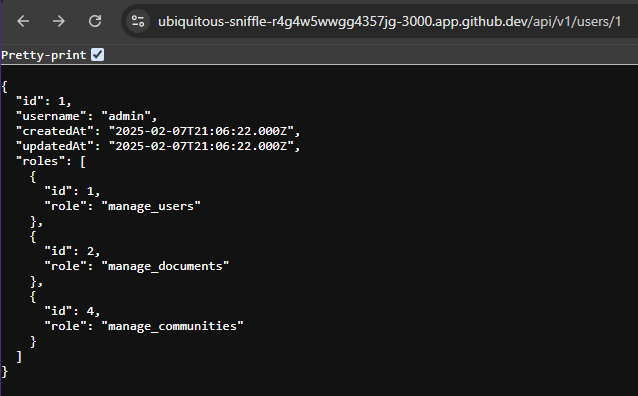
When we visit that route, we’ll need to include the ID of the user to request in the path, as in /api/v1/users/1. If it is working correctly, we should see data for a single user returned in the browser:
Retrieve One Unit Tests
The unit tests for the route to retrieve a single object are nearly identical to the ones use for the retrieve all route. Since we have already verified that each user exists and has the correct roles, we may not need to be as particular when developing these tests.
// -=-=- other code omitted here -=-=-
/**
* Get single user
*/constgetSingleUser= (user) => {
it("should get user '"+user.username+"'", (done) => {
request(app)
.get("/api/v1/users/"+user.id)
.expect(200)
.end((err, res) => {
if (err) returndone(err);
res.body.should.be.an("object");
res.body.should.shallowDeepEqual(user);
done();
});
});
};
/**
* Get single user check schema
*/constgetSingleUserSchemaMatch= (user) => {
it("user '"+user.username+"' should match schema", (done) => {
request(app)
.get("/api/v1/users/"+user.id)
.expect(200)
.end((err, res) => {
if (err) returndone(err);
res.body.should.be.jsonSchema(userSchema);
done();
});
});
};
// -=-=- other code omitted here -=-=-
/**
* Test /api/v1/users route
*/describe("/api/v1/users", () => {
// -=-=- other code omitted here -=-=-
describe("GET /{id}", () => {
users.forEach((u) => {
getSingleUser(u);
getSingleUserSchemaMatch(u);
})
});
});
For these unit tests, we are once again simply checking that we can retrieve each individual user by ID, and also that the response matches the expected userSchema object we used in earlier tests.
However, these unit tests are only checking for the users that we expect the database to contain. What if we receive an ID parameter for a user that does not exist? We should also test that particular situation as well.
// -=-=- other code omitted here -=-=-
/**
* Tries to get a user using an invalid id
*/constgetSingleUserBadId= (invalidId) => {
it("should return 404 when requesting user with id '"+invalidId+"'", (done) => {
request(app)
.get("/api/v1/users/"+invalidId)
.expect(404)
.end((err) => {
if (err) returndone(err);
done();
});
});
};
// -=-=- other code omitted here -=-=-
/**
* Test /api/v1/users route
*/describe("/api/v1/users", () => {
// -=-=- other code omitted here -=-=-
describe("GET /{id}", () => {
users.forEach((u) => {
getSingleUser(u);
getSingleUserSchemaMatch(u);
})
getSingleUserBadId(0)
getSingleUserBadId("test")
getSingleUserBadId(-1)
getSingleUserBadId(5)
});
});
With this unit test, we can easily check that our API properly returns HTTP status code 404 for a number of invalid ID values, including 0, -1, "test", 5, and any others we can think of to try.
Now that we’ve explored the routes we can use to read data from our RESTful API, let’s look at the routes we can use to modify that data. The first one we’ll cover is the create route, which allows us to add a new entry to the database. However, before we do that, let’s create some helpful utility functions that we can reuse throughout our application as we develop more advanced routes.
Success Messages
One thing we’ll want to be able to do is send some well-formatted success messages to the user. While we could include this in each route, it is a good idea to abstract this into a utility function that we can write once and use throughout our application. By doing so, it makes it easier to restructure these messages as needed in the future.
So, let’s create a new utilities folder inside of our server folder, and then a new send-success.js file with the following content:
/**
* @file Sends JSON Success Messages
* @author Russell Feldhausen <russfeld@ksu.edu>
* @exports sendSuccess a function to send JSON Success Messages
*//**
* Send JSON Success Messages
*
* @param {string} message - the message to send
* @param {integer} status - the HTTP status to use
* @param {Object} res - Express response object
*
* @swagger
* components:
* responses:
* Success:
* description: success
* content:
* application/json:
* schema:
* type: object
* required:
* - message
* - id
* properties:
* message:
* type: string
* description: the description of the successful operation
* id:
* type: integer
* description: the id of the saved or created item
* example:
* message: User successfully saved!
*/functionsendSuccess(message, id, status, res) {
res.status(status).json({
message:message,
id:id });
}
exportdefaultsendSuccess;
In this file, we are defining a success message from our application as a JSON object with a message attribute, as well as the id of the object that was acted upon. The code itself is very straightforward, but we are including the appropriate Open API documentation as well, which we can reuse in our routes elsewhere.
To make the Open API library aware of these new files, we need to add it to our configs/openapi.js file:
Likewise, we may also want to send a well-structured message anytime our database throws an error, or if any of our model validation steps fails. So, we can create another file handle-validation-error.js with the following content:
Again, the code for this is not too complex. It builds upon the structure in the Sequelize ValidationError class to create a helpful JSON object that includes both an error attribute as well as an optional errors array that lists each attribute with a validation error, if possible. We also include the appropriate Open API documentation for this response type.
Trial & Error
If we look at the code in the handle-validation-error.js file, it may seem like it came from nowhere, or it may be difficult to see how this was constructed based on what little is given in the Sequelize documentation.
In fact, this code was actually constructed using a trial and error process by iteratively submitting broken models and looking at the raw errors that were produced by Sequelize until a common structure was found. For the purposes of this example, we’re leaving out some of these steps, but we encourage exploring the output to determine the best method for any given application.
Creating a New User
Now that we have created helpers for our route, we can add the code to actually create that new user when an HTTP POST request is received.
In our routes/api/v1/users.js file, let’s add a new route we can use to create a new entry in the users table:
// -=-=- other code omitted here -=-=-
// Import libraries
importexpressfrom"express";
import { ValidationError } from"sequelize";
// Create Express router
constrouter=express.Router();
// Import models
import { User, Role } from"../../../models/models.js";
// Import logger
importloggerfrom"../../../configs/logger.js";
// Import database
importdatabasefrom"../../../configs/database.js"// Import utilities
importhandleValidationErrorfrom"../../../utilities/handle-validation-error.js";
importsendSuccessfrom"../../../utilities/send-success.js";
// -=-=- other code omitted here -=-=-
/**
* Create a new user
*
* @param {Object} req - Express request object
* @param {Object} res - Express response object
* @param {Function} next - Express next middleware function
*
* @swagger
* /api/v1/users:
* post:
* summary: create user
* tags: [users]
* requestBody:
* description: user
* required: true
* content:
* application/json:
* schema:
* $ref: '#/components/schemas/User'
* example:
* username: newuser
* roles:
* - id: 6
* - id: 7
* responses:
* 201:
* $ref: '#/components/responses/Success'
* 422:
* $ref: '#/components/responses/ValidationError'
*/router.post("/", asyncfunction (req, res, next) {
try {
// Use a database transaction to roll back if any errors are thrown
awaitdatabase.transaction(asynct => {
constuser=awaitUser.create(
// Build the user object using body attributes
{
username:req.body.username,
},
// Assign to a database transaction
{
transaction:t }
);
// If roles are included in the body
if (req.body.roles) {
// Find all roles listed
constroles=await Promise.all(
req.body.roles.map(({ id, ...next }) => {
returnRole.findByPk(id);
}),
);
// Attach roles to user
awaituser.setRoles(roles, { transaction:t });
}
      // Send the success message
      sendSuccess("User saved!", user.id, 201, res);
})
} catch (error) {
if (errorinstanceofValidationError) {
handleValidationError(error, res);
} else {
logger.error(error);
res.status(500).end();
}
}
});
At the top of the file, we have added several additional import statements:
ValidationError - we import the ValidationError type from the Sequelize library
database - we import our Sequelize instance from configs/database.js so we can create a transaction
handleValidationError and sendSuccess - we import our two new utilities from the utilities folder
This route itself is quite a bit more complex that our previous routes, so let’s break down what it does piece by piece to see how it all works together.
Start a database transaction
// -=-=- other code omitted here -=-=-
awaitdatabase.transaction(asynct => {
// perform database operations here
});
// -=-=- other code omitted here -=-=-
First, since we will be updating the database using multiple steps, we should use a database transaction to ensure that we only update the database if all operations will succeed. So, we use the Sequelize Transactions feature to create a new managed database transaction. If we successfully reach the end of the block of code contained in this statement, the database transaction will be committed to the database and the changes will be stored.
Create the User itself
// -=-=- other code omitted here -=-=-
constuser=awaitUser.create(
// Build the user object using body attributes
{
username:req.body.username,
},
// Assign to a database transaction
{
transaction:t }
);
// -=-=- other code omitted here -=-=-
Next, we use the User model to create a new instance of the user and store it in the database. The Sequelize Create method will both build the new object in memory as well as save it to the database. This is an asynchronous process, so we must await the result before moving on. We also must give this method a reference to the current database transaction t in the second parameter.
Associate Roles
// -=-=- other code omitted here -=-=-
// If roles are included in the body
if (req.body.roles) {
// Find all roles listed
constroles=await Promise.all(
req.body.roles.map(({ id, ...next }) => {
returnRole.findByPk(id);
}),
);
// Attach roles to user
awaituser.setRoles(roles, { transaction:t });
}
// -=-=- other code omitted here -=-=-
After that, we check to see if the roles attribute was provided as part of the body of the HTTP POST method. If it was, we need to associate those roles with the new user. Here, we are assuming that the submission includes the ID for each role at a minimum, but it may also include other data such as the name of the role. So, before doing anything else, we must first find each Role model in the database by ID using the findByPk method. Once we have a list of roles, then we can add those roles to the User object using the special setRoles method that is created as part of the Roles association on that model. If any roles are null and can’t be found, this will throw an error that we can catch later.
Send Success Messages
// Send the success message
sendSuccess("User saved!", user.id, 201, res);
Finally, if everything is correct, we can send the success message back to the user using the sendSuccess utility method that we created earlier.
Handle Exceptions
// -=-=- other code omitted here -=-=-
} catch (error) {
if (errorinstanceofValidationError) {
handleValidationError(error, res);
} else {
logger.error(error);
res.status(500).end();
}
}
// -=-=- other code omitted here -=-=-
Finally, at the bottom of the file we have a catch block that will catch any exceptions thrown while trying to create our User and associate the correct Role objects. Notice that this catch block is outside the database transaction, so any database changes will not be saved if we reach this block of code.
Inside, we check to see if the error is an instance of the ValidationError class from Sequelize. If so, we can use our new handleValidationError method to process that error and send a well-structured JSON response back to the user about the error. If not, we’ll simply log the error and send back a generic HTTP 500 response code.
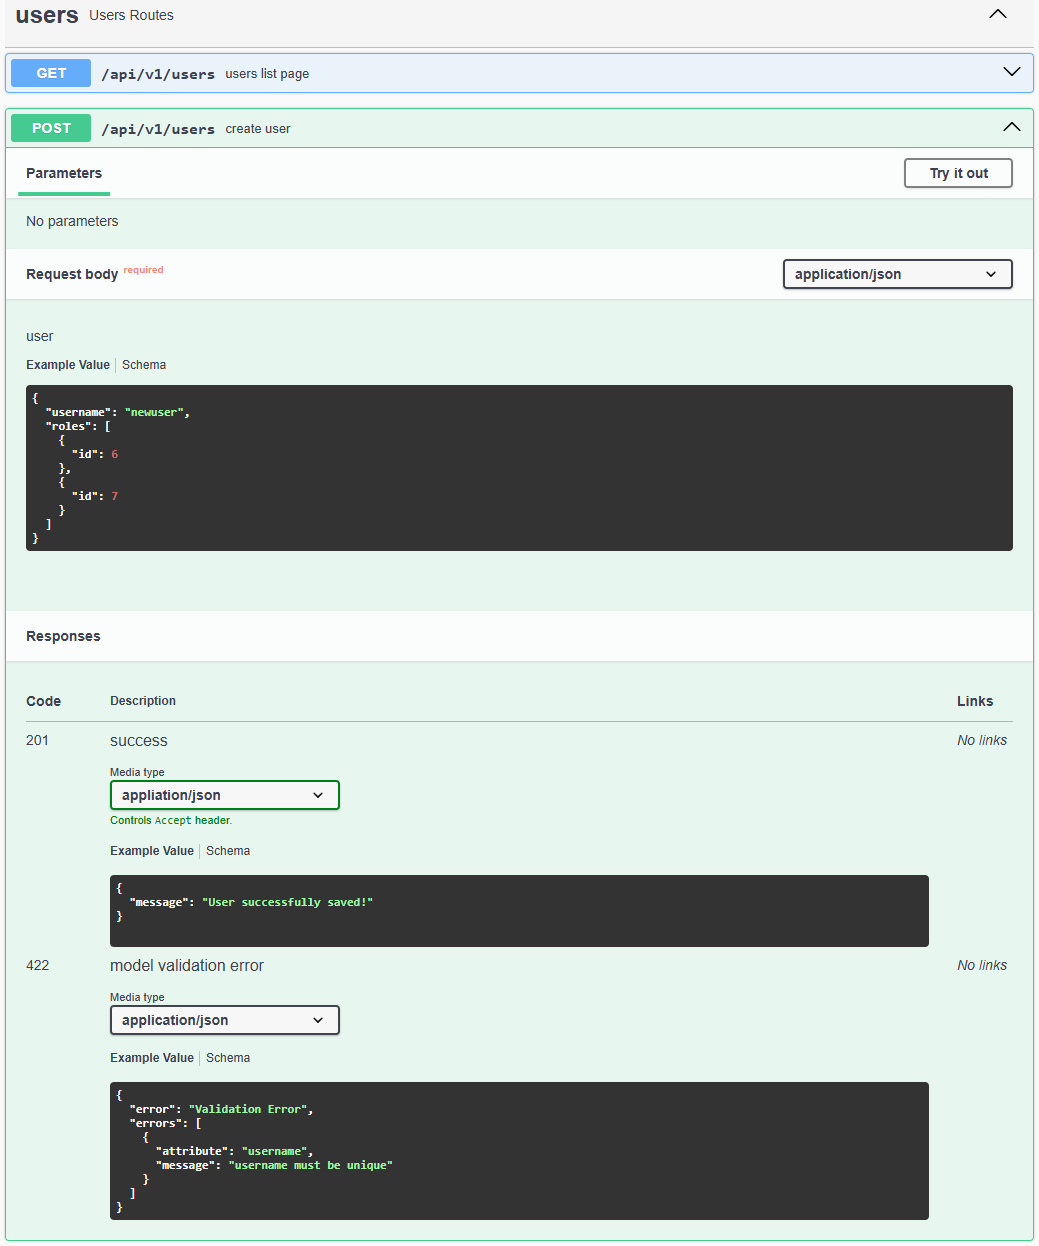
Before we start unit testing this route, let’s quickly do some manual testing using the Open API documentation site. It is truly a very handy way to work with our RESTful APIs as we are developing them, allowing us to test them quickly in isolation to make sure everything is working properly.
So, let’s start our server:
$ npm run dev
Once it starts, we can navigate to the /docs URL, and we should see the Open API documentation for our site, including a new POST route for the users section:
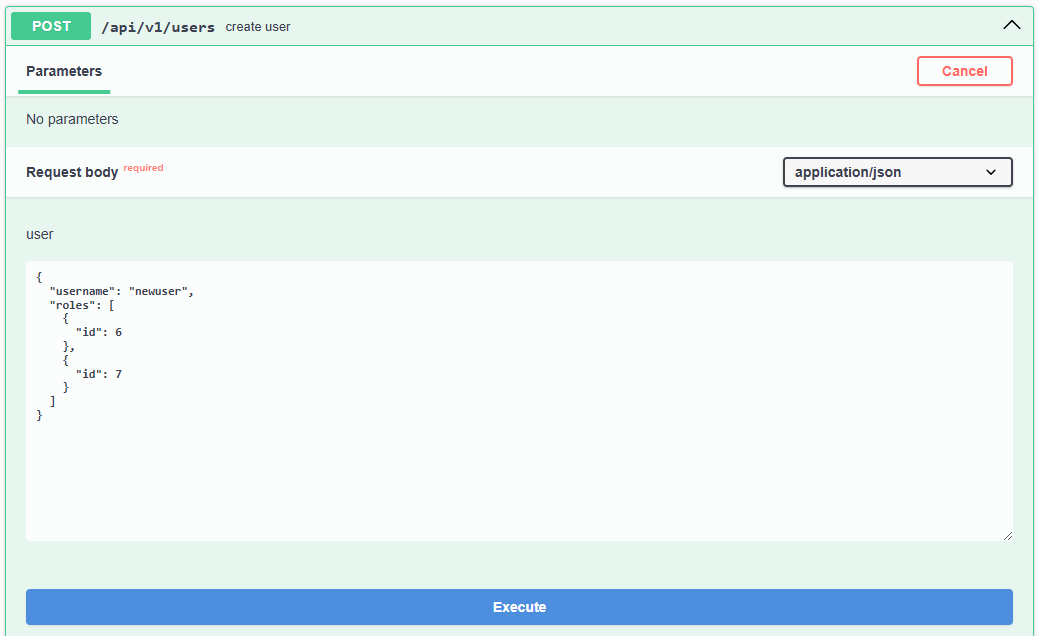
If we documented our route correctly, we can see that this documentation includes not only an example for what a new submission should look like, but also examples of the success and model validation error outputs should be. To test it, we can use the Try it out button on the page to try to create a new user.
Let’s go ahead and try to create the user that is suggested by our example input, which should look like this:
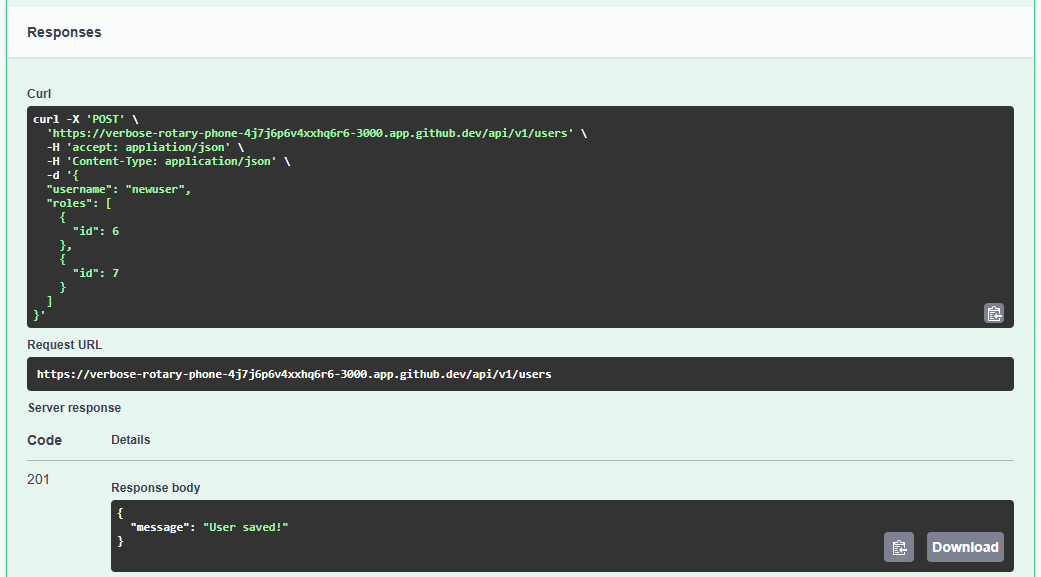
This would create a user with the username newuser and assign them to the roles with IDs 6 (view_documents) and 7 (view_communities). So, we can click the Execute button to send that request to the server and see if it works.
Excellent! We can see that it worked correctly, and we received our expected success message as part of the response. We can also scroll up and try the GET /api/v1/users API endpoint to see if that user appears in our list of all users in the system with the correct roles assigned. If we do, we should see this in the output:
From here, we can try a couple of different scenarios to see if our server is working properly.
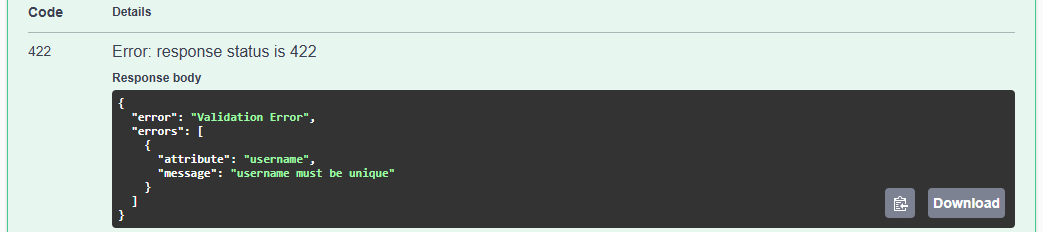
Duplicate Username
First, what if we try and create a user with a duplicate username? To test this, we can simply resubmit the default example again and see what happens. This time, we get an HTTP 422 response code with a very detailed error message:
This is great! It tells us exactly what the error is. This is the output created by our handleValidationError utility function from the previous page.
Missing Attributes
We can also try to submit a new user, but this time we can accidentally leave out some of the attributes, as in this example:
{
"user": "testuser"}
Here, we have mistakenly renamed the username attribute to just user, and we’ve left off the roles list entirely. When we submit this, we also get a helpful error message:
Since the username attribute was not provided, it will be set to null and the database will not allow a null value for that attribute.
However, if we correct that, we do see that it will accept a new user without any listed roles! This is by design, since we may need to create users that don’t have any roles assigned.
Invalid Roles
Finally, what if we try to create a user with an invalid list of roles:
In this instance, we’ll get another helpful error message:
Since there is no role with ID 8 in the database, it finds a null value instead and tries to associate that with our user. This causes an SQL constraint error, which we can send back to our user.
Finally, we should also double-check that our user baduser was not created using GET /api/v1/users API endpoint above. This is because we don’t want to create that user unless a list of valid roles are also provided.
Unit Testing
Now that we have a good handle on how this endpoint works in practice, let’s write some unit tests to confirm that it works as expected in each of these cases. First, we should have a simple unit test that successfully creates a new user:
// -=-=- other code omitted here -=-=-
/**
* Creates a user successfully
*/constcreateUser= (user) => {
it("should successfully create a user '"+user.username+"'", (done) => {
request(app)
.post("/api/v1/users/")
.send(user)
.expect(201)
.end((err, res) => {
if (err) returndone(err);
res.body.should.be.an("object");
res.body.should.have.property("message");
res.body.should.have.property("id")
constcreated_id=res.body.id// Find user in list of all users
request(app)
.get("/api/v1/users")
.expect(200)
.end((err, res) => {
if (err) returndone(err);
constfoundUser=res.body.find(
(u) => u.id===created_id,
);
foundUser.should.shallowDeepEqual(user);
done();
});
});
});
};
// -=-=- other code omitted here -=-=-
// New user structure for creating users
constnew_user= {
username:"test_user",
roles: [
{
id:6 },
{
id:7 }
]
}
/**
* Test /api/v1/users route
*/describe("/api/v1/users", () => {
// -=-=- other code omitted here -=-=-
describe("POST /", () => {
createUser(new_user);
})
});
This first test is very straightforward since it just confirms that we can successfully create a new user in the system. It also confirms that the user now appears in the output from the get all route, which is helpful.
While this at least confirms that the route works as expected, we should write several more unit tests to confirm that the route works correctly even if the user provides invalid input.
Missing Attributes
First, we should confirm that the user will be created even with the list of roles missing. We can do this just by creating a second new_user object that is missing the list of roles.
// -=-=- other code omitted here -=-=-
// New user structure for creating users without roles
constnew_user_no_roles= {
username:"test_user_no_roles",
}
/**
* Test /api/v1/users route
*/describe("/api/v1/users", () => {
// -=-=- other code omitted here -=-=-
describe("POST /", () => {
createUser(new_user);
createUser(new_user_no_roles);
})
});
We should also write a test to make sure the process will fail if any required attributes (in this case, just username) are missing. We can even check the output to make sure the missing attribute is listed:
// -=-=- other code omitted here -=-=-
/**
* Fails to create user with missing required attribute
*/constcreateUserFailsOnMissingRequiredAttribute= (user, attr) => {
it("should fail when required attribute '"+attr+"' is missing", (done) => {
// Create a copy of the user object and delete the given attribute
constupdated_user= {... user}
deleteupdated_user[attr]
request(app)
.post("/api/v1/users/")
.send(updated_user)
.expect(422)
.end((err, res) => {
if (err) returndone(err);
res.body.should.be.an("object");
res.body.should.have.property("error");
res.body.should.have.property("errors")
res.body.errors.should.be.an("array")
// the error should be related to the deleted attribute
expect(res.body.errors.some((e) => e.attribute===attr)).to.equal(true);
done();
});
});
}
// -=-=- other code omitted here -=-=-
/**
* Test /api/v1/users route
*/describe("/api/v1/users", () => {
// -=-=- other code omitted here -=-=-
describe("POST /", () => {
createUser(new_user);
createUser(new_user_no_roles);
createUserFailsOnMissingRequiredAttribute(new_user, "username");
})
});
Duplicate Username
We also should write a unit test that will make sure we cannot create a user with a duplicate username.
// -=-=- other code omitted here -=-=-
/**
* Fails to create user with a duplicate username
*/constcreateUserFailsOnDuplicateUsername= (user) => {
it("should fail on duplicate username '"+user.username+"'", (done) => {
request(app)
.post("/api/v1/users/")
.send(user)
.expect(201)
.end((err, res) => {
if (err) returndone(err);
res.body.should.be.an("object");
res.body.should.have.property("message");
res.body.should.have.property("id")
constcreated_id=res.body.id// Find user in list of all users
request(app)
.get("/api/v1/users")
.expect(200)
.end((err, res) => {
if (err) returndone(err);
constfoundUser=res.body.find(
(u) => u.id===created_id,
);
foundUser.should.shallowDeepEqual(user);
// Try to create same user again
request(app)
.post("/api/v1/users/")
.send(user)
.expect(422)
.end((err, res) => {
if (err) returndone(err);
res.body.should.be.an("object");
res.body.should.have.property("error");
res.body.should.have.property("errors");
res.body.errors.should.be.an("array");
// the error should be related to the username attribute
expect(
res.body.errors.some((e) => e.attribute==="username"),
).to.equal(true);
done();
});
});
});
});
};
// -=-=- other code omitted here -=-=-
/**
* Test /api/v1/users route
*/describe("/api/v1/users", () => {
// -=-=- other code omitted here -=-=-
describe("POST /", () => {
createUser(new_user);
createUser(new_user_no_roles);
createUserFailsOnMissingRequiredAttribute(new_user, "username");
createUserFailsOnDuplicateUsername(new_user);
})
});
This test builds upon the previous createUser test by first creating the user, and then confirming that it appears in the output, before trying to create it again. This time, it should fail, so we can borrow some of the code from the createUserFailsOnMissingRequiredAttribute to confirm that it is failing because of a duplicate username.
Invalid Roles
Finally, we should write a unit test that makes sure a user won’t be created if any invalid role IDs are used, and also that the database transaction is properly rolled back so that the user itself isn’t created.
// -=-=- other code omitted here -=-=-
/**
* Fails to create user with bad role ID
*/constcreateUserFailsOnInvalidRole= (user, role_id) => {
it("should fail when invalid role id '"+role_id+"' is used", (done) => {
// Create a copy of the user object
constupdated_user= { ...user };
// Make a shallow copy of the roles array
updated_user.roles= [... user.roles]
// Add invalid role ID to user object
updated_user.roles.push({
id:role_id,
});
request(app)
.post("/api/v1/users/")
.send(updated_user)
.expect(422)
.end((err, res) => {
if (err) returndone(err);
res.body.should.be.an("object");
res.body.should.have.property("error");
// User with invalid roles should not be created
request(app)
.get("/api/v1/users")
.expect(200)
.end((err, res) => {
if (err) returndone(err);
expect(res.body.some((u) => u.username===updated_user.username)).to.equal(
false,
);
done();
});
});
});
};
// -=-=- other code omitted here -=-=-
/**
* Test /api/v1/users route
*/describe("/api/v1/users", () => {
// -=-=- other code omitted here -=-=-
describe("POST /", () => {
createUser(new_user);
createUser(new_user_no_roles);
createUserFailsOnMissingRequiredAttribute(new_user, "username");
createUserFailsOnDuplicateUsername(new_user);
createUserFailsOnInvalidRole(new_user, 0)
createUserFailsOnInvalidRole(new_user, -1)
createUserFailsOnInvalidRole(new_user, 8)
createUserFailsOnInvalidRole(new_user, "test")
})
});
This test will try to create a valid user, but it appends an invalid role ID to the list of roles to assign to the user. It also confirms that the user itself is not created by querying the get all endpoint and checking for a matching username.
There we go! We have a set of unit tests that cover most of the situations we can anticipate seeing with our route to create new users. If we run all of these tests at this point, they should all pass:
    POST /
      ✔ should successfully create a user 'test_user'
      ✔ should successfully create a user 'test_user_no_roles'
      ✔ should fail when required attribute 'username' is missing
      ✔ should fail on duplicate username 'test_user'
      ✔ should fail when invalid role id '0' is used
      ✔ should fail when invalid role id '-1' is used
      ✔ should fail when invalid role id '8' is used
      ✔ should fail when invalid role id 'test' is used
Great! Now is a great time to lint, format, and then commit and push our work to GitHub before continuing.
Next, let’s look at adding an additional route in our application that allows us to update a User model. This route is very similar to the route used to create a user, but there are a few key differences as well.
// -=-=- other code omitted here -=-=-
/**
* Update a user
*
* @param {Object} req - Express request object
* @param {Object} res - Express response object
* @param {Function} next - Express next middleware function
*
* @swagger
* /api/v1/users/{id}:
* put:
* summary: update user
* tags: [users]
* parameters:
* - in: path
* name: id
* required: true
* schema:
* type: integer
* description: user ID
* requestBody:
* description: user
* required: true
* content:
* application/json:
* schema:
* $ref: '#/components/schemas/User'
* example:
* username: updateduser
* roles:
* - id: 6
* - id: 7
* responses:
* 201:
* $ref: '#/components/responses/Success'
* 422:
* $ref: '#/components/responses/ValidationError'
*/router.put("/:id", asyncfunction (req, res, next) {
try {
constuser=awaitUser.findByPk(req.params.id)
// if the user is not found, return an HTTP 404 not found status code
if (user===null) {
res.status(404).end();
} else {
awaitdatabase.transaction(async (t) => {
awaituser.update(
// Update the user object using body attributes
{
username:req.body.username,
},
// Assign to a database transaction
{
transaction:t,
},
);
// If roles are included in the body
if (req.body.roles) {
// Find all roles listed
constroles=await Promise.all(
req.body.roles.map(({ id, ...next }) => {
returnRole.findByPk(id);
}),
);
// Attach roles to user
awaituser.setRoles(roles, { transaction:t });
} else {
// Remove all roles
awaituser.setRoles([], { transaction:t });
}
// Send the success message
sendSuccess("User saved!", user.id, 201, res);
});
}
} catch (error) {
if (errorinstanceofValidationError) {
handleValidationError(error, res);
} else {
logger.error(error);
res.status(500).end();
}
}
});
// -=-=- other code omitted here -=-=-
As we can see, overall this route is very similar to the create route. The only major difference is that we must first find the user we want to update based on the query parameter, and then we use the update database method to update the existing values in the database. The rest of the work updating the related Roles models is exactly the same. We can also reuse the utility functions we created for the previous route.
Just like we did earlier, we can test this route using the Open API documentation website to confirm that it is working correctly before we even move on to testing it.
Unit Testing Update Route
The unit tests for the route to update a user are very similar to the ones used for creating a user. First, we need a test that will confirm we can successfully update a user entry:
// -=-=- other code omitted here -=-=-
/**
* Update a user successfully
*/constupdateUser= (id, user) => {
it("should successfully update user ID '"+id+"' to '"+user.username+"'", (done) => {
request(app)
.put("/api/v1/users/"+id)
.send(user)
.expect(201)
.end((err, res) => {
if (err) returndone(err);
res.body.should.be.an("object");
res.body.should.have.property("message");
res.body.should.have.property("id");
expect(res.body.id).equal(id)
// Find user in list of all users
request(app)
.get("/api/v1/users")
.expect(200)
.end((err, res) => {
if (err) returndone(err);
constfoundUser=res.body.find(
(u) => u.id===id,
);
foundUser.should.shallowDeepEqual(user);
done();
});
});
});
};
// -=-=- other code omitted here -=-=-
/**
* Test /api/v1/users route
*/describe("/api/v1/users", () => {
// -=-=- other code omitted here -=-=-
describe("PUT /{id}", () => {
updateUser(3, new_user);
});
});
Next, we also want to check that any updated users have the correct roles attached, including instances where the roles were completely removed:
// -=-=- other code omitted here -=-=-
/**
* Update a user and roles successfully
*/constupdateUserAndRoles= (id, user) => {
it("should successfully update user ID '"+id+"' roles", (done) => {
request(app)
.put("/api/v1/users/"+id)
.send(user)
.expect(201)
.end((err, res) => {
if (err) returndone(err);
res.body.should.be.an("object");
res.body.should.have.property("message");
res.body.should.have.property("id");
expect(res.body.id).equal(id)
// Find user in list of all users
request(app)
.get("/api/v1/users")
.expect(200)
.end((err, res) => {
if (err) returndone(err);
constfoundUser=res.body.find(
(u) => u.id===id,
);
// Handle case where user has no roles assigned
constroles=user.roles|| []
foundUser.roles.should.be.an("array");
foundUser.roles.should.have.lengthOf(roles.length);
roles.forEach((role) => {
expect(foundUser.roles.some((r) => r.id===role.id)).to.equal(true);
})
done();
});
});
});
};
// -=-=- other code omitted here -=-=-
/**
* Test /api/v1/users route
*/describe("/api/v1/users", () => {
// -=-=- other code omitted here -=-=-
describe("PUT /{id}", () => {
updateUser(3, new_user);
updateUserAndRoles(3, new_user);
updateUserAndRoles(2, new_user_no_roles);
});
});
We also should check that the username is unchanged if an update is sent with no username attribute, but the rest of the update will succeed. For this test, we can just create a new mock object with just roles and no username included.
// -=-=- other code omitted here -=-=-
// Update user structure with only roles
constupdate_user_only_roles= {
roles: [
{
id:6,
},
{
id:7,
},
],
};
/**
* Test /api/v1/users route
*/describe("/api/v1/users", () => {
// -=-=- other code omitted here -=-=-
describe("PUT /{id}", () => {
updateUser(3, new_user);
updateUserAndRoles(3, new_user);
updateUserAndRoles(2, new_user_no_roles);
updateUserAndRoles(1, update_user_only_roles);
});
});
Finally, we should include a couple of tests to handle the situation where a duplicate username is provided, or where an invalid role is provided. These are nearly identical to the tests used in the create route earlier in this example:
// -=-=- other code omitted here -=-=-
/**
* Fails to update user with a duplicate username
*/constupdateUserFailsOnDuplicateUsername= (id, user) => {
it("should fail on duplicate username '"+user.username+"'", (done) => {
request(app)
.put("/api/v1/users/"+id)
.send(user)
.expect(422)
.end((err, res) => {
if (err) returndone(err);
res.body.should.be.an("object");
res.body.should.have.property("error");
res.body.should.have.property("errors");
res.body.errors.should.be.an("array");
// the error should be related to the username attribute
expect(
res.body.errors.some((e) => e.attribute==="username"),
).to.equal(true);
done();
});
});
};
/**
* Fails to update user with bad role ID
*/constupdateUserFailsOnInvalidRole= (id, user, role_id) => {
it("should fail when invalid role id '"+role_id+"' is used", (done) => {
// Create a copy of the user object
constupdated_user= { ...user };
// Make a shallow copy of the roles array
updated_user.roles= [... user.roles]
// Add invalid role ID to user object
updated_user.roles.push({
id:role_id,
});
request(app)
.put("/api/v1/users/"+id)
.send(updated_user)
.expect(422)
.end((err, res) => {
if (err) returndone(err);
res.body.should.be.an("object");
res.body.should.have.property("error");
// User with invalid roles should not be updated
request(app)
.get("/api/v1/users")
.expect(200)
.end((err, res) => {
if (err) returndone(err);
expect(res.body.some((u) => u.username===updated_user.username)).to.equal(
false,
);
done();
});
});
});
};
// -=-=- other code omitted here -=-=-
// Update user structure with duplicate username
constupdate_user_duplicate_username= {
username:"admin",
};
/**
* Test /api/v1/users route
*/describe("/api/v1/users", () => {
// -=-=- other code omitted here -=-=-
describe("PUT /{id}", () => {
updateUser(3, new_user);
updateUserAndRoles(3, new_user);
updateUserAndRoles(2, new_user_no_roles);
updateUserAndRoles(1, update_user_only_roles);
updateUserFailsOnDuplicateUsername(2, update_user_duplicate_username);
updateUserFailsOnInvalidRole(4, new_user, 0);
updateUserFailsOnInvalidRole(4, new_user, -1);
updateUserFailsOnInvalidRole(4, new_user, 8);
updateUserFailsOnInvalidRole(4, new_user, "test");
})
});
There we go! We have a set of unit tests that cover most of the situations we can anticipate seeing with our route to update users. If we run all of these tests at this point, they should all pass:
    PUT /{id}
      ✔ should successfully update user ID '3' to 'test_user'
      ✔ should successfully update user ID '3' roles
      ✔ should successfully update user ID '2' roles
      ✔ should successfully update user ID '1' roles
      ✔ should fail on duplicate username 'admin'
      ✔ should fail when invalid role id '0' is used
      ✔ should fail when invalid role id '-1' is used
      ✔ should fail when invalid role id '8' is used
      ✔ should fail when invalid role id 'test' is used
Great! Now is a great time to lint, format, and then commit and push our work to GitHub before continuing.
Finally, the last route we need to add to our users routes is the delete route. This route is very simple - it will remove a user based on the given user ID if it exists in the database:
// -=-=- other code omitted here -=-=-
/**
* Delete a user
*
* @param {Object} req - Express request object
* @param {Object} res - Express response object
* @param {Function} next - Express next middleware function
*
* @swagger
* /api/v1/users/{id}:
* delete:
* summary: delete user
* tags: [users]
* parameters:
* - in: path
* name: id
* required: true
* schema:
* type: integer
* description: user ID
* responses:
* 200:
* $ref: '#/components/responses/Success'
*/router.delete("/:id", asyncfunction (req, res, next) {
try {
constuser=awaitUser.findByPk(req.params.id)
// if the user is not found, return an HTTP 404 not found status code
if (user===null) {
res.status(404).end();
} else {
awaituser.destroy();
// Send the success message
sendSuccess("User deleted!", req.params.id, 200, res);
}
} catch (error) {
console.log(error)
logger.error(error);
res.status(500).end();
}
});
// -=-=- other code omitted here -=-=-
Once again, we can test this route using the Open API documentation website. Let’s look at how we can quickly unit test it as well.
Unit Testing Delete Route
The unit tests for this route are similarly very simple. We really only have two cases - the user is found and successfully deleted, or the user cannot be found and an HTTP 404 response is returned.
// -=-=- other code omitted here -=-=-
/**
* Delete a user successfully
*/constdeleteUser= (id) => {
it("should successfully delete user ID '"+id, (done) => {
request(app)
.delete("/api/v1/users/"+id)
.expect(200)
.end((err, res) => {
if (err) returndone(err);
res.body.should.be.an("object");
res.body.should.have.property("message");
res.body.should.have.property("id")
expect(res.body.id).to.equal(String(id))
// Ensure user is not found in list of users
request(app)
.get("/api/v1/users")
.expect(200)
.end((err, res) => {
if (err) returndone(err);
expect(res.body.some((u) => u.id===id)).to.equal(false);
done();
});
});
});
};
/**
* Fail to delete a missing user
*/constdeleteUserFailsInvalidId= (id) => {
it("should fail to delete invalid user ID '"+id, (done) => {
request(app)
.delete("/api/v1/users/"+id)
.expect(404)
.end((err) => {
if (err) returndone(err);
done();
});
});
};
// -=-=- other code omitted here -=-=-
/**
* Test /api/v1/users route
*/describe("/api/v1/users", () => {
// -=-=- other code omitted here -=-=-
describe("DELETE /{id}", () => {
deleteUser(4);
deleteUserFailsInvalidId(0)
deleteUserFailsInvalidId(-1)
deleteUserFailsInvalidId(5)
deleteUserFailsInvalidId("test")
});
});
There we go! That will cover all of the unit tests for the users route. If we try to run all of our tests, we should see that they succeed!
DELETE /{id}
      ✔ should successfully delete user ID '4
      ✔ should fail to delete invalid user ID '0
      ✔ should fail to delete invalid user ID '-1
      ✔ should fail to delete invalid user ID '5
      ✔ should fail to delete invalid user ID 'test
All told, we write just 5 API routes (retrieve all, retrieve one, create, update, and delete) but wrote 53 different unit tests to fully test those routes.
Now is a great time to lint, format, and then commit and push our work to GitHub.
In the next example, we’ll explore how to add authentication to our RESTful API.