CAS Authentication
CAS Authentication
We’ve already studied Central Authentication Service (CAS) as one method for authenticating users through a third party service. In this case, CAS is the service commonly used at K-State for authentication, which is why we like to cover it in our examples. So, let’s look at how to add CAS authentication to our application through Passport.
Installing a Passport Strategy
First, we’ll need to install a new Passport.js strategy for dealing with CAS authentication. Thankfully, the ALT+CS lab at K-State maintains an updated library for this, which can be installed as shown below:
$ npm install https://github.com/alt-cs-lab/passport-casFinding a Good Strategy
Unfortunately, it is very difficult to find an updated Passport.js strategy for CAS authentication. This is partially due to the fact the CAS is not commonly used, and partially because many existing strategies have been written once and then abandoned by the developers. For this class, we sought out the most updated strategy available, then did our best to fix any known/existing bugs.
Configuring CAS Strategy
Next, we can configure our authentication strategy by adding a few items to the configs/auth.js file for our new CAS strategy:
// -=-=- other code omitted here -=-=-

// Import libraries
import passport from "passport";
import { UniqueTokenStrategy } from "passport-unique-token";
import { Strategy as CasStrategy } from '@alt-cs-lab/passport-cas';

// -=-=- other code omitted here -=-=-

// CAS authentication
passport.use(new CasStrategy({
    version: 'CAS2.0',
    ssoBaseURL: process.env.CAS_URL,
    serverBaseURL: process.env.CAS_SERVICE_URL + '/auth/cas'
  },
  (profile, next) => {
    if (profile.user) {
      return authenticateUser(profile.user, next)
    } else {
      logger.warn("CAS authentication succeeded but no user returned: " + JSON.stringify(profile));
      return next(null, false);
    }
  }
))

// -=-=- other code omitted here -=-=-
In this file, we are importing our new CAS authentication strategy, then using passport.use to tell Passport.js to use this authentication strategy when requested. Inside, we set up the various settings for our strategy, as well as the callback function when a user successfully authenticates. In this case, the CAS server will give us a profile object that should contain the user attribute with the user’s username, which we can send to our authenticateUser method we’ve already created. Finally, we also include a short catch to log any errors where the user is able to log in but a username is not provided.
In our .env file, we’ll need to add two more settings. The CAS_URL is the base URL for the CAS server itself, and the CAS_SERVICE_URL is the URL that users should be sent back to, along with a ticket, to complete the log in process. Since we are working in GitHub Codespaces, our CAS_SERVICE_URL will be the same as our OPENAPI_HOST.
# -=-=- other settings omitted here -=-=-
CAS_URL=https://testcas.cs.ksu.edu
CAS_SERVICE_URL=https://$CODESPACE_NAME-$PORT.$GITHUB_CODESPACES_PORT_FORWARDING_DOMAIN
Notice that we already add the /auth/cas route to the end of the CAS_SERVICE_URL in the configuration above - since that path won’t change, it makes sense to just include it there instead of having to remember to add it to the path in the .env file. We should also put sensible defaults in our .env.example and .env.test files as well.
Now, to use this authentication method, all we have to do is update our /auth/cas route in routes/auth.js to use this strategy:
/**
 * CAS Authentication
 *
 * @param {Object} req - Express request object
 * @param {Object} res - Express response object
 * @param {Function} next - Express next middleware function
 *
 * @swagger
 * /auth/cas:
 *   get:
 *     summary: CAS authentication
 *     description:  CAS authentication for deployment
 *     tags: [auth]
 *     responses:
 *       200:
 *         description: success
 */
router.get("/cas", passport.authenticate('cas'), authSuccess);

// -=-=- other code omitted here -=-=-
With that in place, we can start our application and test it by navigating to the /auth/cas route to see if our login attempt works:
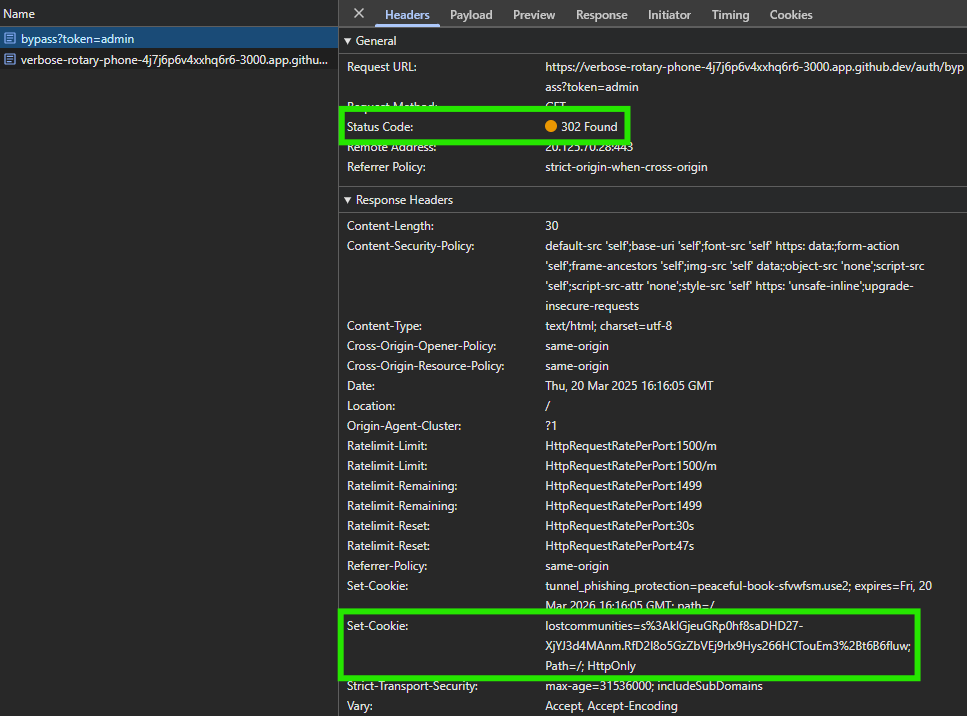
$ npm run devIf everything works correctly, we should be directed to our CAS server to authenticate, then we’ll be sent back to our own server with a ticket to validate our authentication. Finally, once the ticket is validated, we’ll be redirected back to our home page with a session cookie set:
CAS Logout
Finally, we’ll need to add a bit more logic to our logout process to properly log users out of both our application and the CAS server they originally logged in through. So, let’s update our /auth/logout route to include that:
// -=-=- other code omitted here -=-=-
router.get('/logout', function (req, res, next) {
  res.clearCookie(process.env.SESSION_NAME || 'connect.sid');  // clear the session cookie
  req.logout(function(err) {       // logout of passport
    if (err) {
      logger.error(err);
    }
    req.session.destroy(function (err) {  // destroy the session
      if (err) {
        logger.error(err);
      }
      const redirectURL = process.env.CAS_URL + "/logout?service=" + encodeURIComponent(process.env.CAS_SERVICE_URL)
      res.redirect(redirectURL);
    })
  });
});
// -=-=- other code omitted here -=-=-
Most CAS servers will automatically redirect the user back to the service request parameter, but not all of them. However, this will ensure that the CAS server knows the user has logged out and will invalidate any tickets for that user.
Test CAS Server Updated
The test CAS server was updated recently to properly redirect users back to the service request parameter, so you will probably no longer see the Logout page from that server in your testing. This should make developing and testing with that server a bit more straightforward