This example project builds on the previous RESTful API project by adding user authentication. This will ensure users are identified within the system and are only able to perform operations according to the roles assigned to their user accounts.
Project Deliverables
At the end of this example, we will have a project with the following features:
There are many different authentication libraries and methods available for Node.js and Express. For this project, we will use the Passport.js library. It supports many different authentication strategies, and is a very common way that authentication is handled within JavaScript applications.
For our application, we’ll end up using several strategies to authenticate our users:
Unique Token - used to bypass authentication for testing
Let’s first set up our unique token strategy, which allows us to test our authentication routes before setting up anything else.
Authentication Router
First, we’ll need to create a new route file at routes/auth.js to contain our authentication routes. We’ll start with this basic structure and work on filling in each method as we go.
/**
* @file Auth router
* @author Russell Feldhausen <russfeld@ksu.edu>
* @exports router an Express router
*
* @swagger
* tags:
* name: auth
* description: Authentication Routes
* components:
* securitySchemes:
* bearerAuth:
* type: http
* scheme: bearer
* bearerFormat: JWT
* responses:
* AuthToken:
* description: authentication success
* content:
* application/json:
* schema:
* type: object
* required:
* - token
* properties:
* token:
* type: string
* description: a JWT for the user
* example:
* token: abcdefg12345
*/// Import libraries
importexpressfrom"express";
importpassportfrom"passport";
// Import configurations
import"../configs/auth.js";
// Create Express router
constrouter=express.Router();
/**
* Authentication Response Handler
*
* @param {Object} req - Express request object
* @param {Object} res - Express response object
* @param {Function} next - Express next middleware function
*/constauthSuccess=function (req, res, next) {
};
/**
* Bypass authentication for testing
*
* @param {Object} req - Express request object
* @param {Object} res - Express response object
* @param {Function} next - Express next middleware function
*
* @swagger
* /auth/bypass:
* get:
* summary: bypass authentication for testing
* description: Bypasses CAS authentication for testing purposes
* tags: [auth]
* parameters:
* - in: query
* name: token
* required: true
* schema:
* type: string
* description: username
* responses:
* 200:
* description: success
*/router.get("/bypass", function (req, res, next) {
});
/**
* CAS Authentication
*
* @param {Object} req - Express request object
* @param {Object} res - Express response object
* @param {Function} next - Express next middleware function
*
* @swagger
* /auth/cas:
* get:
* summary: CAS authentication
* description: CAS authentication for deployment
* tags: [auth]
* responses:
* 200:
* description: success
*/router.get("/cas", function (req, res, next) {
});
/**
* Request JWT based on previous authentication
*
* @param {Object} req - Express request object
* @param {Object} res - Express response object
* @param {Function} next - Express next middleware function
*
* @swagger
* /auth/token:
* get:
* summary: request JWT
* description: request JWT based on previous authentication
* tags: [auth]
* responses:
* 200:
* $ref: '#/components/responses/AuthToken'
*/router.get("/token", function (req, res, next) {
});
exportdefaultrouter;
This file includes a few items to take note of:
In the top-level Open API comment, we define a new AuthToken response that we’ll send to the user when they request a token.
We create three routes. The first two, /auth/bypass and /auth/cas, for each of our authentication strategies. The last one, /auth/token will be used by our frontend to request a token to access the API.
Finally, we’ll build a authSuccess function to handle actually sending the response to the user.
Before moving on, let’s go ahead and add this router to our app.js file along with the other routers:
// -=-=- other code omitted here -=-=-
// Import routers
importindexRouterfrom"./routes/index.js";
importapiRouterfrom"./routes/api.js";
importauthRouterfrom"./routes/auth.js";
// -=-=- other code omitted here -=-=-
// Use routers
app.use("/", indexRouter);
app.use("/api", apiRouter);
app.use("/auth", authRouter);
// -=-=- other code omitted here -=-=-
We’ll come back to this file once we are ready to link up our authentication strategies.
Unique Token Authentication
Next, let’s install both passport and the passport-unique-token authentication strategy:
$ npm install passport passport-unique-token
We’ll configure that strategy in a new configs/auth.js file with the following content:
/**
* @file Configuration information for Passport.js Authentication
* @author Russell Feldhausen <russfeld@ksu.edu>
*/// Import libraries
importpassportfrom"passport";
import { UniqueTokenStrategy } from"passport-unique-token";
// Import models
import { User, Role } from"../models/models.js";
// Import logger
importloggerfrom"./logger.js";
/**
* Authenticate a user
*
* @param {string} username the username to authenticate
* @param {function} next the next middleware function
*/constauthenticateUser=function(username, next) {
// Find user with the username
User.findOne({
attributes: ["id", "username"],
include: {
model:Role,
as:"roles",
attributes: ["id", "role"],
through: {
attributes: [],
},
},
where: { username:username },
})
.then((user) => {
// User not found
if (user===null) {
logger.debug("Login failed for user: "+username);
returnnext(null, false);
}
// User authenticated
logger.debug("Login succeeded for user: "+user.username);
// Convert Sequelize object to plain JavaScript object
user=JSON.parse(JSON.stringify(user))
returnnext(null, user);
});
}
// Bypass Authentication via Token
passport.use(newUniqueTokenStrategy(
// verify callback function
(token, next) => {
returnauthenticateUser(token, next);
}
))
// Default functions to serialize and deserialize a session
passport.serializeUser(function(user, done) {
done(null, user);
});
passport.deserializeUser(function(user, done) {
done(null, user);
});
In this file, we created an authenticateUser function that will look for a user based on a given username. If found, it will return that user by calling the next middleware function. Otherwise, it will call that function and provide false.
Below, we configure Passport.js using the passport.use function to define the various authentication strategies we want to use. In this case, we’ll start with the Unique Token Strategy, which uses a token provided as part of a query to the web server.
In addition, we need to implement some default functions to handle serializing and deserializing a user from a session. These functions don’t really have any content in our implementation; we just need to include the default code.
Finally, since Passport.js acts as a global object, we don’t even have to export anything from this file!
Testing Authentication
To test this authentication strategy, let’s modify routes/auth.js to use this strategy. We’ll update the /auth/bypass route and also add some temporary code to the authSuccess function:
// -=-=- other code omitted here -=-=-
// Import libraries
importexpressfrom"express";
importpassportfrom"passport";
// Import configurations
import"../configs/auth.js";
// -=-=- other code omitted here -=-=-
constauthSuccess=function (req, res, next) {
res.json(req.user);
};
// -=-=- other code omitted here -=-=-
router.get("/bypass", passport.authenticate('token', {session:false}), authSuccess);
// -=-=- other code omitted here -=-=-
In the authSuccess function, right now we are just sending the content of req.user, which is set by Passport.js on a successful authentication (it is the value we returned when calling the next function in our authentication strategy earlier). We’ll come back to this later when we implement JSON Web Tokens (JWT) later in this tutorial.
The other major change is that now the /auth/bypass route calls the passport.authenticate method with the 'token' strategy specified. It also uses {session: false} as one of the options provided to Passport.js since we aren’t actually going to be using sessions. Finally, if that middleware is satisfied, it will call the authSuccess function to handle sending the response to the user. This takes advantage of the chaining that we can do in Express!
With all of that in place, we can test our server and see if it works:
$ npm run dev
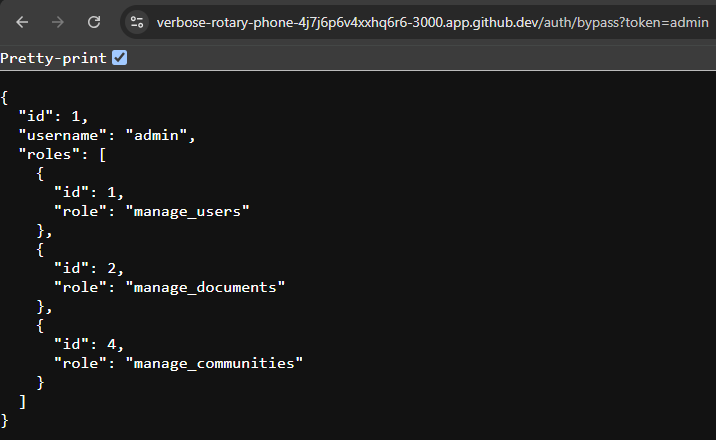
Once the page loads, we want to navigate to the /auth/bypass?token=admin path to see if we can log in as the admin user. Notice that we are including a query parameter named token to include the username in the URL.
There we go! We see that it successfully finds our admin user and returns data about that user, including the roles assigned. This is what we want to see. We can also test this by providing other usernames to make sure it is working.
Securing Authentication
Of course, we don’t want to have this bypass authentication system available all the time in our application. In fact, we really only want to use it for testing and debugging; otherwise, our application will have a major security flaw! So, let’s add a new environment variable BYPASS_AUTH to our .env, .env.test and .env.example files. We should set it to TRUE in the .env.test file, and for now we’ll have it enabled in our .env file as well, but this option should NEVER be enabled in a production setting.
# -=-=- other settings omitted here -=-=-BYPASS_AUTH=true
With that setting in place, we can add it to our configs/auth.js file to only allow bypass authentication if that setting is enabled:
// -=-=- other code omitted here -=-=-
// Bypass Authentication via Token
passport.use(newUniqueTokenStrategy(
// verify callback function
(token, next) => {
// Only allow token authentication when enabled
if (process.env.BYPASS_AUTH==="true") {
returnauthenticateUser(token, next);
} else {
returnnext(null, false);
}
}
))
Before moving on, we should make sure we test both enabling and disabling this setting actually disables bypass authentication. We want to be absolutely sure it works as intended!
One of the most common methods for keeping track of users after they are authenticated is by setting a cookie on their browser that is sent with each request. We’ve already explored this method earlier in this course, so let’s go ahead and configure cookie sessions for our application, storing them in our existing database.
We’ll start by installing both the express-session middleware and the connect-session-sequelize library that we can use to store our sessions in a Sequelize database:
Once those libraries are installed, we can create a configuration for sessions in a new configs/sessions.js file:
/**
* @file Configuration for cookie sessions stored in Sequelize
* @author Russell Feldhausen <russfeld@ksu.edu>
* @exports sequelizeSession a Session instance configured for Sequelize
*/// Import Libraries
importsessionfrom'express-session'importconnectSessionfrom'connect-session-sequelize'// Import Database
importdatabasefrom'./database.js'importloggerfrom'./logger.js'// Initialize Store
constsequelizeStore=connectSession(session.Store)
conststore=newsequelizeStore({
db:database})
// Create tables in Sequelize
store.sync();
if (!process.env.SESSION_SECRET) {
logger.error("Cookie session secret not set! Set a SESSION_SECRET environment variable.")
}
// Session configuration
constsequelizeSession=session({
name:process.env.SESSION_NAME||'connect.sid',
secret:process.env.SESSION_SECRET,
store:store,
resave:false,
proxy:true,
saveUninitialized:false})
exportdefaultsequelizeSession;
This file loads our Sequelize database connection and initializes the Express session middleware and the Sequelize session store. We also have a quick sanity check that will ensure there is a SESSION_SECRET environment variable set, otherwise an error will be printed. Finally, we export that session configuration to our application.
So, we’ll need to add a SESSION_NAME and SESSION_SECRET environment variable to our .env, .env.test and .env.example files. The SESSION_NAME is a unique name for our cookie, and the SESSION_SECRET is a secret key used to secure our cookies and prevent them from being modified.
There are many ways to generate a secret key, but one of the simplest is to just use the built in functions in Node.js itself. We can launch the Node.js REPL environment by just running the node command in the terminal:
$ node
From there, we can use this line to get a random secret key:
Just like we use $ as the prompt for Linux terminal commands, the Node.js REPL environment uses > so we will include that in our documentation. You should not include that character in your command.
If done correctly, we’ll get a random string that you can use as your secret key!
We can include that key in our .env file. To help remember how to do this in the future, we can even include the Node.js command as a comment above that line:
# -=-=- other settings omitted here -=-=-SESSION_NAME=lostcommunities
# require('crypto').randomBytes(64).toString('hex')SESSION_SECRET=46a5fdfe16fa710867102d1f0dbd2329f2eae69be3ed56ca084d9e0ad....
Finally, we can update our app.js file to use this session configuration. We’ll place this between the /api and /auth routes, since we only want to load cookie sessions if the user is accessing the authentication routes, to minimize the number of database requests:
// -=-=- other code omitted here -=-=-
// Import libraries
importcompressionfrom"compression";
importcookieParserfrom"cookie-parser";
importexpressfrom"express";
importhelmetfrom"helmet";
importpathfrom"path";
importswaggerUifrom"swagger-ui-express";
importpassportfrom"passport";
// Import configurations
importloggerfrom"./configs/logger.js";
importopenapifrom"./configs/openapi.js";
importsessionsfrom"./configs/sessions.js";
// -=-=- other code omitted here -=-=-
// Use routers
app.use("/", indexRouter);
app.use("/api", apiRouter);
// Use sessions
app.use(sessions);
app.use(passport.authenticate("session"));
// Use auth routes
app.use("/auth", authRouter);
// -=-=- other code omitted here -=-=-
There we go! Now we can enable cookie sessions in Passport.js by removing the {session: false} setting in our /auth/bypass route in the routes/auth.js file:
// -=-=- other code omitted here -=-=-
router.get("/bypass", passport.authenticate('token'), authSuccess);

// -=-=- other code omitted here -=-=-
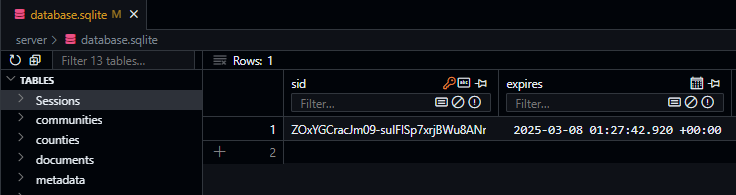
Now, when we navigate to that route and authenticate, we should see our application set a session cookie as part of the response.
We can match the SID in the session cookie with the SID in the Sessions table in our database to confirm that it is working:
From here, we can use these sessions throughout our application to track users as they make additional requests.
Now that we have a working authentication system, the next step is to configure a method to request a valid JSON Web Token, or JWT, that contains information about the authenticated user. We’ve already learned a bit about JWTs in this course, so we won’t cover too many of the details here.
To work with JWTs, we’ll need to install the jsonwebtoken package from NPM:
$ npm install jsonwebtoken
Next, we’ll need to create a secret key that we can use to sign our tokens. We’ll add this as the JWT_SECRET_KEY setting in our .env, .env.test and .env.example files. We can use the same method discussed on the previous page to generate a new random key:
# -=-=- other settings omitted here -=-=-# require('crypto').randomBytes(64).toString('hex')JWT_SECRET_KEY='46a5fdfe16fa710867102d1f0dbd2329f2eae69be3ed56ca084d9e0ad....'
Once we have the library and a key, we can easily create and sign a JWT in the /auth/token route in the routes/auth.js file:
// -=-=- other code omitted here -=-=-
// Import libraries
importexpressfrom"express";
importpassportfrom"passport";
importjsonwebtokenfrom"jsonwebtoken"// -=-=- other code omitted here -=-=-
router.get("/token", function (req, res, next) {
// If user is logged in
if (req.user) {
consttoken=jsonwebtoken.sign(
req.user,
process.env.JWT_SECRET_KEY,
{
expiresIn:'6h' }
)
res.json({
token:token })
} else {
// Send unauthorized response
res.status(401).end()
}
});
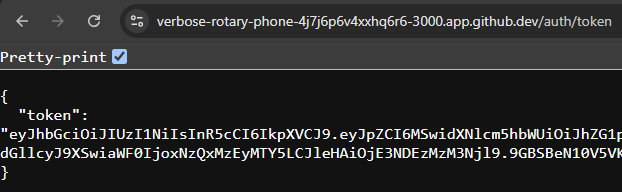
Now, when we visit the /auth/token URL on our working website (after logging in through the /auth/bypass route), we should receive a JWT as a response:
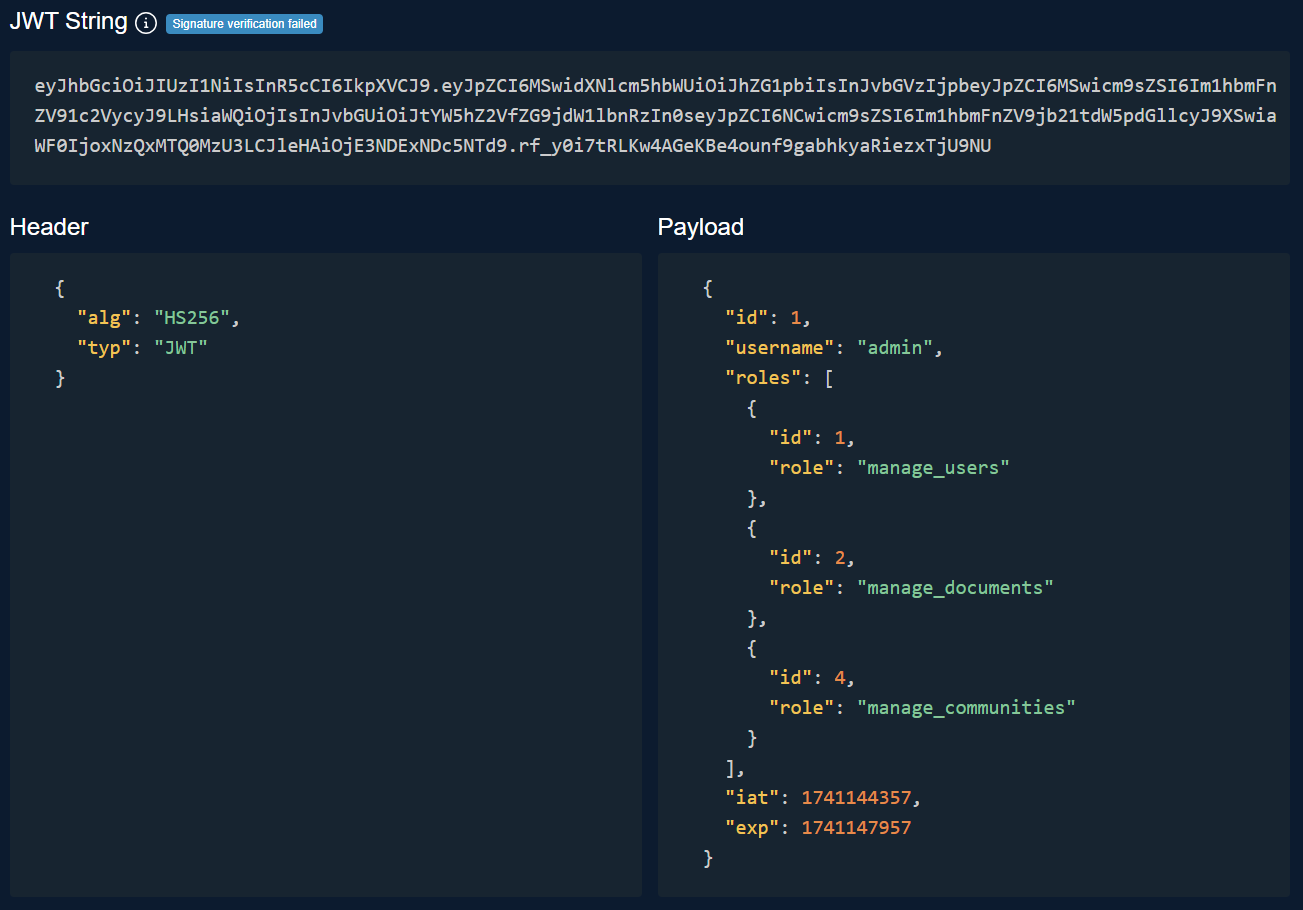
Of course, while that data may seem unreadable, we already know that JWTs are Base64 encoded, so we can easily view the content of the token. Thankfully, there are many great tools we can use to debug our tokens, such as Token.dev, to confirm that they are working correctly.
Do Not Share Live Keys!
While sites like this will also help you confirm that your JWTs are properly signed by asking for your secret key, you SHOULD NOT share a secret key for a live production application with these sites. There is always a chance it has been compromised!
The last step we should take in our authentication system is to properly route users back to the index page after a successful login attempt. Since we will eventually be building a single-page application in Vue.js as our frontend for this application, we only need to worry about directing users back to the index page, which will load our frontend.
So, in our authSuccess method in routes/auth.js, we can update the response to redirect our users back to the index page:
// -=-=- other code omitted here -=-=-
constauthSuccess=function (req, res, next) {
res.redirect("/");
};
// -=-=- other code omitted here -=-=-
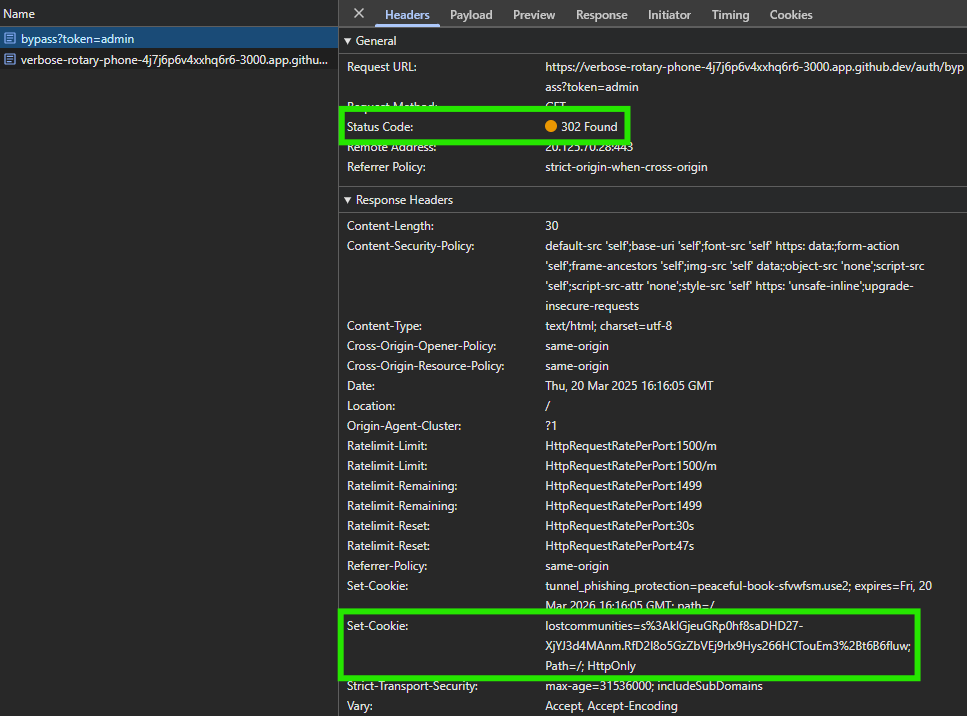
The res.redirect method will sent an HTTP 302 Found response back to the browser with a new location to navigate to. However, by that point, the authentication process will also send a cookie to the browser with the session ID, so the user will be logged in correctly:
Logout Route
Finally, we should also add a logout route. This route will end any sessions created through Passport.js by removing the session from the database and also telling the browser to delete the session cookie. It uses the special req.logout() method that is added to each request by Passport.js. We’ll add our logout route to the bottom of the routes/auth.js file:
// -=-=- other code omitted here -=-=-
// Import configurations
import"../configs/auth.js";
importloggerfrom"../configs/logger.js";
// -=-=- other code omitted here -=-=-
/**
* Logout of a Passport.js session
*
* See https://www.initialapps.com/properly-logout-passportjs-express-session-for-single-page-app/
*
* @param {Object} req - Express request object
* @param {Object} res - Express response object
* @param {Function} next - Express next middleware function
*
* @swagger
* /auth/logout:
* get:
* summary: logout current user
* description: logout current user and end session
* tags: [auth]
* responses:
* 200:
* description: success
*/router.get('/logout', function (req, res, next) {
res.clearCookie(process.env.SESSION_NAME||'connect.sid'); // clear the session cookie
req.logout(function(err) { // logout of passport
if (err) {
logger.error(err);
}
req.session.destroy(function (err) { // destroy the session
if (err) {
logger.error(err);
}
res.redirect('/');
})
});
})
// -=-=- other code omitted here -=-=-
Now, when we access this route with a valid session, we’ll see that the user is properly logged out.
We’ll also no longer be able to access the /auth/token route without logging in again.
However, this route WILL NOT invalidate any existing JWTs already issued to that user - they will still be valid until they expire. In our earlier example, we set the JWTs to have a 6 hour lifetime, so in theory a user could still access the application using a valid JWT up to 6 hours after logging out!
Invalidating JWTs
JSON Web Tokens (JWTs) are a very powerful authentication method for web APIs because they allow users to send requests without worrying about the need for a cookie session. In theory, a JWT issued by any instance of our API can be validated anywhere, making it much easier to horizontally scale this application in the future.
In addition, requests with a JWT generally don’t require a database access with each request to validate the session. Our current cookie sessions store the session data in the database, so now each incoming request containing a session cookie requires a database lookup to get information about the user before any work can be done.
However, this means that any user with a valid JWT will be able to access our application even if they have logged out. This may present a security issue for some applications.
There are some strategies to mitigate this risk:
Use JWTs with a short expiration - this means users may have to log in again and/or request new tokens more often, which could be frustrating.
Add a database session to each JWT - this would mean that each incoming request with a JWT would now result in a database lookup, which could slow things down. Alternatively, sessions could be stored in a faster cache mechanism such as Redis or Valkey.
To permanently invalidate all existing JWT sessions (in case of a security compromise or other concern), simply change the key used to sign the JWTs to a new secure key. This is a method of last resort, but it is always important to know that it is available if needed.
We’ve already studied Central Authentication Service (CAS) as one method for authenticating users through a third party service. In this case, CAS is the service commonly used at K-State for authentication, which is why we like to cover it in our examples. So, let’s look at how to add CAS authentication to our application through Passport.
Installing a Passport Strategy
First, we’ll need to install a new Passport.js strategy for dealing with CAS authentication. Thankfully, the ALT+CS lab at K-State maintains an updated library for this, which can be installed as shown below:
Unfortunately, it is very difficult to find an updated Passport.js strategy for CAS authentication. This is partially due to the fact the CAS is not commonly used, and partially because many existing strategies have been written once and then abandoned by the developers. For this class, we sought out the most updated strategy available, then did our best to fix any known/existing bugs.
Configuring CAS Strategy
Next, we can configure our authentication strategy by adding a few items to the configs/auth.js file for our new CAS strategy:
// -=-=- other code omitted here -=-=-
// Import libraries
importpassportfrom"passport";
import { UniqueTokenStrategy } from"passport-unique-token";
import { StrategyasCasStrategy } from'@alt-cs-lab/passport-cas';
// -=-=- other code omitted here -=-=-
// CAS authentication
passport.use(newCasStrategy({
version:'CAS2.0',
ssoBaseURL:process.env.CAS_URL,
serverBaseURL:process.env.CAS_SERVICE_URL+'/auth/cas' },
(profile, next) => {
if (profile.user) {
returnauthenticateUser(profile.user, next)
} else {
logger.warn("CAS authentication succeeded but no user returned: "+JSON.stringify(profile));
returnnext(null, false);
}
}
))
// -=-=- other code omitted here -=-=-
In this file, we are importing our new CAS authentication strategy, then using passport.use to tell Passport.js to use this authentication strategy when requested. Inside, we set up the various settings for our strategy, as well as the callback function when a user successfully authenticates. In this case, the CAS server will give us a profile object that should contain the user attribute with the user’s username, which we can send to our authenticateUser method we’ve already created. Finally, we also include a short catch to log any errors where the user is able to log in but a username is not provided.
In our .env file, we’ll need to add two more settings. The CAS_URL is the base URL for the CAS server itself, and the CAS_SERVICE_URL is the URL that users should be sent back to, along with a ticket, to complete the log in process. Since we are working in GitHub Codespaces, our CAS_SERVICE_URL will be the same as our OPENAPI_HOST.
# -=-=- other settings omitted here -=-=-CAS_URL=https://testcas.cs.ksu.edu
CAS_SERVICE_URL=https://$CODESPACE_NAME-$PORT.$GITHUB_CODESPACES_PORT_FORWARDING_DOMAIN
Notice that we already add the /auth/cas route to the end of the CAS_SERVICE_URL in the configuration above - since that path won’t change, it makes sense to just include it there instead of having to remember to add it to the path in the .env file. We should also put sensible defaults in our .env.example and .env.test files as well.
Now, to use this authentication method, all we have to do is update our /auth/cas route in routes/auth.js to use this strategy:
/**
* CAS Authentication
*
* @param {Object} req - Express request object
* @param {Object} res - Express response object
* @param {Function} next - Express next middleware function
*
* @swagger
* /auth/cas:
* get:
* summary: CAS authentication
* description: CAS authentication for deployment
* tags: [auth]
* responses:
* 200:
* description: success
*/router.get("/cas", passport.authenticate('cas'), authSuccess);
// -=-=- other code omitted here -=-=-
With that in place, we can start our application and test it by navigating to the /auth/cas route to see if our login attempt works:
$ npm run dev
If everything works correctly, we should be directed to our CAS server to authenticate, then we’ll be sent back to our own server with a ticket to validate our authentication. Finally, once the ticket is validated, we’ll be redirected back to our home page with a session cookie set:
CAS Logout
Finally, we’ll need to add a bit more logic to our logout process to properly log users out of both our application and the CAS server they originally logged in through. So, let’s update our /auth/logout route to include that:
// -=-=- other code omitted here -=-=-
router.get('/logout', function (req, res, next) {
res.clearCookie(process.env.SESSION_NAME||'connect.sid'); // clear the session cookie
req.logout(function(err) { // logout of passport
if (err) {
logger.error(err);
}
req.session.destroy(function (err) { // destroy the session
if (err) {
logger.error(err);
}
constredirectURL=process.env.CAS_URL+"/logout?service="+ encodeURIComponent(process.env.CAS_SERVICE_URL)
res.redirect(redirectURL);
})
});
});
// -=-=- other code omitted here -=-=-
Most CAS servers will automatically redirect the user back to the service request parameter, but not all of them. However, this will ensure that the CAS server knows the user has logged out and will invalidate any tickets for that user.
Test CAS Server Updated
The test CAS server was updated recently to properly redirect users back to the service request parameter, so you will probably no longer see the Logout page from that server in your testing. This should make developing and testing with that server a bit more straightforward
What if a user logs in to our application through CAS, but we don’t have them in our database of users? Do we want to deny them access to the application? Or should we somehow gracefully add them to the list of users and give them some basic access to our application?
Since we are building a website meant to be open to a number of users, let’s go ahead and implement a strategy where a new user can be created in the event that a user logs on through one of our authentication strategies but isn’t found in the database.
Thankfully, to do this is really simple - all we must do is add a few additional lines to our authenticateUser function in the configs/auth.js file:
// -=-=- other code omitted here -=-=-
constauthenticateUser=function(username, next) {
// Find user with the username
User.findOne({
attributes: ["id", "username"],
include: {
model:Role,
as:"roles",
attributes: ["id", "role"],
through: {
attributes: [],
},
},
where: { username:username },
})
.then((user) => {
// User not found
if (user===null) {
// Create new user
User.create({ username:username}).then((user) => {
logger.debug("New user created via login: "+user.username);
// Convert Sequelize object to plain JavaScript object
user=JSON.parse(JSON.stringify(user))
returnnext(null, user);
})
} else {
// User authenticated
logger.debug("Login succeeded for user: "+user.username);
// Convert Sequelize object to plain JavaScript object
user=JSON.parse(JSON.stringify(user))
returnnext(null, user);
}
});
}
// -=-=- other code omitted here -=-=-
Now, when we try to log in using any username, we’ll either be logged in as an existing user, or a new user will be created. We can see this in our log output:
[2025-03-20 07:15:17.256 PM] http:      GET /auth/cas 302 0.697 ms - 0
[2025-03-20 07:15:23.525 PM] debug:     New user created via login: russfeld
[2025-03-20 07:15:23.564 PM] http:      GET /auth/cas?ticket=aac12881-9bea-449c-bf13-b981525cc8db 302 218.923 ms - 30
[2025-03-20 07:15:23.721 PM] http:      GET / 200 1.299 ms - -
That’s all there is to it! Of course, we can also configure this process to automatically assign roles to our newly created user, but for right now we won’t worry about that.
Now that we have our authentication system working for our application, let’s write some unit tests to confirm that it works as expected in a variety of situations.
As part of these tests, we’ll end up creating a test double of one part of our authentication system to make it easier to test. To do this, we’ll use the Sinon library, so let’s start by installing it as a development dependency:
$ npm install --save-dev sinon
We’ll store these tests in the test/auth.js file, starting with this content including the libraries we’ll need to use:
We’ll continue to build out tests below that content in the same file.
Testing Bypass Authentication
First, let’s look at some tests for the /auth/bypass route, since that is the simplest. The first test is a very simple one to confirm that bypass authentication works, and also that it sets the expected cookie in the browser when it redirects the user back to the home page:
// -=-=- other code omitted here -=-=-
// Regular expression to match the expected cookie
constregex_valid="^"+process.env.SESSION_NAME+"=\\S*; Path=/; HttpOnly$";
/**
* Test Bypass authentication
*/constbypassAuth= (user) => {
it("should allow bypass login with user "+user, (done) => {
constre=new RegExp(regex_valid, "gm");
request(app)
.get("/auth/bypass?token="+user)
.expect(302)
.expect("Location", "/")
.expect("set-cookie", re)
.end((err) => {
if (err) returndone(err);
done();
});
});
};
// List of existing users to be tested
constusers= ["admin", "contributor", "manager", "user"];
/**
* Test /auth/ routes
*/describe("/auth", () => {
describe("GET /bypass", () => {
users.forEach((user) => {
bypassAuth(user);
});
});
});
Notice that we are using a regular expression to help us verify that the cookie being sent to the user is using the correct name and has the expected content.
Next, we also should test to make sure that using bypass authentication with any unknown username will create that user:
// -=-=- other code omitted here -=-=-
/**
* Test Bypass authentication creates user
*/constbypassAuthCreatesUser= (user) => {
it("should allow bypass login with new user "+user, (done) => {
constre=new RegExp(regex_valid, "gm");
request(app)
.get("/auth/bypass?token="+user)
.expect(302)
.expect("Location", "/")
.expect("set-cookie", re)
.end((err) => {
if (err) returndone(err);
User.findOne({
attributes: ["id", "username"],
where: { username:user },
}).then((found_user) => {
expect(found_user).to.not.equal(null);
found_user.should.have.property("username");
expect(found_user.username).to.equal(user);
done();
});
});
});
};
// -=-=- other code omitted here -=-=-
/**
* Test /auth/ routes
*/describe("/auth", () => {
describe("GET /bypass", () => {
users.forEach((user) => {
bypassAuth(user);
});
bypassAuthCreatesUser("testuser");
});
});
This test will first log the user in, then it will directly check the database to ensure that the user has been created successfully. Alternatively, we could also use the API, but we’re trying to keep our tests independent, so in this case it makes the most sense to query the database directly in our test instead of any other method.
Testing CAS Authentication
Next, let’s write the tests for our CAS authentication strategy. These are similar to the ones we’ve already written, but they have some key differences as well.
First, we can write a simple test just to show that any user who visits the /auth/cas route will be properly redirected to the correct CAS server:
// -=-=- other code omitted here -=-=-
/**
* Test CAS authentication redirect
*/constcasAuthRedirect= () => {
it("should redirect users to CAS server", (done) => {
constexpectedURL=process.env.CAS_URL+"/login?service="+ encodeURIComponent(process.env.CAS_SERVICE_URL+"/auth/cas");
request(app)
.get("/auth/cas")
.expect(302)
.expect("Location", expectedURL)
.end((err) => {
if (err) returndone(err);
done();
});
});
};
// -=-=- other code omitted here -=-=-
/**
* Test /auth/ routes
*/describe("/auth", () => {
// -=-=- other code omitted here -=-=-
describe("GET /cas", () => {
casAuthRedirect();
});
});
In this test, we are building the URL that the user should be redirected to, based on the settings we have already set in our environment file. Then, we simply check that the returned response is an HTTP 302 Found response with the correct location indicated.
The next two tests are much more complex, because they require us to mock the step where our server confirms that the user is authenticated with the CAS server by sending a request with a ticket attached, and then getting a response for that ticket. We can do this using a bit of clever coding and the Sinon library.
First, we need to mock up a response object that mimics what the server would respond with. This is mocked just so it will be understood by our CAS authentication library and may not work in all cases:
// -=-=- other code omitted here -=-=-
/**
* Helper function to generate a valid mock CAS 2.0 Ticket
*/constvalidTicket= (user, ticket) => {
return {
text: () => {
return`<cas:serviceResponse xmlns:cas='http://www.yale.edu/tp/cas'>
<cas:authenticationSuccess>
<cas:user>${user}</cas:user>
<cas:ksuPersonWildcatID>${123456789}</cas:ksuPersonWildcatID>
<cas:proxyGrantingTicket>${ticket}</cas:proxyGrantingTicket>
</cas:authenticationSuccess>
</cas:serviceResponse>`;
},
};
};
// -=-=- other code omitted here -=-=-
This function creates an object with a single method text() that will return a valid XML ticket for the given user and random ticket ID.
Right below that, we can create a unit test that will mock the global fetch function used by our CAS authentication strategy to contact the CAS server to validate the ticket, and instead it will respond with our mock response object created above:
// -=-=- other code omitted here -=-=-
/**
* Test CAS with valid ticket
*/constcasAuthValidTicket= (user) => {
it("should log in user "+user+" via CAS", (done) => {
constticket="abc123";
constfetchStub=sinon .stub(global, "fetch")
.resolves(validTicket(user, ticket));
constre=new RegExp(regex_valid, "gm");
request(app)
.get("/auth/cas?ticket="+ticket)
.expect(302)
.expect("Location", "/")
.expect("set-cookie", re)
.end((err) => {
if (err) returndone(err);
sinon.assert.calledOnce(fetchStub);
expect(fetchStub.args[0][0]).to.contain("?ticket="+ticket);
done();
});
});
};
// -=-=- other code omitted here -=-=-
/**
* Test /auth/ routes
*/describe("/auth", () => {
// -=-=- other code omitted here -=-=-
describe("GET /cas", () => {
casAuthRedirect();
users.forEach((user) => {
casAuthValidTicket(user);
});
});
});
In this test, we create a fetchStub object that is used by our CAS authentication strategy in place of fetch. It will confirm that the user has a valid ticket and can be authenticated, so we can perform the same steps as before and ensure that the cookie is properly set when the user is authenticated.
We also are checking that the fetch method we mocked was actually called once, and that it contained the ticket we provided as part of the URL. This is just a sanity check to make sure that we mocked up the correct part of our application!
We must also add a new item in the afterEach() hook for Mocha, which will reset all functions and objects that are mocked by Sinon after each test. This ensures we are always working with a clean slate. We’ll update the function in test/hooks.js with this new content:
// -=-=- other code omitted here -=-=-
// Import libraries
importsinonfrom"sinon";
// Root Hook Runs Before Each Test
exportconstmochaHooks= {
// -=-=- other code omitted here -=-=-
// Hook runs after each individual test
afterEach(done) {
// Restore Sinon mocks
sinon.restore();
// Remove all data from the database
seeds.down({ to:0 }).then(() => {
done();
});
},
};
Finally, we also should confirm that logging in via CAS will create a new user if the username is not recognized. This test builds upon the previous CAS test in a way similar to the one used for bypass authentication above:
// -=-=- other code omitted here -=-=-
/**
* Test CAS creates user
*/constcasAuthValidTicketCreatesUser= (user) => {
it("should create new user "+user+" via CAS", (done) => {
constticket="abc123";
constfetchStub=sinon .stub(global, "fetch")
.resolves(validTicket(user, ticket));
constre=new RegExp(regex_valid, "gm");
request(app)
.get("/auth/cas?ticket="+ticket)
.expect(302)
.expect("Location", "/")
.expect("set-cookie", re)
.end((err) => {
if (err) returndone(err);
sinon.assert.calledOnce(fetchStub);
expect(fetchStub.args[0][0]).to.contain("?ticket="+ticket);
User.findOne({
attributes: ["id", "username"],
where: { username:user },
}).then((found_user) => {
expect(found_user).to.not.equal(null);
found_user.should.have.property("username");
expect(found_user.username).to.equal(user);
done();
});
});
});
};
// -=-=- other code omitted here -=-=-
/**
* Test /auth/ routes
*/describe("/auth", () => {
// -=-=- other code omitted here -=-=-
describe("GET /cas", () => {
casAuthRedirect();
users.forEach((user) => {
casAuthValidTicket(user);
});
casAuthValidTicketCreatesUser("testuser");
});
});
As before, this will log a user in via CAS, confirm that it works, and then check in the database to make sure that the new user is properly created.
Testing JWT
Now that we’ve tested both ways to log into our application, we can write some tests to confirm that users can properly request a JWT to be used in our frontend later on. So, our first test simply checks to make sure a user with a valid session can request a token:
// -=-=- other code omitted here -=-=-
/**
* Test user can request a valid token
*/constuserCanRequestToken= (user) => {
it("should allow user "+user+" to request valid JWT", (done) => {
constre=new RegExp(regex_valid, "gm");
constagent=request.agent(app);
agent .get("/auth/bypass?token="+user)
.expect(302)
.expect("Location", "/")
.expect("set-cookie", re)
.end((err) => {
if (err) returndone(err);
agent .get("/auth/token")
.expect(200)
.end((err, res) => {
if (err) returndone(err);
res.body.should.be.an("object");
res.body.should.have.property("token");
consttoken=jsonwebtoken.decode(res.body.token);
token.should.have.property("username");
token.username.should.be.equal(user);
done();
});
});
});
};
// -=-=- other code omitted here -=-=-
/**
* Test /auth/ routes
*/describe("/auth", () => {
// -=-=- other code omitted here -=-=-
describe("GET /token", () => {
users.forEach((user) => {
userCanRequestToken(user);
});
userCanRequestToken("testuser");
});
});
In this test, we must use a persistent browser agent to make our requests. This will ensure that any cookies or other settings are saved between requests. Thankfully, the Supertest library we are using already has that functionality, so all we have to do is create an agent for our testing as shown in the test above. Once we have successfully logged in, we can confirm that the /auth/token endpoint sends a valid JWT that contains information about the current user. For these tests, we are using bypass authentication for simplicity, but any authentication method could be used.
When we run the tests at the bottom of the file, notice that we are running this for all existing users, as well as a newly created user. Both types of users should be able to request a token for our application.
Next, let’s confirm that all of a user’s roles are listed in the JWT issued for that user. This is important because, later on in this example, we’ll be using those roles to implement role-based authorization in our application, so it is vital to make sure our JWTs include the correct roles:
// -=-=- other code omitted here -=-=-
/**
* Test user roles are correctly listed in token
*/constuserRolesAreCorrectInToken= (user) => {
it("should contain correct roles for user "+user+" in JWT", (done) => {
constre=new RegExp(regex_valid, "gm");
constagent=request.agent(app);
agent .get("/auth/bypass?token="+user)
.expect(302)
.expect("Location", "/")
.expect("set-cookie", re)
.end((err) => {
if (err) returndone(err);
agent .get("/auth/token")
.expect(200)
.end((err, res) => {
if (err) returndone(err);
res.body.should.be.an("object");
res.body.should.have.property("token");
consttoken=jsonwebtoken.decode(res.body.token);
User.findOne({
attributes: ["id", "username"],
include: {
model:Role,
as:"roles",
attributes: ["id", "role"],
through: {
attributes: [],
},
},
where: { username:user },
}).then((user) => {
if (user.roles.length!=0) {
token.should.have.property("roles");
expect(token.roles.length).to.equal(user.roles.length);
user.roles.forEach((expected_role) => {
expect(
token.roles.some((role) => role.id==expected_role.id),
).to.equal(true);
});
} else {
token.should.not.have.property("roles");
}
done();
});
});
});
});
};
// -=-=- other code omitted here -=-=-
/**
* Test /auth/ routes
*/describe("/auth", () => {
// -=-=- other code omitted here -=-=-
describe("GET /token", () => {
users.forEach((user) => {
userCanRequestToken(user);
userRolesAreCorrectInToken(user);
});
userCanRequestToken("testuser");
userRolesAreCorrectInToken("testuser");
});
});
This test may seem very long and verbose, but it is very straightforward. We first login and request a token for a user, and then we also look up that user in the database including all associated roles. Then, we simply assert that the number of roles in the token is the same as the number of them in the database, and if there are any roles that each role is found as expected.
Finally, we should write one additional test, that simply confirms that the application will not allow anyone to request a token if they are not currently logged in:
// -=-=- other code omitted here -=-=-
/**
* User must have a valid session to request a token
*/constmustBeLoggedInToRequestToken= () => {
it("should not allow a user to request a token without logging in", (done) => {
request(app)
.get("/auth/token")
.expect(401)
.end((err) => {
if (err) returndone(err);
done();
});
});
};
// -=-=- other code omitted here -=-=-
/**
* Test /auth/ routes
*/describe("/auth", () => {
// -=-=- other code omitted here -=-=-
describe("GET /token", () => {
users.forEach((user) => {
userCanRequestToken(user);
userRolesAreCorrectInToken(user);
});
userCanRequestToken("testuser");
userRolesAreCorrectInToken("testuser");
mustBeLoggedInToRequestToken();
});
});
For this test, we simply check that the application returns an HTTP 401 response if the user tries to request a token without first being logged in.
Testing Logout
Finally, we can write a few tests to make sure our logout process is also working as expected. The first test will confirm that the session cookie we are using is properly removed from the user’s browser when they log out:
// -=-=- other code omitted here -=-=-
// Regular expression to match deleting the cookie
constregex_destroy="^"+process.env.SESSION_NAME+"=; Path=/; Expires=Thu, 01 Jan 1970 00:00:00 GMT$";
/**
* Logout will remove the cookie
*/constlogoutDestroysCookie= (user) => {
it("should remove the cookie on logout", (done) => {
constre=new RegExp(regex_valid, "gm");
constre_destroy=new RegExp(regex_destroy, "gm");
constagent=request.agent(app);
agent .get("/auth/bypass?token="+user)
.expect(302)
.expect("Location", "/")
.expect("set-cookie", re)
.end((err) => {
if (err) returndone(err);
agent .get("/auth/logout")
.expect(302)
.expect("set-cookie", re_destroy)
.end((err) => {
if (err) returndone(err);
done();
});
});
});
};
// -=-=- other code omitted here -=-=-
/**
* Test /auth/ routes
*/describe("/auth", () => {
// -=-=- other code omitted here -=-=-
describe("GET /logout", () => {
logoutDestroysCookie("admin");
});
});
In this test, we are looking for a second set-cookie header to be sent when the user logs out. This header will both contain an empty cookie, but also will set the cookie’s expiration date to the earliest date possible. So, we can simply look for that header to confirm our cookie is being properly removed and expired from the user’s browser when they log out. We only really have to test this for a single username, since the process is identical for all of them.
Next, we should also confirm that the logout process will redirect users to the CAS server as well and log them out of any existing CAS sessions.
// -=-=- other code omitted here -=-=-
// Regular expression for redirecting to CAS
constregex_redirect="^"+process.env.CAS_URL+"/logout\\?service=\\S*$";
/**
* Logout redirects to CAS
*/constlogoutRedirectsToCas= (user) => {
it("should redirect to CAS on logout", (done) => {
constre=new RegExp(regex_valid, "gm");
constre_redirect=new RegExp(regex_redirect, "gm");
constagent=request.agent(app);
agent .get("/auth/bypass?token="+user)
.expect(302)
.expect("Location", "/")
.expect("set-cookie", re)
.end((err) => {
if (err) returndone(err);
agent .get("/auth/logout")
.expect(302)
.expect("Location", re_redirect)
.end((err) => {
if (err) returndone(err);
done();
});
});
});
};
// -=-=- other code omitted here -=-=-
/**
* Test /auth/ routes
*/describe("/auth", () => {
// -=-=- other code omitted here -=-=-
describe("GET /logout", () => {
logoutDestroysCookie("admin");
logoutRedirectsToCas("admin");
});
});
Once again, we are simply checking the Location header of the HTTP 302 Found response received from our application. We are making use of regular expressions to ensure we are being properly redirected to the correct CAS server and the logout route on that server.
Finally, we should confirm that once a user has logged out, they are no longer able to request a new token from the application:
// -=-=- other code omitted here -=-=-
/**
* Logout prevents requesting a token
*/constlogoutPreventsToken= (user) => {
it("should prevent access to token after logging out", (done) => {
constre=new RegExp(regex_valid, "gm");
constagent=request.agent(app);
agent .get("/auth/bypass?token="+user)
.expect(302)
.expect("Location", "/")
.expect("set-cookie", re)
.end((err) => {
if (err) returndone(err);
agent .get("/auth/token")
.expect(200)
.end((err) => {
if (err) returndone(err);
agent .get("/auth/logout")
.expect(302)
.end((err) => {
if (err) returndone(err);
agent .get("/auth/token")
.expect(401)
.end((err) => {
if (err) returndone(err);
done();
});
});
});
});
});
};
// -=-=- other code omitted here -=-=-
/**
* Test /auth/ routes
*/describe("/auth", () => {
// -=-=- other code omitted here -=-=-
describe("GET /logout", () => {
logoutDestroysCookie("admin");
logoutRedirectsToCas("admin");
logoutPreventsToken("admin");
});
});
In this test, we simply log in, request a token, then log out, and show that the application will no longer allow us to request a token, even though we are using the same user agent as before. This is a great way to confirm that our entire process is working!
Now is a great time to lint, format, and commit our code to GitHub before continuing!
The authorized-roles.js file shown in the video is out of date. Refer to the code below for a corrected version. Corrections are discussed in the Errata chapter.
Token Middlewares
Now that we finally have a working authentication system, we can start to add role-based authorization to our application. This will ensure that only users with specific roles can perform certain actions within our RESTful API. To do this, we’ll need to create a couple of new Express middlewares to help load the contents of our JWT into the request, and also to verify that the authenticated user has the appropriate roles to perform an action.
First, let’s create a middleware to handle loading our JWT from an authorization header into the Express request object:
/**
* @file Middleware for reading JWTs from the Bearer header and storing them in the request
* @author Russell Feldhausen <russfeld@ksu.edu>
* @exports tokenMiddleware the token middleware
*/// Import Libraries
importjsonwebtokenfrom'jsonwebtoken'// Import configurations
importloggerfrom'../configs/logger.js'asyncfunctiontokenMiddleware(req, res, next) {
// Retrieve the token from the headers
constauthHeader=req.headers['authorization']
consttoken=authHeader&&authHeader.split(' ')[1]
// If the token is null in the header, send 401 unauthorized
if (token==null) {
logger.debug('JWT in header is null')
returnres.status(401).end();
}
// Verify the token
jsonwebtoken.verify(token, process.env.JWT_SECRET_KEY, async (err, token) => {
// Handle common errors
if (err) {
if (err.name==='TokenExpiredError') {
// If the token is expired, send 401 unauthorized
returnres.status(401).end()
} else {
// If the token won't parse, send 403 forbidden
logger.error("JWT Parsing Error!")
logger.error(err)
returnres.sendStatus(403)
}
}
// Attach token to request
req.token=token;
// Call next middleware
next();
});
}
exportdefaulttokenMiddleware;
This middleware will extract our JWT from the authorization: Bearer header that should be present in any request from our frontend single-page web application to our API. It then checks that the signature matches the expected signature and that the payload of the JWT has not been tampered with. It also makes sure the JWT has not expired. If all of those checks pass, then it simply attaches the contents of the JWT to the Express request object as req.token, so we can use it later in our application.
To use this middleware, we need to make a small change to the structure of our routes/api.js file to allow users to access the base API route without needing the token, but all other routes will require a valid token for access:
/**
* @file API main router
* @author Russell Feldhausen <russfeld@ksu.edu>
* @exports router an Express router
*
* @swagger
* tags:
* name: api
* description: API routes
*/// Import libraries
importexpressfrom"express";
// Import middleware
importtokenMiddlewarefrom"../middlewares/token.js";
// Import v1 routers
importrolesRouterfrom"./api/v1/roles.js";
importusersRouterfrom"./api/v1/users.js";
// Create Express router
constrouter=express.Router();
/**
* Gets the list of API versions
*
* @param {Object} req - Express request object
* @param {Object} res - Express response object
* @param {Function} next - Express next middleware function
*
* @swagger
* /api/:
* get:
* summary: list API versions
* tags: [api]
* responses:
* 200:
* description: the list of users
* content:
* application/json:
* schema:
* type: array
* items:
* type: object
* properties:
* version:
* type: string
* url:
* type: string
* example:
* - version: "1.0"
* url: /api/v1/
*/router.get("/", function (req, res, next) {
res.json([
{
version:"1.0",
url:"/api/v1/",
},
]);
});
// Use Token Middleware
router.use(tokenMiddleware);
// Use v1 routers after API route
router.use("/v1/roles", rolesRouter);
router.use("/v1/users", usersRouter);
exportdefaultrouter;
Here, we import our new middleware, and then we rearrange the contents of the file so that the single /api route comes first, then we add our middleware and the rest of the API routes at the end of the file. Remember that everything in Express is executed in the order it is attached to the application, so in this way any routes that occur before our middleware is attached can be accessed without a valid JWT, but any routes or routers added afterward will require a valid JWT for access.
Role Middleware
Next, we can create another middleware function that will check if a user has the appropriate roles to perform an operation via our API. However, instead of writing a simple function as our middleware, or even writing a number of different functions for each possible role, we can take advantage of one of the most powerful features of JavaScript - we can create a function that returns another function! Let’s take a look and see how it works:
/**
* @file Middleware for role-based authorization
* @author Russell Feldhausen <russfeld@ksu.edu>
* @exports roleBasedAuth middleware
*/// Import configurations
importloggerfrom"../configs/logger.js";
/**
* Build a middleware function to validate a user has one of a list of roles
*
* @param {...any} roles a list of roles that are valid for this operation
* @returns a middleware function for those roles.
*/constroleBasedAuth= (...roles) => {
returnfunctionroleAuthMiddleware (req, res, next) {
logger.debug("Route requires roles: "+roles);
logger.debug(
"User "+req.token.username+" has roles: "+req.token.roles.map((r) => r.role).join(","),
);
letmatch=false;
// loop through each role given
roles.forEach((role) => {
// if the user has that role, then they can proceed
if (req.token.roles.some((r) => r.role===role)) {
logger.debug("Role match!");
if (!match) {
match=true;
returnnext();
}
}
});
if (!match) {
// if no roles match, send an unauthenticated response
logger.debug("No role match!");
returnres.status(401).send();
}
};
};
exportdefaultroleBasedAuth;
This file contains a function named roleBasedAuth that accepts a list of roles as parameters (they can be provided directly or as an array, but either way we can treat them like an array in our code). Then, we will return a new middleware function named roleAuthMiddleware that will check to see if the currently authenticated user (indicated by req.token) has at least one of the named roles. If so, then there is a match and the user should be able to perform the operation. If the user does not have any of the roles listed, then the user should not be able to perform the operation and a 401 Unauthorized response should be sent. This file also includes some helpful logging information to help ensure things are working properly.
Implementing Role-Based Authorization
Finally, let’s look at how we can use that middleware function to implement role-based authorization in our application. Let’s start simple - in this instance, we can update our GET /api/v1/roles/ operation to require the user to have the manage_users role in order to list all possible roles in the application. To do this, we can import our new middleware function in the routes/api/v1/roles.js file, and then call that function to create a new middleware function to use in that file:
/**
* @file Roles router
* @author Russell Feldhausen <russfeld@ksu.edu>
* @exports router an Express router
*
* @swagger
* tags:
* name: roles
* description: Roles Routes
*/// Import libraries
importexpressfrom"express";
// Create Express router
constrouter=express.Router();
// Import models
import { Role } from"../../../models/models.js";
// Import logger
importloggerfrom"../../../configs/logger.js";
// Import middlewares
importroleBasedAuthfrom"../../../middlewares/authorized-roles.js";
/**
* Gets the list of roles
*
* @param {Object} req - Express request object
* @param {Object} res - Express response object
* @param {Function} next - Express next middleware function
*
* @swagger
* /api/v1/roles:
* get:
* summary: roles list page
* description: Gets the list of all roles in the application
* tags: [roles]
* security:
* - bearerAuth:
* - 'manage_users'
* responses:
* 200:
* description: the list of roles
* content:
* application/json:
* schema:
* type: array
* items:
* $ref: '#/components/schemas/Role'
*/router.get("/", roleBasedAuth("manage_users"), asyncfunction (req, res, next) {
try {
constroles=awaitRole.findAll();
res.json(roles);
} catch (error) {
logger.error(error);
res.status(500).end();
}
});
exportdefaultrouter;
Notice here that we are calling the roleBasedAuth function when we add it to our endpoint, which in turn will return a new middleware function that will be called anytime this endpoint is accessed. It is a bit complicated and confusing at first, but hopefully it makes sense.
We also have added a new security item to our Open API documentation, which allows us to test this route by providing a JWT through the Open API documentation website. We can even include the specific roles that are able to access this endpoint, but as of this writing it is only part of the Open API 3.1 spec but is not supported by the swagger-ui library so it won’t appear on our documentation page.
Let’s test it now by starting our server in development mode:
$ npm run dev
Once we have loaded our page, let’s go ahead and log in as the admin user by navigating to /auth/bypass?token=admin - this will return us to our home page, but now we have an active session we can use.
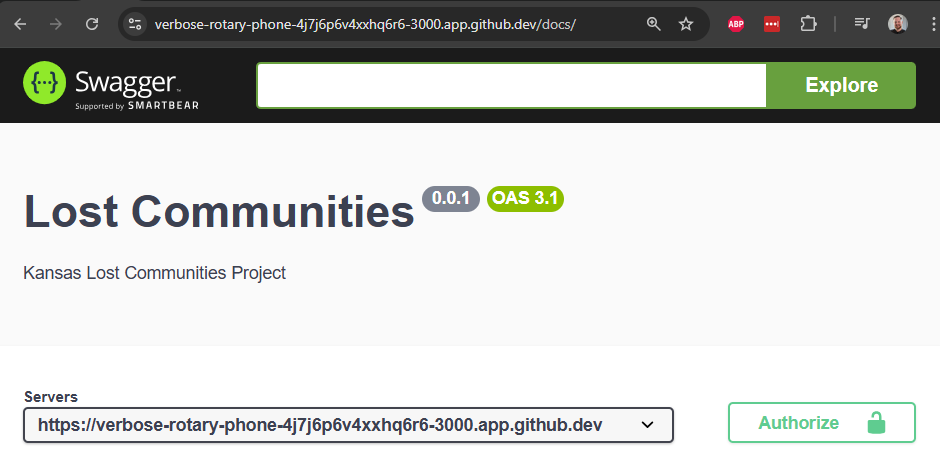
Once we have done that, we can now go to the /docs route to view our documentation. We should now notice that there is a new Authorize button at the top of the page:
In addition, if we scroll down to find our /api/v1/roles route, we should also see that it now has a lock icon next to it, showing that it requires authentication before we can access it:
If we try to test that route now, even though we have a valid session cookie session, it should give us a 401 Unauthorized response because we aren’t providing a valid JWT as part of our request:
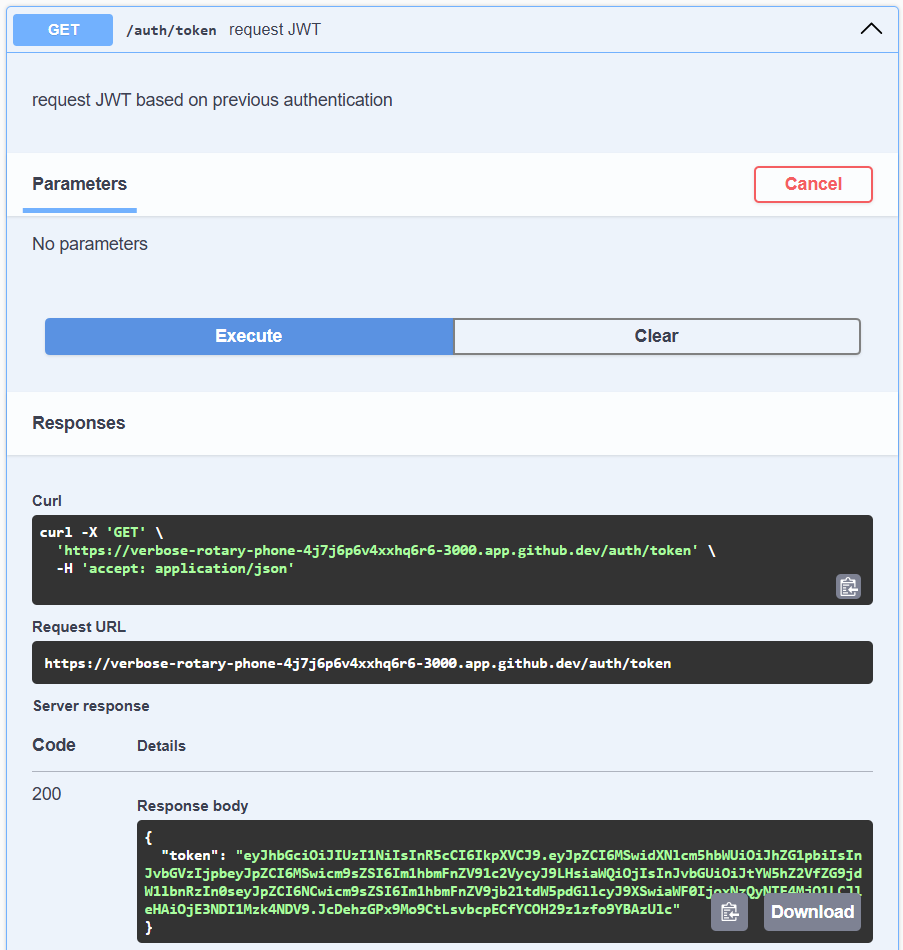
To fix this, we need to authorize our application using a valid JWT. Thankfully, we can request one by finding the /auth/token route in our documentation and executing that route:
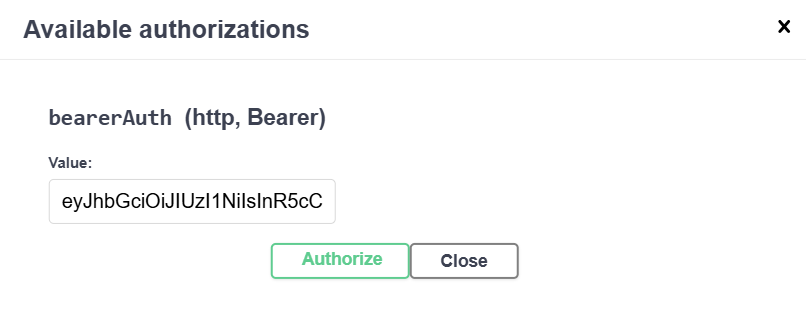
Once we have that, we can click the new Authorize button at the top, and paste the text of that token in the window that pops up. We just need the raw part of the JWT in quotes that is the value of the token property, without the quotes themselves included:
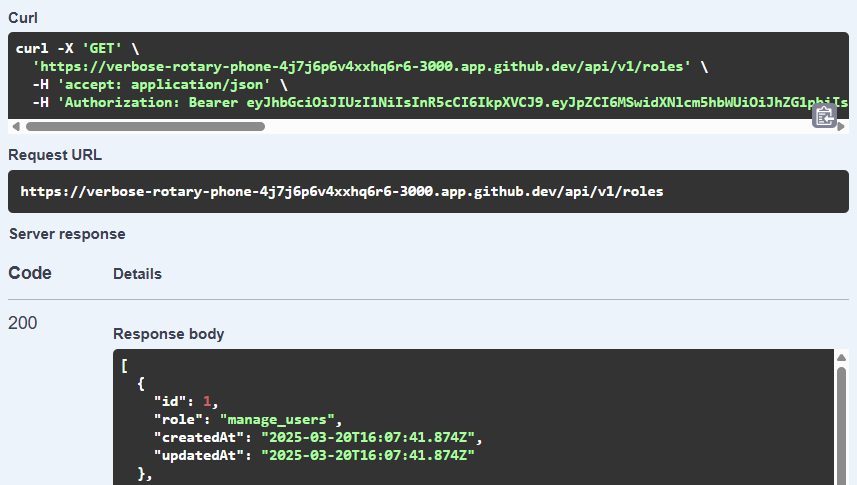
Finally, once that has been done, we can try the /api/v1/roles route again, and it should now let us access that route:
We can also see that it is properly using our role-based authorization by checking the debug output of our application:
[2025-03-21 12:54:14.085 AM] debug:     Route requires roles: manage_users
[2025-03-21 12:54:14.085 AM] debug:     User admin has roles: manage_users,manage_documents,manage_communities
[2025-03-21 12:54:14.086 AM] debug:     Role match!
[2025-03-21 12:54:14.087 AM] sql:       Executing (default): SELECT `id`, `role`, `createdAt`, `updatedAt` FROM `roles` AS `Role`;
[2025-03-21 12:54:14.090 AM] http:      GET /api/v1/roles 200 9.553 ms - 784
There we go! That is all it takes to add role-based authorization to our application. Next, we’ll look at how to update our unit tests to use our new authentication system and roles.
Of course, now that we’re requiring a valid JWT for all API routes, and adding role-based authorization for most routes, all of our existing API unit tests now longer work. So, let’s work on updating those tests to use our new authentication system.
First, let’s build a simple helper function we can use to easily log in as a user and request a token to use in our application. We’ll place this in a new file named test/helpers.js:
This file is pretty straightforward - it simply uses the bypass login system to authenticate as a user, then it requests a token and returns it. It assumes that all other parts of the authentication process work properly - we can do this because we already have unit tests to check that functionality.
Now, let’s use this in our test/api/v1/roles.js file by adding a few new lines to each test. We’ll start with the simple getAllRoles test:
/**
* @file /api/v1/roles Route Tests
* @author Russell Feldhausen <russfeld@ksu.edu>
*/// Load Libraries
importrequestfrom"supertest";
import { use, should } from"chai";
importAjvfrom"ajv";
importaddFormatsfrom"ajv-formats";
importchaiJsonSchemaAjvfrom"chai-json-schema-ajv";
importchaiShallowDeepEqualfrom"chai-shallow-deep-equal";
// Import Express application
importappfrom"../../../app.js";
// Import Helpers
import { login } from"../../helpers.js"// Configure Chai and AJV
constajv=newAjv();
addFormats(ajv);
use(chaiJsonSchemaAjv.create({ ajv, verbose:true }));
use(chaiShallowDeepEqual);
// Modify Object.prototype for BDD style assertions
should();
/**
* Get all Roles
*/constgetAllRoles= (state) => {
it("should list all roles", (done) => {
request(app)
.get("/api/v1/roles")
.set('Authorization', `Bearer ${state.token}`)
.expect(200)
.end((err, res) => {
if (err) returndone(err);
res.body.should.be.an("array");
res.body.should.have.lengthOf(7);
done();
});
});
};
// -=-=- other code omitted here -=-=-
/**
* Test /api/v1/roles route
*/describe("/api/v1/roles", () => {
describe("GET /", () => {
letstate= {};
beforeEach(async () => {
state.token=awaitlogin("admin");
})
getAllRoles(state);
// -=-=- other code omitted here -=-=-
});
});
To update this test, we have created a new state object that is present in our describe block at the bottom of the test. That state object can store various things we’ll use in our tests, but for now we’ll just use it to store a valid JWT for our application. Then, in a beforeEachMocha hook, we use the login helper we created earlier to log in as the “admin” user and store a valid JWT for that user in the state.token property.
Then, we pass that state object to the getAllRoles test. Inside of that test, we use the state.token property to set an Authorization: Bearer header for our request to the API. If everything works correctly, this test should now pass.
We can make similar updates to the other tests in this file:
This will ensure that each RESTful API action will work properly with an authenticated user, but it doesn’t test whether the user has the proper role to perform the action (in this instance, we are using the admin user which has the appropriate role already). On the next page, we’ll build a very flexible system to perform unit testing on our role-based authorization middleware.
Earlier in this example we created a generator function named roleBasedAuth (stored in middlewares/authorized-roles.js) that returns a middleware function named roleAuthMiddleware that we can use as a middleware in any of our RESTful API endpoints to ensure that only users with specific roles are able to perform each and every action in our API.
When it comes to testing, however, this can quickly become really complex. For example, if we have 15 routes and 6 user roles, we must write 120 tests just to test each combination of route and role in order to truly test this setup.
In addition, if we continue to use our current strategy of integration testing (where each test performs a full action on the API), the tests we write will need to be unique for each endpoint, so even if we simplify things, we’ll still need at least 2 tests per endpoint (one for roles that should have access, and another for roles that should not).
Instead, let’s look at a way we can deconstruct our Express application a bit to test two things directly:
Is the roleAuthMiddleware present on each route?
Does the roleAuthMiddleware function allow the correct roles for each route?
If we can confirm both of these for each route, we can assume that our role-based authorization is implemented correctly.
Express Route Stack
As you may recall, applications written in Express consist of an application that has middlewares and handlers attached in a specific order. In addition, we can create smaller components called routers that each have their own middlewares and handlers attached. Overall, we may end up with a structure similar to this one:
In code, each Express router has a stack variable that contains a list of layers, which can either be middleware functions or actual route handlers. Middleware layers will contain the name of the middleware function, whereas route handlers can be checked using a match function to determine if the handler matches a given path.
So, in our test/helpers.js file, we can write a new helper function to this for our tests:
// -=-=- other code omitted here -=-=-
/**
* Iterate through the router stack of an Express app to find a matching middleware function
* attached to a particular path and/or method
*
* @param {string} name the name of the function to find
* @param {string} path the path of the endpoint
* @param {string} method the HTTP method of the endpoint
* @param {Router} router The Express router to search
* @returns
*/constfindMiddlewareFunction= (name, path, method, router=app._router) => {
// Replace blank paths with the default / path
if (path.length==0) {
path="/" }
for (constlayerofrouter.stack) {
// Return if the middleware function is found
if (layer.name===name) {
returnlayer.handle;
} else {
if (layer.match(path)) {
// Recurse into a router
if (layer.name==="router"&&layer.path.length>0) {
// Remove matching portion of path
path=path.slice(layer.path.length);
returnfindMiddlewareFunction(name, path, method, layer.handle);
}
// Find matching handler
if (layer.route&&layer.route.methods[method]) {
returnfindMiddlewareFunction(name, path, method, layer.route);
}
}
}
}
returnnull;
};
// -=-=- other code omitted here -=-=-
Express 5.0 Updates
Starting with Express version 5.0, app._router has been moved to app.router to make accessing the built-in router easier. This should be updated in the code above if you are running Express 5.0 or later. Changelog
Using that function, we can now write another function to actually test our middleware using some mock objects:
// -=-=- other code omitted here -=-=-
// Import Libraries
importrequestfrom"supertest";
import { expect } from"chai";
importsinonfrom"sinon";
// -=-=- other code omitted here -=-=-
/**
* Test if a role is able to access the route via the roleAuthMiddleware function
*
* @param {string} path the path of the endpoint
* @param {string} method the HTTP method of the endpoint
* @param {string} role the role to search for
* @param {boolean} allowed whether the role should be allowed to access the route
*/exportconsttestRoleBasedAuth= (path, method, role, allowed) => {
it(
"should role '"+role+"' access '"+method+" "+path+"': "+allowed,
(done) => {
// Mock Express Request object with token attached
constreq= {
token: {
username:"test",
roles: [
{
role:role,
},
],
},
};
// Mock Express Response object
constres= {
status:sinon.stub(),
send:sinon.stub(),
};
res.status.returns(res);
// Mock Express Next Middleware function
constnext=sinon.stub();
// Find the middleware function in the router stack for the given path and method
constmiddleware=findMiddlewareFunction(
"roleAuthMiddleware",
path,
method,
);
expect(middleware).to.not.equal(null);
// Call the middleware function
middleware(req, res, next);
if (allowed) {
// If allowed, expect the `next` function to be called
expect(next.calledOnce).to.equal(true);
} else {
// Otherwise, it should send a 401 response
expect(res.status.calledWith(401)).to.equal(true);
}
done();
},
);
};
The comments in the function describe how it works pretty clearly. Most of the code is just setting up barebones mock objects using Sinon for the Express request req, response res, and next middleware function. Once it finds our roleAuthMiddleware function in the router stack using the helper function above, it will call it and observe the response to determine if the user was allowed to access the desired endpoint or not.
The last thing we’ll add to our test/helpers.js file is a helpful list of all of the roles available in the application, which we can use for our testing:
// -=-=- other code omitted here -=-=-
// List of global roles
exportconstall_roles= [
"manage_users",
"manage_documents",
"add_documents",
"manage_communities",
"add_communities",
"view_documents",
"view_communities",
];
With those helpers in place, we can now add a few lines to our test/api/v1/roles.js test file to check whether each and every role can access the endpoint in that router.
// -=-=- other code omitted here -=-=-
// Import Helpers
import { login, testRoleBasedAuth, all_roles } from"../../helpers.js";
// -=-=- other code omitted here -=-=-
/**
* Test /api/v1/roles route
*/describe("/api/v1/roles", () => {
describe("GET /", () => {
// -=-=- other code omitted here -=-=-
constallowed_roles= ["manage_users"];
all_roles.forEach((r) => {
testRoleBasedAuth("/api/v1/roles", "get", r, allowed_roles.includes(r))
})
});
});
This code does a couple of very nifty things. First, we clearly define which roles should be allowed to access the endpoint. This can be done as part of the unit testing file here, or we may have some global file in our test suite that documents each role and route that we can read from.
Below that, we iterate through the list of all roles exported from the test/helpers.js file, and call our testRoleBasedAuth method for each one of those roles. The last argument to that function is a boolean that determines whether the role should be able to access this route. To determine that, we simply see if the role from the list of global roles can also be found in the list of allowed roles. If so, that will be true and the function will check that the role can access the route. If not, it will be false and the function will confirm that the user is unable to access the route.
Now, when we run these tests, we’ll see that each role is explicitly checked:
  /api/v1/roles
    GET /
      ✔ should list all roles
      ✔ all roles should match schema
      ✔ should contain 'manage_users' role
      ✔ should contain 'manage_documents' role
      ✔ should contain 'add_documents' role
      ✔ should contain 'manage_communities' role
      ✔ should contain 'add_communities' role
      ✔ should contain 'view_documents' role
      ✔ should contain 'view_communities' role
      ✔ should role 'manage_users' access 'get /api/v1/roles': true
      ✔ should role 'manage_documents' access 'get /api/v1/roles': false
      ✔ should role 'add_documents' access 'get /api/v1/roles': false
      ✔ should role 'manage_communities' access 'get /api/v1/roles': false
      ✔ should role 'add_communities' access 'get /api/v1/roles': false
      ✔ should role 'view_documents' access 'get /api/v1/roles': false
      ✔ should role 'view_communities' access 'get /api/v1/roles': false
There we go! We now have a very flexible way to test our role-based authorization.
We should also add our role-based authorization middleware to our /api/v1/users routes. This can actually be done really simply, because we only want users with the manage_users role to be able to access any of these routes.
So, instead of attaching the middleware to each handler individually, we can attach it directly to the router before any handlers:
That’s all it takes to add role-based authorization to an entire router! It is really simple.
We also should remember to add the new security section to our Open API documentation comments for each route to ensure that our documentation properly displays that each route requires authentication.
Users API Unit Tests - Authentication
As part of our updates, we need to add authentication to each of our unit tests for the /api/v1/users routes. This is relatively straightforward based on what we did in the previous page - it just requires a few tweaks per test.
In short, we need to add a state variable that we can use that contains a token for a user, and then pass that along to each test. We can do this in the global describe section at the bottom:
Notice that we are able to add that code outside of the describe sections for each API endpoint, greatly simplifying things. Of course, if we need to log in as multiple users, we can either add additional tokens to the state or move the state and beforeEach methods to other locations in the code.
Once we have our state, we can simply pass it on to the tests and update each test to use it correctly by setting an Authorization: Bearer header on each request:
// -=-=- other code omitted here -=-=-
/**
* Get all Users
*/constgetAllUsers= (state) => {
it("should list all users", (done) => {
request(app)
.get("/api/v1/users")
.set("Authorization", `Bearer ${state.token}`)
.expect(200)
.end((err, res) => {
if (err) returndone(err);
res.body.should.be.an("array");
res.body.should.have.lengthOf(4);
done();
});
});
};
// -=-=- other code omitted here -=-=-
/**
* Test /api/v1/users route
*/describe("/api/v1/users", () => {
letstate= {};
beforeEach(async () => {
state.token=awaitlogin("admin");
});
describe("GET /", () => {
getAllUsers(state);
// -=-=- other code omitted here -=-=-
});
// -=-=- other code omitted here -=-=-
});
We won’t exhaustively show each update to these tests here since there are so many. Take the time now to update all of the /api/v1/users unit tests to include authentication before continuing. They should all pass once authentication is enabled.
Users API Unit Tests - Role-Based Authorization
Finally, we should add additional unit tests to ensure that each endpoint in the /api/v1/users router is accessible only by users with the correct role. For that, we can simply add a block of code similar to what we did in the roles routes for each endpoint:
All told, there should now be 88 total unit test in that file alone - that is a lot of tests for just 5 API endpoints!
Now is a great time to lint, format, and then commit and push our work to GitHub.
That concludes the first set of tutorials for building a RESTful API. In the next set of tutorials, we’ll focus on building a Vue.js frontend for our application.