Accessing API
Accessing the API
Finally, let’s see what it takes to actually access data that is available in our RESTful API using a properly authenticated request. For this example, we’re going to create a simple ProfileView page that the user can access by clicking the Profile button available after they’ve logged in. This page is just a test, but it will quickly demonstrate what we can do with our existing setup.
So, let’s start by creating the TestUser component we plan on using on that page. We’ll place it in our src/components/test folder.
<script setup>
/**
 * @file Test User Component
 * @author Russell Feldhausen <russfeld@ksu.edu>
 */

// Import Libraries
import { ref } from 'vue'
import { api } from '@/configs/api'
import { Card, Chip } from 'primevue'

// Create Reactive State
const users = ref([])

// Load Users
api.get('/api/v1/users')
  .then(function(response) {
    users.value = response.data
  })
  .catch(function (error) {
    console.log(error)
  })
</script>

<template>
  <div>
    <Card v-for="user in users" :key="user.id">
      <template #title>Username: {{ user.username }}</template>
      <template #content>
        <Chip v-for="role in user.roles" :label="role.role" :key="role.id" />
      </template>
    </Card>
  </div>
</template>
We should be easily able to compare the contents of this file to the TestApi component we developed earlier. In this case, however, we are using the api instance of Axios we created earlier to load our users. That instance will automatically send along the user’s JWT to authenticate the request. We’re also using the PrimeVue Chip component to list the roles assigned to each user.
Next, we can create our new ProfileView.vue page in our src/views folder with the following content:
<script setup>
import TestUser from '../components/test/TestUser.vue'
</script>

<template>
  <TestUser />
</template>
This is nearly identical to our other views, so nothing is really new here.
Finally, we need to add this page to our Vue Router in src/router/index.js:
/**
 * @file Vue Router for the application
 * @author Russell Feldhausen <russfeld@ksu.edu>
 * @exports router a Vue Router
 */

// Import Libraries
import { createRouter, createWebHistory } from 'vue-router'

// Import Stores
import { useTokenStore } from '@/stores/Token'

// Import Views
import HomeView from '../views/HomeView.vue'

const router = createRouter({
  // Configure History Mode
  history: createWebHistory(import.meta.env.BASE_URL),

  // Configure routes
  routes: [
    {
      path: '/',
      name: 'home',
      component: HomeView,
    },
    {
      path: '/about',
      name: 'about',
      // route level code-splitting
      // this generates a separate chunk (About.[hash].js) for this route
      // which is lazy-loaded when the route is visited.
      component: () => import('../views/AboutView.vue'),
    },
    {
      path: '/profile',
      name: 'profile',
      component: () => import('../views/ProfileView.vue')
    }
  ],
})

// -=-=- other code omitted here -=-=-
Again, adding a route is as simple as giving it a name, a path, and listing the component that should be loaded.
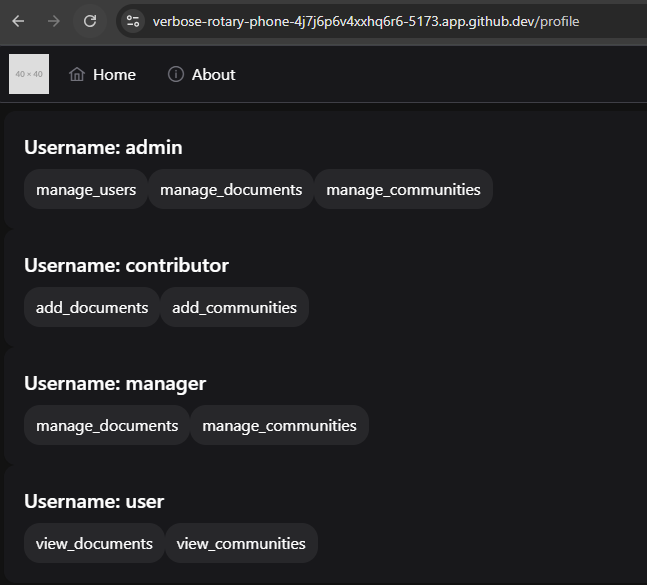
Now, with all of that in place, we should be able to click on the Profile link on the menu under the user’s profile image to access this page:
This is the power of having a really well structured frontend application framework to build upon. Now that we’ve spent all of this time configuring routing, authentication, components, and more, it becomes very straightforward to add new features to our application.
We can even refresh this page and it should reload properly without losing access! As long as we still have a valid cookie from our backend RESTful API server, our application will load, request a token, and then request the data, all seamlessly without any interruptions.
At this point, all that is left is to lint and format our code, then commit and push to GitHub!
