Roles View
Roles View
To start this project, let’s add a new view and a new component to explore the roles available in our application.
First, let’s create a simple component skeleton in a new src/components/roles/ folder. We’ll name it the RolesList component:
<script setup>
/**
 * @file Roles List Component
 * @author Russell Feldhausen <russfeld@ksu.edu>
 */

// Import Libraries
import { ref } from 'vue'
import { api } from '@/configs/api'
import { Card } from 'primevue'

// Create Reactive State
const roles = ref([])

// Load Roles
api
  .get('/api/v1/roles')
  .then(function (response) {
    roles.value = response.data
  })
  .catch(function (error) {
    console.log(error)
  })
</script>

<template>
  <div>
    <Card v-for="role in roles" :key="role.id">
      <template #title>Role: {{ role.role }}</template>
    </Card>
  </div>
</template>
This component should look very familiar - it is based on the TestUser component we developed in the previous tutorial.
Next, we should create a RolesView.vue component in the src/views folder to load that component on a page:
<script setup>
import RolesList from '../components/roles/RolesList.vue'
</script>

<template>
  <RolesList />
</template>
After that, we should add this page to our router:
// -=-=- other code omitted here -=-=-

const router = createRouter({
  // Configure History Mode
  history: createWebHistory(import.meta.env.BASE_URL),

  // Configure routes
  routes: [
    {
      path: '/',
      name: 'home',
      component: HomeView,
    },
    {
      path: '/about',
      name: 'about',
      // route level code-splitting
      // this generates a separate chunk (About.[hash].js) for this route
      // which is lazy-loaded when the route is visited.
      component: () => import('../views/AboutView.vue'),
    },
    {
      path: '/profile',
      name: 'profile',
      component: () => import('../views/ProfileView.vue'),
    },
    {
      path: '/roles',
      name: 'roles',
      component: () => import('../views/RolesView.vue'),
    },
  ],
})

// -=-=- other code omitted here -=-=-
Finally, let’s also add it to our list of menu options in the TopMenu component:
<script setup>
// -=-=- other code omitted here -=-=-

// Declare State
const items = ref([
  {
    label: 'Home',
    icon: 'pi pi-home',
    command: () => {
      router.push({ name: 'home' })
    },
  },
  {
    label: 'About',
    icon: 'pi pi-info-circle',
    command: () => {
      router.push({ name: 'about' })
    },
  },
  {
    label: 'Roles',
    icon: 'pi pi-id-card',
    command: () => {
      router.push({ name: 'roles' })
    },
  },
])
</script>
With those changes in place, we should be able to view the list of available roles in our application by clicking the new Roles link in the top menu bar:
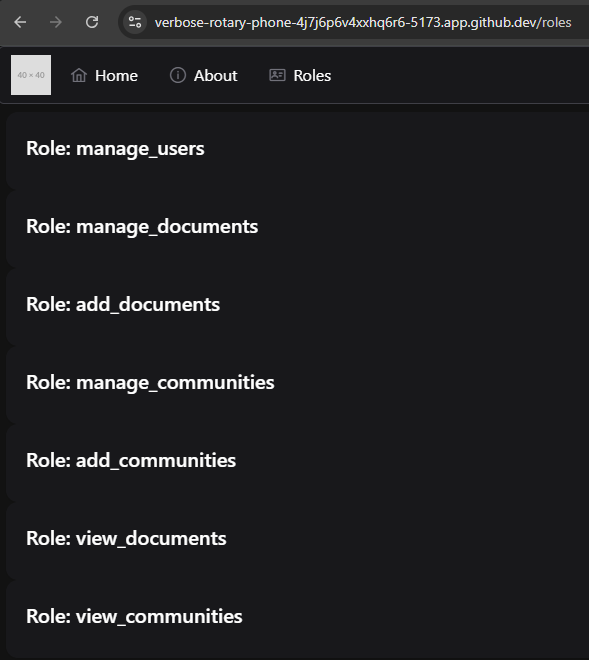
Our application will even redirect users to the CAS server to authenticate if they aren’t already logged in!
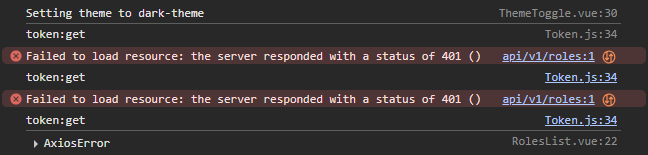
However, what if we log in using the user username instead of admin? Will this page still work? Unfortunately, because the /api/v1/roles API route requires a user to have the manage_users role, it will respond with an HTTP 401 error. We can see these errors in the console of our web browser:
So, we need to add some additional code to our application to make sure that users only see the pages and links the are actually able to access.
Hiding Menu Items
First, let’s explore how we can hide various menu items from our top menu bar based on the roles assigned to our users. To enable this, we can tag each item in the menu that has restricted access with a list of roles that are able to access that page:
<script setup>
// -=-=- other code omitted here -=-=-

// Declare State
const items = ref([
  {
    label: 'Home',
    icon: 'pi pi-home',
    command: () => {
      router.push({ name: 'home' })
    },
  },
  {
    label: 'About',
    icon: 'pi pi-info-circle',
    command: () => {
      router.push({ name: 'about' })
    },
  },
  {
    label: 'Roles',
    icon: 'pi pi-id-card',
    command: () => {
      router.push({ name: 'roles' })
    },
    roles: ['manage_users']
  },
])

// -=-=- other code omitted here -=-=-
</script>
Then, we can create a Vue Computed Property to filter the list of items used in the template:
<script setup>
/**
 * @file Top menu bar of the entire application
 * @author Russell Feldhausen <russfeld@ksu.edu>
 */

// Import Libraries
import { ref, computed } from 'vue'
import { useRouter } from 'vue-router'
const router = useRouter()

// Import Components
import Menubar from 'primevue/menubar'
import ThemeToggle from './ThemeToggle.vue'
import UserProfile from './UserProfile.vue'

// Stores
import { useTokenStore } from '@/stores/Token'
const tokenStore = useTokenStore()

// -=-=- other code omitted here -=-=-

const visible_items = computed(() => {
  return items.value.filter((item) => {
    // If the item lists any roles
    if (item.roles) {
      // Assume the user must be logged in to view it
      if (tokenStore.token.length > 0) {
        // If the roles is a string containing an asterisk
        if (item.roles == "*") {
          // Allow all roles to view
          return true;
        } else {
          // Otherwise, check if any role matches a role the user has
          return item.roles.some((r) => tokenStore.has_role(r))
        }
      } else {
        // If not logged in, hide item
        return false;
      }
    } else {
      // If no roles listed, show item even if not logged in
      return true;
    }
  })
})
</script>
In this function, we are filtering the the menu items based on the roles. If they have a set of roles listed, we check to see if it is an asterisk - if so, all roles are allowed. Otherwise, we assume that it is a list of roles, and check to see if at least one role matches a role that the user has by checking the token store’s has_role getter method. Finally, if no roles are listed, we assume that the item should be visible to users even without logging in.
To use this new computed property, we just replace the items entry in the template with the new computed_items property:
<template>
  <div>
    <Menubar :model="visible_items">
      <template #start>
        <img src="https://placehold.co/40x40" alt="Placeholder Logo" />
      </template>
      <template #end>
        <div class="flex items-center gap-1">
          <ThemeToggle />
          <UserProfile />
        </div>
      </template>
    </Menubar>
  </div>
</template>
That should properly hide menu items from the user based on their roles. Feel free to try it out!
Protecting Routes
Of course, hiding the item from the menu does not prevent the user from manually typing in the route path in the URL and trying to access the page that way. So, we must also add some additional logic to our router to ensure that user’s can’t access. For that, we can add a Per-Route Guard following a very similar approach. In our src/router/index.js file, we can add a new generator function to create a route guard based on roles, and then apply that guard as the beforeEnter property for a route:
// -=-=- other code omitted here -=-=-

/**
 * Router Guard Function to check for role before entering route
 *
 * @param roles a list of roles permitted to enter the route
 * @return boolean true if the navigation is permitted, else returns to the home page
 */
const requireRoles = (...roles) => {
  return () => {
    const tokenStore = useTokenStore()
    const allow = roles.some((r) => tokenStore.has_role(r))
    if (allow) {
      // allow navigation
      return true;
    } else {
      // redirect to home
      return { name: 'home'}
    }
  }
}

const router = createRouter({
  // Configure History Mode
  history: createWebHistory(import.meta.env.BASE_URL),

  // Configure routes
  routes: [
    {
      path: '/',
      name: 'home',
      component: HomeView,
    },
    {
      path: '/about',
      name: 'about',
      // route level code-splitting
      // this generates a separate chunk (About.[hash].js) for this route
      // which is lazy-loaded when the route is visited.
      component: () => import('../views/AboutView.vue'),
    },
    {
      path: '/profile',
      name: 'profile',
      component: () => import('../views/ProfileView.vue'),
    },
    {
      path: '/roles',
      name: 'roles',
      component: () => import('../views/RolesView.vue'),
      beforeEnter: requireRoles("manage_users")
    },
  ],
})

// -=-=- other code omitted here -=-=-
Now, even if we try to type the /roles path into the address bar in our web browser, it won’t allow us to reach that page unless we are logged in to a user account that has the correct role.
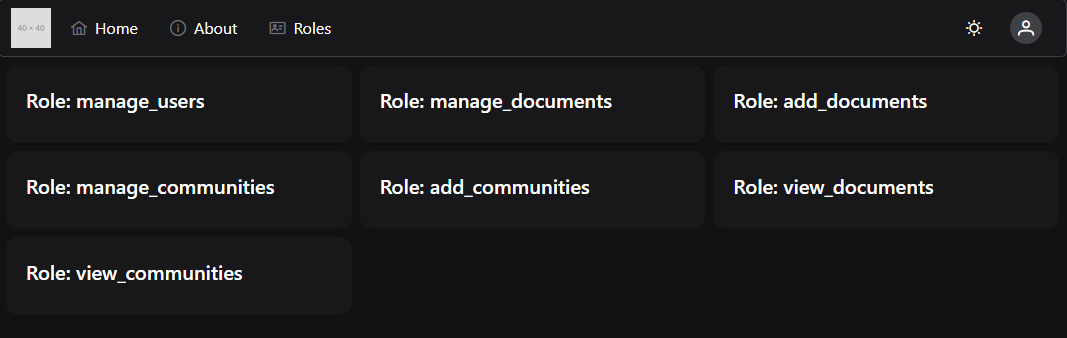
Reactive Style
We can also use Tailwind to add some reactive style to our components. For example, we can use the Grid layout options to place the components in a grid view:
<template>
  <div class="grid grid-cols-1 xl:grid-cols-4 lg:grid-cols-3 sm:grid-cols-2 gap-2">
    <Card v-for="role in roles" :key="role.id">
      <template #title>Role: {{ role.role }}</template>
    </Card>
  </div>
</template>
This will give us a responsive layout that adjusts the number of columns based on the width of the screen: