Pinia
YouTube VideoProps
So far, we’ve mostly been dealing with data in our Vue components in one of two ways:
- It is requested directly from the RESTful API for the component (as in the
UsersListandUserEditcomponents) - It is passed in from a parent component, especially if it is a small helper component (as in the
RoleChipandTextFieldcomponents)
The only exception is the user’s JSON Web Token (JWT), which we have stored in a Pinia store. However, we didn’t spend much time talking about why we stored that token in a Pinia store instead of just making it a global reactive state component and passing that state down the component tree using props.
The concept of passing props down through components, especially between many layers of components, is known as Prop Drilling
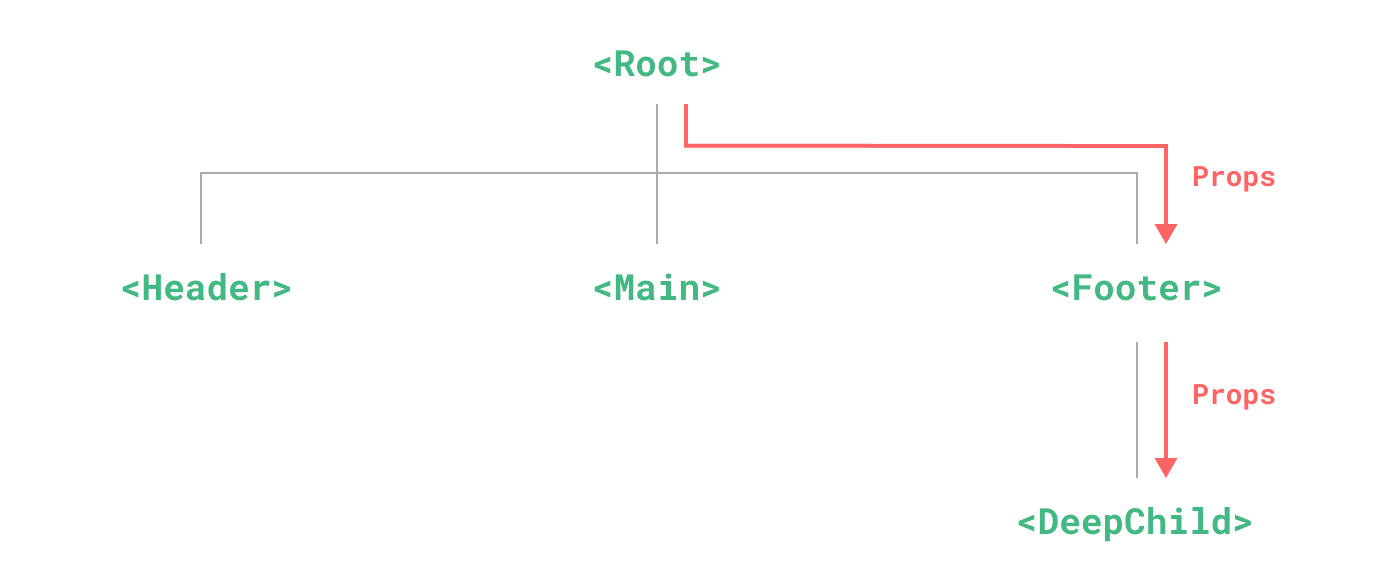
While this method can work well, it can also make an application very complicated with the sheer number of props that must be passed through each component. For example, imagine if each page and component needed access to the user’s JWT to determine which actions to allow (a very real example from the project we are working). In that case, each component may need to be aware of the token as an incoming prop, and may also need to pass it along to any child components that may need it, even if it is three or four layers deep.
Provide / Inject
The Vue framework itself does have a solution to this problem, which is the Provide / Inject interface. In effect, a component can declare a reactive state item and add it to a global dictionary of state items that are available using the provide method along with a unique key for that item, and any other component can receive a reference to that state item using the inject method with the same key.

This is a bit of an improvement, but still has many issues that are discussed in the documentation. For example, it is best to only modify the state at the top-level component that is providing the state, so an additional function may need to be provided to enable proper editing of the state. In addition, for large apps it can be very difficult to ensure that each key is unique, and having hundreds or thousands of keys to keep track of can be a huge burden for programmers.
Pinia
The Pinia library tries to solve all of these issues by providing convenient stores for different types of information in the application. Each store is typically oriented toward a specific type of data (such as users or documents), and it contains all the methods needed to read and modify the state as needed. Then, each component that needs access to the state can simply request a reference to the stores it needs, and everything is nicely compartmentalized and easy to maintain.
To see how this can help simplify our application, let’s look at how we can create a Users store to interface with our RESTful API and maintain a globally-accessible store for data about our users.
Creating a Pinia Store
To create a Pinia store, we can create a new file src/stores/User.js with the following initial content:
/**
 * @file User Store
 * @author Russell Feldhausen <russfeld@ksu.edu>
 */

// Import Libraries
import { ref } from 'vue'
import { defineStore } from 'pinia'
import { api } from '@/configs/api'

// Define Store
export const useUserStore = defineStore('user', () => {
    // State Properties

    // Getters

    // Actions

    // Return all state, getters, and actions
    return { }
})
This is a nice starting structure for a store. At the bare minimum, we use the defineStore method from Pinia to create the store. Inside of that method is a lambda function that actually defines the contents of the store itself, which we’ll iteratively build over time. We’ve also imported a few useful library functions, including our pre-built Axios API interface to make it easy to send requests to our API.
Properties
The first items we should add to our Pinia store are the state properties that we’ll be tracking. These can be anything from simple values all the way up to entire arrays of objects full of data. In most cases, it makes sense to have each Pinia store track data in a format similar to what our application will need. For this example, we’ll use this store to track both the users and roles that are available in our system. So, we’ll need to create two reactive state variables using the ref() function from Vue to store that data as state in our Pinia store:
// -=-=- other code omitted here -=-=-

// Define Store
export const useUserStore = defineStore('user', () => {
  // State Properties
  const users = ref([])
  const roles = ref([])

  // Getters

  // Actions

  // Return all state, getters, and actions
  return { users, roles }
})
Each state property in Pinia is just a reactive state variable from Vue that can be shared across our entire application. So, we’ll just initialize each one to an empty array for now.
Actions - Hydrate
Before we tackle any getters, let’s look at how we can actually get this data from our RESTful API. In many web development frameworks, the process of loading data from the AI is sometimes referred to as Hydration. So, let’s write a method we can use the hydrate these two state variables by making a request to our RESTful API. Most of this code is lifted directly from our existing UsersList component:
// -=-=- other code omitted here -=-=-

// Define Store
export const useUserStore = defineStore('user', () => {
  // -=-=- other code omitted here -=-=-

  // Actions
  /**
   * Load users and roles from the API
   */
  async function hydrate() {
    api
      .get('/api/v1/users')
      .then(function (response) {
          users.value = response.data
      })
      .catch(function (error) {
          console.log(error)
      })

    api
      .get('/api/v1/roles')
      .then(function (response) {
        roles.value = response.data
      })
      .catch(function (error) {
        console.log(error)
      })
  }

  // Return all state, getters, and actions
  return { users, roles, hydrate }

})
As we can see, this function will make two asynchronous requests to the RESTful API to load both the users and roles, and when those requests are resolved it will store the data in the appropriate state variable.
Getters
For this Pinia store, we won’t need any individual getters. Instead, we’ll just use some functions in the component as needed to extract data from the store.
Actions - Save & Delete
Finally, let’s add two more actions to allow us to both save and delete a user through our RESTful API. The code for the save function is mostly taken from our UserEdit component, while the code to delete a user comes from the UserList component, both with minor changes.
// -=-=- other code omitted here -=-=-

// Define Store
export const useUserStore = defineStore('user', () => {
  // -=-=- other code omitted here -=-=-

  // Actions

  // -=-=- other code omitted here -=-=-

  /**
   * Save a user
   */
  async function saveUser(id, user) {
    let method = 'post'
    let url = '/api/v1/users'
    if (id) {
      method = 'put'
      url = url + '/' + id
    }
    return api({
      method: method,
      url: url,
      data: user.value,
    })
      .then(function (response) {
        // rehydrate data
        hydrate()
        return response
      })
      .catch(function (error) {
        console.log("Error saving user!")
        console.log(error)
        throw error
      })
  }

  /**
   * Delete a user
   */
  async function deleteUser(id) {
    return api
      .delete('/api/v1/users/' + id)
      .then(function (response) {
        // rehydrate data
        hydrate()
        return response
      })
      .catch(function (error) {
        console.log("Error deleting user!")
        console.log(error)
        throw error;
      })
  }

  // Return all state, getters, and actions
  return { users, roles, hydrate, saveUser, deleteUser }

})
As we can see in the code above, after each successful API call, we immediately call the hydrate method to update the contents of our users and roles list before passing the response back to the calling method. This ensures that our data is always in sync with the RESTful API backend anytime we make a change. In addition, we are carefully logging any errors we receive here, but we are still throwing the errors back to the calling method so they can be handled there as well.
That is the basic contents of our Users store, which we can use throughout our application.
Using a Store - UsersList
Now, let’s look at how we can use our store in our various components that require data from the Users and Roles APIs. First, we can take a look at our existing UsersList component - there are many lines that we’ll remove or change within the component. Each change is highlighted and described below, with removed lines commented out.
<script>
// -=-=- other code omitted here -=-=-

// Create Reactive State
// const users = ref([])
// const roles = ref([])

// Stores
import { storeToRefs } from 'pinia'
import { useUserStore } from '@/stores/User'
const userStore = useUserStore();
const { users, roles } = storeToRefs(userStore)

// -=-=- other code omitted here -=-=-
</script>
First, we replace the two reactive state variables for users and roles with the same state variables that are extracted from the Pinia store using the storeToRefs() function, which will Destructure the Store and make the variables directly available to our code.
<script>
// -=-=- other code omitted here -=-=-

// Load Users
//api
//  .get('/api/v1/users')
//  .then(function (response) {
//    users.value = response.data
//  })
//  .catch(function (error) {
//    console.log(error)
//  })

// Load Roles
//api
//  .get('/api/v1/roles')
//  .then(function (response) {
//    roles.value = response.data
//  })
//  .catch(function (error) {
//    console.log(error)
//  })

// Hydrate Store
userStore.hydrate()

// -=-=- other code omitted here -=-=-
</script>
Next, we can replace all of the code used to load the users and roles on the page to a simple call to the hydrate method in the store itself.
<script>
// -=-=- other code omitted here -=-=-

// Delete User
const deleteUser = function (id) {
  // api
  //   .delete('/api/v1/users/' + id)
  userStore.deleteUser(id)
    .then(function (response) {
      if (response.status === 200) {
        toast.add({
          severity: 'success',
          summary: 'Success',
          detail: response.data.message,
          life: 5000,
        })
        // Remove that element from the reactive array
        // users.value.splice(
        //   users.value.findIndex((u) => u.id == id),
        //   1,
        // )
      }
    })
    .catch(function (error) {
      toast.add({ severity: 'error', summary: 'Error', detail: error, life: 5000 })
    })
}

// -=-=- other code omitted here -=-=-
</script>
Finally, in the method to delete a user, we can replace the API call with a call to the deleteUser method inside of the Pinia store to handle deleting the user with the selected ID. We can also remove the code that will remove the user from the list, since we no longer need to do that here; instead, the Pinia store will query the updated data from the RESTful API, and the user should no longer be present in that data when it is received.
Those are all of the changes needed to switch the UsersList component to use the store. The template itself remains exactly the same.
Using a Store - UserEdit
We can also update our UserEdit component in a similar way:
<script>
// Import Libraries
import { ref, computed, inject } from 'vue'

// -=-=- other code omitted here -=-=-

// Declare State
// const user = ref({})
// const roles = ref([])
const errors = ref([])

// Stores
import { storeToRefs } from 'pinia'
import { useUserStore } from '@/stores/User'
const userStore = useUserStore();
const { users, roles } = storeToRefs(userStore)

// Find single user or a blank user
const user = computed(() => {
  return (users.value.find((u) => u.id == props.id) || { username: "", roles: [] })
})

// -=-=- other code omitted here -=-=-
</script>
First, we can replace the reactive state variables with the same variables from the Users store. To get a single user, we can create a computed state variable that will find the user in the list that matches the incoming props.id. If a user can’t be found, it will generate a blank User object that can be used to create a new user.
Likewise, we can remove all of the code that loads users and roles and replace that with a hydrate function call in our Pinia store:
<script>
// -=-=- other code omitted here -=-=-

// Load Users
// if (props.id) {
//   api
//     .get('/api/v1/users/' + props.id)
//     .then(function (response) {
//       user.value = response.data
//     })
//     .catch(function (error) {
//       console.log(error)
//     })
// } else {
//   // Empty Value for User Object
//   user.value = {
//     username: '',
//     roles: [],
//   }
// }

// Load Roles
// api
//   .get('/api/v1/roles')
//   .then(function (response) {
//     roles.value = response.data
//   })
//   .catch(function (error) {
//     console.log(error)
//   })

userStore.hydrate()

// -=-=- other code omitted here -=-=-
</script>
Finally, we can replace the call to the api library to save the user with a call to the saveUser method in the UserStore:
<script>
// -=-=- other code omitted here -=-=-

// Save User
const save = function () {
  errors.value = []
  userStore.saveUser(props.id, user)
    .then(function (response) {
      if (response.status === 201) {
        toast.add({
          severity: 'success',
          summary: 'Success',
          detail: response.data.message,
          life: 5000,
        })
        router.push({ name: 'users' })
      }
    })
    .catch(function (error) {
      if (error.status === 422) {
        toast.add({
          severity: 'warn',
          summary: 'Warning',
          detail: error.response.data.error,
          life: 5000,
        })
        errors.value = error.response.data.errors
      } else {
        toast.add({ severity: 'error', summary: 'Error', detail: error, life: 5000 })
      }
    })
}
</script>
With those changes in place, we can also edit our users and create new users.
Using a Store - Roles
Finally, we can update our RolesList to also use the store:
<script setup>
// -=-=- other code omitted here -=-=-

// Stores
import { storeToRefs } from 'pinia'
import { useUserStore } from '@/stores/User'
const userStore = useUserStore();
const { roles } = storeToRefs(userStore)

// Hydrate Store
userStore.hydrate()
</script>
At this point, all API calls to the users and roles endpoints should now be routed through our User Pinia store.
Image Source: Pinia Documentation ↩︎ ↩︎