Preparing for Deployment
YouTube VideoPreparing for Deployment
At this point, we have a pretty well developed application, so let’s start preparing for deployment. Our end goal is to build a single Docker container that contains our application, as well as the ability to deploy it along with a production database like Postgres.
To begin, we need to create a finalized version of our Vue frontend that can be embedded into our backend application directly.
Building in Vue
To create a deployment build of our Vue application, we can simply run the following command in the client folder of our application:
$ npm run buildWhen we run that command, we get lots of output about the different parts of our application that are put together to make the final version. We may also get some warnings about chunks being larger than the cutoff, which we won’t worry about for now.
The final version of our application can be found in a new dist folder inside of our client folder, with a long list of contents:
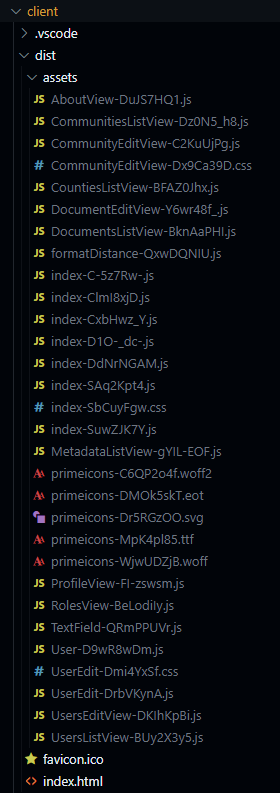
The assets folder contains a large number of items that are all compiled and assembled by the Vite build tool for our application. The key file, however, is the index.html file, which is placed there to serve as the starting point for our application.
Testing the Built Application
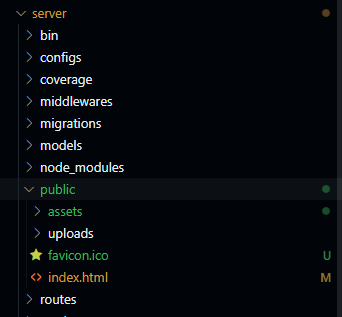
To fully test this application, we can simply copy the entire contents of the client/dist folder into the server/public folder, overwriting the existing index.html file in that location.
In addition, if we’ve changed any of the settings in the .env file to refer to the client in development mode, such as the CAS_SERVICE_URL or OPENAPI_HOST, we’ll need to change those back to using our server port.
Now, all we have to do is run the server in development mode, but we don’t need to start the client at all:
$ npm run devWhen the application loads, we can open our web browser on port 3000 (or whichever port our application is configured to use), and we should be greeted with a working version of our application!
However, we quickly notice that our placeholder image is no longer appearing in our top menu bar. A quick peek at the console in our browser gives us more information:

A bit of online searching can reveal this error - the helmet middleware we are using will prevent images from loading unless they are hosted on our own domain or if they are retrieved from memory using a data: URL. Since we want to allow our placeholder image to load, we can simply update the settings for helmet to allow this in our server/app.js file:
// Use libraries
app.use(express.json());
app.use(express.urlencoded({ extended: false }));
app.use(helmet({
  contentSecurityPolicy: {
    useDefaults: true,
    directives: {
      "img-src": ["'self'", "https:"],
      "connect-src": ["'self'", "blob:"],
    }
  }
}));
app.use(compression());
app.use(cookieParser());
With that change in place, our placeholder image will now load since it is using an https URL. It will also allow us to properly upload files using the blob: URLs.
Another issue we’ll quickly run into is that anytime we refresh our application on any page other than the homepage, we’ll end up with a 404 error message! This is because the server does not know to properly redirect those requests back to the Vue application’s router. We can get around that by installing one more middleware, the connect-history-api-fallback
middleware in our server’s app.js file. We’ll also need to disable the indexRouter since it is no longer needed, and move the static files and this new middleware to after the authentication routes to allow our application to properly redirect to CAS.
$ npm install connect-history-api-fallback// -=-=- other code omitted here -=-=-
// Import libraries
import compression from "compression";
import cookieParser from "cookie-parser";
import express from "express";
import helmet from "helmet";
import path from "path";
import swaggerUi from "swagger-ui-express";
import fs from "node:fs/promises";
import passport from "passport";
import history from "connect-history-api-fallback";
// -=-=- other code omitted here -=-=-
// Use middlewares
app.use(requestLogger);
// Use routers
//app.use("/", indexRouter);
app.use("/api", apiRouter);
// Use sessions
app.use(sessions);
app.use(passport.authenticate("session"));
// Use auth routes
app.use("/auth", authRouter);
// Redirect other requests to Vue application
app.use(history())
// Use static files
app.use(express.static(path.join(import.meta.dirname, "public")));
// -=-=- other code omitted here -=-=-
Now, when we refresh our application on any route that is not recognized by the server, it will direct those requests to the Vue application.
Updating GitIgnore Files
Finally, we should double-check our .gitignore files on both the server and the client to ensure that the built version of our project is not committed to git. In the client/.gitignore file, we already see an entry for dist, so we know that the dist folder and all of its contents will not be committed to git already.
In the server/.gitignore file, we should add a line to ignore the public folder to the bottom of the file. Then, we can use git rm -r --cached public from within the server folder to remove it from our git index before committing.
At this point, we can do one last lint, format, commit, and push before we set up our application for deployment!
Ignoring Files in ESLint
We may run into issues with ESLint trying to clean up our production version of our code if it is stored in the public folder of our server directory. We can ignore it by adding a few lines to the server/eslint.config.js file:
import globals from "globals";
import pluginJs from "@eslint/js";

/** @type {import('eslint').Linter.Config[]} */
export default [
  {
    languageOptions: {
      globals: {
        ...globals.node,
        ...globals.mocha,
      },
    },
    rules: {
      "no-unused-vars": ["error", { argsIgnorePattern: "next" }],
      "no-console": "error",
    },
  },
  {
    ignores: ["public/*"],
  },
  pluginJs.configs.recommended,
];
This will tell ESLint to ignore all files in the public directory.