Docker Compose
YouTube VideoDocker Compose
The last step we can take to make our application easier to deploy is to create a Docker Compose file that shows how to deploy this application easily within a Docker environment. It is becoming more and more popular for self-hosted projects and web applications to include a sample Docker Compose file to show how the application should be deployed in practice. So, let’s look at a quick example for our application.
We’ll place this file at the top-level of our application in a file named compose.yml with the following contents:
services:

  ######################################
  # Lost Communities Solution
  #
  # Repository:
  # https://github.com/cis526-codio/lost-communities-solution
  lostcommunities:

    # Docker Image
    image: ghcr.io/cis526-codio/lost-communities-solution:latest

    # Container Name
    container_name: lostcommunities

    # Restart Container Unless Stopped
    restart: unless-stopped

    # Network Ports
    ports:
      - "3000:3000"

    # Volumes
    volumes:
      - lostcommunities_data:/usr/src/app/data:rw
      - lostcommunities_uploads:/usr/src/app/public/uploads:rw

    # Environment Variables
    environment:
      # =+=+=+= REQUIRED VALUES =+=+=+=
      # These values must be configured for deployment

      # Session Secret Key
      SESSION_SECRET: 'thisisasupersecretkey'
      # JWT Secret Key
      JWT_SECRET_KEY: 'thisisasupersecretkey'
      # Use Node and run `require('crypto').randomBytes(64).toString('hex')` to get a random value

      # CAS Authentication Settings
      # CAS Server URL (send users here to login)
      CAS_URL: 'https://testcas.cs.ksu.edu'
      # CAS Service URL (CAS returns users here; usually where this app is deployed)
      CAS_SERVICE_URL: 'http://localhost:3000'

      # Database File Name
      # Options: ':memory:' to use an in-memory database (not recommended), or any file name otherwise
      DATABASE_FILE: 'data/database.sqlite'

      # Seed initial data on first startup
      SEED_DATA: 'true'

      # =+=+=+= OPTIONAL VALUES =+=+=+=
      # These values are set to reasonable defaults
      # but can be overridden. Default values are shown as comments

      # Log Level
      # Options: error | warn | info | http | verbose | debug | sql | silly
      #LOG_LEVEL: 'http'

      # Network Port
      #PORT: '3000'

      # =+=+=+= OTHER VALUES =+=+=+=
      # These values are not recommended for deployment but are available

      # Custom Session Cookie Name
      #SESSION_NAME: 'connect.sid'

      # Open API Documentation
      # Show OpenAPI Documentation at `/docs` path
      #OPENAPI_VISIBLE: 'false'

      # Open API Host for testing
      #OPENAPI_HOST: 'http://localhost:3000'

      # Export Open API JSON File
      #OPENAPI_EXPORT: 'false

      # Open API Export File Path
      #OPENAPI_EXPORT_PATH: 'openapi.json'

      # Enable Bypass Authentication
      # Use path `/auth/bypass?token=<username>` to log in as any user
      # DO NOT ENABLE IN PRODUCTION - THIS IS INSECURE!
      #BYPASS_AUTH: 'false'

volumes:
  lostcommunities_data:
  lostcommunities_uploads:
Most of this file is pretty straightforward. The one unique bit to point out is the two volume mounts, which connect a Docker volume to both the data and the public/uploads folders of our container. The first folder was created to specifically store our database file, and the second one will store all uploaded files from the users. In our Docker Compose file we are simply storing these in Docker volumes, but an experienced system administrator could change these to link directly to a path on the host system, making it easy to access.
Update the Image Path
Remember to update the image path in the Docker Compose file to match the path where your own Docker image can be found on the GitHub Container Registry - you can find it in your repository by clicking the Package name on the right side of the page.
Using Docker Compose
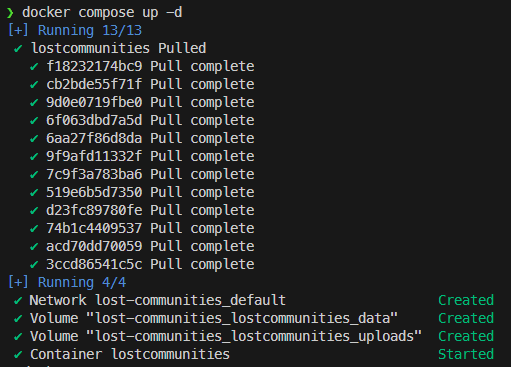
To actually deploy this application, we can simply download a copy of this compose.yml file on any system with Docker installed, and then run the following command to deploy it:
$ docker compose up -dAuthenticating with GitHub Container Registry
Since our Docker image is stored in a private repository on GitHub, we’ll need to authenticate with the GitHub Container Registry. Instructions for doing this with a GitHub Personal Access Token can be found in the GitHub Documentation.
If everything works correctly, we should see our application start in the terminal:
We can test it by going to http://localhost:3000 on our local system, or whatever URL is attached to the deployed container.