Assignment
Warning
This is the assignment page for Lab 1. It is placed before the rest of the module’s content so you may begin working on it as you review the content. Click Next below to continue to the rest of the module.
Lab 1 - Secure Workstations
Instructions
Create two virtual machines meeting the specifications given below. The best way to accomplish this is to treat this assignment like a checklist and check things off as you complete them.
If you have any questions about these items or are unsure what they mean, please contact the instructor. Remember that part of being a system administrator (and a software developer in general) is working within vague specifications to provide what your client is requesting, so eliciting additional information is a very necessary skill.
Note
To be more blunt - this specification may be purposefully designed to be vague, and it is your responsibility to ask questions about any vagaries you find. Once you begin the grading process, you cannot go back and change things, so be sure that your machines meet the expected specification regardless of what is written here. –Russ
Also, to complete many of these items, you may need to refer to additional materials and references not included in this document. System administrators must learn how to make use of available resources, so this is a good first step toward that. Of course, there’s always Google!
Time Expectation
This lab may take anywhere from 1 - 6 hours to complete, depending on your previous experience working with these tools and the speed of the hardware you are using. Installing virtual machines and operating systems is very time-consuming the first time through the process, but it will be much more familiar by the end of this course.
Software
This lab is written with the expectation that most students will be using VMware Workstation or VMware Fusion to complete the assignment. That software is available free of charge on the Broadcom Website ( Download Workstation and Download Fusion ) and is free for personal and academic use, and it is highly recommended for students who are new to working with virtual machines, since most of the assignments in this class are tailored to the use of that platform.
If you are using another virtualization platform, you may have to adapt these instructions to fit. If you are unsure about any specification and how it applies to your setup, please contact the instructor.
You will also need installation media for the following operating systems:
- Windows 11 Version 24H2 or later - Visit the Azure Dev Tools for Teaching page from Microsoft to download this software. See the Azure Dev Tools page on the CS Support Wiki for instructions.
- Look for Windows 11 Education, Version 24H2 on the list of software available on the Azure Dev Tools site.
- File Name:
en-us_windows_11_consumer_editions_version_24h2_x64_dvd_1d5fcad3.iso - SHA 256 Hash:
b56b911bf18a2ceaeb3904d87e7c770bdf92d3099599d61ac2497b91bf190b11 - Your file may vary as Microsoft constantly updates these installers.
- You may choose to upgrade to a later version of Windows 11 if prompted while installing updates, such as 25H1.
- Ubuntu 24.04 LTS (Noble Numbat) or later - Download from Ubuntu, an official Ubuntu Mirror (this is usually the fastest option), or the K-State CS Mirror (this is great if you are on campus).
- File Name:
ubuntu-24.04.3-desktop-amd64.iso - SHA 256 Hash:
faabcf33ae53976d2b8207a001ff32f4e5daae013505ac7188c9ea63988f8328 - If a point release is available (ex: 24.04.4), feel free to us that version. Do not upgrade to a newer LTS or non-LTS release such as Ubuntu 25.04, as those versions may have significant changes that are not covered in these assignments.
- File Name:
Prior Versions
The original course materials were developed for Windows 10 Version 1803 and Ubuntu 18.04 LTS. Some course materials may still show the older versions. Students should use the software versions listed in bold above if at all possible, as these assignments have been verified using those versions. If not, please contact the instructor for alternative options. If you find any errors or issues using the updated versions of these systems, please contact the instructor.
Task 0: Install Virtualization Software
Install the virtualization software platform of your choice. It must support using Windows 11 and Ubuntu 24.04 as a guest OS. In general, you’ll need the latest version of the software.
VMware Workstation or VMware Fusion is recommended and available free of charge on the VMware Website and is free for personal and academic use. Download Workstation or Fusion Here
You may need to install the latest version available for download and then update it within the software to get to the absolute latest version that supports the latest guest OS versions.
VMWare Licenses
VMWare licenses are now free for personal and academic uses starting in 2024. You should be able to download the latest version and install it without a product key. - Russ
Task 1: Create a Windows 11 Virtual Machine
Create a new virtual machine for Windows 11. It should have 60 GB of storage available. If given the option, do not pre-allocate the storage, but do allow it to be separated into multiple files. This will make the VM easier to work with down the road. It should also have at least 2 GB of RAM. You may allocate more RAM if desired. You may also allocate additional CPU cores for better performance if desired.
Install Windows 11 in that virtual machine to a single partition. You may use the express settings when configuring Windows. Do not use a Microsoft account to sign in! Instead, create a local (non-Microsoft) account as defined below. You may also be asked to set the computer name, which is given below.
Note
Windows 11 has made it even more difficult to create a local account when installing. A video in this chapter discusses the process for Windows 10, but an extra step is now needed for Windows 11. Refer to this guide from Tom’s Hardware. Notice on that page that the command used in step 3 is OOBE\BYPASSNRO (without a space).
Windows 11 may also require 4 GB of RAM allocated to install. I believe that once you’ve installed Windows 11 you can reduce the RAM allocated in VMWare to 2 GB and it should work well.
Task 2: Configure Windows 11
Configure the Windows 11 Virtual Machine as specified below.
Computer Name:
cis527w-<your eID>(example:cis527w-russfeld)Don’t Forget To Set Computer Name!
This is very important, as it allows us to track your virtual machine on the K-State network in case something goes wrong in a later lab. By including both the class and your eID, support staff will know who to contact. A majority of students have missed this step in previous semesters, so don’t forget! The computer name must be changed after the Windows installation is complete –Russ
Primary User Account:
- Username:
cis527| Password:cis527_windows - It should be a member of Administrators & Users groups
- Username:
Other User Accounts:
AdminAccount|AdminPassword123(Administrators & Users group)NormalAccount|NormalPassword123(Users group)GuestAccount|GuestPassword123(Guests group only)EvilAccount|EvilPassword123(Users group)
Install Software
- VMware Tools
- Mozilla Firefox
- Mozilla Thunderbird
- IIS Web Server
- Notepad++
- BGInfo
- Download the Bginfo.exe file and place it on the cis527 user’s desktop. It does not have an installation program. Run it once to see what it does!
- Verify Windows Defender is running. It should be installed by default.
Configure Firewall
- Make sure Windows Firewall is enabled
- Allow all incoming connections to port 80 (for IIS)
Tip
You can test this by accessing the Windows VM IP Address from Firefox running on your Ubuntu VM, provided they are on the same virtual network.
Install Windows Updates: Run Windows Update and reboot as necessary until all available updates are installed.
Multiple Updates Required!
Even though you may have installed a particular version of Windows, such as 24H2, you should run updates repeatedly until there are no more updates available. You may end up installing at least one major update rollup. Keep going until you are sure there are no more updates to be found.
Automatic Updates: Make sure the system is set to download and install security updates automatically.
Task 3: Windows Files & Permissions
Warning
Read the whole task before you start! You have been warned. –Russ
Create the folder
C:\cis527. It should be owned by thecis527account, but make sure all other users can read and write to that folder.Within
C:\cis527, create a folder for each user created during task 2 except forcis527, with the folder name matching the user’s name. Make sure that each folder is owned by the user of the same name, and that that user has full permissions to its namesake folder.- For example, user
AdminAccountshould have a folderC:\cis527\AdminAccountand have full ownership and permissions on that folder.
- For example, user
Create a group named
AdminGroupcontainingcis527andAdminAccount, and set permissions onC:\cis527for that group to have full access to each folder created inC:\cis527.- In this example, the folder
AdminAccountshould still be owned byAdminAccountand that account should have explicit full access, but theAdminGroupgroup should also have full access to that folder. - No other user should be able to access any other user’s folder. For example,
EvilAccountcannot accessGuestAccount’s folder, butAdminAccountandcis527can, as well asGuestAccount, who is also the owner of its own folder.Tip
When you create a group and add a user to that group, it does not take effect until you reboot the computer.
- In this example, the folder
In each subfolder of
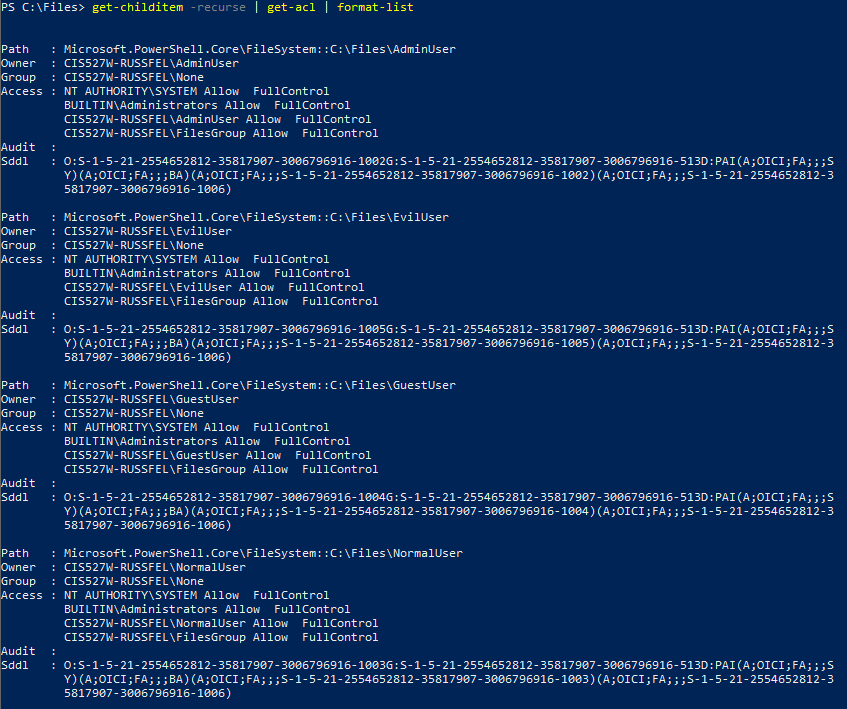
C:\cis527, create a text file. It should have the same owner and access permissions as the folder it is contained in. The name and contents of the text file are up to you.Tip
Use either the
cis527orAdminAccountaccount to create these files, then modify the owner and permissions as needed. Verify that they can only be accessed by the correct users by logging in as each user and seeing what can and can’t be accessed by that user, or by using the permissions auditing tab. Many students neglect this step, leaving the file owner incorrect.Don’t remove the SYSTEM account or the built-in Administrator account’s access from any of these files. Usually this is as simple as not modifying their permissions from the defaults.
See this screenshot and this screenshot for what these permissions should look like in PowerShell. This was created using the command
Get-ChildItem -Recurse | Get-Acl | Format-Listin PowerShell. These screenshots are from an earlier version of this lab using different paths and usernames, but the permissions structure is the same.
Task 4: Create an Ubuntu 24.04 Virtual Machine
Create a new virtual machine for Ubuntu 24.04 Desktop. It should have 30 GB of storage available. If given the option, do not pre-allocate the storage, but do allow it to be separated into multiple files. This will make the VM easier to work with down the road. It should also have at least 2 GB of RAM. You may allocate more RAM if desired. You may also allocate additional CPU cores for better performance if desired.
Note
Ubuntu 24.04 seems to be really RAM hungry right now, so I recommend starting with 2 GB of RAM if you have 8 GB or more available on your system. The installer may freeze if you try to install with only 1 GB of RAM allocated. Once you have it installed, you may be able to reduce this at the expense of some performance if you are short on available RAM (as it will use swap space instead). In Ubuntu, swap should be enabled by default after you install it, but you can learn more about it and how to configure it here. When we get to Module 5 and discuss Ubuntu in the cloud, we’ll come back to this and discuss the performance trade-offs in that scenario. –Russ
Install Ubuntu 24.04 Desktop in that virtual machine to a single partition. You may choose to use a minimal install when prompted. You will be asked to create a user account and set the computer name. Use the information given below.
Tip
The Ubuntu installation will sometimes hang when rebooting after installation in a VM. If that happens, wait about 30 seconds, then click VM > Power > Restart Guest in VMware (or similar) to force a restart. It should not harm the VM.
Task 5: Configure Ubuntu 24.04
Configure the Ubuntu 24.04 Virtual Machine as specified below.
Computer Name:
cis527u-<your eID>(example:cis527u-russfeld)Don’t Forget To Set Computer Name!
This is very important, as it allows us to track your virtual machine on the K-State network in case something goes wrong in a later lab. By including both the class and your eID, support staff will know who to contact. A majority of students have missed this step in previous semesters, so don’t forget! You should be prompted for a computer name as part of the installation process, but it will try to auto-complete it based on the chosen username and must be changed. –Russ
Primary User Account:
- Username:
cis527| Password:cis527_linux - The account should have Administrator type or be in the
sudogroup
- Username:
Other User Accounts:
adminaccount|AdminPassword123(Administrator type orsudogroup)normalaccount|NormalPassword123(Normal type)guestaccount|GuestPassword123(Normal type)evilaccount|EvilPassword123(Normal type)
Install Software
- Open VM Tools (
open-vm-tools-desktop) (recommended) -OR- VMware Tools (do not install both) - Mozilla Firefox (
firefox) - Mozilla Thunderbird (
thunderbird) - Apache Web Server (
apache2) - Synaptic Package Manager (
synaptic) - GUFW Firewall Management Utility (
gufw) - ClamAV (
clamav)
- Open VM Tools (
Configure Firewall
- Make sure Ubuntu Firewall (use
ufw, notiptables) is enabled - Allow all incoming connections to port 80 (for Apache)
Tip
You can test this by accessing the Ubuntu VM IP Address from Firefox on your Windows VM, provided they are on the same virtual network.
- Make sure Ubuntu Firewall (use
Install Updates: Run system updates and reboot as necessary until all available updates are installed.
Automatic Updates: Configure the system to download and install security updates automatically each day.
Task 6: Ubuntu Files & Permissions
Warning
Read the whole task before you start! You have been warned. –Russ
Create a folder
/cis527(at the root of the system, not in a user’s home folder). Any user may read or write to this folder, and it should be owned byroot:root(user:root; group:root).Within
/cis527, create a folder for each user created during task 5 except forcis527, with the folder name matching the user’s name. Make sure that each folder is owned by the user of the same name, and that that user has full permissions to its namesake folder.- For example, user
adminaccountshould have a folder/cis527/adminaccountand have full ownership and permissions on that folder.
- For example, user
Create a group named
admingroupand set permissions on each folder using that group to allow bothcis527andadminaccountto have full access to each folder created in/cis527.- In this example, the folder
adminaccountshould still be owned byadminaccountand that account should have explicit full access, but theadmingroupgroup should also have full access to that folder. - No other user should be able to access any other user’s folder. For example,
evilaccountcannot accessguestaccount’s folder, butadminaccountandcis527can, as well asguestaccount, who is also the owner of its own folder.Tip
When you create a group and add a user to that group, it does not take effect until you reboot the computer.
- In this example, the folder
In each subfolder of
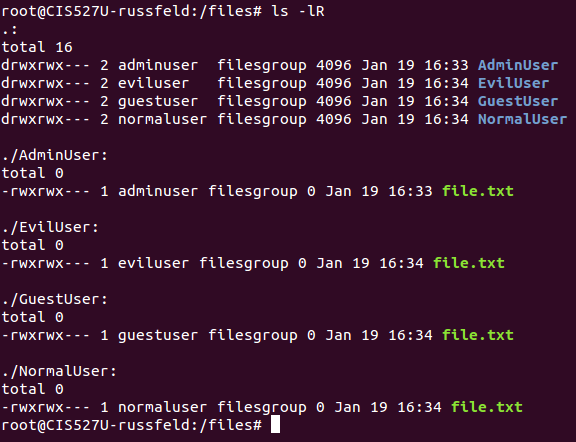
/cis527, create a text file. It should have the same owner and access permissions as the folder it is contained in. The name and contents of the text file are up to you.Tip
Use either the
cis527oradminaccountaccount to create these files, then modify the owner, group, and permissions as needed. Verify that they can only be accessed by the correct users by logging in as each user and seeing what can and can’t be accessed by that user, or by using thesucommand to become that user in the terminal. Many students neglect this step, leaving the file owner incorrect.See this screenshot for what these permissions may look like in Terminal. This was created using the command
ls -lRin the Linux terminal. These screenshots are from an earlier version of this lab using different paths and usernames, but the permissions structure is the same.
Task 7: Make Snapshots
For each of the virtual machines created above, create a snapshot labelled Lab 1 Submit in your virtualization software before you submit the assignment. The grading process may require making changes to the VMs, so this gives you a restore point before grading starts.
Task 8: Schedule A Grading Time
Contact the instructor and schedule a time for interactive grading. You may continue with the next module once grading has been completed.