Secure Workstations
Creating secure workstations for an enterprise.
Creating secure workstations for an enterprise.
Welcome to the first module in this class! Module 1 is all about creating secure workstations. In this module, you’ll learn how to install virtual machine software, install the operating systems we’ll be using in the class, and then configure several aspects of the operating systems. You’ll create users, manage file permissions, install software, and secure those systems.
Before we begin, here is a short overview of one major concept in this module - the operating system. Every computer you use has some sort of operating system installed, even if you don’t realize it. For this module, we’ll be using the two most commonly used operating systems in industry today, Microsoft Windows 10 and Ubuntu Linux. I’m guessing that most of you have used at least one of these systems before, and in fact many of you are probably using one of them now.
Operating systems make up the core of a modern computer. This diagram shows exactly where the operating system fits in a larger hierarchy. A computer consists of hardware, and the operating system is the program that runs directly on the hardware. It is responsible for interfacing with the hardware, and running the applications needed by the user. On the very first computers, each application was itself an operating system. This allowed the programs to directly interface with the hardware, but the major drawback was that only one program could run at a time, and the computer had to be restarted between each program. In addition, each program would need to be customized to match the hardware it was running on.
By using an operating system, applications can be much more generalized, and multiple applications can be running at the same time. Meanwhile, hardware can be changed, sometimes even while the computer is running, and the operating system will manage the necessary interfaces to use that hardware. It is a very efficient system.
The major part of the operating system is called the kernel. It is the part specifically responsible for creating the interface between user applications and the hardware on the system. In fact, most of what you may consider an operating system is in fact applications running on the kernel. The start menu, control panel, and registry are actually applications in Windows. Because of this, there is some disagreement over whether they are considered part of the operating system or not. The same discussion has been going on for years in the Linux community. See the resources section for links to the discussion of GNU vs. Linux.
For this course, anything referring to the kernel or programs typically bundled along with the kernel will be considered the operating system. This follows the typical convention in most system administrator resources online.
If you are interested in learning about how operating system are built and how the kernel functions, consider taking CIS 520: Operating Systems.
Next, we’ll start discussing Windows 10 and Ubuntu Linux in detail.
This is the assignment page for Lab 1. It is placed before the rest of the module’s content so you may begin working on it as you review the content. Click Next below to continue to the rest of the module.
Create two virtual machines meeting the specifications given below. The best way to accomplish this is to treat this assignment like a checklist and check things off as you complete them.
If you have any questions about these items or are unsure what they mean, please contact the instructor. Remember that part of being a system administrator (and a software developer in general) is working within vague specifications to provide what your client is requesting, so eliciting additional information is a very necessary skill.
To be more blunt - this specification may be purposefully designed to be vague, and it is your responsibility to ask questions about any vagaries you find. Once you begin the grading process, you cannot go back and change things, so be sure that your machines meet the expected specification regardless of what is written here. –Russ
Also, to complete many of these items, you may need to refer to additional materials and references not included in this document. System administrators must learn how to make use of available resources, so this is a good first step toward that. Of course, there’s always Google!
This lab may take anywhere from 1 - 6 hours to complete, depending on your previous experience working with these tools and the speed of the hardware you are using. Installing virtual machines and operating systems is very time-consuming the first time through the process, but it will be much more familiar by the end of this course.
This lab is written with the expectation that most students will be using VMware Workstation or VMware Fusion to complete the assignment. That software is available free of charge on the Broadcom Website ( Download Workstation and Download Fusion ) and is free for personal and academic use, and it is highly recommended for students who are new to working with virtual machines, since most of the assignments in this class are tailored to the use of that platform.
If you are using another virtualization platform, you may have to adapt these instructions to fit. If you are unsure about any specification and how it applies to your setup, please contact the instructor.
You will also need installation media for the following operating systems:
en-us_windows_11_consumer_editions_version_24h2_x64_dvd_1d5fcad3.isob56b911bf18a2ceaeb3904d87e7c770bdf92d3099599d61ac2497b91bf190b11ubuntu-24.04.3-desktop-amd64.isofaabcf33ae53976d2b8207a001ff32f4e5daae013505ac7188c9ea63988f8328The original course materials were developed for Windows 10 Version 1803 and Ubuntu 18.04 LTS. Some course materials may still show the older versions. Students should use the software versions listed in bold above if at all possible, as these assignments have been verified using those versions. If not, please contact the instructor for alternative options. If you find any errors or issues using the updated versions of these systems, please contact the instructor.
Install the virtualization software platform of your choice. It must support using Windows 11 and Ubuntu 24.04 as a guest OS. In general, you’ll need the latest version of the software.
VMware Workstation or VMware Fusion is recommended and available free of charge on the VMware Website and is free for personal and academic use. Download Workstation or Fusion Here
You may need to install the latest version available for download and then update it within the software to get to the absolute latest version that supports the latest guest OS versions.
VMWare licenses are now free for personal and academic uses starting in 2024. You should be able to download the latest version and install it without a product key. - Russ
Create a new virtual machine for Windows 11. It should have 60 GB of storage available. If given the option, do not pre-allocate the storage, but do allow it to be separated into multiple files. This will make the VM easier to work with down the road. It should also have at least 2 GB of RAM. You may allocate more RAM if desired. You may also allocate additional CPU cores for better performance if desired.
Install Windows 11 in that virtual machine to a single partition. You may use the express settings when configuring Windows. Do not use a Microsoft account to sign in! Instead, create a local (non-Microsoft) account as defined below. You may also be asked to set the computer name, which is given below.
Windows 11 has made it even more difficult to create a local account when installing. A video in this chapter discusses the process for Windows 10, but an extra step is now needed for Windows 11. Refer to this guide from Tom’s Hardware. Notice on that page that the command used in step 3 is OOBE\BYPASSNRO (without a space).
Windows 11 may also require 4 GB of RAM allocated to install. I believe that once you’ve installed Windows 11 you can reduce the RAM allocated in VMWare to 2 GB and it should work well.
Configure the Windows 11 Virtual Machine as specified below.
Computer Name: This is very important, as it allows us to track your virtual machine on the K-State network in case something goes wrong in a later lab. By including both the class and your eID, support staff will know who to contact. A majority of students have missed this step in previous semesters, so don’t forget! The computer name must be changed after the Windows installation is complete –Russcis527w-<your eID> (example: cis527w-russfeld)
Don’t Forget To Set Computer Name!
Primary User Account:
cis527 | Password: cis527_windowsOther User Accounts:
AdminAccount | AdminPassword123 (Administrators & Users group)NormalAccount | NormalPassword123 (Users group)GuestAccount | GuestPassword123 (Guests group only)EvilAccount | EvilPassword123 (Users group)Install Software
Configure Firewall
You can test this by accessing the Windows VM IP Address from Firefox running on your Ubuntu VM, provided they are on the same virtual network.
Install Windows Updates: Run Windows Update and reboot as necessary until all available updates are installed. Even though you may have installed a particular version of Windows, such as 24H2, you should run updates repeatedly until there are no more updates available. You may end up installing at least one major update rollup. Keep going until you are sure there are no more updates to be found.
Multiple Updates Required!
Automatic Updates: Make sure the system is set to download and install security updates automatically.
Read the whole task before you start! You have been warned. –Russ
Create the folder C:\cis527. It should be owned by the cis527 account, but make sure all other users can read and write to that folder.
Within C:\cis527, create a folder for each user created during task 2 except for cis527, with the folder name matching the user’s name. Make sure that each folder is owned by the user of the same name, and that that user has full permissions to its namesake folder.
AdminAccount should have a folder C:\cis527\AdminAccount and have full ownership and permissions on that folder.Create a group named AdminGroup containing cis527 and AdminAccount, and set permissions on C:\cis527 for that group to have full access to each folder created in C:\cis527.
AdminAccount should still be owned by AdminAccount and that account should have explicit full access, but the AdminGroup group should also have full access to that folder.EvilAccount cannot access GuestAccount’s folder, but AdminAccount and cis527 can, as well as GuestAccount, who is also the owner of its own folder.When you create a group and add a user to that group, it does not take effect until you reboot the computer.
In each subfolder of Use either the C:\cis527, create a text file. It should have the same owner and access permissions as the folder it is contained in. The name and contents of the text file are up to you.
Tip
cis527 or AdminAccount account to create these files, then modify the owner and permissions as needed. Verify that they can only be accessed by the correct users by logging in as each user and seeing what can and can’t be accessed by that user, or by using the permissions auditing tab. Many students neglect this step, leaving the file owner incorrect.
Don’t remove the SYSTEM account or the built-in Administrator account’s access from any of these files. Usually this is as simple as not modifying their permissions from the defaults.
See this screenshot and this screenshot for what these permissions should look like in PowerShell. This was created using the command Get-ChildItem -Recurse | Get-Acl | Format-List in PowerShell. These screenshots are from an earlier version of this lab using different paths and usernames, but the permissions structure is the same.
Create a new virtual machine for Ubuntu 24.04 Desktop. It should have 30 GB of storage available. If given the option, do not pre-allocate the storage, but do allow it to be separated into multiple files. This will make the VM easier to work with down the road. It should also have at least 2 GB of RAM. You may allocate more RAM if desired. You may also allocate additional CPU cores for better performance if desired.
Ubuntu 24.04 seems to be really RAM hungry right now, so I recommend starting with 2 GB of RAM if you have 8 GB or more available on your system. The installer may freeze if you try to install with only 1 GB of RAM allocated. Once you have it installed, you may be able to reduce this at the expense of some performance if you are short on available RAM (as it will use swap space instead). In Ubuntu, swap should be enabled by default after you install it, but you can learn more about it and how to configure it here. When we get to Module 5 and discuss Ubuntu in the cloud, we’ll come back to this and discuss the performance trade-offs in that scenario. –Russ
Install Ubuntu 24.04 Desktop in that virtual machine to a single partition. You may choose to use a minimal install when prompted. You will be asked to create a user account and set the computer name. Use the information given below.
The Ubuntu installation will sometimes hang when rebooting after installation in a VM. If that happens, wait about 30 seconds, then click VM > Power > Restart Guest in VMware (or similar) to force a restart. It should not harm the VM.
Configure the Ubuntu 24.04 Virtual Machine as specified below.
Computer Name: This is very important, as it allows us to track your virtual machine on the K-State network in case something goes wrong in a later lab. By including both the class and your eID, support staff will know who to contact. A majority of students have missed this step in previous semesters, so don’t forget! You should be prompted for a computer name as part of the installation process, but it will try to auto-complete it based on the chosen username and must be changed. –Russcis527u-<your eID> (example: cis527u-russfeld)
Don’t Forget To Set Computer Name!
Primary User Account:
cis527 | Password: cis527_linuxsudo groupOther User Accounts:
adminaccount | AdminPassword123 (Administrator type or sudo group)normalaccount | NormalPassword123 (Normal type)guestaccount | GuestPassword123 (Normal type)evilaccount | EvilPassword123 (Normal type)Install Software
open-vm-tools-desktop) (recommended) -OR- VMware Tools (do not install both)firefox)thunderbird)apache2)synaptic)gufw)clamav)Configure Firewall
ufw, not iptables) is enabledYou can test this by accessing the Ubuntu VM IP Address from Firefox on your Windows VM, provided they are on the same virtual network.
Install Updates: Run system updates and reboot as necessary until all available updates are installed.
Automatic Updates: Configure the system to download and install security updates automatically each day.
Read the whole task before you start! You have been warned. –Russ
Create a folder /cis527 (at the root of the system, not in a user’s home folder). Any user may read or write to this folder, and it should be owned by root:root (user: root; group: root).
Within /cis527, create a folder for each user created during task 5 except for cis527, with the folder name matching the user’s name. Make sure that each folder is owned by the user of the same name, and that that user has full permissions to its namesake folder.
adminaccount should have a folder /cis527/adminaccount and have full ownership and permissions on that folder.Create a group named admingroup and set permissions on each folder using that group to allow both cis527 and adminaccount to have full access to each folder created in /cis527.
adminaccount should still be owned by adminaccount and that account should have explicit full access, but the admingroup group should also have full access to that folder.evilaccount cannot access guestaccount’s folder, but adminaccount and cis527 can, as well as guestaccount, who is also the owner of its own folder.When you create a group and add a user to that group, it does not take effect until you reboot the computer.
In each subfolder of Use either the /cis527, create a text file. It should have the same owner and access permissions as the folder it is contained in. The name and contents of the text file are up to you.
Tip
cis527 or adminaccount account to create these files, then modify the owner, group, and permissions as needed. Verify that they can only be accessed by the correct users by logging in as each user and seeing what can and can’t be accessed by that user, or by using the su command to become that user in the terminal. Many students neglect this step, leaving the file owner incorrect.
See this screenshot for what these permissions may look like in Terminal. This was created using the command ls -lR in the Linux terminal. These screenshots are from an earlier version of this lab using different paths and usernames, but the permissions structure is the same.
For each of the virtual machines created above, create a snapshot labelled Lab 1 Submit in your virtualization software before you submit the assignment. The grading process may require making changes to the VMs, so this gives you a restore point before grading starts.
Contact the instructor and schedule a time for interactive grading. You may continue with the next module once grading has been completed.
As of 2024, VMWare Workstation and VMWare Fusion are free for personal and academic use. You can download them directly from the VMWare website.
In this class, we will be making heavy use of virtualization software to allow us to run multiple operating systems simultaneously on the same computer. This video provides a quick overview of what virtualization is and how it works.
First, a simple view of how a computer works. In essence, whenever you tell the computer to run a program, you are actually telling the operating system what to do. It will then load the requested application software into memory, and begin executing it. The software will send instructions through the operating system to the hardware, describing what actions to take. The hardware will then use electronic circuits to perform those operations.
This diagram shows that a computer would look like without virtualization. This describes how most computers work today, and it has been this way for over 30 years.
Recently, however, virtualization has become much more commonplace. In fact, you may be using some forms of virtualization right now, and not even realize it. In essence, virtualization software emulates some part of a computer system, typically the hardware. By doing so, it allows the hardware to run multiple different operating systems at the same time. Also, it prevents the different operating systems from conflicting with each other.
As an added bonus, by using virtualization, it becomes much easier to migrate operating systems across different hardware setups. Instead of having to reinstall and reconfigure the operating system on the new hardware, simply install the virtualization platform, and copy the virtual machine as if it were any other file.
In essence, virtualization adds one more layer of abstraction between the kernel and the hardware, allowing it to be much more portable and configurable than in a traditional setup. This diagram gives an overview of what that would look like.
Of course, there are many different types of virtualization out there. In this class, we’ll be primarily working with hosted virtualization, which involves installing virtualization software within a “host” operating system. You can also install virtualization software directly on the hardware, which is called bare-metal or hypervisor virtualization.
Beyond that, you can choose to virtualize more than just the hardware. Parts of the operating system itself can be virtualized, leading to the concept of containers, such as those employed by Docker. You can also virtualize parts of individual applications to make them more secure. This is commonly called sandboxing, and many mobile operating systems and browsers today already employ sandboxing between the apps and pages they work with.
This diagram shows what hosted virtualization looks like. You’ll notice that there is a host operating system installed on the hardware itself, and the virtualization layer is installed on top of that.
Compare that to bare-metal virtualization, where the virtualization layer is installed directly on top of the hardware. This is especially powerful, since the system doesn’t have to devote any resources to running the host operating system if it won’t be directly used.
This diagram gives a good overview of containers. In this case, the docker engine acts as the virtualization layer. Inside the containers, instead of having a full operating system, you simply have libraries and applications. They all share the same kernel, provided by the host operating system, though they can have different configurations within each container. It is a very powerful way to deploy applications on cloud servers.
Finally, this diagram gives a quick look at sandboxing. By virtualizing the parts of the system that an application interacts with, you can prevent it from performing malicious actions and interfering with other parts of the system.
To quote Men in Black, the “old & busted” way of doing things involved installing a single operating system per server, and then a single application on that server. This resulted in organizations managing large numbers of physical servers. In addition, most servers were only running at 5% capacity, so the resources were very inefficiently used. Finally, it was a management nightmare, and the only way to add more redundancy to the system was to buy more servers, compounding the problem.
Compare that to the “new hotness” of today, where we can use virtualization to install many operating systems on a single physical server, with each one dedicated to a single application. That results in fewer physical servers, more efficient use of resources, and much simpler redundancy. However, it is up for debate if that truly made management easier, or if it just shifted the management chore from installing and configuring individual systems to installing and configuring deployment and automation tools.
For this course, we’ll be primarily working with hosted virtualization using VMware Workstation. If you are using an Apple computer, you’ll be using VMware Fusion, which is very similar. I highly recommend using this software, as all of the materials in this class have been tested on it, and I am very familiar with it in case you need help. It is available to all K-State CS students for free. A link to the instructions for finding that software is in the resources section below.
However, you may choose to use a different virtualization software package to meet your needs. The only thing to keep in mind is that I can make no guarantees that it will work, and if you run into major issues that we cannot fix, you may be asked to continue working on the labs in this class using VMware products instead. Here is a list of a few other software packages that could be used instead of VMware Workstation or fusion.
Again, if you do not have access to a computer with sufficient resources to install and use VMware, please contact me so we can make other arrangements.
Finally, beyond just virtualization software, there are many cloud providers that will host virtual machines for you. We’ll deal with these more starting in module 5. This list gives a few of the more popular ones out there.
In addition, many cloud providers offer more than just virtual machines, such as containers and application hosting. Again, we’ll discuss these more starting in module 5, but here are a few you may have heard of.
At this point, you should be ready to complete the first task of Lab 1, which is to install Virtualization Software. Make sure you install the proper version, as listed on the Lab 1 Assignment page. If you have any questions, please use the discussion boards to ask your fellow classmates or contact me.
Working with user accounts and groups is one of the key tasks within system administration. Before we get to working directly within a system, here is some background information about users and groups to help you understand why they are so important.
Early computers did not have any concept of user accounts. If you had physical access to a machine and knew how to use it, you could. As computers became more powerful, the concept of time-sharing became increasingly important. While one user was reviewing outputs or rewriting code, another user could use the computer to run a program. To keep track of each person’s usage, user accounts were introduced.
With user accounts, each person could be assigned different permissions, allowing some users to have full access while protecting the system from other users who may not have as much knowledge or experience. In addition, user accounts aid in the process of auditing, useful when you need to determine which user performed a malicious action. Finally, user accounts can help protect your systems from unauthorized use. A strong user account and permissions setup is one of the first lines of defense in any cybersecurity scenario.
One of the major concepts in user accounts is authentication and authorization. Authentication is the process of confirming a user’s identity by a computer, usually through the use of a password or some other authentication factor. We’ll discuss those more deeply on the next slide.
Once a user is authenticated, the user account can then be given authorization to access resources on the computer system. One important caveat to keep in mind: authentication does not imply authorization. Put simply, just because a computer system is able to recognize your user account does not mean you’ll automatically be given access to that system.
Let’s focus a bit more on authentication. Typically authentication is performed by a computer system confirming the presence of one or more authentication factors from the user. There are three traditional types of authentication factors:
Many modern computer systems, particularly ones used online or in highly secure areas, may use multiple factors of authentication, typically referred to as “two-factor” or “multi-factor” authentication. Some examples are using a debit card, where the card is the ownership factor and the PIN is the knowledge factor, or logging on to an online game, where the password is the knowledge factor and the phone number or email address used for verification is the ownership factor.
Once the user is authenticated, the system has several methods for determining if the user is authorized to access system resources. Typically, the system has some sort of security policy, access control list, or file security in place to determine what resources a user can access. We’ll discuss these in more detail as we work with each type of system.
One important concept in user accounts is the use of a user identifier for each account. Internally, the operating system refers to the user account by that identifier instead of the username. This allows the user to change usernames in the future, and for users to reuse usernames from old accounts without inheriting that user’s authorization. User identifiers should never be reused. On Linux, this is referred to as the user identifier or UID, while Windows uses the term security identifier or SID.
Beyond the identifier, most operating systems store a few other bits of information about the user account. Namely, the username, password, location of the user’s home directory, and any groups the user should be a member of.
Speaking of groups, they are simply a list of user accounts. Their usefulness comes in the fact that you can assign system permissions to a group of users instead of each user individually. That way, as users come and go on a system, they can simply be assigned to the correct groups in order to access resources. Of course, users can be a member of multiple groups, and each group has a unique identifier as well.
Finally, let’s review some best practices for working with user accounts on a system. First and foremost, each user of the system should have a unique account. Do not allow users to share accounts, as that will make auditing and working with users who leave that much more difficult.
In addition, enforce strong password policies, and require your users to change their passwords regularly. The recommendation varies, but I’ve found that changing the password every few months is a good practice.
When you are assigning user permissions, follow the principle of least privilege. Only give users access to the smallest number of resources they need to complete their task. Most users do not need to be full administrators, and don’t need access to all of the files on the system. It is much better to be a little overprotective at first than to allow information to be lost due to a user having unnecessary access.
Also, it is very important to create and maintain logs for when users access a system or use administrator privileges. Most computer systems can be configured to create these logs with minimal effort, so it is well worth your time to do so.
As users leave your organization, it is also very important to quickly disable their access. There are many stories online of users leaving a company, only to access the systems after they left to either steal resources or destroy data. By having a policy to disable old user accounts as soon as possible, you’ll be able to minimize that risk.
Finally, as a system administrator, it is very important to get into the practice of not using an administrator account as your normal user account on the system. In most cases, you yourself won’t need administrator access very often, so by using a normal account, you’ll protect your entire organization in the off chance that your account is compromised.
That is all the background information regarding users and groups for this module. Hopefully it will be useful as you work on the first lab in this class.
This video introduces the Windows 10 operating system, and shows how to install it in a virtual machine.
The Windows family of operating systems has the largest market share of all desktop and laptop operating systems, with an estimated 88% of all personal computer systems using some form of Windows. Unsurprisingly, Windows 10 currently holds the largest market share overall, but there are still a large number of systems using Windows 7. Of those, most are either in enterprise organizations who have chosen not to upgrade or owned by home users who rarely purchase a new computer.
The Windows operating system has a long history. It originally was developed as a graphical “shell” for the MS-DOS operating system, which was popular in the early 1980s. Windows 1.0 was released in 1985, followed by Windows 2.0 and 3.0.
Windows surged in popularity with the release of Windows 95, with 40 million copies sold during its first year. Many features of the modern Windows operating system were present even in Windows 95, such as the control panel, registry, and Internet Explorer web browser.
At the same time, development began on a version of Windows that was not dependent on an underlying DOS-based operating system. This process led to the release of Windows NT, followed by Windows 2000 and Windows XP. Windows XP was the dominant operating system on the market for nearly a decade until it was surpassed by Windows 7, which has been on top ever since.
Windows 10 was released in 2015, and is the most current version of Windows. We’ll be using Windows 10 throughout much of this course.
Here is a diagram showing the various versions of Windows and how they relate to one another. Notice that there are a few major families - the DOS versions at the top in red, starting with 1.0. The NT family near the bottom in blue, beginning with NT 3.1, as well as the server versions starting with Server 2003 in green. Finally, in the middle, there are a few mobile versions of Windows as well in yellow and orange, but they have been discontinued in recent years.
Next, let’s see how to install Windows 10 in a virtual machine. At this point, I’m assuming you have already installed VMware Workstation or another virtualization software on your computer. If not, I recommend doing so before continuing.
First, you’ll need to download the Windows 10 installation file and obtain a product key. Both of those can be found on the Microsoft Azure student portal, which is linked in the resources section below the video. This site now uses your K-State eID and password, making it even easier to access.
Once you log in, simply click Software on the left and search for Windows 10. In the list, find the entry for Windows 10 (consumer editions), version 1903 - DVD and download it. On the download page, you can also click this button to access your product key, which you’ll need to provide when you install it.
After you have completed that task, you should have a large installation file in the .ISO file format and a 25 character product key available. You’ll need both when installing Windows.
Next, let’s open VMware Workstation and create a new virtual machine. For this course, I recommend choosing “I will install the operating system later” to bypass the Easy Install feature of VMware. This will allow you to directly observe the installation process as it would be performed on a real computer.
Next, we will select the type and version of the guest operating system. In this case, it will be Windows 10 x64. We can then give it a helpful name, and choose where it is stored on the computer. If you’d like to store it on a secondary hard disk, you can do so here. I recommend storing your virtual machines on the largest, fastest storage device you have available, preferably an SSD with at least 60 GB of free space.
On the following pages, you can choose the desired disk size and format. You should consult the Lab 1 assignment materials to make sure you choose the correct options here.
Finally, you can click Finish to create the virtual machine. We’ll have to customize the hardware anyway, so we can come back to that once it is finished.
Once your virtual machine is created, you can click on the edit virtual machine settings button to customize the hardware. Again, make sure the hardware specification matches what is defined in the assignment for Lab 1. To install the operating system, we’ll have to tell the virtual machine where to find the .ISO file downloaded earlier. Click the CD/DVD option, then select the file and make sure it is enabled.
In addition, we’ll disable the network during installation so that we’ll be prompted to create a local account. Once we are done installing Windows 10, we can re-enable this option to connect to the internet and download updates.
When you are ready to begin the installation process, click the button to power on the virtual machine. When it powers on, you may be prompted to press any key to install Windows. You’ll need to click somewhere inside of the VMWare window before pressing any key in order for the VM to recognize it.
Once it boots, you’ll be given the option to install Windows 10. Follow the prompts to install Windows 10 using the Lab 1 assignment as needed for configuration information. The virtual machine may reboot several times during the process.
While installing, you may have to select options to confirm that you don’t have access to the internet, and would like to continue with limited setup. This is fine - Windows just really wants us to use a Microsoft account. You may also have to answer some security question - feel free to just make up answers if you want! They won’t be needed.
You can also disable many of the optional features, such as the digital assistant, location data, and targeted advertising. While they are helpful on personal computers, they won’t be used in this course.
When you have successfully installed Windows 10, you’ll be ready to move on to configuring Windows 10. The next several videos will discuss that process.
However, before going too far, I recommend installing VMware Tools in the Windows 10 virtual machine. This will allow you to have better control over the virtual machine. You can find instructions for doing that in the resources section below the video.
Before digging too deep into Windows, let’s take some time to learn about one of its most powerful, and least used, features, the PowerShell command line interface. PowerShell is an update to the old Command Prompt terminal, which was a very limited version of the DOS terminal from decades ago.
PowerShell is built on top of the .NET framework, and can leverage many features of that programming environment to perform powerful tasks within a simple interface. While we won’t go too deep into PowerShell in this class, it is a very useful thing to learn.
On your Windows 10 Virtual Machine, you can open PowerShell by searching for it on the Start Menu.
The PowerShell interface is very simple, with just a small terminal that you can use to enter commands. Most commands take the form of a verb, followed by a hyphen, and then a noun. Let’s try a few to see how they work:
Get-Location - get the current directorySet-Location <path> - change directoryGet-ChildItem - list filesNew-Item <name> (-ItemType <"file" | "directory"> -Value <value>) - make a new directory or fileGet-Content <name> - get file contentsRemove-Item <name> - remove a directory or fileCopy-Item <name> - copy a directory or fileMove-Item <name> - move a directory or fileSelect-String -Pattern <pattern> -Path <path> - search for a string in a file or group of filesGet-Command - get a list of commandsGet-Help - get help for a commandGet-Alias - get a list of aliases for a commandOut-File - output to a fileIf you want to use the output of one command as input to another command, you can use the vertical pipe character | between commands. Here are some examples.
Select-String - search for a string in outputMeasure-Object <-Line | -Character | -Word> - get line, word or character countSort-Object - sort output by a propertyWhere-Object - filter output by a propertyYou can also use PowerShell to write and execute scripts of commands. It is very similar to writing code in a programming language, but it is outside of the scope of this class. If you are interested in learning more, there are many great resources linked below the video to get you started. You can also check out the crash-course on PowerShell scripting in the Extras module.
Once you have installed Windows 10, the next step is to configure the user accounts and groups needed on the system. There are three major methods for configuring user accounts, and each give you access to different sets of features. They are the Settings menu, the Control Panel, and the Administrative Tools. Let’s look at each one.
First, the Settings menu. To find it, go to the Start Menu and select Settings. On the Settings menu, click Accounts. From here, you can click the Sign-in Options link to change your own password and other options. You can also click the Family & other users option to add additional users to the computer. However, by default it will ask you to provide the phone number or email address for a Microsoft account. To add a local account, you must first click the “I don’t have this person’s sign-in information” link, then “Add a user without a Microsoft account” to get to the correct screen. From there, you can simply set a username and password for that account.
Once the account is created, you can change the account type. Through the Settings menu, you are only given the option to create standard users and administrators.
Now, let’s look at using the Control Panel to manage user accounts. To find the Control Panel, search for it on the Start Menu. You can also right-click the Start Button to access the Control Panel. Once there, click the User Accounts option twice to get to the User Accounts screen. From here, you can change your account name, something you aren’t able to do from the Settings menu. However, it does not change the username, just the name displayed on the screen. You can also change your own account type here.
However, for most options such as creating a new account, it will refer you back to the Settings menu. There are a few options on the left side of the User Accounts screen that are difficult to find elsewhere, but they are rarely used. The most important one is the ability to create a password reset disk, which is a flash drive that can be used to reset a lost password. However, as we’ll see later in the semester, resetting Windows passwords is trivial provided the disk isn’t encrypted.
Finally, let’s look at using the Administrative Tools to manage user accounts. The easiest way to access these is to right-click on the Start Button and select Computer Management. On that window, you’ll see Local Users and Groups in the tree to the left, under System Tools. Expanding that option will give you access to two folders: Users and Groups. In the Users folder, you’ll see all available user accounts on the system.
You’ll notice that there are a few more accounts listed here than anywhere else, because Windows 10 includes several disabled accounts by default. The first, Administrator, is the actual built-in administrator account on the system. You can roughly compare it to the “root” account on a Linux computer. It has full access to everything on the system, but is disabled by default. Also, it has no password by default. This can create a major security hole, as it could be accidentally (or intentionally) enabled, giving anyone full access to the system. Most organizations choose to set a password on the account as a precaution, but leave it disabled.
The second, DefaultAccount, is simply a dummy account which stores the default profile. A copy of this account is made when each new user account is created. Using some tools available from Microsoft, it is possible to customize this account to give each user on the system a set of default settings, such as a desktop background.
The last default account, Guest, is the built-in guest account. It can be enabled to allow guests to access the computer. They can run programs, surf the internet, and store files in their folder, but generally cannot access any other user’s folders, install software, or change any system configuration. If you must allow guest access to a computer, this is probably one of the better ways to do so.
Going back to Windows, you can create a new user account here very easily. However, there are a few things to be aware of when doing so. First, you can give it a name, username, and password. At the bottom, you’ll see several checkboxes. The first one forces the user to change her or his password when first logging on to the system. I generally recommend not enabling this option, because that will also force the user’s password to expire after a set time. Instead, I recommend unchecking that box, and checking the third one to set the password to never expire. If you would like to enforce password expiration, it is much better to do so using a central directory service such as Active Directory, which we’ll cover in more detail in Module 4.
Once you have created a user account, you can right-click on it to edit a few properties. Notice that by right-clicking any account, you are given the option to set the account’s password. This is helpful if a user has forgotten the account password and does not have a reset disk available. However, if the user has made use of Windows file encryption or some other security features of Windows, it may irrevocably destroy their ability to access that information. So, I only recommend using this feature as a last resort.
Looking at a user’s properties, you can see tabs at the top to configure group memberships and profile information. On the Member Of tab, you can add users to different groups. Notice by default that users are only added to the Users group. If you’d like a user account to be an administrator, you’ll have to manually add that user to the Administrators group here.
The profile tab gives additional options for the user account, such as defining a custom location for the user’s profile, home folder, or scripts. However, I recommend not configuring these options on a local computer account. Instead, you can manage these from Active Directory. We’ll cover that in Module 4.
Next, let’s look at the Groups folder. Here you’ll see several of the groups listed that are included in Windows 10 by default. The three groups to pay attention to are Administrators, Users, and Guests. They correspond to administrator accounts, normal user accounts, and guest accounts. By adding an account to one of those groups, you’ll give it those permissions on the system. There are several other groups available, most of which are not used directly. If you’d like to know more about these groups, consult the relevant Windows documentation. Of course, you can create groups and manage group members from this window as well.
Lastly, let’s briefly look at the User Account Control, or UAC, feature of Windows. You’ve probably seen this pop up from time to time if you use Windows regularly. UAC is used to prevent accounts from changing system settings without getting explicit confirmation of the change from someone with administrator privileges. I recommend leaving UAC at the default setting, as it will prevent malicious programs from making changes to your computer without alerting you first. On earlier versions of Windows, this was a major problem. You can compare this feature to how Mac and Linux computers constantly ask for an administrator account’s password whenever software is installed or system settings are modified.
Finally, one other thing to look at is the Local Group Policy Editor on Windows. You can find it by searching for it on the Start Menu. This allows you to view and edit the local security policy of your system. For example, let’s go to Windows Settings > Security Settings > Account Policies > Password Policy. Here, I could set policies regarding how often passwords must be changed, how long they must be, and whether they should meet certain complexity requirements. However, as I mentioned before, it is best to leave the local group policy alone, and instead configure group policies using Active Directory. We’ll cover that in Module 4.
With this information, you should be able to start Lab 1, Task 2 - Configuring Windows 10. The next pages will continue giving you the information needed to complete that task.
See the warning in the video script below for a correction that is not present in the video –Russ
Now, let’s take a look at file permissions in Windows 10. File permissions are very important in any computer system, as they control which folders and files each user is able to access. In this video, I’ll go through some of the basics of configuring file permissions in Windows.
As demonstration, I’ve created a folder at the root of the C:\ drive, called test. Then, inside of that folder, I’ve created another folder called subfolder. This gives me a simple file hierarchy.
First, let’s look at the permissions for the test folder. To find those, right-click on the folder and select Properties. Then, look at the Security tab. Here, you’ll see a summary of the current file permissions. For this file, there are four groups listed:
We’ll examine each of the those permissions in detail as we make changes.
To make changes to permissions, there are two options. The first is to click the Edit button, which brings up a simple dialog for making changes, but does not include all options available. Therefore, I don’t recommend using this interface unless you want to make very quick changes.
Instead, I recommend clicking the Advanced button below, to get a better idea of the options available.
At the top of this window, you can see the folder name, as well as the current owner of the folder. If you need to change the owner to a different user or group, you can click the Change link to do so.
On this window, there are three tabs. Let’s look at the Permissions tab first. Here, you can see all the entries in the access control list, or ACL, for this folder.
In addition to the user or group and permissions, we can also see how the permissions are inherited. Windows permissions can be inherited from parent folders, and then those permissions can be applied to child folders and files as well.
In many cases, you won’t need to change the inheritance of a folder, as you’ll generally want to inherit the permissions that the system sets. However, you can disable inheritance by clicking the Disable Inheritance button at the bottom. When you do, it will ask you if you want to convert inherited permissions to explicit permissions, or remove them entirely. In most cases, I recommend always converting them to explicit permissions. You can always delete the unneeded ones later, but removing some of the inherited entries may make the folder inaccessible. Let’s disable inheritance on this folder.
Before we make changes, let’s look at the current permissions. I’m going to click on the entry for Administrators, then click Edit. Notice at the top of the window there is a Type option for either allow or deny. I always recommend using allow permissions, as that will give your permissions a consistency to how they are structured. If you feel that you must deny a permission, that is usually a good indication that you should rethink your users and groups to avoid such a scenario.
Below that, you can set where this permission applies. There are many options there, and most of them are pretty self-explanatory.
Finally, there are the basic permissions in Windows. Again, they are pretty self-explanatory. If you are unsure what a particular option does, I highly recommend consulting the Windows documentation. Also, note that you can click the Advanced Permissions link to the right to see more advanced permissions. In most cases, you won’t use them, but they are available if needed.
Going back to the main dialog, there are two sets of permissions that I recommend not changing on ANY folder. First, each folder should have an entry for Administrators, giving that group full control of the folder. If, for any reason, you feel that your Administrators group should not have full control of a folder, you should rethink your permission structure. System administrators will need to have control of a folder in order to change the permissions, and most users should never be Administrators.
Likewise, do not modify the permissions of the SYSTEM group on any folders. That permission is vital for Windows services and processes to be able to perform operations on the folder.
One entry you may want to change is the entry for Authenticated Users. Currently, this entry allows any user with access to this system to access the folder or make changes. In essence, you can think of the Authenticated Users group as Everyone. In many cases, you’ll want to remove that entry entirely, unless you want a folder to be publicly accessible on your system.
The last entry is for the Users group. This gives the permissions for any user not in the Administrators group. Again, you may or may not want to remove this entry, depending on your needs.
Correction: By default, the Users group on Windows 10 contains the Authenticated Users group, so it actually includes all users on the system, not just those outside of the Administrators group. I don’t recommend removing Authenticated Users from Users as it may have unintended consequences. Instead, you may want to make your own group for this purpose, and explicitly add all users who are not in Administrators to that group.
For this example, I’m going to remove the entry for Authenticated Users, but modify the entry for the Users group to allow users in that group to modify the contents of this folder.
Before clicking Apply, notice that there is a checkbox at the bottom to replace all child permissions with inheritable permissions from this object. If you would like to reset the permissions on folders within this one, you can use that option to do so. I’ll do it, just to show you how it works. Of course, if there are several files or folders within this one, that operation could take quite a long time.
There are two other tabs to look at. The first one is the Auditing tab. Here, you can direct Windows to log events related to this folder, such as successful reads, writes, and more. Depending on your organization’s needs, you may need to implement a strict auditing policy through this interface. We won’t worry about it in this class, but I recommend reviewing the relevant documentation if you are interested.
The last tab, Effective Access, allows you to determine what the effective permissions would be for a particular group or user. This is a very useful tool, since users may be part of multiple groups, groups can be nested, and permissions can quickly become very convoluted. When in doubt, use this tool to make sure you have set the permissions correctly.
Once I am done here, I can click Apply, then click OK to apply my changes and exit the dialog.
Let’s briefly look at the child folder’s permissions, just to see what impact those changes had.
You can see that it now inherits permissions directly from its parent folder, as expected. From here, I can add additional permissions that are applicable to just this folder and all of its subfolders.
You should now be able to start working on Lab 1, Task 3 - Windows Files & Permissions. A large portion of that task involves creating a file structure with permissions as defined in the assignment. Make sure you read the instructions carefully, and post questions in the course discussion forum if you are unsure how to interpret a particular direction.
Let’s take a look at how Windows interacts with programs. Each program running on an operating system is called a process. Within each process, there can be multiple threads of execution running concurrently. As a system administrator, the most important thing to keep in mind is that each process running on a computer will consume the system’s resources, either the available memory or CPU time. So, the more processes you run, the slower your computer may seem as you consume more of the available resources.
The operating system stores a few important pieces of information about each process. The most notable is the PID or process identifier. Much like the user accounts and groups, each running process is given an identifier. In this way, if you have multiple copies of the same program running, each one will have a different PID.
To examine processes on Windows, there are a couple of tools available. First, built-in to Windows is the Task Manager. It has been present in Windows since the early days, and gives lots of information about the processes running on a system. You can access it quickly by right-clicking on an open area of the taskbar, or by using the classic CTRL+ALT+DEL key combination.
Another tool I recommend is Process Explorer, part of the Microsoft Sysinternals suite of tools for Windows. You can download it using the link in the resources below this video. Using Sysinternals, you can see additional details about each process running on a computer. You can also replace the built-in Task Manager with Process Explorer if you so choose.
On Windows, you’ll notice that even though we aren’t running any programs, there are still dozens of processes running in the background. Most of them are what we call Services. A service is a process that runs in the background on Windows, and is usually started and managed by the operating system. They perform many important tasks, such as maintaining our network connection, providing printing functions, and logging important system events.
To access the services on Windows, simply search for the Services app on the Start Menu. Here you can see all the services installed on your system, as well as their description, status, and more. I’m going to choose one to review in detail.
On the first screen, you’ll see some of the general information about the service. It includes the startup type, which could be either automatic, delayed, manual, or disabled. You can also start or stop the service here.
On the Log On tab, you’ll see the user account used to run the service. Just like with any other process on Windows, each service must be associated with a user account in order to determine what permissions that process will have. On Windows, there are actually three pseudo accounts that are typically used with services. Those accounts are LocalSystem, LocalService, and NetworkService. Of course, you can always override these defaults and provide the information for another user account, but then this service will have the same permissions as that account.
The Recovery tab describes what actions the system should take if the service fails for any reason. Again, you probably won’t need to modify these options unless you are working with services of your own, but it is important to know that they can be configured here. For example, if an important process fails, you could have the computer automatically restart itself or run a program to notify you.
Finally, the Dependencies tab lets you see any other services that this one depends on, or services that depend on this one. Many Windows services require other services to be active before they will work properly.
One important thing to note about Windows services in particular is the use of the Service Host Process, or svchost.exe. To help conserve resources, Windows can actually embed several services as threads in a single process. In that way, the operating system only has to manage a single process instead of several. If you look at the processes running in Task Manager, you’ll see several entries for Service Host. You can even click the arrow next to that process to see which services are embedded in it. Unfortunately, because this creates a single point of failure, the Service Host Process is a frequent target of Windows malware and viruses. In fact, I once saw a virus try to hide its own executable by naming it svcnost.exe, hoping that a system administrator wouldn’t notice the slight spelling difference very quickly.
With this background information, you are ready for the next step, which is to install some software.
One major part of configuring a computer is installing the desired software. However, it is sometimes very difficult to tell exactly what is happening during a software installation, and each time you install software on a system you run the risk of introducing more vulnerabilities and stability issues on the system. In this video, I’ll give a brief overview of how to observe what is happening when you install a piece of software.
Software on Windows typically consists of several components. First, you have the actual executable itself, as a .EXE file. It may also have several dynamic link libraries, or DLLs, that it uses. A DLL is simply a shared library of code that can be used by other programs or updated without changing the executable file itself. There could also be settings files such as initialization files, or settings stored as registry keys in the Windows registry. Finally, depending on the software it may also install drivers or services as well. Let’s look at one piece of software that is pretty common and see what it does when we install it on our system.
On this system, I have installed InstallWatch Pro, which is available in the Resources section below the video. I’ve also downloaded a copy of Process Monitor from the Microsoft Sysinternals suite of tools. Finally, I downloaded a full installer for Mozilla Firefox.
First off, I need to start InstallWatch Pro and let it make a snapshot of the current system. This process may take several minutes.
Once that is done, I can also start Process Monitor. It will start recording data automatically.
Then, I can instruct InstallWatch Pro to install Mozilla Firefox by providing the location of the installation file here.
When the installation process starts, I’ll just click the default options in the installer and let it continue as it would normally.
When it is finished, InstallWatch Pro will pop back up, and you’ll need to click Finish there so it can work on making a new snapshot after the installation. You should also quickly go to Process Monitor, then click File and uncheck the Capture Events option.
Once InstallWatch Pro is done making a new snapshot, it will display all of the items installed by Mozilla Firefox. We can see several files were added, mostly in the Program Files folder. There were also many keys added to the registry. I recommend doing this process on your own virtual machine at least once and reviewing what you find.
In Process Monitor, we can add a filter to just see all items performed by the Mozilla Firefox setup process, which uses “setup.exe” as its process name. Just click the filter button at the top, and add the appropriate filter. Now we can see each and every option performed by the setup process. In this case, there are nearly 100,000 of them! It could be very tedious to dig through, but if you know you are looking for a particular item, you can use the search features in Process Monitor to find it very quickly.
As you continue working on Lab 1, I encourage you to take a little time and see what each program installs. You might be surprised!
In this last video on Windows 10, we’ll discuss some important security and networking details needed to finish getting your VMs set up and configured properly.
First, let’s talk about security. Whenever you install a new operating system, there are 4 major steps you should always perform before doing just about anything else on the system. Those steps are:
Let’s take a quick look at the Windows Firewall, since you’ll need to allow an application through the firewall. You can find it by searching for “firewall” on the Start Menu. Lab 1 directs you to install the Internet Information Services (IIS) web server. You’ll need to allow it through the firewall somehow. I won’t show you how in this video, but I encourage you to review the links in the resources section below the video for documentation showing how to accomplish this task. There are several ways to do it.
To test your firewall configuration, you can use your Ubuntu virtual machine created as part of Lab 1. First, make sure they are both on the same network segment in VMware by looking at the hardware configuration for each virtual machine. Then, you’ll need to get the IP address of the Windows computer. There are several ways to do this, but one of the simplest is to go to the Network Settings by clicking the networking icon in the system tray, near the clock, then choosing the Ethernet adapter. Here you’ll find the IPv4 address, usually in form of four numbers separated by decimal points. We’ll spend most of Module 3 discussing networking, so I won’t go into too much detail here.
Once you have that IP address, switch to your Ubuntu virtual machine, and open up the Firefox web browser. At the top in the address bar, simply input the IP address and press enter. If everything works correctly, you should be presented with the default IIS screen as seen here. If not, you’ll need to do some debugging to figure out what is missing.
With that, you should now have all the information you need to finish the Windows portion of Lab 1. If you have issues, please feel free to post in the course discussion forums or chat with me. Good luck!
For the second part of this module, we’ll be looking at one other operating system, Ubuntu.
Ubuntu is built using the Linux kernel, which is a completely free and open source operating system kernel developed by Linus Torvalds in 1991. It was his attempt to make a free operating system kernel which would be completely compatible with the Unix operating system via the POSIX standard. There were some previous attempts to do so, most notably the GNU project from the 1980s.
While Linux is usually thought of as an operating system, in actuality it is best thought of as an operating system kernel. Linux is typically bundled with other software and tools, such as the GNU project, and those bundles are referred to as Linux distributions. There are hundreds of Linux distributions available, each one customized to fit a particular need or design.
Here is a quick family tree for the Linux kernel. You can see that it all started with the Unix operating system developed by Bell Labs in the 1970s. It was forked into the BSD family, which still exists today. The underlying kernel for the Mac OS X operating system, Darwin, is still based on the original BSD family of Unix. In the 1980s, Richard Stallman created the GNU project, with an ultimate goal of creating a free version of Unix that was completely open source. That project stalled, but around the same time Linux was introduced. For most users, the Linux kernel coupled with the GNU tools is typically what they think of when they think of Linux as an operating system.
Linux itself is a very versatile kernel, and is used everywhere from the Android mobile operating system all the way to the world’s largest super computers, and nearly everything in between. Basically, if it needs an operating system kernel, there is a good chance that someone has tried to run Linux on it at some point.
For this class, we’ll be looking at the Ubuntu software distribution. Ubuntu is a term from the Nguni Bantu language, meaning humanity, and comes from a philosophy of the same name popularized by Nelson Mandela and Desmond Tutu, among others. Ubuntu itself is based on an older Linux distribution called Debian, which is very popular among many server administrators even today. Since its inception, Ubuntu strives for a new release every 6 month, with every 4th release (every 2 years) being listed as a Long Term Support or LTS release, which is supported with software and security updates for 5 years from release. Depending on the metric used, Ubuntu Linux is generally seen as the most common and most popular Linux distribution in the world for desktops and servers.
As a quick aside, here is the current Linux distribution family tree. The full version of it is linked in the resources section below the video. Ubuntu is shown here as a major branch of the Debian family.
The first major release of Ubuntu was known as Ubuntu 4.10 - Warty Warthog. Each Ubuntu release is given a version number based on the month and year of its release, in this case October of 2004, as well as a code name typically consisting of an alliterative adjective and animal combination. The first LTS release was in 2006 as Dapper Drake. Since that time, there have been 7 other LTS releases:
The most recent version, Focal Fossa, is the current LTS version and the one we’ll be using in this class.
Of course, many new Ubuntu versions may have been released since this video was recorded. –Russ
Now, let’s go through the process of installing Ubuntu in a virtual machine. At this point, I’m assuming you have already installed VMware Workstation or another virtualization software on your computer. If not, I recommend doing so before continuing.
First, you’ll need to download the Ubuntu 20.04 installation file. You can find that file on the Ubuntu download page, and also on the K-State CS mirror of the Ubuntu downloads page. For most uses, I recommend using the CS mirror, as it is generally much faster for students on campus. The link is available in the Resources section below the video. On that page, you’ll need to download the “64-bit PC (AMD64) desktop image” from the link near the top. It should download a file to your computer in the .ISO format.
Next, let’s open VMware Workstation and create a new virtual machine. For this course, I recommend choosing “I will install the operating system later” to bypass the Easy Install feature of VMware. This will allow you to directly observe the installation process as it would be performed on a real computer.
Next, we will select the type and version of the guest operating system. In this case, it will be “Ubuntu 64-bit.” We can then give it a helpful name, and choose where it is stored on the computer. If you’d like to store it on a secondary hard disk, you can do so here. I recommend storing your virtual machines on the largest, fastest storage device you have available, preferably an SSD with at least 60 GB of free space.
On the following pages, you can choose the desired disk size and format. You should consult the Lab 1 assignment materials to make sure you choose the correct options here.
Finally, you can click Finish to create the virtual machine. We’ll have to customize the hardware anyway, so we can come back to that once it is finished.
Once your virtual machine is created, you can click on the edit virtual machine settings button to customize the hardware. Again, make sure the hardware specification matches what is defined in the assignment for Lab 1. To install the operating system, we’ll have to tell the virtual machine where to find the .ISO file downloaded earlier. Click the CD/DVD option, then select the file and make sure it is enabled.
When you are ready to begin the installation process, click the button to power on the virtual machine.
Once it boots, you’ll be given the option to install Ubuntu. Follow the prompts to install Ubuntu using the Lab 1 assignment as needed for configuration information. In general, you can accept the defaults in the installer unless otherwise noted. For the timezone, you can choose Chicago as the nearest city.
Once the installation is complete, you’ll be prompted to reboot your computer. In rare instances, the virtual machine may not reboot correctly. If that happens, you can use the VM menu in VMware to restart the virtual machine. It should not cause any issues as long as the installation process completed.
At this point, you are ready to begin Lab 1, Task 4 - Install Ubuntu 20.04. Feel free to get started!
Once that is complete, you’ll be ready to move on to configuring Ubuntu. The next several videos will discuss that process.
However, before going too far, I recommend installing either “open-vm-tools-desktop” or VMware Tools in the Ubuntu virtual machine. This will allow you to have better control over the virtual machine. You can find instructions for doing that in the resources section below the video.
Also, I recommend taking a minute to familiarize yourself with the filesystem structure in Ubuntu. You’ll learn more about how to navigate this structure in the following videos. This diagram shows the common root-level folders you’ll find and the typical usage of each.
One of the most important features of the Linux operating system is the Terminal command line interface. One major design feature of Linux is that nearly every operation can be controlled via the command line, and in fact some operations can either only be performed or are much simpler to perform there.
To open the Terminal, click the Activities button and search for Terminal. I recommend adding it to the favorites panel by clicking and dragging the icon to the left side of the screen. You’ll be accessing it very often throughout this class, so having quick access to the terminal is very helpful.
By default, Ubuntu uses Bash, the Bourne Again SHell, as the default shell in the terminal. There are many other shells available, so feel free to check them out and see if you find one you prefer. For this course, I will use Bash since it is the default.
Looking at the Bash terminal, there are a few bits of important information presented immediately in the command prompt, which is the text shown on the screen before the blinking cursor. First, shown here in the green text, is the current username, followed by the at @ symbol, then the current computer name. This helps you keep track of which computer you are using, and which username you are currently logged in as. This becomes very important later, as you’ll be controlling several servers using a remote terminal program.
Following the colon, you’ll see in blue the present working directory. In this case, it shows the tilde ~ symbol, which represents the users home folder. You can use the pwd command to see the full path.
Finally, this prompt ends in a dollar sign $. That represents the fact that this terminal is not a root terminal, and doesn’t have root permissions by default. A root terminal, such as one you can get by using the sudo su command, will have a pound or hash symbol # at the end of the prompt. You’ll also notice that the colors are disabled in the root terminal, but that can easily be changed in the Bash configuration file.
Let’s review some simple Linux terminal commands:
pwd - shows the present working directorycd - change directoryls - list filesls -al - show all file details and permissionsmkdir - make new directoryrmdir - remove empty directoryrm - remove filerm -r - recursively remove a foldercp - copy file or foldermv - move file or foldertouch - create a file (by “touching” its entry in the file tree); existing files are unchanged except for updating the last accessed timestampcat - concatenate (print) filesapropos - find commands for a keywordwhatis - find command descriptionswhereis - find location of a command on the filesystemman - find command helpAs we learned in PowerShell, the vertical pipe | character can be used to take the output of a command and use it as input to another command. Here are a few examples:
sortgrep - search for textwc - get word countTo edit files using the Terminal, I recommend using the nano command, as it is generally regarded as the simplest text editor available by default on most Linux systems. If you prefer to use vim, emacs, or another editor, you are encouraged to do so. Also, on a Linux system with a GUI installed, you can use gedit to open the graphical editor as well.
To edit a file, simply type nano followed by the name or path to the file to be edited. If it doesn’t exist, it’ll simply open a blank file. Once there, you can enter your information. Remember that Nano is a terminal program, so you cannot use the mouse to move the cursor, only the arrow keys on the keypad. At the bottom you’ll see several commands you can use. The carat ^ character represents the CTRL key. So, ^O would mean CTRL+O for the “Write Out” command.
To save a file, you can use CTRL+O to write it to the disk. It will ask you to confirm the filename before saving, and you can just press ENTER to accept the one presented. To exit Nano, use CTRL+X. If the file is unsaved, you will be asked to save your changes. Press Y to save the changes, then ENTER to confirm the filename. In practice, you’ll become very used to the process of using CTRL+X, Y, ENTER to save and close a file in Nano.
By default, the Linux Terminal does not give you administrator, or “root” permissions, even though you may be using an administrator account. To use those permissions, a special command called sudo, short for “super user do,” is used. By prefacing any command with the sudo command, it will run that command as the root user, provided you have permissions to do so, and can enter the correct password for the account. In essence, it is a way to “elevate” your account to the root account for a single command.
For example, to install a program on Linux, you must have root or sudo permissions. I can try to use the apt-get update command without it, but it will not work. By prefacing that command with sudo I can, but first I must enter the password to my account.
One quick trick - you can use sudo !! to run the previous command as root, without having to retype it. It is one of the single biggest timesaving tricks on the Linux terminal, and well worth remembering.
In addition, as I showed above, it is possible to switch to a root shell by using the sudo su command. Su is short for “switch user” and is used to change the user account on the terminal. You can use it to log in to any other account on the system, provided you know the password. However, I DO NOT recommend logging in directly as the root user in this way, as any command you accidentally type or copy/paste into this terminal will be run without any warning. It is very easy to irreversibly damage your system by doing so.
That is just a short introduction to the Linux terminal. We’ll learn a few other terminal commands as we continue to explore Ubuntu. I also encourage you to read some of the resources linked below the video if you are new to Linux, as they give you much more information about the terminal and how it can be used.
In this video, we’ll explore how to work with users and groups in Ubuntu Linux. Before we do that, however, let’s take a minute to discuss some important information about user accounts and how they are managed in Linux.
Every Linux system has a special user account called “root.” This account is the default system administrator account, and it has complete control over the system. It is easily identifiable by its UID, which is always 0. In fact, when many programs see that the current UID is 0, they will skip any and all permissions checks without looking at anything else.
On Ubuntu, the root account is disabled by default. It can easily be enabled by setting a password on the account using the passwd command on the Terminal. However, that is not recommended, as it makes your system more vulnerable to some kinds of attacks. Instead, the system provides the sudo command to allow regular users with administrative permissions to perform commands as the root user, without actually using that account.
The sudo command stands for “Super User Do” and is by far one of the most important commands to learn as a system administrator. By prefacing any command with sudo while using an account with the appropriate permissions and providing the account’s password, you can become the root user while that command is running. To give users the ability to use sudo they simply must be added to the “sudo” group or have their user type set to Administrator.
You can also customize how the permissions for sudo are configured by using the visudo command to edit the /etc/sudoers file. For example, you can limit which commands certain accounts are able to perform. Be very careful, as that file has a very specific format and any invalid changes could render the entire system unusable. I generally don’t recommend editing this file unless necessary.
As you configure Ubuntu accounts, you’ll notice that there are three major account types. The first type, Regular User, consists of two sub-types - Standard and Administrator. These accounts are the ones that will be used by real people logging-in to the system interactively. Standard users do not have access to the sudo command, while Administrator users do. The regular users typically have a UID starting at 1000 and above, and each one has a group of the same name created with that user as the only initial member. This is very important for assigning file permissions, as we’ll see in a later video. They also receive a skeleton of the default directory in the /home folder. As you learn about directory services in Module 4, you’ll find this information to be helpful once again.
The other type of user, System User, is a user account created for a program or service. These are similar to the pseudo accounts on Windows 10, but on Ubuntu there are typically several of them, with a unique account assigned to each service. For example, the Apache web server which will be installed as part of this module creates its own user account, which can be used to determine what files can be accessed or served by the web server.
Now, let’s look at the different ways user accounts can be configured on Ubuntu. First, we can go to the Settings application. From there, click the Users button on the left. Here you can see information about your current user account, and are able to change the password. You cannot change the user account type of the current account. To add a new account, you must click the “Unlock” button at the top of the screen and enter your current password. This is the graphical equivalent of using a sudo command. From there, you can create a new user.
You can also install the gnome-system-tools package to get access to a different interface for managing user accounts. Once it is installed, you can search for “Users and Groups” after clicking the activities button to find it. Here, you can add or edit accounts, and you can also manage existing groups. However, you are still unable to add users to groups or do any advanced editing here. To do most of that, you’ll need to use the terminal.
There are several terminal commands which are useful. First, the adduser command will walk you through the process of adding a user to the system. This utility is not part of the default Linux system tools, but has been added to Debian and Ubuntu to simplify the process of adding a regular user. To add a system user, user the useradd command. You can also use commands to remove or modify a user. For example, to add a user to an existing group, use usermod -a -G <group> <user>.
Finally, you can also use the passwd command to change the password for any user account.
To work with groups, very similar commands are available. You can add a group using groupadd by providing a name for the group, as shown here. There are also a couple of commands for setting passwords and security for groups, which are shown in italics on the slides. Those commands are not typically used, but if you are interested in them I encourage you to review the resources below the video to learn more.
One important aspect of working with the Linux operating system is that most system settings and information are stored in simple text files, and anyone with access to those files can see how the system is configured. Let’s take a look at the 4 most important ones.
First, /etc/passwd is the traditional place to find information about a user account. It includes the username, UID, home folder location, and more. It used to include a hash of the password as well, but that was removed years ago because it was a security threat.
Those passwords were moved to /etc/shadow, which you’ll notice is a very protected file. In fact, I can only access it by using the sudo command. Here you’ll see the hash of the cis527 user account we are using.
Similarly, there are /etc/group and /etc/gshadow files, serving the same purpose for groups.
Of course, it should go without saying that it is not recommended to edit those files directly. Instead, use the appropriate terminal commands to modify information about user accounts and groups.
At this point, you should be ready to start working on Lab 1, Task 5 - Configure Ubuntu 20.04. One of the first tasks in that lab is to create several user accounts, so that will be great practice for using some of these tools and commands.
In this video, we will discuss how file permissions work in Ubuntu Linux. Working with file permissions in Linux is sometimes one of the more challenging aspects of the operating system, as it is very limited compared to Windows. It requires a bit of thinking to determine how to configure your permissions, but if done correctly it can be very powerful.
Linux file permissions are assigned based on three classes of user: the owner of the file, the group assigned to the file, and all other users not included in those first two classes. Then, each class can get any combination of three file permissions: read, write, and execute. So, in essence, each file has 9 bits in its mode, determining which of the three permissions are assigned to each of the three classes.
To see these permissions, you can open a terminal and use the ls -l command. It will show a long listing (hence the l) of the files in the folder. You’ll receive output very similar to this diagram, from the great tutorial on Linux file permissions from DigitalOcean, which is linked in the resources below the video. The first column gives the file permissions, known as the “mode” of the file. The next columns give the user and group assigned to the file, respectively. Following that, you’ll find the file size in bytes, the last modified date, and the filename.
This graphic shows how the mode of the file works in detail. The first character is a d if the item is a directory, or a hyphen - if it is not. The next three characters give the read, write, and execute permission status for the user or owner of the file. The character is present if the permission is given, or a hyphen if it is not. The next three characters do the same for the group, then the last three for all other users.
Going back a bit, we can see that there are several different permission setups here in this graphic, with helpful filenames for each one to help us understand them. First, notice that the top two entries are for directories which are accessible either by everyone, or the group.
For users to be able to list the files inside of a directory, they must be given both the read and execute permissions, as we can see here in the eighth entry. If a user is given read permissions but not execute, they would be able to read files inside of the folder, but not able to get a listing of the files names, which isn’t very useful. For files, the execute bit is only needed when the file is either an executable program, or a script written in a scripting language that is directly executable.
Looking through the rest of the entries, we can see what it would look like to have a file private to a user, or publicly accessible (though not writable) by all users. I encourage you to familiarize yourself with this pattern, as it will be very useful throughout this class.
File modes can also be expressed as a set of three octal characters. This is very useful if you have a firm understanding of what each octal mode represents. For each class of users, think of the three permissions, read, write, and execute, as three bits in a binary number. If read and execute are given, then the binary number is 101, which represents 5. That would be the octal value for that set of permissions. So, by using three octal values representing the permissions given to the three classes of user, it is very simple to set permissions using just three digits.
This page shows some common octal values you may use. I recommend reviewing it as you need while setting permissions. It is available in the slides linked below this video.
Now, let’s see how to set these permissions using the tools available in Ubuntu Linux. First and foremost, you can do some work with permissions via the default file browser, called Nautilus. As in Windows, you can right-click on any file or folder, choose Properties, then click on the Permissions tab. Here, you can see several options to choose from. Each one should be pretty self-explanatory based on the information we’ve already covered in this video.
However, you’ll notice that you can only change the permissions on files which you are the owner of. So, if you want to change the permissions of a file outside your home folder, for example, you won’t be able to do so with Nautilus. There are a couple of ways around that, though. One is to install the nautilus-admin package. This will give you an option in Nautilus to right-click a folder or file and open it as an administrator using the sudo command. This will allow you to change the permissions all folders on the system, but it still does not easily allow you to change the owner or group assigned to those files.
For full control over file permissions, once again we must turn to the Terminal. There are several commands that are used to modify file permissions and owners. First is the chmod or “change mode” command. It is used to set the permissions on a file. The syntax is the command, followed by some type of descriptor for the permissions to be set, then the path to the file or folder to set those permissions on.
There are two ways to use this command. The first involves using the classes, permissions, and a set of operators to state how the permissions should be set. For example, ug+rw will add the read and write permissions to the user or owner of the file, as well as the group. You can also say g=rx to set the group permissions to be exactly read and execute, or o-rwx to remove all permissions from users other than the owner or the group. Finally, there is a special class, a, which represents all classes. So, a+x will give the execute permission to all classes of user.
In my opinion, I find that method simpler to understand in theory, but a bit more frustrating to work with in practice, because I have to explicitly spell out my permissions in a long-form manner to get exactly what I want. Thankfully, you can also specify the desired permissions using octal modes as well.
You can also use the chown command to change the owner or group assigned to a file. For this command, note that the user and group are separated by a colon, but no spaces are before or after the colon. Also, note that each file must have a group assigned to it, even if you only want the owner to have access. In that case, remember that each user account has a group of the same name, so you can assign that group as the group on the file as well.
Finally, there is also a chgrp command that allows you to change the group on a file you own. However, most users still just use the chown command for this use. However, if you do not have sudo access, this command is very useful.
Of course, in many instances you’ll find that these commands require the use of the sudo command, In general, you can only change the permissions or group on a file you own without using sudo. Any other changes, including changing the owner of the file, require sudo access. It should also be noted that anyone with sudo access will in effect be able to access any file on the system. So, there is always a tradeoff between giving users the power to make exhaustive changes to file permissions and them being able to access any file on the system.
Now that you know a bit more about file permissions in Linux, you are ready to begin the next part of Lab 1 which is Task 6 - Ubuntu Files & Permissions. Good luck!
In this video we’ll be looking at managing the processes and services running on an Ubuntu Linux system. First, let’s take a look at processes. Recall from the earlier video on Windows Processes and Services that a process is a program running in the foreground for the user, while a service is a program running in the background for the operating system.
On Ubuntu, you can see all the running processes using the System Monitor program. It can be found by searching for it after clicking the Activities button. Here you can find information on all running processes, system resources, and file systems. By right-clicking any of the running processes, you’ll be given options to view information about the process, or even stop or kill the process if it isn’t working properly.
There are also several command-line tools you can use to view the running processes. Installed by default is a program called top which will show much of the same information as the System Monitor. Using the keyboard, you can interface with this menu and view more information as well. Press the q key to quit. There is also a newer, more user-friendly version of top called htop but it is not installed by default.
You can also see the running processes by using the ps command. By default, it will only show the processes running in that terminal window, so you must use the -A option to see all processes on the system. You can also use the -u option, followed by a username, to see all the running processes associated with that user, which is very handy on multi-user systems. The pstree command works similar, but it shows a tree structure demonstrating which processes were spawned from other processes, which can be very helpful in some instances.
To stop a process via the Terminal, use the kill command. Technically, the kill command is used to send signals to a process, and it has other uses than just stopping a process, but that is the typical usage. Refer to the documentation linked in the resources section for specific instructions on how to use each of these commands in more detail.
Finally, there are a couple of other system management tools I’ve found useful over the years. Once of them is glances, which is a Python based system monitor that goes well beyond the tools we’ve seen so far. You can easily install it on your system and get a view like this that shows lots of information about the system. However, since it is based in Python, it installs many additional resources on your system to reach full functionality, which may or may not be desired.
The other tool I recommend is called saidar. It is a more traditional terminal program with fewer dependencies, but still gives a good overview of the system. However, it does not display information about individual processes, so it may be of less use in this situation than the others.
Next, let’s talk a little bit about services on Linux. In many books and online, you’ll see the term daemons used to describe Linux services. That is the more traditional term for these processes that run in the background, and it is still used today by many resources. The term daemon comes from Greek mythology, referring to a being who works tirelessly in the background. It is also a reference to Maxwell’s Demon, a similar concept from a well-known thought exercise in physics. Most daemons in Linux today use a process name ending in d, such as httpd for a web server or sshd for a secure shell server.
On a modern Ubuntu system, the services or daemons are managed by a tool called systemd. Formerly, tools such as init or Upstart were used, but most of them have been phased out at this point in favor of systemd. It is still a very contentious point among Linux enthusiasts, and you’ll find lots of discussion online covering the pros and cons of a particular system. I won’t go too deep into it here, but if you find references to either init or Upstart online, that’s what the discussion is about. To interact with systemd, you can use the systemctl command.
For example, to start a service, you would use sudo systemctl start followed by the name of the service. Other options such as stop, restart, and status are available. Unfortunately, advanced configuration of systemd services in Ubuntu is a bit outside of the scope of this course, as it is a very involved topic. I encourage you to review the documentation for systemd if you find yourself needing to make any changes to services on your system.
Let’s take a look at installing software on Ubuntu Linux. Before we install anything, here is some information about the types of files installed along with a typical application in Ubuntu.
First, the executable file itself is placed somewhere in the path of the system, usually in either /usr/lib or /usr/bin. This is equivalent to the .EXE file in Windows. Each application may also have some shared library or object files, which are typically placed in the /usr/lib folder.
The configuration and settings file for the application are usually placed in the /etc folder, with user-specific information placed in a dotfile in the user’s home directory. To see those files, use the ls -al command to show all hidden files. By convention, any file or folder with a name beginning with a period . is hidden by default. These files are typically referred to as “dotfiles” and are used to store user-specific configuration information in the user’s home folder. They are hidden by default just to prevent most users from ever touching them, but by including them directly in the user’s home folder, they are more likely to be included in system backups. On Windows, this is roughly equivalent to the AppData folder in each user’s home directory.
Finally, every application on Linux typically installs some sort of documentation in the /usr/share directory, which can be accessed using the man command. If required, it may also place a few scripts in the systemd directories so the appropriate service or daemon can be started automatically.
There are several methods to install software on Ubuntu, each with their own advantages and disadvantages. First, most users primarily will start with the Ubuntu Software Center. This is the equivalent of an “app store” for Ubuntu, and it gives quick and easy access to the most commonly used applications. However, many system and server packages are not visible here, and must be installed elsewhere.
The official Ubuntu documentation recommends installing the Synaptic Package Manager for those tasks. It can be installed via the Ubuntu Software Center and then used on its own. It will show you all packages available for your system, and you can easily install or manage them. One nice feature about Synaptic is the ability to see what files are installed by a package by simply right-clicking on an installed package and choosing Properties, then the Installed Files tab. You can compare this to the output from InstallWatch Pro on Windows.
Using Synaptic, you can also configure the software repositories your system is able to install software from. While most software you’ll need is easily installed through the default repositories, you may find that adding or changing those repositories becomes necessary, and you can do so here.
Of course, you can also install and configure software using the command line. The most common way to do so is via the apt, or “Advanced Packaging Tool” command. In previous versions of Ubuntu this was the apt-get command, but the syntax for the apt command is exactly the same. To use apt, you must first update the list of packages available by using sudo apt update. Then, you can install a package using sudo apt install <package>. To remove a package, use the remove option. You can also use apt to upgrade all packages on a system using the upgrade option.
Another option for installing packages on Ubuntu is using the snap tool. Snaps are self-contained file system images containing the app and any dependencies, and are designed to be able to be installed on all major Linux systems. Several of the default Ubuntu packages are using snap, and the Ubuntu Software Center will list snaps if they are available. For this course, I will not be using snaps since they are not quite as widely supported yet, but feel free to review the relevant documentation listed in the resources section if you are interested in learning more.
In addition, you can always install software on Linux by downloading and installing the software package manually. The packages typically use the .DEB file extension, and are installed using the dpkg -i command. However, in most instances you’ll be able to find a software repository which offers the software for installation via the apt tool, and I recommend using that route if at all possible.
Finally, if you so choose, you can download the source code for most applications built for Linux and compile it yourself. This is very rarely needed for most mainstream software, but often there is specialized software for a specific use that requires this level of work. In general, consult the documentation for that particular software for instructions on how to properly configure, build, install and run that software from source.
You should now be able to continue working on Lab 1, Task 5 - Configure Ubuntu 20.04 by installing the required software. As always, if you have any questions, please post in the course discussion forums to see if others are having the same issue.
In this last video on Ubuntu, we’ll discuss some important security and networking details needed to finish getting your VMs set up and configured properly.
First, let’s talk about security. Whenever you install a new operating system, there are 4 major steps you should always perform before doing just about anything else on the system. Those steps are:
sudo group to perform administrative tasks. Most other users should have standard accounts without sudo access. You may also add this system to an LDAP directory to get additional user accounts. We’ll discuss that in detail in Module 4.gufw tool as a graphical interface for the Ubuntu Uncomplicated Firewall (UFW). Once that tool is installed, you can enable the firewall with a single click.Let’s take a quick look at the firewall, since you’ll need to allow an application through the firewall. You can find it by searching for “firewall” once you have installed gufw. Lab 1 directs you to install the Apache 2 web server. You’ll need to allow it through the firewall somehow. I won’t show you how in this video, but I encourage you to review the links in the resources section below the video for documentation showing how to accomplish this task. There are several ways to do it.
To test your firewall configuration, you can use your Windows virtual machine created as part of Lab 1. First, make sure they are both on the same network segment in VMware by looking at the hardware configuration for each virtual machine. Then, you’ll need to get the IP address of the Ubuntu computer. There are several ways to do this, but one of the simplest is to go to the Settings application, then choosing Network from the menu on the left. In the Wired section, click the gear icon to see the details. Here you’ll find the IPv4 address, usually in form of four numbers separated by decimal points. We’ll spend most of Module 3 discussing networking, so I won’t go into too much detail here.
Once you have that IP address, switch to your Windows virtual machine, and open up the Firefox web browser. At the top in the address bar, simply input the IP address and press enter. If everything works correctly, you should be presented with the default Apache screen as seen here. If not, you’ll need to do some debugging to figure out what is missing.
With that, you should now have all the information you need to finish the Ubuntu portion of Lab 1. If you have issues, please feel free to post in the course discussion forums or chat with me. Good luck!
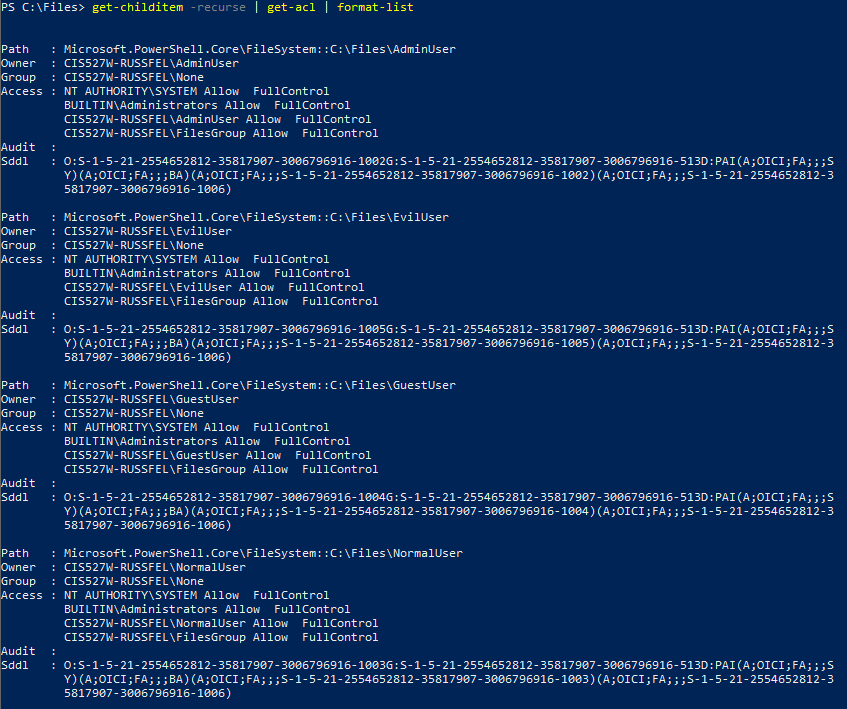
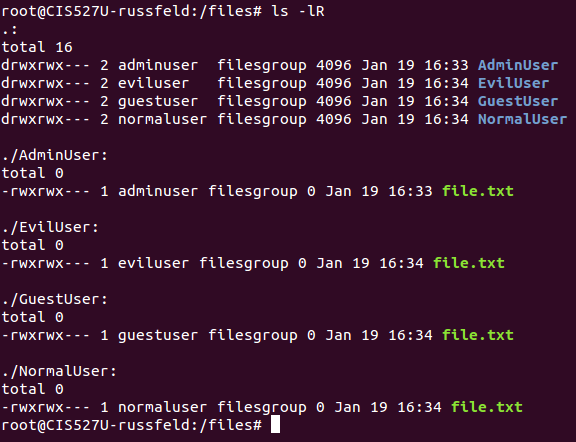