Assignment
Lab 2 - Configuration Management
Generative Artificial Intelligence Policy
Details

- Citations Required: Any usage of GenAI must be noted and cited directly in the work.
- No Direct AI Results: For this assignment, you may not include the GenAI results directly in your submission - this includes configuration files. You must write them yourself and adapt them to your specific setup, not just copy them from AI output.
- Understand Your Work: You may be asked to explain your work in detail as part of this project. Failure to do so may be considered a violation of this policy.
- Policy Violations: Violations may result in a grade of 0 for the assignment and other sanctions approved through the K-State Honor Council.
Instructions
Create two different Puppet Manifest Files that meet the specifications below. Each one will be applied to a newly installed virtual machine of the appropriate operating system configured as described in Task 0. The best way to accomplish this is to treat this assignment like a checklist and check things off as you complete them.
If you have any questions about these items or are unsure what they mean, please contact the instructor. Remember that part of being a system administrator (and a software developer in general) is working within vague specifications to provide what your client is requesting, so eliciting additional information is a very necessary skill.
Note
To be more blunt - this specification may be purposefully designed to be vague, and it is your responsibility to ask questions about any vagaries you find. Once you begin the grading process, you cannot go back and change things, so be sure that your machines meet the expected specification regardless of what is written here. –Russ
Also, to complete many of these items, you may need to refer to additional materials and references not included in this document. System administrators must learn how to make use of available resources, so this is a good first step toward that. Of course, there’s always Google!
Time Expectation
This lab may take anywhere from 1 - 6 hours to complete, depending on your previous experience working with these tools and the speed of the hardware you are using.
Tip
Testing Manifest Files - When testing these manifest files, there is a three step process. First, apply the manifest, then reboot, then apply again. This is because any changes made to group memberships are not applied until after a user logs back in or the system reboots. So, you may get permission issues when creating files or assigning permissions due to incorrect group memberships. Ideally, those permission errors should be eliminated after a reboot. There is no good fix for this in Puppet itself, since it is an operating system issue. Therefore, this is the process that you should use, and it is the process that will be used when your manifest files are graded. Basically, if you get no errors after a reboot, you should be fine!
Task 0: Create New Virtual Machines & Snapshots
Create new Windows 11 and Ubuntu 26.04 virtual machines for this lab. When creating the virtual machines and installing the operating system, use the same information from Lab 1. You should create the cis527 account during installation.
DO NOT PERFORM ANY ADDITIONAL CONFIGURATION AFTER THE INSTALLATION IS COMPLETE EXCEPT WHAT IS LISTED BELOW!
After installing the operating system, install ONLY the following software:
- OpenVox Agent 8
- Windows: Download and install the latest OpenVox Agent 8 from OpenVox Downloads. Look for the file
openvox-agent-<version>-x64.msithat is most recent. - Ubuntu: See the video later in this module for instructions to install Puppet. These instructions are also summarized in the Installing OpenVox Agent: Linux guide.
- Recall that Ubuntu 26.04 is codenamed “Resolute Raccoon”, so use the url
https://apt.voxpupuli.org/openvox8-release-ubuntu26.04.debto get the correct version on Ubuntu in the first step. - Follow the instructions in the video later in this lab to add Puppet to the
sudopath. The path for OpenVox is the same as Puppet.
- Recall that Ubuntu 26.04 is codenamed “Resolute Raccoon”, so use the url
- Windows: Download and install the latest OpenVox Agent 8 from OpenVox Downloads. Look for the file
OpenVox vs. Puppet
In 2025, Puppet moved to a different licensing model. Because of that, access to some of their software and tools became much more difficult. OpenVox is an open source fork of Puppet that aims to be 100% compatible with Puppet itself. So, we’ll be building upon Puppet’s language and framework, but using OpenVox as our actual agent tool.
VMware Tools (Windows) and either
open-vm-tools-desktopor VMware Tools (Ubuntu)All System Updates (Windows & Ubuntu)
On the Windows virtual machine only, create a folder at C:\install and download the following installers. Do not change the name of the installers from the default name provided from the website. You may choose to do this step using the archive Puppet module instead.
- Firefox (
Firefox Setup 153.0.3.exeas of 8/27/2026) - Thunderbird (
Thunderbird Setup 153.0.2.exeas of 8/27/2026) - Notepad++ (
npp.8.9.7.Installer.x64.exeas of 8/27/2026)
Note
I have listed sample names of the installers as of this writing, and these will be the ones that I use for testing; however, you may receive newer versions with slightly different names. That is fine. Just be sure that you don’t get the default stub or web-only installers, which is what Firefox typically gives you unless you follow the links above. They will not work properly for this lab. –Russ
Once you have your virtual machines configured, make a snapshot of each called “Puppet Testing” for your use. As you test your Puppet manifest files, you’ll reset to this snapshot to undo any changes made by Puppet so you can test on a clean VM. The VMs used for grading will be configured as described here.
Warning
When you reset back to a snapshot, any new or modified files on the VM will be lost. So, make sure you keep a backup of the latest version of your manifest files on your host machine! You have been warned!
Task 1: Puppet Manifest File for Ubuntu
Create a Puppet Manifest File for Ubuntu 26.04 that defines the following configuration. This configuration is very similar to, but not exactly the same as, Lab 1, so read through it carefully. Assume that the machine you are applying the manifest file on is configured as described above in Task 0.
Users (Same as Lab 1)
adminaccount|AdminPassword123(Administrator type orsudogroup)normalaccount|NormalPassword123(Normal type)guestaccount|GuestPassword123(Normal type)evilaccount|EvilPassword123(Normal type)- _Create groups as needed below_
Note
Makes sure you can actually log in as these users after creating them! Many students forget to check this step and lose points because the accounts are created, but don’t actually allow users to log in.
Files & Permissions (Same as Lab 1)
- Create a folder
/cis527(at the root of the system, not in a user’s home folder). Any user may read or write to this folder, and it should be owned byroot:root(user:root; group:root). - Within
/cis527, create a folder for each user created during task 5 except forcis527, with the folder name matching the user’s name. Make sure that each folder is owned by the user of the same name, and that that user has full permissions to its namesake folder. - Create a group named
admingroupand set permissions on each folder using that group to allow bothcis527andadminaccountto have full access to each folder created in/cis527. No other user should be able to access any other user’s folder. - In each subfolder of
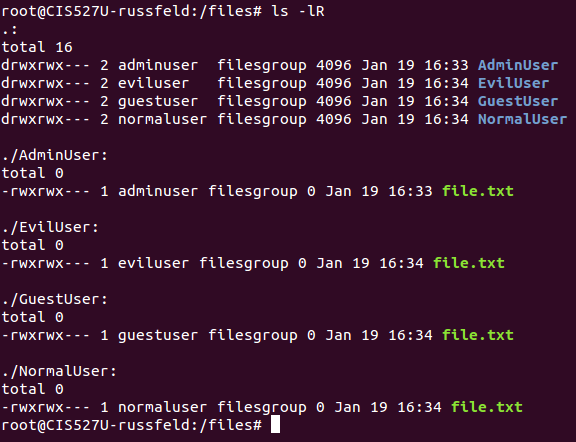
/cis527, create a text file. It should have the same owner and access permissions as the folder it is contained in. The name and contents of the text file are up to you. - See this screenshot for what these permissions may look like in Terminal. This was created using the command
ls -lRin the Linux terminal. These screenshots are from an earlier version of this lab using different paths and usernames, but the permissions structure is the same.
- Create a folder
Software (Same as Lab 1)
- Mozilla Firefox (
firefox) - Mozilla Thunderbird (
thunderbird) - Apache Web Server (
apache2) - Synaptic Package Manager (
synaptic) - GUFW Firewall Management Utility (
gufw) - ClamAV (
clamav)
- Mozilla Firefox (
Services - Ensure the following services are running:
- Apache Web Server
- Clam AntiVirus’ FreshClam Service
Note
You will have to find the appropriate name for each service. –Russ
Task 2: Puppet Manifest File for Windows 11
Create a Puppet Manifest File for Windows 11 that defines the following configuration. This configuration is very similar to, but not exactly the same as, Lab 1, so read through it carefully. Assume that the machine you are applying the manifest file on is configured as described above in Task 0.
Users (Same as Lab 1)
AdminAccount|AdminPassword123(Administrators & Users group)NormalAccount|NormalPassword123(Users group)GuestAccount|GuestPassword123(Guests group only)EvilAccount|EvilPassword123(Users group)- _Create groups as needed below_
Note
Makes sure you can actually log in as these users after creating them! Many students forget to check this step and lose points because the accounts are created, but don’t actually allow users to log in.
Files & Permissions (Same as Lab 1)
- Create the folder
C:\cis527. It should be owned by thecis527account, but make sure all other users can read and write to that folder. - Within
C:\cis527, create a folder for each user created during task 2 except forcis527, with the folder name matching the user’s name. Make sure that each folder is owned by the user of the same name, and that that user has full permissions to its namesake folder. - Create a group named
AdminGroupcontainingcis527andAdminAccount, and set permissions onC:\cis527for that group to have full access to each folder created inC:\cis527. No other user should be able to access any other user’s folder. - In each subfolder of
C:\cis527, create a text file. It should have the same owner and access permissions as the folder it is contained in. The name and contents of the text file are up to you. - Don’t remove the SYSTEM account or the built-in Administrator account’s access from any of these files. Usually this is as simple as not modifying their permissions from the defaults.
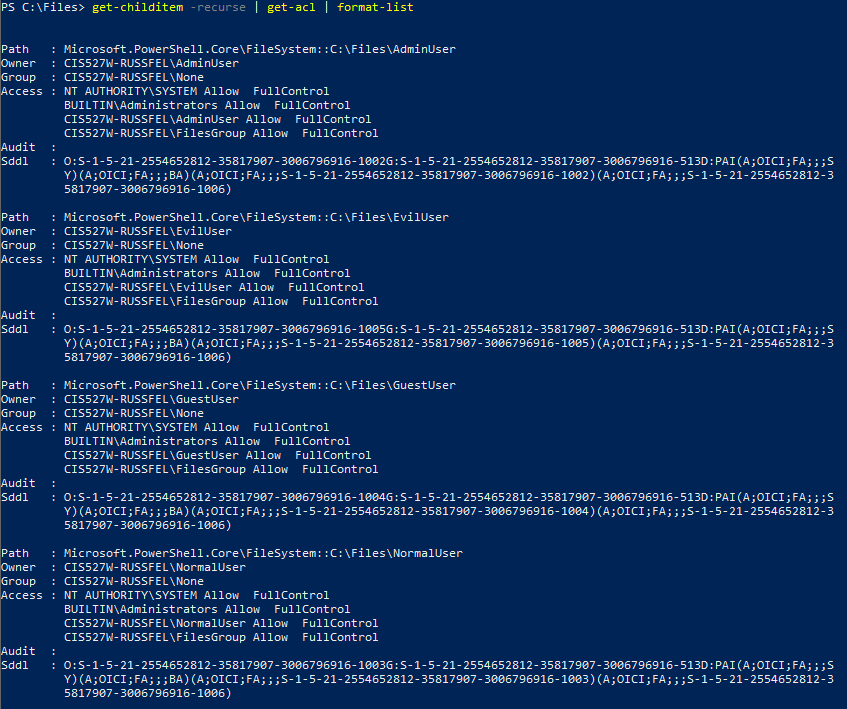
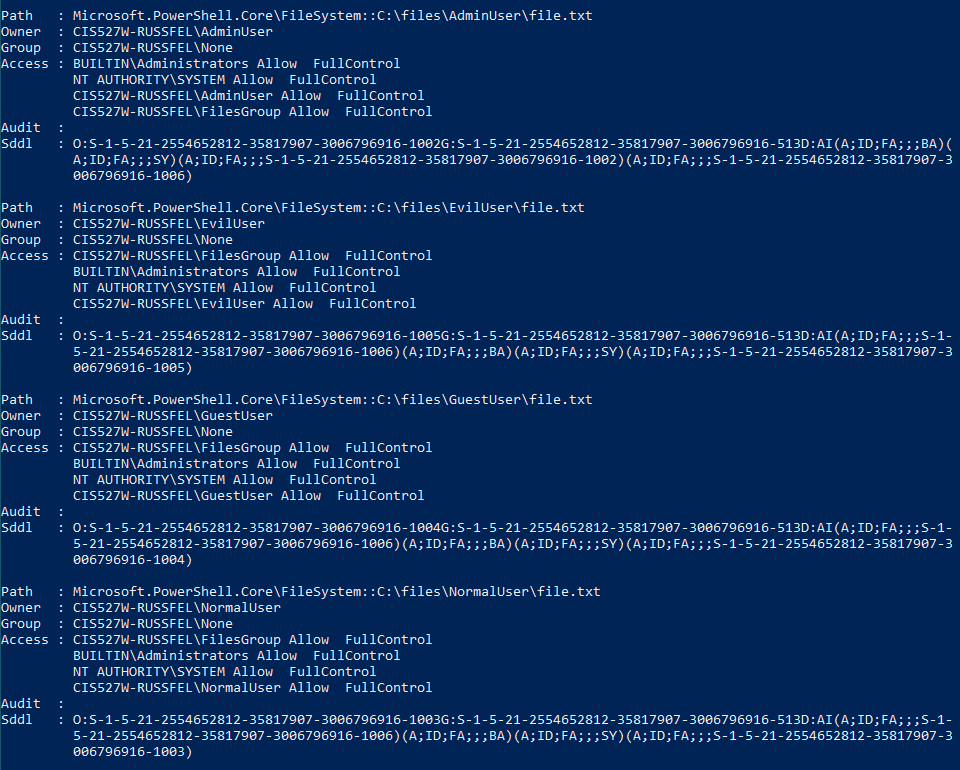
- See this screenshot and this screenshot for what these permissions should look like in PowerShell. This was created using the command
Get-ChildItem -Recurse | Get-Acl | Format-Listin PowerShell. These screenshots are from an earlier version of this lab using different paths and usernames, but the permissions structure is the same.
- Create the folder
Software - Install the latest version of the following software. The installation should be done SILENTLY without any user interaction required. In addition, Puppet should be able to detect if they are already installed, and not attempt to install them again if the manifest is run multiple times.
- Mozilla Firefox
- Mozilla Thunderbird
- Notepad++
Note
You will need to research the appropriate options to give to the installer through Puppet for them to install silently. For this lab, you should not use any Windows package managers such as Chocolatey or Ninite. The installation files will be already downloaded and stored in
C:\install. Also, you’ll need to make sure your resource names exactly match the names of the packages after they are installed, or Puppet will attempt to reinstall them each time the manifest file is applied. –Russ
Services - Ensure the following services are running:
- DHCP Client
- DNS Client
- Windows Update
Note
You will have to find the appropriate name for each service. –Russ
Task 3: Upload to Canvas & Contact Instructor
Note
Please add comments to your Puppet Manifest Files describing any Puppet Modules that must be installed prior to applying them.
Upload your completed Puppet Manifest Files to Canvas and then contact the instructor for grading. You may continue with the next module once grading has been completed. In general, this lab does not require interactive grading, but you are welcome to request a time if you’d prefer.