Configuration Management
Automated provisioning of workstations and servers.
Automated provisioning of workstations and servers.
As of 2023, the Puppet Learning VM is no longer being maintained. The videos below demonstrate some of the features of Puppet, which can also be done on your Ubuntu VM after installing Puppet Agent. Unfortunately, it is not easily possible to simulate an enterprise Puppet setup without this VM, so I’ll keep these videos up for demonstration purposes. –Russ
Welcome to Module 2! In this module, we’ll be discussing configuration management. The next video will define that concept in detail and give some additional background.
The lab assignment will have you work with Puppet to completely automate most of the tasks you performed in Lab 1. By doing so, hopefully you’ll see the incredible power of using configuration management tools in your workflow as a system administrator.
For the lab, I chose to use the Puppet configuration management tool for a couple of reasons. First, they have an open source, community edition that is very powerful and easy to use, so there is no cost to get started. Secondly, their documentation and support is very well done, so you’ll have plenty of ways to get help if you get stuck. Finally, they provide an easy to use learning VM that can walk you through the basics of Puppet quickly and easily.
To get started in this module, I recommend downloading the Puppet Learning VM at this URL. The link is also in the resources section below this video. It is a very large download, so I recommend starting it now so you are ready to go by the time you get to that point. A later video will discuss how to install and use that VM in detail.
Good luck!
This module deals with the topic of configuration management. Before I introduce that topic directly, let’s look at what we’ve done so far in this class.
In Lab 1, you were asked to set up and configure a single operating system VM for both Windows and Linux. For many system administrators, that is exactly how they operate on real systems - each one is set up by hand, one at a time, manually. This process, of course, does have some benefits. For the sysadmin, they get hands-on management with each computer they support. In addition, they can easily customize each system to meet the individual needs of the user. For sysadmins with a low level of experience, or few resources, this can be a very easy way to at least help users configure their systems. And, in practice, this method works well for small groups of users. If you are only supporting a few users, maybe even up to several dozen, manually managing systems and configurations may be the most efficient and cost-effective way to do so.
However, there are some major downsides to this as well. First and foremost, it is a very time consuming and labor intensive process. You probably experienced that while working on the first lab. Depending on your own experience and familiarity with those systems and the tasks at hand, it may have taken anywhere from one to several hours to complete. While you can, of course, become more proficient, it may still take quite a bit of hands-on time to configure an operating system. In addition, there is the high likelihood of machines being configured inconsistently, leading to additional support headaches down the road. I can confidently say from my time working as a sysadmin and from grading labs in this class, even with the same simple instructions, it is very difficult for any two people to configure a computer in exactly the same way. Also, as new software and operating system updates are released, you’ll find that you need to install them on a per-machine basis, or depend on the end users to do those updates themselves. Finally, as your groups get larger, this approach really doesn’t scale well at all.
So, that leads to the big question - how do we make this process scalable?
One way to do this is through the use of automation tools, such as GNU Make. While Make was developed to help with compiling large pieces of code, it shares many similarities with the tools we’ll look at in this module. Many system administrators also wrote scripts to automate part of their process, but in most cases those scripts were simply a list of steps or commands that the sysadmin would run manually, and they would have to be customized to fit each particular operating system or configuration.
There are also a couple of techniques that can be used to scale this process. One is through the use of system images. Much like the virtual machines we are using in this class, you can actually store the entire hard drive of a computer as a system image and copy it as many times as you’d like to machines. However, this process is also very time-consuming since the images are so big, and they can only be copied onto the same or similar hardware configurations. This is great when everyone has the same hardware, but in many organizations that simply isn’t the case. Lastly, you can also use tools to create custom operating system installers for both Windows and Linux, with much of the configuration and software pre-installed and configured along with the operating system. Again, this is very time consuming, and it must be redone and updated every time something changes. In addition, none of these methods really address how to handle updates and new software once the system is in the hands of the users. In short, we need something better.
Enter the concept of a defined configuration. Imagine this: what if we could write out exactly how we would like our computers to be configured, and then direct our staff to make sure the system matched that configuration, regardless of the operating system or hardware? That configuration would be a list of configured items only, not a set of steps to accomplish that task. In essence, much of the first lab assignment could be thought of as a defined configuration. Those items are high level, system independent, and hopefully just enough information that any competent system administrator could build a system that meets those requirements. If that is the case, could we build a software tool to do the same?
This is the big concept behind configuration management. As a system administrator, all you have to do is define your desired configuration in a way that these tools can understand it, then they will do the rest. In that way, you can think of your system configuration as just another piece of “source code” and manage it just like any other code. If you need to deploy a new piece of software or update one, simply change the configuration file and every system using the tool will make the necessary changes to match. By doing so, this will greatly reduce downtime and errors and increase the consistency of all the systems you are managing. According to one estimate, 70% of all downtime in datacenters is due to human error, so the more we can take humans out of the equation, the better.
There are many tools available for configuration management. For this class, we’ll be using Puppet as it is one of the easiest tools to work with in my experience, and it is available for a variety of platforms and uses. If you are interested in using configuration management tools in your own work, I encourage you to review each of these platforms, as each one offers unique features and abilities.
As we discuss automation tools, I briefly want to bring up the term DevOps, since it is really one of the big things you’ll hear discussed on the internet today. DevOps is a shortened form of “development operations” and is, in essence, a very close collaboration between software development and system administration staff. A good way to think of this is the application of “agile” software development practices to the world of system administration, so that the systems can be as “agile” (pun intended) as the developers want them to be. This involves a high level of automation and monitoring, both in terms of configuration management but also deployment and testing. There are also the very short development cycles traditionally seen in agile development, with increased deployment frequency. We’ll spend a little bit of time talking about DevOps later in the course, but many of the concepts we are covering here in configuration management are very applicable there as well.
Finally, here are a few tools from the DevOps world you may come across. Some of the biggest ones, Jenkins and Travis, are used for build and test automation, while tools such as Nagios and Icinga are helpful for system monitoring. Feel free to check out any of these tools on your own time, as you may find several of them very useful.
Create two different Puppet Manifest Files that meet the specifications below. Each one will be applied to a newly installed virtual machine of the appropriate operating system configured as described in Task 0. The best way to accomplish this is to treat this assignment like a checklist and check things off as you complete them.
If you have any questions about these items or are unsure what they mean, please contact the instructor. Remember that part of being a system administrator (and a software developer in general) is working within vague specifications to provide what your client is requesting, so eliciting additional information is a very necessary skill.
To be more blunt - this specification may be purposefully designed to be vague, and it is your responsibility to ask questions about any vagaries you find. Once you begin the grading process, you cannot go back and change things, so be sure that your machines meet the expected specification regardless of what is written here. –Russ
Also, to complete many of these items, you may need to refer to additional materials and references not included in this document. System administrators must learn how to make use of available resources, so this is a good first step toward that. Of course, there’s always Google!
This lab may take anywhere from 1 - 6 hours to complete, depending on your previous experience working with these tools and the speed of the hardware you are using.
Testing Manifest Files - When testing these manifest files, there is a three step process. First, apply the manifest, then reboot, then apply again. This is because any changes made to group memberships are not applied until after a user logs back in or the system reboots. So, you may get permission issues when creating files or assigning permissions due to incorrect group memberships. Ideally, those permission errors should be eliminated after a reboot. There is no good fix for this in Puppet itself, since it is an operating system issue. Therefore, this is the process that you should use, and it is the process that will be used when your manifest files are graded. Basically, if you get no errors after a reboot, you should be fine!
Create new Windows 11 and Ubuntu 24.04 virtual machines for this lab. When creating the virtual machines and installing the operating system, use the same information from Lab 1. You should create the cis527 account during installation.
DO NOT PERFORM ANY ADDITIONAL CONFIGURATION AFTER THE INSTALLATION IS COMPLETE EXCEPT WHAT IS LISTED BELOW!
After installing the operating system, install ONLY the following software:
puppet-agent-x64-latest.msi in that directory.https://apt.puppet.com/puppet8-release-noble.deb to get the correct version on Ubuntu in the first step.sudo path.In 2025, Puppet was consumed by Perforce, and they limited access to many of the existing downloads and documentation. You can find more information about this change here: Our Plans for Open Source Puppet in 2025.
Because of this, much of the existing documentation for Puppet 8 was migrated and updated to reference their new secure setup, and access to newer Puppet versions requires requesting an account and agreeing to an EULA. I have done my best to update the links to accurate documentation, but some content was unfortunately lost.
However, we’re going to forge ahead and use the existing older versions of Puppet published in late 2024 for now. I will eventually update this course to use a new tool in place of Puppet since it no longer seems to be as freely available as before.
VMware Tools (Windows) and either open-vm-tools-desktop or VMware Tools (Ubuntu)
All System Updates (Windows & Ubuntu)
On the Windows virtual machine only, create a folder at C:\install and download the following installers. Do not change the name of the installers from the default name provided from the website. You may choose to do this step using the download_file Puppet module instead.
Firefox Setup 142.0.exe as of 8/20/2025)Thunderbird Setup 142.exe as of 8/20/2025)npp.8.8.5.Installer.x64.exe as of 8/20/2024)I have listed sample names of the installers as of this writing, and these will be the ones that I use for testing; however, you may receive newer versions with slightly different names. That is fine. Just be sure that you don’t get the default stub or web-only installers, which is what Firefox typically gives you unless you follow the links above. They will not work properly for this lab. –Russ
Once you have your virtual machines configured, make a snapshot of each called “Puppet Testing” for your use. As you test your Puppet manifest files, you’ll reset to this snapshot to undo any changes made by Puppet so you can test on a clean VM. The VMs used for grading will be configured as described here.
When you reset back to a snapshot, any new or modified files on the VM will be lost. So, make sure you keep a backup of the latest version of your manifest files on your host machine! You have been warned!
Create a Puppet Manifest File for Ubuntu 24.04 that defines the following configuration. This configuration is very similar to, but not exactly the same as, Lab 1, so read through it carefully. Assume that the machine you are applying the manifest file on is configured as described above in Task 0.
Users (Same as Lab 1)
adminaccount | AdminPassword123 (Administrator type or sudo group)normalaccount | NormalPassword123 (Normal type)guestaccount | GuestPassword123 (Normal type)evilaccount | EvilPassword123 (Normal type)Makes sure you can actually log in as these users after creating them! Many students forget to check this step and lose points because the accounts are created, but don’t actually allow users to log in.
Files & Permissions (Same as Lab 1)
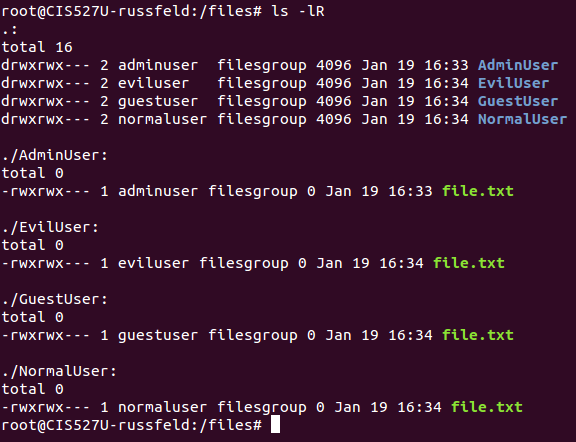
/cis527 (at the root of the system, not in a user’s home folder). Any user may read or write to this folder, and it should be owned by root:root (user: root; group: root)./cis527, create a folder for each user created during task 5 except for cis527, with the folder name matching the user’s name. Make sure that each folder is owned by the user of the same name, and that that user has full permissions to its namesake folder.admingroup and set permissions on each folder using that group to allow both cis527 and adminaccount to have full access to each folder created in /cis527. No other user should be able to access any other user’s folder./cis527, create a text file. It should have the same owner and access permissions as the folder it is contained in. The name and contents of the text file are up to you.ls -lR in the Linux terminal. These screenshots are from an earlier version of this lab using different paths and usernames, but the permissions structure is the same.Software (Same as Lab 1)
firefox)thunderbird)apache2)synaptic)gufw)clamav)Services - Ensure the following services are running:
You will have to find the appropriate name for each service. –Russ
Create a Puppet Manifest File for Windows 11 that defines the following configuration. This configuration is very similar to, but not exactly the same as, Lab 1, so read through it carefully. Assume that the machine you are applying the manifest file on is configured as described above in Task 0.
Users (Same as Lab 1)
AdminAccount | AdminPassword123 (Administrators & Users group)NormalAccount | NormalPassword123 (Users group)GuestAccount | GuestPassword123 (Guests group only)EvilAccount | EvilPassword123 (Users group)Makes sure you can actually log in as these users after creating them! Many students forget to check this step and lose points because the accounts are created, but don’t actually allow users to log in.
Files & Permissions (Same as Lab 1)
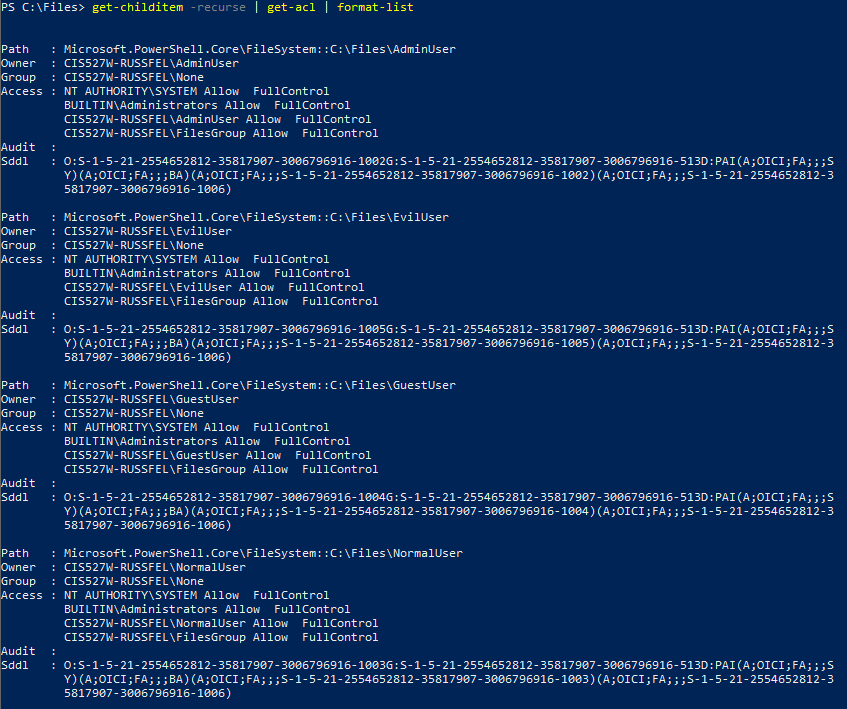
C:\cis527. It should be owned by the cis527 account, but make sure all other users can read and write to that folder.C:\cis527, create a folder for each user created during task 2 except for cis527, with the folder name matching the user’s name. Make sure that each folder is owned by the user of the same name, and that that user has full permissions to its namesake folder.AdminGroup containing cis527 and AdminAccount, and set permissions on C:\cis527 for that group to have full access to each folder created in C:\cis527. No other user should be able to access any other user’s folder.C:\cis527, create a text file. It should have the same owner and access permissions as the folder it is contained in. The name and contents of the text file are up to you.Get-ChildItem -Recurse | Get-Acl | Format-List in PowerShell. These screenshots are from an earlier version of this lab using different paths and usernames, but the permissions structure is the same.Software - Install the latest version of the following software. The installation should be done SILENTLY without any user interaction required. In addition, Puppet should be able to detect if they are already installed, and not attempt to install them again if the manifest is run multiple times.
You will need to research the appropriate options to give to the installer through Puppet for them to install silently. For this lab, you should not use any Windows package managers such as Chocolatey or Ninite. The installation files will be already downloaded and stored in C:\install. Also, you’ll need to make sure your resource names exactly match the names of the packages after they are installed, or Puppet will attempt to reinstall them each time the manifest file is applied. –Russ
Services - Ensure the following services are running:
You will have to find the appropriate name for each service. –Russ
Please add comments to your Puppet Manifest Files describing any Puppet Modules that must be installed prior to applying them.
Upload your completed Puppet Manifest Files to Canvas and then contact the instructor for grading. You may continue with the next module once grading has been completed. In general, this lab does not require interactive grading, but you are welcome to request a time if you’d prefer.
The video refers to Puppet version 6, but Puppet 8 is now the latest version. For the lab assignment, you’ll want to install Puppet 8 and not Puppet 6. This changes the URL used to get the release package - see the assignment page for more information. The basic process is otherwise the same.
To begin work on Lab 2, you’ll need to install Puppet Agent on your new VMs. This video will walk you through that process.
First, let’s look at installing Puppet Agent on Ubuntu. Here I have an Ubuntu VM configured as described in the Lab 2 assignment, except I have not installed the Puppet Agent software yet. To install Puppet Agent, we must first enable the Puppet Platform repositories. A link to these instructions are in the resources section below the video. On that page, scroll down to the section titled “Enable the Puppet Platform on Apt” and enter the two commands given.
However, we’ll need to determine the URL required for our version of Puppet and Ubuntu. In this case, we’d like to install Puppet version 6, and we are using Ubuntu 20.04, which is codenamed “Focal Fossa”. So, our URL would consist of ‘puppet6’ as the platform name, and ‘focal’ as the OS abbreviation. So, the full URL will be https://apt.puppetlabs.com/puppet6-release-focal.deb. When we place that first URL after wget in the first command, it will simply download a .DEB installation file to your computer. The second command uses the dpkg tool to install that file.
Once we’ve done that, we can use sudo apt update and sudo apt install puppet-agent to install the Puppet Agent program on Ubuntu.
However, you won’t be able to use those commands until we add them to the PATH environment variable. The PATH variable is a list of folders that contain the commands you can access from the Terminal. If you have reviewed the information in the Extras module for Bash Scripting, you are already familiar with the PATH variable. The instructions for installing Puppet Agent on Linux linked in the resources section gives one way to add these commands to your PATH variable, but it is incomplete and will not work in all cases. So, there are two options: one would be to use the full path each time you need to use the Puppet commands, and the second is to modify the PATH variable. In this video, I’ll walk you through the steps to modify your PATH to enable direct access to these commands.
First, you must add it to your own PATH variable. To do so, use the following command to edit your Bash configuration file:
nano ~/.bashrcUse the arrow keys to navigate to the bottom of the file. Then, on a new line, add the following:
export PATH=/opt/puppetlabs/bin:$PATHThen press CTRL+X, then Y, then ENTER to save and close the file. Finally, close and reopen Terminal to load the new PATH variable. If you did it correctly, you should be able to run the puppet command, as you can see here.
However, if you try to use sudo to run the puppet command as root, you’ll notice that it still cannot find the command. This is due to the fact that the system protects the PATH variable from changes when using root privileges in order to enhance system security. So, you’ll also need to edit the PATH variable used by the sudo command. To do so, use the following command to open the sudo configuration file:
sudo visudoThis command will open the \etc\sudoers file on your system for editing. Near the top, you’ll see a line for Defaults secure_path containing the PATH variable used by the sudo command. Carefully edit that line by adding the following text to the end, before the closing quotation mark:
:/opt/puppetlabs/binNote that I added a colon to the end of the existing line, then the new path. On my system, the full line now looks like this:
Defaults secure_path="/usr/local/sbin:/usr/local/bin:/usr/sbin:/usr/bin:/sbin:/bin:/snap/bin:/opt/puppetlabs/bin"Once you are done editing, you can use CTRL+X, then Y, then ENTER to save and close the file. You should now be able to use the sudo puppet command as well.
Now, let’s switch over to Windows and install the Puppet Agent there. First, you’ll need to download the Puppet Agent using the link on the resources page below this video. Remember to find the latest version of the Puppet Agent installer, as there are many listed on this page. Once you have downloaded the file, simply double-click on it to run the installer. It will install Puppet Agent on the computer. It’s that simple!
As of 2023, the Puppet Learning VM is no longer being maintained. The videos below demonstrate some of the features of Puppet, which can also be done on your Ubuntu VM after installing Puppet Agent. Unfortunately, it is not easily possible to simulate an enterprise Puppet setup without this VM, so I’ll keep these videos up for demonstration purposes. –Russ
In this video, we will begin learning how to use Puppet to configure a system. Before creating our own Puppet scripts, called Manifest Files, we will discuss how Puppet actually views a system it is configuring.
In Puppet, a system is simply a set of resources. There are many different types of resources, such as files, user accounts, installed programs, and more. In addition to a type, each resource has a title, and a set of attributes giving additional information about the resource. The resources section below the video has links to the Puppet documentation for resource types.
Let’s review some different resources using the Puppet Learning VM. You can also perform many of these same operations on your Windows and Linux computers with Puppet Agent installed. If you’d like to follow along, I’ll be working in the hello_puppet quest on the Puppet Learning VM.
I have already performed the first task for the hello_puppet quest, so I’m now connected to one of the internal systems and installed the Puppet Agent on it. Now, I can start Task 2, where I review a file resource. Using Puppet, you can describe a file resource such as the following:
sudo puppet resource file /tmp/testThat should give you information about that file. Here you can see that the resource is of type file, and has its path for a title. Below that are the attributes of the file, given as parameter => value pairs. Since the file doesn’t exist, the only attribute visible is the ensure attribute, and it shows that the file is absent on the system.
We can easily create the file using this command:
touch /tmp/testThen we can use the same resource command to view it:
sudo puppet resource file /tmp/testNow we can see many additional attributes of the file.
We can also use the puppet resource command to modify resource. For example, let’s add some content to that file:
sudo puppet resource file /tmp/test content='Hello Puppet!'Once you run that command, you can view the contents of the file to confirm that it worked:
cat /tmp/testThere are many types of resources that can be viewed and modified in this way. For example, you can view information about a user account, such as the learning account on the current VM:
sudo puppet resource user learningYou can also find information about installed software packages, such as the Apache Webserver httpd:
sudo puppet resource package httpdIn this case, since the package is not installed on the system, the ensure attribute is set to purged, which is similar to absent.
The Puppet Learning VM quest describes how to see the inner workings of a Puppet Resource by breaking it. I’m not going to go over that process in detail, but I recommend you review that information on your own.
As with the file, we can configure attributes easily enough:
sudo puppet resource package httpd ensure=presentThat command will install the latest version of the httpd package. Note that when it executes, the ensure value is changed to the current version. Later, as you define your Puppet manifests, you can use the ensure attribute to install the latest version using the present value, or provide a specific version number here if desired.
There are many different types of resources available in Puppet. I encourage you to review some of the documentation linked below this video before continuing, just to get an idea of what is available. The next video will describe how to create your own Puppet Manifest Files and apply them to a system directly using the Puppet Agent.
As of 2023, the Puppet Learning VM is no longer being maintained. The videos below demonstrate some of the features of Puppet, which can also be done on your Ubuntu VM after installing Puppet Agent. Unfortunately, it is not easily possible to simulate an enterprise Puppet setup without this VM, so I’ll keep these videos up for demonstration purposes. –Russ
Now, let’s take a look at how we can use Puppet to create defined configurations to be applied to our systems. In Puppet, we refer to those defined configurations as manifest files. Each manifest file defines a set of resources to be configured on the system. Then, the Puppet Agent tool compares the configuration defined in the manifest file and the system’s current configuration, making changes as needed to the system until they match. In addition, each manifest file should be written in a way that it can be repeatedly applied to a system, since it is only defining the configuration desired and not the steps to accomplish it. This makes Puppet a very powerful tool for managing system configuration across a variety of systems and platforms.
When you apply a manifest file, Puppet will go through a compilation process to convert the manifest file into a catalog. When working in a larger organization with a Puppet master server containing several manifest files, this allows the system to distill all of that information into a single place. We’ll talk a bit more about that when we look at a master/agent setup using Puppet.
Now, let’s create our first Puppet Manifest files. Once again, I’m using the Learning Puppet VM during the hello_puppet quest, but you can follow along on your own Windows or Linux VM as well. I’ll use SSH to connect to the hello.puppet.vm node, then make sure the Puppet Agent is installed.
To make this process simpler, I’m also going to install the Nano text editor. For most beginners, I feel that Nano is the easiest command-line text editor to learn, though it may not be the most powerful. If you are familiar with Vim, feel free to use it as it is already installed on this system. Since the Learning Puppet VM is using CentOS as its Linux distribution of choice, the command to install packages is a bit different than on Ubuntu. To install Nano, type the following:
sudo yum install nanoNow, let’s open a new text file using Nano, called manifest.pp. In that file, we can define a file resource as follows:
file { '/tmp/testfile':
  ensure => 'file',
  content => 'Manifest File!',
  mode => '0644'
}
Once you have created that file, press CTRL+X, then Y, then ENTER to save and close the file in Nano. Then, you can apply the file using this command:
sudo puppet apply manifest.ppIt should successfully apply, and give you a message that the file was created. You can then use either
sudo puppet resource file /tmp/testfileor
ls -l /tmp/testfileto verify that the file exists and has the correct permissions. You can also view the file’s contents using
cat /tmp/testfileIt’s that easy! Most of the attributes displayed when you use the puppet resource command are configurable in a manifest file, so you can use puppet resource to determine how a system is currently configured, then copy the desired attributes into a manifest file to define that configuration. Let’s add a few more things to our manifest:
package {  'nano':
  ensure => 'present'
}

user { 'cis527':
  ensure => 'present',
  shell => '/bin/zsh',
  home => '/home/cis527',
  managehome => true
}
Once you’ve edited a manifest file, you can verify that your syntax is correct using the following command:
puppet parser validate manifest.ppIf you have any errors in your manifest file, it will give you the approximate line and column number. Be careful about your use of colons, commas, quotes, and brackets. As with any programming language, Puppet is very particular about the correct use of syntax.
Now, let’s apply that manifest and see what happens:
sudo puppet apply manifest.ppSince the Nano package is already installed, it probably won’t do much at this point. However, it should create the cis527 user. We can verify that it worked by switching to that user account. First, we’ll need to set a password for it:
sudo passwd cis527Then, we can use that password and the switch user command to log in as that user:
su cis527If all goes well, our terminal should change to show that we are logged in as the cis527 user. Of course, it is possible to define the desired password in the manifest file, but that is something you’ll have to figure out on your own as you complete Lab 2. (I can’t give everything away, can I?)
Before moving on to the next video, I encourage you to play around with this temporary manifest file a bit and see what other changes you can make to the resources we’ve defined, or what other resources you can use here.
As of 2023, the Puppet Learning VM is no longer being maintained. The videos below demonstrate some of the features of Puppet, which can also be done on your Ubuntu VM after installing Puppet Agent. Unfortunately, it is not easily possible to simulate an enterprise Puppet setup without this VM, so I’ll keep these videos up for demonstration purposes. –Russ
Now that we’ve seen Puppet Manifest files, let’s discuss some of the caveats of such a system. On the Learning Puppet VM, during the hello_puppet quest as described in the earlier videos, I’m going to continue to create manifest files on the hello.puppet.vm node.
Using Nano, create the following manifest file:
file { '/tmp/test1':
  ensure => 'file'
}

file { '/tmp/test2':
  ensure => 'file'
}

file { '/tmp/test3':
  ensure => 'file'
}

notify { "First Notification": }
notify { "Second Notification": }
notify { "Third Notification": }
Once that is done, apply the manifest:
sudo puppet apply test.ppWhen you do, you may see things applied out of order. Since a Puppet Manifest file only defines the desired configuration, it is up to the Puppet Agent tool to determine which steps are necessary and in what order. This is because Puppet considers each resource definition to be atomic, meaning that it is independent of all other resources. In some cases, however, we want to make sure that some resources are configured before others. Thankfully, Puppet gives us many ways to do so.
The first uses the before and require keywords. Here is an example from the Puppet documentation linked in the resources section below the video:
package { 'openssh-server':
  ensure => present,
  before => File['/etc/ssh/sshd_config'],
}

file { '/etc/ssh/sshd_config':
  ensure => file,
  mode => '0600',
  source => 'puppet:///modules/sshd/sshd_config',
  require => Package['openssh-server'],
}
Each of these elements creates the same relationship. You only need to include either the before or require keyword in one of the resources, but both are not required.
Similarly, the notify and subscribe keywords create a similar relationship. From the documentation:
file { '/etc/ssh/sshd_config':
  ensure => file,
  mode => '0600',
  source => 'puppet:///modules/sshd/sshd_config',
  notify => Service['sshd'],
}

service { 'sshd':
  ensure => running,
  enable => true,
  subscribe => File['/etc/ssh/sshd_config'],
}
Again, only one or the other is required. However, unlike with the before and require keywords, in this case the second item will only be refreshed if the prior resource has changed. In this example, if the sshd_config file is changed, then the sshd service will be restarted so it will read the newly changed file. This is a very powerful tool for making changes to configuration files and making sure the services immediately restart and load the new configuration.
Finally, the third method is through the use of chaining arrows. This tells the Puppet Agent to apply resources in the order they are written in the manifest. One of the most powerful and common uses of this is to create a “Package, File, Service” chain. Here is the example from the Puppet documentation:
# first:
package { 'openssh-server':
  ensure => present,
} -> # and then:
file { '/etc/ssh/sshd_config':
  ensure => file,
  mode => '0600',
  source => 'puppet:///modules/sshd/sshd_config',
} ~> # and then, if the previous file was updated:
service { 'sshd':
  ensure => running,
  enable => true,
}
This manifest will ensure the openssh-server package is installed first. Then, once it is installed, it will place the desired configuration file on the system. The first arrow with a simple hyphen creates a before/require relationship. Then, if that file is modified in any way, the second arrow, using a tilde ~ character, will enforce a notify/subscribe relationship and cause the sshd service to refresh.
As you work on your Puppet Manifest files for Lab 2, it is helpful to keep in mind that some resources may need to be chained together to work properly. However, do not try to chain together your entire manifest file, as that defeats much of the flexibility of Puppet itself.
In this video, we’ll go just a bit deeper into the Puppet language and some additional features of Puppet. You may not need all of this information to complete Lab 2, but it is definitely helpful.
First, as with any programming language, Puppet allows you to assign variables. The basic syntax for assigning a variable is:
$my_variable = "Some text"As with many scripting languages, a variable name always begins with a dollar sign $, and is assigned with a single equals sign =. Unlike most languages, however, variables can only be assigned once. If you think about it, this makes sense, since Puppet may apply resources in any order. In this way, it is much more of a declarative language than an imperative language, though it shares some features of both.
You can then use variables in your manifest files. For example, a variable is interpolated in any double-quoted string, such as here:
$username = "russfeld"
notify { "Your home directory is /home/${username}": }
Puppet also has a very powerful templating language that can be used with configuration files. It is outside the scope of what I’ll cover in this class, but I encourage you to look into it on your own if you are interested.
Another tool bundled with Puppet is Facter. Facter is able to provide information about the system it is running on. Puppet can then use that information in manifest variables and templates to customize the system’s configuration. To see the facts available on your system, type:
facter -pOf course, you’ll find that there are many facts available. You can find a full list of facts in the Puppet documentation linked below this video. You can also write custom facts, if needed.
Puppet also has very powerful programming constructs which can be used in your manifest files. One of the most useful is the conditional statement, or “if” statement. The syntax is very similar to most other languages. For example, here is the sample “if” statement from the Puppet documentation:
if $facts['is_virtual'] {
  warning('Tried to include class ntp on virtual machine; this node might be misclassified.')
}
elsif $facts['os']['family'] == 'Darwin' {
  warning('This NTP module does not yet work on our Mac laptops.')
}
else {
  include ntp
}
In this statement, the manifest is determining if the system is virtualized, or if the OS family is Darwin, the base kernel family for Apple Macintosh laptops. If either of those is the case, it will print a warning message. However, if neither of those is true, then it will include the ntp module. We’ll talk about modules later in the video. An “if” statement such as this, combined with the information that can be gleaned from a system using Facter, allows you to create manifest files that could be applied on a variety of different systems.
One caveat to be aware of: make sure you are careful about your data types. In Puppet, as in many other languages, the boolean value false and the string value "false" are different. In fact, Puppet treats non-empty strings as the boolean value true by default. In addition, all of the facts from Facter are strings, so you must be careful how you use them.
Consider this example:
$boolean = "false"
if $boolean {
  notify{"This is true":}
}
else {
  notify{"This is false":}
}
When you run a manifest file containing this code, you’ll be notified that the value is true, since is a string. To resolve this problem, you can use the str2bool function included in the Puppet Labs Standard Library. First, install the Puppet Labs Standard Library module using the following command:
puppet module install puppetlabs-stdlibThen, modify the manifest file as follows:
include stdlib
$boolean = "false"
if str2bool("$boolean") {
  notify{"This is true":}
}
else {
  notify{"This is false":}
}
Now, you’ll get the expected result. The Puppet Labs Standard Library includes many other useful functions, so I encourage you to check them out. The documentation is linked in the resources below this video.
In addition to the “if” statement, Puppet also includes a “case” statement. The basic syntax is as follows:
case $operatingsystem {
  "centos": { $apache = "httpd" }
  "redhat": { $apache = "httpd" }
  "debian": { $apache = "apache2" }
  "ubuntu": { $apache = "apache2" }
  default: { fail("Unrecognized OS") }
}
The matches here are case-insensitive, which is very helpful. You can also combine some of the labels and use regular expressions, as in this example:
case $operatingsystem {
"centos", "redhat": { $apache = "httpd" }
/^(Debian|Ubuntu)$/: { $apache = "apache2" }
default: { fail("Unrecognized OS") }
}
When using regular expressions, note that the matching is case-sensitive.
Finally, Puppet code can be further organized into classes. As with most object-oriented languages, a class definition is very simple. Here is one example:
class myclass (String $message = "Hello") {
  notify { "${message} user": }
}
Once the class is defined, you can use the include keyword to declare it in your manifest file, using all default values for parameters:
include myclassOr you may declare it using a resource syntax, allowing you to override default parameter values:
class { 'myclass':
  message => "Test"
}
Either way, it is important to remember that you must always declare a class to use it. A class definition itself is not sufficient for the resources inside the class to be configured.
Finally, on most enterprise Puppet systems, the manifest files have been further organized into a set of modules. Each module is a self-contained set of manifest files, templates, and configuration files, all for a particular use. For example, above the sample code references the ntp module, which is a module available from Puppet for managing NTP servers.
Unfortunately, writing your own modules is a very complex task, and I have decided that it is outside of the scope of what I’d like to cover in this class. Feel free to continue following the documentation in the Learning Puppet VM to see more about how to write your own modules.
In many cases, however, there are already modules freely available to perform a variety of common management tasks. So, I highly recommend checking out the available modules on Puppet Forge to see what’s out there. As with many system administration tasks, don’t try to reinvent the wheel if one already exists!
As of 2023, the Puppet Learning VM is no longer being maintained. The videos below demonstrate some of the features of Puppet, which can also be done on your Ubuntu VM after installing Puppet Agent. Unfortunately, it is not easily possible to simulate an enterprise Puppet setup without this VM, so I’ll keep these videos up for demonstration purposes. –Russ
In this video, I’ll give a quick demonstration of what a true enterprise Puppet setup might look like. Once again, I’m going to be using the Learning Puppet VM, and this time I’ll be following the agent_run quest to demonstrate these features.
The agent_run quest gives us a client system already set up and ready to go. We can access it using SSH:
ssh learning@agent.puppet.vmOnce we are on that system, we can try to force a Puppet Agent run using the following command:
sudo puppet agent -tHowever, when the Puppet Agent tries to contact the Puppet Master server, it presents an error about client certificates. As a security measure, we must sign the certificate for each agent that tries to contact the server before it will be allowed access. Without this step, any malicious user could gain valuable information about our system configuration by talking with the Puppet Master.
To sign that certificate, we can go back to the Puppet Master by exiting the current SSH session:
exitThen we can use this command to show all the unsigned certificates on the system:
sudo puppet cert listTo sign a certificate, we can use this command:
sudo puppet cert sign agent.puppet.vmNow, we can reconnect to our agent node:
ssh learning@agent.puppet.vmAnd try to run the agent again:
sudo puppet agent -tThis time, we should be successful. However, we haven’t really told Puppet what we want configured on this system. So, let’s go back to the Puppet Master and do so:
exitOn the Puppet Master, we would like to edit the manifest file used to configure each system. As before, I’ll quickly install Nano to make editing files much simpler, but feel free to use Vim if you would like:
sudo yum install nanoNext, we’ll edit the default site manifest file, which is located at the end of a very long directory path:
nano /etc/puppetlabs/code/environments/production/manifests/site.ppThis is the default site manifest file for this system. On an actual system, you may define different environments and roles for each system, which may alter the path to this file. For this example, we’ll just make a quick edit to show how it can be done.
At the bottom of the file, add the following:
node 'agent.puppet.vm' {
  notify { "Hello Puppet!": }
}
Then, use CTRL+X, then Y, then ENTER to save and close the file.
Finally, return to the agent VM:
ssh learning@agent.puppet.vmand run Puppet Agent once again:
sudo puppet agent -tIf done correctly, you should see a notification of "Hello Puppet!" in the output.
This is a very short demo of the power of Puppet’s Master and Agent architecture. The Puppet Learning VM quests go much more in-depth in ways to use Puppet in an organization. I highly encourage you to review that information if you are interested, but it is not required to complete Lab 2.
Here are a few hints for completing Lab 2, based on the struggles some students have had during previous semesters.
First, let’s talk about passwords. On the Puppet documentation for the user resource type, it notes that on Linux, the password given in the configuration file must already be encrypted. Thankfully, it gives you some hints here on using built-in functions, or functions from the Puppet Labs Standard Library, to calculate the correct encrypted password. You can also use the Sensitive data type to redact the plain-text password from log files. Of course, on Windows, you can only use cleartext passwords.
Next, installing packages on Windows can be quite difficult without using a package management program such as Chocolatey. In the resources section below this video, I’ve included a few links describing the process for installing and managing packages in Windows in detail. In short, you’ll need to be very careful about the title matching the actual DisplayName of the package, as well as the install_options to make them install silently. This may take a bit of trial and error to get it working correctly.
In addition, when you download the installation files for Windows, make sure you get the full installers and not the “stub” installer that just downloads the real installer in the background. Sometimes you have to dig a bit deeper on the vendor’s website to find these. As stated in the assignment sheet, you may also choose to download the files using the download_file Puppet module. Either approach will work.
Another important note: on both Windows and Linux, changes to group membership do not take effect immediately. On Linux, the current user must log-out and log-in to see the change, whereas on Windows a reboot is required in most cases. Because of this, when testing your manifest files, you may find it necessary to apply the manifest, then logout/reboot and apply it again for all resources to be configured correctly. That is fine, provided that it works as intended on the second application.
Finally, you may find that defining permissions in Windows is difficult using the default file resource. You may choose to install the puppetlabs-acl module to configure Windows permissions directly. The resources section below the video includes a link to that module and its documentation as well.
I hope these hints help you successfully complete Lab 2 with minimal frustration. As always, if you have any questions or run into any issues, please post on the course discussion forums before contacting the instructor. Good luck!