Assignment
Lab 3 - Core Networking Services
Instructions
Create three virtual machines meeting the specifications given below. The best way to accomplish this is to treat this assignment like a checklist and check things off as you complete them.
If you have any questions about these items or are unsure what they mean, please contact the instructor. Remember that part of being a system administrator (and a software developer in general) is working within vague specifications to provide what your client is requesting, so eliciting additional information is a very necessary skill.
Note
To be more blunt - this specification may be purposefully designed to be vague, and it is your responsibility to ask questions about any vagaries you find. Once you begin the grading process, you cannot go back and change things, so be sure that your machines meet the expected specification regardless of what is written here. –Russ
Also, to complete many of these items, you may need to refer to additional materials and references not included in this document. System administrators must learn how to make use of available resources, so this is a good first step toward that. Of course, there’s always Google!
Time Expectation
This lab may take anywhere from 1 - 6 hours to complete, depending on your previous experience working with these tools and the speed of the hardware you are using. Installing virtual machines and operating systems is very time-consuming the first time through the process, but it will be much more familiar by the end of this course.
Task 0: Create 3 VMs
For this lab, you’ll need to have ONE Windows 11 VM, and TWO Ubuntu 24.04 VMs available. You may reuse existing VMs from Lab 1 or Lab 2. In either case, they should have the full expected configuration applied, either manually as in Lab 1 or via the Puppet Manifest files created for Lab 2.
For the second Ubuntu VM, you may either quickly install and configure a new VM from scratch following the Lab 1 guide or using the Puppet Manifest from Lab 2, or you may choose to create a copy of one of your existing Ubuntu VMs. If you choose to copy one, follow these steps:
- Completely shut down the VM - do not suspend it.
- Close VMware Workstation.
- Make a copy of the entire folder containing the VM.
- Open the new VM in VMware Workstation (look for the .VMX file in the copied folder).
- When prompted, select “I copied it” to reinitialize the network interface. THIS IS IMPORTANT!
- Boot the new VM, and change the hostname to
cis527s-<your eID>.- Setting the Hostname on Ubuntu 24.04 from LinuxConfig.org
Warning
If you do not follow these instructions carefully, the two VMs may have conflicts on the network since they’ll have identical networking hardware and names, making this lab much more difficult or impossible to complete. You have been warned! –Russ
- Setting the Hostname on Ubuntu 24.04 from LinuxConfig.org
Clearly label your original Ubuntu VM as CLIENT and the new Ubuntu VM as SERVER in VMware Workstation so you know which is which. For this lab, we’ll mostly be using the SERVER VM, but will use the CLIENT VM for some testing and as part of the SNMP example in Task 5.
Note
VMware Fusion (Mac) Users - Before progressing any further, I recommend creating a new NAT virtual network configuration and moving all of your VMs to that network, instead of the default “Share with my Mac” (vmnet8) network. In this lab, you’ll need to disable DHCP on the network you are using, which is very difficult to do on the default networks. You can find relevant instructions in Add a NAT Configuration and Connect and Set Up the Network Adapter in the VMware Fusion 13 Documentation.
Task 1: Remote Connections
PART A: On your Windows 11 VM, activate the Remote Desktop feature to allow remote access.
- Both the
cis527andAdminAccountaccounts should be able to access the system remotely, as well as the default systemAdministratoraccount. - In addition, change the port used by Remote Desktop to be 34567.
Tip
You’ll need to edit the registry and reboot the computer to accomplish this task. –Russ
- You’ll also need to make sure appropriate firewall rules are in place to accept these incoming connections, and ensure the firewall is properly enabled.
- You can test your connection from your Ubuntu Client VM using the Remmina program.
PART B: On your Ubuntu 24.04 VM labelled SERVER, install and activate the OpenSSH Server for remote access.
- Both the
cis527andadminaccountaccounts should be able to access the system remotely. - In addition, change the port used by the SSH server to 23456.
Tip
In the SSH configuration file, the entries starting with a
#are comments. Typically the default values for each setting are included in the configuration file but commented out. In Ubuntu 24.04, you need to fully reload the daemon and the SSH socket for some changes to take effect - read the comment directly above the port setting line in the configuration file! –Russ - You’ll also need to make sure the appropriate firewall rules are in place to accept these incoming connections, and ensure the firewall is properly enabled.
- You can test your connection from your Windows VM using the
sshcommand in PowerShell, or from the Ubuntu 24.04 VM labelled CLIENT using thesshcommand.Tip
See the appropriate pages in the Extras module for more information about WSL and SSH. –Russ
Resources
- Enable Remote Desktop on your PC from Microsoft Support
- How to Change the Listening Port for Remote Desktop from Microsoft Support
- Change Remote Desktop RDP Port from Tweaks.com
- OpenSSH Server from the Ubuntu Server Guide
- Configuring OpenSSH from Ubuntu Community Help Wiki
- Quick Guide to Enabling SSH on Ubuntu 24.04 from LinuxConfig.org
Task 2: Ubuntu Static IP Address
On your Ubuntu 24.04 VM labelled SERVER, set up a static IP address. The host part of the IP address should end in .41, and the network part should remain the same as the one automatically assigned by VMware.
Note
So, if your VMware is configured to give IP addresses in the 192.168.138.0/24 network, you’ll set the computer to use the 192.168.138.41 address.
You’ll need to set the following settings correctly:
- IP Address
- Subnet Mask
- Default Gateway
Note
VMware typically uses host
2as its internal router to avoid conflicts with home routers, which are typically on host1. So, on the192.168.138.0/24network, the default gateway would usually be192.168.138.2. When in doubt, you may want to record these settings on one of your working VMs before changing them. - DNS Servers. Use one of the following options:
- Your Default Gateway Address (easiest). VMware’s internal router also acts as a DNS resolver for you, just like a home router would
- Off Campus: OpenDNS (
208.67.222.222and208.67.220.220) or Google DNS (8.8.8.8and8.8.4.4) - On Campus: K-State’s DNS Servers (
10.130.30.52and10.130.30.53)
Tip
I personally recommend using the graphical tools in Ubuntu to configure a static IP address. There are many resources online that direct you to use netplan or edit configuration files manually, but I’ve found that those methods aren’t as simple and many times lead to an unusable system if done incorrectly. In any case, making a snapshot before this step is recommended, in case you have issues. –Russ
Resources
- How to Configure Static IP Address on Ubuntu 20.04 Focal Fossa Desktop/Server from LinuxConfig.org
- The Command Line Way: Network Configuration from Ubuntu Server Guide.
Task 3: DNS Server
For this step, install the bind9 package on the Ubuntu 24.04 VM labelled SERVER, and configure it to act as a primary master and caching nameserver for your network. You’ll need to include the configuration for both types of uses in your config file. In addition, you’ll need to configure both the zone file and reverse zone file, as well as forwarders.
Tip
These instructions were built based on the How To Configure BIND as a Private Network DNS Server on Ubuntu 22.04 guide from DigitalOcean. In general, you can follow the first part of that guide to configure a Primary DNS Server, making the necessary substitutions listed below. The guide works for Ubuntu 24.04 as well. –Russ
In your configuration, include the following items:
All files:
- Since you are not creating a Secondary DNS Server, you can leave out any
allow-transferentries from all configuration files.
- Since you are not creating a Secondary DNS Server, you can leave out any
named.conf.optionsfile:- Create an ACL called
cis527that includes your entire VM network in CIDR notation. Do not list individual IP addresses. - Enable recursion, and allow all computers in the
cis527ACL to perform recursive queries. - Configure DNS forwarding, using one of the options given above in Task 2. I recommend using the same option as above, since you have (hopefully) already confirmed that it works for your situation.
- Create an ACL called
named.conf.localfile:- Create a zone file and reverse zone file, stored in
/etc/bind/zones.Note
The DigitalOcean guide uses a
/16subnet of10.128.0.0/16, and includes the10.128portion in the reverse zone file name and configuration. For your VM network, you are most likely using a/24subnet, such as192.168.40.0/24, so you can include the192.168.40portion in your zone file name and configuration. In that case, the zone name would be40.168.192.in-addr.arpa, and the file could be named accordingly. Similarly, in the reverse zone file itself, you would only need to include the last segment of the IP address for each PTR record, instead of the last two. Either way is correct. - List those files by path in this file in the correct zone definitions.
- Create a zone file and reverse zone file, stored in
Zone files:
- Use
<your eID>.cis527.orgas your fully qualified domain name (FQDN) in your configuration file. (Example:russfeld.cis527.org)Domain Ownership
For full disclosure, I own thecis527.orgdomain name, so you don’t have to worry about any configurations causing issues with an actual website.–Russ - Use
ns.<your eID>.cis527.orgas the name of your authoritative nameserver. You can useadmin.<your eID>.cis527.orgfor the contact email address.Note
Since the at symbol
@has other uses in the DNS Zone file, the email address uses a period.instead. So, the email addressadmin@<your eID>.cis527.orgwould be written asadmin.<your eID>.cis527.org. - Don’t forget to increment the
serialfield in theSOArecord each time you edit the file. Otherwise your changes may not take effect. - Create an NS record for
ns.<your eID>.cis527.org.Tip
HINT: The DigitalOcean guide does not include an at symbol
@at the beginning of that record, but I’ve found that sometimes it is necessary to include it in order to make thenamed-checkzonecommand happy. See a related post on ServerFault for additional ways to solve that common error.–Russ
- Use
Forward Zone File:
- Create an A record for
ns.<your eID>.cis527.orgthat points to your Ubuntu 24.04 VM labelled SERVER using the IP address in your network ending in41as described above. - Create an A record for
ad.<your eID>.cis527.orgthat points to the IP address in your network ending in42. (You’ll use that IP address in the next assignment for your Windows server.) This record will be for the Active Directory server in Lab 4 - Create a CNAME record for
ubuntu.<your eID>.cis527.orgthat redirects tons.<your eID>.cis527.org. - Create a CNAME record for
ldap.<your eID>.cis527.orgthat redirects tons.<your eID>.cis527.org. - Create a CNAME record for
windows.<your eID>.cis527.orgthat redirects toad.<your eID>.cis527.org.
- Create an A record for
Reverse Zone File:
- Create a PTR record for the IP address ending in
41that points tons.<your eID>.cis527.org. - Create a PTR record for the IP address ending in
42that points toad.<your eID>.cis527.org.
- Create a PTR record for the IP address ending in
Tip
HINT: The periods, semicolons, and whitespace in the DNS configuration files are very important! Be very careful about formatting, including the trailing periods after full DNS names such as ad.<your eID>.cis527.org.. –Russ
Once you are done, I recommend checking your configuration using the named-checkconf and named-checkzone commands. Note that the second argument to the named-checkzone command is the full path to your zone file, so you may need to include the file path and not just the name of the file. Example: named-checkzone russfeld.cis527.org /etc/bind/zones/db.russfeld.cis527.org
Of course, you may need to update your firewall configuration to allow incoming DNS requests to this system! If your firewall is disabled and/or not configured, there will be a deduction of up to 10% of the total points on this lab
To test your DNS server, you can set a static DNS address on either your Windows or Ubuntu VM labelled CLIENT, and use the dig or nslookup commands to verify that each DNS name and IP address is resolved properly.
Note
See the Bind Troubleshooting page for some helpful screenshots of using dig to debug DNS server configuration.
Warning
As of 2023, the DNS servers on campus do not seem to support DNSSEC, which may cause issues with forwarders. If you are connected to the campus network, I recommend changing the setting in named.conf.options to dnssec-validation no; to disable DNSSEC validation - that seems to resolve the issue.
Resources
- How To Configure BIND as a Private Network DNS Server on Ubuntu 22.04 from DigitalOcean (works for Ubuntu 24.04)
- Bind9 Server How-To from Ubuntu Community Help Wiki
- DNS Configuration from Ubuntu Server Guide
- Reverse DNS/bind named-checkzone “zone NS has no address records (A or AAAA) error” on ServerFault (common error in previous semesters)
Task 4: DHCP Server
Warning
READ THIS CAREFULLY
Make ABSOLUTELY sure that the VMware virtual network you are using is not a “Bridged” or “Shared” network before continuing. It MUST be using “NAT”. You can check by going to Edit > Virtual Network Editor in VMware Workstation or VMware Fusion > Preferences > Network in VMware Fusion and looking for the settings of the network each of your VMs is configured to use.
Having your network configured incorrectly while performing this step is a great way to break the network your host computer is currently connected to, and in a worst case scenario will earn you a visit from K-State’s IT staff (and they won’t be happy)! –Russ
Next, install the isc-dhcp-server package on the Ubuntu 24.04 VM labelled SERVER, and configure it to act as a DHCP server for your internal VM network.
In your configuration, include the following items:
In general, the network settings used by this DHCP server should match those used by VMware’s internal router.
- You can also look at the network settings received by your Windows 11 VM, which at this point are from VMware’s internal router.
Use
<your eID>.cis527.orgas the domain name. (Example:russfeld.cis527.org)For the dynamic IP range, use IPs ending in
.100-.250in your network.For DNS servers, enter the IP address of your Ubuntu 24.04 VM labelled SERVER ending in
.41. This will direct all DHCP clients to use the DNS server configured in Task 3.- Do not use the domain name of your DNS server in your DHCP config file. While it can work, it depends on your DNS server being properly configured in Task 3.
- Alternatively, for testing if your DNS server is not working properly, you can use one of the other DNS options given above in Task 2. However, you must be using the DNS server from Task 3 when graded for full credit.
Tip
A working solution can be fewer than 20 lines of actual settings (not including comments) in the settings file. If you find that your configuration is becoming much longer than that, you are probably making it too difficult and complex. –Russ
Of course, you may need to update your firewall configuration to allow incoming DHCP requests to this system! If your firewall is disabled and/or not configured, there will be a deduction of up to 10% of the total points on this lab
Once your DHCP server is installed, configured, and running properly, turn off the DHCP server in VMware. Go to Edit > Virtual Network Editor in VMware Workstation or VMware Fusion > Preferences > Network in VMware Fusion and look for the NAT network you are using. There should be an option to disable the DHCP server for that network there.
Once that is complete, you can test the DHCP server using the Windows VM. To do so, restart your Windows VM so it will completely forget any current DHCP settings. When it reboots, if everything works correctly, it should get an IP address and network information from your DHCP server configured in this step. It should also be able to access the internet with those settings. An easy way to check is to run the command ipconfig in PowerShell and look for the DNS suffix of <your eID>.cis527.org in the output.
Resources
- Install and Configure ISC DHCP Server from Ubuntu Documentation
- Dynamic Host Configuration Protocol (DHCP) from Ubuntu Server Guide
- How to Install DHCP Server in Ubuntu & Debian from TecAdmin.net
Task 5: SNMP Daemon
Install an SNMP Daemon on the Ubuntu 24.04 VM labelled SERVER, and connect to it from your Ubuntu 24.04 VM labelled CLIENT. The DigitalOcean and Kifarunix tutorials linked below are a very good resource to follow for this part of the assignment. In that tutorial, the agent server will be your SERVER VM, and the manager server will be your CLIENT VM.
- In the tutorial, configure a user
cis527using the passwordcis527_snmpfor both the authentication and encryption passphrases.- This user should not be created in the
snmpd.conffile, and any “bootstrap” users should be removed.
- This user should not be created in the
- The DigitalOcean tutorial includes information for modifying the configuration file to make SNMP listen on all interfaces.
- The DigitalOcean method for creating users does not work. Use the method in the Kifarunix tutorial for configuring SNMP version 3 users.
- The DigitalOcean tutorial includes information for downloading the MIBS and configuring a
~/.snmp/snmp.conffile that can store your user information.
Of course, you may need to update your firewall configuration to allow incoming SNMP requests to this system! If your firewall is disabled and/or not configured, there will be a deduction of up to 10% of the total points on this lab
Then, perform the following quick activity:
- While logged into the CLIENT VM, use the SNMP tools to query the number of ICMP Echos (pings) that have been received by the SERVER VM. Take a screenshot with the command used and the result clearly highlighted in the terminal output.
- You may use either
snmpgetand the OID number or name, or usesnmpwalkandgrepto find the requested information.
- You may use either
- Sent at least 10 ICMP Echos (pings) from the CLIENT VM to the SERVER VM and make sure they were properly received. Take a screenshot of the output, clearly showing how many pings were sent.
- If they weren’t received, check your firewall settings.
- Once again, use the SNMP tools from the CLIENT VM to query the number of ICMP Echos (pings) that have been received by the SERVER VM. It should clearly show that it has increased by the number sent during the previous command. Take a screenshot with the command used and the result clearly highlighted in the terminal output. It should match the expected output based on the previous two screenshots.
Note
You will present the screenshots as proof that you performed this activity for grading. You may preform all three commands in a single screenshot if desired. See this example for an idea of what the output should look like. –Russ
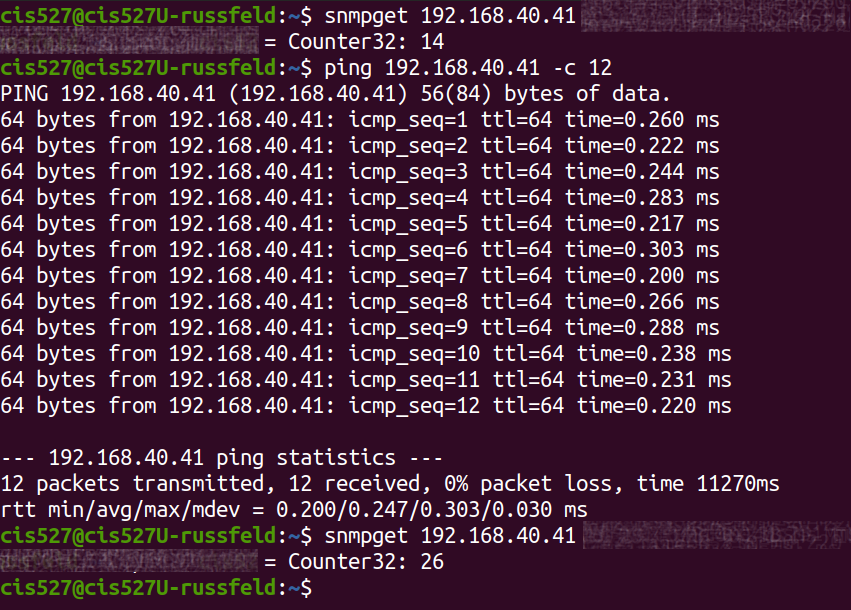
Resources
- How to Install and Configure an SNMP Daemon and Client on Ubuntu 18.04 from DigitalOcean (works for 24.04 as well)
- Install and Configure SNMP on Ubuntu 22.04/Debian 11 from Kifarunix (includes correct command to create user accounts)
- How to Use The Net-SNMP Tool Suite to Manage and Monitor Servers from DigitalOcean (works for 24.04)
- SNMP Agent from Ubuntu Community Help Wiki
Task 6: Wireshark
Install Wireshark on the Ubuntu 24.04 VM labelled SERVER.
Warning
Firefox recently released an update the enables DNS over HTTPS by default. So, in order to use Firefox to request DNS packets that can be captured, you’ll need to disable DNS over HTTPS in Firefox. Alternatively, you can use dig to query DNS and capture the desired packets - this seems to be much easier to replicate easily.
Then, using Wireshark, create screenshots showing that you captured and can show the packet content of each of the following types of packets:
- A DNS standard query for an A record for
people.cs.ksu.edu - A DNS standard query response for
people.cs.ksu.edu- HINT: It should respond with a CNAME record pointing to
invicta.cs.ksu.edu
- HINT: It should respond with a CNAME record pointing to
- A DNS standard query response for a PTR record for
208.67.222.222(it will look like222.222.67.208.in-addr.arpa)- HINT: It should respond with a PTR record for
resolver1.opendns.com
- HINT: It should respond with a PTR record for
- An ICMP Echo (ping) request
- An encrypted SNMP packet showing
cis527orbootstrapas the username (look for themsgUserNamefield)- HINT: Use the commands from Task 5
- A DHCP Offer packet showing the Domain Name of
<your ID>.cis527.org- HINT: Reboot one of your other VMs to force it to request a new IP address, or use the
ipconfig(Windows) ordhclient(Ubuntu) commands to renew the IP address
- HINT: Reboot one of your other VMs to force it to request a new IP address, or use the
- An HTTP 301: Moved Permanently or HTTP 302: Found redirect response
- HINT: Clear the cache in your web browser, then navigate to
http://people.cs.ksu.edu/~sgsax(without a trailing slash). It should redirect tohttp://people.cs.ksu.edu/~sgsax/(with a trailing slash).
- HINT: Clear the cache in your web browser, then navigate to
- An HTTP Basic Authentication request, clearly showing the username and password in plaintext (expand the entries in the middle pane to find it).
- HINT: Visit
http://httpbin.org/basic-auth/testuser/testpassand usetestuser|testpassto log in
- HINT: Visit
Tip
You’ll present those 8 screenshots as part of the grading process for this lab, so I recommend storing them on the desktop of that VM so they are easy to find. Make sure your screenshot CLEARLY shows the data requested. Often you may have to expand sections of the packet analysis (lower-left pane) to find the requested information. –Russ
Resources
- Install and Use Wireshark on Ubuntu Linux from It’s FOSS
Task 7: Make Snapshots
In each of the virtual machines created above, create a snapshot labelled “Lab 3 Submit” before you submit the assignment. The grading process may require making changes to the VMs, so this gives you a restore point before grading starts.
Task 8: Schedule A Grading Time
Contact the instructor and schedule a time for interactive grading. You may continue with the next module once grading has been completed.