Assignment
Lab 4 - Directory Services
Instructions
Create four virtual machines meeting the specifications given below. The best way to accomplish this is to treat this assignment like a checklist and check things off as you complete them.
If you have any questions about these items or are unsure what they mean, please contact the instructor. Remember that part of being a system administrator (and a software developer in general) is working within vague specifications to provide what your client is requesting, so eliciting additional information is a very necessary skill.
Note
To be more blunt - this specification may be purposefully designed to be vague, and it is your responsibility to ask questions about any vagaries you find. Once you begin the grading process, you cannot go back and change things, so be sure that your machines meet the expected specification regardless of what is written here. –Russ
Also, to complete many of these items, you may need to refer to additional materials and references not included in this document. System administrators must learn how to make use of available resources, so this is a good first step toward that. Of course, there’s always Google!
Time Expectation
This lab may take anywhere from 1 - 6 hours to complete, depending on your previous experience working with these tools and the speed of the hardware you are using. Installing virtual machines and operating systems is very time-consuming the first time through the process, but it will be much more familiar by the end of this course.
Warning
Most students in previous semesters have reported that this lab is generally the most frustrating and time-consuming to complete. I recommend setting aside ample amounts of time to work on this lab. This is especially true if the system you are running your VMs on is not very powerful, since running multiple VMs at the same time may slow things down significantly. However, if you find that you are going in circles and not getting it to work, that would be a great time to ask for help. –Russ
Task 0: Create 4 VMs
Windows Server 2025 Does Not Work
In Windows Server 2025, there is an unresolved bug preventing Ubuntu clients from joining a Windows Active Directory Domain hosted by that server version. As of 8/28/2025, this is still unresolved.
You can find the discussion of the outstanding bug (here)[https://gitlab.freedesktop.org/realmd/adcli/-/issues/40].
For now, we’ll continue to use Windows Server 2022 for this class.
For this lab, you’ll need the following VMs:
- A Windows 11 VM. You may reuse your existing Windows 11 VM from a previous lab.
- A Windows Server 2022 Standard (Updated July 2023 or newer) VM. See Task 1 below for configuration details.
- An Ubuntu 24.04 VM labelled CLIENT. This should be the existing CLIENT VM from Lab 3.
- An Ubuntu 24.04 VM labelled SERVER. You have three options to create this VM:
- You can create a copy of your existing CLIENT VM from Lab 3, which does not have DHCP and DNS servers installed. Follow the instructions in the Lab 3 assignment to create a copy of that VM. In this case, you’ll need to reconfigure the VMware NAT network to handle DHCP duties. Make sure you label this copy SERVER in VMWare. This is generally the option that is simplest, and causes the least headaches.
- You may continue to use your exiting SERVER VM from Lab 3, with DHCP and DNS servers installed. You may choose to continue to use this server as your primary DNS and DHCP server for your VM network, which would truly mimic what an enterprise network would be like. Remember that you’ll need to have this VM running at all times to provide those services to other systems on your network. You may also choose instead to disable them and reconfigure the VMware NAT network to handle DHCP duties. Either approach is fine. This option is generally a bit closer to an actual enterprise scenario, but can also cause many headaches, especially if your system doesn’t have enough power to run several VMs simultaneously.
- You may create a new Ubuntu 24.04 VM from scratch, label it SERVER, and configure it as defined either in Lab 1 or using the Puppet manifest files from Lab 2. This is effectively the same as copying your CLIENT VM from Lab 3, but you get additional practice installing and configuring an Ubuntu VM, I guess.
Warning
Before starting this lab, make a snapshot in each VM labelled “Before Lab 4” that you can restore to later if you have any issues. In most cases, it is simpler to restore a snapshot and try again instead of debugging an error when setting up an LDAP or AD server. In addition, Task 6 below will ask you to restore to a snapshot in at least one VM before starting that step.
Task 1: Install Windows Server 2022 Standard
Create a new virtual machine for Windows Server 2022 Standard using the “Windows Server 2022 Standard” installation media (you may choose a newer option if available, but this lab was tested on that specific version - see the warning above about Server 2025 not working currently). You can download the installation files and obtain a product key from the Microsoft Azure Student Portal discussed in Module 1.
- File Name:
en-us_windows_server_2022_updated_july_2023_x64_dvd_541692c3.iso - SHA 256 Hash:
e215493d331ebd57ea294b2dc96f9f0d025bc97b801add56ef46d8868d810053
Tip
For this system, I recommend giving the VM ample resources, usually at least 2 GB RAM and multiple processor cores if you can spare them. You may need to adjust the VM settings as needed to balance the performance of this VM against the available resources on your system.
When installing the operating system, configure it as specified below:
Make sure you choose the Desktop Experience option when installing, unless you want a real challenge! It is possible to perform these steps without a GUI, but it is much more difficult.
Computer Name:
cis527d-<your eID>(example:cis527d-russfeld)Info
This is very important, as it allows us to track your virtual machine on the K-State network in case something goes wrong in a later lab. By including both the class and your eID, support staff will know who to contact. A majority of students have missed this step in previous semesters, so don’t forget! The computer name must be changed after the Windows installation is complete –Russ
Passwords: Use
cis527_windowsas the password for the built-in Administrator accountInstall Software
- VMware Tools
- Mozilla Firefox (you’ll thank me later)
Install Windows Updates: Run Windows Update and reboot as necessary until all available updates are installed.
Automatic Updates: Make sure the system is set to download and install security updates automatically.
Make a snapshot of this VM once it is fully configured and updated. You can restore to this snapshot if you have issues installing Active Directory.
Tip
You can use CTRL+ALT+Insert to send a CTRL+ALT+Delete to your VM in VMware without affecting your host OS.
Note
If you are working in Azure, follow the video instructions at the end of this chapter to install a version of Windows Server for Azure. You do not have to install VMWare Tools but should install Firefox.
Azure supports some backups and restore point options, but they are not as simple to use as VMWare snapshots. You can learn more about Azure backups here: https://learn.microsoft.com/en-us/azure/virtual-machines/backup-recovery. In general, I have avoided using them in my testing.
Task 2: Configure an Active Directory Domain Controller
Configure your Windows Server as an Active Directory Domain Controller. Follow the steps and configuration details below:
First, set a static IP address on your Windows Server VM. Use the IP address ending in
42that was reserved for this use in Lab 3. For the static DNS entries, use that same IP address or the localhost IP address (127.0.0.1) as the first entry, and then use the IP address of your DNS server (either your Ubuntu Server from Lab 3 or VMware’s default gateway address, whichever option you are using) as the second DNS entry. In this way, the server will use itself as a DNS server first, and if that fails then it will use the other server. This is very important when dealing with Active Directory Domains, as the Domain Controller is also a DNS server.Follow the instructions in the resources section below to install and configure the Active Directory Domain Services role on the server.
- Domain Name:
ad.<your eID>.cis527.org(example:ad.russfeld.cis527.org) - Forest Functional Level & Domain Functional Level: Windows Server 2016
- NETBIOS Domain Name:
AD(this should be the default that is presented by the wizard) - Passwords: Use
cis527_windowsfor all passwords
- Domain Name:
Add a User Account to your Active Directory
- Use your own eID for the username here, and
cis527_windowsas the password.
- Use your own eID for the username here, and
Tip
As of Summer 2021, there was a bug in Windows Server that prevented the built-in Administrator account from changing some settings, specifically network settings, once the server is promoted to a domain controller. This can make it difficult to fix networking issues in this or future labs. The easy fix for this is to copy the Administrator account in the Active Directory User and Computers tool and give the new copy a different name, such as “Admin”, and then use that account to log on to the server.
Note
If you are working in Azure, do not set a static IP in Windows Server - this is already managed for you by Azure. Your IP address will most likely be of the form 10.0.0.X - that is the address you’ll use to connect other VMs to this Active Directory domain.
Resources
- Install Active Directory Domain Services (Level 100) from Microsoft
- Add User Accounts on Active Directory from Server-World
- AD DS Installation and Removal Wizard Page Descriptions from Microsoft
Task 3: Join the Domain with Windows 11
Join your Windows 11 VM to the Active Directory Domain created in Task 2. Follow the steps and configuration details below:
First, set static DNS entries on your Windows 11 VM. You SHOULD NOT set a static IP, just static DNS entries. Use the Windows Server IP address ending in
42as the first entry, and the second entry should be the same one used on the server earlier (either your Ubuntu Server from Lab 3 or VMware’s default gateway, whichever option you are using).Join the system to the domain, following the instructions linked in the resources section below.
Once the system reboots, you should be able to log in using the user account you created in Task 2.
Note
If you are working in Azure, you’ll need to add a hosts file entry to the Windows 11 client that directs the domain name ad.<your eID>.cis527.org to the IP address of the Windows Server (usually of the form 10.0.0.X). See this resource for details: https://www.ionos.com/digitalguide/server/configuration/hosts-file/
Resources
- Join a Computer to a Domain from Microsoft Support
Task 4: Configure an OpenLDAP Server
Install OpenLDAP on your Ubuntu VM labelled SERVER. Follow the steps and configuration details below:
First, set a static IP address on your Ubuntu VM labelled SERVER, if it does not have one already. Use the IP address ending in
41that was reserved for this use in Lab 3. For the static DNS entries, use that same IP address as the first entry to reference your DNS server from Lab 3 (see the provided model solutions if your server was not working in Lab 3), and then use the IP address for VMware’s default gateway address as the second DNS entry. In this way, the server will use itself as a DNS server first, and if that fails then it will use the other server. This is very important when dealing with LDAP domains, so that the server can properly resolve theldap.<your eID>.cis527.orgaddress.If you haven’t already, make a snapshot of this VM that you can restore if you run into issues setting up an OpenLDAP server.
Set up and configure an OpenLDAP server, following the first part of the instructions in the guide linked in the resources section below.
- Domain Name:
ldap.<your eID>.cis527.org(example:ldap.russfeld.cis527.org) - Base DN:
dc=ldap,dc=<your eID>,dc=cis527,dc=org(example:dc=ldap,dc=russfeld,dc=cis527,dc=org) - Passwords: Use
cis527_linuxfor all passwords - You DO NOT have to perform the other steps in the guide to configure TLS at this point
- Domain Name:
Install LDAP Account Manager (LAM). See the documentation linked below for how to install and configure LDAP Account Manager.
Add a User Account to your OpenLDAP Directory
- Follow the instructions in the guide below to create
ous forusers,groups, and create anadmingroup as well. - Use your own eID for the username, and
cis527_linuxas the password.
- Follow the instructions in the guide below to create
Configure the server to use TLS. You should follow the Ubuntu Server Guide to create and sign your own certificates. Make sure you use the correct domain name!
- You should make a snapshot of your Ubuntu Server VM before attempting to add TLS. It is very difficult to undo any errors in this process, therefore it is much easier to just roll back to a previous snapshot and try again.
- At the end of the process, copy the certificate at
/usr/local/share/ca-certificates/mycacert.crtto the home directory of thecis527user for the next step.
Of course, you may need to modify your firewall configuration to allow incoming connections to the LDAP server! If your firewall is disabled and/or not configured, there will be a deduction of up to 10% of the total points on this lab
Resources
- How to Install OpenLDAP on Ubuntu 22.04 from HowToForge (works for Ubuntu 24.04)
- Note: In this document, you can skip the steps of manually adding groups and users to LDAP before install LDAP Account Manager. Once LAM is configured, it will automatically add the default OUs for groups and users.
- LDAP & TLS from the Ubuntu Server Guide
Task 5: Configure Ubuntu to Authenticate via LDAP
On your Ubuntu VM labelled CLIENT, configure the system to authenticate against the OpenLDAP server created in Task 4.
First, confirm that you are able to resolve
ldap.<your eID>.cis527.orgusingdigon your client VM. If that doesn’t work, you may need to set a static DNS entry to point to your Ubuntu VM labelled SERVER as configured in Lab 3, or add a manual entry to your hosts file.Next, copy the
mycacert.crtfile from the home directory on your SERVER to the/usr/local/share/ca-certificates/directory on the CLIENT, and then runsudo update-ca-certificatesto install it.- If you have configured SSH properly, you can copy the file from one server to another using
scp. The command may be something likescp -P 23456 ldap.<your eID>.cis527.org:~/mycacert.crt ./. - You’ll need to use
sudoto copy that file into the apporpriate directory on the client. Read the output from the commands to ensure it is installed properly!
- If you have configured SSH properly, you can copy the file from one server to another using
Then, make sure that you can connect to the LDAP server using TLS. You can use
ldapwhoami -x -ZZ -H ldap://ldap.<your eID>.cis527.organd it should returnanonymousif it works.Before you configure SSSD, make a snapshot of this VM. If your SSSD configuration does not work, you can restore this snapshot and try again.
To test your SSSD configuration, use the command
getent passwd <username>(example:getent passwd russfeld) and confirm that it returns an entry for your LDAP user.To log in as the LDAP user, use the
su <username>command (example:su russfeld).Finally, reboot the system, and make sure you can log in graphically by choosing the “Not listed?” option on the login screen and entering your LDAP user’s credentials.
Resources
- SSSD and LDAP on Ubuntu Server Guide
Task 6: Interoperability - Ubuntu Client on Windows Domain
- On your Ubuntu VM labelled CLIENT, make a snapshot labelled “OpenLDAP” to save your configuration you performed for Task 5.
- Open the Snapshot Manager (VM > Snapshot > Snapshot Manager) for that VM
- Restore the “Before Lab 4” Snapshot. This should take you back to the state of this VM prior to setting it up as an OpenLDAP client.
- Follow the instructions in the video in this module to join your Windows Active Directory Domain with your Ubuntu VM. You’ll want to confirm that you are able to resolve
ad.<your eID>.cis527.orgusingdigon your client VM. If that doesn’t work, you may need to set a static DNS entry to point to your Windows server as configured earlier in this lab, or add a manual entry to your hosts file.Warning
If you get errors like “Insufficient permissions to join the domain”, you may need to install
krb5-userand then addrdns=falseto the[libdefaults]section of the/etc/krb5.conffile, as described in this thread. That seemed to fix the error for me. - Make a snapshot labelled “ActiveDirectory” to save your configuration for this task. You can switch between snapshots to have this VM act as a client for either directory service.
Note
If you are working in Azure, you’ll need to add a hosts file entry to the Ubuntu client that directs the domain name ad.<your eID>.cis527.org to the IP address of the Windows Server (usually of the form 10.0.0.X). See this resource for details: https://www.ionos.com/digitalguide/server/configuration/hosts-file/.
This part can be done completely from the terminal - that is typically the best way to work with Linux in Azure. You can access a Linux system in Azure using SSH easily.
Resources
- SSSD and Active Directory from Ubuntu
- Join in Active Directory Domain from Server-World (works for 24.04)
- How to Join Ubuntu 18.04 / Debian 10 To Active Directory (AD) Domain from Computingforgeeks (works for 24.04)
Task 7: Query Servers Using LDAPSearch
From your Ubuntu VM labelled CLIENT, use the ldapsearch command (in the ldap-utils package) to query your Active Directory and OpenLDAP servers. Take a screenshot of the output from each command.
Below are example commands from a working solution. You’ll need to adapt them to match your environment. There are also sample screenshots of expected output.
- Active Directory Example Screenshot (instructive, but using old data)
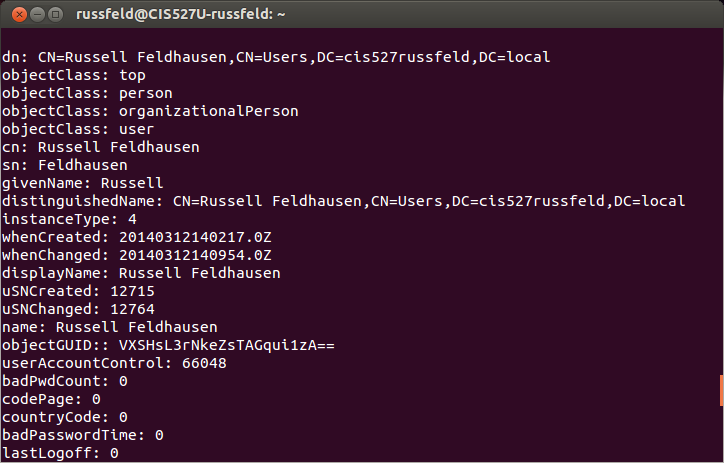
ldapsearch -LLL -H ldap://192.168.40.42:389 -b "dc=ad,dc=russfeld,dc=cis527,dc=org" -D "ad\Administrator" -w "cis527_windows"- OpenLDAP Example Screenshot (instructive, but using old data)
ldapsearch -LLL -H ldap://192.168.40.41:389 -b "dc=ldap,dc=russfeld,dc=cis527,dc=org" -D "cn=admin,dc=ldap,dc=russfeld,dc=cis527,dc=org" -w "cis527_linux"Tip
You’ll be asked to perform each of these commands as part of the grading process, but the screenshots provide good insurance in case you aren’t able to get them to work –Russ
Task 8: Make Snapshots
In each of the virtual machines created above, create a snapshot labelled “Lab 4 Submit” before you submit the assignment. The grading process may require making changes to the VMs, so this gives you a restore point before grading starts. Also, you may have multiple Lab 4 snapshots on some VMs, so feel free to label them accordingly.
Task 9: Schedule A Grading Time
Contact the instructor and schedule a time for interactive grading. You may continue with the next module once grading has been completed.