Directory Services
Consistent usernames across devices.
Consistent usernames across devices.
Welcome to Module 4! In this module, we’ll discuss how to use directory services to provide consistent user accounts and permissions across a number of systems. Specifically, we’ll look at the Active Directory Domain Services for Windows, and the OpenLDAP implementation of the Lightweight Directory Access Protocol (LDAP) for Ubuntu Linux.
In addition, we’ll see how to configure clients to connect to each of those servers. Finally, I’ll discuss some implementation concerns for interoperability, for instances where you’ll have a heterogeneous network environment.
Many students have reported to me that this is one of the most difficult lab assignments in this course, as it can be very frustrating to get everything set up and working correctly the first time. As always, if you have any questions or run into issues, please post in the course discussion forums to get help. Good luck!
This video presents a brief overview of directory services and related concepts. This information is very helpful in understanding the larger role that many of these services play in modern computer networks.
At its core, a directory service is simply a piece of software that can store and retrieve information. The information stored could take many forms, including user accounts, groups, system information, resources, security settings, and more. By providing a centralized location to store that information, it becomes much simpler to share that information across a large enterprise network.
We’ve already worked with one example of a directory service in this course. The modern Domain Name Service is, at its core, a directory service. It stores a directory of domain names matched to IP addresses, as well as additional information about a domain such as the location of the mail server. It can then provide that information to the systems on a large network, providing a level of consistency that is difficult to achieve if each computer has to store a local version of the same information.
Directory services for computers have also been around for quite a while. This page gives a brief timeline of events, starting in the late 1980s and culminating with the release of Microsoft’s Active Directory Domain Services in 1999. Let’s look at each of these items in detail.
First, the X.500 set of standards was released in 1988, and was one of the first projects that aimed to provide a consistent directory of user account information. It was actually developed as a directory for the X.400 set of standards for email, which at that time was the dominant way that email was handled on the internet. Those standards were developed using the OSI networking protocols. However, with the rise of the TCP/IP set of internet protocols, these systems were quickly made obsolete. X.400 was replaced by the SMTP standards used today to send email between MTAs, while X.500 forms the basis of many later protocols. What is most notable about X.500 is that it actually defined several underlying protocols, including a Directory Access Protocol (DAP), as well as a Directory System Protocol (DSP) and others. Today, we primarily use protocols based on the original DAP defined by X.500.
Soon after the release of the X.500 standards, work began on an implementation of the DAP protocol using the TCP/IP internet protocols. It was eventually named the Lightweight Directory Access Protocol, or LDAP. LDAP is the underlying protocol used by many of todays directory services, including Microsoft Active Directory.
However, it is very important to understand that LDAP is not a complete implementation of the original X.500 DAP. Instead, it implements a core set of features, and then adds some additional features not present in the original protocol, while several parts of the original protocol are not implemented. The maintainers of the X.500 standard are very quick to point out this difference, but in practice most systems fully support LDAP as it stands today.
LDAP also has uses beyond just a directory service for user accounts on workstations. For example, LDAP can be used to provide a user lookup service to an email client, or it can be linked with a website to provide user authentication from a central repository of users.
LDAP, along with many other directory services, defines a tree structure for the data. In this way, the data can be organized in a hierarchical manner, closely resembling the real relationships between people, departments, and organizations in an enterprise. For example, in this diagram, you can clearly see nodes in the tree for the overarching organization, the organizational unit, and the individual user.
LDAP uses several short abbreviations for different fields and types of data, and at times they can be a bit confusing to new system administrators. This slide lists a few of the most common ones, as well as a good way to remember them. For example, an ou in LDAP is an organizational unit, which could be a department, office, or some other collection of users and systems.
You can see these abbreviations clearly in this sample LDAP entry. Here, we can see the distinguished name includes the canonical name, as well as the domain components identifying its location in the tree. We can also see the common name and surname for this user, as well as the distinguished name for his supervisor. As you work with LDAP throughout this module, you’ll see data presented in this format several times.
Switching gears a bit, in the early 1990s, there were many different software programs developed to help share files and users between systems. One of the first was Samba. Samba is an open source project that originally reverse engineered the SMB (hence the name) and CIFS file sharing protocols used by Windows. By doing so, they were able to enable file sharing between Linux based systems, including Macs, and Windows. Eventually, Microsoft worked with the developers of the project to allow them to fully implement the protocol, and in more recent versions, a computer running Samba can even act as part of an Active Directory domain. We’ll work with Samba a bit later this semester when we deal with application servers.
Around the same time, Novell released their Directory Services software. This was one of the first directory services targeted at large organizations, and for many years it was the dominant software in that area. It was built on top of the IPX/SPX internet protocols, so it required computers to run special software in order to use the directory service.
Much like the LDAP example earlier, NDS also supported a tree structure for storing information in the directory. It also had some novel features for assigning permissions across different users and ous, which made it a very powerful tool. Many older system administrators have probably worked with Novell in the past. I remember that both my high school, as well as some departments at K-State, used NDS until they switched to Microsoft Active Directory in the mid 2000s.
Before we discuss Active Directory, we should first discuss Windows Workgroups and Homegroups. Most home networks don’t need a full directory service, but it is very helpful to have a way to share files easily between a few computers connected to the same network. Prior to Windows 7, Windows used a “Workgroup” to share these files.
Computers with the same Workgroup name would be able to discover each other across a local network, and any shared files or resources would be available. However, user accounts were not shared, so you wanted to access a resource shared from a particular computer, you’d have to know a username and password for that system as well. For smaller networks, this usually wasn’t a problem at all. However, as the network grows larger, it becomes more and more difficult to maintain consistent user accounts across all systems.
That all changed in 1999 with the introduction of Microsoft Active Directory. It coincided with the release of Windows 2000, one of the first major Windows releases directly targeted at large enterprises. Active Directory uses LDAP and Kerberos to handle authentication, and provides not only a central repository of user accounts and systems, but it can also be used to share security configurations across those systems as well. It was really ideal for large enterprise networks, and gave administrators the level of control they desired. Active Directory quickly became the dominant directory service, and most enterprises today use Active Directory to manage user accounts for their Windows systems. In fact, both K-State and K-State Computer Science primarily use Active Directory to manage their user accounts across a variety of systems and platforms.
With a shared domain, the user account information is stored on the central domain controller, instead of the individual workstations. In this way, any user who has a valid account on the domain and permissions to access a resource can do so, regardless of which system they are connected to. This is what allows you to use the same user account to log on to computers across campus, as well as online resources such as webmail and Canvas. One of the major activities in this lab will be to install and configure an Active Directory Domain, so you can get first-hand experience of how this works.
Lastly, no discussion of directory services would be complete without discussing Kerberos. Kerberos is named after Cerberus, the three-headed dog from ancient Greek mythology. It allows a client and a server to mutually authenticate each other’s identity through a third party, hence the three-headed mascot.
Kerberos was originally developed at MIT in the 1980s, and fully released in 1993 as RFC 1510. It is one of the primary ways that directory services today handle authentication, and it is used by many other types of security software on the internet today.
The Kerberos protocol is quite complex, and it uses many different cryptographic primitives to ensure the communication is properly secured and authenticated. However, this diagram gives a quick overview of the protocol and how it works.
If everything works correctly, both the client and server know they can trust each other, and they have established keys that allow them to communicate privately and share the requested information. Kerberos is a very powerful protocol, and if you’d like to learn more, I highly recommend reading the linked resources below this video. Kerberos is also discussed in several of the cybersecurity courses here at K-State.
That’s all the background information you’ll need for this module. Next, you’ll work on installing Microsoft Active Directory on Windows and OpenLDAP on Ubuntu, as well as configuring clients to use those systems for authentication.
Create four virtual machines meeting the specifications given below. The best way to accomplish this is to treat this assignment like a checklist and check things off as you complete them.
If you have any questions about these items or are unsure what they mean, please contact the instructor. Remember that part of being a system administrator (and a software developer in general) is working within vague specifications to provide what your client is requesting, so eliciting additional information is a very necessary skill.
To be more blunt - this specification may be purposefully designed to be vague, and it is your responsibility to ask questions about any vagaries you find. Once you begin the grading process, you cannot go back and change things, so be sure that your machines meet the expected specification regardless of what is written here. –Russ
Also, to complete many of these items, you may need to refer to additional materials and references not included in this document. System administrators must learn how to make use of available resources, so this is a good first step toward that. Of course, there’s always Google!
This lab may take anywhere from 1 - 6 hours to complete, depending on your previous experience working with these tools and the speed of the hardware you are using. Installing virtual machines and operating systems is very time-consuming the first time through the process, but it will be much more familiar by the end of this course.
Most students in previous semesters have reported that this lab is generally the most frustrating and time-consuming to complete. I recommend setting aside ample amounts of time to work on this lab. This is especially true if the system you are running your VMs on is not very powerful, since running multiple VMs at the same time may slow things down significantly. However, if you find that you are going in circles and not getting it to work, that would be a great time to ask for help. –Russ
In Windows Server 2025, there is an unresolved bug preventing Ubuntu clients from joining a Windows Active Directory Domain hosted by that server version. As of 8/28/2025, this is still unresolved.
You can find the discussion of the outstanding bug (here)[https://gitlab.freedesktop.org/realmd/adcli/-/issues/40].
For now, we’ll continue to use Windows Server 2022 for this class.
For this lab, you’ll need the following VMs:
Before starting this lab, make a snapshot in each VM labelled “Before Lab 4” that you can restore to later if you have any issues. In most cases, it is simpler to restore a snapshot and try again instead of debugging an error when setting up an LDAP or AD server. In addition, Task 6 below will ask you to restore to a snapshot in at least one VM before starting that step.
Create a new virtual machine for Windows Server 2022 Standard using the “Windows Server 2022 Standard” installation media (you may choose a newer option if available, but this lab was tested on that specific version - see the warning above about Server 2025 not working currently). You can download the installation files and obtain a product key from the Microsoft Azure Student Portal discussed in Module 1.
en-us_windows_server_2022_updated_july_2023_x64_dvd_541692c3.isoe215493d331ebd57ea294b2dc96f9f0d025bc97b801add56ef46d8868d810053For this system, I recommend giving the VM ample resources, usually at least 2 GB RAM and multiple processor cores if you can spare them. You may need to adjust the VM settings as needed to balance the performance of this VM against the available resources on your system.
When installing the operating system, configure it as specified below:
Make sure you choose the Desktop Experience option when installing, unless you want a real challenge! It is possible to perform these steps without a GUI, but it is much more difficult.
Computer Name: This is very important, as it allows us to track your virtual machine on the K-State network in case something goes wrong in a later lab. By including both the class and your eID, support staff will know who to contact. A majority of students have missed this step in previous semesters, so don’t forget! The computer name must be changed after the Windows installation is complete –Russcis527d-<your eID> (example: cis527d-russfeld)
Info
Passwords: Use cis527_windows as the password for the built-in Administrator account
Install Software
Install Windows Updates: Run Windows Update and reboot as necessary until all available updates are installed.
Automatic Updates: Make sure the system is set to download and install security updates automatically.
Make a snapshot of this VM once it is fully configured and updated. You can restore to this snapshot if you have issues installing Active Directory.
You can use CTRL+ALT+Insert to send a CTRL+ALT+Delete to your VM in VMware without affecting your host OS.
If you are working in Azure, follow the video instructions at the end of this chapter to install a version of Windows Server for Azure. You do not have to install VMWare Tools but should install Firefox.
Azure supports some backups and restore point options, but they are not as simple to use as VMWare snapshots. You can learn more about Azure backups here: https://learn.microsoft.com/en-us/azure/virtual-machines/backup-recovery. In general, I have avoided using them in my testing.
Configure your Windows Server as an Active Directory Domain Controller. Follow the steps and configuration details below:
First, set a static IP address on your Windows Server VM. Use the IP address ending in 42 that was reserved for this use in Lab 3. For the static DNS entries, use that same IP address or the localhost IP address (127.0.0.1) as the first entry, and then use the IP address of your DNS server (either your Ubuntu Server from Lab 3 or VMware’s default gateway address, whichever option you are using) as the second DNS entry. In this way, the server will use itself as a DNS server first, and if that fails then it will use the other server. This is very important when dealing with Active Directory Domains, as the Domain Controller is also a DNS server.
Follow the instructions in the resources section below to install and configure the Active Directory Domain Services role on the server.
ad.<your eID>.cis527.org (example: ad.russfeld.cis527.org)AD (this should be the default that is presented by the wizard)cis527_windows for all passwordsAdd a User Account to your Active Directory
cis527_windows as the password.As of Summer 2021, there was a bug in Windows Server that prevented the built-in Administrator account from changing some settings, specifically network settings, once the server is promoted to a domain controller. This can make it difficult to fix networking issues in this or future labs. The easy fix for this is to copy the Administrator account in the Active Directory User and Computers tool and give the new copy a different name, such as “Admin”, and then use that account to log on to the server.
If you are working in Azure, do not set a static IP in Windows Server - this is already managed for you by Azure. Your IP address will most likely be of the form 10.0.0.X - that is the address you’ll use to connect other VMs to this Active Directory domain.
Join your Windows 11 VM to the Active Directory Domain created in Task 2. Follow the steps and configuration details below:
First, set static DNS entries on your Windows 11 VM. You SHOULD NOT set a static IP, just static DNS entries. Use the Windows Server IP address ending in 42 as the first entry, and the second entry should be the same one used on the server earlier (either your Ubuntu Server from Lab 3 or VMware’s default gateway, whichever option you are using).
Join the system to the domain, following the instructions linked in the resources section below.
Once the system reboots, you should be able to log in using the user account you created in Task 2.
If you are working in Azure, you’ll need to add a hosts file entry to the Windows 11 client that directs the domain name ad.<your eID>.cis527.org to the IP address of the Windows Server (usually of the form 10.0.0.X). See this resource for details: https://www.ionos.com/digitalguide/server/configuration/hosts-file/
Install OpenLDAP on your Ubuntu VM labelled SERVER. Follow the steps and configuration details below:
First, set a static IP address on your Ubuntu VM labelled SERVER, if it does not have one already. Use the IP address ending in 41 that was reserved for this use in Lab 3. For the static DNS entries, use that same IP address as the first entry to reference your DNS server from Lab 3 (see the provided model solutions if your server was not working in Lab 3), and then use the IP address for VMware’s default gateway address as the second DNS entry. In this way, the server will use itself as a DNS server first, and if that fails then it will use the other server. This is very important when dealing with LDAP domains, so that the server can properly resolve the ldap.<your eID>.cis527.org address.
If you haven’t already, make a snapshot of this VM that you can restore if you run into issues setting up an OpenLDAP server.
Set up and configure an OpenLDAP server, following the first part of the instructions in the guide linked in the resources section below.
ldap.<your eID>.cis527.org (example: ldap.russfeld.cis527.org)dc=ldap,dc=<your eID>,dc=cis527,dc=org (example: dc=ldap,dc=russfeld,dc=cis527,dc=org)cis527_linux for all passwordsInstall LDAP Account Manager (LAM). See the documentation linked below for how to install and configure LDAP Account Manager.
Add a User Account to your OpenLDAP Directory
ous for users, groups, and create an admin group as well.cis527_linux as the password.Configure the server to use TLS. You should follow the Ubuntu Server Guide to create and sign your own certificates. Make sure you use the correct domain name!
/usr/local/share/ca-certificates/mycacert.crt to the home directory of the cis527 user for the next step.Of course, you may need to modify your firewall configuration to allow incoming connections to the LDAP server! If your firewall is disabled and/or not configured, there will be a deduction of up to 10% of the total points on this lab
On your Ubuntu VM labelled CLIENT, configure the system to authenticate against the OpenLDAP server created in Task 4.
First, confirm that you are able to resolve ldap.<your eID>.cis527.org using dig on your client VM. If that doesn’t work, you may need to set a static DNS entry to point to your Ubuntu VM labelled SERVER as configured in Lab 3, or add a manual entry to your hosts file.
Next, copy the mycacert.crt file from the home directory on your SERVER to the /usr/local/share/ca-certificates/ directory on the CLIENT, and then run sudo update-ca-certificates to install it.
scp. The command may be something like scp -P 23456 ldap.<your eID>.cis527.org:~/mycacert.crt ./.sudo to copy that file into the apporpriate directory on the client. Read the output from the commands to ensure it is installed properly!Then, make sure that you can connect to the LDAP server using TLS. You can use ldapwhoami -x -ZZ -H ldap://ldap.<your eID>.cis527.org and it should return anonymous if it works.
Before you configure SSSD, make a snapshot of this VM. If your SSSD configuration does not work, you can restore this snapshot and try again.
To test your SSSD configuration, use the command getent passwd <username> (example: getent passwd russfeld) and confirm that it returns an entry for your LDAP user.
To log in as the LDAP user, use the su <username> command (example: su russfeld).
Finally, reboot the system, and make sure you can log in graphically by choosing the “Not listed?” option on the login screen and entering your LDAP user’s credentials.
ad.<your eID>.cis527.org using dig on your client VM. If that doesn’t work, you may need to set a static DNS entry to point to your Windows server as configured earlier in this lab, or add a manual entry to your hosts file.If you get errors like “Insufficient permissions to join the domain”, you may need to install krb5-user and then add rdns=false to the [libdefaults] section of the /etc/krb5.conf file, as described in this thread. That seemed to fix the error for me.
If you are working in Azure, you’ll need to add a hosts file entry to the Ubuntu client that directs the domain name ad.<your eID>.cis527.org to the IP address of the Windows Server (usually of the form 10.0.0.X). See this resource for details: https://www.ionos.com/digitalguide/server/configuration/hosts-file/.
This part can be done completely from the terminal - that is typically the best way to work with Linux in Azure. You can access a Linux system in Azure using SSH easily.
From your Ubuntu VM labelled CLIENT, use the ldapsearch command (in the ldap-utils package) to query your Active Directory and OpenLDAP servers. Take a screenshot of the output from each command.
Below are example commands from a working solution. You’ll need to adapt them to match your environment. There are also sample screenshots of expected output.
ldapsearch -LLL -H ldap://192.168.40.42:389 -b "dc=ad,dc=russfeld,dc=cis527,dc=org" -D "ad\Administrator" -w "cis527_windows"ldapsearch -LLL -H ldap://192.168.40.41:389 -b "dc=ldap,dc=russfeld,dc=cis527,dc=org" -D "cn=admin,dc=ldap,dc=russfeld,dc=cis527,dc=org" -w "cis527_linux"You’ll be asked to perform each of these commands as part of the grading process, but the screenshots provide good insurance in case you aren’t able to get them to work –Russ
In each of the virtual machines created above, create a snapshot labelled “Lab 4 Submit” before you submit the assignment. The grading process may require making changes to the VMs, so this gives you a restore point before grading starts. Also, you may have multiple Lab 4 snapshots on some VMs, so feel free to label them accordingly.
Contact the instructor and schedule a time for interactive grading. You may continue with the next module once grading has been completed.
This video uses Windows Server 2016, but the process should be functionally identical in Windows Server 2019. Also make sure you refer to the Lab 4 assignment for the correct root domain name. –Russ
In this video, I’ll go through some of the process of configuring a Windows Server 2016 VM to act as an Active Directory Domain Controller. The goal of this video isn’t to show you all the steps of the process, but provide commentary on some of the more confusing steps you’ll perform.
In general, I’ll be following the two guides linked in the resources section below this video. The third guide gives quite a bit of additional information about each option in the Active Directory Domain Services installation wizard, and is a very handy reference as you work through this process.
First, I’ll need to set a static IP address on this system. I’ll be using the IP address ending in 42 for this server, which was reserved in in the DNS server configured in Lab 3. I’ll also need to configure some static DNS entries. For a Domain Controller, you’ll always want to make the first DNS entry the IP address of the server itself. This is because a Domain Controller also acts as a DNS server for the domain, so you’ll need to tell this system to refer to itself for some DNS lookups. For the other entry, I’ll use the VMware router, which is the same as the default gateway address in my setup.
Next, I’m going to follow the steps to add the “Active Directory Domain Services” role to this server. This process is pretty straightforward, so I’ll leave it to you to follow the guide.
Once the installation is complete, you’ll be prompted to promote the server to a domain controller. This is the step where you’ll actually configure the Active Directory installation. For this setup, we’re going to create a new forest, using the cis527.local root domain name. You’ll need to adjust these settings to match the required configuration for the lab assignment. By using a .local top-level domain, we can guarantee that this will never be routable on the global internet. The use of a .local suffix here doesn’t actually comply with current DNS standards, but for our internal VM network it will work just fine. Of course, if you are doing this on an actual enterprise system, you may actually use your company’s internet domain name here, with a custom prefix for your directory. For example, the K-State Computer Science department might use a domain name of ldap.cs.ksu.edu for this server.
Next, you’ll need to configure the functional level of the domain. If you have older systems in your network, you will want to choose the option here for the oldest domain controller in the domain. Since we’re just creating a new system, we can use the latest option here.
You’ll also need to input a password here for Directory Services Restore Mode. In an enterprise setting, this is the password that you’ll use if you ever have to restore your domain from a backup, or work with a domain controller that will not boot correctly. So, you’d generally make this a unique password, and store it in a safe location. For our example, I’m just going to use the password we’ve been using for all of our Windows systems, but in practice you would make it much more secure.
Next are the DNS options. If you are running a separate DNS server in your organization, you’ll need to checkmark this box to create a DNS delegation. However, for this lab assignment you won’t need to do that, since we aren’t trying to combine our Windows and Linux environments.
Following that, you’ll need to configure the NetBIOS name for the domain. In general, this is just the first part of your fully domain name. NetBIOS is a very old protocol that is not commonly used, but some Windows systems will still use it to find resources on a network. You can just accept the default option here, unless a different name would be more reasonable.
In addition, you’ll be able to configure the storage paths on your system. For this example, we’ll just keep the default paths. However, on a production server, it might make more sense to store these on a different drive, just in case you have to reinstall the operating system in the future. These are the folders that store the actual database and information for the Active Directory domain.
Finally, you’ll be able to review the options before applying them. If you’d like, you can click the “View script” button to view a PowerShell script that you could use to perform these steps on a Windows Server without a GUI installed.
With all the settings in place, you can continue with the configuration process. The first step is a prerequisites check to make sure that the server is able to complete the installation. You may get a couple of warnings about weaker cryptography algorithms and DNS server delegation, but you can ignore those for this example. If the prerequisites check is passed, you can click “Install” to install the service.
Once it has installed and rebooted, you’ll notice that you are now prompted to log in as a domain user. On Windows systems, the domain name is shown before the \, followed by your username. So, in this example, it now wants me to log in as CIS527\Administrator. This is a different account than the Administrator account on the computer itself, which we were using previously. To log in as a local account, you can use the computer name, followed by a \ and then the username. If you don’t remember the computer name, you can click the “How do I sign in to another domain?” link below the prompt to find it. For now, we’ll log in as the domain administrator account.
Once you’ve logged in, you’ll need to create at least one user on the Active Directory domain. You can find the Active Directory Users and Computers application under the Tools menu on the Server Manager. Thankfully, adding a user here is very similar to adding a user in the Computer Management interface on a Windows computer. As before, make sure you uncheck the box labeled “User must change password at next logon” and checkmark the “Password never expires” box for now.
That should get the server all set up! Next, we’ll look at adding a Windows 10 computer to your new Active Directory Domain.
Once you have completely set up your Active Directory Domain, you can begin to add Windows clients to the domain. This video will walk through some of that process, and I’ll discuss a few of the steps as we go.
For this example, I have my Windows 10 VM from the earlier labs. It is on the same network as the domain controller. Before I begin, I’ll need to set some static DNS settings on this computer. First, and most importantly, I’ll add a DNS entry for the domain controller first, and the second entry can be any of the other working DNS servers on the network. In this case, I’ll just use the VMware default gateway.
Next, I’m going to right-click on the Start button and choose the System option. Before adding it to the domain, I need to make sure it is named correctly. If not, I’ll need to rename it and reboot before adding it to the domain. Once a computer is on a domain, it is very difficult to rename it.
Once I’m sure it is correct, I’m going to click the System Info link to get to the old System options in the Control Panel. Here I should be able to see the current workgroup. To add the system to a domain, click the Change settings button to the right of the computer name. Then, I’ll click the Change button to add it to the domain.
On this window, I’ll choose the Domain option, and enter the name of the domain, in this case cis527.local, and click OK. You may get a message about the NetBIOS name of the computer being too long, but you can safely ignore that message.
If everything works correctly, you should see a pop up asking you to enter the username and password of an account with permissions to add a computer to the domain. In this case, the only account we’ve set up with those permissions is the domain administrator account, so we’ll enter those credentials here. Once you enter it, it should welcome you to the domain, and prompt you to restart.
If your computer is unable to contact the domain at this step, it is usually a problem with your network configuration. To diagnose the problem, try to ping the domain name using the command-line ping utility and see what the response is. If it cannot find it, then check your network settings and DNS settings and make sure you can ping the domain controller as well. In many cases, this can be one of the more frustrating errors to debug if it happens to you.
Once the system reboots, you’ll be able to log in using any valid credentials for a domain user. As you experienced with the domain controller, you can enter the domain or computer name, followed by a slash, and then the user name to choose which user account to use. Thankfully, here you can always use .\ to log in as the local computer. In this case, let’s use our domain user account.
Once you log in, let’s take a look at the Computer Management interface to see what changed about the users and groups on the system. If you open up the Administrators group, you’ll notice that it now includes an entry for CIS527\Domain Admins, and likewise the Users group contains a new entry for CIS527\Domain Users. That means, by default, any user on the domain can now log on to the computer as a user, and anyone on the domain with administrative privileges can log on to any computer on the domain and gain administrator permissions there as well. It is very important to understand these default permissions, so that you can assign them accordingly. For example, in many organizations, you may want to immediately remove the Domain Users entry from the Users group, and add a smaller group instead. You probably don’t need folks from the Accounting department logging on to systems in Human Resources, right?
That’s really all there is to it! You’ve successfully set up a Windows Active Directory Domain and added your first client computer to it. The next few videos will walk you through the same process on Ubuntu with OpenLDAP.
One of the major features of Microsoft’s Active Directory is the ability to use Group Policy Objects, or GPOs, to enforce specific security settings on any Windows client added to the domain. For large enterprises, this is a major tool in their arsenal to ensure that Windows PCs are properly configured and secured in their organization.
Group Policy can be set at both the local computer level, as well as via Active Directory. The settings themselves are hierarchical in nature, so you can easily browse through related settings when using the Group Policy Editor tool. In addition, GPOs are inheritable, and multiple GPOs can be applied to a group or OU in a domain.
When group policies are applied, they follow this order. First, any policies set locally on the machine are applied, then policies from the Active Directory site, then the global domain itself, and finally any policies applied to the OU containing this computer or user are applied. At each level, any previous settings can be overridden, so in essence, the policies applied at the OU level take precedence over others.
Some examples of things you can control via Group Policy are shown here. You can create mapped drives, which we will see in a later module. You can also set power options, which could be used in an organization to save money by reducing energy usage. In addition, you can use group policy to enforce password restrictions, and even install printers and printer drivers as well.
Let’s take a look at one quick demonstration, setting a password policy for the domain. This tutorial is from Infoworld, and is linked in the resources section below the video.
Here I have opened my Windows 2016 Server VM as configured for Lab 4. First, I’ll open the Group Policy Management Console, which is available on the Tools menu in Windows Server Manager. Next, I’ll find my domain, and right-click it to create a GPO in this domain. I’ll also give the GPO a helpful name, and click OK to create it.
Next, I can right-click the policy and choose Edit. In the policy editor, I’ll need to dig down the following path:
<name>\Computer Configuration\Policies\Windows Settings\Security Settings\Account Policies\Password PolicyIn that window, we’ll right-click the “Password Must Meet Complexity Requirements” option, and choose Properties. Then, we’ll enable the setting by checkmarking the box and clicking Enable. You can find more information about the policy by clicking the Explain tab at the top.
Finally, once the policy is configured, you’ll need to right-click on it once again, and select the Enforced option to enforce it on the domain itself.
That’s all there is to it! Now, any new password created on this domain must meet those complexity requirements. While you won’t have to work with Group Policy for this lab assignment, we’ll come back to it in a later module as we work with application and file servers.
PHPLDAPAdmin no longer works on Ubuntu 24.04 since it has several incompatibility issues with PHP 8+. The assignment has been updated to use the new LDAP Account Manager (LAM) software instead. You may ignore the part of this video showing how to configure PHPLDAPAdmin and instead refer to the guide linked from the assignment page to configure LAM.
Also, see the transcript below for an updated version of the ldapwhoami command.
As we did earlier with setting up Active Directory on Windows, let’s take a look at the steps required to install and configure OpenLDAP on Linux. The goal of this video isn’t to show you all the steps of the process, but provide commentary on some of the more confusing steps you’ll perform.
For this example, I’m using the Ubuntu VM labelled Server from Lab 3. I have chosen to disable the DHCP server on this system, and instead have replaced it with the VMware DHCP server. In practice, that change should not affect any of this process. Also, I’ll generally be following the guide from DigitalOcean, which is linked in the resources section below the video.
At this point, I have also already performed the first steps of the guide, which is to install the slapd and ldap-utils packages on this system. Now, I’ll step through the configuration process for slapd and discuss the various options it presents.
sudo dpkg-reconfigure slapdFirst, it will ask you if you want to omit the OpenLDAP server configuration. Make sure you select <No> for that option. You can use the arrow keys (← and →) to move the red-shaded selector to the option you’d like to select, then press ENTER to confirm it.
Next, it will ask for your domain name. For this example, I’ll just use ldap.cis527russfeld.cs.ksu.edu. You’ll need to adjust these settings to match the required configuration for the lab assignment. This matches the DNS configuration I made in Lab 3, which is very important later on in this process.
Next, it will also ask for your organization name. I’ll just use cis527 here.
Then, it will ask for your Administrator password. This is the equivalent of the root account within the domain. It is able to change all domain settings, and therefore the password for this account should be very complex and well protected. For this example, I’ll just use the same password we are using for everything else, but in practice you’ll want to carefully consider this password.
The next option is whether you want to have the database removed if you purge the slapd package. Selecting <yes> on this option would delete your LDAP database if you ever chose to reinstall the slapd package. For most uses, you’ll always want to select <no> here, which is what I’ll do.
Since there are some existing configuration files in place, the installer asks if you’d like those to be moved. Unless you are reinstalling slapd on an existing server, you can select <yes> for this option.
That should complete the configuration for the OpenLDAP server. For this example, I have disabled the firewall on this system, but for your lab assignment you’ll need to do a bit of firewall configuration at this point.
Finally, let’s add some encryption to this server to protect the information shared across the network. This step was not required in previous versions of this lab, but it has always been a good idea. Now that Ubuntu uses SSSD, or System Security Services Daemon, for authentication, it requires us to provide TLS encryption on our LDAP server. So, let’s do that now.
For these steps, we’ll be closely following the Ubuntu Server Guide linked below this video. We’ll be adjusting a few of the items to match our configuration, but most of the commands are exactly the same.
First, we’ll need to install a couple of packages to allow us to create and manipulate security certificates
sudo apt update
sudo apt install gnutls-bin ssl-cert
Next, we need to create our own certificate authority, or CA. In a production system, you would instead work with an actual CA to obtain a security certificate from them, but that can be time consuming and expensive. So, for this example, we’ll just create our own. Also, contrary to what your browser may lead you to believe, using your own CA certificates will result in an encrypted connection, it just may not be “trusted” since your browser doesn’t recognize the CA certificate.
If you want to know more about CAs and certificates, check out the handy YouTube video I’ve linked below this video. It gives a great description of how certificates work in much more detail. I’ve also included links to the lectures in Module 3 and Module 5 that deal with TLS certificates.
So, we’ll first create a private key for our CA:
sudo certtool --generate-privkey --bits 4096 --outfile /etc/ssl/private/mycakey.pemThen, we’ll create a template file that contains the options we need for creating this certificate. Notice here that I’ve modified this information from what is provided in the Ubuntu Server Guide document to match our setup:
sudo nano /etc/ssl/ca.infoand put the following text into that file.
cn = CIS 527
ca
cert_signing_key
expiration_days = 3650
Then, we can use that template to create our self-signed certificate authority certificate:
sudo certtool --generate-self-signed --load-privkey /etc/ssl/private/mycakey.pem --template /etc/ssl/ca.info --outfile /usr/local/share/ca-certificates/mycacert.crtThis will create a certificate called mycacert.crt that is stored in /usr/local/share/ca-certificates/. This is our self-signed CA certificate. So, whenever we want any system to trust one of our self-signed certificates that we make from our CA, we’ll need to make sure that system has a copy of this CA certificate in its list of trusted certificates.
To do that, we simply place the certificate in /usr/local/share/ca-certificates/, and then run the following command to add it to the list of trusted certificates:
sudo update-ca-certificatesIf that command works correctly, it should tell us that it has added 1 certificate to our list.
Before we move on, let’s make a copy of our mycacert.crt file in our cis527 users’s home directory. We’ll use this file in the next part of this lab when we are configuring our client system to authenticate using LDAP.
cp /usr/local/share/ca-certificates/mycacert.crt ~/Now that we’ve created our own self-signed CA, we can use it to create a certificate for our LDAP server. So, we’ll start by creating yet another private key:
sudo certtool --generate-privkey --bits 2048 --outfile /etc/ldap/ldap01_slapd_key.pemThen, we’ll create another template file to give the information about the certificate that we’d like to create:
sudo nano /etc/ssl/ldap01.infoand place the following tex in that file:
organization = CIS 527
cn = ldap.cis527russfeld.cs.ksu.edu
tls_www_server
encryption_key
signing_key
expiration_days = 365
Notice that in that file, we entered the fully qualified domain name for our LDAP server on the second line. This is the most important part that makes all of this work. On our client machine, we must have a DNS entry that links this domain name to our LDAP server’s IP address, and then the certificate the server uses must match that domain name. So, if we don’t get this step right, the whole system may not work correctly until we fix it!
Finally, we can use this long and complex command to create and sign our server’s certificate:
sudo certtool --generate-certificate --load-privkey /etc/ldap/ldap01_slapd_key.pem --load-ca-certificate /etc/ssl/certs/mycacert.pem --load-ca-privkey /etc/ssl/private/mycakey.pem --template /etc/ssl/ldap01.info --outfile /etc/ldap/ldap01_slapd_cert.pemOnce the certificate has been created, we just need to do a couple of tweaks so that it has the correct permissions. This will allow the LDAP server to properly access the file:
sudo chgrp openldap /etc/ldap/ldap01_slapd_key.pem
sudo chmod 0640 /etc/ldap/ldap01_slapd_key.pem
Finally, at long last, we are ready to tell our LDAP server to use the certificate. To do that, we’ll create an LDIF file:
nano ~/certinfo.ldifand in that file we’ll put the information about our certificate:
dn: cn=config
add: olcTLSCACertificateFile
olcTLSCACertificateFile: /etc/ssl/certs/mycacert.pem
-
add: olcTLSCertificateFile
olcTLSCertificateFile: /etc/ldap/ldap01_slapd_cert.pem
-
add: olcTLSCertificateKeyFile
olcTLSCertificateKeyFile: /etc/ldap/ldap01_slapd_key.pem
Once that file is created, we can use the ldapmodify tool to import it into our server:
sudo ldapmodify -Y EXTERNAL -H ldapi:/// -f certinfo.ldifWhew! That was a lot of work! Now, if we did everything correctly, we should be able to query this LDAP server using TLS. The best way to check that is by using the following command:
ldapwhoami -x -ZZ -H ldap.cis527russfeld.cs.ksu.eduThe -ZZ part of that command tells it to use TLS, and if it works correctly it should return anonymous as the result. If this step fails, then you may need to do some troubleshooting to see what the problem is.
That should do it! In the next video, I’ll show how to configure another Ubuntu VM to use this LDAP server for authentication.
See the transcript below for an updated version of the ldapwhoami command.
Once we’ve set up and configured our OpenLDAP server on Linux, we can configure another VM to act as an LDAP client and use that server for authentication. Thankfully, now that Ubuntu 20.04 uses SSSD, this process is pretty simple.
For the most part, we’ll be following the instructions in the Ubuntu Server Guide page linked below this video. It is a pretty in-depth overview of how to configure SSSD to use LDAP for authentication. In fact, if you’ve done the Windows portions of this assignment already, you’ll be familiar with several of these steps.
First, we’ll need to install a couple of packages on this system to allow us to interact with LDAP systems via SSSD:
sudo apt update
sudo apt install sssd-ldap ldap-utils
Next, we’ll need to get a copy of our certificate authority, or CA, certificate from our Ubuntu 20.04 VM labelled SERVER. If we followed the instructions in the previous video correctly, we should have created a copy of that file in the home directory of the cis527 user on our server.
If not, you can do so by logging on to the SERVER VM as cis527 and using the following command:
cp /usr/local/share/ca-certificates/mycacert.crt ~/Then, from the CLIENT VM, we can use scp to copy that file using SSH. Hopefully you were able to get the SSH portion of the lab set up and working correctly. If not, you may have to copy this from the SERVER VM to your host system, and then from your host system back to the CLIENT VM. To copy the file using scp, use a command similar to the following
scp -P 22222 cis527@192.168.40.41:~/mycacert.crt ~/Let’s break that command down. First, the -P 22222 tells us the we are using port 22222 to connect to the system, which is how it was configured in Lab 3. Then, we have cis527@, which is the username we’d like to use on the remote system, followed by 192.168.40.41, which is the IP address of our SERVER VM. Next, there is a colon, and a file path, which is ~/mycacert.crt, which is the path to the certificate file on the SERVER VM. Finally, we have a space, and another path ~/ showing where we’d like to place the file on our CLIENT VM.
Of course, if you want to learn more about SSH and SCP, check out the video in the Extras section for more information.
Once we have a copy of the certificate on our CLIENT VM, we can install it using the following commands:
sudo cp ~/mycacert.crt /usr/local/share/ca-certificates/
sudo update-ca-certificates
If that command works correctly, it should tell us that it has added 1 certificate to our list. That means that our CLIENT VM now includes our own self-signed CA in its list of trusted CA certificates. That’s what we want!
Next, we’ll need to create an SSSD configuration file. Unfortunately, unlike the example we’ll see later with Windows and Active Directory, we’ll have to create this one manually. Here’s an example of what that would look like. First, we’ll open the file:
sudo nano /etc/sssd/sssd.confand then put the following contents inside of it:
[sssd]
config_file_version = 2
domains = ldap.cis527russfeld.cs.ksu.edu

[domain/ldap.cis527russfeld.cs.ksu.edu]
id_provider = ldap
auth_provider = ldap
ldap_uri = ldap://ldap.cis527russfeld.cs.ksu.edu
cache_credentials = True
ldap_search_base = dc=ldap,dc=cis527russfeld,dc=cs,dc=ksu,dc=edu
Notice that we’ve customized this file to match our LDAP configuration information from the previous video.
Also, we must make sure that that file is owned by root:root and only the user has permission to access that file:
sudo chown root:root /etc/sssd/sssd.conf
sudo chmod 600 /etc/sssd/sssd.conf
Finally, we can restart the SSSD service to load the new settings:
sudo systemctl restart sssdIf this command returns an error, it usually either means that there is a typo in the sssd.conf file created earlier, or that the file’s permissions are incorrect. So, make sure you double-check that if you run into an error at this point.
Now, let’s tackle the creation of home directories. This is handled by the Pluggable Authentication Modules, or PAM, framework. There are many ways to do this, including editing a config file manually. However, there is a quick and easy way to do this as well, using the pam-auth-update command:
sudo pam-auth-updateIn the menu, press the SPACE key to enable the “Create home directory on login” option, then press ENTER to save the changes.
Finally, we can do some testing to make sure that things are working correctly. First, we’ll need to be able to access our LDAP server using its DNS name, so we can test that using dig:
dig ldap.cis527russfeld.cs.ksu.eduHopefully you were able to get your LDAP server working in the previous lab. If not, you may load some of the model solution files from Lab 3 provided on Canvas to get this part working.
Next, we’ll make sure we can access the LDAP server
ldapwhoami -x -H ldap.cis527russfeld.cs.ksu.eduThis command should return anonymous. If not, your CLIENT VM is having trouble contacting your SERVER VM or the LDAP server itself. In that case, you may want to check your firewall configuration - did you remember to allow the correct ports for LDAP?
Once that command works, we can try it again using TLS by adding -ZZ to the command:
ldapwhoami -x -ZZ -H ldap.cis527russfeld.cs.ksu.eduHopefully this command should return anonymous just like it did previously. If not, there is probably a configuration issue with your TLS certificates that you’ll need to resolve before moving on.
Finally, if everything looks like it is working, we can try to load information about one of our LDAP users using the getent command:
getent passwd russfeldThis command should return information about the user we created on our LDAP server. If not, then we may need to check the settings in our sssd.conf file to make sure the LDAP information is correct.
Thankfully, if that worked, we can try to log on to the system as that user using the su command:
su russfeldIt works! We can even go to our home directory and see that it was created for us:
cd ~/
pwd
Now, at this point, I should point out one very important impact of how our system is configured. I am logged in as an LDAP user, but notice that if I try to log in as root, I’m able to use sudo without any additional configuration! Yikes!
How did that happen? It actually is due to a setting in our sudoers file that is present by default on all Ubuntu systems. Let’s take a look at that file:
sudo visudoIf we look through that file, we’ll find a line that says members of the admin group may gain root privileges. In fact, that’s exactly what happened! Just because we chose to name our group admin on the LDAP server, our users would automatically gain sudo access on any system they log into. The same would happen for a group named sudo as well. So, it is very important to make sure your groups on your LDAP server use unique names, otherwise you may inadvertently create a major security hole in your systems.
To test the graphical login, you’ll need to fully reboot your computer. Once that is done, you can click the “Not listed?” option at the bottom of the list of users, then enter the credentials for your LDAP user to log in. If everything is configured correctly, it should let you log in directly to the system.
You have now successfully configured your system to allow Ubuntu to use LDAP servers for user accounts. This should be enough information to help you complete that section of Lab 4. As always, if you have any questions, feel free to post in the course discussion forums on Canvas. Good luck!
In the following two videos, we’ll look at how to enable interoperability between our Windows- and Linux-based systems. In many organizations today, you’ll have a mix of many different operating systems, so it is very helpful to understand how to integrate them together in a single directory service.
In this video, I’ll show you how to add an Ubuntu VM to a Windows Active Directory Domain. This is by far the most common use-case for interoperability, and has been used by many organizations including K-State. For most users, Windows Active Directory provides a great set of features for Windows-based systems, and it is simple to integrate Linux and Mac clients into that environment.
For this example, I’m using the Windows 2019 server set up as defined in Lab 4’s assignment. I’ve reconfigured the domain to have the fully qualified domain name ad.cis527russfeld.cs.ksu.edu for this example, as you would in a real environment. This is due to the fact that many Linux packages do not accept the .local top-level domain I used in the previous video as an example.
For the client, I am using a copy of my Ubuntu 20.04 VM labelled CLIENT from Lab 3. For this assignment, you’ll use that same VM, but restored to a snapshot taken before it was configured as a client for OpenLDAP. Remember that you’ll need create this snapshot before you start the Lab 4 assignment, or else you may need to create a new VM for this activity.
Finally, I’ve found there really isn’t a great guide for doing this online, but I’m generally following the instructions in the Server-World guide linked below this video. I’ll do my best to clarify what parts are important and what parts I leave out and why.
First, as with any client I wish to add to a domain, I’ll need to set a static DNS entry to point to the domain controller itself. For the second entry, I’ll just use the VMware router as always. Once I’ve done that, I’ll disable and enable the network connection so that my changes take effect.
Then, I’ll need to install the realmd package. This package allows us to interface with Active Directory Domain servers.
sudo apt update
sudo apt install realmd
The instructions found online typically have you install a large number of packages at this step, but don’t do a good job of describing what they are used for. Thankfully, Ubuntu 20.04 includes a special program called packagekit by default, which allows us to automatically install the packages we need as we need them. So, we’ll start by just installing realmd and going from there.
Once we have realmd installed, we can use it to query our Active Directory domain using the realm discover command:
realm discover ad.cis527russfeld.cs.ksu.eduIf that command works correctly, you should see output giving information about the Active Directory Domain we just queried. However, if you get an error at this step, that usually means that something isn’t working correctly. In that case, double-check that you have properly set your DNS entries, and that you can ping your Windows 2019 server using both the IP address and the Active Directory Domain name. You’ll need to be able to use DNS to resolve that domain name in order for this system to join the domain.
Once we are ready to join the domain, we can simply using the sudo realm join command.
sudo realm join ad.cis527russfeld.cs.ksu.eduOnce we enter that command, we’ll be prompted for the password for the Administrator account. This is the Administrator account of our Active Directory domain, so we’ll have to provide the correct password here.
Here’s where the cool part happens. The realmd program is smart enough to know what packages we need in order to interface with an Active Directory domain, and because we have packagekit installed on Ubuntu 20.04 by default, the realmd command can automatically install those packages when we use the realm join command. So, we don’t have to worry about remembering to install all of these packages manually - it is done for us automatically! Very handy!
Ok, now that we have joined the domain, we can see if we can get information about an Active Directory user account using the id command:
id russfeld@ad.cis527russfeld.cs.ksu.eduIf everything is working correctly, you should see some information about that user printed to the screen. If not, you’ll need to do some troubleshooting.
Now, we can even log in as that user using the su, or “switch user” command:
su russfeld@ad.cis527russfeld.cs.ksu.eduThere we go! We are now logged in to this system as one of our Active Directory users. However, there are couple of things we can do to improve this experience. First, notice that we have to enter our fully qualified domain name for our Active Directory domain to log in. That can get really annoying, espeically with a long domain like ours. Also, what if we try to check our home directory:
cd ~/We find out that this user doesn’t even have a home directory to store files in. That’s no good!
So, let’s log out of this user and try to fix these issues.
exitFirst, let’s change a setting so that we don’t have to enter the full Active Directory Domain name each time we want to log in as one of those users. To do that, we’ll edit the sssd configuration file. The sssd package helps provide access to authentication resources across many different sources.
sudo nano /etc/sssd/sssd.confIn that file, we’ll see a line like the following:
use_fully_qualified_names = TrueWe’ll simply set that setting to False and then save the file.
use_fully_qualified_names = FalseFinally, we can restart the sssd daemon to load the new settings.
sudo systemctl restart sssdNow, we can use the id command with just the username:
id russfeldand we should get the correct info. We can even use that username to log in to the system using the su command.
su russfeld
exit
Yay! Now, let’s tackle the creation of home directories. This is handled by the Pluggable Authentication Modules, or PAM, framework. There are many ways to do this, including editing a config file manually. However, there is a quick and easy way to do this as well, using the pam-auth-update command:
sudo pam-auth-updateIn the menu, press the SPACE key to enable the “Create home directory on login” option, then press ENTER to save the changes.
There we go! Now, when we log in as our domain user, it will automatically create a home directory for us:
su russfeld
cd ~/
pwd
Awesome! Now, one interesting thing to discuss at this point is the fact that many online tutorials require us to install the oddjob and oddjob-mkhomedir packages. As far as I can tell, these are only required if we are using selinux instead of apparmor to protect our system. Since we aren’t doing that, we’ll just leave this out for now. However, if you do decide to use selinux on your system, you may have to do some additional configuration in order for your home directories to be properly created.
Ok, the last thing we may want to tackle on this system is the ability for our domain users to log on graphically. In previous versions of Ubuntu, this required a bit more configuration. However, in Ubuntu 20.04, all we have to do is restart the system to reload a few of the changes we just made. Then, we can click the “Not listed?” option at the bottom of the login window, and enter our domain username and password.
Voila! That’s all it takes to log on graphically using an Active Directory domain user account on Ubuntu 20.04. The process has gotten much simpler over the years, to the point where it isn’t that much more difficult than adding a Windows 10 client to a domain.
This portion is no longer part of the Lab 4 assignment, but I left it here because it is interesting to know that it can be done. –Russ
In this video, I’ll show you how to set up an Ubuntu VM to act as a Windows Active Directory Domain Controller using Samba. Unfortunately, at this time it is not straightforward at all to use OpenLDAP as the server, hence the decision to use Samba instead. This is a much more complicated process than adding Ubuntu as a client to an existing Active Directory Domain, but I feel that it is important to see that it is indeed possible. This is helpful if your organization is primarily Linux-based, but you wish to include a few Windows clients on the network as well.
For this example, I’m using the Ubuntu VM labelled Client from earlier in this lab. I’ve created a snapshot to store the work done previously to add it to an OpenLDAP domain, but now I’ve restored the snapshot labelled “Before Lab 4” and will use that snapshot to create a Samba server. The reason I am doing this on the VM labelled Client and not the one labelled Server is because the Samba installation will directly conflict with Bind9, OpenLDAP, and many other tools we’ve already installed on the server. So, this allows us to avoid any conflicts with those tools.
For the client, I have restored my Windows 10 VM to a snapshot taken before it was added to my Active Directory Domain. Remember that you’ll need to create this snapshot before you start the Lab 4 assignment, or else you may need to create a new VM for this activity.
Finally, I’ll generally be following the great guide by Jack Wallen that is linked in the resources section below this video, but I’ll be making a few minor changes to match our environment and clarifying a few things that he leaves out.
Before we begin, we’ll need to set a static IP on this system, since it will be acting as a server. I’m going to use the IP ending in 45 in my local subnet. For the DNS entries, we’ll also need to set the first entry to be this system itself, just like we did with the Windows Domain Controller. The second DNS entry can be the VMware router or any other valid DNS server.
First, we’ll need to install Samba as well as a few supporting tools:
sudo apt update
sudo apt install samba libpam-winbind smbclient
This will install many supporting packages as well.
Next, we need to make a few edits to our hosts file as well as update our hostname. This will help Samba find the correct settings as we configure it in a later step. First, let’s edit the hosts file:
sudo nano /etc/hostsI’ll need to add or edit a few entries at the top of this file. Here’s what mine currently looks like:
127.0.0.1       localhost.localdomain
127.0.1.1       dc
192.168.40.41   localhost
192.168.40.41   smbrussfeld.cis527.cs.ksu.edu       smbrussfeld
192.168.40.41   dc.smbrussfeld.cis527.cs.ksu.edu    dc
The first line is updated to be localhost.localdomain, just to make it clear that that IP address is for the loopback adapter. The second line gives the new hostname for this system. In this case, I’m calling it dc for domain controller. The third line redirects the localhost domain name to the external IP address. Finally, the fourth and fifth lines give the name of the domain as well as the fully qualified domain name for this system, respectively.
To go along with this change, we’ll edit the hostname file as well:
sudo nano /etc/hostnameIt should now be the same as the hostname used in the hosts file:
dcFinally, we’ll need to restart the computer for these changes to take effect.
Once it has restarted, we’ll need to remove any existing Samba configuration files and database files.
Thankfully, there are some great commands for finding the location of those files. First, you can find the location of the config file using this command:
smbd -b | grep "CONFIGFILE"It is usually at /etc/samba/smb.conf. So, to delete it, you’ll use:
sudo rm -f /etc/samba/smb.confNext, you can find the locations of all database files using this command:
smbd -b | egrep "LOCKDIR|STATEDIR|CACHEDIR|PRIVATE_DIR"It should give you four different directory paths. So, for each of those directories, you’ll need to enter that directory, then delete all files with the .tdb and .ldb file extensions. So, for the first one, you could use these commands:
cd /var/run/samba
sudo rm -f *.tdb *.ldb
Repeat that process for the other three directories to make sure they are all clear.
Once that is done, it is time to create our new domain. We’ll use the samba-tool command to do this in interactive mode:
sudo samba-tool domain provision --use-rfc2307 --interactiveFirst, it will ask you for the realm. For this example, I’ll use the name smbrussfeld.cis527.cs.ksu.edu. Following that, it should ask you for the NetBIOS name of your domain. The default should be smbrussfeld, which is fine. You can also accept the defaults of dc for the server role, and SAMBA_INTERNAL for the DNS backend. For the DNS forwarder address, you can use the VMware router’s IP address, or any other valid DNS server address from Lab 3. Finally, you’ll need to enter a password for the Administrator account. I’ll use the same password as always.
Once you’ve entered that information, your domain will be configured. Now, we’ll need to add a user to Samba and enable it using the following commands:
sudo smbpasswd -a <username>
sudo smbpasswd -e <username>
Next, we’ll need to disable the systemd-resolved service. This service is installed by default on Ubuntu 18.04, and is responsible for caching local DNS queries. However, since it binds to port 53, it will prevent our Samba server from binding to that port. To disable it, we’ll use the following commands:
sudo systemctl disable systemd-resolved
sudo systemctl stop systemd-resolved
We’ll also need to disable the existing Samba services, and enable the Samba Domain Controller service:
sudo systemctl disable nmbd
sudo systemctl stop nmbd
sudo systemctl disable smbd
sudo systemctl stop smbd
sudo systemctl unmask samba-ad-dc
sudo systemctl enable samba-ad-dc
sudo systemctl start samba-ad-dc
Lastly, we’ll need to replace any existing Kerberos configuration file with the one created by Samba. So, you’ll perform these commands to delete the existing file (if any) and create a symbolic link to the one from Samba.
sudo mv /etc/krb5.conf /etc/krb5.conf.orig
sudo ln -sf /var/lib/samba/private/krb5.conf /etc/krb5.confIf you get an error from the first command, you can safely ignore it.
Finally, if everything is configured correctly, we can query our domain using the smbclient command:
smbclient -L localhost -U%Hopefully you should get output from that command giving information about your domain. If not, you’ll probably need to review the Samba log file stored in /var/log/samba/log.samba to see what the error is.
If everything is working correctly, you can then add your Windows 10 VM to the domain. First, as with any client I wish to add to a domain, I’ll need to set a static DNS entry to point to the domain controller itself. For the second entry, I’ll just use the VMware router as always. Then, I can add it to the domain following the instructions in the earlier video.
After a reboot, it should allow you to log in as the domain user created earlier.
It is quite a process, but hopefully this demonstrates what it takes to create an Active Directory Domain using Samba. I highly recommend that you try this process at least once, even if you don’t plan on completing it as part of Lab 4, just to see how it all works together.
It appears that I have managed to confuse lots of people with the Windows AD portion of this lab. That’s not my intent, and any confusion is totally my fault here. This is mostly due to the fact that I reused an older video showing how to set up an Active Directory server and not clearly describing how things should be changed. I’ll do my best to clarify what you need to know and how you can adapt any existing setup you may have so that it works.
When configuring an Active Directory (AD) domain, there are two important settings: the root domain name (numbered 1 in the screenshots below) and the NETBIOS domain name (numbered 2 in the screenshots below).
In an ideal setup, those names are closely related. Typically, if the root domain name is ad.russfeld.cis527.org then the NETBIOS domain name would be ad - the first part of the root domain name. In most cases, you should not change the NETBIOS domain name from the default that is proposed by the setup process. (If you did, that’s fine - keep reading!)
In the video for setting up an AD domain, I used a simplified root domain name cis527.local, which meant that my NETBIOS domain name would be cis527 as shown in the screenshots below:
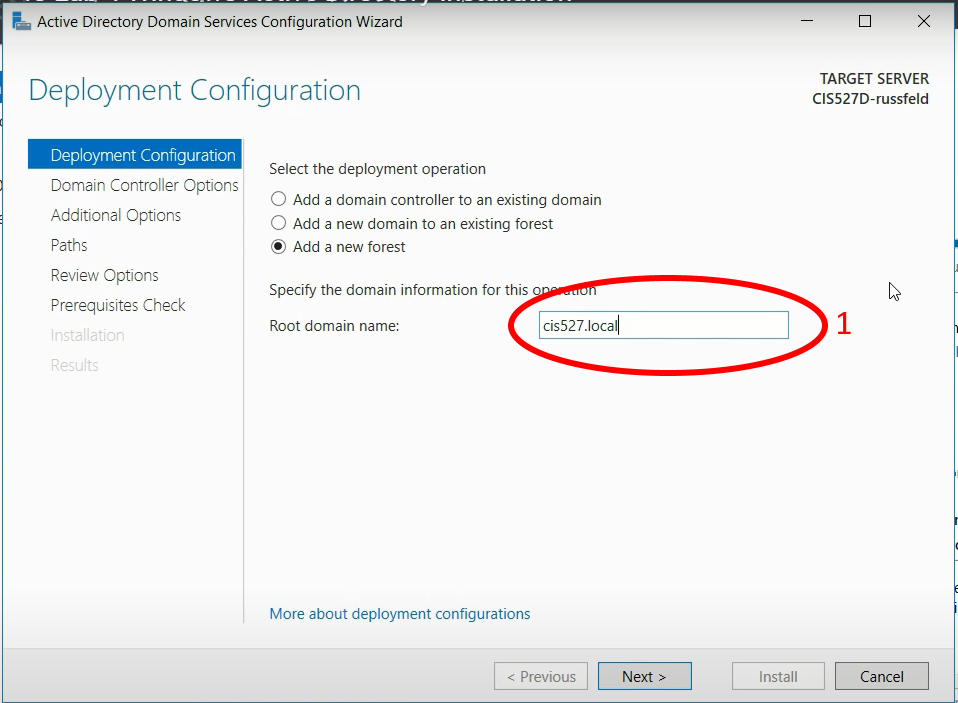
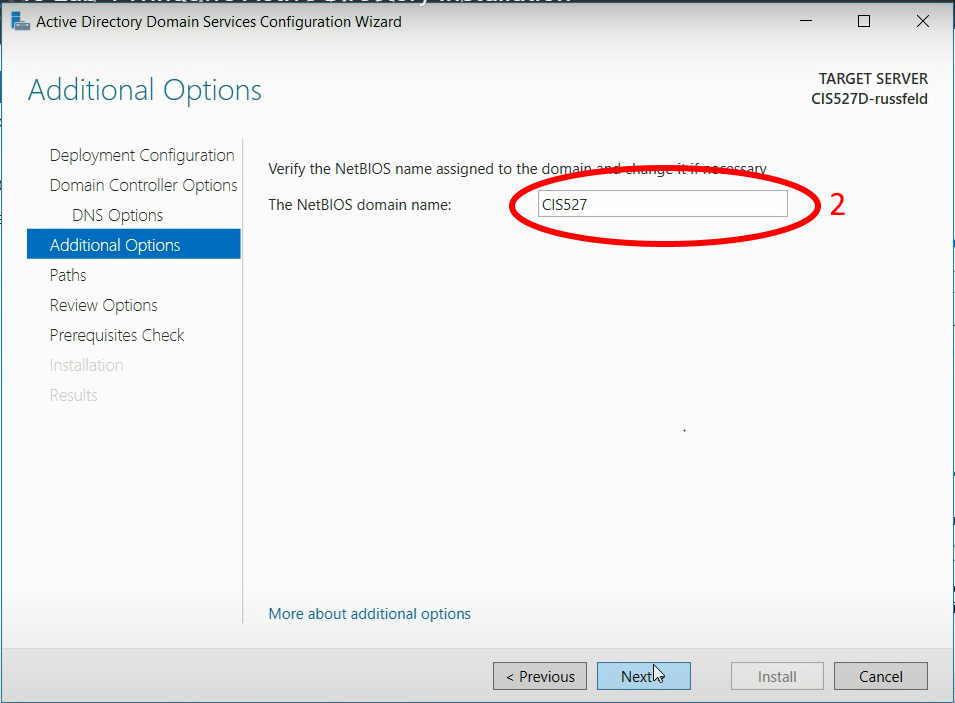
For the lab assignment itself, I give you a more concrete desired root domain name such as ad.<your eID>.cis527.org. However, I do not specify the NETBIOS domain name, which should default to ad. However, you can freely change it, and I believe that the video is leading many students to change that value to either cis527 or <your eID>. To be clear, you should not change the NETBIOS domain name at this step - whatever is proposed by the configuration wizard is correct.
If you’ve changed this, that’s fine! You’ll just have to adapt a couple of things further down the line.
To see how your domain is set up, open the Active Directory Users and Computers tool in your Windows Server VM, and find the user you created in the Users folder and open it. There should be an Account tab that looks like the following screenshot (this is from a different VM setup, so the domain names are purposefully different than what the lab specifies):
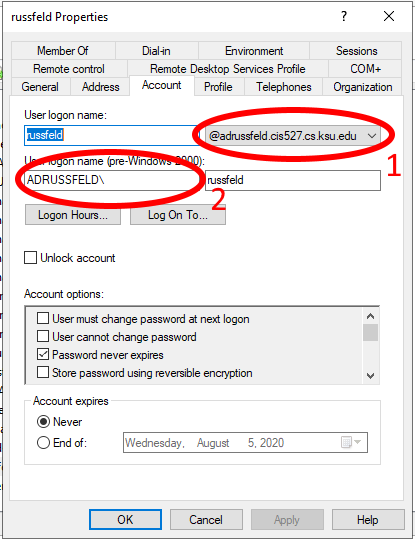
In that screenshot, you can clearly see the root domain name labelled with the number 1, which is adrussfeld.cis527.cs.ksu.edu, and the NETBIOS domain name labelled with number 2 is ADRUSSFELD. This is the VM that I used for creating the Linux Client on Windows Domain video that was new for Summer 2020. So, make note of both of these settings in your AD configuration, as you’ll need them when trying to log on to the domain or run commands.
When referencing usernames on an AD domain, there are two basic methods:
<username>@<root domain name><NETBIOS domain name>\<username>So, when I want to log in as that user on Ubuntu, I would use method 1 with the root domain name (this is before we change the sssd configuration file to not require the full domain name):

However, if I want to do the ldapsearch command to search the Windows AD, I’ll need to use method 2 with the NETBIOS domain name:

So, you should be able to adapt to whichever method is required, making changes where necessary to make the commands work.
Q: What if my root domain name and NETBIOS domain name are different? For example, my root domain name is ad.<eID>.cis527.org but I set my NETBIOS domain name to cis527<eID>.
As far as I can tell, you should still be able to complete Lab 4 with an AD domain configured in this way. The only issues you may run into are when using the realm join command and the ldapsearch commands on Ubuntu. You’ll have to pay close attention to which method is being used, and adjust the commands as necessary to fit the situation. So far, I’ve worked with at least two students who ran into this issue but were able to get it to work with minimal problems.
It may also be very important to make sure that both your Windows client and Ubuntu client are configured to use the Windows AD server as the first DNS entry. I usually just set a static DNS entry on each of those systems before joining the domain as directed in the video - in the real world you’d have your DHCP server do this for you.
Here are some helpful networking diagrams to better explain the desired state before and after the end of Lab 4. In all of these diagrams, I am using a sample network with the IP address 192.168.40.0. You will have to adapt the IPs to match your network configuration. In addition, each network address will need to be updated with your unique eID as directed in the lab assignment.
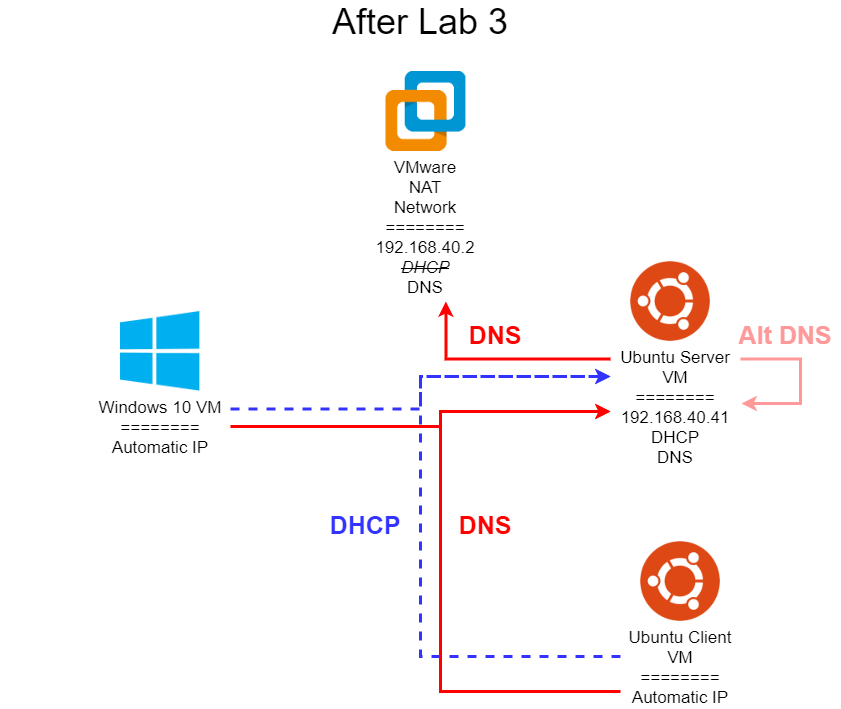
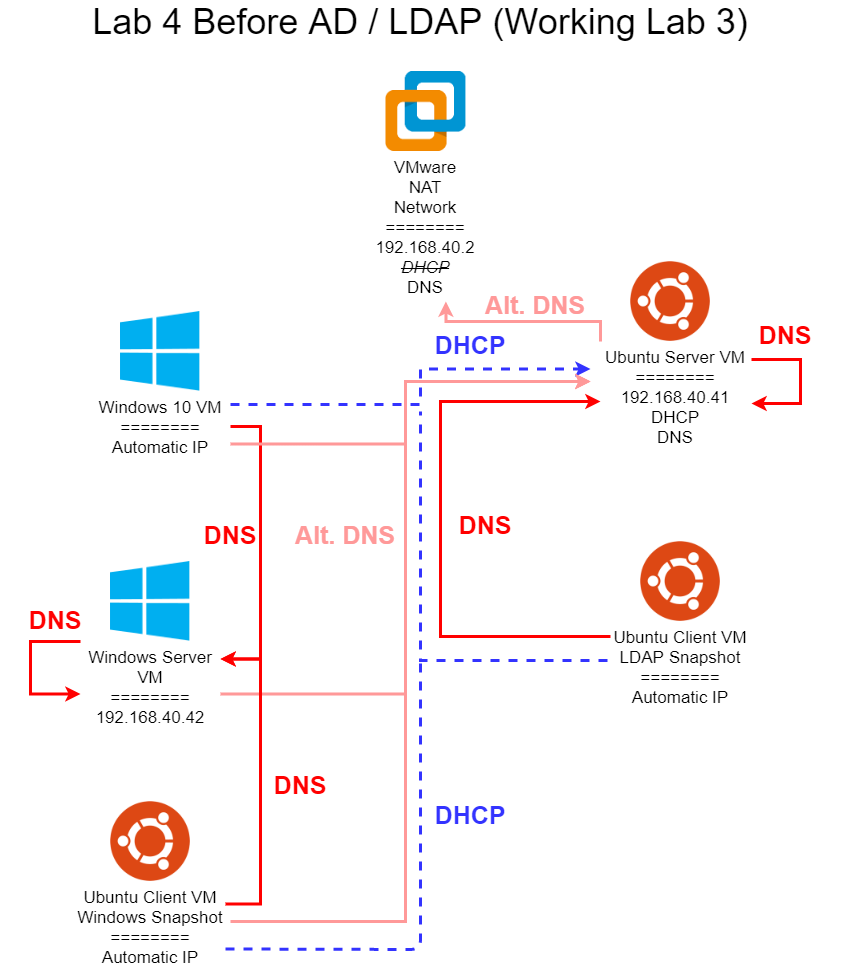
Once you’ve completed all of Lab 3, your network diagram should resemble the one shown above. Recall that all systems are currently configured to get DHCP and DNS information from your Ubuntu VM labelled Server, so in general it must be running at all times for this network to function. In addition, the Ubuntu VM labelled Server does not use itself for DNS, but still uses the VMare built-in DNS server, though you may have configured an alternate entry so it can refer to itself for DNS as well. This is the most likely starting point for this lab if you completed Lab 3.
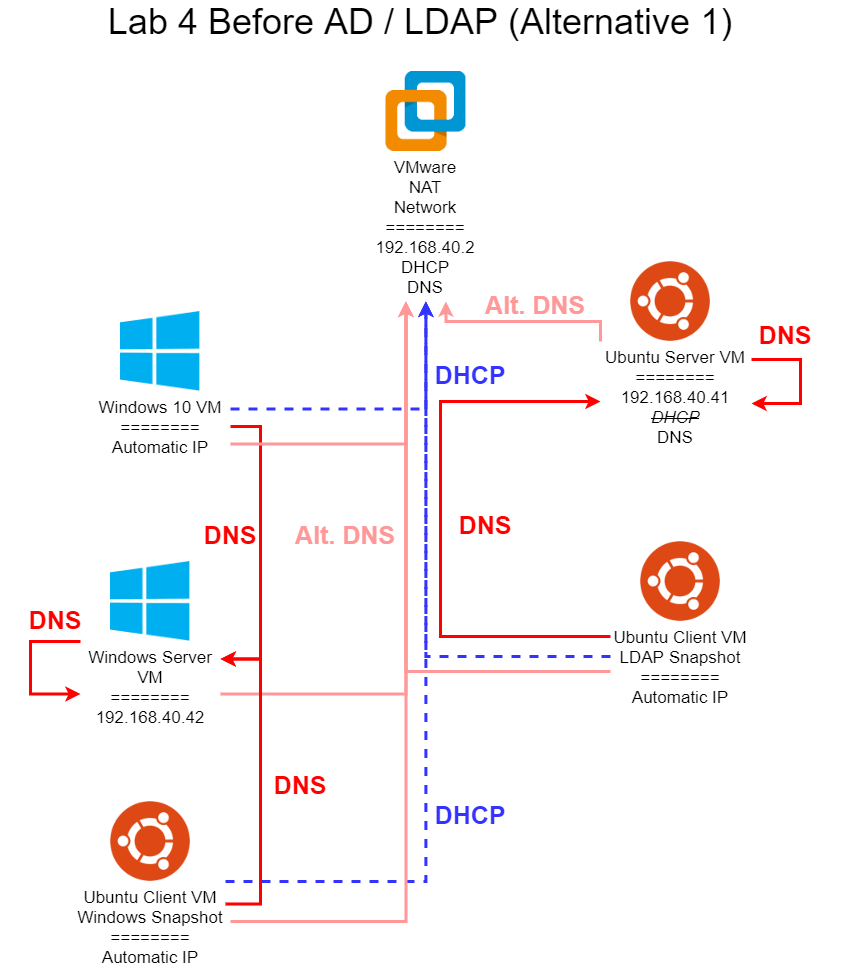
This diagram shows what an ideal network setup would look like, provided you have a working Lab 3 solution. In Lab 4, most of the changes required to get from the final Lab 3 network to this configuration are spread across multiple tasks. However, here are the major highlights:
ldap.<your eID>.cis527.orgldap.<your eID>.cis527.org192.168.40.42 and a primary static DNS entry pointing to itself, with an alternate entry set to the Ubuntu Server VM or the VMware DNS server (Lab 4, Task 2). Once the Active Directory server is installed, it should be able to resolve ad.<your eID>.cis527.org.ad.<your eID>.cis527.org.ad.<your eID>.cis527.org.This is the ideal setup for a this lab, but it depends on a fully working Lab 3 solution. In addition, you’ll need to keep the Ubuntu Server VM running at all times, which may present a problem on systems that struggle to run multiple VMs concurrently. So, below I discuss two alternative options.
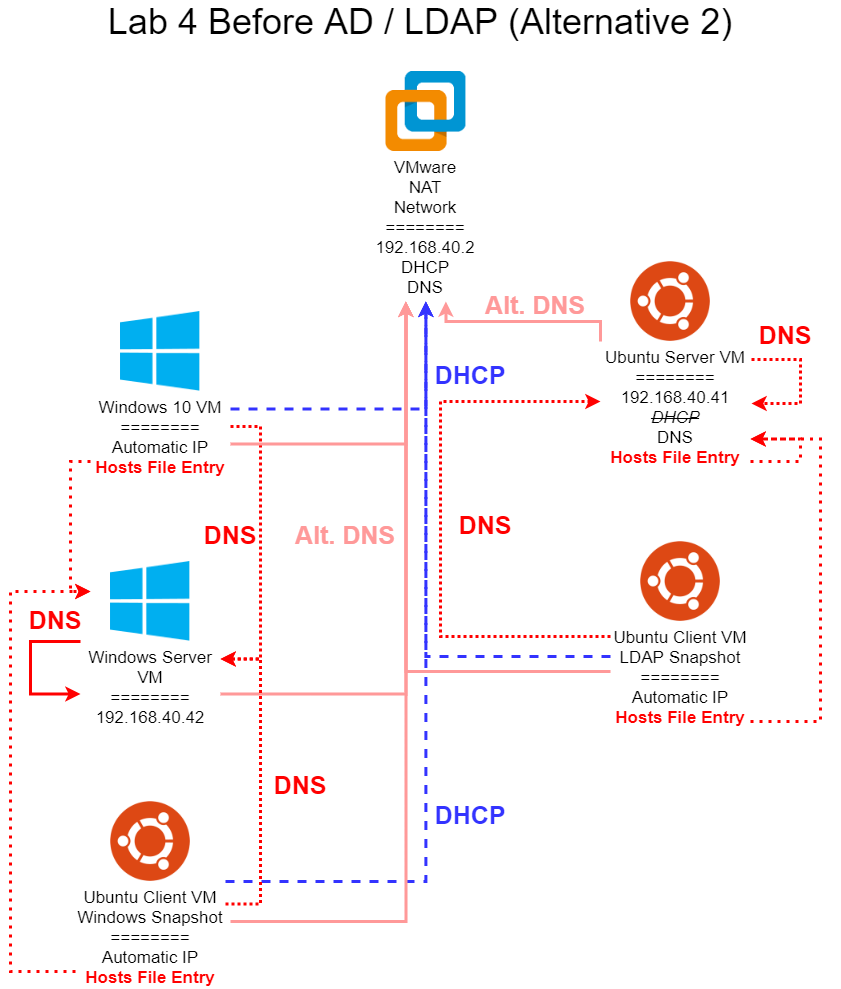
In this diagram, we are bypassing the DHCP server configured in Lab 3, and reverting our network back to using the VMware DHCP server. In addition, we are avoiding using our own DNS server running on the Ubuntu Server VM unless absolutely necessary. So, the following changes are made to the network from Lab 3:
sudo systemctl disable isc-dhcp-server. Must still be able to resolve ldap.<your eID>.cis527.orgldap.<your eID>.cis527.org192.168.40.42 and a primary static DNS entry pointing to itself, with an alternate entry set to the the VMware DNS server (Lab 4, Task 2). Once the Active Directory server is installed, it should be able to resolve ad.<your eID>.cis527.org.ad.<your eID>.cis527.org.ad.<your eID>.cis527.org.In effect, each system that is getting automatic IP addresses is now using the VMware DHCP server. However, since that DHCP server does not give the correct DNS addresses, we must set static DNS entries on everything, with the Ubuntu Server VM and Ubuntu Client VM pointing to the DNS server running on the Ubuntu Server VM, and the Windows Server, Windows 10 Client, and the Ubuntu Client VM’s Windows Snapshot pointing to the DNS server running on the Windows Server (after Active Directory is installed). In addition, each of those systems should have an alternate DNS entry that points to the VMware DNS server, allowing them to still access the internet properly.
However, if you are still having issues with your DNS entries or DNS servers not working correctly, fear not! There is one more alternative option available to you.
In this diagram, we are bypassing the DHCP server configured in Lab 3, and reverting our network back to using the VMware DHCP server. In addition, we are avoiding using our own DNS server running on the Ubuntu Server VM unless absolutely necessary. Finally, we are adding entries to the hosts file on each system to bypass DNS completely, ensuring that we can still complete this lab even if our DNS systems are not working at all. So, the following changes are made to the network from Lab 3:
sudo systemctl disable isc-dhcp-server. Must still be able to resolve ldap.<your eID>.cis527.org. If it cannot, add an entry to the /etc/hosts file that links 192.168.40.41 to ldap.<your eID>.cis527.org.ldap.<your eID>.cis527.org. If it cannot, add an entry to the /etc/hosts file that links 192.168.40.41 to ldap.<your eID>.cis527.org.192.168.40.42 and a primary static DNS entry pointing to itself, with an alternate entry set to the the VMware DNS server (Lab 4, Task 2). Once the Active Directory server is installed, it should be able to resolve ad.<your eID>.cis527.org. If it cannot, you are better off just rebuilding your AD server - this should always work on a working AD server!ad.<your eID>.cis527.org. If it cannot, add an entry to the C:\Windows\System32\drivers\etc\hosts file that links 192.168.40.42 to ad.<your eID>.cis527.org.ad.<your eID>.cis527.org. If it cannot, add an entry to the /etc/hosts file that links 192.168.40.42 to ad.<your eID>.cis527.org.In essence, we still configure each system with the correct static DNS entries. However, as a fallback in case those DNS entries are not working properly, we can use entries in the hosts file to bypass DNS completely and guarantee that we’re always going to get to the correct system.
This is a very useful workaround, and while an ideal network in the real world shouldn’t require it, many times system administrators include entries in the hosts file to ensure that systems can still be used in the event of DNS failure. Otherwise, an innocuous DNS failure could prevent users from even logging on to the system, either via LDAP or Active Directory.
As shown in the diagram above, the only DNS entry that must work is the Windows Server VM must be able to use itself for DNS. If that does not work, then most likely your Active Directory configuration failed and you will need to try again. Windows Active Directory relies heavily on DNS to function properly. I’ve not ever had this happen in my experience, so I highly doubt this failure case will be common.
You can find more information about how to edit your hosts file at this resource.
I failed to mention in the video that you cannot use the Remote Desktop Connection to access Azure VMs while on the K-State Campus Network. K-State has blocked all outgoing RDP connections. So, you must either work from a network location that is not on campus, or use a VPN to access a network outside of K-State.
In this video, I’m going to go through the process of setting up a virtual machine in Azure for the system administration class. This is really useful for students that either have a newer MacBook that aren’t able to virtualize Windows Server yet, but it’s also useful for anybody that either has a lower powered system that wants to virtualize things in the cloud, or if you just want to get more experience working with Azure as a cloud service provider. So to get access to Azure, we’re going to start at the CS support page, which is support .cs .ksu .edu. And in here under the FAQs, there’s a link right here that says, I need some software by Microsoft. If you click that link, that will take you to this page. And right here, it has this link for the Microsoft Azure DevTools for Teaching. This link tends to change over time, but this page will always be kept up to date with the correct link. So I’m going to click that link, and it’s going to take me to a page where I can sign in. This used to use a different account system. Now it actually uses your K -State single sign -on account. So I’m going to go ahead and sign in to Azure using that account. It’s going to take me to my organization sign -in page. So I’ll sign in through K -State. It may need to do two factor if it needs to. And then it will pop in and take me to this page.
I’m going to tell it to stay signed in because this is my computer. On a shared computer, you might not want to do that. Here, it looks like I’ve got an error fetching tenants. I’m just going to refresh this page real quick to make sure that it is able to fetch everything. There we go. Okay, so here on this education overview, you should see your available credits. Hopefully you’ve got credits available. If not, there is a place where you can go to renew these, and we’ll look at that in just a minute. But what I’m going to do is I’m going to switch over to the Azure virtual machine dashboard. So I’m going to go over here to this menu, and I’m going to choose dashboard. And so this takes me to the dashboard. Right now, there’s no resources to display or anything. And if I go down here to all resources, it will also show me all of the resources that are available. There’s some other options here, such as virtual. virtual machines and load balancers and everything like that. So there’s a lot of different things that you can look at here on this resources. So feel free to play around with this and see what all is available. It will keep track of recents. For example, there is a view for subscriptions. And so if you find the view for subscriptions, this is where I can actually see your Azure for students. If you need to renew it, I believe you can do it from this view right here. So you just have to find subscriptions in the services list.
But we’re going to go to virtual machines. So under the menu, I just found virtual machines and we’re going to create a couple of virtual machines here and get them to talk to each other. So the first thing I’m going to do is I want to create an Azure virtual machine. All right, so we’ve got a virtual machine. I can use my Azure for students. I can create a resource group. I’m going to use the CIS 527 resource group that I created earlier. You can create new resource groups as you want. I’m going to call this Windows Server 2022 video, just so I know which one this is. We’re going to create it in the US East region in whatever availability zone is available. I’m just going to create it in Zone 1. One thing I need to do is remember that all of my VMs need to be created in the same zone, so I’m using US East Zone 1. Then I can choose my image. There are a few different images that you can choose from. I’ve done this before, so I have these in the recently used. For the Windows Server, I’m going to look for Windows Server 2022 Data Center Azure Edition. What you don’t want is the core. If you look there is an Azure Edition, there are also some Azure Edition core options.
If I look at Windows Server here, you’ll see that there are a lot of different Windows Server images out there. You’ll need to look at all these different versions. What you want is the Azure Edition without the core. You can look through tons and tons and tons of these. But as I showed on that previous machine, I want Windows Server 2022 Data Center Azure Edition, and I want it without the core. I want Small Disk, Windows Server 2022. Looks like there are tons and tons and tons of these. Azure Edition Core, Azure Edition Core, Azure Edition. There we go. Windows Server 2022 Data Center Azure Edition. I’m just going to grab one of these. I’m going to grab that one. You can see that that’s the one that I had previously, Azure Edition X64 Gen2. We’re going to run it on X64. We can run it with Azure Spot Discount, which is a discounted rate. I’m not going to turn that on right now.
We’re going to run this on a standard B1A. this CPU, you can run it with more memory and actually if you can, I recommend doing it. There are a lot of different ones available but I’m gonna just try and run this on a standard B1S. So we’re gonna hit review and create. Let’s see, basics. Oh yes, I need to go back here to the basics and I need to set a password. So I’m going to use CS5 .27 as my username and then I’m going to use this generated password as a default password. I have it off screen in a notepad just so I remember that password and I’m gonna make sure that I enable the remote desktop port so that I have that available. So now we’re gonna go to review and create. It’s going to create this, it’s going to set up my subscription credits. So I’m gonna hit create and this will actually create my virtual machine. This process may take a little bit so you’ll see up here, it’s submitting the deployment. and it’s doing the deployment in progress. And so it will take a little bit to run this deployment. And then once it’s done, I’ll show you how to connect to that virtual machine.
OK, so that took about a minute or so to complete. So once the deployment is complete, I can click this option to say Go to Resource. There are also some things that I can do such as set up auto shutdown. So I’m going to click on that real quick and go to this auto shutdown. You can enable it to shut down on an automated schedule just in case you don’t forget. This helps you conserve resources. Basically, if you’re not using your VM, you should shut it down so that you’re not using up any of your resources. I’m not going to set this up right now, but it’s something to keep in mind that you can do. So I’m going to go to this back here, and then I’m going to click Go to Resource. And this will take me to the overview of the resource. So some of the things that you’ll notice is it’s booting up right now. So it says the virtual machine agent status is not ready, probably because the VM’s not fully booted yet. So that’s okay. We’re not going to worry about that too much right now. Instead, we’re going to try and connect to this system. And so we can either hit Connect or Connect via Bastion. I’m just going to connect to the system. And so it’s going to show me what the public IP address is of the system, the username and the port, and it will let me download the native RDP. They also have some other different things you can do, such as going through a Bastion, a serial portal, an admin center. There are lots of different ways you can do it. I’m going to play around with just the native RDP, which is really the thing that is easiest to use. So I’m going to click this to download the RDP file, which downloads this remote desktop profile. And then if I open this file, it’s actually going to open up the remote desktop viewer on my system. And so I’m going to switch my window capture to grab that.
Okay, so once I download that RDP file and open it up, it will eventually come up and ask me for my credentials to… connect to that system, it has my username prefilled. I’m just gonna type in my password and check mark, remember me and hit okay. And then it will pop up and ask me if I want to connect to that system. So eventually it will configure that remote session and we’ll see here that it will pop up and I’m gonna make this a little bit smaller so that we can see what’s going on. And let me actually try and window capture that. All right, so our virtual machine is loading right now.
Okay, so I tried to connect to this virtual machine but it’s been giving me a lot of issues and I think it has to do with the fact that it only has one virtual CPU and one gigabyte of memory. So we’re gonna go ahead and scale up the Windows server just so that we have a little bit more access to this. So I’m going to click the stop button to stop this virtual machine and then we’re going to rescale it. So to do that, I need to wait for this stopping virtual machine. So this will take maybe a minute or so for it to stop. and then we will go through and rescale it. Okay. So once the virtual machine has stopped, then I’m going to go down here on the side, and I’m going to scroll down to find availability and scale, and then look at the size option. So there are a lot of different sizes that we can use. Currently, we’re using B1S, which is free services eligible. I’m going to change this to one of the other options. So you’ll notice that these prices go up very, very quickly. And so generally, the B series is the best series for what you want to use. And so they’ve got some of these different sizes, but you’ll notice that they get very, very pricey very quickly. So I’m going to choose the next one up, which is the B2S. So I’m going to resize it to a B2S. This is going to be a little higher. It’s going to take up some of your actual Azure credits, but as long as you’re not running your virtual machines for too long, you won’t use up your credits very quickly. Like that showed, it will use up $36 a month if you run it continuously for a full month. So you shouldn’t need to run it too long. So I’ve resized this up to a B2S, which gives me a little bit more size. So now if I refresh that page, it should bring up the correct size for the system now. Yeah, standard B2S, two virtual CPUs, four gigabytes of memory.
So now let’s start this up and see if we can connect to it. So we’re going to let it start. And then once it’s done starting, we’re going to go to the Connect tab and we’re going to download that RDP file again and connect to it through that. All right, so finally I’ve got connected to this. So I now have my virtual machine running here on remote desktop, and I can manage everything just as if I’m working locally on that machine. It should be pretty performant when you’re running it on a B2S system. So for example, here I can go to Computer Management. I can see all the computer management tools. I can see the server manager dashboard, and I should have full admin access to this version. virtual machine to do whatever I want. Unfortunately, I’m recording this on an ultra wide monitor and it defaults to full screen. So you’ll notice that I have a lot of screen space and you can’t really see what’s going on here. But from here, you should be able to follow along with everything you need to do in this virtual machine in order to actually set up a Windows Active Directory.
So the other thing that I’m going to show you real quick on the system is PowerShell. So I’m just going to in this search box here, I’m gonna load up PowerShell real quick. And then what I’m going to do is zoom in a little bit so we can see what’s going on here in PowerShell. So in PowerShell, I’m going to check the IP config and we’ll see that we have this adapter right here that is set to 10 .0 .0 .4. And we’ll need to remember that because that’s the IP address of the internal network that we’re working on. This 172 .178 .112 .59, the external address that it gave us is different than the internal IP address that we have. in our network in Azure, and we’ll look at that in just a second. So I’m going to leave this running, I’m going to leave this connected, but I’m going to switch back to Chrome and we’re going to create another system real quick.
All right, so back here in Chrome, I’m going to go back to my Azure services, I’m going to go to my virtual machines, and we’re going to create another Azure virtual machine. And so this one, again, I’m going to add to my CS5 .27 resource group. This, I’m going to call it Windows 11 video. I’m going to put it in the same availability zone. I’m going to create it using the Windows 11 Pro VM, X64. I’m also going to run this on a B2S just to give us a little bit more power. This one should run okay on a B1S, but I’m going to go ahead and upgrade it to a B2S just to have that extra power to make this work a little bit easier. So we’re going to run it on a B2S. We’re going to set up a username and I’m going to use a different password for this. So I’ve got my password already set up there, allow remote desktop. And then we’re going to confirm that we have an eligible license with multi -tenant hosting rights. We do because we’re working through the student licenses that we have. So we’re going to confirm that we have that. So now we’re going to hit review and create and it’s going to create this virtual machine for us. So we’ll let it create this. And then same as before, once it gets created and deployed, we’re going to download that remote desktop file and open it up on remote desktop so we can see what’s going on. And I’ll come back to this video as soon as this is done deploying.
Okay, so once again, this resource is now deployed. I’m going to click go to resource. It’s still booting up. So you may not get a little error here, but I’m just going to go to connect. I’m going to download the RDP file. And then I’m going to open that RDP file. It will… will pop up and prompt me to connect to that system. You won’t be able to see this because I can’t window capture it because it’s a protected window. But as soon as this comes up, I will switch over and show you that connection and show that the two systems can talk to each other. Okay, so after a couple of minutes, this machine comes up. I have to click through some of the initial setup process on Windows 11, just like any other machine. But now I am here on my remote desktop looking at my Windows 11 machine. I’ve got PowerShell opened up. So I’m gonna make that a little bit bigger so that we can see what’s going on here with that window. And once again, I’m just gonna type in IP config. And you’ll notice this is assigned the IP address 10 .0 .0 .5. And so that tells me what its IP address is on the internal network that these other systems can talk to. And so if I try and ping 10 .0 .0 .4, I should probably not get a response because Windows server has a firewall on it. But those two are both actually in the same network and they should be able to respond. Let me actually jump to Windows Server real quick and check the firewall and see if I can ping the other way around.
Okay, so for testing this, I went into the Windows firewall and I found the options for core networking diagnostics, ICMP echo request, and I enabled those on domain and private networks so that we can actually receive a ping from the systems. And so now if I switch back to my Windows Server, if I go here to Windows Server, I can now ping that IP address of 0 .0 .5, which is the Windows 11, and I received that ping response back. So we’re actually able to talk to each other. This is really important to know when you’re setting up your Active Directory. Basically your server is going to have one IP address and you won’t be able to set a static IP address on it. You’ll just leave the IP address alone. And then on your Windows client, you’ll know the address is 10 .0 .0 .5 or something similar. And you’ll have to set up a host file entry for this. I’ll kind of talk anybody through that that has any questions. But this is the basic idea for setting up virtual machines in Azure. You can also go through the same process to set up an Ubuntu virtual machine. It’s basically the same process as anything else. So if you have any questions or any issues with that, let me know. Otherwise, I’m happy to help. So feel free to ask any questions you have.
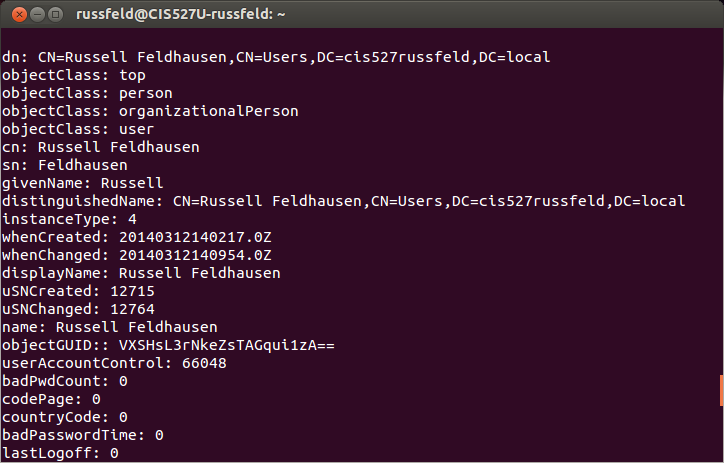