Subsections of Introduction
Course Introduction
YouTube VideoResources
Video Script
Welcome to CIS 527 - Enterprise System Administration and CC 510 - Computer Systems Administration. Even though these are two different courses in the catalog, they teach the same content and will use the same Canvas course. So, anywhere you see CIS 527 in this course, you can also mentally substitute CC 510 in its place.
My name is Russell Feldhausen, and I’ll be your instructor for this course. My contact information is shown here, and is also listed on the syllabus, and on the home page of the course on K-State Canvas. My email address is russfeld@ksu.edu, and it is the official method of communication for matters outside of this course, since it allows me to have a record of our conversations and respond when I’m available. However, I’ll also be available via the K-State CS Discord server and on Microsoft Teams, so you can easily chat with me there.
We also have one teaching assistant this semester - Josh Barron. He’ll also be available to answer questions, help with lab assignments, and will be doing some of the lab grading as well.
For communication in this course, there are two basic methods that I recommend. For general questions about the course, content, getting help with labs, and any other items relevant to the course, I encourage you to use the Ed Discussion message board. This allows all of us to communicate in a single space, and it also means that any questions I answer will immediately be available for the whole class. For personal issues, grading questions, or if you have something that is a “to-do” item for me, please email the course email, which is cis527-help@ksuemailprod.onmicrosoft.com. While I will strive to check Ed Discussion often, I’ve found that sometimes tasks can get lost in the discussion, so having an email in my inbox to prompt me to follow up is very helpful.
I am working remotely out of my home in Kansas City, so I won’t be available on campus very often during the semester. I do have an office, and I will be there usually on Mondays to meet with folks on campus and hold office hours. I’ll be sure to announce those times as they are scheduled.
In addition, I must give credit to several people for helping me develop the content in this course. First and foremost is Seth Galitzer, the CS system administrator, as well as several of my former students and teaching assistants.
For a brief overview of the course, there are 7 lab modules, plus a final project, that you’ll be responsible for completing. The modules are configured in K-State Canvas as gated modules, meaning that you must complete each item in the module in order before continuing. There will be one module due each week, and you may work ahead at your own pace. When you are ready to have a lab graded, you’ll schedule a time to meet interactively with me either in person or remotely. Finally, all work in this course must be completed and all labs graded by no later than the Friday of finals week.
Looking ahead to the rest of this first module, you’ll see that there are a few more items to be completed before you can move on. In the next video, I’ll discuss a bit more information about navigating through this course on Canvas and using the videos posted on YouTube.
One thing I highly encourage each of you to do is read the syllabus for this course in its entirety, and let me know if you have any questions. My view is that the syllabus is a contact between me as your teacher and you as a student, defining how each of us should treat each other and what we should expect from each other. I have made a few changes to my standard syllabus template for this course, and those changes are clearly highlighted. Finally, the syllabus itself is subject to change as needed as we adapt to this new course layout and format, and all changes will be clearly communicated to everyone before they take effect.
The grading in this course is very simple. Each of the 7 lab assignments will be worth 10% of your grade, for a total of 70%. Likewise, there are 15 quizzes, each one worth .66% for a total of 10%. We’ll also have a few guided discussions throughout the class, and your participation in each discussion will be 2% of your grade for a total of 10%. Finally, the final project is worth another 10% of your grade. There will be some extra credit points available, mainly through the Bug Bounty assignment, which you will review as part of this module. Lastly, the standard “90-80-70-60” grading scale will apply, though I reserve the right to curve grades up to a higher grade level at my discretion. Therefore, you will never be required to get higher than 90% for an A, but you may get an A if you score slightly below 90% if I choose to curve the grades.
Since this is a completely online course, you may be asking yourself what is different about this course. First off, you can work ahead at your own pace, and turn in work whenever you like before the due date. However, as discussed before, you must do all the readings and assignments in order before moving on, so you cannot skip ahead.
In addition, due to the flexible online format of this class, there won’t be any long lecture videos to watch. Instead, each module will consist of several short videos, each focused on a particular topic or task. Likewise, there won’t be any textbooks formally used, but you’ll be directed to a bevy of online resources for additional information.
What hasn’t changed, though, is the basic concept of a college course. You’ll still be expected to watch or read about 6 hours of content to complete each module. In addition to that, each lab assignment may require anywhere from 1 to 6 hours of work to complete. If you plan on doing a module every week, that roughly equates to 6 hours of content and 6 hours of homework each week, which is the expected workload from a 3 credit hour college course during the summer.
Also, while some of the quizzes will be graded automatically, much of the grading will still be done directly by me or my GTA. This includes the lab assignments. For each lab assignment, you’ll schedule a time to meet with us either in person or remotely to review your work for that lab. Finally, we’ll still be available to meet with you online for virtual office hours as needed. Of course, you can always contact me via email if you have any questions. In fact, since I regularly work from home anyway, I’ll probably be easier to contact than some of my fellow faculty!
For this class, each student is required to have access to a personal computer. It should have plenty of RAM and CPU power to host several virtual machines concurrently. In addition, you’ll need some virtual machine software, which is available for free to K-State CS students. I’ll discuss how to acquire and install that software in the first lab module. Finally, you’ll also need access to a high-speed connection capable of web conferencing with video. If you have any concerns about meeting these requirements, please contact me ASAP! We may have options available through some on-campus resources to help you out.
Finally, as you are aware, this course is always subject to change. While we have taught this class several times before, there may be a few hiccups as we get started due to new software and situations. The best advice I have is to look upon this graphic with the words “Don’t Panic” written in large, friendly letters, and remember that it’ll all work out in the end as long as you know where your towel is.
So, to complete this module, there are a few other things that you’ll need to do. The next step is to watch the video on navigating Canvas and using the YouTube videos, which will give you a good idea of how to most effectively work through the content in this course.
To get to that video, click the “Next” button at the bottom right of this page.
Navigating Canvas & YouTube
YouTube VideoVideo Script
This course makes extensive use of several features of Canvas which you may or may not have worked with before. To give you the best experience in this course, this video will briefly describe those features and the best way to access them.
When you first access the course on Canvas, you will be shown this homepage, with my contact information and any important information about the course. This is a quick, easy reference for you if you ever need to get in touch with me.
Let’s walk through the options in the main menu to the left. First, any course announcements will be posted in the Announcements section, which is available here. Those announcements will also be configured to send emails to all students when they are posted, though in your personal Canvas settings you can disable email notifications if you so choose. Please make sure you check here often for any updates to course information.
The next section is Modules, which is where you’ll primarily interact with the course. You’ll notice that I’ve disabled several of the common menu items in this course, such as Files and Assignments. This is to simplify things for you as students, so you remember that all the course content is available in one place.
When you first arrive at the Modules section, you’ll see all of the content in the course laid out in order. If you like, you can minimize the modules you aren’t working on by clicking the arrow to the left of the module name.
As you look at each module, you’ll see that it gives quite a bit of information about the course. At the top of each module is an item telling you what parts of the module you must complete to continue. In this case, it says “Complete All Items.” Likewise, the following modules may list a prerequisite module, which you must complete before you can access it.
Within each module is a set of items, which must be completed in listed order. Under each item you’ll see information about what you must do in order to complete that item. For many of them, it will simply say “view,” which means you must view the item at least once to continue. Others may say “contribute,” “submit,” or give a minimum score required to continue. For assignments, it also helpfully gives the number of points available, and the due date.
Let’s click on the first item, Course Introduction, to get started. You’ve already been to this page by this point. Most course pages will consist of an embedded video, followed by links to any resources used or referenced in the video, including the slides and a downloadable version of the video. Finally, a rough video script will be posted on the page for your quick reference.
While I cannot force you to watch each video in its entirety, I highly recommend doing so. The script on the page may not accurately reflect all of the content in the video, nor can it show how to perform some tasks which are purely visual.
When you are ready to move to the next step in a module, click the “Next” button at the bottom of the page. Canvas will automatically add “Next” and “Previous” buttons to each piece of content which is accessed through the Modules section, which makes it very easy to work through the course content. I’ll click through a couple of items here.
At any point, you may click on the Modules link in the menu to the left to return to the Modules section of the site. You’ll notice that I’ve viewed the first few items in the first module, so I can access more items here. This is handy if you want to go back and review the content you’ve already seen, or if you leave and want to resume where you left off. Canvas will put green checkmarks to the right of items you’ve completed.
Finally, you’ll find the usual Canvas links to view your grades in the course, as well as a list of fellow students taking the course.
Let’s go back to the Course Introduction page, and look at some of the features of the YouTube video player that may be useful to you as you go through this course.
When you load the player, it gives you a control toolbar at the bottom with several options. From here, you can restart the video, control playback speed, adjust the volume, enable subtitled captions, see information about the video, open the video in a new window, and more.
Every video in this course will have subtitles available, though the subtitles may be slightly garbled as they are automatically transcribed from the audio. I will do my best to edit them to be as accurate as possible. This will make the videos accessible to all students. In addition, studies have shown that a large number of video viewers prefer to have subtitles available even if they do not have any hearing impairment. So, please feel free to enable subtitles at any time.
In addition, I will attempt to speak as clearly as possible when creating the videos. If you feel that I am going too fast, or that you can keep up with me going more quickly, feel free to adjust the playback speed as needed. I have been known to absorb lecture videos at 1.5x playback speed myself, depending on the content.
Finally, you are welcome to download the videos from YouTube if desired, based on your internet connection or other factors. If you are interested in getting these videos in another format, please contact me.
Hopefully this gives you a good idea of the different resources available in this course. To complete the first module, click the next button below to continue with the next item.
Where to Find Help
YouTube VideoResources
Video Script
As you work on the materials in this course, you may run into questions or problems and need assistance. This video reviews the various types of help available to you in this course.
First and foremost, anytime you have a questions or need assistance in the course, please post in the course Discord room. It is the best place to go to get help with anything related to this course, from the tutorials and projects to issues with Codio and Canvas. Before you post on Discord, take a minute to look around and make sure the question has not already been posted before. It will save everyone quite a bit of time.
There are a few major reasons we’ve chosen to use Discord in this program. Our goal is to respond as quickly as possible, and having a single place for all questions allows the instructors and the TAs to work together to answer questions and solve problems quickly. As an added bonus, it reduces the amount of email generated by the class. Discord includes lots of features to make your messages easily readable using both markdown and code blocks. Finally, by participating in discussions on Discord and helping to answer questions from your fellow students, you can earn extra credit points!
Of course, if you aren’t able to find an answer in either of those places, the next step would be to search online for an answer. For better or worse, in the real world as a system administrator, many times you simply won’t know the answer, and will be tasked with finding the best one available. Learning how to leverage online search engines is a powerful skill to develop, and one major desired outcome of this course is to help you get better at finding and evaluating online resources for your work.
If all else fails, please email me and let me know. Make sure you clearly explain your question and the steps you’ve taken to solve it thus far. If I feel it can be easily answered by one of the earlier steps, I may redirect you back to those before answering it directly. But, at times there are indeed questions that come up that don’t have an easy answer, and I’m more than happy to help answer them as needed.
Beyond Discord, there are a few resources you should be aware of. First, if you have any issues working with K-State Canvas, the YouTube Videos, K-State IT resources, or any other technology related to the delivery of the course, your first source of help is the K-State IT Helpdesk. They can easily be reached via email at helpdesk@ksu.edu. Beyond them, there are many online resources for using Canvas and YouTube, many of which are linked in the resources section below the video. As a last resort, you may contact me via email, but in most cases I will not be able to help and will simply redirect you to the K-State helpdesk for assistance.
Next, we have grading and administrative issues. This could include problems or mistakes in the grade you received on a lab, missing course resources, or any concerns you have regarding the course and the conduct of myself and your peers. Since this is an online course, you’ll be interacting with us on a variety of online platforms, and sometimes things happen that are inappropriate or offensive. There are lots of resources at K-State to help you with those situations. First and foremost, please email me as soon as possible and let me know about your concern, if it is appropriate for me to be involved. If not, or if you’d rather talk with someone other than me about your issue, I encourage you to contact either your academic advisor, the CS department staff, College of Engineering Student Services, or the K-State Office of Student Life. Finally, if you have any concerns that you feel should be reported to K-State, you can do so at https://www.k-state.edu/report/. That site also has links to a large number of resources at K-State that you can use when you need help.
Finally, if you find any errors or omissions in the course content, or have suggestions for additional resources to include in the course, please email me. There are some extra credit points available for helping to improve the course, so be on the lookout for anything that you feel could be changed or improved.
So, in summary, if you have any issues using Canvas or accessing the course content, contact the K-State Helpdesk as a first step. If you run into issues with the labs, your first step should be to consult the course modules and discussion forums. For grading questions and errors in the course content, contact me directly. For other issues, please contact either myself or your academic advising resources as appropriate.
Our goal in this program is to make sure that you have the resources available to you to be successful. Please don’t be afraid to take advantage of them and ask questions whenever you want.
What You'll Learn
YouTube VideoResources
Video Script
Before you begin this course, here is a quick overview of what you’ll be learning and why it is important.
First, the labs. Lab 1 - Secure Workstations, is all about installing and configuring computers for your end users to use in a large organization. This is a great place to start in system administration, because it is very similar to working on your own, personal computer. You’ll install an operating system, learn about its various parts, and configure a secure and stable workstation. If you’ve taken my CIS 225 course, this is basically a review of a large portion of that material.
Lab 2 - Configuration Management, builds on the first lab by showing how you can use tools to automate much of the workstation configuration process. For this class, we’ll be learning how to use Puppet, but many other tools exist for this task. At the end of this lab, you should have a script available that will automatically perform most of the configuration you did in lab 1.
Lab 3 is all about networking. Most modern computers are completely useless without access to network resources, so this is a vital part of system administration. In this lab, you’ll configure a network for your virtual machines, as well as several networking services for them to use. We’ll also be exploring several common networking protocols, such as HTTP, DNS, and DHCP, using tools such as Wireshark to capture and inspect individual network packets. Some of this material comes directly from CIS 525, but with a focus more on system administration than building networked programs.
Lab 4 expands upon the previous labs by creating centralized directory services for your workstations, Using such a service, users can use a single username and password to access resources throughout an organization, much like your eID is used here at K-State. This lab is notoriously one of the most difficult and frustrating labs to complete in this course, but I believe it is also one of the most useful ones as well.
Lab 5 shifts the focus in this class toward the cloud. Many companies today operate some, if not all, of their centralized assets in the cloud. In this lab, you’ll configure several cloud resources, and we’ll discuss the tradeoffs and differences between cloud resources and other traditional computing resources.
Lab 6 focuses on building servers for a variety of enterprise use cases, including file servers, application servers, web servers, and more. We’ll discuss what it takes to provide a large number of resources for an organization, and you’ll get hands-on experience working with several of them.
The final lab introduces many smaller concerns for system administrators, but each of them is vital to creating truly stable and effective resources. You’ll learn about state-of-the-art techniques in backups, system monitoring, developer operations (or DevOps), and some of the theory behind being an effective system administrator through ITIL, formerly the Information Technology Infrastructure Library.
At the end of the semester, you’ll complete a final project that integrates and demonstrates all of your knowledge about system administration. You’ll be asked to communicate information effectively, show that you can perform your own research and analysis, and more. The final project module is already available on K-State Online for you to view, so I recommend you review it soon.
At this point, you may be asking yourself why this information is so important to learn? Here are a few thoughts from my own experience to help answer that question.
First and foremost, computers are ubiquitous in today’s world. There is hardly a career left that doesn’t involve technology in some way, from engineering and science to agriculture and even hotel and restaurant management. By learning how to work closely with these tools, you’ll have an indispensable skill set for your entire career, no matter what path you choose.
Likewise, this class gives you a chance to hone your own technical skills. Students who have previously taken this class have reported that the information covered was very helpful for them during their internships and job searches, and they were quickly able to understand how to use the corporate systems available to them.
Similarly, you’ll also learn how to maximize your effectiveness on your personal computer, through the use of scripting, virtual machines, and operating system features. It will truly take you from a normal computer user to a power user.
In addition, throughout the class you’ll be honing your communication skills, which is constantly cited as one of the most important soft skills for finding a job in the tech industry. If you are able to communicate better than your peers, you’ll be that much closer to landing your dream job.
Speaking of which, there are lots of great careers out there if you do decide to pursue system administration. Every company both large and small has need of someone with this particular skill set, and each industry has a unique set of challenges and requirements. A system administrator will always be in demand, and I can guarantee that the job is never boring.
You’ll also be able to put your skills and knowledge to good use by helping others discover how to use their computing resources most effectively. It is a great opportunity to share your knowledge with others and build those working relationships.
Finally, yes, you may even find yourself in a management position, or you may be asked to work with management. Having a strong understanding of every aspect of an organization’s technical infrastructure and what’s out there can help you make good decisions and lead effectively. There are countless stories of companies who miss out on the latest technological advances, only to find themselves left behind or worse. In the resources section below the video, you can read more about what happened to Circuit City, a large electronics retailer that chose to become complacent, and ended up bankrupt.
With that in mind, I hope you are excited to continue this course and start working on the first module.
Fall 2025 Syllabus
CIS 527 - Enterprise Systems Administration
CC 510 - Computer Systems Administration
Previous Versions
This syllabus covers both courses. They are taught using the same content.
- Instructor: Mr. Russell Feldhausen (russfeld AT ksu DOT edu)
- Office: DUE 2213, but I mostly work remotely from Kansas City, MO
- Phone: (785) 292-3121 (Call/Text)
- Website: https://russfeld.me
- Virtual Office Hours: By appointment via Zoom. Book time to meet with me
Teaching Assistant
Preferred Methods of Communication:
- Email: Email is the official method of communication for this course. Any emails sent to the instructor regarding this course should be answered within one class day. Please use the official course email address: cis527-help@ksuemailprod.onmicrosoft.com
- Ed Discussion: For short questions and discussions of course content and assignments, Ed Discussion is preferred since questions can be asked once and answered for all students. Students are encouraged to post questions there and use that space for discussion, and the instructor will strive to answer questions there as well.
- Phone/Text: Emergencies only! I will do my best to respond as quickly as I can.
Prerequisites
- CIS 527: CIS 300.
- CC 510: CC 310 or CIS 300.
Students may enroll in CIS or CC courses only if they have earned a grade of C or better for each prerequisite to those courses.
Course Description
Computer information systems form the backbone of many large organizations, and many students will be called upon in their careers to help create, manage and maintain these large systems. This course will give students knowledge and experience working with enterprise level computer systems including workstation management, file servers, web servers, networking devices, configuration management, monitoring, and more. We will mainly focus on the GNU/Linux and Microsoft Windows server software, and much of the learning will take place in hands-on lab activities working directly with these systems. In addition, students will be responsible for developing some technical documentation and communicating information about their systems in a variety of ways. Finally, throughout the course students will be exposed to a variety of information directly from system administrators across campus.
Student Learning Outcomes
After completing this course, a successful student will be able to:
- Understand the major components of an enterprise level computer network and server system
- Design and implement a simple enterprise level server system and network, as well as provision workstations on that network quickly and easily
- Communicate information about enterprise systems clearly and effectively to users of all skill levels and interests
- Develop ways to increase efficiency by automating tasks whenever possible using scripting and configuration management tools
- Understand and describe security risks in any enterprise system and any ways that they can be mitigated
- Show how to monitor enterprise systems for problems and use that information to locate and fix any issues within the system
- Work with cloud technologies and describe how they can be integrated into an enterprise information technology setup
Major Course Topics
- Configuration Management using Puppet
- Creating Secure Workstations (CIS 225 overview/review)
- Setting up an Enterprise Directory Service & Single Sign On
- Enterprise File Sharing
- Web & Application Servers
- Core Networking Services (DHCP, DNS, ICMP, etc.)
- System Monitoring & Maintenance
- Backup Strategies
- The Cloud & DevOps
Course Structure
This course is being taught 100% online and mostly asynchronous. There may be some bumps in the road. Students will work at their own pace through several modules, with due dates for completion of each module given. Material will be provided in the form of recorded videos, links to online resources, and discussion prompts. Each module will include a hands-on lab assignment, which will be graded interactively by the instructor or TAs. Assignments may also include written portions or presentations, which will be submitted online.
The course will also include a final project and presentation. More information about this can be found in the final project module on Canvas.
The Work
There is no shortcut to becoming a great programmer or system administrator. Only by doing the work will you develop the skills and knowledge to make you a successful system administrator. This course is built around that principle, and gives you ample opportunity to do the work, with as much support as we can offer.
Lectures & Quizzes: Each module will include many lectures and quizzes. The goal is to introduce you to a new topic and provide ample background information, then check for your understanding of the core concepts through the quiz. Many lectures include links to additional resources that you are welcome to review if you want to dig deeper into a particular topic. Those additional resources may also be useful when completing the lab assignments.
Lab Assignments: Throughout the semester you will be building a non-trivial system architecture iteratively; every week a new lab assignment will be due. Each lab builds upon the prior lab’s infrastructure, so it is critical that you complete each lab in a timely manner! This process also reflects the way system administration is done in the real world - breaking large projects into more readily achievable milestones helps manage the development process.
Following along that real-world theme, labs will mostly be graded on whether they achieve the goals as described in the lab assignment. You can think of each lab assignment as a directive given to you by your supervisor - if you meet those requirements, you are successful; however, if your system fails to meet those requirements, then it is not useful at all, even if it is partially complete. In practice, you may earn some partial credit for attempting a portion of a lab, but the majority of points will require full functionality.
Final Project: At the end of this course, you will design and evaluate a final project of your choosing to demonstrate your ability. This project can link back to your interest or other fields, and will serve as a capstone project for this course.
Grading
In theory, each student begins the course with an A. As you submit work, you can either maintain your A (for good work) or chip away at it (for less adequate or incomplete work). In practice, each student starts with 0 points in the gradebook and works upward toward a final point total earned out of the possible number of points. In this course, each assignment constitutes a portion of the final grade, as detailed below:
- 70% - Lab Assignments* (7 labs, 10% each lab)
- 10% - Quizzes (15 quizzes, 0.66% each)
- 10% - Discussions (5 discussions, 2% each)
- 10% - Final Project
All group work will include a REQUIRED peer evaluation component which can adjust that portion of the individual’s grade up to 50%. If a student should fail to contribute to a group assignment at all, their grade for that assignment will be reduced to a zero. Failure to complete the peer evaluation will result in a 10% grade deduction for that assignment.
Letter grades will be assigned following the standard scale:
- 90% - 100% → A
- 80% - 89.99% → B
- 70% - 79.99% → C
- 60% - 69.99% → D
- 00% - 59.99% → F
Submission, Regrading, and Early Grading Policy
As a rule, submissions in this course will not be graded until after they are due, even if submitted early. Students may resubmit assignments many times before the due date, and only the latest submission will be graded. For assignments submitted via GitHub release tag, only the tagged release that was submitted to Canvas will be graded, even if additional commits have been made. Students must create a new tagged release and resubmit that tag to have it graded for that assignment.
Once an assignment is graded, students are not allowed to resubmit the assignment for regrading or additional credit without special permission from the instructor to do so. In essence, students are expected to ensure their work is complete and meets the requirements before submission, not after feedback is given by the instructor during grading. However, students should use that feedback to improve future assignments and milestones.
For the project milestones, it is solely at the discretion of the instructor whether issues noted in the feedback for a milestone will result in grade deductions in a later milestones if they remain unresolved, though the instructor will strive to give students ample time to resolve issues before any additional grade deductions are made.
Likewise, students may ask questions of the instructor while working on the assignment and receive help, but the instructor will not perform a full code review nor give grading-level feedback until after the assignment is submitted and the due date has passed. Again, students are expected to be able to make their own judgments on the quality and completion of an assignment before submission.
That said, a student may email the instructor to request early grading on an assignment before the due date, in order to move ahead more quickly. The instructor’s receipt of that email will effectively mean that the assignment for that student is due immediately, and all limitations above will apply as if the assignment’s due date has now passed.
Collaboration Policy
In this course, all work submitted by a student should be created solely by the student without any outside assistance beyond the instructor and TA/GTAs. Students may seek outside help or tutoring regarding concepts presented in the course, but should not share or receive any answers, source code, program structure, or any other materials related to the course. Learning to debug problems is a vital skill, and students should strive to ask good questions and perform their own research instead of just sharing broken source code when asking for assistance.
That said, the field of system administration requires the use of lots of online documentation and reference materials, and the point of the class is to learn how to effectively use those resources instead of “reinventing the wheel from scratch” in each assignment. Whenever content in an assignment is taken from an outside source, this should be noted somewhere in the assignment.
Late Work
Warning
While my original intent was to have this course completely asynchronous and self-paced, I’ve found that students prefer having more strict deadlines than more flexibility, and many times they will perform better in the course when deadlines are enforced. Therefore, deadlines will be strictly enforced this semester. Read this late work policy very carefully! If you are unsure how to interpret it, please contact the instructors via email. Not understanding the policy does not mean that it won’t apply to you!
Due to the asynchronous nature of this course, staying on task and keeping up with deadlines is very important. Therefore, all course work must be submitted, and all interactively graded materials must be graded with the instructor or TA, on or before the posted due date to receive full credit. For labs, it is not simply enough to contact the instructor/TA asking to schedule a grading time before the due date; the grading itself must be completed before the due date in order to be considered “on time”.
Any work submitted and graded after the due date is subject to a deduction of 10% of the total points possible on the assignment for each class day that the assignment is late. For example, if an assignment is due on a Friday and is submitted the following Tuesday, it will be subject to a reduction of 20% of the total points possible, or 10% for each class day it was late (Monday and Tuesday in this example). Grading done on non-class days will be considered to have been submitted on the next available class day. Deductions for non-class days will still be automatically entered by Canvas - contact the instructor to have these deductions removed.
These deductions will only be applied to grades above 50% of the total points on the assignment. So, if you scored higher than 50%, your grade will be reduced by the late penalty down to a minimum grade of 50%. If you scored lower than 50% on the assignment, no deductions will be applied.
Also, note that several labs in this class require successful completion of previous labs. If you are behind and choose to skip a lab assignment to catch up, you may still have to make up some or all of that work in order to complete a later lab. You may contact the instructor to discuss options for obtaining model solutions to previous labs if needed.
All course work must be submitted, and all interactively graded materials must be graded with the instructor, on or before the last day of the semester in which the student is enrolled in the course in order for it to be graded on time. No late work will be accepted after that date.
If you have extenuating circumstances, please discuss them with the instructor as soon as they arise so other arrangements can be made. If you know you have upcoming events that will prevent you from completing work in this course, you should contact the instructor ASAP and plan on working ahead before your event instead of catching up afterwards. If you find that you are getting behind in the class, you are encouraged to speak to the instructor for options to catch up quickly.
Incomplete Policy
Students should strive to complete this course in its entirety before the end of the semester in which they are enrolled. However, since retaking the course would be costly and repetitive for students, we would like to give students a chance to succeed with a little help rather than immediately fail students who are struggling.
If you are unable to complete the course in a timely manner, please contact the instructor to discuss an incomplete grade. Incomplete grades are given solely at the instructor’s discretion. See the official K-State Grading Policy for more information. In general, poor time management alone is not a sufficient reason for an incomplete grade.
Unless otherwise noted in writing on a signed Incomplete Agreement Form, the following stipulations apply to any incomplete grades given in this course:
- Students who request an incomplete will have their final grade capped at a C.
- Students will be given a maximum of 8 calendar weeks from the end of the enrolled semester to complete the course. It is expected that students have completed at least half of the course in order to qualify for an incomplete.
- Students understand that access to instructor and TA assistance may be limited after the end of an academic semester due to holidays and other obligations.
- For CC courses only:
- Students may receive at most two incompletes in Computational Core courses throughout their time in the program.
- Any modules in a future CC course which depend on incomplete work will not be accessible until the previous course is finished
- For example, if a student is given an incomplete in CC 210, then all modules in CC 310 will be inaccessible until CC 210 is complete
Recommended Texts & Supplies
To participate in this course, students must have access to a modern web browser and broadband internet connection. All course materials will be provided via Canvas. Modules may also contain links to external resources for
additional information, such as programming language documentation.
The online textbook for this course can be found at https://textbooks.cs.ksu.edu/cis527/. All relevant pages from the textbook are also embedded into the appropriate Canvas modules.
Students in this course are expected to have access to a computer with virtual machine software (VMware, Virtual Box, Parallels, or other) installed and running. The computer should be capable of running multiple VMs simultaneously, which usually means having 8GB of RAM and a moderately powerful processor. Contact the instructor if you have questions or concerns.
All K-State Computer Science students have access to free software from Microsoft and VMWare. More information can be found on the K-State CS Support Website.
Since this class covers such a wide range of material, no single textbook will suffice. Therefore, students who would like a textbook should refer to resources available through the K-State Library and other online resources. The O’Riley For Higher Education digital library contains an entire catalog of books published on that platform, and it is a great resource for this course.
We will also use several online resources as needed.
This book contains useful information for anyone thinking about pursuing a career in system administration or information technology in general:
“The Practice of System and Network Administration” by Thomas Limoncelli, Christina Hogan and Strata Chalup.
ISBN 0321492668 - eBook Editions Available - Amazon Link
Subject to Change
The details in this syllabus are not set in stone. Due to the flexible nature of this class, adjustments may need to be made as the semester progresses, though they will be kept to a minimum. If any changes occur, the changes will be posted on the K-State Canvas page for this course and emailed to all students.
Standard Syllabus Statements
Info
The statements below are standard syllabus statements from K-State and our program. The latest versions are available online here.
Academic Honesty
Kansas State University has an Honor and Integrity System based on personal integrity, which is presumed to be sufficient assurance that, in academic matters, one’s work is performed honestly and without unauthorized assistance. Undergraduate and graduate students, by registration, acknowledge the jurisdiction of the Honor and Integrity System. The policies and procedures of the Honor and Integrity System apply to all full and part-time students enrolled in undergraduate and graduate courses on-campus, off-campus, and via distance learning. A component vital to the Honor and Integrity System is the inclusion of the Honor Pledge which applies to all assignments, examinations, or other course work undertaken by students. The Honor Pledge is implied, whether or not it is stated: “On my honor, as a student, I have neither given nor received unauthorized aid on this academic work.” A grade of XF can result from a breach of academic honesty. The F indicates failure in the course; the X indicates the reason is an Honor Pledge violation.
For this course, a violation of the Honor Pledge will result in sanctions such as a 0 on the assignment or an XF in the course, depending on severity. Actively seeking unauthorized aid, such as posting lab assignments on sites such as Chegg or StackOverflow, or asking another person to complete your work, even if unsuccessful, will result in an immediate XF in the course.
This course assumes that all your course work will be done by you. Use of AI text and code generators such as ChatGPT and GitHub Copilot in any submission for this course is strictly forbidden unless explicitly allowed by your instructor. Any unauthorized use of these tools without proper attribution is a violation of the K-State Honor Pledge.
We reserve the right to use various platforms that can perform automatic plagiarism detection by tracking changes made to files and comparing submitted projects against other students’ submissions and known solutions. That information may be used to determine if plagiarism has taken place.
Students with Disabilities
At K-State it is important that every student has access to course content and the means to demonstrate course mastery. Students with disabilities may benefit from services including accommodations provided by the Student Access Center. Disabilities can include physical, learning, executive functions, and mental health. You may register at the Student Access Center or to learn more contact:
- Manhattan/Olathe/Global Campus – Student Access Center
- K-State Salina Campus – Julie Rowe; Student Success Coordinator
Students already registered with the Student Access Center please request your Letters of Accommodation early in the semester to provide adequate time to arrange your approved academic accommodations. Once SAC approves your Letter of Accommodation it will be e-mailed to you, and your instructor(s) for this course. Please follow up with your instructor to discuss how best to implement the approved accommodations.
Expectations for Conduct
All student activities in the University, including this course, are governed by the Student Judicial Conduct Code as outlined in the Student Governing Association By Laws, Article V, Section 3, number 2. Students who engage in behavior that disrupts the learning environment may be asked to leave the class.
Mutual Respect and Inclusion in K-State Teaching & Learning Spaces
At K-State, faculty and staff are committed to creating and maintaining an inclusive and supportive learning environment for students from diverse backgrounds and perspectives. K-State courses, labs, and other virtual and physical learning spaces promote equitable opportunity to learn, participate, contribute, and succeed, regardless of age, race, color, ethnicity, nationality, genetic information, ancestry, disability, socioeconomic status, military or veteran status, immigration status, Indigenous identity, gender identity, gender expression, sexuality, religion, culture, as well as other social identities.
Faculty and staff are committed to promoting equity and believe the success of an inclusive learning environment relies on the participation, support, and understanding of all students. Students are encouraged to share their views and lived experiences as they relate to the course or their course experience, while recognizing they are doing so in a learning environment in which all are expected to engage with respect to honor the rights, safety, and dignity of others in keeping with the K-State Principles of Community.
If you feel uncomfortable because of comments or behavior encountered in this class, you may bring it to the attention of your instructor, advisors, and/or mentors. If you have questions about how to proceed with a confidential process to resolve concerns, please contact the Student Ombudsperson Office. Violations of the student code of conduct can be reported using the Code of Conduct Reporting Form. You can also report discrimination, harassment or sexual harassment, if needed.
Netiquette
Info
This is our personal policy and not a required syllabus statement from K-State. It has been adapted from this statement from K-State Online, and theRecurse Center Manual. We have adapted their ideas to fit this course.
Online communication is inherently different than in-person communication. When speaking in person, many times we can take advantage of the context and body language of the person speaking to better understand what the speaker means, not just what is said. This information is not present when communicating online, so we must be much more careful about what we say and how we say it in order to get our meaning across.
Here are a few general rules to help us all communicate online in this course, especially while using tools such as Canvas or Discord:
- Use a clear and meaningful subject line to announce your topic. Subject lines such as “Question” or “Problem” are not helpful. Subjects such as “Logic Question in Project 5, Part 1 in Java” or “Unexpected Exception when Opening Text File in Python” give plenty of information about your topic.
- Use only one topic per message. If you have multiple topics, post multiple messages so each one can be discussed independently.
- Be thorough, concise, and to the point. Ideally, each message should be a page or less.
- Include exact error messages, code snippets, or screenshots, as well as any previous steps taken to fix the problem. It is much easier to solve a problem when the exact error message or screenshot is provided. If we know what you’ve tried so far, we can get to the root cause of the issue more quickly.
- Consider carefully what you write before you post it. Once a message is posted, it becomes part of the permanent record of the course and can easily be found by others.
- If you are lost, don’t know an answer, or don’t understand something, speak up! Email and Canvas both allow you to send a message privately to the instructors, so other students won’t see that you asked a question. Don’t be afraid to ask questions anytime, as you can choose to do so without any fear of being identified by your fellow students.
- Class discussions are confidential. Do not share information from the course with anyone outside of the course without explicit permission.
- Do not quote entire message chains; only include the relevant parts. When replying to a previous message, only quote the relevant lines in your response.
- Do not use all caps. It makes it look like you are shouting. Use appropriate text markup (bold, italics, etc.) to highlight a point if needed.
- No feigning surprise. If someone asks a question, saying things like “I can’t believe you don’t know that!” are not helpful, and only serve to make that person feel bad.
- No “well-actually’s.” If someone makes a statement that is not entirely correct, resist the urge to offer a “well, actually…” correction, especially if it is not relevant to the discussion. If you can help solve their problem, feel free to provide correct information, but don’t post a correction just for the sake of being correct.
- Do not correct someone’s grammar or spelling. Again, it is not helpful, and only serves to make that person feel bad. If there is a genuine mistake that may affect the meaning of the post, please contact the person privately or let the instructors know privately so it can be resolved.
- Avoid subtle -isms and microaggressions. Avoid comments that could make others feel uncomfortable based on their personal identity. See the syllabus section on Diversity and Inclusion above for more information on this topic. If a comment makes you uncomfortable, please contact the instructor.
- Avoid sarcasm, flaming, advertisements, lingo, trolling, doxxing, and other bad online habits. They have no place in an academic environment. Tasteful humor is fine, but sarcasm can be misunderstood.
As a participant in course discussions, you should also strive to honor the diversity of your classmates by adhering to the K-State Principles of Community.
Discrimination, Harassment, and Sexual Harassment
Kansas State University is committed to maintaining academic, housing, and work environments that are free of discrimination, harassment, and sexual harassment. Instructors support the University’s commitment by creating a safe learning environment during this course, free of conduct that would interfere with your academic opportunities. Instructors also have a duty to report any behavior they become aware of that potentially violates the University’s policy prohibiting discrimination, harassment, and sexual harassment, as outlined by PPM 3010.
If a student is subjected to discrimination, harassment, or sexual harassment, they are encouraged to make a non-confidential report to the University’s Office of Civil Rights and Title IX (OCR & TIX) using the online reporting form. Incident disclosure is not required to receive resources at K-State. Reports that include domestic and dating violence, sexual assault, or stalking, should be considered for reporting by the complainant to the Kansas State University Police Department or the Riley County Police Department. Reports made to law enforcement are separate from reports made to OIE. A complainant can choose to report to one or both entities. Confidential support and advocacy can be found with the K-State Center for Advocacy, Response, and Education (CARE). Confidential mental health services can be found with Lafene Counseling and Psychological Services (CAPS). Academic support can be found with the Student Support and Accountability (SSA) office. SSA is a non-confidential resource. OCR & TIX also provides a comprehensive list of resources on their website. If you have questions about non-confidential and confidential resources, please contact OCR & TIX at civilrights@k-state.edu or (785) 532–6220.
Academic Freedom Statement
Kansas State University is a community of students, faculty, and staff who work together to discover new knowledge, create new ideas, and share the results of their scholarly inquiry with the wider public. Although new ideas or research results may be controversial or challenge established views, the health and growth of any society requires frank intellectual exchange. Academic freedom protects this type of free exchange and is thus essential to any university’s mission.
Moreover, academic freedom supports collaborative work in the pursuit of truth and the dissemination of knowledge in an environment of inquiry, respectful debate, and professionalism. Academic freedom is not limited to the classroom or to scientific and scholarly research, but extends to the life of the university as well as to larger social and political questions. It is the right and responsibility of the university community to engage with such issues.
Campus Safety
Kansas State University is committed to providing a safe teaching and learning environment for student and faculty members. In order to enhance your safety in the unlikely case of a campus emergency make sure that you know where and how to quickly exit your classroom and how to follow any emergency directives. Current Campus Emergency Information is available at the University’s Advisory webpage.
Student Resources
K-State has many resources to help contribute to student success. These resources include accommodations for academics, paying for college, student life, health and safety, and others. Check out the Student Guide to Help and Resources: One Stop Shop for more information.
Student Academic Creations
Student academic creations are subject to Kansas State University and Kansas Board of Regents Intellectual Property Policies. For courses in which students will be creating intellectual property, the K-State policy can be found at University Handbook, Appendix R: Intellectual Property Policy and Institutional Procedures (part I.E.). These policies address ownership and use of student academic creations.
Mental Health
Your mental health and good relationships are vital to your overall well-being. Symptoms of mental health issues may include excessive sadness or worry, thoughts of death or self-harm, inability to concentrate, lack of motivation, or substance abuse. Although problems can occur anytime for anyone, you should pay extra attention to your mental health if you are feeling academic or financial stress, discrimination, or have experienced a traumatic event, such as loss of a friend or family member, sexual assault or other physical or emotional abuse.
If you are struggling with these issues, do not wait to seek assistance.
For Kansas State Salina Campus:
For Global Campus/K-State Online:
University Excused Absences
K-State has a University Excused Absence policy (Section F62). Class absence(s) will be handled between the instructor and the student unless there are other university offices involved. For university excused absences, instructors shall provide the student the opportunity to make up missed assignments, activities, and/or attendance specific points that contribute to the course grade, unless they decide to excuse those missed assignments from the student’s course grade. Please see the policy for a complete list of university excused absences and how to obtain one. Students are encouraged to contact their instructor regarding their absences.
Copyright Notice
© The materials in this online course fall under the protection of all intellectual property, copyright and trademark laws of the U.S. The digital materials included here come with the legal permissions and releases of the copyright holders. These course materials should be used for educational purposes only; the contents should not be distributed electronically or otherwise beyond the confines of this online course. The URLs listed here do not suggest endorsement of either the site owners or the contents found at the sites. Likewise, mentioned brands (products and services) do not suggest endorsement. Students own copyright to what they create.
Subsections of Secure Workstations
Introduction
YouTube VideoResources
Video Script
Welcome to the first module in this class! Module 1 is all about creating secure workstations. In this module, you’ll learn how to install virtual machine software, install the operating systems we’ll be using in the class, and then configure several aspects of the operating systems. You’ll create users, manage file permissions, install software, and secure those systems.
Before we begin, here is a short overview of one major concept in this module - the operating system. Every computer you use has some sort of operating system installed, even if you don’t realize it. For this module, we’ll be using the two most commonly used operating systems in industry today, Microsoft Windows 10 and Ubuntu Linux. I’m guessing that most of you have used at least one of these systems before, and in fact many of you are probably using one of them now.
Operating systems make up the core of a modern computer. This diagram shows exactly where the operating system fits in a larger hierarchy. A computer consists of hardware, and the operating system is the program that runs directly on the hardware. It is responsible for interfacing with the hardware, and running the applications needed by the user. On the very first computers, each application was itself an operating system. This allowed the programs to directly interface with the hardware, but the major drawback was that only one program could run at a time, and the computer had to be restarted between each program. In addition, each program would need to be customized to match the hardware it was running on.
By using an operating system, applications can be much more generalized, and multiple applications can be running at the same time. Meanwhile, hardware can be changed, sometimes even while the computer is running, and the operating system will manage the necessary interfaces to use that hardware. It is a very efficient system.
The major part of the operating system is called the kernel. It is the part specifically responsible for creating the interface between user applications and the hardware on the system. In fact, most of what you may consider an operating system is in fact applications running on the kernel. The start menu, control panel, and registry are actually applications in Windows. Because of this, there is some disagreement over whether they are considered part of the operating system or not. The same discussion has been going on for years in the Linux community. See the resources section for links to the discussion of GNU vs. Linux.
For this course, anything referring to the kernel or programs typically bundled along with the kernel will be considered the operating system. This follows the typical convention in most system administrator resources online.
If you are interested in learning about how operating system are built and how the kernel functions, consider taking CIS 520: Operating Systems.
Next, we’ll start discussing Windows 10 and Ubuntu Linux in detail.
Assignment
Warning
This is the assignment page for Lab 1. It is placed before the rest of the module’s content so you may begin working on it as you review the content. Click Next below to continue to the rest of the module.
Lab 1 - Secure Workstations
Instructions
Create two virtual machines meeting the specifications given below. The best way to accomplish this is to treat this assignment like a checklist and check things off as you complete them.
If you have any questions about these items or are unsure what they mean, please contact the instructor. Remember that part of being a system administrator (and a software developer in general) is working within vague specifications to provide what your client is requesting, so eliciting additional information is a very necessary skill.
Note
To be more blunt - this specification may be purposefully designed to be vague, and it is your responsibility to ask questions about any vagaries you find. Once you begin the grading process, you cannot go back and change things, so be sure that your machines meet the expected specification regardless of what is written here. –Russ
Also, to complete many of these items, you may need to refer to additional materials and references not included in this document. System administrators must learn how to make use of available resources, so this is a good first step toward that. Of course, there’s always Google!
Time Expectation
This lab may take anywhere from 1 - 6 hours to complete, depending on your previous experience working with these tools and the speed of the hardware you are using. Installing virtual machines and operating systems is very time-consuming the first time through the process, but it will be much more familiar by the end of this course.
Software
This lab is written with the expectation that most students will be using VMware Workstation or VMware Fusion to complete the assignment. That software is available free of charge on the Broadcom Website ( Download Workstation and Download Fusion ) and is free for personal and academic use, and it is highly recommended for students who are new to working with virtual machines, since most of the assignments in this class are tailored to the use of that platform.
If you are using another virtualization platform, you may have to adapt these instructions to fit. If you are unsure about any specification and how it applies to your setup, please contact the instructor.
You will also need installation media for the following operating systems:
- Windows 11 Version 24H2 or later - Visit the Azure Dev Tools for Teaching page from Microsoft to download this software. See the Azure Dev Tools page on the CS Support Wiki for instructions.
- Look for Windows 11 Education, Version 24H2 on the list of software available on the Azure Dev Tools site.
- File Name:
en-us_windows_11_consumer_editions_version_24h2_x64_dvd_1d5fcad3.iso - SHA 256 Hash:
b56b911bf18a2ceaeb3904d87e7c770bdf92d3099599d61ac2497b91bf190b11 - Your file may vary as Microsoft constantly updates these installers.
- You may choose to upgrade to a later version of Windows 11 if prompted while installing updates, such as 25H1.
- Ubuntu 24.04 LTS (Noble Numbat) or later - Download from Ubuntu, an official Ubuntu Mirror (this is usually the fastest option), or the K-State CS Mirror (this is great if you are on campus).
- File Name:
ubuntu-24.04.3-desktop-amd64.iso - SHA 256 Hash:
faabcf33ae53976d2b8207a001ff32f4e5daae013505ac7188c9ea63988f8328 - If a point release is available (ex: 24.04.4), feel free to us that version. Do not upgrade to a newer LTS or non-LTS release such as Ubuntu 25.04, as those versions may have significant changes that are not covered in these assignments.
Prior Versions
The original course materials were developed for Windows 10 Version 1803 and Ubuntu 18.04 LTS. Some course materials may still show the older versions. Students should use the software versions listed in bold above if at all possible, as these assignments have been verified using those versions. If not, please contact the instructor for alternative options. If you find any errors or issues using the updated versions of these systems, please contact the instructor.
Task 0: Install Virtualization Software
Install the virtualization software platform of your choice. It must support using Windows 11 and Ubuntu 24.04 as a guest OS. In general, you’ll need the latest version of the software.
VMware Workstation or VMware Fusion is recommended and available free of charge on the VMware Website and is free for personal and academic use. Download Workstation or Fusion Here
You may need to install the latest version available for download and then update it within the software to get to the absolute latest version that supports the latest guest OS versions.
VMWare Licenses
VMWare licenses are now free for personal and academic uses starting in 2024. You should be able to download the latest version and install it without a product key. - Russ
Task 1: Create a Windows 11 Virtual Machine
Create a new virtual machine for Windows 11. It should have 60 GB of storage available. If given the option, do not pre-allocate the storage, but do allow it to be separated into multiple files. This will make the VM easier to work with down the road. It should also have at least 2 GB of RAM. You may allocate more RAM if desired. You may also allocate additional CPU cores for better performance if desired.
Install Windows 11 in that virtual machine to a single partition. You may use the express settings when configuring Windows. Do not use a Microsoft account to sign in! Instead, create a local (non-Microsoft) account as defined below. You may also be asked to set the computer name, which is given below.
Note
Windows 11 has made it even more difficult to create a local account when installing. A video in this chapter discusses the process for Windows 10, but an extra step is now needed for Windows 11. Refer to this guide from Tom’s Hardware. Notice on that page that the command used in step 3 is OOBE\BYPASSNRO (without a space).
Windows 11 may also require 4 GB of RAM allocated to install. I believe that once you’ve installed Windows 11 you can reduce the RAM allocated in VMWare to 2 GB and it should work well.
Configure the Windows 11 Virtual Machine as specified below.
Computer Name: cis527w-<your eID> (example: cis527w-russfeld)
Don’t Forget To Set Computer Name!
This is very important, as it allows us to track your virtual machine on the K-State network in case something goes wrong in a later lab. By including both the class and your eID, support staff will know who to contact. A majority of students have missed this step in previous semesters, so don’t forget! The computer name must be changed after the Windows installation is complete –Russ
Primary User Account:
- Username:
cis527 | Password: cis527_windows - It should be a member of Administrators & Users groups
Other User Accounts:
AdminAccount | AdminPassword123 (Administrators & Users group)NormalAccount | NormalPassword123 (Users group)GuestAccount | GuestPassword123 (Guests group only)EvilAccount | EvilPassword123 (Users group)
Install Software
Configure Firewall
- Make sure Windows Firewall is enabled
- Allow all incoming connections to port 80 (for IIS)
Tip
You can test this by accessing the Windows VM IP Address from Firefox running on your Ubuntu VM, provided they are on the same virtual network.
Install Windows Updates: Run Windows Update and reboot as necessary until all available updates are installed.
Multiple Updates Required!
Even though you may have installed a particular version of Windows, such as 24H2, you should run updates repeatedly until there are no more updates available. You may end up installing at least one major update rollup. Keep going until you are sure there are no more updates to be found.
Automatic Updates: Make sure the system is set to download and install security updates automatically.
Task 3: Windows Files & Permissions
Warning
Read the whole task before you start! You have been warned. –Russ
Create the folder C:\cis527. It should be owned by the cis527 account, but make sure all other users can read and write to that folder.
Within C:\cis527, create a folder for each user created during task 2 except for cis527, with the folder name matching the user’s name. Make sure that each folder is owned by the user of the same name, and that that user has full permissions to its namesake folder.
- For example, user
AdminAccount should have a folder C:\cis527\AdminAccount and have full ownership and permissions on that folder.
Create a group named AdminGroup containing cis527 and AdminAccount, and set permissions on C:\cis527 for that group to have full access to each folder created in C:\cis527.
- In this example, the folder
AdminAccount should still be owned by AdminAccount and that account should have explicit full access, but the AdminGroup group should also have full access to that folder. - No other user should be able to access any other user’s folder. For example,
EvilAccount cannot access GuestAccount’s folder, but AdminAccount and cis527 can, as well as GuestAccount, who is also the owner of its own folder.
Tip
When you create a group and add a user to that group, it does not take effect until you reboot the computer.
In each subfolder of C:\cis527, create a text file. It should have the same owner and access permissions as the folder it is contained in. The name and contents of the text file are up to you.
Tip
Use either the cis527 or AdminAccount account to create these files, then modify the owner and permissions as needed. Verify that they can only be accessed by the correct users by logging in as each user and seeing what can and can’t be accessed by that user, or by using the permissions auditing tab. Many students neglect this step, leaving the file owner incorrect.
Don’t remove the SYSTEM account or the built-in Administrator account’s access from any of these files. Usually this is as simple as not modifying their permissions from the defaults.
See this screenshot and this screenshot for what these permissions should look like in PowerShell. This was created using the command Get-ChildItem -Recurse | Get-Acl | Format-List in PowerShell. These screenshots are from an earlier version of this lab using different paths and usernames, but the permissions structure is the same.
Task 4: Create an Ubuntu 24.04 Virtual Machine
Create a new virtual machine for Ubuntu 24.04 Desktop. It should have 30 GB of storage available. If given the option, do not pre-allocate the storage, but do allow it to be separated into multiple files. This will make the VM easier to work with down the road. It should also have at least 2 GB of RAM. You may allocate more RAM if desired. You may also allocate additional CPU cores for better performance if desired.
Note
Ubuntu 24.04 seems to be really RAM hungry right now, so I recommend starting with 2 GB of RAM if you have 8 GB or more available on your system. The installer may freeze if you try to install with only 1 GB of RAM allocated. Once you have it installed, you may be able to reduce this at the expense of some performance if you are short on available RAM (as it will use swap space instead). In Ubuntu, swap should be enabled by default after you install it, but you can learn more about it and how to configure it here. When we get to Module 5 and discuss Ubuntu in the cloud, we’ll come back to this and discuss the performance trade-offs in that scenario. –Russ
Install Ubuntu 24.04 Desktop in that virtual machine to a single partition. You may choose to use a minimal install when prompted. You will be asked to create a user account and set the computer name. Use the information given below.
Tip
The Ubuntu installation will sometimes hang when rebooting after installation in a VM. If that happens, wait about 30 seconds, then click VM > Power > Restart Guest in VMware (or similar) to force a restart. It should not harm the VM.
Configure the Ubuntu 24.04 Virtual Machine as specified below.
Computer Name: cis527u-<your eID> (example: cis527u-russfeld)
Don’t Forget To Set Computer Name!
This is very important, as it allows us to track your virtual machine on the K-State network in case something goes wrong in a later lab. By including both the class and your eID, support staff will know who to contact. A majority of students have missed this step in previous semesters, so don’t forget! You should be prompted for a computer name as part of the installation process, but it will try to auto-complete it based on the chosen username and must be changed. –Russ
Primary User Account:
- Username:
cis527 | Password: cis527_linux - The account should have Administrator type or be in the
sudo group
Other User Accounts:
adminaccount | AdminPassword123 (Administrator type or sudo group)normalaccount | NormalPassword123 (Normal type)guestaccount | GuestPassword123 (Normal type)evilaccount | EvilPassword123 (Normal type)
Install Software
- Open VM Tools (
open-vm-tools-desktop) (recommended) -OR- VMware Tools (do not install both) - Mozilla Firefox (
firefox) - Mozilla Thunderbird (
thunderbird) - Apache Web Server (
apache2) - Synaptic Package Manager (
synaptic) - GUFW Firewall Management Utility (
gufw) - ClamAV (
clamav)
Configure Firewall
- Make sure Ubuntu Firewall (use
ufw, not iptables) is enabled - Allow all incoming connections to port 80 (for Apache)
Tip
You can test this by accessing the Ubuntu VM IP Address from Firefox on your Windows VM, provided they are on the same virtual network.
Install Updates: Run system updates and reboot as necessary until all available updates are installed.
Automatic Updates: Configure the system to download and install security updates automatically each day.
Task 6: Ubuntu Files & Permissions
Warning
Read the whole task before you start! You have been warned. –Russ
Create a folder /cis527 (at the root of the system, not in a user’s home folder). Any user may read or write to this folder, and it should be owned by root:root (user: root; group: root).
Within /cis527, create a folder for each user created during task 5 except for cis527, with the folder name matching the user’s name. Make sure that each folder is owned by the user of the same name, and that that user has full permissions to its namesake folder.
- For example, user
adminaccount should have a folder /cis527/adminaccount and have full ownership and permissions on that folder.
Create a group named admingroup and set permissions on each folder using that group to allow both cis527 and adminaccount to have full access to each folder created in /cis527.
- In this example, the folder
adminaccount should still be owned by adminaccount and that account should have explicit full access, but the admingroup group should also have full access to that folder. - No other user should be able to access any other user’s folder. For example,
evilaccount cannot access guestaccount’s folder, but adminaccount and cis527 can, as well as guestaccount, who is also the owner of its own folder.
Tip
When you create a group and add a user to that group, it does not take effect until you reboot the computer.
In each subfolder of /cis527, create a text file. It should have the same owner and access permissions as the folder it is contained in. The name and contents of the text file are up to you.
Tip
Use either the cis527 or adminaccount account to create these files, then modify the owner, group, and permissions as needed. Verify that they can only be accessed by the correct users by logging in as each user and seeing what can and can’t be accessed by that user, or by using the su command to become that user in the terminal. Many students neglect this step, leaving the file owner incorrect.
See this screenshot for what these permissions may look like in Terminal. This was created using the command ls -lR in the Linux terminal. These screenshots are from an earlier version of this lab using different paths and usernames, but the permissions structure is the same.
Task 7: Make Snapshots
For each of the virtual machines created above, create a snapshot labelled Lab 1 Submit in your virtualization software before you submit the assignment. The grading process may require making changes to the VMs, so this gives you a restore point before grading starts.
Task 8: Schedule A Grading Time
Contact the instructor and schedule a time for interactive grading. You may continue with the next module once grading has been completed.
Virtualization & VMware
Note
As of 2024, VMWare Workstation and VMWare Fusion are free for personal and academic use. You can download them directly from the VMWare website.
Resources
Video Script
In this class, we will be making heavy use of virtualization software to allow us to run multiple operating systems simultaneously on the same computer. This video provides a quick overview of what virtualization is and how it works.
First, a simple view of how a computer works. In essence, whenever you tell the computer to run a program, you are actually telling the operating system what to do. It will then load the requested application software into memory, and begin executing it. The software will send instructions through the operating system to the hardware, describing what actions to take. The hardware will then use electronic circuits to perform those operations.
This diagram shows that a computer would look like without virtualization. This describes how most computers work today, and it has been this way for over 30 years.
Recently, however, virtualization has become much more commonplace. In fact, you may be using some forms of virtualization right now, and not even realize it. In essence, virtualization software emulates some part of a computer system, typically the hardware. By doing so, it allows the hardware to run multiple different operating systems at the same time. Also, it prevents the different operating systems from conflicting with each other.
As an added bonus, by using virtualization, it becomes much easier to migrate operating systems across different hardware setups. Instead of having to reinstall and reconfigure the operating system on the new hardware, simply install the virtualization platform, and copy the virtual machine as if it were any other file.
In essence, virtualization adds one more layer of abstraction between the kernel and the hardware, allowing it to be much more portable and configurable than in a traditional setup. This diagram gives an overview of what that would look like.
Of course, there are many different types of virtualization out there. In this class, we’ll be primarily working with hosted virtualization, which involves installing virtualization software within a “host” operating system. You can also install virtualization software directly on the hardware, which is called bare-metal or hypervisor virtualization.
Beyond that, you can choose to virtualize more than just the hardware. Parts of the operating system itself can be virtualized, leading to the concept of containers, such as those employed by Docker. You can also virtualize parts of individual applications to make them more secure. This is commonly called sandboxing, and many mobile operating systems and browsers today already employ sandboxing between the apps and pages they work with.
This diagram shows what hosted virtualization looks like. You’ll notice that there is a host operating system installed on the hardware itself, and the virtualization layer is installed on top of that.
Compare that to bare-metal virtualization, where the virtualization layer is installed directly on top of the hardware. This is especially powerful, since the system doesn’t have to devote any resources to running the host operating system if it won’t be directly used.
This diagram gives a good overview of containers. In this case, the docker engine acts as the virtualization layer. Inside the containers, instead of having a full operating system, you simply have libraries and applications. They all share the same kernel, provided by the host operating system, though they can have different configurations within each container. It is a very powerful way to deploy applications on cloud servers.
Finally, this diagram gives a quick look at sandboxing. By virtualizing the parts of the system that an application interacts with, you can prevent it from performing malicious actions and interfering with other parts of the system.
To quote Men in Black, the “old & busted” way of doing things involved installing a single operating system per server, and then a single application on that server. This resulted in organizations managing large numbers of physical servers. In addition, most servers were only running at 5% capacity, so the resources were very inefficiently used. Finally, it was a management nightmare, and the only way to add more redundancy to the system was to buy more servers, compounding the problem.
Compare that to the “new hotness” of today, where we can use virtualization to install many operating systems on a single physical server, with each one dedicated to a single application. That results in fewer physical servers, more efficient use of resources, and much simpler redundancy. However, it is up for debate if that truly made management easier, or if it just shifted the management chore from installing and configuring individual systems to installing and configuring deployment and automation tools.
For this course, we’ll be primarily working with hosted virtualization using VMware Workstation. If you are using an Apple computer, you’ll be using VMware Fusion, which is very similar. I highly recommend using this software, as all of the materials in this class have been tested on it, and I am very familiar with it in case you need help. It is available to all K-State CS students for free. A link to the instructions for finding that software is in the resources section below.
However, you may choose to use a different virtualization software package to meet your needs. The only thing to keep in mind is that I can make no guarantees that it will work, and if you run into major issues that we cannot fix, you may be asked to continue working on the labs in this class using VMware products instead. Here is a list of a few other software packages that could be used instead of VMware Workstation or fusion.
Again, if you do not have access to a computer with sufficient resources to install and use VMware, please contact me so we can make other arrangements.
Finally, beyond just virtualization software, there are many cloud providers that will host virtual machines for you. We’ll deal with these more starting in module 5. This list gives a few of the more popular ones out there.
In addition, many cloud providers offer more than just virtual machines, such as containers and application hosting. Again, we’ll discuss these more starting in module 5, but here are a few you may have heard of.
At this point, you should be ready to complete the first task of Lab 1, which is to install Virtualization Software. Make sure you install the proper version, as listed on the Lab 1 Assignment page. If you have any questions, please use the discussion boards to ask your fellow classmates or contact me.
Users & Groups
YouTube VideoResources
Video Script
Working with user accounts and groups is one of the key tasks within system administration. Before we get to working directly within a system, here is some background information about users and groups to help you understand why they are so important.
Early computers did not have any concept of user accounts. If you had physical access to a machine and knew how to use it, you could. As computers became more powerful, the concept of time-sharing became increasingly important. While one user was reviewing outputs or rewriting code, another user could use the computer to run a program. To keep track of each person’s usage, user accounts were introduced.
With user accounts, each person could be assigned different permissions, allowing some users to have full access while protecting the system from other users who may not have as much knowledge or experience. In addition, user accounts aid in the process of auditing, useful when you need to determine which user performed a malicious action. Finally, user accounts can help protect your systems from unauthorized use. A strong user account and permissions setup is one of the first lines of defense in any cybersecurity scenario.
One of the major concepts in user accounts is authentication and authorization. Authentication is the process of confirming a user’s identity by a computer, usually through the use of a password or some other authentication factor. We’ll discuss those more deeply on the next slide.
Once a user is authenticated, the user account can then be given authorization to access resources on the computer system. One important caveat to keep in mind: authentication does not imply authorization. Put simply, just because a computer system is able to recognize your user account does not mean you’ll automatically be given access to that system.
Let’s focus a bit more on authentication. Typically authentication is performed by a computer system confirming the presence of one or more authentication factors from the user. There are three traditional types of authentication factors:
- Ownership - something the user has, such as keys, keycards, tokens, phones, etc. These are typically something physical, but could also be the ownership of a particular email account or phone number.
- Knowledge - something the user knows, such as a password, pass phrase, PIN, or other item. Most computer systems rely solely on knowledge factors for authentication.
- Inherence - something the user is. This includes things such as fingerprints, retina scans, DNA, or other factors about the user which would be very difficult to change or duplicate.
Many modern computer systems, particularly ones used online or in highly secure areas, may use multiple factors of authentication, typically referred to as “two-factor” or “multi-factor” authentication. Some examples are using a debit card, where the card is the ownership factor and the PIN is the knowledge factor, or logging on to an online game, where the password is the knowledge factor and the phone number or email address used for verification is the ownership factor.
Once the user is authenticated, the system has several methods for determining if the user is authorized to access system resources. Typically, the system has some sort of security policy, access control list, or file security in place to determine what resources a user can access. We’ll discuss these in more detail as we work with each type of system.
One important concept in user accounts is the use of a user identifier for each account. Internally, the operating system refers to the user account by that identifier instead of the username. This allows the user to change usernames in the future, and for users to reuse usernames from old accounts without inheriting that user’s authorization. User identifiers should never be reused. On Linux, this is referred to as the user identifier or UID, while Windows uses the term security identifier or SID.
Beyond the identifier, most operating systems store a few other bits of information about the user account. Namely, the username, password, location of the user’s home directory, and any groups the user should be a member of.
Speaking of groups, they are simply a list of user accounts. Their usefulness comes in the fact that you can assign system permissions to a group of users instead of each user individually. That way, as users come and go on a system, they can simply be assigned to the correct groups in order to access resources. Of course, users can be a member of multiple groups, and each group has a unique identifier as well.
Finally, let’s review some best practices for working with user accounts on a system. First and foremost, each user of the system should have a unique account. Do not allow users to share accounts, as that will make auditing and working with users who leave that much more difficult.
In addition, enforce strong password policies, and require your users to change their passwords regularly. The recommendation varies, but I’ve found that changing the password every few months is a good practice.
When you are assigning user permissions, follow the principle of least privilege. Only give users access to the smallest number of resources they need to complete their task. Most users do not need to be full administrators, and don’t need access to all of the files on the system. It is much better to be a little overprotective at first than to allow information to be lost due to a user having unnecessary access.
Also, it is very important to create and maintain logs for when users access a system or use administrator privileges. Most computer systems can be configured to create these logs with minimal effort, so it is well worth your time to do so.
As users leave your organization, it is also very important to quickly disable their access. There are many stories online of users leaving a company, only to access the systems after they left to either steal resources or destroy data. By having a policy to disable old user accounts as soon as possible, you’ll be able to minimize that risk.
Finally, as a system administrator, it is very important to get into the practice of not using an administrator account as your normal user account on the system. In most cases, you yourself won’t need administrator access very often, so by using a normal account, you’ll protect your entire organization in the off chance that your account is compromised.
That is all the background information regarding users and groups for this module. Hopefully it will be useful as you work on the first lab in this class.
Windows 10 Overview & Installation
YouTube VideoResources
Video Script
This video introduces the Windows 10 operating system, and shows how to install it in a virtual machine.
The Windows family of operating systems has the largest market share of all desktop and laptop operating systems, with an estimated 88% of all personal computer systems using some form of Windows. Unsurprisingly, Windows 10 currently holds the largest market share overall, but there are still a large number of systems using Windows 7. Of those, most are either in enterprise organizations who have chosen not to upgrade or owned by home users who rarely purchase a new computer.
The Windows operating system has a long history. It originally was developed as a graphical “shell” for the MS-DOS operating system, which was popular in the early 1980s. Windows 1.0 was released in 1985, followed by Windows 2.0 and 3.0.
Windows surged in popularity with the release of Windows 95, with 40 million copies sold during its first year. Many features of the modern Windows operating system were present even in Windows 95, such as the control panel, registry, and Internet Explorer web browser.
At the same time, development began on a version of Windows that was not dependent on an underlying DOS-based operating system. This process led to the release of Windows NT, followed by Windows 2000 and Windows XP. Windows XP was the dominant operating system on the market for nearly a decade until it was surpassed by Windows 7, which has been on top ever since.
Windows 10 was released in 2015, and is the most current version of Windows. We’ll be using Windows 10 throughout much of this course.
Here is a diagram showing the various versions of Windows and how they relate to one another. Notice that there are a few major families - the DOS versions at the top in red, starting with 1.0. The NT family near the bottom in blue, beginning with NT 3.1, as well as the server versions starting with Server 2003 in green. Finally, in the middle, there are a few mobile versions of Windows as well in yellow and orange, but they have been discontinued in recent years.
Next, let’s see how to install Windows 10 in a virtual machine. At this point, I’m assuming you have already installed VMware Workstation or another virtualization software on your computer. If not, I recommend doing so before continuing.
First, you’ll need to download the Windows 10 installation file and obtain a product key. Both of those can be found on the Microsoft Azure student portal, which is linked in the resources section below the video. This site now uses your K-State eID and password, making it even easier to access.
Once you log in, simply click Software on the left and search for Windows 10. In the list, find the entry for Windows 10 (consumer editions), version 1903 - DVD and download it. On the download page, you can also click this button to access your product key, which you’ll need to provide when you install it.
After you have completed that task, you should have a large installation file in the .ISO file format and a 25 character product key available. You’ll need both when installing Windows.
Next, let’s open VMware Workstation and create a new virtual machine. For this course, I recommend choosing “I will install the operating system later” to bypass the Easy Install feature of VMware. This will allow you to directly observe the installation process as it would be performed on a real computer.
Next, we will select the type and version of the guest operating system. In this case, it will be Windows 10 x64. We can then give it a helpful name, and choose where it is stored on the computer. If you’d like to store it on a secondary hard disk, you can do so here. I recommend storing your virtual machines on the largest, fastest storage device you have available, preferably an SSD with at least 60 GB of free space.
On the following pages, you can choose the desired disk size and format. You should consult the Lab 1 assignment materials to make sure you choose the correct options here.
Finally, you can click Finish to create the virtual machine. We’ll have to customize the hardware anyway, so we can come back to that once it is finished.
Once your virtual machine is created, you can click on the edit virtual machine settings button to customize the hardware. Again, make sure the hardware specification matches what is defined in the assignment for Lab 1. To install the operating system, we’ll have to tell the virtual machine where to find the .ISO file downloaded earlier. Click the CD/DVD option, then select the file and make sure it is enabled.
In addition, we’ll disable the network during installation so that we’ll be prompted to create a local account. Once we are done installing Windows 10, we can re-enable this option to connect to the internet and download updates.
When you are ready to begin the installation process, click the button to power on the virtual machine. When it powers on, you may be prompted to press any key to install Windows. You’ll need to click somewhere inside of the VMWare window before pressing any key in order for the VM to recognize it.
Once it boots, you’ll be given the option to install Windows 10. Follow the prompts to install Windows 10 using the Lab 1 assignment as needed for configuration information. The virtual machine may reboot several times during the process.
While installing, you may have to select options to confirm that you don’t have access to the internet, and would like to continue with limited setup. This is fine - Windows just really wants us to use a Microsoft account. You may also have to answer some security question - feel free to just make up answers if you want! They won’t be needed.
You can also disable many of the optional features, such as the digital assistant, location data, and targeted advertising. While they are helpful on personal computers, they won’t be used in this course.
When you have successfully installed Windows 10, you’ll be ready to move on to configuring Windows 10. The next several videos will discuss that process.
However, before going too far, I recommend installing VMware Tools in the Windows 10 virtual machine. This will allow you to have better control over the virtual machine. You can find instructions for doing that in the resources section below the video.
Windows 10 PowerShell
YouTube VideoResources
Video Script
Before digging too deep into Windows, let’s take some time to learn about one of its most powerful, and least used, features, the PowerShell command line interface. PowerShell is an update to the old Command Prompt terminal, which was a very limited version of the DOS terminal from decades ago.
PowerShell is built on top of the .NET framework, and can leverage many features of that programming environment to perform powerful tasks within a simple interface. While we won’t go too deep into PowerShell in this class, it is a very useful thing to learn.
On your Windows 10 Virtual Machine, you can open PowerShell by searching for it on the Start Menu.
The PowerShell interface is very simple, with just a small terminal that you can use to enter commands. Most commands take the form of a verb, followed by a hyphen, and then a noun. Let’s try a few to see how they work:
Get-Location - get the current directorySet-Location <path> - change directoryGet-ChildItem - list filesNew-Item <name> (-ItemType <"file" | "directory"> -Value <value>) - make a new directory or fileGet-Content <name> - get file contentsRemove-Item <name> - remove a directory or fileCopy-Item <name> - copy a directory or fileMove-Item <name> - move a directory or fileSelect-String -Pattern <pattern> -Path <path> - search for a string in a file or group of filesGet-Command - get a list of commandsGet-Help - get help for a commandGet-Alias - get a list of aliases for a commandOut-File - output to a file
If you want to use the output of one command as input to another command, you can use the vertical pipe character | between commands. Here are some examples.
Select-String - search for a string in outputMeasure-Object <-Line | -Character | -Word> - get line, word or character countSort-Object - sort output by a propertyWhere-Object - filter output by a property
You can also use PowerShell to write and execute scripts of commands. It is very similar to writing code in a programming language, but it is outside of the scope of this class. If you are interested in learning more, there are many great resources linked below the video to get you started. You can also check out the crash-course on PowerShell scripting in the Extras module.
Windows 10 User Management
YouTube VideoResources
Video Script
Once you have installed Windows 10, the next step is to configure the user accounts and groups needed on the system. There are three major methods for configuring user accounts, and each give you access to different sets of features. They are the Settings menu, the Control Panel, and the Administrative Tools. Let’s look at each one.
First, the Settings menu. To find it, go to the Start Menu and select Settings. On the Settings menu, click Accounts. From here, you can click the Sign-in Options link to change your own password and other options. You can also click the Family & other users option to add additional users to the computer. However, by default it will ask you to provide the phone number or email address for a Microsoft account. To add a local account, you must first click the “I don’t have this person’s sign-in information” link, then “Add a user without a Microsoft account” to get to the correct screen. From there, you can simply set a username and password for that account.
Once the account is created, you can change the account type. Through the Settings menu, you are only given the option to create standard users and administrators.
Now, let’s look at using the Control Panel to manage user accounts. To find the Control Panel, search for it on the Start Menu. You can also right-click the Start Button to access the Control Panel. Once there, click the User Accounts option twice to get to the User Accounts screen. From here, you can change your account name, something you aren’t able to do from the Settings menu. However, it does not change the username, just the name displayed on the screen. You can also change your own account type here.
However, for most options such as creating a new account, it will refer you back to the Settings menu. There are a few options on the left side of the User Accounts screen that are difficult to find elsewhere, but they are rarely used. The most important one is the ability to create a password reset disk, which is a flash drive that can be used to reset a lost password. However, as we’ll see later in the semester, resetting Windows passwords is trivial provided the disk isn’t encrypted.
Finally, let’s look at using the Administrative Tools to manage user accounts. The easiest way to access these is to right-click on the Start Button and select Computer Management. On that window, you’ll see Local Users and Groups in the tree to the left, under System Tools. Expanding that option will give you access to two folders: Users and Groups. In the Users folder, you’ll see all available user accounts on the system.
You’ll notice that there are a few more accounts listed here than anywhere else, because Windows 10 includes several disabled accounts by default. The first, Administrator, is the actual built-in administrator account on the system. You can roughly compare it to the “root” account on a Linux computer. It has full access to everything on the system, but is disabled by default. Also, it has no password by default. This can create a major security hole, as it could be accidentally (or intentionally) enabled, giving anyone full access to the system. Most organizations choose to set a password on the account as a precaution, but leave it disabled.
The second, DefaultAccount, is simply a dummy account which stores the default profile. A copy of this account is made when each new user account is created. Using some tools available from Microsoft, it is possible to customize this account to give each user on the system a set of default settings, such as a desktop background.
The last default account, Guest, is the built-in guest account. It can be enabled to allow guests to access the computer. They can run programs, surf the internet, and store files in their folder, but generally cannot access any other user’s folders, install software, or change any system configuration. If you must allow guest access to a computer, this is probably one of the better ways to do so.
Going back to Windows, you can create a new user account here very easily. However, there are a few things to be aware of when doing so. First, you can give it a name, username, and password. At the bottom, you’ll see several checkboxes. The first one forces the user to change her or his password when first logging on to the system. I generally recommend not enabling this option, because that will also force the user’s password to expire after a set time. Instead, I recommend unchecking that box, and checking the third one to set the password to never expire. If you would like to enforce password expiration, it is much better to do so using a central directory service such as Active Directory, which we’ll cover in more detail in Module 4.
Once you have created a user account, you can right-click on it to edit a few properties. Notice that by right-clicking any account, you are given the option to set the account’s password. This is helpful if a user has forgotten the account password and does not have a reset disk available. However, if the user has made use of Windows file encryption or some other security features of Windows, it may irrevocably destroy their ability to access that information. So, I only recommend using this feature as a last resort.
Looking at a user’s properties, you can see tabs at the top to configure group memberships and profile information. On the Member Of tab, you can add users to different groups. Notice by default that users are only added to the Users group. If you’d like a user account to be an administrator, you’ll have to manually add that user to the Administrators group here.
The profile tab gives additional options for the user account, such as defining a custom location for the user’s profile, home folder, or scripts. However, I recommend not configuring these options on a local computer account. Instead, you can manage these from Active Directory. We’ll cover that in Module 4.
Next, let’s look at the Groups folder. Here you’ll see several of the groups listed that are included in Windows 10 by default. The three groups to pay attention to are Administrators, Users, and Guests. They correspond to administrator accounts, normal user accounts, and guest accounts. By adding an account to one of those groups, you’ll give it those permissions on the system. There are several other groups available, most of which are not used directly. If you’d like to know more about these groups, consult the relevant Windows documentation. Of course, you can create groups and manage group members from this window as well.
Lastly, let’s briefly look at the User Account Control, or UAC, feature of Windows. You’ve probably seen this pop up from time to time if you use Windows regularly. UAC is used to prevent accounts from changing system settings without getting explicit confirmation of the change from someone with administrator privileges. I recommend leaving UAC at the default setting, as it will prevent malicious programs from making changes to your computer without alerting you first. On earlier versions of Windows, this was a major problem. You can compare this feature to how Mac and Linux computers constantly ask for an administrator account’s password whenever software is installed or system settings are modified.
Finally, one other thing to look at is the Local Group Policy Editor on Windows. You can find it by searching for it on the Start Menu. This allows you to view and edit the local security policy of your system. For example, let’s go to Windows Settings > Security Settings > Account Policies > Password Policy. Here, I could set policies regarding how often passwords must be changed, how long they must be, and whether they should meet certain complexity requirements. However, as I mentioned before, it is best to leave the local group policy alone, and instead configure group policies using Active Directory. We’ll cover that in Module 4.
With this information, you should be able to start Lab 1, Task 2 - Configuring Windows 10. The next pages will continue giving you the information needed to complete that task.
Windows 10 File Permissions
Warning
See the warning in the video script below for a correction that is not present in the video –Russ
Resources
Video Script
Now, let’s take a look at file permissions in Windows 10. File permissions are very important in any computer system, as they control which folders and files each user is able to access. In this video, I’ll go through some of the basics of configuring file permissions in Windows.
As demonstration, I’ve created a folder at the root of the C:\ drive, called test. Then, inside of that folder, I’ve created another folder called subfolder. This gives me a simple file hierarchy.
First, let’s look at the permissions for the test folder. To find those, right-click on the folder and select Properties. Then, look at the Security tab. Here, you’ll see a summary of the current file permissions. For this file, there are four groups listed:
- Authenticated Users - all but full control
- SYSTEM - full control
- Administrators - full control
- Users - read & execute, list contents, and read files
We’ll examine each of the those permissions in detail as we make changes.
To make changes to permissions, there are two options. The first is to click the Edit button, which brings up a simple dialog for making changes, but does not include all options available. Therefore, I don’t recommend using this interface unless you want to make very quick changes.
Instead, I recommend clicking the Advanced button below, to get a better idea of the options available.
At the top of this window, you can see the folder name, as well as the current owner of the folder. If you need to change the owner to a different user or group, you can click the Change link to do so.
On this window, there are three tabs. Let’s look at the Permissions tab first. Here, you can see all the entries in the access control list, or ACL, for this folder.
In addition to the user or group and permissions, we can also see how the permissions are inherited. Windows permissions can be inherited from parent folders, and then those permissions can be applied to child folders and files as well.
In many cases, you won’t need to change the inheritance of a folder, as you’ll generally want to inherit the permissions that the system sets. However, you can disable inheritance by clicking the Disable Inheritance button at the bottom. When you do, it will ask you if you want to convert inherited permissions to explicit permissions, or remove them entirely. In most cases, I recommend always converting them to explicit permissions. You can always delete the unneeded ones later, but removing some of the inherited entries may make the folder inaccessible. Let’s disable inheritance on this folder.
Before we make changes, let’s look at the current permissions. I’m going to click on the entry for Administrators, then click Edit. Notice at the top of the window there is a Type option for either allow or deny. I always recommend using allow permissions, as that will give your permissions a consistency to how they are structured. If you feel that you must deny a permission, that is usually a good indication that you should rethink your users and groups to avoid such a scenario.
Below that, you can set where this permission applies. There are many options there, and most of them are pretty self-explanatory.
Finally, there are the basic permissions in Windows. Again, they are pretty self-explanatory. If you are unsure what a particular option does, I highly recommend consulting the Windows documentation. Also, note that you can click the Advanced Permissions link to the right to see more advanced permissions. In most cases, you won’t use them, but they are available if needed.
Going back to the main dialog, there are two sets of permissions that I recommend not changing on ANY folder. First, each folder should have an entry for Administrators, giving that group full control of the folder. If, for any reason, you feel that your Administrators group should not have full control of a folder, you should rethink your permission structure. System administrators will need to have control of a folder in order to change the permissions, and most users should never be Administrators.
Likewise, do not modify the permissions of the SYSTEM group on any folders. That permission is vital for Windows services and processes to be able to perform operations on the folder.
One entry you may want to change is the entry for Authenticated Users. Currently, this entry allows any user with access to this system to access the folder or make changes. In essence, you can think of the Authenticated Users group as Everyone. In many cases, you’ll want to remove that entry entirely, unless you want a folder to be publicly accessible on your system.
The last entry is for the Users group. This gives the permissions for any user not in the Administrators group. Again, you may or may not want to remove this entry, depending on your needs.
Warning
Correction: By default, the Users group on Windows 10 contains the Authenticated Users group, so it actually includes all users on the system, not just those outside of the Administrators group. I don’t recommend removing Authenticated Users from Users as it may have unintended consequences. Instead, you may want to make your own group for this purpose, and explicitly add all users who are not in Administrators to that group.
For this example, I’m going to remove the entry for Authenticated Users, but modify the entry for the Users group to allow users in that group to modify the contents of this folder.
Before clicking Apply, notice that there is a checkbox at the bottom to replace all child permissions with inheritable permissions from this object. If you would like to reset the permissions on folders within this one, you can use that option to do so. I’ll do it, just to show you how it works. Of course, if there are several files or folders within this one, that operation could take quite a long time.
There are two other tabs to look at. The first one is the Auditing tab. Here, you can direct Windows to log events related to this folder, such as successful reads, writes, and more. Depending on your organization’s needs, you may need to implement a strict auditing policy through this interface. We won’t worry about it in this class, but I recommend reviewing the relevant documentation if you are interested.
The last tab, Effective Access, allows you to determine what the effective permissions would be for a particular group or user. This is a very useful tool, since users may be part of multiple groups, groups can be nested, and permissions can quickly become very convoluted. When in doubt, use this tool to make sure you have set the permissions correctly.
Once I am done here, I can click Apply, then click OK to apply my changes and exit the dialog.
Let’s briefly look at the child folder’s permissions, just to see what impact those changes had.
You can see that it now inherits permissions directly from its parent folder, as expected. From here, I can add additional permissions that are applicable to just this folder and all of its subfolders.
You should now be able to start working on Lab 1, Task 3 - Windows Files & Permissions. A large portion of that task involves creating a file structure with permissions as defined in the assignment. Make sure you read the instructions carefully, and post questions in the course discussion forum if you are unsure how to interpret a particular direction.
Windows 10 Processes & Services
YouTube VideoResources
Video Script
Let’s take a look at how Windows interacts with programs. Each program running on an operating system is called a process. Within each process, there can be multiple threads of execution running concurrently. As a system administrator, the most important thing to keep in mind is that each process running on a computer will consume the system’s resources, either the available memory or CPU time. So, the more processes you run, the slower your computer may seem as you consume more of the available resources.
The operating system stores a few important pieces of information about each process. The most notable is the PID or process identifier. Much like the user accounts and groups, each running process is given an identifier. In this way, if you have multiple copies of the same program running, each one will have a different PID.
To examine processes on Windows, there are a couple of tools available. First, built-in to Windows is the Task Manager. It has been present in Windows since the early days, and gives lots of information about the processes running on a system. You can access it quickly by right-clicking on an open area of the taskbar, or by using the classic CTRL+ALT+DEL key combination.
Another tool I recommend is Process Explorer, part of the Microsoft Sysinternals suite of tools for Windows. You can download it using the link in the resources below this video. Using Sysinternals, you can see additional details about each process running on a computer. You can also replace the built-in Task Manager with Process Explorer if you so choose.
On Windows, you’ll notice that even though we aren’t running any programs, there are still dozens of processes running in the background. Most of them are what we call Services. A service is a process that runs in the background on Windows, and is usually started and managed by the operating system. They perform many important tasks, such as maintaining our network connection, providing printing functions, and logging important system events.
To access the services on Windows, simply search for the Services app on the Start Menu. Here you can see all the services installed on your system, as well as their description, status, and more. I’m going to choose one to review in detail.
On the first screen, you’ll see some of the general information about the service. It includes the startup type, which could be either automatic, delayed, manual, or disabled. You can also start or stop the service here.
On the Log On tab, you’ll see the user account used to run the service. Just like with any other process on Windows, each service must be associated with a user account in order to determine what permissions that process will have. On Windows, there are actually three pseudo accounts that are typically used with services. Those accounts are LocalSystem, LocalService, and NetworkService. Of course, you can always override these defaults and provide the information for another user account, but then this service will have the same permissions as that account.
The Recovery tab describes what actions the system should take if the service fails for any reason. Again, you probably won’t need to modify these options unless you are working with services of your own, but it is important to know that they can be configured here. For example, if an important process fails, you could have the computer automatically restart itself or run a program to notify you.
Finally, the Dependencies tab lets you see any other services that this one depends on, or services that depend on this one. Many Windows services require other services to be active before they will work properly.
One important thing to note about Windows services in particular is the use of the Service Host Process, or svchost.exe. To help conserve resources, Windows can actually embed several services as threads in a single process. In that way, the operating system only has to manage a single process instead of several. If you look at the processes running in Task Manager, you’ll see several entries for Service Host. You can even click the arrow next to that process to see which services are embedded in it. Unfortunately, because this creates a single point of failure, the Service Host Process is a frequent target of Windows malware and viruses. In fact, I once saw a virus try to hide its own executable by naming it svcnost.exe, hoping that a system administrator wouldn’t notice the slight spelling difference very quickly.
With this background information, you are ready for the next step, which is to install some software.
Windows 10 Software Installation
YouTube VideoResources
Video Script
One major part of configuring a computer is installing the desired software. However, it is sometimes very difficult to tell exactly what is happening during a software installation, and each time you install software on a system you run the risk of introducing more vulnerabilities and stability issues on the system. In this video, I’ll give a brief overview of how to observe what is happening when you install a piece of software.
Software on Windows typically consists of several components. First, you have the actual executable itself, as a .EXE file. It may also have several dynamic link libraries, or DLLs, that it uses. A DLL is simply a shared library of code that can be used by other programs or updated without changing the executable file itself. There could also be settings files such as initialization files, or settings stored as registry keys in the Windows registry. Finally, depending on the software it may also install drivers or services as well. Let’s look at one piece of software that is pretty common and see what it does when we install it on our system.
On this system, I have installed InstallWatch Pro, which is available in the Resources section below the video. I’ve also downloaded a copy of Process Monitor from the Microsoft Sysinternals suite of tools. Finally, I downloaded a full installer for Mozilla Firefox.
First off, I need to start InstallWatch Pro and let it make a snapshot of the current system. This process may take several minutes.
Once that is done, I can also start Process Monitor. It will start recording data automatically.
Then, I can instruct InstallWatch Pro to install Mozilla Firefox by providing the location of the installation file here.
When the installation process starts, I’ll just click the default options in the installer and let it continue as it would normally.
When it is finished, InstallWatch Pro will pop back up, and you’ll need to click Finish there so it can work on making a new snapshot after the installation. You should also quickly go to Process Monitor, then click File and uncheck the Capture Events option.
Once InstallWatch Pro is done making a new snapshot, it will display all of the items installed by Mozilla Firefox. We can see several files were added, mostly in the Program Files folder. There were also many keys added to the registry. I recommend doing this process on your own virtual machine at least once and reviewing what you find.
In Process Monitor, we can add a filter to just see all items performed by the Mozilla Firefox setup process, which uses “setup.exe” as its process name. Just click the filter button at the top, and add the appropriate filter. Now we can see each and every option performed by the setup process. In this case, there are nearly 100,000 of them! It could be very tedious to dig through, but if you know you are looking for a particular item, you can use the search features in Process Monitor to find it very quickly.
As you continue working on Lab 1, I encourage you to take a little time and see what each program installs. You might be surprised!
Windows 10 Security & Networking
YouTube VideoResources
Video Script
In this last video on Windows 10, we’ll discuss some important security and networking details needed to finish getting your VMs set up and configured properly.
First, let’s talk about security. Whenever you install a new operating system, there are 4 major steps you should always perform before doing just about anything else on the system. Those steps are:
- Configure User Accounts & Passwords - at least get your administrator and standard account set up. You can add more users later, or you may add it to an Active Directory Domain for user accounts.
- Configure the Firewall - Windows 10 has the firewall enabled by default, but you should always confirm that your firewall is active before accessing the internet. On older, unpatched versions of Windows, researchers were able to demonstrate that the system can be compromised in as little as 5 minutes just by connecting it to the internet without any additional security or steps taken.
- Install Antivirus Software - All computers should still run some form of antivirus software. Windows comes with Windows Defender installed by default, and it will suffice as a basic form of antivirus protection. On a production system, I recommend installing a professional antivirus solution if possible.
- Install All System Updates - You should also install all available system updates for your operating system. This makes sure you have patches against the latest known flaws and attacks. Windows will generally do so for you automatically, but you can check for updates manually through the Windows Update.
Let’s take a quick look at the Windows Firewall, since you’ll need to allow an application through the firewall. You can find it by searching for “firewall” on the Start Menu. Lab 1 directs you to install the Internet Information Services (IIS) web server. You’ll need to allow it through the firewall somehow. I won’t show you how in this video, but I encourage you to review the links in the resources section below the video for documentation showing how to accomplish this task. There are several ways to do it.
To test your firewall configuration, you can use your Ubuntu virtual machine created as part of Lab 1. First, make sure they are both on the same network segment in VMware by looking at the hardware configuration for each virtual machine. Then, you’ll need to get the IP address of the Windows computer. There are several ways to do this, but one of the simplest is to go to the Network Settings by clicking the networking icon in the system tray, near the clock, then choosing the Ethernet adapter. Here you’ll find the IPv4 address, usually in form of four numbers separated by decimal points. We’ll spend most of Module 3 discussing networking, so I won’t go into too much detail here.
Once you have that IP address, switch to your Ubuntu virtual machine, and open up the Firefox web browser. At the top in the address bar, simply input the IP address and press enter. If everything works correctly, you should be presented with the default IIS screen as seen here. If not, you’ll need to do some debugging to figure out what is missing.
With that, you should now have all the information you need to finish the Windows portion of Lab 1. If you have issues, please feel free to post in the course discussion forums or chat with me. Good luck!
Ubuntu Overview & Installation
YouTube VideoResources
Video Script
For the second part of this module, we’ll be looking at one other operating system, Ubuntu.
Ubuntu is built using the Linux kernel, which is a completely free and open source operating system kernel developed by Linus Torvalds in 1991. It was his attempt to make a free operating system kernel which would be completely compatible with the Unix operating system via the POSIX standard. There were some previous attempts to do so, most notably the GNU project from the 1980s.
While Linux is usually thought of as an operating system, in actuality it is best thought of as an operating system kernel. Linux is typically bundled with other software and tools, such as the GNU project, and those bundles are referred to as Linux distributions. There are hundreds of Linux distributions available, each one customized to fit a particular need or design.
Here is a quick family tree for the Linux kernel. You can see that it all started with the Unix operating system developed by Bell Labs in the 1970s. It was forked into the BSD family, which still exists today. The underlying kernel for the Mac OS X operating system, Darwin, is still based on the original BSD family of Unix. In the 1980s, Richard Stallman created the GNU project, with an ultimate goal of creating a free version of Unix that was completely open source. That project stalled, but around the same time Linux was introduced. For most users, the Linux kernel coupled with the GNU tools is typically what they think of when they think of Linux as an operating system.
Linux itself is a very versatile kernel, and is used everywhere from the Android mobile operating system all the way to the world’s largest super computers, and nearly everything in between. Basically, if it needs an operating system kernel, there is a good chance that someone has tried to run Linux on it at some point.
For this class, we’ll be looking at the Ubuntu software distribution. Ubuntu is a term from the Nguni Bantu language, meaning humanity, and comes from a philosophy of the same name popularized by Nelson Mandela and Desmond Tutu, among others. Ubuntu itself is based on an older Linux distribution called Debian, which is very popular among many server administrators even today. Since its inception, Ubuntu strives for a new release every 6 month, with every 4th release (every 2 years) being listed as a Long Term Support or LTS release, which is supported with software and security updates for 5 years from release. Depending on the metric used, Ubuntu Linux is generally seen as the most common and most popular Linux distribution in the world for desktops and servers.
As a quick aside, here is the current Linux distribution family tree. The full version of it is linked in the resources section below the video. Ubuntu is shown here as a major branch of the Debian family.
The first major release of Ubuntu was known as Ubuntu 4.10 - Warty Warthog. Each Ubuntu release is given a version number based on the month and year of its release, in this case October of 2004, as well as a code name typically consisting of an alliterative adjective and animal combination. The first LTS release was in 2006 as Dapper Drake. Since that time, there have been 7 other LTS releases:
- 8.04 - Hardy Heron
- 10.04 - Lucid Lynx
- 12.04 - Precise Pangolin
- 14.04 - Trusty Tahr
- 16.04 - Xenial Xerus
- 18.04 - Bionic Beaver
- 20.04 - Focal Fossa
The most recent version, Focal Fossa, is the current LTS version and the one we’ll be using in this class.
Note
Of course, many new Ubuntu versions may have been released since this video was recorded. –Russ
Now, let’s go through the process of installing Ubuntu in a virtual machine. At this point, I’m assuming you have already installed VMware Workstation or another virtualization software on your computer. If not, I recommend doing so before continuing.
First, you’ll need to download the Ubuntu 20.04 installation file. You can find that file on the Ubuntu download page, and also on the K-State CS mirror of the Ubuntu downloads page. For most uses, I recommend using the CS mirror, as it is generally much faster for students on campus. The link is available in the Resources section below the video. On that page, you’ll need to download the “64-bit PC (AMD64) desktop image” from the link near the top. It should download a file to your computer in the .ISO format.
Next, let’s open VMware Workstation and create a new virtual machine. For this course, I recommend choosing “I will install the operating system later” to bypass the Easy Install feature of VMware. This will allow you to directly observe the installation process as it would be performed on a real computer.
Next, we will select the type and version of the guest operating system. In this case, it will be “Ubuntu 64-bit.” We can then give it a helpful name, and choose where it is stored on the computer. If you’d like to store it on a secondary hard disk, you can do so here. I recommend storing your virtual machines on the largest, fastest storage device you have available, preferably an SSD with at least 60 GB of free space.
On the following pages, you can choose the desired disk size and format. You should consult the Lab 1 assignment materials to make sure you choose the correct options here.
Finally, you can click Finish to create the virtual machine. We’ll have to customize the hardware anyway, so we can come back to that once it is finished.
Once your virtual machine is created, you can click on the edit virtual machine settings button to customize the hardware. Again, make sure the hardware specification matches what is defined in the assignment for Lab 1. To install the operating system, we’ll have to tell the virtual machine where to find the .ISO file downloaded earlier. Click the CD/DVD option, then select the file and make sure it is enabled.
When you are ready to begin the installation process, click the button to power on the virtual machine.
Once it boots, you’ll be given the option to install Ubuntu. Follow the prompts to install Ubuntu using the Lab 1 assignment as needed for configuration information. In general, you can accept the defaults in the installer unless otherwise noted. For the timezone, you can choose Chicago as the nearest city.
Once the installation is complete, you’ll be prompted to reboot your computer. In rare instances, the virtual machine may not reboot correctly. If that happens, you can use the VM menu in VMware to restart the virtual machine. It should not cause any issues as long as the installation process completed.
At this point, you are ready to begin Lab 1, Task 4 - Install Ubuntu 20.04. Feel free to get started!
Once that is complete, you’ll be ready to move on to configuring Ubuntu. The next several videos will discuss that process.
However, before going too far, I recommend installing either “open-vm-tools-desktop” or VMware Tools in the Ubuntu virtual machine. This will allow you to have better control over the virtual machine. You can find instructions for doing that in the resources section below the video.
Also, I recommend taking a minute to familiarize yourself with the filesystem structure in Ubuntu. You’ll learn more about how to navigate this structure in the following videos. This diagram shows the common root-level folders you’ll find and the typical usage of each.
Ubuntu Terminal
YouTube VideoResources
Video Script
One of the most important features of the Linux operating system is the Terminal command line interface. One major design feature of Linux is that nearly every operation can be controlled via the command line, and in fact some operations can either only be performed or are much simpler to perform there.
To open the Terminal, click the Activities button and search for Terminal. I recommend adding it to the favorites panel by clicking and dragging the icon to the left side of the screen. You’ll be accessing it very often throughout this class, so having quick access to the terminal is very helpful.
By default, Ubuntu uses Bash, the Bourne Again SHell, as the default shell in the terminal. There are many other shells available, so feel free to check them out and see if you find one you prefer. For this course, I will use Bash since it is the default.
Looking at the Bash terminal, there are a few bits of important information presented immediately in the command prompt, which is the text shown on the screen before the blinking cursor. First, shown here in the green text, is the current username, followed by the at @ symbol, then the current computer name. This helps you keep track of which computer you are using, and which username you are currently logged in as. This becomes very important later, as you’ll be controlling several servers using a remote terminal program.
Following the colon, you’ll see in blue the present working directory. In this case, it shows the tilde ~ symbol, which represents the users home folder. You can use the pwd command to see the full path.
Finally, this prompt ends in a dollar sign $. That represents the fact that this terminal is not a root terminal, and doesn’t have root permissions by default. A root terminal, such as one you can get by using the sudo su command, will have a pound or hash symbol # at the end of the prompt. You’ll also notice that the colors are disabled in the root terminal, but that can easily be changed in the Bash configuration file.
Let’s review some simple Linux terminal commands:
pwd - shows the present working directorycd - change directoryls - list filesls -al - show all file details and permissionsmkdir - make new directoryrmdir - remove empty directoryrm - remove filerm -r - recursively remove a foldercp - copy file or foldermv - move file or foldertouch - create a file (by “touching” its entry in the file tree); existing files are unchanged except for updating the last accessed timestampcat - concatenate (print) filesapropos - find commands for a keywordwhatis - find command descriptionswhereis - find location of a command on the filesystemman - find command help
As we learned in PowerShell, the vertical pipe | character can be used to take the output of a command and use it as input to another command. Here are a few examples:
sortgrep - search for textwc - get word count
To edit files using the Terminal, I recommend using the nano command, as it is generally regarded as the simplest text editor available by default on most Linux systems. If you prefer to use vim, emacs, or another editor, you are encouraged to do so. Also, on a Linux system with a GUI installed, you can use gedit to open the graphical editor as well.
To edit a file, simply type nano followed by the name or path to the file to be edited. If it doesn’t exist, it’ll simply open a blank file. Once there, you can enter your information. Remember that Nano is a terminal program, so you cannot use the mouse to move the cursor, only the arrow keys on the keypad. At the bottom you’ll see several commands you can use. The carat ^ character represents the CTRL key. So, ^O would mean CTRL+O for the “Write Out” command.
To save a file, you can use CTRL+O to write it to the disk. It will ask you to confirm the filename before saving, and you can just press ENTER to accept the one presented. To exit Nano, use CTRL+X. If the file is unsaved, you will be asked to save your changes. Press Y to save the changes, then ENTER to confirm the filename. In practice, you’ll become very used to the process of using CTRL+X, Y, ENTER to save and close a file in Nano.
By default, the Linux Terminal does not give you administrator, or “root” permissions, even though you may be using an administrator account. To use those permissions, a special command called sudo, short for “super user do,” is used. By prefacing any command with the sudo command, it will run that command as the root user, provided you have permissions to do so, and can enter the correct password for the account. In essence, it is a way to “elevate” your account to the root account for a single command.
For example, to install a program on Linux, you must have root or sudo permissions. I can try to use the apt-get update command without it, but it will not work. By prefacing that command with sudo I can, but first I must enter the password to my account.
One quick trick - you can use sudo !! to run the previous command as root, without having to retype it. It is one of the single biggest timesaving tricks on the Linux terminal, and well worth remembering.
In addition, as I showed above, it is possible to switch to a root shell by using the sudo su command. Su is short for “switch user” and is used to change the user account on the terminal. You can use it to log in to any other account on the system, provided you know the password. However, I DO NOT recommend logging in directly as the root user in this way, as any command you accidentally type or copy/paste into this terminal will be run without any warning. It is very easy to irreversibly damage your system by doing so.
That is just a short introduction to the Linux terminal. We’ll learn a few other terminal commands as we continue to explore Ubuntu. I also encourage you to read some of the resources linked below the video if you are new to Linux, as they give you much more information about the terminal and how it can be used.
Ubuntu User Management
YouTube VideoResources
Video Script
In this video, we’ll explore how to work with users and groups in Ubuntu Linux. Before we do that, however, let’s take a minute to discuss some important information about user accounts and how they are managed in Linux.
Every Linux system has a special user account called “root.” This account is the default system administrator account, and it has complete control over the system. It is easily identifiable by its UID, which is always 0. In fact, when many programs see that the current UID is 0, they will skip any and all permissions checks without looking at anything else.
On Ubuntu, the root account is disabled by default. It can easily be enabled by setting a password on the account using the passwd command on the Terminal. However, that is not recommended, as it makes your system more vulnerable to some kinds of attacks. Instead, the system provides the sudo command to allow regular users with administrative permissions to perform commands as the root user, without actually using that account.
The sudo command stands for “Super User Do” and is by far one of the most important commands to learn as a system administrator. By prefacing any command with sudo while using an account with the appropriate permissions and providing the account’s password, you can become the root user while that command is running. To give users the ability to use sudo they simply must be added to the “sudo” group or have their user type set to Administrator.
You can also customize how the permissions for sudo are configured by using the visudo command to edit the /etc/sudoers file. For example, you can limit which commands certain accounts are able to perform. Be very careful, as that file has a very specific format and any invalid changes could render the entire system unusable. I generally don’t recommend editing this file unless necessary.
As you configure Ubuntu accounts, you’ll notice that there are three major account types. The first type, Regular User, consists of two sub-types - Standard and Administrator. These accounts are the ones that will be used by real people logging-in to the system interactively. Standard users do not have access to the sudo command, while Administrator users do. The regular users typically have a UID starting at 1000 and above, and each one has a group of the same name created with that user as the only initial member. This is very important for assigning file permissions, as we’ll see in a later video. They also receive a skeleton of the default directory in the /home folder. As you learn about directory services in Module 4, you’ll find this information to be helpful once again.
The other type of user, System User, is a user account created for a program or service. These are similar to the pseudo accounts on Windows 10, but on Ubuntu there are typically several of them, with a unique account assigned to each service. For example, the Apache web server which will be installed as part of this module creates its own user account, which can be used to determine what files can be accessed or served by the web server.
Now, let’s look at the different ways user accounts can be configured on Ubuntu. First, we can go to the Settings application. From there, click the Users button on the left. Here you can see information about your current user account, and are able to change the password. You cannot change the user account type of the current account. To add a new account, you must click the “Unlock” button at the top of the screen and enter your current password. This is the graphical equivalent of using a sudo command. From there, you can create a new user.
You can also install the gnome-system-tools package to get access to a different interface for managing user accounts. Once it is installed, you can search for “Users and Groups” after clicking the activities button to find it. Here, you can add or edit accounts, and you can also manage existing groups. However, you are still unable to add users to groups or do any advanced editing here. To do most of that, you’ll need to use the terminal.
There are several terminal commands which are useful. First, the adduser command will walk you through the process of adding a user to the system. This utility is not part of the default Linux system tools, but has been added to Debian and Ubuntu to simplify the process of adding a regular user. To add a system user, user the useradd command. You can also use commands to remove or modify a user. For example, to add a user to an existing group, use usermod -a -G <group> <user>.
Finally, you can also use the passwd command to change the password for any user account.
To work with groups, very similar commands are available. You can add a group using groupadd by providing a name for the group, as shown here. There are also a couple of commands for setting passwords and security for groups, which are shown in italics on the slides. Those commands are not typically used, but if you are interested in them I encourage you to review the resources below the video to learn more.
One important aspect of working with the Linux operating system is that most system settings and information are stored in simple text files, and anyone with access to those files can see how the system is configured. Let’s take a look at the 4 most important ones.
First, /etc/passwd is the traditional place to find information about a user account. It includes the username, UID, home folder location, and more. It used to include a hash of the password as well, but that was removed years ago because it was a security threat.
Those passwords were moved to /etc/shadow, which you’ll notice is a very protected file. In fact, I can only access it by using the sudo command. Here you’ll see the hash of the cis527 user account we are using.
Similarly, there are /etc/group and /etc/gshadow files, serving the same purpose for groups.
Of course, it should go without saying that it is not recommended to edit those files directly. Instead, use the appropriate terminal commands to modify information about user accounts and groups.
At this point, you should be ready to start working on Lab 1, Task 5 - Configure Ubuntu 20.04. One of the first tasks in that lab is to create several user accounts, so that will be great practice for using some of these tools and commands.
Ubuntu File Permissions
YouTube VideoResources
Video Script
In this video, we will discuss how file permissions work in Ubuntu Linux. Working with file permissions in Linux is sometimes one of the more challenging aspects of the operating system, as it is very limited compared to Windows. It requires a bit of thinking to determine how to configure your permissions, but if done correctly it can be very powerful.
Linux file permissions are assigned based on three classes of user: the owner of the file, the group assigned to the file, and all other users not included in those first two classes. Then, each class can get any combination of three file permissions: read, write, and execute. So, in essence, each file has 9 bits in its mode, determining which of the three permissions are assigned to each of the three classes.
To see these permissions, you can open a terminal and use the ls -l command. It will show a long listing (hence the l) of the files in the folder. You’ll receive output very similar to this diagram, from the great tutorial on Linux file permissions from DigitalOcean, which is linked in the resources below the video. The first column gives the file permissions, known as the “mode” of the file. The next columns give the user and group assigned to the file, respectively. Following that, you’ll find the file size in bytes, the last modified date, and the filename.
This graphic shows how the mode of the file works in detail. The first character is a d if the item is a directory, or a hyphen - if it is not. The next three characters give the read, write, and execute permission status for the user or owner of the file. The character is present if the permission is given, or a hyphen if it is not. The next three characters do the same for the group, then the last three for all other users.
Going back a bit, we can see that there are several different permission setups here in this graphic, with helpful filenames for each one to help us understand them. First, notice that the top two entries are for directories which are accessible either by everyone, or the group.
For users to be able to list the files inside of a directory, they must be given both the read and execute permissions, as we can see here in the eighth entry. If a user is given read permissions but not execute, they would be able to read files inside of the folder, but not able to get a listing of the files names, which isn’t very useful. For files, the execute bit is only needed when the file is either an executable program, or a script written in a scripting language that is directly executable.
Looking through the rest of the entries, we can see what it would look like to have a file private to a user, or publicly accessible (though not writable) by all users. I encourage you to familiarize yourself with this pattern, as it will be very useful throughout this class.
File modes can also be expressed as a set of three octal characters. This is very useful if you have a firm understanding of what each octal mode represents. For each class of users, think of the three permissions, read, write, and execute, as three bits in a binary number. If read and execute are given, then the binary number is 101, which represents 5. That would be the octal value for that set of permissions. So, by using three octal values representing the permissions given to the three classes of user, it is very simple to set permissions using just three digits.
This page shows some common octal values you may use. I recommend reviewing it as you need while setting permissions. It is available in the slides linked below this video.
Now, let’s see how to set these permissions using the tools available in Ubuntu Linux. First and foremost, you can do some work with permissions via the default file browser, called Nautilus. As in Windows, you can right-click on any file or folder, choose Properties, then click on the Permissions tab. Here, you can see several options to choose from. Each one should be pretty self-explanatory based on the information we’ve already covered in this video.
However, you’ll notice that you can only change the permissions on files which you are the owner of. So, if you want to change the permissions of a file outside your home folder, for example, you won’t be able to do so with Nautilus. There are a couple of ways around that, though. One is to install the nautilus-admin package. This will give you an option in Nautilus to right-click a folder or file and open it as an administrator using the sudo command. This will allow you to change the permissions all folders on the system, but it still does not easily allow you to change the owner or group assigned to those files.
For full control over file permissions, once again we must turn to the Terminal. There are several commands that are used to modify file permissions and owners. First is the chmod or “change mode” command. It is used to set the permissions on a file. The syntax is the command, followed by some type of descriptor for the permissions to be set, then the path to the file or folder to set those permissions on.
There are two ways to use this command. The first involves using the classes, permissions, and a set of operators to state how the permissions should be set. For example, ug+rw will add the read and write permissions to the user or owner of the file, as well as the group. You can also say g=rx to set the group permissions to be exactly read and execute, or o-rwx to remove all permissions from users other than the owner or the group. Finally, there is a special class, a, which represents all classes. So, a+x will give the execute permission to all classes of user.
In my opinion, I find that method simpler to understand in theory, but a bit more frustrating to work with in practice, because I have to explicitly spell out my permissions in a long-form manner to get exactly what I want. Thankfully, you can also specify the desired permissions using octal modes as well.
You can also use the chown command to change the owner or group assigned to a file. For this command, note that the user and group are separated by a colon, but no spaces are before or after the colon. Also, note that each file must have a group assigned to it, even if you only want the owner to have access. In that case, remember that each user account has a group of the same name, so you can assign that group as the group on the file as well.
Finally, there is also a chgrp command that allows you to change the group on a file you own. However, most users still just use the chown command for this use. However, if you do not have sudo access, this command is very useful.
Of course, in many instances you’ll find that these commands require the use of the sudo command, In general, you can only change the permissions or group on a file you own without using sudo. Any other changes, including changing the owner of the file, require sudo access. It should also be noted that anyone with sudo access will in effect be able to access any file on the system. So, there is always a tradeoff between giving users the power to make exhaustive changes to file permissions and them being able to access any file on the system.
Now that you know a bit more about file permissions in Linux, you are ready to begin the next part of Lab 1 which is Task 6 - Ubuntu Files & Permissions. Good luck!
Ubuntu Processes & Services
YouTube VideoResources
Video Script
In this video we’ll be looking at managing the processes and services running on an Ubuntu Linux system. First, let’s take a look at processes. Recall from the earlier video on Windows Processes and Services that a process is a program running in the foreground for the user, while a service is a program running in the background for the operating system.
On Ubuntu, you can see all the running processes using the System Monitor program. It can be found by searching for it after clicking the Activities button. Here you can find information on all running processes, system resources, and file systems. By right-clicking any of the running processes, you’ll be given options to view information about the process, or even stop or kill the process if it isn’t working properly.
There are also several command-line tools you can use to view the running processes. Installed by default is a program called top which will show much of the same information as the System Monitor. Using the keyboard, you can interface with this menu and view more information as well. Press the q key to quit. There is also a newer, more user-friendly version of top called htop but it is not installed by default.
You can also see the running processes by using the ps command. By default, it will only show the processes running in that terminal window, so you must use the -A option to see all processes on the system. You can also use the -u option, followed by a username, to see all the running processes associated with that user, which is very handy on multi-user systems. The pstree command works similar, but it shows a tree structure demonstrating which processes were spawned from other processes, which can be very helpful in some instances.
To stop a process via the Terminal, use the kill command. Technically, the kill command is used to send signals to a process, and it has other uses than just stopping a process, but that is the typical usage. Refer to the documentation linked in the resources section for specific instructions on how to use each of these commands in more detail.
Finally, there are a couple of other system management tools I’ve found useful over the years. Once of them is glances, which is a Python based system monitor that goes well beyond the tools we’ve seen so far. You can easily install it on your system and get a view like this that shows lots of information about the system. However, since it is based in Python, it installs many additional resources on your system to reach full functionality, which may or may not be desired.
The other tool I recommend is called saidar. It is a more traditional terminal program with fewer dependencies, but still gives a good overview of the system. However, it does not display information about individual processes, so it may be of less use in this situation than the others.
Next, let’s talk a little bit about services on Linux. In many books and online, you’ll see the term daemons used to describe Linux services. That is the more traditional term for these processes that run in the background, and it is still used today by many resources. The term daemon comes from Greek mythology, referring to a being who works tirelessly in the background. It is also a reference to Maxwell’s Demon, a similar concept from a well-known thought exercise in physics. Most daemons in Linux today use a process name ending in d, such as httpd for a web server or sshd for a secure shell server.
On a modern Ubuntu system, the services or daemons are managed by a tool called systemd. Formerly, tools such as init or Upstart were used, but most of them have been phased out at this point in favor of systemd. It is still a very contentious point among Linux enthusiasts, and you’ll find lots of discussion online covering the pros and cons of a particular system. I won’t go too deep into it here, but if you find references to either init or Upstart online, that’s what the discussion is about. To interact with systemd, you can use the systemctl command.
For example, to start a service, you would use sudo systemctl start followed by the name of the service. Other options such as stop, restart, and status are available. Unfortunately, advanced configuration of systemd services in Ubuntu is a bit outside of the scope of this course, as it is a very involved topic. I encourage you to review the documentation for systemd if you find yourself needing to make any changes to services on your system.
Ubuntu Software Installation
YouTube VideoResources
Video Script
Let’s take a look at installing software on Ubuntu Linux. Before we install anything, here is some information about the types of files installed along with a typical application in Ubuntu.
First, the executable file itself is placed somewhere in the path of the system, usually in either /usr/lib or /usr/bin. This is equivalent to the .EXE file in Windows. Each application may also have some shared library or object files, which are typically placed in the /usr/lib folder.
The configuration and settings file for the application are usually placed in the /etc folder, with user-specific information placed in a dotfile in the user’s home directory. To see those files, use the ls -al command to show all hidden files. By convention, any file or folder with a name beginning with a period . is hidden by default. These files are typically referred to as “dotfiles” and are used to store user-specific configuration information in the user’s home folder. They are hidden by default just to prevent most users from ever touching them, but by including them directly in the user’s home folder, they are more likely to be included in system backups. On Windows, this is roughly equivalent to the AppData folder in each user’s home directory.
Finally, every application on Linux typically installs some sort of documentation in the /usr/share directory, which can be accessed using the man command. If required, it may also place a few scripts in the systemd directories so the appropriate service or daemon can be started automatically.
There are several methods to install software on Ubuntu, each with their own advantages and disadvantages. First, most users primarily will start with the Ubuntu Software Center. This is the equivalent of an “app store” for Ubuntu, and it gives quick and easy access to the most commonly used applications. However, many system and server packages are not visible here, and must be installed elsewhere.
The official Ubuntu documentation recommends installing the Synaptic Package Manager for those tasks. It can be installed via the Ubuntu Software Center and then used on its own. It will show you all packages available for your system, and you can easily install or manage them. One nice feature about Synaptic is the ability to see what files are installed by a package by simply right-clicking on an installed package and choosing Properties, then the Installed Files tab. You can compare this to the output from InstallWatch Pro on Windows.
Using Synaptic, you can also configure the software repositories your system is able to install software from. While most software you’ll need is easily installed through the default repositories, you may find that adding or changing those repositories becomes necessary, and you can do so here.
Of course, you can also install and configure software using the command line. The most common way to do so is via the apt, or “Advanced Packaging Tool” command. In previous versions of Ubuntu this was the apt-get command, but the syntax for the apt command is exactly the same. To use apt, you must first update the list of packages available by using sudo apt update. Then, you can install a package using sudo apt install <package>. To remove a package, use the remove option. You can also use apt to upgrade all packages on a system using the upgrade option.
Another option for installing packages on Ubuntu is using the snap tool. Snaps are self-contained file system images containing the app and any dependencies, and are designed to be able to be installed on all major Linux systems. Several of the default Ubuntu packages are using snap, and the Ubuntu Software Center will list snaps if they are available. For this course, I will not be using snaps since they are not quite as widely supported yet, but feel free to review the relevant documentation listed in the resources section if you are interested in learning more.
In addition, you can always install software on Linux by downloading and installing the software package manually. The packages typically use the .DEB file extension, and are installed using the dpkg -i command. However, in most instances you’ll be able to find a software repository which offers the software for installation via the apt tool, and I recommend using that route if at all possible.
Finally, if you so choose, you can download the source code for most applications built for Linux and compile it yourself. This is very rarely needed for most mainstream software, but often there is specialized software for a specific use that requires this level of work. In general, consult the documentation for that particular software for instructions on how to properly configure, build, install and run that software from source.
You should now be able to continue working on Lab 1, Task 5 - Configure Ubuntu 20.04 by installing the required software. As always, if you have any questions, please post in the course discussion forums to see if others are having the same issue.
Ubuntu Security & Networking
YouTube VideoResources
Video Script
In this last video on Ubuntu, we’ll discuss some important security and networking details needed to finish getting your VMs set up and configured properly.
First, let’s talk about security. Whenever you install a new operating system, there are 4 major steps you should always perform before doing just about anything else on the system. Those steps are:
- Configure User Accounts & Passwords - at the very least, make sure you have at least one user account with a secure password added to the
sudo group to perform administrative tasks. Most other users should have standard accounts without sudo access. You may also add this system to an LDAP directory to get additional user accounts. We’ll discuss that in detail in Module 4. - Configure the Firewall - Ubuntu ships with a firewall installed, but by default it is not configured or enabled. To configure the firewall, I recommend installing the
gufw tool as a graphical interface for the Ubuntu Uncomplicated Firewall (UFW). Once that tool is installed, you can enable the firewall with a single click. - Install Antivirus Software - All computers should still run some form of antivirus software. Ubuntu does not provide any by default, but it is very easy to install the ClamAV scanner. It is an open source antivirus scanner, and is recommended for use on all Linux systems.
- Install All System Updates - You should also install all available system updates for your operating system. This makes sure you have patches against the latest known flaws and attacks. Ubuntu has the ability to install updates automatically, but it must be configured. You can search for the Software & Updates program after clicking the Activities button. Once there, look at the Updates tab to configure automatic updates. You can always use Synaptic or apt to make sure all packages are the latest version.
Let’s take a quick look at the firewall, since you’ll need to allow an application through the firewall. You can find it by searching for “firewall” once you have installed gufw. Lab 1 directs you to install the Apache 2 web server. You’ll need to allow it through the firewall somehow. I won’t show you how in this video, but I encourage you to review the links in the resources section below the video for documentation showing how to accomplish this task. There are several ways to do it.
To test your firewall configuration, you can use your Windows virtual machine created as part of Lab 1. First, make sure they are both on the same network segment in VMware by looking at the hardware configuration for each virtual machine. Then, you’ll need to get the IP address of the Ubuntu computer. There are several ways to do this, but one of the simplest is to go to the Settings application, then choosing Network from the menu on the left. In the Wired section, click the gear icon to see the details. Here you’ll find the IPv4 address, usually in form of four numbers separated by decimal points. We’ll spend most of Module 3 discussing networking, so I won’t go into too much detail here.
Once you have that IP address, switch to your Windows virtual machine, and open up the Firefox web browser. At the top in the address bar, simply input the IP address and press enter. If everything works correctly, you should be presented with the default Apache screen as seen here. If not, you’ll need to do some debugging to figure out what is missing.
With that, you should now have all the information you need to finish the Ubuntu portion of Lab 1. If you have issues, please feel free to post in the course discussion forums or chat with me. Good luck!
Subsections of Configuration Management
Introduction
Puppet Learning VM Deprecated
As of 2023, the Puppet Learning VM is no longer being maintained. The videos below demonstrate some of the features of Puppet, which can also be done on your Ubuntu VM after installing Puppet Agent. Unfortunately, it is not easily possible to simulate an enterprise Puppet setup without this VM, so I’ll keep these videos up for demonstration purposes. –Russ
Resources
Video Script
Welcome to Module 2! In this module, we’ll be discussing configuration management. The next video will define that concept in detail and give some additional background.
The lab assignment will have you work with Puppet to completely automate most of the tasks you performed in Lab 1. By doing so, hopefully you’ll see the incredible power of using configuration management tools in your workflow as a system administrator.
For the lab, I chose to use the Puppet configuration management tool for a couple of reasons. First, they have an open source, community edition that is very powerful and easy to use, so there is no cost to get started. Secondly, their documentation and support is very well done, so you’ll have plenty of ways to get help if you get stuck. Finally, they provide an easy to use learning VM that can walk you through the basics of Puppet quickly and easily.
To get started in this module, I recommend downloading the Puppet Learning VM at this URL. The link is also in the resources section below this video. It is a very large download, so I recommend starting it now so you are ready to go by the time you get to that point. A later video will discuss how to install and use that VM in detail.
Good luck!
Configuration Management Overview
YouTube VideoResources
Video Script
This module deals with the topic of configuration management. Before I introduce that topic directly, let’s look at what we’ve done so far in this class.
In Lab 1, you were asked to set up and configure a single operating system VM for both Windows and Linux. For many system administrators, that is exactly how they operate on real systems - each one is set up by hand, one at a time, manually. This process, of course, does have some benefits. For the sysadmin, they get hands-on management with each computer they support. In addition, they can easily customize each system to meet the individual needs of the user. For sysadmins with a low level of experience, or few resources, this can be a very easy way to at least help users configure their systems. And, in practice, this method works well for small groups of users. If you are only supporting a few users, maybe even up to several dozen, manually managing systems and configurations may be the most efficient and cost-effective way to do so.
However, there are some major downsides to this as well. First and foremost, it is a very time consuming and labor intensive process. You probably experienced that while working on the first lab. Depending on your own experience and familiarity with those systems and the tasks at hand, it may have taken anywhere from one to several hours to complete. While you can, of course, become more proficient, it may still take quite a bit of hands-on time to configure an operating system. In addition, there is the high likelihood of machines being configured inconsistently, leading to additional support headaches down the road. I can confidently say from my time working as a sysadmin and from grading labs in this class, even with the same simple instructions, it is very difficult for any two people to configure a computer in exactly the same way. Also, as new software and operating system updates are released, you’ll find that you need to install them on a per-machine basis, or depend on the end users to do those updates themselves. Finally, as your groups get larger, this approach really doesn’t scale well at all.
So, that leads to the big question - how do we make this process scalable?
One way to do this is through the use of automation tools, such as GNU Make. While Make was developed to help with compiling large pieces of code, it shares many similarities with the tools we’ll look at in this module. Many system administrators also wrote scripts to automate part of their process, but in most cases those scripts were simply a list of steps or commands that the sysadmin would run manually, and they would have to be customized to fit each particular operating system or configuration.
There are also a couple of techniques that can be used to scale this process. One is through the use of system images. Much like the virtual machines we are using in this class, you can actually store the entire hard drive of a computer as a system image and copy it as many times as you’d like to machines. However, this process is also very time-consuming since the images are so big, and they can only be copied onto the same or similar hardware configurations. This is great when everyone has the same hardware, but in many organizations that simply isn’t the case. Lastly, you can also use tools to create custom operating system installers for both Windows and Linux, with much of the configuration and software pre-installed and configured along with the operating system. Again, this is very time consuming, and it must be redone and updated every time something changes. In addition, none of these methods really address how to handle updates and new software once the system is in the hands of the users. In short, we need something better.
Enter the concept of a defined configuration. Imagine this: what if we could write out exactly how we would like our computers to be configured, and then direct our staff to make sure the system matched that configuration, regardless of the operating system or hardware? That configuration would be a list of configured items only, not a set of steps to accomplish that task. In essence, much of the first lab assignment could be thought of as a defined configuration. Those items are high level, system independent, and hopefully just enough information that any competent system administrator could build a system that meets those requirements. If that is the case, could we build a software tool to do the same?
This is the big concept behind configuration management. As a system administrator, all you have to do is define your desired configuration in a way that these tools can understand it, then they will do the rest. In that way, you can think of your system configuration as just another piece of “source code” and manage it just like any other code. If you need to deploy a new piece of software or update one, simply change the configuration file and every system using the tool will make the necessary changes to match. By doing so, this will greatly reduce downtime and errors and increase the consistency of all the systems you are managing. According to one estimate, 70% of all downtime in datacenters is due to human error, so the more we can take humans out of the equation, the better.
There are many tools available for configuration management. For this class, we’ll be using Puppet as it is one of the easiest tools to work with in my experience, and it is available for a variety of platforms and uses. If you are interested in using configuration management tools in your own work, I encourage you to review each of these platforms, as each one offers unique features and abilities.
As we discuss automation tools, I briefly want to bring up the term DevOps, since it is really one of the big things you’ll hear discussed on the internet today. DevOps is a shortened form of “development operations” and is, in essence, a very close collaboration between software development and system administration staff. A good way to think of this is the application of “agile” software development practices to the world of system administration, so that the systems can be as “agile” (pun intended) as the developers want them to be. This involves a high level of automation and monitoring, both in terms of configuration management but also deployment and testing. There are also the very short development cycles traditionally seen in agile development, with increased deployment frequency. We’ll spend a little bit of time talking about DevOps later in the course, but many of the concepts we are covering here in configuration management are very applicable there as well.
Finally, here are a few tools from the DevOps world you may come across. Some of the biggest ones, Jenkins and Travis, are used for build and test automation, while tools such as Nagios and Icinga are helpful for system monitoring. Feel free to check out any of these tools on your own time, as you may find several of them very useful.
Assignment
Lab 2 - Configuration Management
Instructions
Create two different Puppet Manifest Files that meet the specifications below. Each one will be applied to a newly installed virtual machine of the appropriate operating system configured as described in Task 0. The best way to accomplish this is to treat this assignment like a checklist and check things off as you complete them.
If you have any questions about these items or are unsure what they mean, please contact the instructor. Remember that part of being a system administrator (and a software developer in general) is working within vague specifications to provide what your client is requesting, so eliciting additional information is a very necessary skill.
Note
To be more blunt - this specification may be purposefully designed to be vague, and it is your responsibility to ask questions about any vagaries you find. Once you begin the grading process, you cannot go back and change things, so be sure that your machines meet the expected specification regardless of what is written here. –Russ
Also, to complete many of these items, you may need to refer to additional materials and references not included in this document. System administrators must learn how to make use of available resources, so this is a good first step toward that. Of course, there’s always Google!
Time Expectation
This lab may take anywhere from 1 - 6 hours to complete, depending on your previous experience working with these tools and the speed of the hardware you are using.
Tip
Testing Manifest Files - When testing these manifest files, there is a three step process. First, apply the manifest, then reboot, then apply again. This is because any changes made to group memberships are not applied until after a user logs back in or the system reboots. So, you may get permission issues when creating files or assigning permissions due to incorrect group memberships. Ideally, those permission errors should be eliminated after a reboot. There is no good fix for this in Puppet itself, since it is an operating system issue. Therefore, this is the process that you should use, and it is the process that will be used when your manifest files are graded. Basically, if you get no errors after a reboot, you should be fine!
Task 0: Create New Virtual Machines & Snapshots
Create new Windows 11 and Ubuntu 24.04 virtual machines for this lab. When creating the virtual machines and installing the operating system, use the same information from Lab 1. You should create the cis527 account during installation.
DO NOT PERFORM ANY ADDITIONAL CONFIGURATION AFTER THE INSTALLATION IS COMPLETE EXCEPT WHAT IS LISTED BELOW!
After installing the operating system, install ONLY the following software:
- Puppet Agent 8
- Windows: Download and install the latest Puppet Agent from Puppet Downloads. Look for the file
puppet-agent-x64-latest.msi in that directory. - Ubuntu: See the video later in this module for instructions to install Puppet. These instructions are also summarized in the README for the Puppet APT repositories.
- Recall that Ubuntu 24.04 is codenamed “Noble Numbat”, so use the url
https://apt.puppet.com/puppet8-release-noble.deb to get the correct version on Ubuntu in the first step. - Follow the instructions in the video later in this lab to add Puppet to the
sudo path.
Puppet Changed Security Model in 2025
In 2025, Puppet was consumed by Perforce, and they limited access to many of the existing downloads and documentation. You can find more information about this change here: Our Plans for Open Source Puppet in 2025.
Because of this, much of the existing documentation for Puppet 8 was migrated and updated to reference their new secure setup, and access to newer Puppet versions requires requesting an account and agreeing to an EULA. I have done my best to update the links to accurate documentation, but some content was unfortunately lost.
However, we’re going to forge ahead and use the existing older versions of Puppet published in late 2024 for now. I will eventually update this course to use a new tool in place of Puppet since it no longer seems to be as freely available as before.
On the Windows virtual machine only, create a folder at C:\install and download the following installers. Do not change the name of the installers from the default name provided from the website. You may choose to do this step using the download_file Puppet module instead.
- Firefox (
Firefox Setup 142.0.exe as of 8/20/2025) - Thunderbird (
Thunderbird Setup 142.exe as of 8/20/2025) - Notepad++ (
npp.8.8.5.Installer.x64.exe as of 8/20/2024)
Note
I have listed sample names of the installers as of this writing, and these will be the ones that I use for testing; however, you may receive newer versions with slightly different names. That is fine. Just be sure that you don’t get the default stub or web-only installers, which is what Firefox typically gives you unless you follow the links above. They will not work properly for this lab. –Russ
Once you have your virtual machines configured, make a snapshot of each called “Puppet Testing” for your use. As you test your Puppet manifest files, you’ll reset to this snapshot to undo any changes made by Puppet so you can test on a clean VM. The VMs used for grading will be configured as described here.
Warning
When you reset back to a snapshot, any new or modified files on the VM will be lost. So, make sure you keep a backup of the latest version of your manifest files on your host machine! You have been warned!
Task 1: Puppet Manifest File for Ubuntu
Create a Puppet Manifest File for Ubuntu 24.04 that defines the following configuration. This configuration is very similar to, but not exactly the same as, Lab 1, so read through it carefully. Assume that the machine you are applying the manifest file on is configured as described above in Task 0.
Task 2: Puppet Manifest File for Windows 11
Create a Puppet Manifest File for Windows 11 that defines the following configuration. This configuration is very similar to, but not exactly the same as, Lab 1, so read through it carefully. Assume that the machine you are applying the manifest file on is configured as described above in Task 0.
Users (Same as Lab 1)
AdminAccount | AdminPassword123 (Administrators & Users group)NormalAccount | NormalPassword123 (Users group)GuestAccount | GuestPassword123 (Guests group only)EvilAccount | EvilPassword123 (Users group)- _Create groups as needed below_
Note
Makes sure you can actually log in as these users after creating them! Many students forget to check this step and lose points because the accounts are created, but don’t actually allow users to log in.
Files & Permissions (Same as Lab 1)
- Create the folder
C:\cis527. It should be owned by the cis527 account, but make sure all other users can read and write to that folder. - Within
C:\cis527, create a folder for each user created during task 2 except for cis527, with the folder name matching the user’s name. Make sure that each folder is owned by the user of the same name, and that that user has full permissions to its namesake folder. - Create a group named
AdminGroup containing cis527 and AdminAccount, and set permissions on C:\cis527 for that group to have full access to each folder created in C:\cis527. No other user should be able to access any other user’s folder. - In each subfolder of
C:\cis527, create a text file. It should have the same owner and access permissions as the folder it is contained in. The name and contents of the text file are up to you. - Don’t remove the SYSTEM account or the built-in Administrator account’s access from any of these files. Usually this is as simple as not modifying their permissions from the defaults.
- See this screenshot and this screenshot for what these permissions should look like in PowerShell. This was created using the command
Get-ChildItem -Recurse | Get-Acl | Format-List in PowerShell. These screenshots are from an earlier version of this lab using different paths and usernames, but the permissions structure is the same.
Software - Install the latest version of the following software. The installation should be done SILENTLY without any user interaction required. In addition, Puppet should be able to detect if they are already installed, and not attempt to install them again if the manifest is run multiple times.
- Mozilla Firefox
- Mozilla Thunderbird
- Notepad++
Note
You will need to research the appropriate options to give to the installer through Puppet for them to install silently. For this lab, you should not use any Windows package managers such as Chocolatey or Ninite. The installation files will be already downloaded and stored in C:\install. Also, you’ll need to make sure your resource names exactly match the names of the packages after they are installed, or Puppet will attempt to reinstall them each time the manifest file is applied. –Russ
Services - Ensure the following services are running:
- DHCP Client
- DNS Client
- Windows Update
Note
You will have to find the appropriate name for each service. –Russ
Note
Please add comments to your Puppet Manifest Files describing any Puppet Modules that must be installed prior to applying them.
Upload your completed Puppet Manifest Files to Canvas and then contact the instructor for grading. You may continue with the next module once grading has been completed. In general, this lab does not require interactive grading, but you are welcome to request a time if you’d prefer.
Installing Puppet
Note
The video refers to Puppet version 6, but Puppet 8 is now the latest version. For the lab assignment, you’ll want to install Puppet 8 and not Puppet 6. This changes the URL used to get the release package - see the assignment page for more information. The basic process is otherwise the same.
Resources
Video Script
To begin work on Lab 2, you’ll need to install Puppet Agent on your new VMs. This video will walk you through that process.
First, let’s look at installing Puppet Agent on Ubuntu. Here I have an Ubuntu VM configured as described in the Lab 2 assignment, except I have not installed the Puppet Agent software yet. To install Puppet Agent, we must first enable the Puppet Platform repositories. A link to these instructions are in the resources section below the video. On that page, scroll down to the section titled “Enable the Puppet Platform on Apt” and enter the two commands given.
However, we’ll need to determine the URL required for our version of Puppet and Ubuntu. In this case, we’d like to install Puppet version 6, and we are using Ubuntu 20.04, which is codenamed “Focal Fossa”. So, our URL would consist of ‘puppet6’ as the platform name, and ‘focal’ as the OS abbreviation. So, the full URL will be https://apt.puppetlabs.com/puppet6-release-focal.deb. When we place that first URL after wget in the first command, it will simply download a .DEB installation file to your computer. The second command uses the dpkg tool to install that file.
Once we’ve done that, we can use sudo apt update and sudo apt install puppet-agent to install the Puppet Agent program on Ubuntu.
However, you won’t be able to use those commands until we add them to the PATH environment variable. The PATH variable is a list of folders that contain the commands you can access from the Terminal. If you have reviewed the information in the Extras module for Bash Scripting, you are already familiar with the PATH variable. The instructions for installing Puppet Agent on Linux linked in the resources section gives one way to add these commands to your PATH variable, but it is incomplete and will not work in all cases. So, there are two options: one would be to use the full path each time you need to use the Puppet commands, and the second is to modify the PATH variable. In this video, I’ll walk you through the steps to modify your PATH to enable direct access to these commands.
First, you must add it to your own PATH variable. To do so, use the following command to edit your Bash configuration file:
Use the arrow keys to navigate to the bottom of the file. Then, on a new line, add the following:
export PATH=/opt/puppetlabs/bin:$PATH
Then press CTRL+X, then Y, then ENTER to save and close the file. Finally, close and reopen Terminal to load the new PATH variable. If you did it correctly, you should be able to run the puppet command, as you can see here.
However, if you try to use sudo to run the puppet command as root, you’ll notice that it still cannot find the command. This is due to the fact that the system protects the PATH variable from changes when using root privileges in order to enhance system security. So, you’ll also need to edit the PATH variable used by the sudo command. To do so, use the following command to open the sudo configuration file:
This command will open the \etc\sudoers file on your system for editing. Near the top, you’ll see a line for Defaults secure_path containing the PATH variable used by the sudo command. Carefully edit that line by adding the following text to the end, before the closing quotation mark:
Note that I added a colon to the end of the existing line, then the new path. On my system, the full line now looks like this:
Defaults secure_path="/usr/local/sbin:/usr/local/bin:/usr/sbin:/usr/bin:/sbin:/bin:/snap/bin:/opt/puppetlabs/bin"
Once you are done editing, you can use CTRL+X, then Y, then ENTER to save and close the file. You should now be able to use the sudo puppet command as well.
Now, let’s switch over to Windows and install the Puppet Agent there. First, you’ll need to download the Puppet Agent using the link on the resources page below this video. Remember to find the latest version of the Puppet Agent installer, as there are many listed on this page. Once you have downloaded the file, simply double-click on it to run the installer. It will install Puppet Agent on the computer. It’s that simple!
Puppet Resources
Puppet Learning VM Deprecated
As of 2023, the Puppet Learning VM is no longer being maintained. The videos below demonstrate some of the features of Puppet, which can also be done on your Ubuntu VM after installing Puppet Agent. Unfortunately, it is not easily possible to simulate an enterprise Puppet setup without this VM, so I’ll keep these videos up for demonstration purposes. –Russ
Resources
Video Script
In this video, we will begin learning how to use Puppet to configure a system. Before creating our own Puppet scripts, called Manifest Files, we will discuss how Puppet actually views a system it is configuring.
In Puppet, a system is simply a set of resources. There are many different types of resources, such as files, user accounts, installed programs, and more. In addition to a type, each resource has a title, and a set of attributes giving additional information about the resource. The resources section below the video has links to the Puppet documentation for resource types.
Let’s review some different resources using the Puppet Learning VM. You can also perform many of these same operations on your Windows and Linux computers with Puppet Agent installed. If you’d like to follow along, I’ll be working in the hello_puppet quest on the Puppet Learning VM.
I have already performed the first task for the hello_puppet quest, so I’m now connected to one of the internal systems and installed the Puppet Agent on it. Now, I can start Task 2, where I review a file resource. Using Puppet, you can describe a file resource such as the following:
sudo puppet resource file /tmp/test
That should give you information about that file. Here you can see that the resource is of type file, and has its path for a title. Below that are the attributes of the file, given as parameter => value pairs. Since the file doesn’t exist, the only attribute visible is the ensure attribute, and it shows that the file is absent on the system.
We can easily create the file using this command:
Then we can use the same resource command to view it:
sudo puppet resource file /tmp/test
Now we can see many additional attributes of the file.
We can also use the puppet resource command to modify resource. For example, let’s add some content to that file:
sudo puppet resource file /tmp/test content='Hello Puppet!'
Once you run that command, you can view the contents of the file to confirm that it worked:
There are many types of resources that can be viewed and modified in this way. For example, you can view information about a user account, such as the learning account on the current VM:
sudo puppet resource user learning
You can also find information about installed software packages, such as the Apache Webserver httpd:
sudo puppet resource package httpd
In this case, since the package is not installed on the system, the ensure attribute is set to purged, which is similar to absent.
The Puppet Learning VM quest describes how to see the inner workings of a Puppet Resource by breaking it. I’m not going to go over that process in detail, but I recommend you review that information on your own.
As with the file, we can configure attributes easily enough:
sudo puppet resource package httpd ensure=present
That command will install the latest version of the httpd package. Note that when it executes, the ensure value is changed to the current version. Later, as you define your Puppet manifests, you can use the ensure attribute to install the latest version using the present value, or provide a specific version number here if desired.
There are many different types of resources available in Puppet. I encourage you to review some of the documentation linked below this video before continuing, just to get an idea of what is available. The next video will describe how to create your own Puppet Manifest Files and apply them to a system directly using the Puppet Agent.
Puppet Manifest Files
Puppet Learning VM Deprecated
As of 2023, the Puppet Learning VM is no longer being maintained. The videos below demonstrate some of the features of Puppet, which can also be done on your Ubuntu VM after installing Puppet Agent. Unfortunately, it is not easily possible to simulate an enterprise Puppet setup without this VM, so I’ll keep these videos up for demonstration purposes. –Russ
Resources
Video Script
Now, let’s take a look at how we can use Puppet to create defined configurations to be applied to our systems. In Puppet, we refer to those defined configurations as manifest files. Each manifest file defines a set of resources to be configured on the system. Then, the Puppet Agent tool compares the configuration defined in the manifest file and the system’s current configuration, making changes as needed to the system until they match. In addition, each manifest file should be written in a way that it can be repeatedly applied to a system, since it is only defining the configuration desired and not the steps to accomplish it. This makes Puppet a very powerful tool for managing system configuration across a variety of systems and platforms.
When you apply a manifest file, Puppet will go through a compilation process to convert the manifest file into a catalog. When working in a larger organization with a Puppet master server containing several manifest files, this allows the system to distill all of that information into a single place. We’ll talk a bit more about that when we look at a master/agent setup using Puppet.
Now, let’s create our first Puppet Manifest files. Once again, I’m using the Learning Puppet VM during the hello_puppet quest, but you can follow along on your own Windows or Linux VM as well. I’ll use SSH to connect to the hello.puppet.vm node, then make sure the Puppet Agent is installed.
To make this process simpler, I’m also going to install the Nano text editor. For most beginners, I feel that Nano is the easiest command-line text editor to learn, though it may not be the most powerful. If you are familiar with Vim, feel free to use it as it is already installed on this system. Since the Learning Puppet VM is using CentOS as its Linux distribution of choice, the command to install packages is a bit different than on Ubuntu. To install Nano, type the following:
Now, let’s open a new text file using Nano, called manifest.pp. In that file, we can define a file resource as follows:
file { '/tmp/testfile':
  ensure => 'file',
  content => 'Manifest File!',
  mode => '0644'
}
Once you have created that file, press CTRL+X, then Y, then ENTER to save and close the file in Nano. Then, you can apply the file using this command:
sudo puppet apply manifest.pp
It should successfully apply, and give you a message that the file was created. You can then use either
sudo puppet resource file /tmp/testfile
or
to verify that the file exists and has the correct permissions. You can also view the file’s contents using
It’s that easy! Most of the attributes displayed when you use the puppet resource command are configurable in a manifest file, so you can use puppet resource to determine how a system is currently configured, then copy the desired attributes into a manifest file to define that configuration. Let’s add a few more things to our manifest:
package {  'nano':
  ensure => 'present'
}

user { 'cis527':
  ensure => 'present',
  shell => '/bin/zsh',
  home => '/home/cis527',
  managehome => true
}
Once you’ve edited a manifest file, you can verify that your syntax is correct using the following command:
puppet parser validate manifest.pp
If you have any errors in your manifest file, it will give you the approximate line and column number. Be careful about your use of colons, commas, quotes, and brackets. As with any programming language, Puppet is very particular about the correct use of syntax.
Now, let’s apply that manifest and see what happens:
sudo puppet apply manifest.pp
Since the Nano package is already installed, it probably won’t do much at this point. However, it should create the cis527 user. We can verify that it worked by switching to that user account. First, we’ll need to set a password for it:
Then, we can use that password and the switch user command to log in as that user:
If all goes well, our terminal should change to show that we are logged in as the cis527 user. Of course, it is possible to define the desired password in the manifest file, but that is something you’ll have to figure out on your own as you complete Lab 2. (I can’t give everything away, can I?)
Before moving on to the next video, I encourage you to play around with this temporary manifest file a bit and see what other changes you can make to the resources we’ve defined, or what other resources you can use here.
Puppet Resource Ordering
Puppet Learning VM Deprecated
As of 2023, the Puppet Learning VM is no longer being maintained. The videos below demonstrate some of the features of Puppet, which can also be done on your Ubuntu VM after installing Puppet Agent. Unfortunately, it is not easily possible to simulate an enterprise Puppet setup without this VM, so I’ll keep these videos up for demonstration purposes. –Russ
Resources
Video Script
Now that we’ve seen Puppet Manifest files, let’s discuss some of the caveats of such a system. On the Learning Puppet VM, during the hello_puppet quest as described in the earlier videos, I’m going to continue to create manifest files on the hello.puppet.vm node.
Using Nano, create the following manifest file:
file { '/tmp/test1':
  ensure => 'file'
}

file { '/tmp/test2':
  ensure => 'file'
}

file { '/tmp/test3':
  ensure => 'file'
}

notify { "First Notification": }
notify { "Second Notification": }
notify { "Third Notification": }
Once that is done, apply the manifest:
sudo puppet apply test.pp
When you do, you may see things applied out of order. Since a Puppet Manifest file only defines the desired configuration, it is up to the Puppet Agent tool to determine which steps are necessary and in what order. This is because Puppet considers each resource definition to be atomic, meaning that it is independent of all other resources. In some cases, however, we want to make sure that some resources are configured before others. Thankfully, Puppet gives us many ways to do so.
The first uses the before and require keywords. Here is an example from the Puppet documentation linked in the resources section below the video:
package { 'openssh-server':
  ensure => present,
  before => File['/etc/ssh/sshd_config'],
}

file { '/etc/ssh/sshd_config':
  ensure => file,
  mode => '0600',
  source => 'puppet:///modules/sshd/sshd_config',
  require => Package['openssh-server'],
}
Each of these elements creates the same relationship. You only need to include either the before or require keyword in one of the resources, but both are not required.
Similarly, the notify and subscribe keywords create a similar relationship. From the documentation:
file { '/etc/ssh/sshd_config':
  ensure => file,
  mode => '0600',
  source => 'puppet:///modules/sshd/sshd_config',
  notify => Service['sshd'],
}

service { 'sshd':
  ensure => running,
  enable => true,
  subscribe => File['/etc/ssh/sshd_config'],
}
Again, only one or the other is required. However, unlike with the before and require keywords, in this case the second item will only be refreshed if the prior resource has changed. In this example, if the sshd_config file is changed, then the sshd service will be restarted so it will read the newly changed file. This is a very powerful tool for making changes to configuration files and making sure the services immediately restart and load the new configuration.
Finally, the third method is through the use of chaining arrows. This tells the Puppet Agent to apply resources in the order they are written in the manifest. One of the most powerful and common uses of this is to create a “Package, File, Service” chain. Here is the example from the Puppet documentation:
# first:
package { 'openssh-server':
  ensure => present,
} -> # and then:
file { '/etc/ssh/sshd_config':
  ensure => file,
  mode => '0600',
  source => 'puppet:///modules/sshd/sshd_config',
} ~> # and then, if the previous file was updated:
service { 'sshd':
  ensure => running,
  enable => true,
}
This manifest will ensure the openssh-server package is installed first. Then, once it is installed, it will place the desired configuration file on the system. The first arrow with a simple hyphen creates a before/require relationship. Then, if that file is modified in any way, the second arrow, using a tilde ~ character, will enforce a notify/subscribe relationship and cause the sshd service to refresh.
As you work on your Puppet Manifest files for Lab 2, it is helpful to keep in mind that some resources may need to be chained together to work properly. However, do not try to chain together your entire manifest file, as that defeats much of the flexibility of Puppet itself.
Puppet Variables & Facts
YouTube VideoResources
Video Script
In this video, we’ll go just a bit deeper into the Puppet language and some additional features of Puppet. You may not need all of this information to complete Lab 2, but it is definitely helpful.
First, as with any programming language, Puppet allows you to assign variables. The basic syntax for assigning a variable is:
$my_variable = "Some text"
As with many scripting languages, a variable name always begins with a dollar sign $, and is assigned with a single equals sign =. Unlike most languages, however, variables can only be assigned once. If you think about it, this makes sense, since Puppet may apply resources in any order. In this way, it is much more of a declarative language than an imperative language, though it shares some features of both.
You can then use variables in your manifest files. For example, a variable is interpolated in any double-quoted string, such as here:
$username = "russfeld"
notify { "Your home directory is /home/${username}": }
Puppet also has a very powerful templating language that can be used with configuration files. It is outside the scope of what I’ll cover in this class, but I encourage you to look into it on your own if you are interested.
Another tool bundled with Puppet is Facter. Facter is able to provide information about the system it is running on. Puppet can then use that information in manifest variables and templates to customize the system’s configuration. To see the facts available on your system, type:
Of course, you’ll find that there are many facts available. You can find a full list of facts in the Puppet documentation linked below this video. You can also write custom facts, if needed.
Puppet Programming Constructs & Classes
YouTube VideoResources
Video Script
Puppet also has very powerful programming constructs which can be used in your manifest files. One of the most useful is the conditional statement, or “if” statement. The syntax is very similar to most other languages. For example, here is the sample “if” statement from the Puppet documentation:
if $facts['is_virtual'] {
  warning('Tried to include class ntp on virtual machine; this node might be misclassified.')
}
elsif $facts['os']['family'] == 'Darwin' {
  warning('This NTP module does not yet work on our Mac laptops.')
}
else {
  include ntp
}
In this statement, the manifest is determining if the system is virtualized, or if the OS family is Darwin, the base kernel family for Apple Macintosh laptops. If either of those is the case, it will print a warning message. However, if neither of those is true, then it will include the ntp module. We’ll talk about modules later in the video. An “if” statement such as this, combined with the information that can be gleaned from a system using Facter, allows you to create manifest files that could be applied on a variety of different systems.
One caveat to be aware of: make sure you are careful about your data types. In Puppet, as in many other languages, the boolean value false and the string value "false" are different. In fact, Puppet treats non-empty strings as the boolean value true by default. In addition, all of the facts from Facter are strings, so you must be careful how you use them.
Consider this example:
$boolean = "false"
if $boolean {
  notify{"This is true":}
}
else {
  notify{"This is false":}
}
When you run a manifest file containing this code, you’ll be notified that the value is true, since is a string. To resolve this problem, you can use the str2bool function included in the Puppet Labs Standard Library. First, install the Puppet Labs Standard Library module using the following command:
puppet module install puppetlabs-stdlib
Then, modify the manifest file as follows:
include stdlib
$boolean = "false"
if str2bool("$boolean") {
  notify{"This is true":}
}
else {
  notify{"This is false":}
}
Now, you’ll get the expected result. The Puppet Labs Standard Library includes many other useful functions, so I encourage you to check them out. The documentation is linked in the resources below this video.
In addition to the “if” statement, Puppet also includes a “case” statement. The basic syntax is as follows:
case $operatingsystem {
  "centos": { $apache = "httpd" }
  "redhat": { $apache = "httpd" }
  "debian": { $apache = "apache2" }
  "ubuntu": { $apache = "apache2" }
  default: { fail("Unrecognized OS") }
}
The matches here are case-insensitive, which is very helpful. You can also combine some of the labels and use regular expressions, as in this example:
case $operatingsystem {
"centos", "redhat": { $apache = "httpd" }
/^(Debian|Ubuntu)$/: { $apache = "apache2" }
default: { fail("Unrecognized OS") }
}
When using regular expressions, note that the matching is case-sensitive.
Finally, Puppet code can be further organized into classes. As with most object-oriented languages, a class definition is very simple. Here is one example:
class myclass (String $message = "Hello") {
  notify { "${message} user": }
}
Once the class is defined, you can use the include keyword to declare it in your manifest file, using all default values for parameters:
Or you may declare it using a resource syntax, allowing you to override default parameter values:
class { 'myclass':
  message => "Test"
}
Either way, it is important to remember that you must always declare a class to use it. A class definition itself is not sufficient for the resources inside the class to be configured.
Finally, on most enterprise Puppet systems, the manifest files have been further organized into a set of modules. Each module is a self-contained set of manifest files, templates, and configuration files, all for a particular use. For example, above the sample code references the ntp module, which is a module available from Puppet for managing NTP servers.
Unfortunately, writing your own modules is a very complex task, and I have decided that it is outside of the scope of what I’d like to cover in this class. Feel free to continue following the documentation in the Learning Puppet VM to see more about how to write your own modules.
In many cases, however, there are already modules freely available to perform a variety of common management tasks. So, I highly recommend checking out the available modules on Puppet Forge to see what’s out there. As with many system administration tasks, don’t try to reinvent the wheel if one already exists!
Puppet Agent & Master Demo
Puppet Learning VM Deprecated
As of 2023, the Puppet Learning VM is no longer being maintained. The videos below demonstrate some of the features of Puppet, which can also be done on your Ubuntu VM after installing Puppet Agent. Unfortunately, it is not easily possible to simulate an enterprise Puppet setup without this VM, so I’ll keep these videos up for demonstration purposes. –Russ
Resources
Video Script
In this video, I’ll give a quick demonstration of what a true enterprise Puppet setup might look like. Once again, I’m going to be using the Learning Puppet VM, and this time I’ll be following the agent_run quest to demonstrate these features.
The agent_run quest gives us a client system already set up and ready to go. We can access it using SSH:
ssh learning@agent.puppet.vm
Once we are on that system, we can try to force a Puppet Agent run using the following command:
However, when the Puppet Agent tries to contact the Puppet Master server, it presents an error about client certificates. As a security measure, we must sign the certificate for each agent that tries to contact the server before it will be allowed access. Without this step, any malicious user could gain valuable information about our system configuration by talking with the Puppet Master.
To sign that certificate, we can go back to the Puppet Master by exiting the current SSH session:
Then we can use this command to show all the unsigned certificates on the system:
To sign a certificate, we can use this command:
sudo puppet cert sign agent.puppet.vm
Now, we can reconnect to our agent node:
ssh learning@agent.puppet.vm
And try to run the agent again:
This time, we should be successful. However, we haven’t really told Puppet what we want configured on this system. So, let’s go back to the Puppet Master and do so:
On the Puppet Master, we would like to edit the manifest file used to configure each system. As before, I’ll quickly install Nano to make editing files much simpler, but feel free to use Vim if you would like:
Next, we’ll edit the default site manifest file, which is located at the end of a very long directory path:
nano /etc/puppetlabs/code/environments/production/manifests/site.pp
This is the default site manifest file for this system. On an actual system, you may define different environments and roles for each system, which may alter the path to this file. For this example, we’ll just make a quick edit to show how it can be done.
At the bottom of the file, add the following:
node 'agent.puppet.vm' {
  notify { "Hello Puppet!": }
}
Then, use CTRL+X, then Y, then ENTER to save and close the file.
Finally, return to the agent VM:
ssh learning@agent.puppet.vm
and run Puppet Agent once again:
If done correctly, you should see a notification of "Hello Puppet!" in the output.
This is a very short demo of the power of Puppet’s Master and Agent architecture. The Puppet Learning VM quests go much more in-depth in ways to use Puppet in an organization. I highly encourage you to review that information if you are interested, but it is not required to complete Lab 2.
Hints
YouTube VideoResources
Video Script
Here are a few hints for completing Lab 2, based on the struggles some students have had during previous semesters.
First, let’s talk about passwords. On the Puppet documentation for the user resource type, it notes that on Linux, the password given in the configuration file must already be encrypted. Thankfully, it gives you some hints here on using built-in functions, or functions from the Puppet Labs Standard Library, to calculate the correct encrypted password. You can also use the Sensitive data type to redact the plain-text password from log files. Of course, on Windows, you can only use cleartext passwords.
Next, installing packages on Windows can be quite difficult without using a package management program such as Chocolatey. In the resources section below this video, I’ve included a few links describing the process for installing and managing packages in Windows in detail. In short, you’ll need to be very careful about the title matching the actual DisplayName of the package, as well as the install_options to make them install silently. This may take a bit of trial and error to get it working correctly.
In addition, when you download the installation files for Windows, make sure you get the full installers and not the “stub” installer that just downloads the real installer in the background. Sometimes you have to dig a bit deeper on the vendor’s website to find these. As stated in the assignment sheet, you may also choose to download the files using the download_file Puppet module. Either approach will work.
Another important note: on both Windows and Linux, changes to group membership do not take effect immediately. On Linux, the current user must log-out and log-in to see the change, whereas on Windows a reboot is required in most cases. Because of this, when testing your manifest files, you may find it necessary to apply the manifest, then logout/reboot and apply it again for all resources to be configured correctly. That is fine, provided that it works as intended on the second application.
Finally, you may find that defining permissions in Windows is difficult using the default file resource. You may choose to install the puppetlabs-acl module to configure Windows permissions directly. The resources section below the video includes a link to that module and its documentation as well.
I hope these hints help you successfully complete Lab 2 with minimal frustration. As always, if you have any questions or run into any issues, please post on the course discussion forums before contacting the instructor. Good luck!
Subsections of Core Networking Services
Introduction
YouTube VideoResources
Video Transcript
Welcome to Module 3! In this module, you’ll learn all about how to link your systems up using a variety of networking tools and protocols. First, we’ll discuss the OSI 7-Layer Networking Model and how each layer impacts your system. Then, we’ll look at how to configure various networking options in both Windows and Linux.
Following that, you’ll learn how to configure a DNS and DHCP server using Ubuntu and connect your VMs to those services to make sure they are working properly. Finally, you’ll gain some experience working with some network troubleshooting tools, and you’ll use those to explore a few networking protocols such as HTTP and SNMP.
The lab assignment will instruct you to configure remote access for the VMs you’ve already created, as well as set up a new Linux VM to act as a DNS and DHCP server for your growing enterprise. Finally, you’ll get some hands-on experience with the SNMP protocol and Wireshark while performing some simple network monitoring.
This module helps build the foundation needed for the next module, which will cover setting up centralized directory and authentication systems in both Windows and Ubuntu. A deep understanding of networking is also crucial to later modules dealing with the cloud, as the cloud itself is primarily accessed via a network connection.
Click the next button to continue to the next page, which introduces the OSI 7-Layer Networking Model.
Networking Overview
YouTube VideoResources
Video Transcript
Before we start working with networking on our virtual machines, let’s take a few minutes to discuss some fundamental concepts in computer networking.
For most people, a computer network represents a single entity connecting their personal computer to “The Internet,” and not much thought is given to how it works. In fact, many users believe that there is a direct line from their computer directly to the computer they are talking with. While that view isn’t incorrect, it is definitely incomplete.
A computer network more closely resembles this diagram. Here we have three computers, connected by six different network devices. The devices themselves are also interconnected, giving this network a high level of redundancy. To get from Computer A to Computer B, there are several possible paths that could be taken, such as this one. If, at any time, one of those network links goes down, the network can use a different path to try and reach the desired endpoint.
This is all due to the fact that computer networks use a technology called “packet switching.” Instead of each computer talking directly with one another, as you do when you make a long-distance phone call, the messages sent between two computers can be broken into packets, and then distributed across the network. Each packet is able to make its way from the sender to the receiver, where they are reassembled into the correct message. A great analogy to this process is sending a postcard through the mail. The postal service uses the address on the postcard to get it from you to its destination, but the path taken may change each time. At each stop along the way, the post office determines what the best next step would be, hopefully getting your postcard closer to the correct destination each time. This allows your postcard to get where it needs to go, without anyone ever trying to determine the entire route beforehand.
When we scale this up to the size of the internet, visualized here, it is really easy to see why this is important. By using packet switching, a message can get from one end of the internet to the other without needing to take the time to figure out the entire path beforehand. It can simply move from one router to another, each time taking the most logical step toward its destination.
Modern computer networks use a theoretical model called the Open Systems Interconnection (or OSI) model, commonly referred to as the OSI 7-Layer model, to determine how each part of the network functions. For system administrators, this model is very helpful as it allows us to understand what different parts of the network should be doing, without worrying too much about the underlying technologies making it happen. In this module, we’ll look at each layer of this model in detail.
When an application wants to communicate across a network, it generates a data packet starting at layer 7, the application layer, on the computer it is sending from. Then, the packet moves downward through the layers, with each layer adding a bit of information to the packet. Once it reaches the bottom layer, it will be transmitted to the first hop on the network, usually your home router. The router will then examine the packet to determine where it needs to go. It can do so by peeling back the layers a bit, usually to layer 3, the network layer, which contains the IP address of the destination. Then, it will send the packet on its way to the next hop. Once it is received by the destination computer, it will move the packet back up the layers, with each one peeling off its little bit of information. Finally, the packet will be received by the destination application.
As we discussed, each layer adds a bit of information to the packet as it moves down from the application toward the physical layer. This is called encapsulation. To help understand this, we can return to the postal service analogy from earlier. Let’s say you’d like to send someone a letter. You can write the letter to represent the packet of data you’d like to send, then place it in a fancy envelope with the name of the recipient on it. Then, you’ll place that envelope in a mailing envelope, and put the mailing address of the recipient on the outside. This is effectively encapsulating your letter, with each layer adding information about where it is destined. Then, the postal service might add a barcode to your letter, and place it in a large box with other letters headed to the same destination, further encapsulating it. Once it reaches the destination, each layer will be removed, slowly revealing the letter inside.
In this video, we’ll discuss the bottom two layers of the model, the physical and data link layers. Later videos will discuss the other layers in much more detail.
First, the physical layer. This layer represents the individual bytes being sent across the network, one bit at a time. Typically this is handled directly in hardware, usually by your network interface card or NIC. There are many different ways this can be done, and each type of network has a different way of doing it. For this class, we won’t be concerned with that level of detail. If you hear things such as “100BASE-T” or “1000BASE-T” or “gigabit,” those terms are typically referring to the physical layer.
The next layer up is the data link layer. At this layer, data consists of a frame, which is a standard sized chunk of data to be sent from one computer to another. A packet may fit inside of a frame, or a packet may be further divided into multiple frames, depending on the system and size of the packet. Some common technologies used at this layer are Ethernet, and the variety of 802.11 wireless protocols, among others.
One important concept at this layer is the media access control address, or MAC address. Each physical piece of hardware is assigned a unique, 48-bit identifier on the network. When it is written, it is usually presented as 6 pairs of 2 hexadecimal characters, separated by colons, such as the example seen here. The MAC address is used in the data link layer to identify the many different devices on the network. For most devices, the MAC address is set by the manufacturer of the device, and is usually stored in the hardware itself. It is intended to be permanent, and globally unique in the world. However, many modern systems allow you to change, or “spoof,” the MAC address. This can be really useful when dealing with technologies such as virtualization. However, it also can be used maliciously. By duplicating an existing MAC address on the network, you can essentially convince the router to forward all traffic meant for that system to you, allowing you to perform man-in-the-middle attacks very easily. For most uses, however, you won’t have to do anything to configure MAC addresses on your system, but you’ll want to be aware of what they are and how they are used.
The major networking item handled by the data link layer is routing. Routing is how each node in the network determines the best path to get from one point to another on the network. It is also very important in allowing the network to have redundant connections while preventing loops across those connections. To determine how to route a packet, most networks use some variant of a spanning tree algorithm to build the network map. Let’s see how that works.
To start, here is a simple network. There are 6 network segments, labeled a through f. There are also 7 network bridges connecting those segments, numbered with their ID on the network. To begin, the network bridge with the lowest ID is selected as the root bridge. Next, each bridge determines the least-cost path from itself to the root bridge. The port on that bridge in the direction of the root bridge is labelled as the root port, or RP in this diagram. Then, the shortest path from each network segment toward the root bridge is labelled as the designated port, or DP. Finally, any ports on a bridge not labelled as a root port or designated port are blocked, labelled BP on this diagram.
Now, to get a message from network segment f to the root bridge, it can send a message toward its designated port, on bridge 4. Then, bridge 4 will send the packet out of its root port into segment c, which will pass it along its designated port on bridge 24. The process continues until the packet reaches the root bridge. In this way, any two network segments are able to find a path to the root bridge, which will allow them to communicate.
If, at any time a link is broken, the spanning tree algorithm can be run again to relabel the ports. So, in this instance, segment f would now send a message toward bridge 5, since the link between segment c and bridge 24 is broken.
Finally, the other important concept at layer 2 is the use of virtual local area networks, or VLANs. A VLAN is simply a partition of a network at layer 2, isolating each network. In essence, what you are doing is marking certain ports of a router as part of one network or another, and telling the router to treat them as separate networks. In this way, you can simplify your network design by having systems grouped by function, and not by location.
Here’s a great example. In this instance, we have a building with three floors. Traditionally, each floor would consist of its own network segment, since typically there would be one router per floor. Using VLANs, we can rearrange the network to allow all computers in the engineering department to be on the same network segment, even though they are spread across multiple floors of the building.
In the real world, VLANs are used extensively here at K-State. For example, all of the wireless access points are on the same VLAN, even though they are spread across campus. The same goes for any credit card terminals, since they must be protected from malicious users attempting to listen for credit card numbers on the network.
Most enterprise-level network routers are able to create VLANs, but many home routers do not support that feature. Since we won’t be working with very large networks in this course, we won’t work with VLANs directly. However, they are very important to understand, since most enterprises make use of them.
In the following videos, we’ll discuss the next layers of the OSI model in more detail.
Network Layer
YouTube VideoResources
Video Transcript
In this video, I’ll discuss how the network layer of the 7-layer OSI model works.
The network layer is used to route packets from one host to another via a network. Typically, most modern networks today use the Internet Protocol or IP to perform this task, though there are other protocols available. In addition to computers, most routers also perform tasks at layer 3, since they need to be able to read and work with the address information contained in most network packets.
For most of the internet’s history, the network layer used the Internet Protocol version 4, commonly known as IPv4. This slide gives the packet structure of IPv4, showing the information it adds to each packet that goes through that layer. The most important information is the source and destination IP address, giving the unique address on the network for the sender and intended recipient of this packet of information. Let’s take a closer look at IP addresses, as they are a very important part of understanding how a computer network works.
For IPv4, an IP address consists of a 32-bit binary number, giving that host’s unique identifier on the network. No two computers can share the same IP address on the same network. In most cases, the IP address is represented in Dot-Decimal notation.
Here’s an example of that notation. Here, the binary number 10101100 is represented as the decimal number 172 in the first part of the IP address. Each block of 8 bits, or one byte, is represented by the corresponding decimal number, separated by a dot or period. This makes the address much easier to remember, almost like a phone number.
In fact, on the early days of the internet, that is exactly how it was set up. The early internet used a form of routing called “classful networking” to determine how IP addresses were divided. The type of network was determined by the first 4 bits of the IP address, much like an area code in modern phone numbers. There were several classes of networks, each of various sizes.
When an organization wanted to connect to the internet, they would register to receive a block of network addresses for their use. For a large network, such as IBM, they may receive an entire Class A network, whereas smaller organizations would receive a smaller Class B or Class C network. So, for a Class A network, the IP address would consist of the prefix 0, followed by 7 bits identifying the network. Then, the remaining 24 bits would identify the host on that network, usually assigned by the network owner. This helped standardize which parts of the IP address denoted the owner of the network, and which part denoted the unique computer on that network. For example, in this system, K-State would have the Class B network with the prefix 129.130.
You can even see some of this structure in this map of the IPv4 internet address space created by XKCD from several years ago. Many of the low numbered IP address blocks are assigned to a specific organization, representing the Class A networks those organizations had in the early days of the internet.
However, as the internet grew larger, this proved to be very inefficient. For example, many organizations did not use up all of their IP address space, leading to a large number of addresses that were unused yet unavailable for others to use. So, in the early 1990s, the internet switched to a new method of addressing, called Classless Inter-Domain Routing, or CIDR, sometimes pronounced as “cider.” Instead of dividing the IPv4 address space into equal sized chunks, they introduced the concept of a subnet, allowing the address space to be divided in many more flexible ways.
Let’s take a look at an example. Here, we are given the IP address 192.168.2.130, with the accompanying subnet mask of 255.255.255.0. To determine which part of the IP address is the network part, simply look at the bits of the IP address that correspond to the leading 1s in the subnet mask. If you are familiar with binary operations, you are simply performing the binary and operation on the IP and subnet to find the network part. Similarly, for the host part, look at the part of the IP address that corresponds to the 0s in the subnet mask. This would be equivalent to performing the binary and operation on the IP address and the inverse of the subnet mask.
Here’s yet another example. Here, you can see that the subnet mask has changed, therefore the network and host portion of the IP address is different. In this way, organizations can choose how to divide up their allocated address space to better fit their needs.
To help make this a bit simpler, you can use a special form of notation called CIDR Notation to describe networks. In CIDR notation, the network is denoted by its base IP address, followed by a slash and the number of 1s in the subnet mask. So, for the first example on the previous slide, the CIDR notation of that network would be 192.168.2.0/24, since the network starts at IP address 192.168.2.0 and the subnet mask of 255.255.255.0 contains 24 leading 1s. Pretty simple, right?
With CIDR, an IP address can be subdivided many times at different levels. For example, several years ago the website freesoft.org had this IP address. Looking at the routing structure of the internet, you would find that the first part of that IP address was assigned to MCI, a large internet service provider. They then subdivided their network among a variety of organizations, one of those being Automation Research Systems, who received a smaller block of IP addresses from MCI. They further subdivided their own addresses, and eventually one of those addresses was used by freesoft.org.
The groups who control the internet, the Internet Engineering Task Force (IETF) and the Internet Assigned Numbers Authority (IANA), have also marked several IP address ranges as reserved for specific uses. This slide lists some of the more important ranges. First, they have reserved three major segments for local area networks, listed at the top of this slide. Many of you are probably familiar with the third network segment, starting with 192.168, as that is typically used by home routers. If you are using the K-State wireless network, you may notice that your IP address begins with a 10, which is part of the first segment listed here. There are also three other reserved segments for various uses. We’ll discuss a couple of them in more detail later in this module.
However, since many local networks may be using the same IP addresses, we must make sure that those addresses are not used on the global internet itself. To accomplish this, most home routers today perform a service called Network Address Translation, or NAT. Anytime a computer on the internal network tries to make a connection with a computer outside, the NAT router will replace the source IP address in the packet with its own IP address, while keeping track of the original internal IP address. Then, when it receives a response, it will update the incoming packet’s destination IP address with the original internal IP of the sender. This allows multiple computers to share the same external IP address on the internet. In addition, by default NAT routers will block any incoming packets that don’t have a corresponding outgoing request, acting as a very powerful firewall for your internal network. If you have ever hosted a server on your home network, you are probably familiar with the practice of port-forwarding on your router, which adds and entry to your router’s NAT table telling it where to send packets it receives.
For many years, IPv4 worked well on the internet. However, as internet access became more common, they ran into a problem. IPv4 only specified internet addresses which were 32-bits in length. That means that there are only about 4.2 billion unique IPv4 addresses available. With a world population over 7 billion, this very quickly became a limiting factor. So, as early as the 1990s, they began work on a new version of the protocol, called IPv6. IPv6 uses 128-bit IP addresses, allowing for 340 undecillion unique addresses. According to a calculation posted online, assuming that there was a planet with 7 billion people on it for each and every star in each and every galaxy in the known universe, you could assign each of those people 10 unique IPv6 addresses and still have enough to do it again for 10,000 more universes. Source
IPv6 uses a very similar packet structure to IPv4, with things simplified just a bit. Also, you’ll note here that the source and destination addresses are 4 times as large, making room for the larger address space.
IPv6 addresses, therefore, are quite a bit different. They are represented digitally as 128-bit binary numbers, but typically we write them as 8 groups of 4 hexadecimal digits, sometimes referred to as a “hextet,” separated by colons. Since IPv6 addresses are very long, we’ve adapted a couple of ways to simplify writing them.
For example, consider this IPv6 address. To simplify it, first you may omit any leading zeros in a block. Then, you can combine consecutive blocks of 0 together, replacing them with a double colon. However, you may only do that step once per address, as two instances of it could make the IP address ambiguous. Finally, we can remove all spaces to get the final address, shown in the last line.
IPv6 addresses use a variety of different methods to denote which part of the address is the network and host part. In essence, this is somewhat similar to the old classful routing of IPv4 addresses. Each prefix on an IPv6 address indicates a different type of address, and therefore a different parsing method. This slide gives a few of the most common prefixes you might see.
For this course, I won’t go too deep into IPv6 routing, as most organizations still primarily use IPv4 internally. In addition, in many cases the network hardware automatically handles converting between IPv6 and IPv4 addresses, so you’ll spend very little time configuring IPv6 unless you are working for an ISP or very large organization.
In the next video, we’ll continue this discussion on the transport layer.
Transport Layer
YouTube VideoResources
Video Transcript
Now, let’s take a look at layer 4 of the OSI model - the transport layer.
The transport layer is responsible for facilitating host-to-host communication between applications on two different hosts. Depending on the protocol used, it may also offer services such as reliability, flow control, sustained connections, and more. When writing a networked application, your application typically interfaces with the transport layer, creating a particular type of network socket and providing the details for creating the connection. On most computer systems today, we use either the TCP or UDP protocol at this layer, though many others exist for various uses.
First, let’s look at the Transmission Control Protocol, or TCP. It was developed in the 1980s, and is really the protocol responsible for unifying the various worldwide networks into the internet we know today. TCP is a stateful protocol, meaning that it is able to maintain information about the connection between packets sent and received. It also provides many services to make it a reliable connection, from acknowledging received packets, resending missed packets, and rearranging packets received out of order, so the application gets the data in the order it was intended. Because of this, we refer to TCP as a connection-oriented protocol, since it creates a sustained connection between two applications running on two hosts on the network.
Here is a simplified version of the state diagram for TCP, showing the process for establishing and closing a connection. While we won’t focus on this process in this course, you’ll see packets for some of these states a bit later when we use Wireshark to collect network packets.
Since TCP is a stateful protocol, it includes several pieces of information in its packet structure. The two most notable parts are the sequence and acknowledgement fields, which allow TCP to reorganize packets into the correct order, resend missing packets, and acknowledge packets that have been successfully received. In addition, you’ll notice that it lists a source and destination port, which we’ll cover shortly.
The other most commonly used transport layer protocol is the User Datagram Protocol, or UDP. Unlike TCP, UDP is a stateless, unreliable protocol. Basically, when you send a packet using UDP, you are given no guarantees that it will arrive, or no acknowledgement when it does. In addition, each packet sent via UDP is independent, so there is no sustained connection between two hosts. While that may seem to make UDP completely useless, it actually has several unique uses. For example, the domain name system or DNS uses UDP, since each DNS lookup is essentially a single packet request and response. If a request is sent and no response is received quickly enough, it can simply resend another request, without the extra overhead of maintaining any state for the previous connection. Similarly, UDP is also helpful for streaming media. A single lost packet in a video stream is not going to cause much of an issue, and by the time it could be resent, it is already too old to be of use. So, by using UDP, the stream can have a much lower overhead, and as long as enough packets are received, the stream can be displayed.
Since UDP is stateless, the packet structure is also much simpler. It really just includes a source and destination port, as well as a length and checksum field to help make sure the packet itself is correct.
So, to quickly compare TCP and UDP, TCP is great for long, reliable connections between two hosts, whereas UDP is great for short bursts of data which could be lost in transit without affecting the application itself.
One great way to remember these is through the two worst jokes in the history of Computer Science.
Want to hear a TCP joke? Well, I could tell it to you, but I’d have to keep repeating it until I was sure you got it.
Want to hear a UDP joke? Well, I could tell it to you, but I’d never be sure if you got it or not.
See the difference?
Both TCP and UDP, as well as many other transport layer protocols, use ports to determine which packets are destined for each application. A port is simply a virtual connection point on a host, usually managed by the networking stack inside the operating system. Each port is denoted by a 16-bit number, and typically each port can only be used by one application at a time. You can think of the ports like the name on the envelope from our previous example. Since multiple people could share the same address, you have to look at the name on the envelope to determine which person should open it. Similarly, since many programs can be running on the same computer and share the same IP, you must look at the port to figure out which program should receive the packet.
There are several ports that are considered “well known” ports, meaning that they have a specific use defined. While there is no rule that says you have to adhere to these ports, and in some cases it is advantageous to ignore them, these “well known” ports are what allows us to communicate easily over the internet. When an application establishes an outgoing connection, it will be assigned a high-numbered “ephemeral” port to use as the source port, whereas the destination port is typically a “well known” port for the application or service it wishes to communicate with. In that way, there won’t be any conflicts between a web browser and a web server operating on the same host. If they both tried to use port 80, it would be a problem!
When ports are written with IP addresses, they are typically added at the end following a colon. So, in this example, we are referencing port 1234 on the computer with IP address 192.168.0.1.
There are over 1000 well known ports that have common usage. Here are just a few of them, along with the associated application or protocol. We’ll look more closely at several of these protocols later in this module.
So, to summarize the OSI 7-layer network model, here’s the overall view of the postal service analogy we’ve been using. At layers 5-7, you would write a letter to send to someone. At layer 4, the transport layer, you’d add the name of the person you’d like to send it to, as well as your own name. Then, at layer 3, the network layer would add the to and from mailing address. Layer 2 is the post office, which would take your envelope and add it to a box. Then, at the physical layer, a truck would transport the box containing your letter along its path. At several stops, the letter may be inspected and placed in different boxes, similar to how a router would move packets between networks. Finally, at the receiving end, each layer is peeled back, until the final letter is available to the intended recipient.
In networking terms, the application creates a packet at layers 5 - 7. Then, the transport layer adds the port, and the network layer adds the IP addresses to the packet. Then, the data link layer puts the packet into one or more frames, and the physical layer transmits those frames between nodes on the network. At some points, the router will look at the addresses from the third layer to help with routing the packet along its path. Finally, once it is received at the intended recipient, the layers can be removed until the packet is presented to the application.
I hope these videos help you better understand how the OSI 7-layer network model works. Next, we’ll discuss how to use these concepts to connect your systems to a network, as well as how to troubleshoot things when those connections don’t work.
Assignment
Lab 3 - Core Networking Services
Instructions
Create three virtual machines meeting the specifications given below. The best way to accomplish this is to treat this assignment like a checklist and check things off as you complete them.
If you have any questions about these items or are unsure what they mean, please contact the instructor. Remember that part of being a system administrator (and a software developer in general) is working within vague specifications to provide what your client is requesting, so eliciting additional information is a very necessary skill.
Note
To be more blunt - this specification may be purposefully designed to be vague, and it is your responsibility to ask questions about any vagaries you find. Once you begin the grading process, you cannot go back and change things, so be sure that your machines meet the expected specification regardless of what is written here. –Russ
Also, to complete many of these items, you may need to refer to additional materials and references not included in this document. System administrators must learn how to make use of available resources, so this is a good first step toward that. Of course, there’s always Google!
Time Expectation
This lab may take anywhere from 1 - 6 hours to complete, depending on your previous experience working with these tools and the speed of the hardware you are using. Installing virtual machines and operating systems is very time-consuming the first time through the process, but it will be much more familiar by the end of this course.
Task 0: Create 3 VMs
For this lab, you’ll need to have ONE Windows 11 VM, and TWO Ubuntu 24.04 VMs available. You may reuse existing VMs from Lab 1 or Lab 2. In either case, they should have the full expected configuration applied, either manually as in Lab 1 or via the Puppet Manifest files created for Lab 2.
For the second Ubuntu VM, you may either quickly install and configure a new VM from scratch following the Lab 1 guide or using the Puppet Manifest from Lab 2, or you may choose to create a copy of one of your existing Ubuntu VMs. If you choose to copy one, follow these steps:
- Completely shut down the VM - do not suspend it.
- Close VMware Workstation.
- Make a copy of the entire folder containing the VM.
- Open the new VM in VMware Workstation (look for the .VMX file in the copied folder).
- When prompted, select “I copied it” to reinitialize the network interface. THIS IS IMPORTANT!
- Boot the new VM, and change the hostname to
cis527s-<your eID>.- Setting the Hostname on Ubuntu 24.04 from LinuxConfig.org
Warning
If you do not follow these instructions carefully, the two VMs may have conflicts on the network since they’ll have identical networking hardware and names, making this lab much more difficult or impossible to complete. You have been warned! –Russ
Clearly label your original Ubuntu VM as CLIENT and the new Ubuntu VM as SERVER in VMware Workstation so you know which is which. For this lab, we’ll mostly be using the SERVER VM, but will use the CLIENT VM for some testing and as part of the SNMP example in Task 5.
Note
VMware Fusion (Mac) Users - Before progressing any further, I recommend creating a new NAT virtual network configuration and moving all of your VMs to that network, instead of the default “Share with my Mac” (vmnet8) network. In this lab, you’ll need to disable DHCP on the network you are using, which is very difficult to do on the default networks. You can find relevant instructions in Add a NAT Configuration and Connect and Set Up the Network Adapter in the VMware Fusion 13 Documentation.
Task 1: Remote Connections
PART A: On your Windows 11 VM, activate the Remote Desktop feature to allow remote access.
- Both the
cis527 and AdminAccount accounts should be able to access the system remotely, as well as the default system Administrator account. - In addition, change the port used by Remote Desktop to be 34567.
Tip
You’ll need to edit the registry and reboot the computer to accomplish this task. –Russ
- You’ll also need to make sure appropriate firewall rules are in place to accept these incoming connections, and ensure the firewall is properly enabled.
- You can test your connection from your Ubuntu Client VM using the Remmina program.
PART B: On your Ubuntu 24.04 VM labelled SERVER, install and activate the OpenSSH Server for remote access.
- Both the
cis527 and adminaccount accounts should be able to access the system remotely. - In addition, change the port used by the SSH server to 23456.
Tip
In the SSH configuration file, the entries starting with a # are comments. Typically the default values for each setting are included in the configuration file but commented out. In Ubuntu 24.04, you need to fully reload the daemon and the SSH socket for some changes to take effect - read the comment directly above the port setting line in the configuration file! –Russ
- You’ll also need to make sure the appropriate firewall rules are in place to accept these incoming connections, and ensure the firewall is properly enabled.
- You can test your connection from your Windows VM using the
ssh command in PowerShell, or from the Ubuntu 24.04 VM labelled CLIENT using the ssh command.
Tip
See the appropriate pages in the Extras module for more information about WSL and SSH. –Russ
Resources
Task 2: Ubuntu Static IP Address
On your Ubuntu 24.04 VM labelled SERVER, set up a static IP address. The host part of the IP address should end in .41, and the network part should remain the same as the one automatically assigned by VMware.
Note
So, if your VMware is configured to give IP addresses in the 192.168.138.0/24 network, you’ll set the computer to use the 192.168.138.41 address.
You’ll need to set the following settings correctly:
- IP Address
- Subnet Mask
- Default Gateway
Note
VMware typically uses host 2 as its internal router to avoid conflicts with home routers, which are typically on host 1. So, on the 192.168.138.0/24 network, the default gateway would usually be 192.168.138.2. When in doubt, you may want to record these settings on one of your working VMs before changing them.
- DNS Servers. Use one of the following options:
- Your Default Gateway Address (easiest). VMware’s internal router also acts as a DNS resolver for you, just like a home router would
- Off Campus: OpenDNS (
208.67.222.222 and 208.67.220.220) or Google DNS (8.8.8.8 and 8.8.4.4) - On Campus: K-State’s DNS Servers (
10.130.30.52 and 10.130.30.53)
Tip
I personally recommend using the graphical tools in Ubuntu to configure a static IP address. There are many resources online that direct you to use netplan or edit configuration files manually, but I’ve found that those methods aren’t as simple and many times lead to an unusable system if done incorrectly. In any case, making a snapshot before this step is recommended, in case you have issues. –Russ
Resources
Task 3: DNS Server
For this step, install the bind9 package on the Ubuntu 24.04 VM labelled SERVER, and configure it to act as a primary master and caching nameserver for your network. You’ll need to include the configuration for both types of uses in your config file. In addition, you’ll need to configure both the zone file and reverse zone file, as well as forwarders.
Tip
These instructions were built based on the How To Configure BIND as a Private Network DNS Server on Ubuntu 22.04 guide from DigitalOcean. In general, you can follow the first part of that guide to configure a Primary DNS Server, making the necessary substitutions listed below. The guide works for Ubuntu 24.04 as well. –Russ
In your configuration, include the following items:
All files:
- Since you are not creating a Secondary DNS Server, you can leave out any
allow-transfer entries from all configuration files.
named.conf.options file:
- Create an ACL called
cis527 that includes your entire VM network in CIDR notation. Do not list individual IP addresses. - Enable recursion, and allow all computers in the
cis527 ACL to perform recursive queries. - Configure DNS forwarding, using one of the options given above in Task 2. I recommend using the same option as above, since you have (hopefully) already confirmed that it works for your situation.
named.conf.local file:
- Create a zone file and reverse zone file, stored in
/etc/bind/zones.
Note
The DigitalOcean guide uses a /16 subnet of 10.128.0.0/16, and includes the 10.128 portion in the reverse zone file name and configuration. For your VM network, you are most likely using a /24 subnet, such as 192.168.40.0/24, so you can include the 192.168.40 portion in your zone file name and configuration. In that case, the zone name would be 40.168.192.in-addr.arpa, and the file could be named accordingly. Similarly, in the reverse zone file itself, you would only need to include the last segment of the IP address for each PTR record, instead of the last two. Either way is correct.
- List those files by path in this file in the correct zone definitions.
Zone files:
- Use
<your eID>.cis527.org as your fully qualified domain name (FQDN) in your configuration file. (Example: russfeld.cis527.org)
Domain Ownership
For full disclosure, I own the cis527.org domain name, so you don’t have to worry about any configurations causing issues with an actual website.–Russ
- Use
ns.<your eID>.cis527.org as the name of your authoritative nameserver. You can use admin.<your eID>.cis527.org for the contact email address.
Note
Since the at symbol @ has other uses in the DNS Zone file, the email address uses a period . instead. So, the email address admin@<your eID>.cis527.org would be written as admin.<your eID>.cis527.org.
- Don’t forget to increment the
serial field in the SOA record each time you edit the file. Otherwise your changes may not take effect. - Create an NS record for
ns.<your eID>.cis527.org.
Tip
HINT: The DigitalOcean guide does not include an at symbol @ at the beginning of that record, but I’ve found that sometimes it is necessary to include it in order to make the named-checkzone command happy. See a related post on ServerFault for additional ways to solve that common error.–Russ
Forward Zone File:
- Create an A record for
ns.<your eID>.cis527.org that points to your Ubuntu 24.04 VM labelled SERVER using the IP address in your network ending in 41 as described above. - Create an A record for
ad.<your eID>.cis527.org that points to the IP address in your network ending in 42. (You’ll use that IP address in the next assignment for your Windows server.) This record will be for the Active Directory server in Lab 4 - Create a CNAME record for
ubuntu.<your eID>.cis527.org that redirects to ns.<your eID>.cis527.org. - Create a CNAME record for
ldap.<your eID>.cis527.org that redirects to ns.<your eID>.cis527.org. - Create a CNAME record for
windows.<your eID>.cis527.org that redirects to ad.<your eID>.cis527.org.
Reverse Zone File:
- Create a PTR record for the IP address ending in
41 that points to ns.<your eID>.cis527.org. - Create a PTR record for the IP address ending in
42 that points to ad.<your eID>.cis527.org.
Tip
HINT: The periods, semicolons, and whitespace in the DNS configuration files are very important! Be very careful about formatting, including the trailing periods after full DNS names such as ad.<your eID>.cis527.org.. –Russ
Once you are done, I recommend checking your configuration using the named-checkconf and named-checkzone commands. Note that the second argument to the named-checkzone command is the full path to your zone file, so you may need to include the file path and not just the name of the file. Example: named-checkzone russfeld.cis527.org /etc/bind/zones/db.russfeld.cis527.org
Of course, you may need to update your firewall configuration to allow incoming DNS requests to this system! If your firewall is disabled and/or not configured, there will be a deduction of up to 10% of the total points on this lab
To test your DNS server, you can set a static DNS address on either your Windows or Ubuntu VM labelled CLIENT, and use the dig or nslookup commands to verify that each DNS name and IP address is resolved properly.
Note
See the Bind Troubleshooting page for some helpful screenshots of using dig to debug DNS server configuration.
Warning
As of 2023, the DNS servers on campus do not seem to support DNSSEC, which may cause issues with forwarders. If you are connected to the campus network, I recommend changing the setting in named.conf.options to dnssec-validation no; to disable DNSSEC validation - that seems to resolve the issue.
Resources
Task 4: DHCP Server
Warning
READ THIS CAREFULLY
Make ABSOLUTELY sure that the VMware virtual network you are using is not a “Bridged” or “Shared” network before continuing. It MUST be using “NAT”. You can check by going to Edit > Virtual Network Editor in VMware Workstation or VMware Fusion > Preferences > Network in VMware Fusion and looking for the settings of the network each of your VMs is configured to use.
Having your network configured incorrectly while performing this step is a great way to break the network your host computer is currently connected to, and in a worst case scenario will earn you a visit from K-State’s IT staff (and they won’t be happy)! –Russ
Next, install the isc-dhcp-server package on the Ubuntu 24.04 VM labelled SERVER, and configure it to act as a DHCP server for your internal VM network.
In your configuration, include the following items:
In general, the network settings used by this DHCP server should match those used by VMware’s internal router.
- You can also look at the network settings received by your Windows 11 VM, which at this point are from VMware’s internal router.
Use <your eID>.cis527.org as the domain name. (Example: russfeld.cis527.org)
For the dynamic IP range, use IPs ending in .100-.250 in your network.
For DNS servers, enter the IP address of your Ubuntu 24.04 VM labelled SERVER ending in .41. This will direct all DHCP clients to use the DNS server configured in Task 3.
- Do not use the domain name of your DNS server in your DHCP config file. While it can work, it depends on your DNS server being properly configured in Task 3.
- Alternatively, for testing if your DNS server is not working properly, you can use one of the other DNS options given above in Task 2. However, you must be using the DNS server from Task 3 when graded for full credit.
Tip
A working solution can be fewer than 20 lines of actual settings (not including comments) in the settings file. If you find that your configuration is becoming much longer than that, you are probably making it too difficult and complex. –Russ
Of course, you may need to update your firewall configuration to allow incoming DHCP requests to this system! If your firewall is disabled and/or not configured, there will be a deduction of up to 10% of the total points on this lab
Once your DHCP server is installed, configured, and running properly, turn off the DHCP server in VMware. Go to Edit > Virtual Network Editor in VMware Workstation or VMware Fusion > Preferences > Network in VMware Fusion and look for the NAT network you are using. There should be an option to disable the DHCP server for that network there.
Once that is complete, you can test the DHCP server using the Windows VM. To do so, restart your Windows VM so it will completely forget any current DHCP settings. When it reboots, if everything works correctly, it should get an IP address and network information from your DHCP server configured in this step. It should also be able to access the internet with those settings. An easy way to check is to run the command ipconfig in PowerShell and look for the DNS suffix of <your eID>.cis527.org in the output.
Resources
Task 5: SNMP Daemon
Install an SNMP Daemon on the Ubuntu 24.04 VM labelled SERVER, and connect to it from your Ubuntu 24.04 VM labelled CLIENT. The DigitalOcean and Kifarunix tutorials linked below are a very good resource to follow for this part of the assignment. In that tutorial, the agent server will be your SERVER VM, and the manager server will be your CLIENT VM.
- In the tutorial, configure a user
cis527 using the password cis527_snmp for both the authentication and encryption passphrases.- This user should not be created in the
snmpd.conf file, and any “bootstrap” users should be removed.
- The DigitalOcean tutorial includes information for modifying the configuration file to make SNMP listen on all interfaces.
- The DigitalOcean method for creating users does not work. Use the method in the Kifarunix tutorial for configuring SNMP version 3 users.
- The DigitalOcean tutorial includes information for downloading the MIBS and configuring a
~/.snmp/snmp.conf file that can store your user information.
Of course, you may need to update your firewall configuration to allow incoming SNMP requests to this system! If your firewall is disabled and/or not configured, there will be a deduction of up to 10% of the total points on this lab
Then, perform the following quick activity:
- While logged into the CLIENT VM, use the SNMP tools to query the number of ICMP Echos (pings) that have been received by the SERVER VM. Take a screenshot with the command used and the result clearly highlighted in the terminal output.
- You may use either
snmpget and the OID number or name, or use snmpwalk and grep to find the requested information.
- Sent at least 10 ICMP Echos (pings) from the CLIENT VM to the SERVER VM and make sure they were properly received. Take a screenshot of the output, clearly showing how many pings were sent.
- If they weren’t received, check your firewall settings.
- Once again, use the SNMP tools from the CLIENT VM to query the number of ICMP Echos (pings) that have been received by the SERVER VM. It should clearly show that it has increased by the number sent during the previous command. Take a screenshot with the command used and the result clearly highlighted in the terminal output. It should match the expected output based on the previous two screenshots.
Note
You will present the screenshots as proof that you performed this activity for grading. You may preform all three commands in a single screenshot if desired. See this example for an idea of what the output should look like. –Russ
Resources
Task 6: Wireshark
Install Wireshark on the Ubuntu 24.04 VM labelled SERVER.
Warning
Firefox recently released an update the enables DNS over HTTPS by default. So, in order to use Firefox to request DNS packets that can be captured, you’ll need to disable DNS over HTTPS in Firefox. Alternatively, you can use dig to query DNS and capture the desired packets - this seems to be much easier to replicate easily.
Then, using Wireshark, create screenshots showing that you captured and can show the packet content of each of the following types of packets:
- A DNS standard query for an A record for
people.cs.ksu.edu - A DNS standard query response for
people.cs.ksu.edu- HINT: It should respond with a CNAME record pointing to
invicta.cs.ksu.edu
- A DNS standard query response for a PTR record for
208.67.222.222 (it will look like 222.222.67.208.in-addr.arpa)- HINT: It should respond with a PTR record for
resolver1.opendns.com
- An ICMP Echo (ping) request
- An encrypted SNMP packet showing
cis527 or bootstrap as the username (look for the msgUserName field)- HINT: Use the commands from Task 5
- A DHCP Offer packet showing the Domain Name of
<your ID>.cis527.org- HINT: Reboot one of your other VMs to force it to request a new IP address, or use the
ipconfig (Windows) or dhclient (Ubuntu) commands to renew the IP address
- An HTTP 301: Moved Permanently or HTTP 302: Found redirect response
- HINT: Clear the cache in your web browser, then navigate to
http://people.cs.ksu.edu/~sgsax (without a trailing slash). It should redirect to http://people.cs.ksu.edu/~sgsax/ (with a trailing slash).
- An HTTP Basic Authentication request, clearly showing the username and password in plaintext (expand the entries in the middle pane to find it).
- HINT: Visit
http://httpbin.org/basic-auth/testuser/testpass and use testuser | testpass to log in
Tip
You’ll present those 8 screenshots as part of the grading process for this lab, so I recommend storing them on the desktop of that VM so they are easy to find. Make sure your screenshot CLEARLY shows the data requested. Often you may have to expand sections of the packet analysis (lower-left pane) to find the requested information. –Russ
Resources
Task 7: Make Snapshots
In each of the virtual machines created above, create a snapshot labelled “Lab 3 Submit” before you submit the assignment. The grading process may require making changes to the VMs, so this gives you a restore point before grading starts.
Task 8: Schedule A Grading Time
Contact the instructor and schedule a time for interactive grading. You may continue with the next module once grading has been completed.
Windows Network Configuration
YouTube VideoResources
Video Transcript
Now, let’s look at how to manage and configure a network connection in Windows 10.
To begin, I’m working in the Windows 10 VM I created for Lab 2, with the Puppet Manifest files applied.
First, let’s take a quick look at how our networking is configured in VMware. This will be very important as you complete Lab 3. To view the virtual networks in VMware Workstation, click the Edit menu, then choose Virtual Network Editor. On VMware Fusion, you can find this by going to the VMware Fusion menu, selecting Preferences, then the Network option.
Here, we can see the virtual networks available on your system. Right now, there are two networks on my system, one “Host-only” network, and one “NAT” network. For this lab, we’ll be working with the “NAT” network, so let’s select it.
First, let’s look at the network type, listed here. For this module, it is very important to confirm that the network type is set to “NAT” and not “Bridged.” If you use a “Bridged” network for this lab, you could easily break the network that your host computer is connected to, and in the worst case earn yourself a visit from K-State IT staff as they try to diagnose the problem. So, make sure it is set correctly here!
We can also see lots of information about the network’s settings. For example, we can see the subnet IP here, and the subnet mask here. By clicking on the NAT Settings button, I can also find the gateway IP. The gateway IP is the IP of the router, which tells your system where to direct outgoing internet traffic. You’ll want to make a note of all three of those, as we’ll need them later to set a static IP in Windows. You can also click the DHCP Settings button to view the settings for the DHCP server, including the range of IP addresses it uses, which can also be very helpful. If you want to change any of these settings, you can click the Change Settings button at the bottom. You’ll need Administrator privileges to make any changes.
Next, let’s confirm that our VM is using that virtual network. To do so, click the VM menu, then select Settings, then choose the Network Adapter. Make sure the network connection is set to “NAT” here as well.
Ok, now let’s look at the network configuration in Windows 10. First, you can see information about the available network adapters in the Device Manager. You can access that by right-clicking on the Start button and choosing Device Manager from the list. On that window, expand the section for Network Adapters. Here, you’ll see that this VM has a single network adapter, as well as a couple of Bluetooth devices available.
Next, let’s look at the network settings for our network adapter. You can find these by right-clicking the Start button once again, and choosing Network Connections, or by right-clicking the Network icon in the notification area and selecting Open Network & Internet Settings. This will bring you to the Network Status window in the Settings app. While you can find quite a bit of information about your network settings here, I’ve found it is much easier to click the option below for Change adapter options to get to the classic Network Connections menu on the Control Panel.
Here, I can see all of the available network adapters on my system, as well as a bit of information about each one. Let’s right-click on the Ethernet0 adapter, and select Status. This window will show the current connection status, as well as some basic statistics. You can click the Details button to view even more information, such as your IP address, MAC address, and more.
If you’d like to set a static IP address for this system, you’ll need to click the Properties button at the bottom, then select the Internet Protocol Version 4 (TCP/IPv4) option, and finally Properties below that. On this window, you can set a static IP address for your system. To do so, I’ll have to enter an IP address, subnet mask, and default gateway. For the IP address, I’ll just make sure that it isn’t in use on the network by picking one outside the DHCP range used by VMware. The subnet mask and default gateway should be the same as the ones you found in the VMware network settings earlier. Finally, we’ll need to enter some DNS servers. Typically, you can just enter the same IP address as your default gateway, as most routers also can act as DNS resolvers as well. You can also use other DNS servers, such as those from OpenDNS or Google, as described in the Lab 3 assignment. Finally, I’ll click OK to save and apply those settings. If everything is successful, I should still be able to access the internet. Let’s open a web browser, just to be sure. For this lab assignment, you won’t be setting a static IP on Windows 10, but you will use this process in the next module when you configure your first Windows server. The process is very similar.
Windows includes a number of tools to help troubleshoot and diagnose issues with your network connection. First off, the network troubleshooter available in the Network & Internet Settings menu is pretty good, and can help you figure out many simple issues with your network connection.
Beyond that, there are a few command-line tools that you should be familiar with on Windows. So, let’s open a PowerShell window. The first command to use is ipconfig. This tool has been available in Windows since the earliest versions, and it can give you quite a bit of information about your network connection. Running it without any additional options will give you your IP address, subnet mask, default gateway, and other basic information for each of your network adapters.
You can also run ipconfig /all to see all the available information about all network adapters on your system. It gives quite a bit more information, including your MAC address and DHCP lease information.
That command also allows you to manage your DHCP client. For example, you can use ipconfig /release to release all DHCP addresses, then ipconfig /renew to request a new DHCP address. This is very handy if you have recently reset or reconfigured your network router, as you can tell Windows to just request a new IP address without having to reboot the system.
It can also help manage your DNS cache. Windows maintains a cache of all DNS requests and the responses you receive, so that multiple requests for the same DNS name can be quickly resolved without needing to query again. You can use ipconfig /displaydns to view the cached DNS entries, and ipconfig /flushdns to clear the cache. This is very handy when you are trying to diagnose issues with DNS on your system. Of course, DNS caching could create a privacy concern, as the DNS cache will contain information about all websites you’ve visited on this system. In fact, some anti-cheat programs for online video games have been found to check the Windows DNS cache, looking for entries from programs known to interfere with their games.
Finally, Windows includes a couple of really handy troubleshooting tools. First, you can use the ping command to send a simple message to any server on the internet. It uses the Internet Control Message Protocol, or ICMP, which allows it to send a simple “echo” request to the server. Most servers will respond to that request, allowing you to confirm that you are able to communicate with it properly across the internet. While that may seem like a very simple tool, it can actually be used in very powerful ways to diagnose a troublesome internet connection. Similarly, the tracert command will use a series of ICMP “echo” messages to trace the route across the internet from your computer to any other system. See the video on troubleshooting in this module for more information on how to troubleshoot connections using these tools.
The Windows Sysinternals suite of tools also includes one helpful tool, called TCPView, which allows you to view all of the active TCP connections on your system. This will show all open ports as well as any established connections. As you are working with networked programs, you can use TCPView to get a good idea of what connections are happening on your system. It can also help you diagnose some problems with programs and your firewall configuration. You can also use the netstat command in PowerShell to find similar information, but I prefer this graphical view.
That’s all for configuring Windows networking. Stay tuned for information about configuring networking in Ubuntu!
Ubuntu Network Configuration
Note
This video was recorded on Ubuntu 18.04, but nothing significant has changed in Ubuntu 24.04. –Russ
Resources
Video Transcript
Now, let’s look at how to manage and configure a network connection in Ubuntu 18.04.
To begin, I’m working in the Ubuntu VM I created for Lab 2, with the Puppet Manifest files applied.
First, let’s take a quick look at how our networking is configured in VMware. This information is also covered in the video on Windows networking, but it is relevant here as well, since this will be very important as you complete Lab 3. To view the virtual networks in VMware Workstation, click the Edit menu, then choose Virtual Network Editor. On VMware Fusion, you can find this by going to the VMware Fusion menu, selecting Preferences, then the Network option.
Here, we can see the virtual networks available on your system. Right now, there are two networks on my system, one “Host-only” network, and one “NAT” network. For this lab, we’ll be working with the “NAT” network, so let’s select it.
First, let’s look at the network type, listed here. For this module, it is very important to confirm that the network type is set to “NAT” and not “Bridged.” If you use a “Bridged” network for this lab, you could easily break the network that your host computer is connected to, and in the worst case earn yourself a visit from K-State IT staff as they try to diagnose the problem. So, make sure it is set correctly here!
We can also see lots of information about the network’s settings. For example, we can see the subnet IP here, and the subnet mask here. By clicking on the NAT Settings button, I can also find the gateway IP. The gateway IP is the IP of the router, which tells your system where to direct outgoing internet traffic. You’ll want to make a note of all three of those, as we’ll need them later to set a static IP in Ubuntu. You can also click the DHCP Settings button to view the settings for the DHCP server, including the range of IP addresses it uses, which can also be very helpful. If you want to change any of these settings, you can click the Change Settings button at the bottom. You’ll need Administrator privileges to make any changes.
Next, let’s confirm that our VM is using that virtual network. To do so, click the VM menu, then select Settings, then choose the Network Adapter. Make sure the network connection is set to “NAT” here as well.
Ok, now let’s look at the network configuration in Ubuntu. In this video, I’ll discuss how to view and update the network settings using the GUI. There are, of course, many ways to edit configuration files on the terminal to accomplish these tasks as well. However, I’ve found that the desktop version of Ubuntu works best if you stick with the GUI tools.
You can access the network settings by clicking the Activities button and searching for Settings, then selecting the Network option. As with Windows, you can right-click the networking icon in the notification area, then select the network connection you wish to change, and choosing the appropriate settings option in that menu.
Once in the Settings menu, click the Gear icon next to the connection you’d like to configure. The Details tab will show you the details of the current connection, including the IP address, MAC address, default gateway, and any DNS servers. On the Identity tab, you’ll see that you can edit the name of the connection, as well as the MAC address.
To change the network settings, click the IPv4 tab. Here, you can choose to input a manual IP address. If I select that option, I’ll have to enter an IP address, subnet mask, and default gateway. For the IP address, I’ll just make sure that it isn’t in use on the network by picking one outside the DHCP range used by VMware. The subnet mask and default gateway should be the same as the ones you found in the VMware network settings earlier. Finally, we’ll need to enter some DNS servers. Typically, you can just enter the same IP address as your default gateway, as most routers also can act as DNS resolvers as well. You can also use other DNS servers, such as those from OpenDNS or Google, as described in the Lab 3 assignment.
Once you have made your changes, click the green Apply button in the upper-right corner to apply your changes. If everything is successful, I should still be able to access the internet. Let’s open a web browser, just to be sure.
Ubuntu includes a number of tools to help troubleshoot and diagnose issues with your network connection. Most of these are accessed via the command line. So, let’s open a Terminal window. First, you can view available network devices using the networkctl command. You can also view their status using networkctl status.
If you’ve worked with Linux in the past, you’re probably familiar with the ifconfig command. However, in recent years it has been replaced with the new ip command, and Ubuntu 18.04 is the first LTS version of Ubuntu that doesn’t include ifconfig by default. So, we’ll be using the newer commands in this course.
The first command to use is the ip address show command. This command will show you quite a bit of information about each network adapter on your system, including the IP address. You can also find the default gateway using ip route show. The new ip command has many powerful options that are too numerous to name here. I highly recommend reviewing some of the resources linked below the video to learn more about this powerful command.
In addition, Ubuntu includes a ping command, very similar to the one included in Windows. It uses the Internet Control Message Protocol, or ICMP, which allows it to send a simple “echo” request to the server. Most servers will respond to that request, allowing you to confirm that you are able to communicate with it properly across the internet. While that may seem like a very simple tool, it can actually be used in very powerful ways to diagnose a troublesome internet connection. On Ubuntu, note that by default the ping command will continuously send messages until you stop the command using CTRL+C. You can also specify the number of messages to send using the -c <number> option, such as ping 192.168.0.1 -c 4 to send 4 messages to that IP address.
Similarly, the mtr command will use a series of ICMP “echo” messages to trace the route across the internet from your computer to any other system. This is similar to the tracert command on Windows, and, in fact, there is a similar traceroute command which can be installed on Ubuntu. However, it has been deprecated in favor of mtr in recent versions of Ubuntu. See the video on troubleshooting in this module for more information on how to troubleshoot connections using these tools.
Finally, Ubuntu also has a tool that can be used to examine TCP sockets. Previously, you would use the netstat command for this purpose, but it has been replaced by the new ss command, short for “socket statistics.” For example, using just the ss command will get a list of all sockets, much like what TCPView will show on Windows. You can find just the listening TCP sockets by using ss -lt. As with the other commands, there are many different uses for this command. Consult the resources linked below this video for more information on how to use it.
With that information in hand, you should be able to complete Task 2 of this lab assignment, which is to set a static IP address on your Ubuntu VM acting as the server. If you run into any issues, please post in the course discussion forums to get help. Good luck!
Troubleshooting
YouTube VideoResources
Video Transcript
When you are working with network connections, you’ll inevitably run into issues. Understanding how to perform basic network troubleshooting is a very important skill for any system administrator to have, and it is one that you’ll find yourself using time and time again. In this video, I’m going to briefly review some of the steps that you can take to diagnose and fix network issues.
As a quick side-note, many of the resources linked below this video still refer to older Linux commands such as ifconfig and traceroute instead of their newer counterparts. So, you may have to translate the commands a bit to get them to work on newer systems, but the process and theory itself should still apply.
In addition, many of these troubleshooting tools can be blocked by restrictive firewall rules. So, you’ll need to be aware of your current firewall configurations and adjust as necessary. If possible, you could disable firewalls for testing, but that also could create a security concern. So, make sure you keep in mind the fact that firewalls can also be the root cause of many of these symptoms.
First, when faced with any unknown network issue, the very first step is to reboot any and all devices involved if possible. This includes your computer, routers, switches, modems, and any other networking devices along the path between your system and the intended destination. While this may seem drastic, in many cases it could be a simple fault in the hardware or networking software that a quick reboot will fix, while diagnosing and fixing the error without a reboot may be nearly impossible. Of course, in an enterprise setting, you probably don’t want to reboot your entire network infrastructure each time you have an issue, so you’ll have to examine the tradeoffs before doing so. On a home network, however, rebooting the computer and router is a pretty negligible cost.
Next, I recommend determining how far across the network you can reach. In effect, this helps you pinpoint the exact root cause of the network issue, and it will tell you where to focus your efforts. This process can be performed on almost any operating system, as long as it has the ping command available, as well as a command to display the current IP address.
First, you’ll need to determine if your computer is able to connect to itself. You can do so by using the ping command to send requests to the loopback interface on your system. To do so, use these two commands:
ping 127.0.0.1
ping localhost
The first command pings the IP address of the loopback adapter, ensuring that the networking drivers in the operating system are working properly. If that command returns an error, or is not able to connect to your system, it most likely means your networking hardware or drivers on the local system are failing and need to be fixed. The second command pings the same address, but using the commonly available DNS name localhost. If that command fails, but the first one succeeds, it could mean that the DNS resolver or hosts file on your system is corrupt. If so, that’s where you’ll want to focus your efforts.
If you are able to successfully ping yourself, the next step is to determine if you have a valid IP address. You can use either the ipconfig command on Windows or the ip commands on Linux to find your current IP address. Then, use the ping command to make sure you can send and receive messages via that IP address. If that step fails, you may want to release and renew your IP address if you are using DHCP, or verifying that you have the correct IP settings if you are using a static IP address. To release and renew your IP address, use the following commands on Windows:
ipconfig /release
ipconfig /renew
On Linux, it is a little less straightforward, but the best way to accomplish the same task is by using these commands:
sudo dhclient -r
sudo dhclient
If you are able to get a valid IP address using these steps, you can continue on to see if you are able to access the rest of the network. If not, you may need to check your network router settings or static IP address settings to make sure they are correct.
Next, you’ll want to ping the default gateway address as configured in your system. Generally, that should be the address of your router on your network. You can find that address using the ipconfig and ip commands as described above. Use the ping command to try and reach that address. If it works, that means you are able to successfully contact your router. If not, it could be an issue with the network cables between you and your router, or a misconfiguration of either your router or static IP address. In either case, this is sometimes the most frustrating case to deal with, as you’ve ensured that your computer is working, but it cannot reach the core of your local network. I recommend looking at the Network Hardware Troubleshooting Flowchart from Foner Books to try and work your way through this problem.
If you are able to connect with your default gateway, the next step is to see if you can reach your intended destination. If it is another computer on your network or another network, try to ping it’s IP address. If that connection fails, most likely the problem is somewhere between your router and that computer. In that case, you’ll want to try this troubleshooting procedure again from that computer and see if you can pinpoint the problem.
If you are trying to reach a website on the internet, there are a couple more steps to perform here. First, if you know the public IP address and default gateway address your internet service provider, or ISP, is providing to you, you can try to ping those addresses. If they do not work, most likely the problem is with your network modem or your local ISP. In that case, you’ll want to get in touch with them to try and resolve the issue.
Next, you should try to ping a server on the internet by IP address. I usually recommend either the OpenDNS servers, which are 208.67.222.222 and 208.67.220.220, or the Google DNS servers, which are 8.8.8.8 and 8.8.4.4. If you can reach those servers, your connection to the internet is definitely working. If not, the issue is also most likely with your ISP, and you’ll need to contact them to resolve the problem.
Finally, you should try to ping a few web addresses by the DNS names. I usually recommend using an address that is guaranteed to be available, but one that won’t be cached on the system. I hate to say it, but using search engines other than Google, such as www.bing.com or www.yahoo.com, are all great choices for this step. When you do so, you could receive a message that it is unable to resolve that DNS name into an IP address. If that is the case, you should check your DNS settings. If nothing else, you can always replace them with settings for OpenDNS or Google DNS and test with those addresses.
If you are able to resolve the IP address but are unable to reach them, then you could have a firewall issue of some kind. It is very rare that you are able to ping servers by IP address but not via the DNS names, so a firewall is the most likely culprit here.
Of course, if you are able to reach those sites correctly using ping, then the last step is to open a web browser and try to load one of those webpages. If that fails, then you’ll need to examine either the browser software itself or the firewall. The firewall could be blocking HTTP connections, or the browser could be corrupted and need reinstalled. In either case, it is most likely a software issue at that point.
This is just a brief overview of some of the steps you could take to diagnose a network issue. To be honest, I could probably teach an entire course just on this one subject, since there are that many different things that could go wrong in a modern computer network. However, this should give you a set of universal tools you can use to help at least pinpoint the location of the error and narrow your search to a specific device or configuration for the source of the issue. Of course, as a last resort you can always search the internet for additional troubleshooting steps or advice, but remember that sometimes you aren’t even able to do that when your internet isn’t working. So, it helps to have a basic understanding of network troubleshooting and familiarity with a few quick tools to help you out.
Network Monitoring with Wireshark
YouTube VideoResources
Video Transcript
Many times when you are working with networks as a system administrator, it is helpful to be able to see the actual traffic being sent across the network. Thankfully, there are many tools available to help you do just that. In this video, I’ll introduce one of those tools, named Wireshark.
Wireshark originally began as Ethereal, a network monitoring program developed in 1998 by Gerald Combs. In 2006, the name was changed to Wireshark to avoid copyright issues, and has been under constant development ever since. It is completely open source under the GNU General Public License, or GPL. Wireshark can be used to capture and inspect individual packets of network traffic, and it natively understands and decodes several hundred different protocols, giving you a very handy way to inspect not only the type of traffic on your network, but the contents of those packets.
Before we continue, there is one important warning I must share with you. Using Wireshark on a network allows you to potentially intercept and decode any unencrypted packets on the network, regardless of whether they are sent or received by your computer. This is a violation of K-State’s IT policies, and therefore you should never use Wireshark while directly connected to K-State’s network. As long as you are only using Wireshark within your VM network, and you’ve confirmed that your VM network is not set to “bridged” mode, you should be fine. So, make sure you are very careful when using this tool.
First, we’ll need to install Wireshark. It is available for a variety of platforms. For this example, I’ll be installing it on Ubuntu Linux. To do that, we can simply use the apt tool:
sudo apt update
sudo apt install wireshark
When you install Wireshark, you may be shown a message about installing Dumpcap in a way that allows members of the wireshark group to capture packets. Press ENTER to go to the next screen, then use the arrow keys (← and →) to select <Yes> on the menu asking if non-superusers should be able to capture packets, then press ENTER to confirm that option.
After you install Wireshark, you’ll need to add your current user account to the wireshark group. If you are using the cis527 account, you can do the following:
sudo usermod -a -G wireshark cis527
Next, you’ll need to log out and log in for the new group membership to take effect. Otherwise, you won’t be able to directly capture packets unless you run Wireshark as root, which is not recommended.
Once you do so, you can search for “Wireshark” on the Activities menu to open the program. If you configured it correctly, it should show you all of your network interfaces on the first page. If you do not see them, check to make sure that your user account is properly added to the wireshark group and that you’ve logged-out and logged-in again.
To capture packets, we must first select which interface we’d like to listen to. Since I would like to capture packets on the actual network, I’m doing to select ens33 from this list. Your network interface may be named slightly differently, but it should be obvious which one is the correct one. As soon as you do so, you’ll start seeing all of the network packets sent and received on that network interface. By default, we are not listening in “promiscuous” mode, which would allow us to see all the packets on the network, regardless of the sender or recipient.
As you can see, even if you aren’t doing anything on the network yourself, there is always a bit of background traffic. Many of these packets are from your system and others on the network performing simple network requests from several of the background services or daemons. Most of them can be safely ignored for now, but if you are concerned about malicious network traffic on your network, any of these packets could be suspect.
Now, let’s see if we can capture some interesting network traffic. First, I’m going to open a web browser, and go to a simple web page. I’m visiting my old personal page on the K-State CS systems, since it doesn’t automatically redirect me to a secure connection. That way we can see the contents of the packets themselves.
Now that we’ve done so, let’s use the filtering features in Wireshark to see those packets. First, I’m going to press the “stop” button at the top to stop capturing packets. Next, I’m going to enter dns in the filter and press ENTER to only show the DNS packets in the output. There are still quite a few of them, but after scrolling through them I should see the ones I’m looking for.
Here I’ve selected the first packet I sent, which is a standard DNS query for people.cs.ksu.edu. Below, I can see all of the layers of the packet. The top layer shows the frame from the Physical and Data Link layers. Below that, we see the Ethernet protocol information from the Data Link layer. By expanding that, we can see the source and destination MAC addresses of the this packet. Going further, we can see the Internet Protocol Version 4 header from the Network layer, which gives the source and destination IP addresses for this packet. Note that the original destination was the default gateway, which is also the DNS server I’ve configured this system to use.
We can also see that it used the User Datagram Protocol in the Transport layer. Here, we can see the source and destination ports. Notice that the source port is a very high number, meaning that it is most likely an ephemeral port on this system, whereas the destination port is 53, the “well-known” port for the DNS application layer protocol.
Finally, we can see the contents of the DNS packet itself. If we look inside, we can see the query for people.cs.ksu.edu inside the packet. This view helps you clearly visualize the layers of encapsulation that each packet goes through as it makes its way across the network.
A couple of packets later, we can see the response to the earlier query. Going back through each layer, you can see the source and destination MAC address, IP address, and port numbers are all reversed, just as you’d expect. Finally, looking at the contents of the DNS packet, we can see the response includes an answer for the query. Here, it shows that people.cs.ksu.edu is a CNAME or “canonical name” record, which points to invicta.cs.ksu.edu, the actual server it is stored on. Thankfully, DNS will also give us the IP address of that server, which is the second record, an A or “address record,” in the response. We’ll discuss these DNS record types in a later video.
Depending on your browser’s configuration, you may also see additional DNS queries for the each URL included on the page that was loaded. For example, here I see queries for projecteuler.net, russfeld.me, and beattieunioncemetery.org, which are all linked at the bottom of my page. Most browsers do this as a way to speed up subsequent requests, as they assume you are likely to click on at least one of those links while visiting that page. Since it has already done the DNS query, it is one step closer to loading that page for you. In fact, many browsers may already send requests to that server in the background and have the page cached and ready to go before you click the link.
This is a very brief introduction to the power of Wireshark and how to use it to capture packets. Over the next few videos, we’ll explore some Application layer protocols and use Wireshark to help us explore the packets for each one. In the meantime, I encourage you to play around a bit with Wireshark and see what sorts of packets you can see on your own.
DHCP
YouTube VideoResources
Video Transcript
The Dynamic Host Configuration Protocol, or DHCP, is a core part of operating any network today. This video will introduce DHCP and demonstrate how it works. In your lab assignment, you’ll be setting up and configuring your own DHCP server, so this information will be very helpful in completing that task.
As a quick note, much of the information in this lecture is adapted from information provided by Seth Galitzer, our system administrator here in K-State CS. He created the original slides as part of a guest lecture in this course when it was offered on campus, and was gracious enough to share this information for future versions of the course.
First, let’s review a bit of internet history. Prior to the 1980s, there were many networks that existed across the world, but they were not interconnected. In 1982, the TCP and IP protocols were developed, with the aim of unifying all of those networks into a grand interconnected network, or “internet.” At the time, there were only a few hundred computers worldwide which would be part of this network, so manual configuration wasn’t too bad. As there were more and more computers on the internet, they realized that it would be helpful to have a way to automatically configure new systems. So, in 1985, the Bootstrap Protocol, or BOOTP, was developed in order to provide some automation. However, BOOTP was very limited, and only could perform some functions. As the internet was growing by leaps and bounds at this point, they decided a new solution was needed. So, in 1989, they formed the DHC working group to build a better way. In 1993, their initial specification for DHCP was released, and in 1996 the first working server was available. A year later, in 1997, they finalized the protocol into the standard it is today.
There were some major reasons why DHCP was needed. As discussed, the internet, as well as many corporate networks, were getting larger and larger, and manual configuration of those networks was simply too difficult to manage. In addition, with the introduction of laptops and mobile devices, computers needed to be able to seamlessly move from network to network without needing additional configuration. So, they really needed a method to automatically configure network settings on a computer when it initially connected to a network. Hence, the creation of DHCP.
Beyond that, there are many features built in to DHCP to make it a very powerful system. First, it includes the concept of “leasing” an IP address. When a system first connects to the network, it is given an IP address and a length of time it may keep that IP address. Once that time is up, it must renew its lease on that IP, or the system may assign that IP to a new system. In this way, as systems come and go, the DHCP server can reuse IP addresses once the leases have expired. In addition to IP addresses, modern DHCP servers can also send additional information about the network, such as DNS servers, SMTP servers, and more. Using DHCP, modern computers can be much more portable, allowing them to seamlessly connect to any network providing a DHCP server. Finally, even though DHCP is very powerful, there are many instances where a static IP address is preferred, such as for servers and printers. Thankfully, DHCP is fully compatible with static IP addresses on the same network. All that is required is a bit of configuration to mark which sections of the network should be automatically configured and which shouldn’t. In addition, many DHCP servers can be configured to always give the same IP address to a particular host, providing even more flexibility.
Let’s dig a bit deeper in to the DHCP protocol itself to see how it works. In essence, DHCP is a 4-step handshake that happens when any new computer connects to a network. In the first step, the computer sends out a special “discover” message to every system on the network, asking for help to connect. That message is sent to the destination IP address 255.255.255.255, which is a special broadcast address telling the network to send that packet to every computer on the network. This allows the computer to communicate, even if it doesn’t have the proper network settings yet. In the second step, a DHCP server will receive that “discover” message, and send back an “offer” message containing an IP address and additional settings the computer could use. Once the computer receives that message, it will then broadcast a “request” message, which requests a specific IP address. It could be one it was using previously if it is renewing a lease, otherwise it will be one from the “offer” message it received. When the DHCP server receives that “request” message, if that IP address is still available, it will respond with an “acknowledge” message confirming the address, or it will respond with an error to the computer, which starts the process over again. Once the computer receives an “acknowledge” message, it can then configure its network settings using the information it has received, and it is good to go.
So, in short, it goes something like this:
- Client: “Hi, I’m new!”
- Server: “Welcome! Here’s some settings you could use.”
- Client: “Cool! Can I use these settings?”
- Server" “Sure can! You are all set.”
DHCP also works with multiple servers. Since each server will receive the “discover” message, it will respond with its own “offer” message. The computer can then choose which “offer” to respond to, and the servers will only respond with an “acknowledge” message if it was the original sender of the offer. In that way, you can have multiple DHCP servers available on the network, providing additional redundancy and capacity.
If a computer fails to get an IP address from DHCP, it can automatically configure an IP address using the Automatic Private IP Address (APIPA) configuration protocol. In essence, it will assign an IP address in the link-local subnet, that allows it to work on the network without conflicting with anything else. Both IPv4 and IPv6 have set aside a block addresses for this use.
Seth was also gracious enough to provide some sample DHCP configuration files. These were used on CS systems when the department was located in Nichols Hall years ago. Here at the top, you can see the configuration settings for the DHCP lease time. By default, each lease is good for 10 minutes, but clients can request a lease as long as 2 hours (120 minutes, or 7200 seconds). Below that, we can see some default settings for the network, giving the domain name, DNS servers, subnet mask, broadcast addresses, and more for this network.
Here we can see an example for a fixed-address configuration. Whenever a computer contacts this server using that MAC address, it will be assigned the IP address listed below. This is very handy when you have laptops that may come and go on the network. In this way, they are always configured to use DHCP so that the user can use them elsewhere without any problems, but when they are connected to this network they are effectively given a static IP address. Finally, below that we can see a configuration for a simple pool of IP addresses available for automatic configuration.
Of course, this is not a complete configuration file, nor will any of these settings work for your lab assignment. So, you’ll need to read the appropriate documentation as well as discover your own network’s settings in order to configure your DHCP server.
Let’s look at a quick example of how this would look in practice. Here I have configured an Ubuntu VM as directed in Lab 3 to act as a DHCP and DNS server. I also have a second Ubuntu VM acting as our client. Finally, I have disabled the DHCP server in VMware on this network segment.
First, on my server, I’m going to start Wireshark so we can capture these packets. I’ll also add a filter for bootp to make sure we only see the DHCP server packets. Since BOOTP and DHCP are compatible protocols, this is the way that Wireshark sees the packets.
Next, I’m going to boot up the client, which will cause it to request an IP address as it boots. Once it has booted and I’ve logged in, I’m also going to release my IP address:
This should show that it sent a DHCPRELEASE packet to my DHCP server. Then, after waiting a few seconds, we can request a new IP address:
Examining the output, you’ll see that we send a DHCPDISCOVER message, then we receive a DHCPOFFER from the server. We can then request an IP using a DHCPREQUEST message, and finally we’ll receive a DHCPACK message back from the server acknowledging that request. Here, you’ll notice that we send the DHCPREQUEST before we even receive the DHCPOFFER. Since we had an IP previously, we can just go ahead and request it again and see if it works. If so, we’ll be on the network a little bit faster, but if not, we can just respond to the DHCPOFFER we receive and continue the original handshake.
Going back to the server, we can clearly see those four packets, as well as the earlier DHCPRELEASE packet. By examining any of those packets, we can see the different bits of information sent from the server to the client and vice-versa.
In addition, by default the DHCP server will log information to the system log, so we can find information about these packets by searching through that log file:
cat /var/log/syslog | grep dhcp
When troubleshooting a DHCP server, it is very helpful to review any error messages present in the system log.
With that information, you should be ready to configure your own DHCP server. As always, if you have any questions or run into issues, please post in the course discussion forums on Canvas. This process can definitely be frustrating the first time you do it, since there is so much new information to read and understand. Don’t be afraid to ask for help if you get stuck!
DNS
Note
The examples in this video are for an old version of Lab 3, but should be instructive enough to be useful. Read the new Lab 3 assignment carefully and follow its instructions when configuring your system for grading. Some commands are different - see the transcript below for updated commands –Russ
Resources
Video Transcript
The Domain Name System, or DNS, is another integral part of working with the internet and larger networks today. In this video, we’ll cover the history of DNS, how it works, and how to use it in an enterprise organization using the BIND software.
As a quick note, much of the information in this lecture is adapted from information provided by Seth Galitzer, our system administrator here in K-State CS. He created the original slides as part of a guest lecture in this course when it was offered on campus, and was gracious enough to share this information for future versions of the course.
First, let’s review some quick history. As you may know, the precursor to today’s internet, the ARPANET, was first conceived in 1965. By 1969, the first four nodes of that network were connected. Over the next two decades, ARPANET slowly grew in size, and by 1982, with the introduction of TCP and IP, it exploded in size as various networks joined together to create the internet we know today.
In the early days, they found it would be helpful to have a list of human-readable names for the nodes on the network. In that way, instead of remembering the IP address of a particular server, you could just remember its name and look up the IP address, much like you would look up the phone number of a person or business using a phone book. So, they created a file called hosts.txt, which was hosted by the Stanford Research Institute. In essence, it contained a list of all of the servers on ARPANET, paired with its IP address. Anyone could query that file with a computer name, and get back the IP address of the system.
While it was a useful system, it had some major drawbacks: first, it must be updated manually. At one time, the only way to add a new system to the file was to contact the person in charge of it via telephone. As the file grew larger, it was more and more difficult to maintain consistency and avoid name collisions. Finally, it became very taxing on SRIs system, as each system on the growing internet would download a copy of the hosts.txt file to store locally, sometimes requesting it many times per day to get the very latest version of the file. So, a new system needed to be built to provide this feature.
In 1983, the first version of the Domain Name Service, or DNS, was published as an RFC. It was later finalized in 1987. They proposed creating a distributed system of name servers, as well as a hierarchical, consistent name space for all the systems on the internet. Beyond just working with domain names and IP addresses, they also added the ability for the system to work with many different protocols and data types, hopefully designing it in such a way that it would work well into the future. Thankfully, their design was very successful, and we still use it today.
The domain name space we use today has a hierarchical format, much like this diagram. At the very top of the diagram is the root nameserver. It is responsible for keeping track of the locations of the DNS servers for all top-level domains, or TLDs, in the current domain name space. The original DNS specification calls for 13 root name servers, which is still true today. However, due to advances in technology, there are nearly 1000 redundant root name servers on the internet today, each one a clone of one of the 13 root servers. The file containing information for all of the top-level domains is very small, only about 2 MB, and can be viewed by following the link in the resources section below this video.
Below the root name server is the name server for each chosen top-level domain. For example, these are nameservers for the .com, .org, .edu and other top-level domains. Under each top-level domain are the name servers for each individual domain name, such as yahoo.com, slashdot.org, or k-state.edu. Within each domain, there can be additional levels of delegation, such as the cs.k-state.edu subzone, maintained within the K-State CS department for our internal systems.
With the hierarchical design of the domain name space, it may take a few steps to determine the appropriate IP address for a given domain name. For example, if you wanted to find the IP address of www.wikipedia.org, you might first start by querying the root name server for the location of the .org name server. Then, the .org nameserver could tell you where the wikipedia.org name server is. Finally, when you ask the wikipedia.org name server where www.wikipedia.org is located, it will be able to tell you since it is the authoritative name server for that domain. In practice, often there is a caching DNS server hosted by your ISP that stores previously requested domain names, so you won’t always have to talk directly with the root name servers. This helps reduce the overall load across the root servers and makes many queries much faster.
The most commonly used DNS software today is BIND. BIND was originally developed in the 1980s as the first software to fully implement the new DNS standard, and it has been constantly under development ever since. The latest version of BIND is BIND 9, which was first released in 2000, but still consistently gets updates even today.
The DNS specification includes many different types of records. The most commonly used ones are listed here. For example, an A record is used to list a specific IPv4 address for a host name, whereas a CNAME record is used to provide an alias for another domain name. For this lab assignment, you’ll be configuring a DNS server using BIND within your network and using several of these record types, so let’s take a look at how that works.
Here I have configured an Ubuntu VM as directed in Lab 3 to act as a DHCP and DNS server. I also have a second Ubuntu VM acting as our client. Finally, I have disabled the DHCP server in VMware on this network segment.
First, on my server, I’m going to start Wireshark so we can capture these packets. I’ll also add a filter for dns to make sure we only see the DNS server packets.
On the client, I have already verified that it is configured to use the other Ubuntu VM as a DNS server. You can see the currently configured DNS servers using this command:
At the bottom of that output, it should show the current DNS server for your ethernet connection. You’ll have to press Q to close the output. To query a DNS record, we can use a couple of different commands. First, we can use the dig command to lookup a DNS name:
Looking at the output received, we can see that we did indeed get the correct IP address. We can also run that command for win.cis527.cs.ksu.edu and ubu.cis527.cs.ksu.edu. Note that the output for ubu.cis527.cs.ksu.edu includes both the CNAME record and the A record.
To perform a reverse lookup, we can use the dig -x command. Since my sample network is using the 192.168.40.0/24 subnet, I could look up the following IP address:
It should return the PTR record associated with that IP. I can do the same for the IP address ending in 42 as well.
On a Windows computer, you can use the nslookup command without any additional options to perform both forward and reverse DNS lookups.
Back on the server VM, we should clearly be able to see the DNS packets in Wireshark. Each one gives the type of record requested, and just below it is the response packet with the answer from our DNS server.
With that information, you should be ready to configure your own DNS server. As always, if you have any questions or run into issues, please post in the course discussion forums on Canvas. This process can definitely be frustrating the first time you do it, since there is so much new information to read and understand. Don’t be afraid to ask for help if you get stuck!
SNMP
YouTube VideoResources
Video Transcript
In the next few videos, we’ll take a look at few other important networking protocols that you may come across as a system administrator. The first one we’ll review is the Simple Network Management Protocol, or SNMP.
It was first developed in 1988 as a way for system administrators to query information from a variety of devices on a network, and possibly even update that information as needed. Remember that, in 1988, this was well before the development of the web browsers we know today, so it wasn’t as simple as using the web-based configuration interface present on most routers today. However, while most systems today support SNMP, it is primarily used for remote monitoring of networking equipment, and not as much for configuration as it was originally intended.
Over the years, there have been many different versions of SNMP developed. Each one includes a few different features. The first version, SNMPv1, is very basic. While it works well for some things, it only includes a plain-text “community string” for authentication, resulting in minimal security. SNMPv2 is a significant revision to SNMPv1, and includes a much more robust security model. However, many users found that new model to be overly complex, and a second version called SNMPv2c, for “Community” was developed without the new security model. Finally, SNMPv3 was developed to include better security, authentication, and a more user-friendly design. It is the only currently accepted standard, though many devices still use the older versions as well.
In SNMP, the data is presented in the form of variables. The variables themselves have a very hierarchical structure, so that similar types of data are grouped together. However, the variables themselves can be difficult to read directly, since each level of the hierarchy is denoted by a number instead of a name.
To help make the variables more readable, SNMP includes a Management Information Base, or MIB, to define what each variable means. Each individual device can define its own MIB, though there are some standards available for common types of data. You can find a couple of those standards linked below the video.
The SNMP protocol itself lists many different types of protocol data units, or PDUs, as part of the standard. For example, the GetRequest PDU is used to query a particular variable on a device, and the Response PDU would be sent back from the device. You’ll be able to see several of these PDUs a bit later in the video when we use Wireshark to caputre some SNMP packets.
As mentioned earlier, one feature of SNMP is the use of a “community string” for authentication. In SNMPv1, the community string is a simple text identifier that you can provide along with your request. The server then determines if that community string has access to the variable it requested, and if so, it will return the appropriate response. However, since community strings are sent as plain-text, anyone who was able intercept a packet could find the community string, so it wasn’t very secure. In later versions of SNMP, additional security features were added to resolve this issue. In this video, we will see an example of using SNMPv3 with proper security and encryption.
Now that you know a bit about SNMP, let’s see a quick example of how it works. Once again, I have configured an Ubuntu VM as directed in Lab 3 to act as an SNMP server, and I’ve also configured a second Ubuntu VM to act as an SNMP manager or client.
First, on my server, I’m going to start Wireshark so we can capture these packets. Notice that I’m capturing packets on the ethernet adapter, since I’ll be accessing it from another system. I’ll also add a filter for snmp to make sure we only see the SNMP server packets.
Next, on the client system, we can query the data available via SNMP using a couple of different commands. First, I’m going to use the simple snmpget command to query a single variable. I’ve already configured this system to use a set of authentication credentials stored in a configuration file, which you can do as part of Lab 3’s assignment. In this case, I’ll query the system’s uptime:
snmpget 192.168.40.41 sysUpTime.0
In the response, we can clearly see the system’s uptime. If we switch back to Wireshark, we can see that it captured some SNMP packets. If we were using SNMP v1, they would be plaintext and we could read the information here clearly. However, since we are now using SNMPv3
To see all the available SNMP variables on your system, you can try the following:
This command will result in thousands of lines of output, giving all of the variables available on the system. Looking at Wireshark, there are lots of SNMP packets being transmitted. In fact, each data item in SNMP is sent via its own packet.
Since it can be very difficult to find exactly what you are looking for using the snmpwalk command, you can use grep to search the output for a particular item. For example, to see all of the variables related to TCP, I could do the following:
snmpwalk 192.168.40.41 | grep TCP-MIB
If I know the set of variables I’d like to query, I can also include them in the snmpwalk command, such as this example:
snmpwalk 192.168.40.41 TCP-MIB::tcp
Either way, you should see the variables related to TCP. In the lab assignment, you’ll need to query some information about a different set of variables, so you’ll have to do some digging on your own to find the right ones.
That’s a quick overview of how to use SNMP to query information about your system across the network. If you have any questions about getting it configured on your system, use the course discussion forums on Canvas to ask a question anytime!
HTTP
YouTube VideoResources
Video Transcript
Next, let’s review a couple of application layer protocols. One of the most common of those is the Hypertext Transfer Protocol, or HTTP.
HTTP was developed by Tim Berners-Lee while he worked at CERN in the late 1980s as part of his project to build the World Wide Web. HTTP itself is an application-layer protocol that is built on top of the TCP transport-layer protocol. As with many early application-layer protocols, it is actually a text-based protocol, making it very easy to read and work with manually if desired. HTTP is the protocol used to access webpages on the World Wide Web. In fact, if you look at the address bar of most web browsers, you’ll still see http:// in front of web addresses, indicating that it is using the HTTP protocol to access that site.
Since HTTP is a text-based protocol, it defines a set of commands and responses to make it easy for the system to understand each packet. The two most common HTTP commands are GET and POST. GET is used to request a webpage from a server, and POST is used to submit information back to the server, usually as part of a form on the website. Other commands are defined, but they are generally not used very often.
When the server responds to a command from a client, it sends along a numerical status code for the response. Some of the common status codes are listed here. For example, 200 means that the request was accepted properly, whereas 404 indicates that the requested resource was not found on the server. You’ve probably seen some of these error codes in your web browser from time to time.
As I mentioned earlier, HTTP is a text-based protocol. That means, if you are able to type quickly enough, you can use a text-based program such as Telnet to actually send queries directly to a web server. This image shows an HTTP request and response sent using Telnet to the main Wikipedia server.
Let’s see if we can recreate this connection on our own system. Once again, I’m going to use my Ubuntu server configured as directed for Lab 3. I’m also going to start Wireshark so we can capture these packets. I’ll add a filter for http to make sure we only see the HTTP packets.
To initiate an HTTP connection, we’ll use the telnet command to connect to a server on port 80:
That should connect you to the server. Once connected, you can request the homepage using this HTTP command:
GET /index.html HTTP/1.0
Host: cs.ksu.edu
Once you leave a blank line, the server should respond. In this case, you should get the following headers in your response:
HTTP/1.1 301 Moved Permanently
Date: Wed, 05 Sep 2018 19:47:12 GMT
Server: Apache/2.4.25 (Debian)
Location: http://www.cs.ksu.edu/index.html
Content-Length: 316
Connection: close
Content-Type: text/html; charset=iso-8859-1
Looking at the response, you can see that the status code is 301 Moved Permanently, letting me know that the page is available at a different location. A little bit later, it gives the new location as http://www.cs.ksu.edu/index.html. So, I’ll have to query that server instead.
GET /index.html HTTP/1.0
Host: www.cs.ksu.edu
Once I do that, I should now get a proper web page as the response:
HTTP/1.1 200 OK
Date: Wed, 05 Sep 2018 19:49:59 GMT
Server: Apache/2.4.25 (Debian)
Accept-Ranges: bytes
Vary: Accept-Encoding
Connection: close
Content-Type: text/html

<!DOCTYPE html>
<html lang="en-US"><head>
...
Going back to Wireshark, we should clearly see those HTTP packets. You can see each request packet, followed by the response including the status code. If you examine the contents of the packets, you’ll see that it exactly matches what we were able to receive using telnet. It’s really that simple.
Now, let’s do one more quick example, just to see one of the weaknesses of the HTTP protocol. Some early websites required authentication using the HTTP protocol. However, unless you use a security layer such as TLS, those packets would not be encrypted whatsoever, and anyone able to capture the packet could decode the username and password. Let’s see what HTTP authentication would look like using telnet.
First, we’ll have to create a base64 encoding of our username and password. These are the same credentials used in the lab assignment:
echo -n cis527:cis527_apache | base64 -
The output should be Y2lzNTI3OmNpczUyN19hcGFjaGU=, which is what we’ll use for the next command.
Now, let’s use telnet to connect to our secured page:
telnet people.cs.ksu.edu 80
GET /~russfeld/test/ HTTP/1.0
Host: people.cs.ksu.edu
Authorization: Basic Y2lzNTI3OmNpczUyN19hcGFjaGU=
If it works correctly, you should receive a response like the following:
HTTP/1.1 200 OK
Date: Wed, 05 Sep 2018 20:06:10 GMT
Server: Apache/2.4.10 (Debian)
Last-Modified: Wed, 17 Feb 2016 16:48:27 GMT
ETag: "5e-52bfa04e3af09"
Accept-Ranges: bytes
Content-Length: 94
Vary: Accept-Encoding
Connection: close
Content-Type: text/html

<html>
<head>
	<title>Congrats!</title>
</head>
<body>
Congrats! You did it!
</body>
</html>
So, even though it looks like the username and password are encrypted, they are easily deciphered using any base64 decoding program. As part of the lab assignment, you’ll capture an authentication packet just like this one in Wireshark.
This is just a quick introduction to HTTP. There are many interesting features in the protocol, and they are easy to explore by simply capturing packets with Wireshark while you use a web browser to surf the World Wide Web. I encourage you to do just that to get a bit more experience with HTTP.
Email Protocols
YouTube VideoResources
Video Transcript
In this video, we’ll look at one more set of application layer protocols, the ones for sending and receiving electronic mail, or email.
Email was developed in the early days of the ARPANET, and was originally built as an extension to the existing File Transfer Protocol or FTP. Using these email protocols, a user on one system could send a message to a user on another system. Email was originally designed to be a text-only format, but the later introduction of the Multipurpose Internet Mail Extensions, or MIME, allowed emails to include additional content such as HTML markup, images, and more.
To send and receive email across the internet, there are a number of protocols involved. First, the Simple Mail Transfer Protocol (SMTP) is used to send mail from an email client to a server, and then between the servers until it reaches its desired recipient. Once there, the recipient can use either the Post Office Protocol (POP3), the Internet Message Access Protocol (IMAP), Microsoft’s Exchange ActiveSync, or any number of webmail clients to actually view the email.
On an email server itself, there are several pieces of software involved in sending and receiving email. First, the Mail Transfer Agent (MTA) is responsible for SMTP connections, and is primarily used to send and receive email from other email servers. Next, the Mail Delivery Agent (MDA) will receive email from the MTA destined for users on this server, and will route it to the appropriate mailbox. Finally, there are any number of ways to get the email from the mailbox to the user, using the POP3, IMAP, or any number of other protocols. Or, as is often the case today, the user can simply view the email in a web browser, using a webmail client.
To see how email is routed through the internet, here is a nice diagram from Wikipedia showing the process. When Alice wants to send an email to Bob, she must first compose the email and send it to her local MTA using the SMTP protocol. Then, the MTA will use a DNS lookup to find the MX entry for Bob’s email domain, which is b.org in this example. Then, the MTA can send that email to Bob’s MTA, which will then pass it along to the MDA on that system, placing it in Bob’s mailbox. Finally, Bob can then use a protocol such as POP3 to read the email from his mailbox onto his computer.
As with many other application layer protocols, several of the core email protocols are text-based as well, and can easily be done by hand using telnet. This slide shows what it would look like to use telnet to receive email using the POP3 protocol. However, most email servers today require the use of a secure protocol when accessing an email account, so it is difficult to perform this activity today.
cis527@cis527russfeldpuppet:~$ telnet mail.servergrove.com 110
Trying 69.195.222.232...
Connected to mail.servergrove.com.
Escape character is '^]'.
+OK POP3 ready
USER test@beattieunioncemetery.org
+OK
PASS uns3cur3
+OK logged in.
STAT
+OK 2 5580
RETR 1
+OK 4363 octets follow.
Received: (qmail 11929 invoked from network); 26 Feb 2016 16:16:14 +0000
Received-SPF: none (no valid SPF record)
Received: from mx-mia-1.servergrove.com (69.195.198.246)
  by sg111.servergrove.com with SMTP; 26 Feb 2016 16:15:43 +0000
...
...
...
DELE 2
+OK message 2 deleted
QUIT
+OK Bye-bye.
However, many SMTP servers still support sending email via an unsecured connection. This is mainly because there are several older devices such as printers, copiers, network devices, and security devices that are all designed to send alerts via email. Those older devices are difficult if not impossible to upgrade, so many system administrators are forced to use an unsecured SMTP server to accept those notification emails. So, we can use one of those to perform this quick test and see how it works.
For this example, I will connect to the K-State CS Linux servers, as the server we are using will only accept emails from a limited number of systems, including these servers. In addition, it will only accept email sent to a limited number of domains. Both of these protections are in place to limit the amount of unsolicited SPAM email that could be sent using this server.
First, I’ll use telnet to connect to the email server on port 25, the well-known port for SMTP:
telnet smtp.cs.ksu.edu 25
Then, I’ll need to establish a connection with it, send my email, and close the connection. To make it easier to see below, I’ve prefixed the messages from the server and my telnet client with ###:
### Trying 129.130.10.29...
### Connected to daytona.cs.ksu.edu.
### Escape character is '^]'.
### 220 daytona.cis.ksu.edu ESMTP Postfix (Debian/GNU)
HELO daytona.cs.ksu.edu
### 250 daytona.cis.ksu.edu
MAIL FROM: testuser@ksu.edu
### 250 2.1.0 Ok
RCPT TO: russfeld@ksu.edu
### 250 2.1.5 Ok
DATA
### 354 End data with <CR><LF>.<CR><LF>
From: "Russell Feldhausen"
To: "Test"
Date: Fri, 6 September 2018 10:00:00 -0700
Subject: Test Message

This is a test! Hope it Works!

.
### 250 2.0.0 Ok: queued as 827D23FDD1
QUIT
### 221 2.0.0 Bye
### Connection closed by foreign host.
Once I have completed that process, I should receive the email in my inbox shortly. You’ll notice that there are many things interesting about this email. First, my email client reports the correct date and time that it was received, but at the top of the email itself it gives a different timestamp for when it was sent. Additionally, even though I used my own email address as the recipient, in the email header I listed the name “Test” as the recipient, which is what appears in the email client.
I hope that this example clearly demonstrates how easy it is to spoof any part of an email. The email servers and protocols themselves don’t enforce many rules at all, so it is easy to abuse the system, leading to the large amount of SPAM email we receive on a daily basis. However, I still find it fascinating to see behind the curtains a little at how these protocols are actually structured and how easy it is to work with them.
Security
YouTube VideoResources
Video Transcript
Lastly, it is very important to take a few minutes to discuss some security concerns related to networking. While this isn’t a security course, it is vital for system administrators to understand the security tradeoffs of any system they configure.
When dealing with networks, there are a few security concepts to keep in mind. First and foremost is your firewall. On any system you work with, you should ensure that the firewall is properly enabled. It should also be configured to only allow incoming connections on the smallest set of ports that will allow the server to function. In other words, you should only allow ports for software you are planning to use on the server, and all other ports should be blocked. This follows the security concept of “Principle of Least Privilege,” where you only allow the smallest number of permissions required for the system to function.
Similarly, many larger networks should also employ some network monitoring software to scan for unwanted network traffic. While a firewall helps guard against incoming connections, it cannot detect a malicious outgoing connection from a compromised system. A proper network monitoring system could help you detect that breach and stop it before it becomes a larger issue.
For smaller networks and home users, simply installing and using a NAT router offers a significant layer of protection with minimal hassle. A NAT router will block all incoming traffic by default, unless you or one of your systems requests a port to be opened for a specific use. While it isn’t a perfect system, in general this is much better than connecting a computer directly to the public internet itself.
Lastly, for any network connections, you should consider using some form of encryption and authentication on the connection. By doing so, you can be sure that you are connecting to the correct system on the other end, and that no one else can intercept your communication once it is established. Thankfully, there are many ways to accomplish this.
Many systems today use Transport Layer Security, or TLS, to help secure their network connections. TLS was formerly known as SSL, and while many users may use the terms interchangeably, technically SSL is an obsolete protocol that was replaced by TLS many years ago, so TLS is the proper way to refer to it today. The TLS name can also be a bit misleading, because it doesn’t truly reside in the transport layer. Instead, it is typically above the transport layer, but below the top three application layers of the 7 layer OSI model. Many diagrams show it as part of the session layer, which is a pretty good way to think of it.
In essence, what TLS does is perform a handshake protocol after the TCP connection has been established between the two systems, but before any application data is sent or received. This diagram shows what a TLS handshake entails. The blue boxes at the top are the TCP connection being established, followed by the tan boxes giving the steps of the TLS handshake protocol. During that process, the two systems exchange security certificates, agree on an encryption algorithm, and generate a shared encryption key that is known only to those two systems. The sender and recipient can confirm each other’s identity based on a “chain of trust” for the certificates presented; in essence, they look to see if the certificate is signed by someone they trust, in which case they can also trust the certificate itself. Once that is done, it then cedes control to the application, which can then start sending and receiving packets.
When a packet is transmitted, the TLS layer will encrypt the packet so that it cannot be read by others. It will also include a second part of the message, called a message authentication code or MAC, that will help detect if the encrypted packet is altered in any way.
Many protocols today use TLS by default, including HTTP. You’ve probably seen the https protocol in your web browser many times. That simply means that your browser is using TLS to communicate with the web server. In addition, many browsers will show information about the certificate presented by the web server, and will alert you if the certificate is untrusted.
This is a very brief overview of the security concerns involved in a networked world. I encourage you to consider taking additional courses in cyber security if you are interested in learning the details of how these systems are implemented. In any case, you should always be thinking about security as you configure your systems to connect to a network.
Bind Troubleshooting
As I was reworking this lab for the Summer 2020 semester, I ran into a few issues getting my own bind9 server to work. In doing so, I ended up taking some great screenshots of common misconfigurations of bind9 and the related output from using the dig command to diagnose the issue. I figured it would be helpful to share those screenshots here to give you a nice guide to some common errors you may encounter when working with bind9.
Note
When using the dig command, you can specify the DNS server it contacts using the @ symbol followed by the IP address of the server. For example, if my DNS server is at IP address 192.168.40.41, I can use the following command to query it:
dig @192.168.40.41 ns.cis527russfeld.cs.ksu.edu
This can be done from the server with DNS installed, or another system. You should not use the localhost address 127.0.01 for this, since Ubuntu installs a local caching DNS server by default that runs on localhost. The bind9 DNS server is typically only accessible via the external IP address.
If an address is not specified, dig uses the DNS settings of the operating system. The screenshots below were created on a system that had the DNS configuration updated to point directly at the DNS server created for this lab.
Incorrect Screenshots
Bad PTR Response
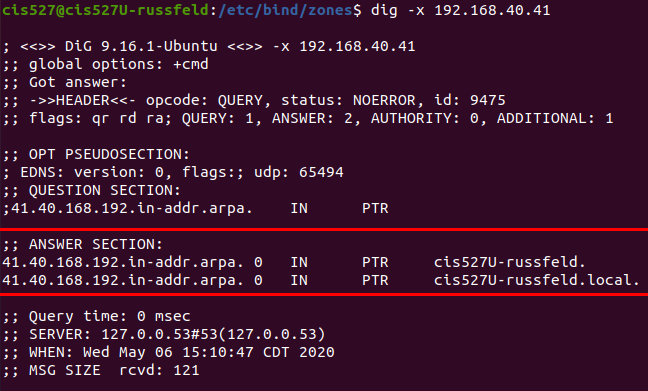
In this screenshot, I attempted to do a reverse lookup of 192.168.40.41, which should resolve to ns.cis527russfeld.cs.ksu.edu. This test was done from the machine with that IP address. Unfortunately, my server was misconfigured, and the reverse zone file was not properly included (the path in my named.conf.local file had a typo, to be exact). Since that file was not availble, my system returned the response from it’s local DNS information, showing that the IP address 192.168.40.41 belongs to cis527U-russfeld., which is the name of the actual computer and not its name in the DNS system. This can happen if you try to request information about the local system and the DNS server does not contain the correct information.
No PTR Response
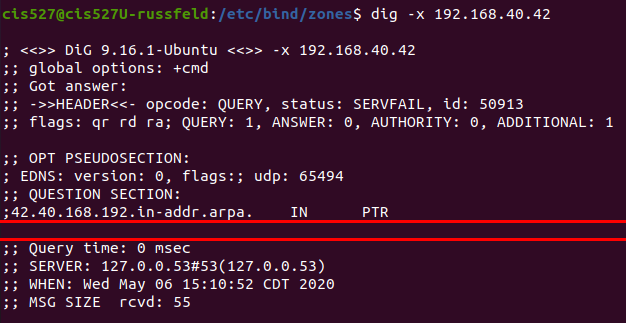
With the same misconfiguration as described above, when I query a different system, such as 192.168.40.42, I instead get an empty response as shown here. This is the usual situation if the DNS server is misconfigured and the PTR record cannot be found. If the output of dig is missing an answer section, it usually indicates that the lookup failed.
Missing Period
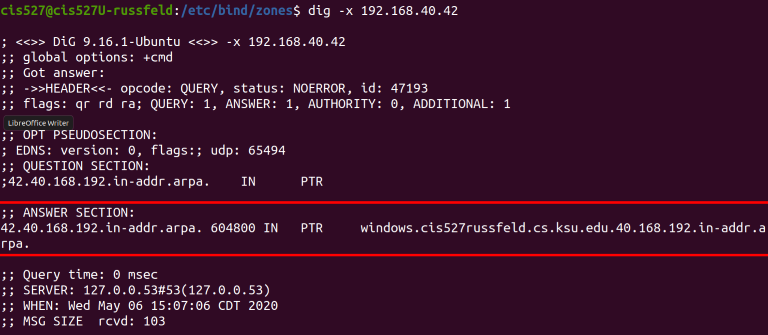
So, I corrected my error and restarted my bind9 server, and once again tried to query one of my reverse lookup addresses. However, in this case, I did get a response from the DNS server, but it was incorrect. The address returned when I queried 192.168.40.42 as windows.cis527russfeld.cs.ksu.edu.40.168.192.in-addr.arpa, which is not what I wanted. This can happen when you forget to add the all important period at the end of an entry in your zone file.

That one, right there. If you forget that one, the bind9 DNS server will automatically append a whole bunch of domain information after the address. Sometimes we want that, but in this case, we don’t. So, be very careful and don’t forget the periods.
DNS Caching
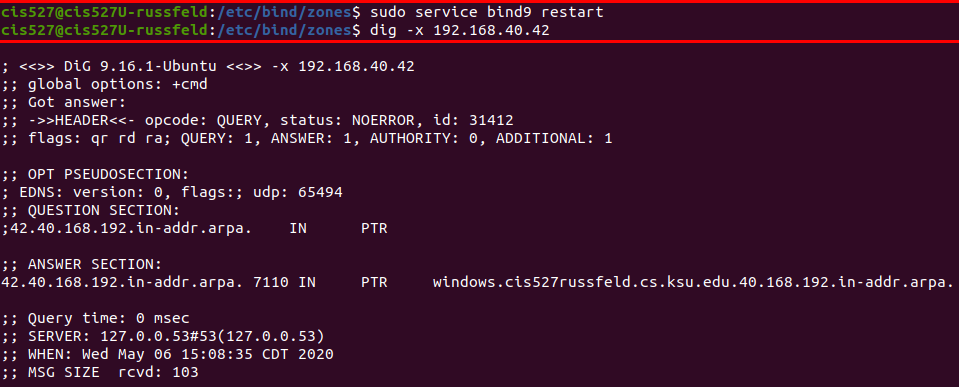
In this screenshot, I had just resolved the error above and restarted my bind9 server to load the newly changed files. Then, I once again used dig to query 192.168.40.42, expecting to see the correct output. Instead, I still received the incorrect output as seen in the screenshot above. This is a very common problem!
There can be a couple of causes of this issue. First, whenever you update a zone file, don’t forget to change the serial value to a larger number. The DigitalOcean guide just has you start with 2 and go to 3 and so on. I like to use the date, followed by a serial for that day. So, I would use a serial such as 202005061 for the first update made on May 6th, 2020 (2020-05-06).
Secondly, even if you remember to do that, many modern systems employ some form of DNS caching that stores the responses from previous queries. Both Ubuntu and Windows do this automatically. So, you may also have to clear your DNS cache to make sure it is properly querying the server. On Ubuntu, use sudo resolvectl flush-caches and on Windows use ipconfig /flush-dns.
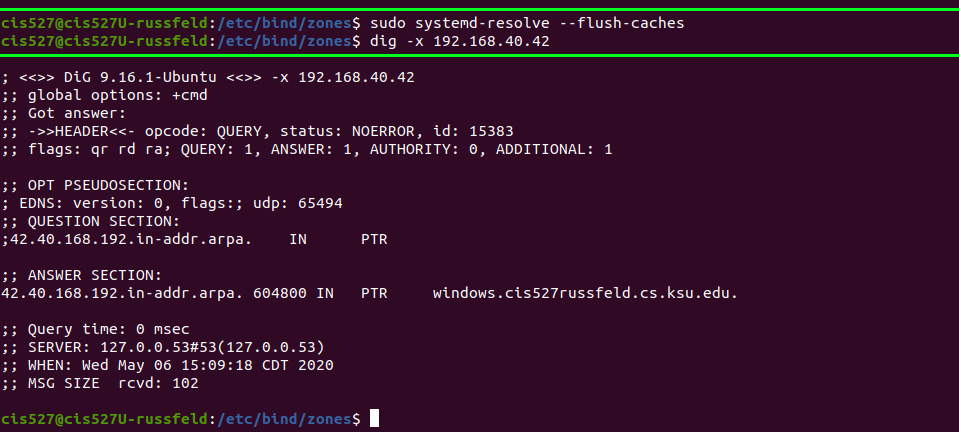
Immediately after flushing the DNS cache, I was able to perform the query again and get the correct result.
Correct Screenshots
Below are screenshots showing correct output for various dig commands. You may use these screenshots to help in your debugging process. To take these screenshots, I updated the static IP address configuration for the Ubuntu Server to use it’s own IP address 192.168.40.41 as the only DNS server.
Correct A Records
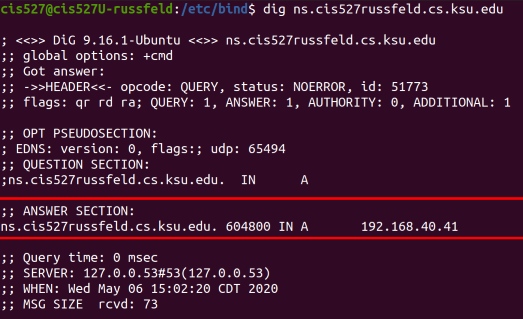
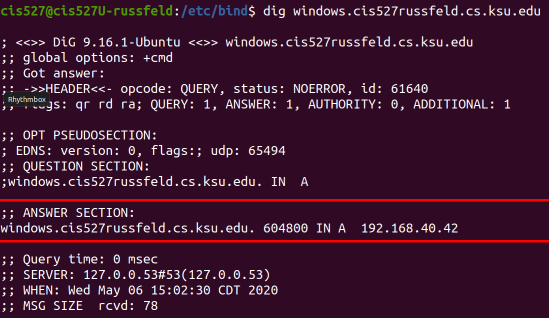
Correct CNAME Records

Correct PTR Record
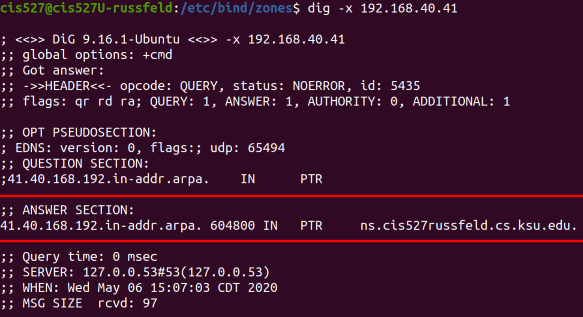
Correct Recursive Lookup (Outside our DNS Server)
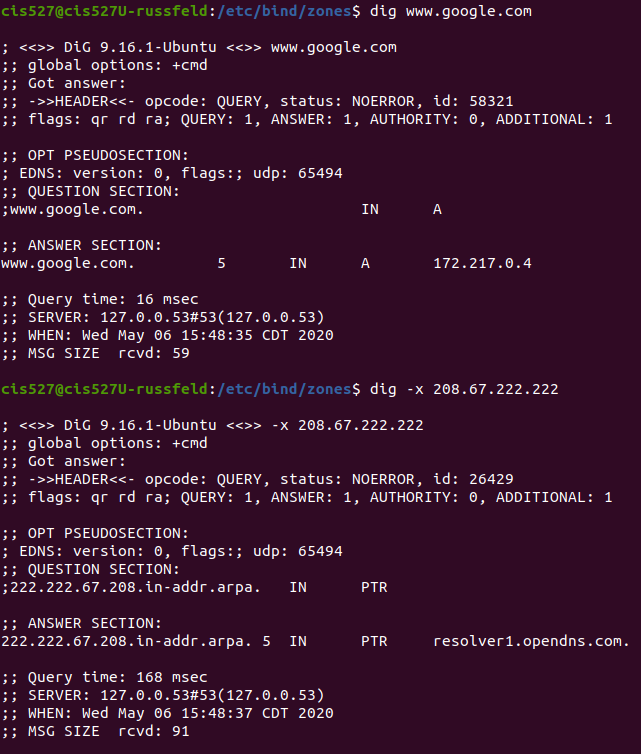
Lab 3 Demo
Warning
This is for an older version of Lab 3, but the basic idea is the same. You may have to update some details such as the network IP addresses and hostnames to match the current instructions for Lab 3.
Video Transcript
Okay, so I’m going to try and talk through a model solution version of lab three and give you some advice on how to go about this lab. And also how to verify that you got this lab configured and working properly. So the first thing we’re going to do is we’re going to look at our IP address. So I’m going to go to the Edit menu in VMware and then choose virtual network editor. And in the virtual network editor, we’re going to find our NAT network. And we’ll notice that it has a subnet address of 192.168.40.0, yours will probably be similar, but it may have a different third octet right here. It’s usually randomly assigned by VMware when you install it. Mine is dot 40. Yours might be different, so we need to make note of that IP address. The other thing in here we can see is this checkmark the use local DHCP service; once you get done with task four and have your DHCP server running, you’ll want to go in here and uncheck this box, you have to click this change settings button to give it admin access. But then you can uncheck this box to turn off VMware’s DHCP service, so you can use your own. So remember we have 192.168.40.
So up here in Ubuntu, we want to set a static IP address in that same range. So in my settings, if I go in here and look at IPv4, you can notice that I’ve set an IP address 192.168.40.41. And the dot 41 is what the assignment says that we’re going to use for our Ubuntu server. We also need to set the gateway. In VMware, it uses a default gateway of dot two inside of your network. The reason it does this is dot one is usually used by your home routers and some other services. And so to avoid any conflicts, VMware has set it to dot two. We also have the netmask of 255.255.255.0. That’s pretty standard. We talked about the lecture. And then you notice that right now I’ve actually set it to refer to itself as a DNS server. Originally in the lab, you’ll probably set this to dot two, so that you still have working internet. But once you get your DNS server working, you can set it to dot 41. So that actually refers to itself for its DNS. So we’ll go ahead and apply this once you apply it, you can turn it off and turn it back on to make sure it’s applied.
This is the only VM in this lab that you need to set a static IP address on. I’ve seen some students try and set static IPs on the Ubuntu and the Windows, you don’t need to do that. For testing of your DNS server, you can set a static DNS entry temporarily. But the idea is by the time you get done with lab three these to your Ubuntu client and your Windows client should both be getting its IP address from the DHCP server on your Ubuntu server.
Okay, so once we have that set, we can confirm our IP address is correct by doing ip addr show that will show us our IP address. And we’ll notice right here that we see the 40 dot 41 IP address. We also need to keep in mind this ens33. This is the name of the interface that this is connected on. And so in the DHCP setup, you’ll need to go in and set a file that defines which interfaces to listen on. This is the interface we want to listen on. But for the DNS server, we actually tell it the IP address that we want to listen on. And so we’ll need this IP address in our DNS server configuration.
So once we have our DNS server up and running, we’ll also need to make sure that we allow it through the firewall, I’ll leave that up to you, you can look up what ports you need and how to allow that through the firewall.
But if it’s working, we can use the dig command followed by an at symbol and the IP address of our system. And so what this does is this tells dig to ignore any DNS settings we have on our system and query this particular server, and we’re going to query for ns.cis527russfeld.cs.ksu.edu. And when we do that, we get this response. Here, just to help. Let me put this command back up here again. So I’m doing dig at the IP address of my server. And you can do this either on the server or on the client. And then I’m giving it the name of a server that I want to look up in our DNS configuration. And so if I run this command, in this answer section, I should get back that this name goes to this IP address, which is correct. So that’s how we look up an entry on our forward zone.
If we went to look up an entry in our reverse zone, instead of doing the name, we do dash x, and then we would put in an IP address, I’m going to put in the IP address 42 which when we do this, it will show our answer section is we’re looking up 42.40.168.192.in-addr.arpa, which is the reverse lookup IP address. And then we are getting our Windows Server back.
So to really check to see if your DNS server is working, those are the two commands you need. You just need to be able to use dig at your server’s IP address, and then dash x for reverse lookup, or for forward lookup, you just put in a domain name. You can also test your forwarding. If you want to make sure your forwarding is working, I can dig that server and just look for www.yahoo.com for example, and I can get responses from that. I can also look up the reverse. If I want to look up a reverse, I can do a reverse for 208.67.222.222 which is one of the OpenDNS resolvers. So this is pretty much confirmed that our DNS server is working on the server.
If you want to check it from one of your clients, you can switch over to your client, and here on the client I can run those exact same commands. So if I do dig at my server IP address, and this is without setting any static DNS entries, this is just telling dig to query this IP. And then if I do my address here, then I can run it. And once again, we’re getting that answer. And so this is how you can check, you can test your DNS configuration before you have DHCP working, you don’t have to change anything on your client, you just use the at symbol in your dig command to tell it to query that particular DNS server for this entry.
So that’s the DNS parts. If that doesn’t work, there’s a really good guide on DNS troubleshooting that talks you through a lot of different things you might run into, Be especially careful of your periods and your spacing in your DNS configuration files. All of that is really important. There’s also a really good discussion on Piazza right now about the number of octets in your reverse zone file. In the dot local file, you can have three octets and then you only need one octet in your zone file. If that doesn’t make sense post on Piazza, let us know. We can try and clarify that.
Okay, so the second part is your DHCP server. And the DHCP server configuration is pretty simple. However, I’m going to call out one thing real quick. If I go to /etc/default, you’ll notice there’s a file in here that might exist. That’s, whoops. Helps if I go to the server. I go to the server. And then looking here, you’ll see there is a file called isc-dhcp-server. And so in this file, it has some entries. And depending on what guide you read, sometimes you will need to define an interface right here that your DHCP server could listen on. Mine I didn’t need to define that, it just worked. But in a lot of cases, you might need to define that. So this is where you would put that is that ens33 that we saw earlier.
So once you get your DHCP server running, you can start it, I’m just going to restart mine. So I restart that. And now your server should be running. If you want to check, a good way to check is you can do sudo cat /var/log/syslog. And we’ll look at the very end of our syslog. These last few entries. And we can see here that our, that our DHCP server started up; it read its config file. And then it will say things like listening and sending. And as long as you see that it’s listening on ens33. That means it’s working. If you get an error here that says it doesn’t, it’s not configured to listen on any interfaces, that’s where you might need to change that defaults file to listen on ens33 to work. So. That’s how you can tell your DHCP server started correctly.
There’s a couple other commands that you can use using the ss command to look at listening ports. So ss -l will show you all the listening ports on your system. However, it’s not very useful at all. So instead, we can try two different versions, I’m going to do ss -l, then I’m going to do t which will listen for TCP ports only. And then n which will show us the port numbers. So if I do ss -ltn, I will see really quickly that I have a DNS server listening right here on port 53. That’s what we’re looking for for DNS. DHCP, however, is not TCP is UDP. And so if I look for UDP, I’ll see a DHCP server listening here on every IP address on port 67. And so there is the entry for your DHCP server. And so if you’re not sure if your servers are running correctly, you can use ss -ltn or ss -lun and look for entries that end in 53 for your DNS server or 67, for your DHCP server.
You’ll also notice that there is 161 for your SNMP server if you have that running. So this is kind of a really useful thing. You can also see your SSH server running on 22222, and we’ll see our HTTP server Apache running on port 80. So a couple of quick commands.
But the really easy way to test your DHCP server is actually on Windows. And so on Windows, I have no static IP address set. If I do ipconfig /release, that will release all of our IP configurations. And then I can do ipconfig /renew to force it to renew that IP address. And so it will think for just a minute and then it will come back and it should give us an IP address that has something within our range. It has dot two as the gateway. But the big giveaway is you can find this connection-specific DNS suffix, and it will contain your eID. That’s the dead giveaway that you are getting a DHCP address from your DHCP server. And that’s why it’s actually really easy to test this on Windows.
Now, if I do ipconfig /all, then it will show all the information. And you can see that it also is getting the DNS server for your network. And so it actually gets the right DNS server, it will also show you what your DHCP server is. So if you want to know where that IP address came from, you can find it here as well. And then, of course, we can use nslookup to look up different names on our network. So if I do nslookup, I can look that up. And if I do the reverse, I can get the reverse as well. So everything is looking really good here.
The other thing you can do, obviously, for testing is on your Ubuntu client, you can do sudo dhclient -r, which will run the DHCP client and refresh. If I do sudo dhclient -v, you’ll actually see it sending the DHCP discover. So it sends to discover, then we get an offer of this IP address from our server IP. And you can see that it works.
So those are a quick overview of what lab three should look like when it’s working correctly. The big things to do are get your DNS server up and running, and then test it here on your server using those dig commands with the at symbol on them. So if we go back through my history, we find some of these dig commands having the at symbol where we can query a particular DNS server and look up a particular address. Once you get that working, you can then test it from your client using that same syntax or you can just go ahead, get your DHCP server up and running, check the system log to make sure it’s running. And then go to your Windows client, reboot it and make sure that it’s getting an IP address from your system. And then you should be good to go.
If it’s not working, check your config files, check your firewall, make sure that it’s listening on the right ports, or feel free to reach out on Piazza and let us know. So I hope this video was helpful. If you have suggestions or questions or anything else I can go over please let me know.
Good luck.
Lab 3 Networking Diagrams
Here are some helpful networking diagrams to better explain the desired state before and after the end of Lab 3. In all of these diagrams, I am using a sample network with the IP address 192.168.40.0. You will have to adapt the IPs to match your network configuration. In addition, each network address will need to be updated with your unique eID as directed in the lab assignment.
Before Lab 3
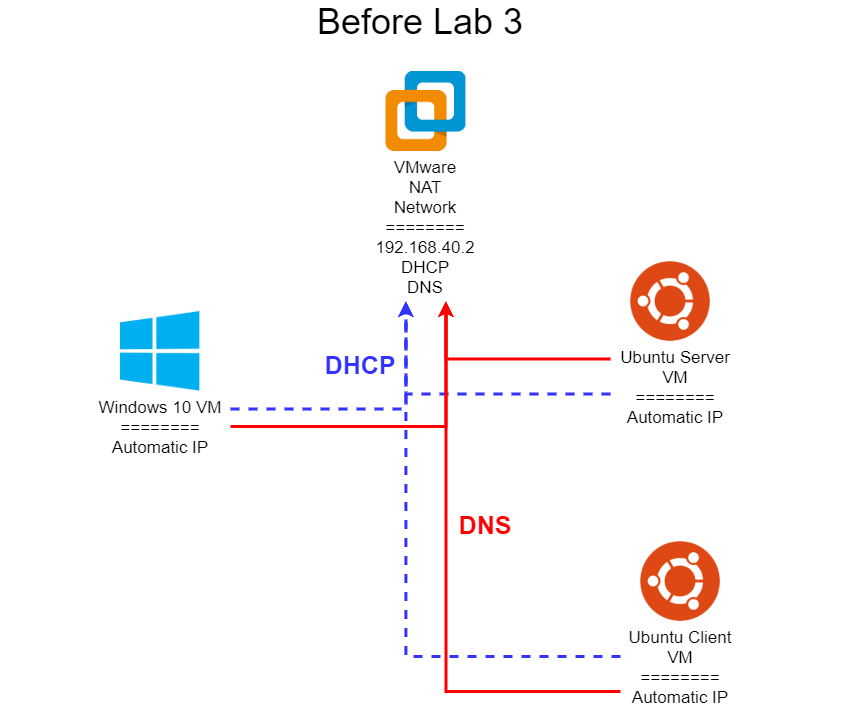
Once you’ve completed Task 1 of Lab 3, you should have three virtual machines connected to your network. Each of them will be configured to automatically get an IP address using DHCP, and they will also be configured to use the automatically provided DNS information from that DHCP server. By default, the NAT network in VMware is configured to use VMware’s built-in DHCP server to handle automatic IP addresses, and that DHCP server also configures each system to use VMware’s built-in DNS server. That server can be found at 192.168.40.2.
This is very similar to how most home networks are configured, where the wireless router acts as both a DHCP server and DNS server (in actuality, a DNS forwarder, since it doesn’t really resolve DNS entries itself).
After Lab 3
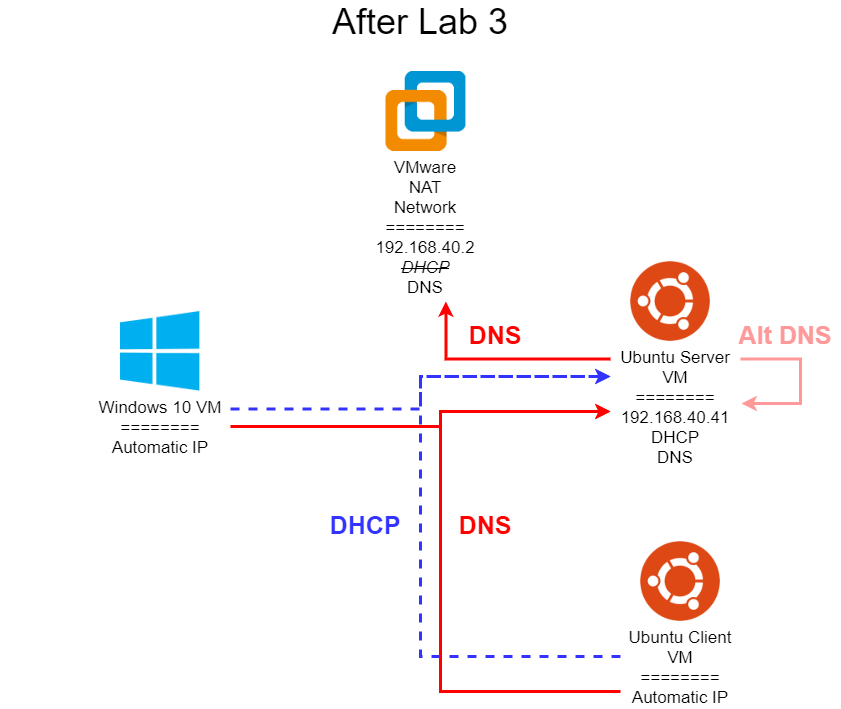
Once you’ve completed all of Lab 3, your network diagram should resemble the one shown above. At this point, you have installed and configured both a DNS and a DHCP server on your Ubuntu VM labelled Server, and disabled the built-in DHCP server in VMware’s NAT network. By doing so, your Ubuntu VM labelled Client as well as your Windows 10 VM will now be getting automatic IP addresses from your Ubuntu server. In addition, the DHCP server will configure those systems to use your Ubuntu server as the primary DNS server. So, whenever you try to access any addresses in the cis527<your eID>.cs.ksu.edu network on those systems, they will use your Ubuntu DNS server to look up the names.
However, notice that your Ubuntu VM labelled Server still uses the VMware DNS server as its primary entry. By doing so, it will not be able to look up any addresses in the cis527<your eID>.cs.ksu.edu network at this time. However, you can modify its DNS settings to include a secondary entry which points back to itself (it is important to use it’s external 192.168.40.41 IP address for this, and not the localhost address 127.0.0.1). By doing so, that will allow it to query itself for DNS entries it can’t find, but will still guarantee it can access the internet even if your internal DNS server is not configured properly.
Subsections of Directory Services
Introduction
YouTube VideoResources
Video Transcript
Welcome to Module 4! In this module, we’ll discuss how to use directory services to provide consistent user accounts and permissions across a number of systems. Specifically, we’ll look at the Active Directory Domain Services for Windows, and the OpenLDAP implementation of the Lightweight Directory Access Protocol (LDAP) for Ubuntu Linux.
In addition, we’ll see how to configure clients to connect to each of those servers. Finally, I’ll discuss some implementation concerns for interoperability, for instances where you’ll have a heterogeneous network environment.
Many students have reported to me that this is one of the most difficult lab assignments in this course, as it can be very frustrating to get everything set up and working correctly the first time. As always, if you have any questions or run into issues, please post in the course discussion forums to get help. Good luck!
Directory Services Overview
YouTube VideoResources
Video Transcript
This video presents a brief overview of directory services and related concepts. This information is very helpful in understanding the larger role that many of these services play in modern computer networks.
At its core, a directory service is simply a piece of software that can store and retrieve information. The information stored could take many forms, including user accounts, groups, system information, resources, security settings, and more. By providing a centralized location to store that information, it becomes much simpler to share that information across a large enterprise network.
We’ve already worked with one example of a directory service in this course. The modern Domain Name Service is, at its core, a directory service. It stores a directory of domain names matched to IP addresses, as well as additional information about a domain such as the location of the mail server. It can then provide that information to the systems on a large network, providing a level of consistency that is difficult to achieve if each computer has to store a local version of the same information.
Directory services for computers have also been around for quite a while. This page gives a brief timeline of events, starting in the late 1980s and culminating with the release of Microsoft’s Active Directory Domain Services in 1999. Let’s look at each of these items in detail.
First, the X.500 set of standards was released in 1988, and was one of the first projects that aimed to provide a consistent directory of user account information. It was actually developed as a directory for the X.400 set of standards for email, which at that time was the dominant way that email was handled on the internet. Those standards were developed using the OSI networking protocols. However, with the rise of the TCP/IP set of internet protocols, these systems were quickly made obsolete. X.400 was replaced by the SMTP standards used today to send email between MTAs, while X.500 forms the basis of many later protocols. What is most notable about X.500 is that it actually defined several underlying protocols, including a Directory Access Protocol (DAP), as well as a Directory System Protocol (DSP) and others. Today, we primarily use protocols based on the original DAP defined by X.500.
Soon after the release of the X.500 standards, work began on an implementation of the DAP protocol using the TCP/IP internet protocols. It was eventually named the Lightweight Directory Access Protocol, or LDAP. LDAP is the underlying protocol used by many of todays directory services, including Microsoft Active Directory.
However, it is very important to understand that LDAP is not a complete implementation of the original X.500 DAP. Instead, it implements a core set of features, and then adds some additional features not present in the original protocol, while several parts of the original protocol are not implemented. The maintainers of the X.500 standard are very quick to point out this difference, but in practice most systems fully support LDAP as it stands today.
LDAP also has uses beyond just a directory service for user accounts on workstations. For example, LDAP can be used to provide a user lookup service to an email client, or it can be linked with a website to provide user authentication from a central repository of users.
LDAP, along with many other directory services, defines a tree structure for the data. In this way, the data can be organized in a hierarchical manner, closely resembling the real relationships between people, departments, and organizations in an enterprise. For example, in this diagram, you can clearly see nodes in the tree for the overarching organization, the organizational unit, and the individual user.
LDAP uses several short abbreviations for different fields and types of data, and at times they can be a bit confusing to new system administrators. This slide lists a few of the most common ones, as well as a good way to remember them. For example, an ou in LDAP is an organizational unit, which could be a department, office, or some other collection of users and systems.
You can see these abbreviations clearly in this sample LDAP entry. Here, we can see the distinguished name includes the canonical name, as well as the domain components identifying its location in the tree. We can also see the common name and surname for this user, as well as the distinguished name for his supervisor. As you work with LDAP throughout this module, you’ll see data presented in this format several times.
Switching gears a bit, in the early 1990s, there were many different software programs developed to help share files and users between systems. One of the first was Samba. Samba is an open source project that originally reverse engineered the SMB (hence the name) and CIFS file sharing protocols used by Windows. By doing so, they were able to enable file sharing between Linux based systems, including Macs, and Windows. Eventually, Microsoft worked with the developers of the project to allow them to fully implement the protocol, and in more recent versions, a computer running Samba can even act as part of an Active Directory domain. We’ll work with Samba a bit later this semester when we deal with application servers.
Around the same time, Novell released their Directory Services software. This was one of the first directory services targeted at large organizations, and for many years it was the dominant software in that area. It was built on top of the IPX/SPX internet protocols, so it required computers to run special software in order to use the directory service.
Much like the LDAP example earlier, NDS also supported a tree structure for storing information in the directory. It also had some novel features for assigning permissions across different users and ous, which made it a very powerful tool. Many older system administrators have probably worked with Novell in the past. I remember that both my high school, as well as some departments at K-State, used NDS until they switched to Microsoft Active Directory in the mid 2000s.
Before we discuss Active Directory, we should first discuss Windows Workgroups and Homegroups. Most home networks don’t need a full directory service, but it is very helpful to have a way to share files easily between a few computers connected to the same network. Prior to Windows 7, Windows used a “Workgroup” to share these files.
Computers with the same Workgroup name would be able to discover each other across a local network, and any shared files or resources would be available. However, user accounts were not shared, so you wanted to access a resource shared from a particular computer, you’d have to know a username and password for that system as well. For smaller networks, this usually wasn’t a problem at all. However, as the network grows larger, it becomes more and more difficult to maintain consistent user accounts across all systems.
That all changed in 1999 with the introduction of Microsoft Active Directory. It coincided with the release of Windows 2000, one of the first major Windows releases directly targeted at large enterprises. Active Directory uses LDAP and Kerberos to handle authentication, and provides not only a central repository of user accounts and systems, but it can also be used to share security configurations across those systems as well. It was really ideal for large enterprise networks, and gave administrators the level of control they desired. Active Directory quickly became the dominant directory service, and most enterprises today use Active Directory to manage user accounts for their Windows systems. In fact, both K-State and K-State Computer Science primarily use Active Directory to manage their user accounts across a variety of systems and platforms.
With a shared domain, the user account information is stored on the central domain controller, instead of the individual workstations. In this way, any user who has a valid account on the domain and permissions to access a resource can do so, regardless of which system they are connected to. This is what allows you to use the same user account to log on to computers across campus, as well as online resources such as webmail and Canvas. One of the major activities in this lab will be to install and configure an Active Directory Domain, so you can get first-hand experience of how this works.
Lastly, no discussion of directory services would be complete without discussing Kerberos. Kerberos is named after Cerberus, the three-headed dog from ancient Greek mythology. It allows a client and a server to mutually authenticate each other’s identity through a third party, hence the three-headed mascot.
Kerberos was originally developed at MIT in the 1980s, and fully released in 1993 as RFC 1510. It is one of the primary ways that directory services today handle authentication, and it is used by many other types of security software on the internet today.
The Kerberos protocol is quite complex, and it uses many different cryptographic primitives to ensure the communication is properly secured and authenticated. However, this diagram gives a quick overview of the protocol and how it works.
- First, the client will communicate with the authentication server.
- The server responds with two messages, labelled A and B in this diagram. Message A is encrypted by the server using the client’s key. When the client receives that message, it attempts to decrypt it. If it is successful, it can use the contents inside the message to prove its identity.
- Then, it can send two new messages, C and D, to the ticket granting server, which in practice is usually the authentication server, but it doesn’t have to be. Message C includes the contents of message B along with information about what the client would like to access, and message D is the decrypted contents of the original message A. The ticket granting server then looks at those messages and confirms the user’s identity.
- If it is correct, it will then send two more messages, E and F, to the client. Message E is the ticket that can be given to the server containing the desired resource, and message F contains a key that can be used to communicate with that server.
- So, the client finally can contact the destination server, sending along message E, the ticket from earlier, as well as a new message G that is protected with the key contained in message F.
- Finally, the server decrypts message G and uses it to create and send back message H, which can be confirmed by the client to make sure the server is using the same key.
If everything works correctly, both the client and server know they can trust each other, and they have established keys that allow them to communicate privately and share the requested information. Kerberos is a very powerful protocol, and if you’d like to learn more, I highly recommend reading the linked resources below this video. Kerberos is also discussed in several of the cybersecurity courses here at K-State.
That’s all the background information you’ll need for this module. Next, you’ll work on installing Microsoft Active Directory on Windows and OpenLDAP on Ubuntu, as well as configuring clients to use those systems for authentication.
Assignment
Lab 4 - Directory Services
Instructions
Create four virtual machines meeting the specifications given below. The best way to accomplish this is to treat this assignment like a checklist and check things off as you complete them.
If you have any questions about these items or are unsure what they mean, please contact the instructor. Remember that part of being a system administrator (and a software developer in general) is working within vague specifications to provide what your client is requesting, so eliciting additional information is a very necessary skill.
Note
To be more blunt - this specification may be purposefully designed to be vague, and it is your responsibility to ask questions about any vagaries you find. Once you begin the grading process, you cannot go back and change things, so be sure that your machines meet the expected specification regardless of what is written here. –Russ
Also, to complete many of these items, you may need to refer to additional materials and references not included in this document. System administrators must learn how to make use of available resources, so this is a good first step toward that. Of course, there’s always Google!
Time Expectation
This lab may take anywhere from 1 - 6 hours to complete, depending on your previous experience working with these tools and the speed of the hardware you are using. Installing virtual machines and operating systems is very time-consuming the first time through the process, but it will be much more familiar by the end of this course.
Warning
Most students in previous semesters have reported that this lab is generally the most frustrating and time-consuming to complete. I recommend setting aside ample amounts of time to work on this lab. This is especially true if the system you are running your VMs on is not very powerful, since running multiple VMs at the same time may slow things down significantly. However, if you find that you are going in circles and not getting it to work, that would be a great time to ask for help. –Russ
Task 0: Create 4 VMs
Windows Server 2025 Does Not Work
In Windows Server 2025, there is an unresolved bug preventing Ubuntu clients from joining a Windows Active Directory Domain hosted by that server version. As of 8/28/2025, this is still unresolved.
You can find the discussion of the outstanding bug (here)[https://gitlab.freedesktop.org/realmd/adcli/-/issues/40].
For now, we’ll continue to use Windows Server 2022 for this class.
For this lab, you’ll need the following VMs:
- A Windows 11 VM. You may reuse your existing Windows 11 VM from a previous lab.
- A Windows Server 2022 Standard (Updated July 2023 or newer) VM. See Task 1 below for configuration details.
- An Ubuntu 24.04 VM labelled CLIENT. This should be the existing CLIENT VM from Lab 3.
- An Ubuntu 24.04 VM labelled SERVER. You have three options to create this VM:
- You can create a copy of your existing CLIENT VM from Lab 3, which does not have DHCP and DNS servers installed. Follow the instructions in the Lab 3 assignment to create a copy of that VM. In this case, you’ll need to reconfigure the VMware NAT network to handle DHCP duties. Make sure you label this copy SERVER in VMWare. This is generally the option that is simplest, and causes the least headaches.
- You may continue to use your exiting SERVER VM from Lab 3, with DHCP and DNS servers installed. You may choose to continue to use this server as your primary DNS and DHCP server for your VM network, which would truly mimic what an enterprise network would be like. Remember that you’ll need to have this VM running at all times to provide those services to other systems on your network. You may also choose instead to disable them and reconfigure the VMware NAT network to handle DHCP duties. Either approach is fine. This option is generally a bit closer to an actual enterprise scenario, but can also cause many headaches, especially if your system doesn’t have enough power to run several VMs simultaneously.
- You may create a new Ubuntu 24.04 VM from scratch, label it SERVER, and configure it as defined either in Lab 1 or using the Puppet manifest files from Lab 2. This is effectively the same as copying your CLIENT VM from Lab 3, but you get additional practice installing and configuring an Ubuntu VM, I guess.
Warning
Before starting this lab, make a snapshot in each VM labelled “Before Lab 4” that you can restore to later if you have any issues. In most cases, it is simpler to restore a snapshot and try again instead of debugging an error when setting up an LDAP or AD server. In addition, Task 6 below will ask you to restore to a snapshot in at least one VM before starting that step.
Task 1: Install Windows Server 2022 Standard
Create a new virtual machine for Windows Server 2022 Standard using the “Windows Server 2022 Standard” installation media (you may choose a newer option if available, but this lab was tested on that specific version - see the warning above about Server 2025 not working currently). You can download the installation files and obtain a product key from the Microsoft Azure Student Portal discussed in Module 1.
- File Name:
en-us_windows_server_2022_updated_july_2023_x64_dvd_541692c3.iso - SHA 256 Hash:
e215493d331ebd57ea294b2dc96f9f0d025bc97b801add56ef46d8868d810053
Tip
For this system, I recommend giving the VM ample resources, usually at least 2 GB RAM and multiple processor cores if you can spare them. You may need to adjust the VM settings as needed to balance the performance of this VM against the available resources on your system.
When installing the operating system, configure it as specified below:
Make sure you choose the Desktop Experience option when installing, unless you want a real challenge! It is possible to perform these steps without a GUI, but it is much more difficult.
Computer Name: cis527d-<your eID> (example: cis527d-russfeld)
Info
This is very important, as it allows us to track your virtual machine on the K-State network in case something goes wrong in a later lab. By including both the class and your eID, support staff will know who to contact. A majority of students have missed this step in previous semesters, so don’t forget! The computer name must be changed after the Windows installation is complete –Russ
Passwords: Use cis527_windows as the password for the built-in Administrator account
Install Software
Install Windows Updates: Run Windows Update and reboot as necessary until all available updates are installed.
Automatic Updates: Make sure the system is set to download and install security updates automatically.
Make a snapshot of this VM once it is fully configured and updated. You can restore to this snapshot if you have issues installing Active Directory.
Tip
You can use CTRL+ALT+Insert to send a CTRL+ALT+Delete to your VM in VMware without affecting your host OS.
Note
If you are working in Azure, follow the video instructions at the end of this chapter to install a version of Windows Server for Azure. You do not have to install VMWare Tools but should install Firefox.
Azure supports some backups and restore point options, but they are not as simple to use as VMWare snapshots. You can learn more about Azure backups here: https://learn.microsoft.com/en-us/azure/virtual-machines/backup-recovery. In general, I have avoided using them in my testing.
Task 2: Configure an Active Directory Domain Controller
Configure your Windows Server as an Active Directory Domain Controller. Follow the steps and configuration details below:
First, set a static IP address on your Windows Server VM. Use the IP address ending in 42 that was reserved for this use in Lab 3. For the static DNS entries, use that same IP address or the localhost IP address (127.0.0.1) as the first entry, and then use the IP address of your DNS server (either your Ubuntu Server from Lab 3 or VMware’s default gateway address, whichever option you are using) as the second DNS entry. In this way, the server will use itself as a DNS server first, and if that fails then it will use the other server. This is very important when dealing with Active Directory Domains, as the Domain Controller is also a DNS server.
Follow the instructions in the resources section below to install and configure the Active Directory Domain Services role on the server.
- Domain Name:
ad.<your eID>.cis527.org (example: ad.russfeld.cis527.org) - Forest Functional Level & Domain Functional Level: Windows Server 2016
- NETBIOS Domain Name:
AD (this should be the default that is presented by the wizard) - Passwords: Use
cis527_windows for all passwords
Add a User Account to your Active Directory
- Use your own eID for the username here, and
cis527_windows as the password.
Tip
As of Summer 2021, there was a bug in Windows Server that prevented the built-in Administrator account from changing some settings, specifically network settings, once the server is promoted to a domain controller. This can make it difficult to fix networking issues in this or future labs. The easy fix for this is to copy the Administrator account in the Active Directory User and Computers tool and give the new copy a different name, such as “Admin”, and then use that account to log on to the server.
Note
If you are working in Azure, do not set a static IP in Windows Server - this is already managed for you by Azure. Your IP address will most likely be of the form 10.0.0.X - that is the address you’ll use to connect other VMs to this Active Directory domain.
Resources
Task 3: Join the Domain with Windows 11
Join your Windows 11 VM to the Active Directory Domain created in Task 2. Follow the steps and configuration details below:
First, set static DNS entries on your Windows 11 VM. You SHOULD NOT set a static IP, just static DNS entries. Use the Windows Server IP address ending in 42 as the first entry, and the second entry should be the same one used on the server earlier (either your Ubuntu Server from Lab 3 or VMware’s default gateway, whichever option you are using).
Join the system to the domain, following the instructions linked in the resources section below.
Once the system reboots, you should be able to log in using the user account you created in Task 2.
Note
If you are working in Azure, you’ll need to add a hosts file entry to the Windows 11 client that directs the domain name ad.<your eID>.cis527.org to the IP address of the Windows Server (usually of the form 10.0.0.X). See this resource for details: https://www.ionos.com/digitalguide/server/configuration/hosts-file/
Resources
Install OpenLDAP on your Ubuntu VM labelled SERVER. Follow the steps and configuration details below:
First, set a static IP address on your Ubuntu VM labelled SERVER, if it does not have one already. Use the IP address ending in 41 that was reserved for this use in Lab 3. For the static DNS entries, use that same IP address as the first entry to reference your DNS server from Lab 3 (see the provided model solutions if your server was not working in Lab 3), and then use the IP address for VMware’s default gateway address as the second DNS entry. In this way, the server will use itself as a DNS server first, and if that fails then it will use the other server. This is very important when dealing with LDAP domains, so that the server can properly resolve the ldap.<your eID>.cis527.org address.
If you haven’t already, make a snapshot of this VM that you can restore if you run into issues setting up an OpenLDAP server.
Set up and configure an OpenLDAP server, following the first part of the instructions in the guide linked in the resources section below.
- Domain Name:
ldap.<your eID>.cis527.org (example: ldap.russfeld.cis527.org) - Base DN:
dc=ldap,dc=<your eID>,dc=cis527,dc=org (example: dc=ldap,dc=russfeld,dc=cis527,dc=org) - Passwords: Use
cis527_linux for all passwords - You DO NOT have to perform the other steps in the guide to configure TLS at this point
Install LDAP Account Manager (LAM). See the documentation linked below for how to install and configure LDAP Account Manager.
Add a User Account to your OpenLDAP Directory
- Follow the instructions in the guide below to create
ous for users, groups, and create an admin group as well. - Use your own eID for the username, and
cis527_linux as the password.
Configure the server to use TLS. You should follow the Ubuntu Server Guide to create and sign your own certificates. Make sure you use the correct domain name!
- You should make a snapshot of your Ubuntu Server VM before attempting to add TLS. It is very difficult to undo any errors in this process, therefore it is much easier to just roll back to a previous snapshot and try again.
- At the end of the process, copy the certificate at
/usr/local/share/ca-certificates/mycacert.crt to the home directory of the cis527 user for the next step.
Of course, you may need to modify your firewall configuration to allow incoming connections to the LDAP server! If your firewall is disabled and/or not configured, there will be a deduction of up to 10% of the total points on this lab
Resources
- How to Install OpenLDAP on Ubuntu 22.04 from HowToForge (works for Ubuntu 24.04)
- Note: In this document, you can skip the steps of manually adding groups and users to LDAP before install LDAP Account Manager. Once LAM is configured, it will automatically add the default OUs for groups and users.
- LDAP & TLS from the Ubuntu Server Guide
On your Ubuntu VM labelled CLIENT, configure the system to authenticate against the OpenLDAP server created in Task 4.
First, confirm that you are able to resolve ldap.<your eID>.cis527.org using dig on your client VM. If that doesn’t work, you may need to set a static DNS entry to point to your Ubuntu VM labelled SERVER as configured in Lab 3, or add a manual entry to your hosts file.
Next, copy the mycacert.crt file from the home directory on your SERVER to the /usr/local/share/ca-certificates/ directory on the CLIENT, and then run sudo update-ca-certificates to install it.
- If you have configured SSH properly, you can copy the file from one server to another using
scp. The command may be something like scp -P 23456 ldap.<your eID>.cis527.org:~/mycacert.crt ./. - You’ll need to use
sudo to copy that file into the apporpriate directory on the client. Read the output from the commands to ensure it is installed properly!
Then, make sure that you can connect to the LDAP server using TLS. You can use ldapwhoami -x -ZZ -H ldap://ldap.<your eID>.cis527.org and it should return anonymous if it works.
Before you configure SSSD, make a snapshot of this VM. If your SSSD configuration does not work, you can restore this snapshot and try again.
To test your SSSD configuration, use the command getent passwd <username> (example: getent passwd russfeld) and confirm that it returns an entry for your LDAP user.
To log in as the LDAP user, use the su <username> command (example: su russfeld).
Finally, reboot the system, and make sure you can log in graphically by choosing the “Not listed?” option on the login screen and entering your LDAP user’s credentials.
Resources
Task 6: Interoperability - Ubuntu Client on Windows Domain
- On your Ubuntu VM labelled CLIENT, make a snapshot labelled “OpenLDAP” to save your configuration you performed for Task 5.
- Open the Snapshot Manager (VM > Snapshot > Snapshot Manager) for that VM
- Restore the “Before Lab 4” Snapshot. This should take you back to the state of this VM prior to setting it up as an OpenLDAP client.
- Follow the instructions in the video in this module to join your Windows Active Directory Domain with your Ubuntu VM. You’ll want to confirm that you are able to resolve
ad.<your eID>.cis527.org using dig on your client VM. If that doesn’t work, you may need to set a static DNS entry to point to your Windows server as configured earlier in this lab, or add a manual entry to your hosts file.
Warning
If you get errors like “Insufficient permissions to join the domain”, you may need to install krb5-user and then add rdns=false to the [libdefaults] section of the /etc/krb5.conf file, as described in this thread. That seemed to fix the error for me.
- Make a snapshot labelled “ActiveDirectory” to save your configuration for this task. You can switch between snapshots to have this VM act as a client for either directory service.
Note
If you are working in Azure, you’ll need to add a hosts file entry to the Ubuntu client that directs the domain name ad.<your eID>.cis527.org to the IP address of the Windows Server (usually of the form 10.0.0.X). See this resource for details: https://www.ionos.com/digitalguide/server/configuration/hosts-file/.
This part can be done completely from the terminal - that is typically the best way to work with Linux in Azure. You can access a Linux system in Azure using SSH easily.
Resources
Task 7: Query Servers Using LDAPSearch
From your Ubuntu VM labelled CLIENT, use the ldapsearch command (in the ldap-utils package) to query your Active Directory and OpenLDAP servers. Take a screenshot of the output from each command.
Below are example commands from a working solution. You’ll need to adapt them to match your environment. There are also sample screenshots of expected output.
- Active Directory Example Screenshot (instructive, but using old data)
ldapsearch -LLL -H ldap://192.168.40.42:389 -b "dc=ad,dc=russfeld,dc=cis527,dc=org" -D "ad\Administrator" -w "cis527_windows"
- OpenLDAP Example Screenshot (instructive, but using old data)
ldapsearch -LLL -H ldap://192.168.40.41:389 -b "dc=ldap,dc=russfeld,dc=cis527,dc=org" -D "cn=admin,dc=ldap,dc=russfeld,dc=cis527,dc=org" -w "cis527_linux"
Tip
You’ll be asked to perform each of these commands as part of the grading process, but the screenshots provide good insurance in case you aren’t able to get them to work –Russ
Task 8: Make Snapshots
In each of the virtual machines created above, create a snapshot labelled “Lab 4 Submit” before you submit the assignment. The grading process may require making changes to the VMs, so this gives you a restore point before grading starts. Also, you may have multiple Lab 4 snapshots on some VMs, so feel free to label them accordingly.
Task 9: Schedule A Grading Time
Contact the instructor and schedule a time for interactive grading. You may continue with the next module once grading has been completed.
Windows Active Directory Installation
Note
This video uses Windows Server 2016, but the process should be functionally identical in Windows Server 2019. Also make sure you refer to the Lab 4 assignment for the correct root domain name. –Russ
Resources
Video Transcript
In this video, I’ll go through some of the process of configuring a Windows Server 2016 VM to act as an Active Directory Domain Controller. The goal of this video isn’t to show you all the steps of the process, but provide commentary on some of the more confusing steps you’ll perform.
In general, I’ll be following the two guides linked in the resources section below this video. The third guide gives quite a bit of additional information about each option in the Active Directory Domain Services installation wizard, and is a very handy reference as you work through this process.
First, I’ll need to set a static IP address on this system. I’ll be using the IP address ending in 42 for this server, which was reserved in in the DNS server configured in Lab 3. I’ll also need to configure some static DNS entries. For a Domain Controller, you’ll always want to make the first DNS entry the IP address of the server itself. This is because a Domain Controller also acts as a DNS server for the domain, so you’ll need to tell this system to refer to itself for some DNS lookups. For the other entry, I’ll use the VMware router, which is the same as the default gateway address in my setup.
Next, I’m going to follow the steps to add the “Active Directory Domain Services” role to this server. This process is pretty straightforward, so I’ll leave it to you to follow the guide.
Once the installation is complete, you’ll be prompted to promote the server to a domain controller. This is the step where you’ll actually configure the Active Directory installation. For this setup, we’re going to create a new forest, using the cis527.local root domain name. You’ll need to adjust these settings to match the required configuration for the lab assignment. By using a .local top-level domain, we can guarantee that this will never be routable on the global internet. The use of a .local suffix here doesn’t actually comply with current DNS standards, but for our internal VM network it will work just fine. Of course, if you are doing this on an actual enterprise system, you may actually use your company’s internet domain name here, with a custom prefix for your directory. For example, the K-State Computer Science department might use a domain name of ldap.cs.ksu.edu for this server.
Next, you’ll need to configure the functional level of the domain. If you have older systems in your network, you will want to choose the option here for the oldest domain controller in the domain. Since we’re just creating a new system, we can use the latest option here.
You’ll also need to input a password here for Directory Services Restore Mode. In an enterprise setting, this is the password that you’ll use if you ever have to restore your domain from a backup, or work with a domain controller that will not boot correctly. So, you’d generally make this a unique password, and store it in a safe location. For our example, I’m just going to use the password we’ve been using for all of our Windows systems, but in practice you would make it much more secure.
Next are the DNS options. If you are running a separate DNS server in your organization, you’ll need to checkmark this box to create a DNS delegation. However, for this lab assignment you won’t need to do that, since we aren’t trying to combine our Windows and Linux environments.
Following that, you’ll need to configure the NetBIOS name for the domain. In general, this is just the first part of your fully domain name. NetBIOS is a very old protocol that is not commonly used, but some Windows systems will still use it to find resources on a network. You can just accept the default option here, unless a different name would be more reasonable.
In addition, you’ll be able to configure the storage paths on your system. For this example, we’ll just keep the default paths. However, on a production server, it might make more sense to store these on a different drive, just in case you have to reinstall the operating system in the future. These are the folders that store the actual database and information for the Active Directory domain.
Finally, you’ll be able to review the options before applying them. If you’d like, you can click the “View script” button to view a PowerShell script that you could use to perform these steps on a Windows Server without a GUI installed.
With all the settings in place, you can continue with the configuration process. The first step is a prerequisites check to make sure that the server is able to complete the installation. You may get a couple of warnings about weaker cryptography algorithms and DNS server delegation, but you can ignore those for this example. If the prerequisites check is passed, you can click “Install” to install the service.
Once it has installed and rebooted, you’ll notice that you are now prompted to log in as a domain user. On Windows systems, the domain name is shown before the \, followed by your username. So, in this example, it now wants me to log in as CIS527\Administrator. This is a different account than the Administrator account on the computer itself, which we were using previously. To log in as a local account, you can use the computer name, followed by a \ and then the username. If you don’t remember the computer name, you can click the “How do I sign in to another domain?” link below the prompt to find it. For now, we’ll log in as the domain administrator account.
Once you’ve logged in, you’ll need to create at least one user on the Active Directory domain. You can find the Active Directory Users and Computers application under the Tools menu on the Server Manager. Thankfully, adding a user here is very similar to adding a user in the Computer Management interface on a Windows computer. As before, make sure you uncheck the box labeled “User must change password at next logon” and checkmark the “Password never expires” box for now.
That should get the server all set up! Next, we’ll look at adding a Windows 10 computer to your new Active Directory Domain.
Windows Client Configuration
YouTube VideoResources
Video Transcript
Once you have completely set up your Active Directory Domain, you can begin to add Windows clients to the domain. This video will walk through some of that process, and I’ll discuss a few of the steps as we go.
For this example, I have my Windows 10 VM from the earlier labs. It is on the same network as the domain controller. Before I begin, I’ll need to set some static DNS settings on this computer. First, and most importantly, I’ll add a DNS entry for the domain controller first, and the second entry can be any of the other working DNS servers on the network. In this case, I’ll just use the VMware default gateway.
Next, I’m going to right-click on the Start button and choose the System option. Before adding it to the domain, I need to make sure it is named correctly. If not, I’ll need to rename it and reboot before adding it to the domain. Once a computer is on a domain, it is very difficult to rename it.
Once I’m sure it is correct, I’m going to click the System Info link to get to the old System options in the Control Panel. Here I should be able to see the current workgroup. To add the system to a domain, click the Change settings button to the right of the computer name. Then, I’ll click the Change button to add it to the domain.
On this window, I’ll choose the Domain option, and enter the name of the domain, in this case cis527.local, and click OK. You may get a message about the NetBIOS name of the computer being too long, but you can safely ignore that message.
If everything works correctly, you should see a pop up asking you to enter the username and password of an account with permissions to add a computer to the domain. In this case, the only account we’ve set up with those permissions is the domain administrator account, so we’ll enter those credentials here. Once you enter it, it should welcome you to the domain, and prompt you to restart.
If your computer is unable to contact the domain at this step, it is usually a problem with your network configuration. To diagnose the problem, try to ping the domain name using the command-line ping utility and see what the response is. If it cannot find it, then check your network settings and DNS settings and make sure you can ping the domain controller as well. In many cases, this can be one of the more frustrating errors to debug if it happens to you.
Once the system reboots, you’ll be able to log in using any valid credentials for a domain user. As you experienced with the domain controller, you can enter the domain or computer name, followed by a slash, and then the user name to choose which user account to use. Thankfully, here you can always use .\ to log in as the local computer. In this case, let’s use our domain user account.
Once you log in, let’s take a look at the Computer Management interface to see what changed about the users and groups on the system. If you open up the Administrators group, you’ll notice that it now includes an entry for CIS527\Domain Admins, and likewise the Users group contains a new entry for CIS527\Domain Users. That means, by default, any user on the domain can now log on to the computer as a user, and anyone on the domain with administrative privileges can log on to any computer on the domain and gain administrator permissions there as well. It is very important to understand these default permissions, so that you can assign them accordingly. For example, in many organizations, you may want to immediately remove the Domain Users entry from the Users group, and add a smaller group instead. You probably don’t need folks from the Accounting department logging on to systems in Human Resources, right?
That’s really all there is to it! You’ve successfully set up a Windows Active Directory Domain and added your first client computer to it. The next few videos will walk you through the same process on Ubuntu with OpenLDAP.
Windows Group Policy
YouTube VideoResources
Video Transcript
One of the major features of Microsoft’s Active Directory is the ability to use Group Policy Objects, or GPOs, to enforce specific security settings on any Windows client added to the domain. For large enterprises, this is a major tool in their arsenal to ensure that Windows PCs are properly configured and secured in their organization.
Group Policy can be set at both the local computer level, as well as via Active Directory. The settings themselves are hierarchical in nature, so you can easily browse through related settings when using the Group Policy Editor tool. In addition, GPOs are inheritable, and multiple GPOs can be applied to a group or OU in a domain.
When group policies are applied, they follow this order. First, any policies set locally on the machine are applied, then policies from the Active Directory site, then the global domain itself, and finally any policies applied to the OU containing this computer or user are applied. At each level, any previous settings can be overridden, so in essence, the policies applied at the OU level take precedence over others.
Some examples of things you can control via Group Policy are shown here. You can create mapped drives, which we will see in a later module. You can also set power options, which could be used in an organization to save money by reducing energy usage. In addition, you can use group policy to enforce password restrictions, and even install printers and printer drivers as well.
Let’s take a look at one quick demonstration, setting a password policy for the domain. This tutorial is from Infoworld, and is linked in the resources section below the video.
Here I have opened my Windows 2016 Server VM as configured for Lab 4. First, I’ll open the Group Policy Management Console, which is available on the Tools menu in Windows Server Manager. Next, I’ll find my domain, and right-click it to create a GPO in this domain. I’ll also give the GPO a helpful name, and click OK to create it.
Next, I can right-click the policy and choose Edit. In the policy editor, I’ll need to dig down the following path:
<name>\Computer Configuration\Policies\Windows Settings\Security Settings\Account Policies\Password Policy
In that window, we’ll right-click the “Password Must Meet Complexity Requirements” option, and choose Properties. Then, we’ll enable the setting by checkmarking the box and clicking Enable. You can find more information about the policy by clicking the Explain tab at the top.
Finally, once the policy is configured, you’ll need to right-click on it once again, and select the Enforced option to enforce it on the domain itself.
That’s all there is to it! Now, any new password created on this domain must meet those complexity requirements. While you won’t have to work with Group Policy for this lab assignment, we’ll come back to it in a later module as we work with application and file servers.
Ubuntu LDAP Installation
YouTube Video
Note
PHPLDAPAdmin no longer works on Ubuntu 24.04 since it has several incompatibility issues with PHP 8+. The assignment has been updated to use the new LDAP Account Manager (LAM) software instead. You may ignore the part of this video showing how to configure PHPLDAPAdmin and instead refer to the guide linked from the assignment page to configure LAM.
Also, see the transcript below for an updated version of the ldapwhoami command.
Resources
Video Transcript
As we did earlier with setting up Active Directory on Windows, let’s take a look at the steps required to install and configure OpenLDAP on Linux. The goal of this video isn’t to show you all the steps of the process, but provide commentary on some of the more confusing steps you’ll perform.
For this example, I’m using the Ubuntu VM labelled Server from Lab 3. I have chosen to disable the DHCP server on this system, and instead have replaced it with the VMware DHCP server. In practice, that change should not affect any of this process. Also, I’ll generally be following the guide from DigitalOcean, which is linked in the resources section below the video.
At this point, I have also already performed the first steps of the guide, which is to install the slapd and ldap-utils packages on this system. Now, I’ll step through the configuration process for slapd and discuss the various options it presents.
sudo dpkg-reconfigure slapd
First, it will ask you if you want to omit the OpenLDAP server configuration. Make sure you select <No> for that option. You can use the arrow keys (← and →) to move the red-shaded selector to the option you’d like to select, then press ENTER to confirm it.
Next, it will ask for your domain name. For this example, I’ll just use ldap.cis527russfeld.cs.ksu.edu. You’ll need to adjust these settings to match the required configuration for the lab assignment. This matches the DNS configuration I made in Lab 3, which is very important later on in this process.
Next, it will also ask for your organization name. I’ll just use cis527 here.
Then, it will ask for your Administrator password. This is the equivalent of the root account within the domain. It is able to change all domain settings, and therefore the password for this account should be very complex and well protected. For this example, I’ll just use the same password we are using for everything else, but in practice you’ll want to carefully consider this password.
The next option is whether you want to have the database removed if you purge the slapd package. Selecting <yes> on this option would delete your LDAP database if you ever chose to reinstall the slapd package. For most uses, you’ll always want to select <no> here, which is what I’ll do.
Since there are some existing configuration files in place, the installer asks if you’d like those to be moved. Unless you are reinstalling slapd on an existing server, you can select <yes> for this option.
That should complete the configuration for the OpenLDAP server. For this example, I have disabled the firewall on this system, but for your lab assignment you’ll need to do a bit of firewall configuration at this point.
Finally, let’s add some encryption to this server to protect the information shared across the network. This step was not required in previous versions of this lab, but it has always been a good idea. Now that Ubuntu uses SSSD, or System Security Services Daemon, for authentication, it requires us to provide TLS encryption on our LDAP server. So, let’s do that now.
For these steps, we’ll be closely following the Ubuntu Server Guide linked below this video. We’ll be adjusting a few of the items to match our configuration, but most of the commands are exactly the same.
First, we’ll need to install a couple of packages to allow us to create and manipulate security certificates
sudo apt update
sudo apt install gnutls-bin ssl-cert
Next, we need to create our own certificate authority, or CA. In a production system, you would instead work with an actual CA to obtain a security certificate from them, but that can be time consuming and expensive. So, for this example, we’ll just create our own. Also, contrary to what your browser may lead you to believe, using your own CA certificates will result in an encrypted connection, it just may not be “trusted” since your browser doesn’t recognize the CA certificate.
If you want to know more about CAs and certificates, check out the handy YouTube video I’ve linked below this video. It gives a great description of how certificates work in much more detail. I’ve also included links to the lectures in Module 3 and Module 5 that deal with TLS certificates.
So, we’ll first create a private key for our CA:
sudo certtool --generate-privkey --bits 4096 --outfile /etc/ssl/private/mycakey.pem
Then, we’ll create a template file that contains the options we need for creating this certificate. Notice here that I’ve modified this information from what is provided in the Ubuntu Server Guide document to match our setup:
sudo nano /etc/ssl/ca.info
and put the following text into that file.
cn = CIS 527
ca
cert_signing_key
expiration_days = 3650
Then, we can use that template to create our self-signed certificate authority certificate:
sudo certtool --generate-self-signed --load-privkey /etc/ssl/private/mycakey.pem --template /etc/ssl/ca.info --outfile /usr/local/share/ca-certificates/mycacert.crt
This will create a certificate called mycacert.crt that is stored in /usr/local/share/ca-certificates/. This is our self-signed CA certificate. So, whenever we want any system to trust one of our self-signed certificates that we make from our CA, we’ll need to make sure that system has a copy of this CA certificate in its list of trusted certificates.
To do that, we simply place the certificate in /usr/local/share/ca-certificates/, and then run the following command to add it to the list of trusted certificates:
sudo update-ca-certificates
If that command works correctly, it should tell us that it has added 1 certificate to our list.
Before we move on, let’s make a copy of our mycacert.crt file in our cis527 users’s home directory. We’ll use this file in the next part of this lab when we are configuring our client system to authenticate using LDAP.
cp /usr/local/share/ca-certificates/mycacert.crt ~/
Now that we’ve created our own self-signed CA, we can use it to create a certificate for our LDAP server. So, we’ll start by creating yet another private key:
sudo certtool --generate-privkey --bits 2048 --outfile /etc/ldap/ldap01_slapd_key.pem
Then, we’ll create another template file to give the information about the certificate that we’d like to create:
sudo nano /etc/ssl/ldap01.info
and place the following tex in that file:
organization = CIS 527
cn = ldap.cis527russfeld.cs.ksu.edu
tls_www_server
encryption_key
signing_key
expiration_days = 365
Notice that in that file, we entered the fully qualified domain name for our LDAP server on the second line. This is the most important part that makes all of this work. On our client machine, we must have a DNS entry that links this domain name to our LDAP server’s IP address, and then the certificate the server uses must match that domain name. So, if we don’t get this step right, the whole system may not work correctly until we fix it!
Finally, we can use this long and complex command to create and sign our server’s certificate:
sudo certtool --generate-certificate --load-privkey /etc/ldap/ldap01_slapd_key.pem --load-ca-certificate /etc/ssl/certs/mycacert.pem --load-ca-privkey /etc/ssl/private/mycakey.pem --template /etc/ssl/ldap01.info --outfile /etc/ldap/ldap01_slapd_cert.pem
Once the certificate has been created, we just need to do a couple of tweaks so that it has the correct permissions. This will allow the LDAP server to properly access the file:
sudo chgrp openldap /etc/ldap/ldap01_slapd_key.pem
sudo chmod 0640 /etc/ldap/ldap01_slapd_key.pem
Finally, at long last, we are ready to tell our LDAP server to use the certificate. To do that, we’ll create an LDIF file:
and in that file we’ll put the information about our certificate:
dn: cn=config
add: olcTLSCACertificateFile
olcTLSCACertificateFile: /etc/ssl/certs/mycacert.pem
-
add: olcTLSCertificateFile
olcTLSCertificateFile: /etc/ldap/ldap01_slapd_cert.pem
-
add: olcTLSCertificateKeyFile
olcTLSCertificateKeyFile: /etc/ldap/ldap01_slapd_key.pem
Once that file is created, we can use the ldapmodify tool to import it into our server:
sudo ldapmodify -Y EXTERNAL -H ldapi:/// -f certinfo.ldif
Whew! That was a lot of work! Now, if we did everything correctly, we should be able to query this LDAP server using TLS. The best way to check that is by using the following command:
ldapwhoami -x -ZZ -H ldap.cis527russfeld.cs.ksu.edu
The -ZZ part of that command tells it to use TLS, and if it works correctly it should return anonymous as the result. If this step fails, then you may need to do some troubleshooting to see what the problem is.
That should do it! In the next video, I’ll show how to configure another Ubuntu VM to use this LDAP server for authentication.
Ubuntu Client Configuration
YouTube Video
Note
See the transcript below for an updated version of the ldapwhoami command.
Resources
Video Transcript
Once we’ve set up and configured our OpenLDAP server on Linux, we can configure another VM to act as an LDAP client and use that server for authentication. Thankfully, now that Ubuntu 20.04 uses SSSD, this process is pretty simple.
For the most part, we’ll be following the instructions in the Ubuntu Server Guide page linked below this video. It is a pretty in-depth overview of how to configure SSSD to use LDAP for authentication. In fact, if you’ve done the Windows portions of this assignment already, you’ll be familiar with several of these steps.
First, we’ll need to install a couple of packages on this system to allow us to interact with LDAP systems via SSSD:
sudo apt update
sudo apt install sssd-ldap ldap-utils
Next, we’ll need to get a copy of our certificate authority, or CA, certificate from our Ubuntu 20.04 VM labelled SERVER. If we followed the instructions in the previous video correctly, we should have created a copy of that file in the home directory of the cis527 user on our server.
If not, you can do so by logging on to the SERVER VM as cis527 and using the following command:
cp /usr/local/share/ca-certificates/mycacert.crt ~/
Then, from the CLIENT VM, we can use scp to copy that file using SSH. Hopefully you were able to get the SSH portion of the lab set up and working correctly. If not, you may have to copy this from the SERVER VM to your host system, and then from your host system back to the CLIENT VM. To copy the file using scp, use a command similar to the following
scp -P 22222 cis527@192.168.40.41:~/mycacert.crt ~/
Let’s break that command down. First, the -P 22222 tells us the we are using port 22222 to connect to the system, which is how it was configured in Lab 3. Then, we have cis527@, which is the username we’d like to use on the remote system, followed by 192.168.40.41, which is the IP address of our SERVER VM. Next, there is a colon, and a file path, which is ~/mycacert.crt, which is the path to the certificate file on the SERVER VM. Finally, we have a space, and another path ~/ showing where we’d like to place the file on our CLIENT VM.
Of course, if you want to learn more about SSH and SCP, check out the video in the Extras section for more information.
Once we have a copy of the certificate on our CLIENT VM, we can install it using the following commands:
sudo cp ~/mycacert.crt /usr/local/share/ca-certificates/
sudo update-ca-certificates
If that command works correctly, it should tell us that it has added 1 certificate to our list. That means that our CLIENT VM now includes our own self-signed CA in its list of trusted CA certificates. That’s what we want!
Next, we’ll need to create an SSSD configuration file. Unfortunately, unlike the example we’ll see later with Windows and Active Directory, we’ll have to create this one manually. Here’s an example of what that would look like. First, we’ll open the file:
sudo nano /etc/sssd/sssd.conf
and then put the following contents inside of it:
[sssd]
config_file_version = 2
domains = ldap.cis527russfeld.cs.ksu.edu

[domain/ldap.cis527russfeld.cs.ksu.edu]
id_provider = ldap
auth_provider = ldap
ldap_uri = ldap://ldap.cis527russfeld.cs.ksu.edu
cache_credentials = True
ldap_search_base = dc=ldap,dc=cis527russfeld,dc=cs,dc=ksu,dc=edu
Notice that we’ve customized this file to match our LDAP configuration information from the previous video.
Also, we must make sure that that file is owned by root:root and only the user has permission to access that file:
sudo chown root:root /etc/sssd/sssd.conf
sudo chmod 600 /etc/sssd/sssd.conf
Finally, we can restart the SSSD service to load the new settings:
sudo systemctl restart sssd
If this command returns an error, it usually either means that there is a typo in the sssd.conf file created earlier, or that the file’s permissions are incorrect. So, make sure you double-check that if you run into an error at this point.
Now, let’s tackle the creation of home directories. This is handled by the Pluggable Authentication Modules, or PAM, framework. There are many ways to do this, including editing a config file manually. However, there is a quick and easy way to do this as well, using the pam-auth-update command:
In the menu, press the SPACE key to enable the “Create home directory on login” option, then press ENTER to save the changes.
Finally, we can do some testing to make sure that things are working correctly. First, we’ll need to be able to access our LDAP server using its DNS name, so we can test that using dig:
dig ldap.cis527russfeld.cs.ksu.edu
Hopefully you were able to get your LDAP server working in the previous lab. If not, you may load some of the model solution files from Lab 3 provided on Canvas to get this part working.
Next, we’ll make sure we can access the LDAP server
ldapwhoami -x -H ldap.cis527russfeld.cs.ksu.edu
This command should return anonymous. If not, your CLIENT VM is having trouble contacting your SERVER VM or the LDAP server itself. In that case, you may want to check your firewall configuration - did you remember to allow the correct ports for LDAP?
Once that command works, we can try it again using TLS by adding -ZZ to the command:
ldapwhoami -x -ZZ -H ldap.cis527russfeld.cs.ksu.edu
Hopefully this command should return anonymous just like it did previously. If not, there is probably a configuration issue with your TLS certificates that you’ll need to resolve before moving on.
Finally, if everything looks like it is working, we can try to load information about one of our LDAP users using the getent command:
This command should return information about the user we created on our LDAP server. If not, then we may need to check the settings in our sssd.conf file to make sure the LDAP information is correct.
Thankfully, if that worked, we can try to log on to the system as that user using the su command:
It works! We can even go to our home directory and see that it was created for us:
Now, at this point, I should point out one very important impact of how our system is configured. I am logged in as an LDAP user, but notice that if I try to log in as root, I’m able to use sudo without any additional configuration! Yikes!
How did that happen? It actually is due to a setting in our sudoers file that is present by default on all Ubuntu systems. Let’s take a look at that file:
If we look through that file, we’ll find a line that says members of the admin group may gain root privileges. In fact, that’s exactly what happened! Just because we chose to name our group admin on the LDAP server, our users would automatically gain sudo access on any system they log into. The same would happen for a group named sudo as well. So, it is very important to make sure your groups on your LDAP server use unique names, otherwise you may inadvertently create a major security hole in your systems.
To test the graphical login, you’ll need to fully reboot your computer. Once that is done, you can click the “Not listed?” option at the bottom of the list of users, then enter the credentials for your LDAP user to log in. If everything is configured correctly, it should let you log in directly to the system.
You have now successfully configured your system to allow Ubuntu to use LDAP servers for user accounts. This should be enough information to help you complete that section of Lab 4. As always, if you have any questions, feel free to post in the course discussion forums on Canvas. Good luck!
Linux Client on Windows Domain
YouTube VideoResources
Video Transcript
In the following two videos, we’ll look at how to enable interoperability between our Windows- and Linux-based systems. In many organizations today, you’ll have a mix of many different operating systems, so it is very helpful to understand how to integrate them together in a single directory service.
In this video, I’ll show you how to add an Ubuntu VM to a Windows Active Directory Domain. This is by far the most common use-case for interoperability, and has been used by many organizations including K-State. For most users, Windows Active Directory provides a great set of features for Windows-based systems, and it is simple to integrate Linux and Mac clients into that environment.
For this example, I’m using the Windows 2019 server set up as defined in Lab 4’s assignment. I’ve reconfigured the domain to have the fully qualified domain name ad.cis527russfeld.cs.ksu.edu for this example, as you would in a real environment. This is due to the fact that many Linux packages do not accept the .local top-level domain I used in the previous video as an example.
For the client, I am using a copy of my Ubuntu 20.04 VM labelled CLIENT from Lab 3. For this assignment, you’ll use that same VM, but restored to a snapshot taken before it was configured as a client for OpenLDAP. Remember that you’ll need create this snapshot before you start the Lab 4 assignment, or else you may need to create a new VM for this activity.
Finally, I’ve found there really isn’t a great guide for doing this online, but I’m generally following the instructions in the Server-World guide linked below this video. I’ll do my best to clarify what parts are important and what parts I leave out and why.
First, as with any client I wish to add to a domain, I’ll need to set a static DNS entry to point to the domain controller itself. For the second entry, I’ll just use the VMware router as always. Once I’ve done that, I’ll disable and enable the network connection so that my changes take effect.
Then, I’ll need to install the realmd package. This package allows us to interface with Active Directory Domain servers.
sudo apt update
sudo apt install realmd
The instructions found online typically have you install a large number of packages at this step, but don’t do a good job of describing what they are used for. Thankfully, Ubuntu 20.04 includes a special program called packagekit by default, which allows us to automatically install the packages we need as we need them. So, we’ll start by just installing realmd and going from there.
Once we have realmd installed, we can use it to query our Active Directory domain using the realm discover command:
realm discover ad.cis527russfeld.cs.ksu.edu
If that command works correctly, you should see output giving information about the Active Directory Domain we just queried. However, if you get an error at this step, that usually means that something isn’t working correctly. In that case, double-check that you have properly set your DNS entries, and that you can ping your Windows 2019 server using both the IP address and the Active Directory Domain name. You’ll need to be able to use DNS to resolve that domain name in order for this system to join the domain.
Once we are ready to join the domain, we can simply using the sudo realm join command.
sudo realm join ad.cis527russfeld.cs.ksu.edu
Once we enter that command, we’ll be prompted for the password for the Administrator account. This is the Administrator account of our Active Directory domain, so we’ll have to provide the correct password here.
Here’s where the cool part happens. The realmd program is smart enough to know what packages we need in order to interface with an Active Directory domain, and because we have packagekit installed on Ubuntu 20.04 by default, the realmd command can automatically install those packages when we use the realm join command. So, we don’t have to worry about remembering to install all of these packages manually - it is done for us automatically! Very handy!
Ok, now that we have joined the domain, we can see if we can get information about an Active Directory user account using the id command:
id russfeld@ad.cis527russfeld.cs.ksu.edu
If everything is working correctly, you should see some information about that user printed to the screen. If not, you’ll need to do some troubleshooting.
Now, we can even log in as that user using the su, or “switch user” command:
su russfeld@ad.cis527russfeld.cs.ksu.edu
There we go! We are now logged in to this system as one of our Active Directory users. However, there are couple of things we can do to improve this experience. First, notice that we have to enter our fully qualified domain name for our Active Directory domain to log in. That can get really annoying, espeically with a long domain like ours. Also, what if we try to check our home directory:
We find out that this user doesn’t even have a home directory to store files in. That’s no good!
So, let’s log out of this user and try to fix these issues.
First, let’s change a setting so that we don’t have to enter the full Active Directory Domain name each time we want to log in as one of those users. To do that, we’ll edit the sssd configuration file. The sssd package helps provide access to authentication resources across many different sources.
sudo nano /etc/sssd/sssd.conf
In that file, we’ll see a line like the following:
use_fully_qualified_names = True
We’ll simply set that setting to False and then save the file.
use_fully_qualified_names = False
Finally, we can restart the sssd daemon to load the new settings.
sudo systemctl restart sssd
Now, we can use the id command with just the username:
and we should get the correct info. We can even use that username to log in to the system using the su command.
Yay! Now, let’s tackle the creation of home directories. This is handled by the Pluggable Authentication Modules, or PAM, framework. There are many ways to do this, including editing a config file manually. However, there is a quick and easy way to do this as well, using the pam-auth-update command:
In the menu, press the SPACE key to enable the “Create home directory on login” option, then press ENTER to save the changes.
There we go! Now, when we log in as our domain user, it will automatically create a home directory for us:
Awesome! Now, one interesting thing to discuss at this point is the fact that many online tutorials require us to install the oddjob and oddjob-mkhomedir packages. As far as I can tell, these are only required if we are using selinux instead of apparmor to protect our system. Since we aren’t doing that, we’ll just leave this out for now. However, if you do decide to use selinux on your system, you may have to do some additional configuration in order for your home directories to be properly created.
Ok, the last thing we may want to tackle on this system is the ability for our domain users to log on graphically. In previous versions of Ubuntu, this required a bit more configuration. However, in Ubuntu 20.04, all we have to do is restart the system to reload a few of the changes we just made. Then, we can click the “Not listed?” option at the bottom of the login window, and enter our domain username and password.
Voila! That’s all it takes to log on graphically using an Active Directory domain user account on Ubuntu 20.04. The process has gotten much simpler over the years, to the point where it isn’t that much more difficult than adding a Windows 10 client to a domain.
Windows Client on Linux Domain
Note
This portion is no longer part of the Lab 4 assignment, but I left it here because it is interesting to know that it can be done. –Russ
Resources
Video Transcript
In this video, I’ll show you how to set up an Ubuntu VM to act as a Windows Active Directory Domain Controller using Samba. Unfortunately, at this time it is not straightforward at all to use OpenLDAP as the server, hence the decision to use Samba instead. This is a much more complicated process than adding Ubuntu as a client to an existing Active Directory Domain, but I feel that it is important to see that it is indeed possible. This is helpful if your organization is primarily Linux-based, but you wish to include a few Windows clients on the network as well.
For this example, I’m using the Ubuntu VM labelled Client from earlier in this lab. I’ve created a snapshot to store the work done previously to add it to an OpenLDAP domain, but now I’ve restored the snapshot labelled “Before Lab 4” and will use that snapshot to create a Samba server. The reason I am doing this on the VM labelled Client and not the one labelled Server is because the Samba installation will directly conflict with Bind9, OpenLDAP, and many other tools we’ve already installed on the server. So, this allows us to avoid any conflicts with those tools.
For the client, I have restored my Windows 10 VM to a snapshot taken before it was added to my Active Directory Domain. Remember that you’ll need to create this snapshot before you start the Lab 4 assignment, or else you may need to create a new VM for this activity.
Finally, I’ll generally be following the great guide by Jack Wallen that is linked in the resources section below this video, but I’ll be making a few minor changes to match our environment and clarifying a few things that he leaves out.
Before we begin, we’ll need to set a static IP on this system, since it will be acting as a server. I’m going to use the IP ending in 45 in my local subnet. For the DNS entries, we’ll also need to set the first entry to be this system itself, just like we did with the Windows Domain Controller. The second DNS entry can be the VMware router or any other valid DNS server.
First, we’ll need to install Samba as well as a few supporting tools:
sudo apt update
sudo apt install samba libpam-winbind smbclient
This will install many supporting packages as well.
Next, we need to make a few edits to our hosts file as well as update our hostname. This will help Samba find the correct settings as we configure it in a later step. First, let’s edit the hosts file:
I’ll need to add or edit a few entries at the top of this file. Here’s what mine currently looks like:
127.0.0.1       localhost.localdomain
127.0.1.1       dc
192.168.40.41   localhost
192.168.40.41   smbrussfeld.cis527.cs.ksu.edu       smbrussfeld
192.168.40.41   dc.smbrussfeld.cis527.cs.ksu.edu    dc
The first line is updated to be localhost.localdomain, just to make it clear that that IP address is for the loopback adapter. The second line gives the new hostname for this system. In this case, I’m calling it dc for domain controller. The third line redirects the localhost domain name to the external IP address. Finally, the fourth and fifth lines give the name of the domain as well as the fully qualified domain name for this system, respectively.
To go along with this change, we’ll edit the hostname file as well:
It should now be the same as the hostname used in the hosts file:
Finally, we’ll need to restart the computer for these changes to take effect.
Once it has restarted, we’ll need to remove any existing Samba configuration files and database files.
Thankfully, there are some great commands for finding the location of those files. First, you can find the location of the config file using this command:
smbd -b | grep "CONFIGFILE"
It is usually at /etc/samba/smb.conf. So, to delete it, you’ll use:
sudo rm -f /etc/samba/smb.conf
Next, you can find the locations of all database files using this command:
smbd -b | egrep "LOCKDIR|STATEDIR|CACHEDIR|PRIVATE_DIR"
It should give you four different directory paths. So, for each of those directories, you’ll need to enter that directory, then delete all files with the .tdb and .ldb file extensions. So, for the first one, you could use these commands:
cd /var/run/samba
sudo rm -f *.tdb *.ldb
Repeat that process for the other three directories to make sure they are all clear.
Once that is done, it is time to create our new domain. We’ll use the samba-tool command to do this in interactive mode:
sudo samba-tool domain provision --use-rfc2307 --interactive
First, it will ask you for the realm. For this example, I’ll use the name smbrussfeld.cis527.cs.ksu.edu. Following that, it should ask you for the NetBIOS name of your domain. The default should be smbrussfeld, which is fine. You can also accept the defaults of dc for the server role, and SAMBA_INTERNAL for the DNS backend. For the DNS forwarder address, you can use the VMware router’s IP address, or any other valid DNS server address from Lab 3. Finally, you’ll need to enter a password for the Administrator account. I’ll use the same password as always.
Once you’ve entered that information, your domain will be configured. Now, we’ll need to add a user to Samba and enable it using the following commands:
sudo smbpasswd -a <username>
sudo smbpasswd -e <username>
Next, we’ll need to disable the systemd-resolved service. This service is installed by default on Ubuntu 18.04, and is responsible for caching local DNS queries. However, since it binds to port 53, it will prevent our Samba server from binding to that port. To disable it, we’ll use the following commands:
sudo systemctl disable systemd-resolved
sudo systemctl stop systemd-resolved
We’ll also need to disable the existing Samba services, and enable the Samba Domain Controller service:
sudo systemctl disable nmbd
sudo systemctl stop nmbd
sudo systemctl disable smbd
sudo systemctl stop smbd
sudo systemctl unmask samba-ad-dc
sudo systemctl enable samba-ad-dc
sudo systemctl start samba-ad-dc
Lastly, we’ll need to replace any existing Kerberos configuration file with the one created by Samba. So, you’ll perform these commands to delete the existing file (if any) and create a symbolic link to the one from Samba.
sudo mv /etc/krb5.conf /etc/krb5.conf.orig
sudo ln -sf /var/lib/samba/private/krb5.conf /etc/krb5.conf
If you get an error from the first command, you can safely ignore it.
Finally, if everything is configured correctly, we can query our domain using the smbclient command:
smbclient -L localhost -U%
Hopefully you should get output from that command giving information about your domain. If not, you’ll probably need to review the Samba log file stored in /var/log/samba/log.samba to see what the error is.
If everything is working correctly, you can then add your Windows 10 VM to the domain. First, as with any client I wish to add to a domain, I’ll need to set a static DNS entry to point to the domain controller itself. For the second entry, I’ll just use the VMware router as always. Then, I can add it to the domain following the instructions in the earlier video.
After a reboot, it should allow you to log in as the domain user created earlier.
It is quite a process, but hopefully this demonstrates what it takes to create an Active Directory Domain using Samba. I highly recommend that you try this process at least once, even if you don’t plan on completing it as part of Lab 4, just to see how it all works together.
AD and NETBIOS Names
It appears that I have managed to confuse lots of people with the Windows AD portion of this lab. That’s not my intent, and any confusion is totally my fault here. This is mostly due to the fact that I reused an older video showing how to set up an Active Directory server and not clearly describing how things should be changed. I’ll do my best to clarify what you need to know and how you can adapt any existing setup you may have so that it works.
When configuring an Active Directory (AD) domain, there are two important settings: the root domain name (numbered 1 in the screenshots below) and the NETBIOS domain name (numbered 2 in the screenshots below).
In an ideal setup, those names are closely related. Typically, if the root domain name is ad.russfeld.cis527.org then the NETBIOS domain name would be ad - the first part of the root domain name. In most cases, you should not change the NETBIOS domain name from the default that is proposed by the setup process. (If you did, that’s fine - keep reading!)
In the video for setting up an AD domain, I used a simplified root domain name cis527.local, which meant that my NETBIOS domain name would be cis527 as shown in the screenshots below:
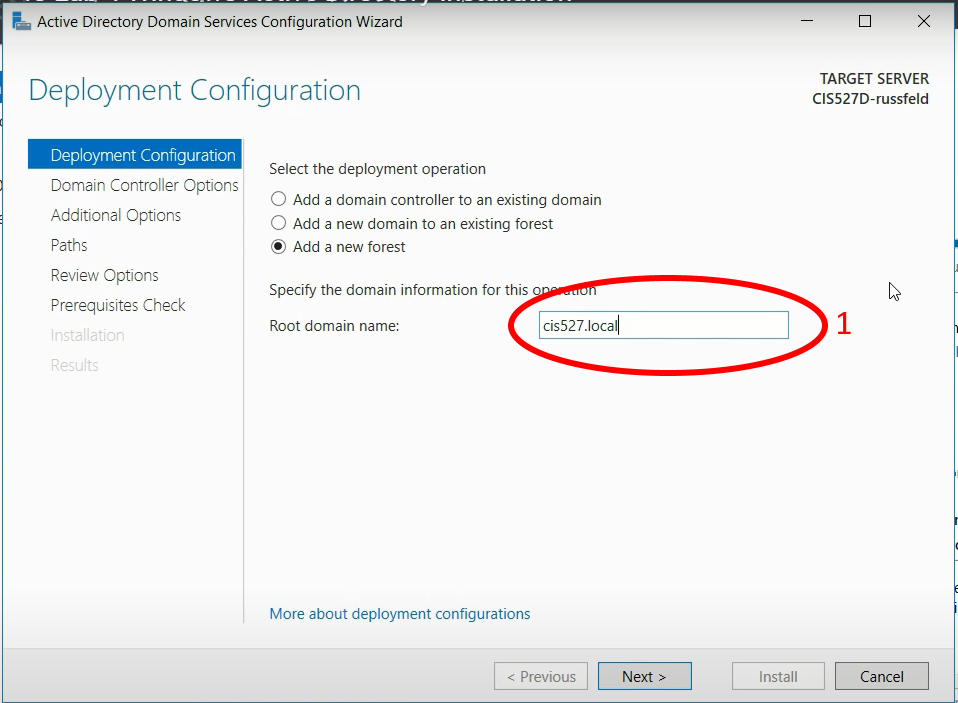
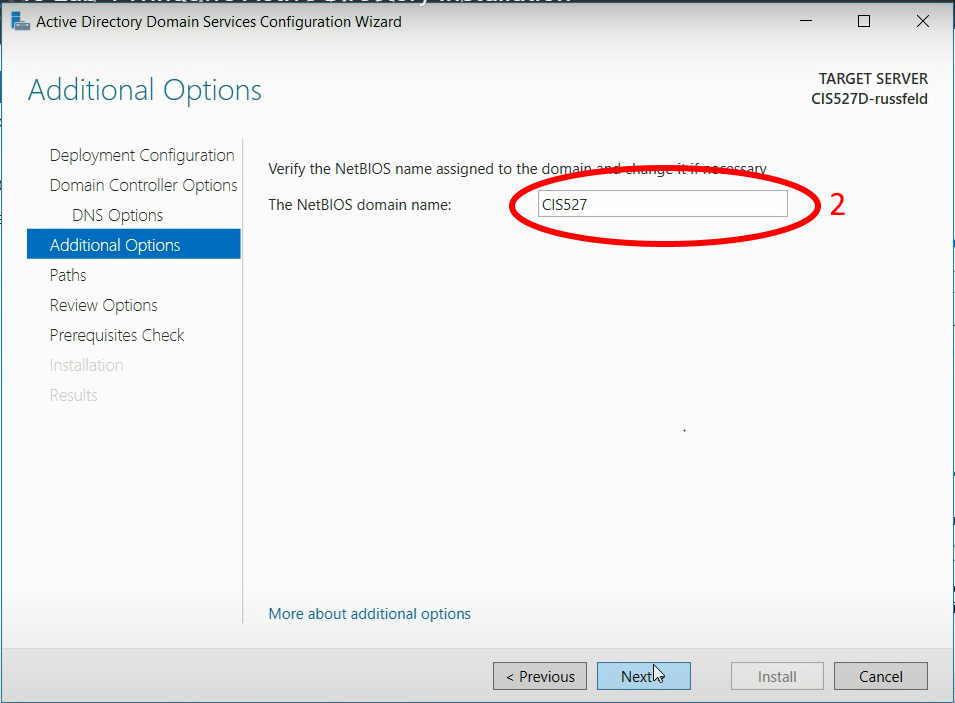
For the lab assignment itself, I give you a more concrete desired root domain name such as ad.<your eID>.cis527.org. However, I do not specify the NETBIOS domain name, which should default to ad. However, you can freely change it, and I believe that the video is leading many students to change that value to either cis527 or <your eID>. To be clear, you should not change the NETBIOS domain name at this step - whatever is proposed by the configuration wizard is correct.
If you’ve changed this, that’s fine! You’ll just have to adapt a couple of things further down the line.
To see how your domain is set up, open the Active Directory Users and Computers tool in your Windows Server VM, and find the user you created in the Users folder and open it. There should be an Account tab that looks like the following screenshot (this is from a different VM setup, so the domain names are purposefully different than what the lab specifies):
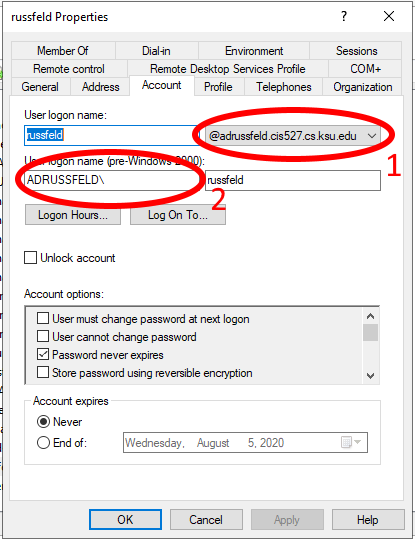
In that screenshot, you can clearly see the root domain name labelled with the number 1, which is adrussfeld.cis527.cs.ksu.edu, and the NETBIOS domain name labelled with number 2 is ADRUSSFELD. This is the VM that I used for creating the Linux Client on Windows Domain video that was new for Summer 2020. So, make note of both of these settings in your AD configuration, as you’ll need them when trying to log on to the domain or run commands.
When referencing usernames on an AD domain, there are two basic methods:
<username>@<root domain name><NETBIOS domain name>\<username>
So, when I want to log in as that user on Ubuntu, I would use method 1 with the root domain name (this is before we change the sssd configuration file to not require the full domain name):

However, if I want to do the ldapsearch command to search the Windows AD, I’ll need to use method 2 with the NETBIOS domain name:

So, you should be able to adapt to whichever method is required, making changes where necessary to make the commands work.
Q: What if my root domain name and NETBIOS domain name are different? For example, my root domain name is ad.<eID>.cis527.org but I set my NETBIOS domain name to cis527<eID>.
As far as I can tell, you should still be able to complete Lab 4 with an AD domain configured in this way. The only issues you may run into are when using the realm join command and the ldapsearch commands on Ubuntu. You’ll have to pay close attention to which method is being used, and adjust the commands as necessary to fit the situation. So far, I’ve worked with at least two students who ran into this issue but were able to get it to work with minimal problems.
It may also be very important to make sure that both your Windows client and Ubuntu client are configured to use the Windows AD server as the first DNS entry. I usually just set a static DNS entry on each of those systems before joining the domain as directed in the video - in the real world you’d have your DHCP server do this for you.
Lab 4 Networking Diagrams
YouTube VideoHere are some helpful networking diagrams to better explain the desired state before and after the end of Lab 4. In all of these diagrams, I am using a sample network with the IP address 192.168.40.0. You will have to adapt the IPs to match your network configuration. In addition, each network address will need to be updated with your unique eID as directed in the lab assignment.
After Lab 3
Once you’ve completed all of Lab 3, your network diagram should resemble the one shown above. Recall that all systems are currently configured to get DHCP and DNS information from your Ubuntu VM labelled Server, so in general it must be running at all times for this network to function. In addition, the Ubuntu VM labelled Server does not use itself for DNS, but still uses the VMare built-in DNS server, though you may have configured an alternate entry so it can refer to itself for DNS as well. This is the most likely starting point for this lab if you completed Lab 3.
Starting Lab 4 with a Working Lab 3 Solution
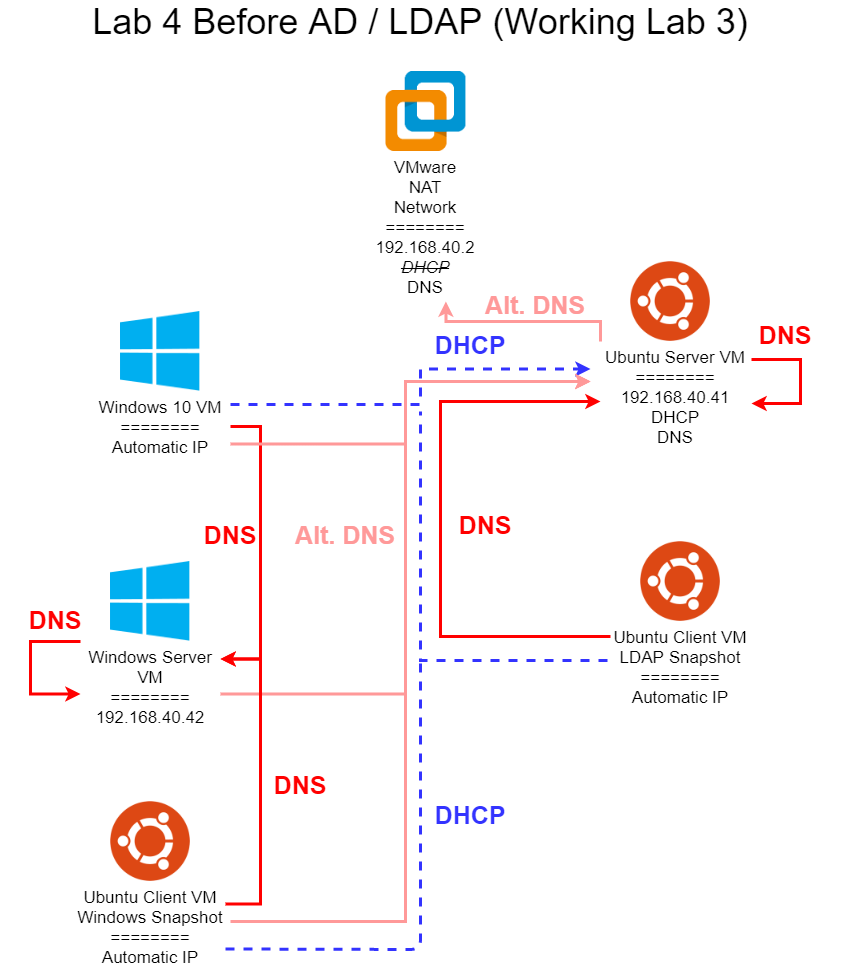
This diagram shows what an ideal network setup would look like, provided you have a working Lab 3 solution. In Lab 4, most of the changes required to get from the final Lab 3 network to this configuration are spread across multiple tasks. However, here are the major highlights:
- VMware NAT Network - the built-in DHCP server should still be disabled as it was in Lab 3.
- Ubuntu Server VM - now uses itself as a primary DNS entry, with an alternate entry set to the VMware DNS server (Lab 4, Task 4). Must be able to resolve
ldap.<your eID>.cis527.org - Ubuntu Client VM - no changes, still gets both DNS and DHCP from the Ubuntu Server VM (Lab 4, Task 5). Must be able to resolve
ldap.<your eID>.cis527.org - Windows Server VM - new VM (Lab 4, Task 1). Should have a static IP address of
192.168.40.42 and a primary static DNS entry pointing to itself, with an alternate entry set to the Ubuntu Server VM or the VMware DNS server (Lab 4, Task 2). Once the Active Directory server is installed, it should be able to resolve ad.<your eID>.cis527.org. - Windows 10 VM - now has a static DNS entry to point to the Windows Server VM, with an alternate entry set to the Ubuntu Server VM or the VMware DNS server (Lab 4, Task 3). Once the Active Directory server is installed, it should be able to resolve
ad.<your eID>.cis527.org. - Ubuntu Client VM - Windows Snapshot - when configuring the Ubuntu Client VM to connect to Windows Active Directory, it should have a static DNS entry pointing to the Windows Server VM, with an alternate entry set to the Ubuntu Server VM or the VMware DNS server (Lab 4, Task 6). Once the Active Directory server is installed, it should be able to resolve
ad.<your eID>.cis527.org.
This is the ideal setup for a this lab, but it depends on a fully working Lab 3 solution. In addition, you’ll need to keep the Ubuntu Server VM running at all times, which may present a problem on systems that struggle to run multiple VMs concurrently. So, below I discuss two alternative options.
Lab 4 Alternative Network Setup - Option 1 (Static DNS Entries)
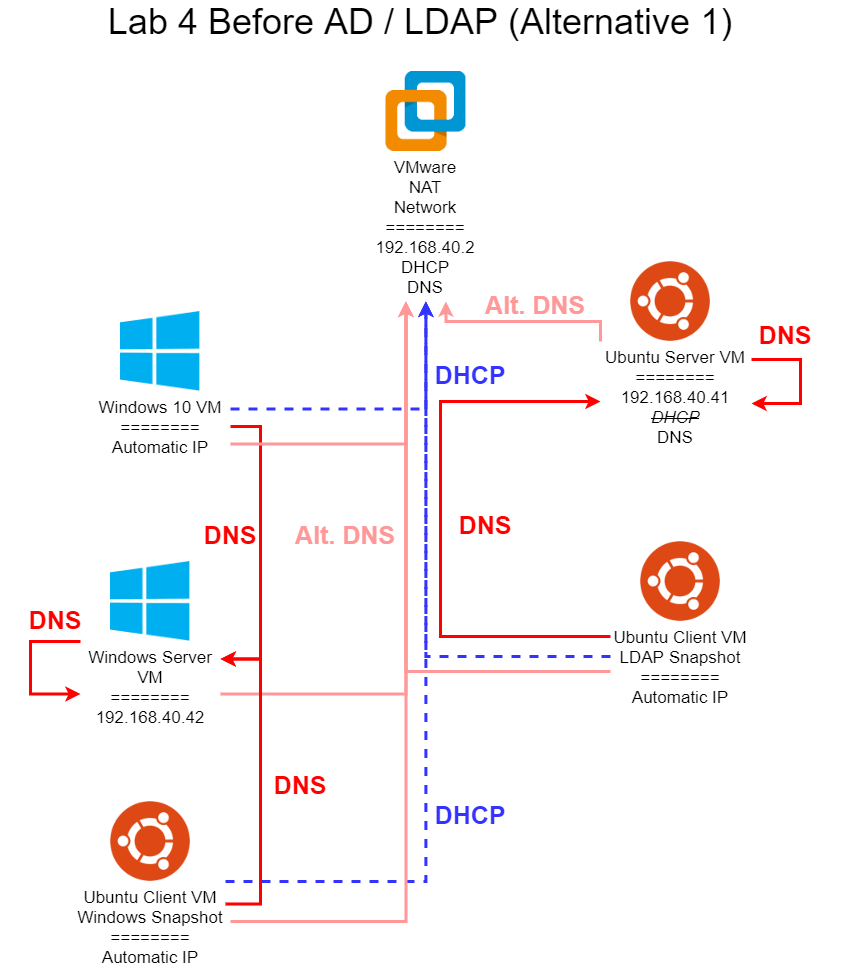
In this diagram, we are bypassing the DHCP server configured in Lab 3, and reverting our network back to using the VMware DHCP server. In addition, we are avoiding using our own DNS server running on the Ubuntu Server VM unless absolutely necessary. So, the following changes are made to the network from Lab 3:
- VMware NAT Network - the built-in DHCP server must be re-enabled if it was disabled in Lab 3.
- Ubuntu Server VM - now uses itself as a primary DNS entry, with an alternate entry set to the VMware DNS server (Lab 4, Task 4). The DHCP server that was configured in Lab 3 is disabled using
sudo systemctl disable isc-dhcp-server. Must still be able to resolve ldap.<your eID>.cis527.org - Ubuntu Client VM - now gets a DHCP address from VMware. We must set a primary static DNS entry to point to the Ubuntu Server VM, with an alternate entry set to the VMware DNS server (Lab 4, Task 5). Must be able to resolve
ldap.<your eID>.cis527.org - Windows Server VM - new VM (Lab 4, Task 1). Should have a static IP address of
192.168.40.42 and a primary static DNS entry pointing to itself, with an alternate entry set to the the VMware DNS server (Lab 4, Task 2). Once the Active Directory server is installed, it should be able to resolve ad.<your eID>.cis527.org. - Windows 10 VM - now has a static DNS entry to point to the Windows Server VM, with an alternate entry set to the VMware DNS server (Lab 4, Task 3). Once the Active Directory server is installed, it should be able to resolve
ad.<your eID>.cis527.org. - Ubuntu Client VM - Windows Snapshot - when configuring the Ubuntu Client VM to connect to Windows Active Directory, it should have a static DNS entry pointing to the Windows Server VM, with an alternate entry set to the VMware DNS server (Lab 4, Task 6). Once the Active Directory server is installed, it should be able to resolve
ad.<your eID>.cis527.org.
In effect, each system that is getting automatic IP addresses is now using the VMware DHCP server. However, since that DHCP server does not give the correct DNS addresses, we must set static DNS entries on everything, with the Ubuntu Server VM and Ubuntu Client VM pointing to the DNS server running on the Ubuntu Server VM, and the Windows Server, Windows 10 Client, and the Ubuntu Client VM’s Windows Snapshot pointing to the DNS server running on the Windows Server (after Active Directory is installed). In addition, each of those systems should have an alternate DNS entry that points to the VMware DNS server, allowing them to still access the internet properly.
However, if you are still having issues with your DNS entries or DNS servers not working correctly, fear not! There is one more alternative option available to you.
Lab 4 Alternative Network Setup - Option 2 (Hosts File Entries)
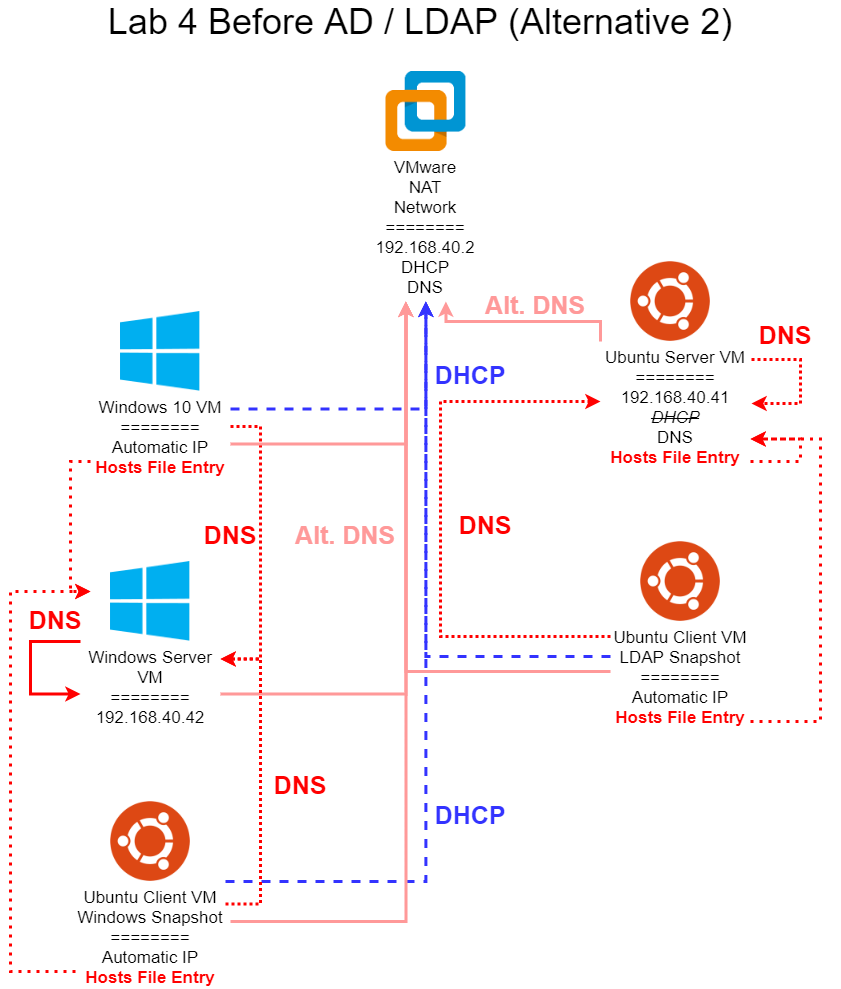
In this diagram, we are bypassing the DHCP server configured in Lab 3, and reverting our network back to using the VMware DHCP server. In addition, we are avoiding using our own DNS server running on the Ubuntu Server VM unless absolutely necessary. Finally, we are adding entries to the hosts file on each system to bypass DNS completely, ensuring that we can still complete this lab even if our DNS systems are not working at all. So, the following changes are made to the network from Lab 3:
- VMware NAT Network - the built-in DHCP server must be re-enabled if it was disabled in Lab 3.
- Ubuntu Server VM - now uses itself as a primary DNS entry, with an alternate entry set to the VMware DNS server (Lab 4, Task 4). The DHCP server that was configured in Lab 3 is disabled using
sudo systemctl disable isc-dhcp-server. Must still be able to resolve ldap.<your eID>.cis527.org. If it cannot, add an entry to the /etc/hosts file that links 192.168.40.41 to ldap.<your eID>.cis527.org. - Ubuntu Client VM - now gets a DHCP address from VMware. We must set a primary static DNS entry to point to the Ubuntu Server VM, with an alternate entry set to the VMware DNS server (Lab 4, Task 5). Must be able to resolve
ldap.<your eID>.cis527.org. If it cannot, add an entry to the /etc/hosts file that links 192.168.40.41 to ldap.<your eID>.cis527.org. - Windows Server VM - new VM (Lab 4, Task 1). Should have a static IP address of
192.168.40.42 and a primary static DNS entry pointing to itself, with an alternate entry set to the the VMware DNS server (Lab 4, Task 2). Once the Active Directory server is installed, it should be able to resolve ad.<your eID>.cis527.org. If it cannot, you are better off just rebuilding your AD server - this should always work on a working AD server! - Windows 10 VM - now has a static DNS entry to point to the Windows Server VM, with an alternate entry set to the VMware DNS server (Lab 4, Task 3). Once the Active Directory server is installed, it should be able to resolve
ad.<your eID>.cis527.org. If it cannot, add an entry to the C:\Windows\System32\drivers\etc\hosts file that links 192.168.40.42 to ad.<your eID>.cis527.org. - Ubuntu Client VM - Windows Snapshot - when configuring the Ubuntu Client VM to connect to Windows Active Directory, it should have a static DNS entry pointing to the Windows Server VM, with an alternate entry set to the VMware DNS server (Lab 4, Task 6). Once the Active Directory server is installed, it should be able to resolve
ad.<your eID>.cis527.org. If it cannot, add an entry to the /etc/hosts file that links 192.168.40.42 to ad.<your eID>.cis527.org.
In essence, we still configure each system with the correct static DNS entries. However, as a fallback in case those DNS entries are not working properly, we can use entries in the hosts file to bypass DNS completely and guarantee that we’re always going to get to the correct system.
This is a very useful workaround, and while an ideal network in the real world shouldn’t require it, many times system administrators include entries in the hosts file to ensure that systems can still be used in the event of DNS failure. Otherwise, an innocuous DNS failure could prevent users from even logging on to the system, either via LDAP or Active Directory.
As shown in the diagram above, the only DNS entry that must work is the Windows Server VM must be able to use itself for DNS. If that does not work, then most likely your Active Directory configuration failed and you will need to try again. Windows Active Directory relies heavily on DNS to function properly. I’ve not ever had this happen in my experience, so I highly doubt this failure case will be common.
You can find more information about how to edit your hosts file at this resource.
Creating Azure VMs
Warning
I failed to mention in the video that you cannot use the Remote Desktop Connection to access Azure VMs while on the K-State Campus Network. K-State has blocked all outgoing RDP connections. So, you must either work from a network location that is not on campus, or use a VPN to access a network outside of K-State.
Edited Transcript
In this video, I’m going to go through the process of setting up a virtual machine in Azure for the system administration class. This is really useful for students that either have a newer MacBook that aren’t able to virtualize Windows Server yet, but it’s also useful for anybody that either has a lower powered system that wants to virtualize things in the cloud, or if you just want to get more experience working with Azure as a cloud service provider. So to get access to Azure, we’re going to start at the CS support page, which is support .cs .ksu .edu. And in here under the FAQs, there’s a link right here that says, I need some software by Microsoft. If you click that link, that will take you to this page. And right here, it has this link for the Microsoft Azure DevTools for Teaching. This link tends to change over time, but this page will always be kept up to date with the correct link. So I’m going to click that link, and it’s going to take me to a page where I can sign in. This used to use a different account system. Now it actually uses your K -State single sign -on account. So I’m going to go ahead and sign in to Azure using that account. It’s going to take me to my organization sign -in page. So I’ll sign in through K -State. It may need to do two factor if it needs to. And then it will pop in and take me to this page.
I’m going to tell it to stay signed in because this is my computer. On a shared computer, you might not want to do that. Here, it looks like I’ve got an error fetching tenants. I’m just going to refresh this page real quick to make sure that it is able to fetch everything. There we go. Okay, so here on this education overview, you should see your available credits. Hopefully you’ve got credits available. If not, there is a place where you can go to renew these, and we’ll look at that in just a minute. But what I’m going to do is I’m going to switch over to the Azure virtual machine dashboard. So I’m going to go over here to this menu, and I’m going to choose dashboard. And so this takes me to the dashboard. Right now, there’s no resources to display or anything. And if I go down here to all resources, it will also show me all of the resources that are available. There’s some other options here, such as virtual. virtual machines and load balancers and everything like that. So there’s a lot of different things that you can look at here on this resources. So feel free to play around with this and see what all is available. It will keep track of recents. For example, there is a view for subscriptions. And so if you find the view for subscriptions, this is where I can actually see your Azure for students. If you need to renew it, I believe you can do it from this view right here. So you just have to find subscriptions in the services list.
But we’re going to go to virtual machines. So under the menu, I just found virtual machines and we’re going to create a couple of virtual machines here and get them to talk to each other. So the first thing I’m going to do is I want to create an Azure virtual machine. All right, so we’ve got a virtual machine. I can use my Azure for students. I can create a resource group. I’m going to use the CIS 527 resource group that I created earlier. You can create new resource groups as you want. I’m going to call this Windows Server 2022 video, just so I know which one this is. We’re going to create it in the US East region in whatever availability zone is available. I’m just going to create it in Zone 1. One thing I need to do is remember that all of my VMs need to be created in the same zone, so I’m using US East Zone 1. Then I can choose my image. There are a few different images that you can choose from. I’ve done this before, so I have these in the recently used. For the Windows Server, I’m going to look for Windows Server 2022 Data Center Azure Edition. What you don’t want is the core. If you look there is an Azure Edition, there are also some Azure Edition core options.
If I look at Windows Server here, you’ll see that there are a lot of different Windows Server images out there. You’ll need to look at all these different versions. What you want is the Azure Edition without the core. You can look through tons and tons and tons of these. But as I showed on that previous machine, I want Windows Server 2022 Data Center Azure Edition, and I want it without the core. I want Small Disk, Windows Server 2022. Looks like there are tons and tons and tons of these. Azure Edition Core, Azure Edition Core, Azure Edition. There we go. Windows Server 2022 Data Center Azure Edition. I’m just going to grab one of these. I’m going to grab that one. You can see that that’s the one that I had previously, Azure Edition X64 Gen2. We’re going to run it on X64. We can run it with Azure Spot Discount, which is a discounted rate. I’m not going to turn that on right now.
We’re going to run this on a standard B1A. this CPU, you can run it with more memory and actually if you can, I recommend doing it. There are a lot of different ones available but I’m gonna just try and run this on a standard B1S. So we’re gonna hit review and create. Let’s see, basics. Oh yes, I need to go back here to the basics and I need to set a password. So I’m going to use CS5 .27 as my username and then I’m going to use this generated password as a default password. I have it off screen in a notepad just so I remember that password and I’m gonna make sure that I enable the remote desktop port so that I have that available. So now we’re gonna go to review and create. It’s going to create this, it’s going to set up my subscription credits. So I’m gonna hit create and this will actually create my virtual machine. This process may take a little bit so you’ll see up here, it’s submitting the deployment. and it’s doing the deployment in progress. And so it will take a little bit to run this deployment. And then once it’s done, I’ll show you how to connect to that virtual machine.
OK, so that took about a minute or so to complete. So once the deployment is complete, I can click this option to say Go to Resource. There are also some things that I can do such as set up auto shutdown. So I’m going to click on that real quick and go to this auto shutdown. You can enable it to shut down on an automated schedule just in case you don’t forget. This helps you conserve resources. Basically, if you’re not using your VM, you should shut it down so that you’re not using up any of your resources. I’m not going to set this up right now, but it’s something to keep in mind that you can do. So I’m going to go to this back here, and then I’m going to click Go to Resource. And this will take me to the overview of the resource. So some of the things that you’ll notice is it’s booting up right now. So it says the virtual machine agent status is not ready, probably because the VM’s not fully booted yet. So that’s okay. We’re not going to worry about that too much right now. Instead, we’re going to try and connect to this system. And so we can either hit Connect or Connect via Bastion. I’m just going to connect to the system. And so it’s going to show me what the public IP address is of the system, the username and the port, and it will let me download the native RDP. They also have some other different things you can do, such as going through a Bastion, a serial portal, an admin center. There are lots of different ways you can do it. I’m going to play around with just the native RDP, which is really the thing that is easiest to use. So I’m going to click this to download the RDP file, which downloads this remote desktop profile. And then if I open this file, it’s actually going to open up the remote desktop viewer on my system. And so I’m going to switch my window capture to grab that.
Okay, so once I download that RDP file and open it up, it will eventually come up and ask me for my credentials to… connect to that system, it has my username prefilled. I’m just gonna type in my password and check mark, remember me and hit okay. And then it will pop up and ask me if I want to connect to that system. So eventually it will configure that remote session and we’ll see here that it will pop up and I’m gonna make this a little bit smaller so that we can see what’s going on. And let me actually try and window capture that. All right, so our virtual machine is loading right now.
Okay, so I tried to connect to this virtual machine but it’s been giving me a lot of issues and I think it has to do with the fact that it only has one virtual CPU and one gigabyte of memory. So we’re gonna go ahead and scale up the Windows server just so that we have a little bit more access to this. So I’m going to click the stop button to stop this virtual machine and then we’re going to rescale it. So to do that, I need to wait for this stopping virtual machine. So this will take maybe a minute or so for it to stop. and then we will go through and rescale it. Okay. So once the virtual machine has stopped, then I’m going to go down here on the side, and I’m going to scroll down to find availability and scale, and then look at the size option. So there are a lot of different sizes that we can use. Currently, we’re using B1S, which is free services eligible. I’m going to change this to one of the other options. So you’ll notice that these prices go up very, very quickly. And so generally, the B series is the best series for what you want to use. And so they’ve got some of these different sizes, but you’ll notice that they get very, very pricey very quickly. So I’m going to choose the next one up, which is the B2S. So I’m going to resize it to a B2S. This is going to be a little higher. It’s going to take up some of your actual Azure credits, but as long as you’re not running your virtual machines for too long, you won’t use up your credits very quickly. Like that showed, it will use up $36 a month if you run it continuously for a full month. So you shouldn’t need to run it too long. So I’ve resized this up to a B2S, which gives me a little bit more size. So now if I refresh that page, it should bring up the correct size for the system now. Yeah, standard B2S, two virtual CPUs, four gigabytes of memory.
So now let’s start this up and see if we can connect to it. So we’re going to let it start. And then once it’s done starting, we’re going to go to the Connect tab and we’re going to download that RDP file again and connect to it through that. All right, so finally I’ve got connected to this. So I now have my virtual machine running here on remote desktop, and I can manage everything just as if I’m working locally on that machine. It should be pretty performant when you’re running it on a B2S system. So for example, here I can go to Computer Management. I can see all the computer management tools. I can see the server manager dashboard, and I should have full admin access to this version. virtual machine to do whatever I want. Unfortunately, I’m recording this on an ultra wide monitor and it defaults to full screen. So you’ll notice that I have a lot of screen space and you can’t really see what’s going on here. But from here, you should be able to follow along with everything you need to do in this virtual machine in order to actually set up a Windows Active Directory.
So the other thing that I’m going to show you real quick on the system is PowerShell. So I’m just going to in this search box here, I’m gonna load up PowerShell real quick. And then what I’m going to do is zoom in a little bit so we can see what’s going on here in PowerShell. So in PowerShell, I’m going to check the IP config and we’ll see that we have this adapter right here that is set to 10 .0 .0 .4. And we’ll need to remember that because that’s the IP address of the internal network that we’re working on. This 172 .178 .112 .59, the external address that it gave us is different than the internal IP address that we have. in our network in Azure, and we’ll look at that in just a second. So I’m going to leave this running, I’m going to leave this connected, but I’m going to switch back to Chrome and we’re going to create another system real quick.
All right, so back here in Chrome, I’m going to go back to my Azure services, I’m going to go to my virtual machines, and we’re going to create another Azure virtual machine. And so this one, again, I’m going to add to my CS5 .27 resource group. This, I’m going to call it Windows 11 video. I’m going to put it in the same availability zone. I’m going to create it using the Windows 11 Pro VM, X64. I’m also going to run this on a B2S just to give us a little bit more power. This one should run okay on a B1S, but I’m going to go ahead and upgrade it to a B2S just to have that extra power to make this work a little bit easier. So we’re going to run it on a B2S. We’re going to set up a username and I’m going to use a different password for this. So I’ve got my password already set up there, allow remote desktop. And then we’re going to confirm that we have an eligible license with multi -tenant hosting rights. We do because we’re working through the student licenses that we have. So we’re going to confirm that we have that. So now we’re going to hit review and create and it’s going to create this virtual machine for us. So we’ll let it create this. And then same as before, once it gets created and deployed, we’re going to download that remote desktop file and open it up on remote desktop so we can see what’s going on. And I’ll come back to this video as soon as this is done deploying.
Okay, so once again, this resource is now deployed. I’m going to click go to resource. It’s still booting up. So you may not get a little error here, but I’m just going to go to connect. I’m going to download the RDP file. And then I’m going to open that RDP file. It will… will pop up and prompt me to connect to that system. You won’t be able to see this because I can’t window capture it because it’s a protected window. But as soon as this comes up, I will switch over and show you that connection and show that the two systems can talk to each other. Okay, so after a couple of minutes, this machine comes up. I have to click through some of the initial setup process on Windows 11, just like any other machine. But now I am here on my remote desktop looking at my Windows 11 machine. I’ve got PowerShell opened up. So I’m gonna make that a little bit bigger so that we can see what’s going on here with that window. And once again, I’m just gonna type in IP config. And you’ll notice this is assigned the IP address 10 .0 .0 .5. And so that tells me what its IP address is on the internal network that these other systems can talk to. And so if I try and ping 10 .0 .0 .4, I should probably not get a response because Windows server has a firewall on it. But those two are both actually in the same network and they should be able to respond. Let me actually jump to Windows Server real quick and check the firewall and see if I can ping the other way around.
Okay, so for testing this, I went into the Windows firewall and I found the options for core networking diagnostics, ICMP echo request, and I enabled those on domain and private networks so that we can actually receive a ping from the systems. And so now if I switch back to my Windows Server, if I go here to Windows Server, I can now ping that IP address of 0 .0 .5, which is the Windows 11, and I received that ping response back. So we’re actually able to talk to each other. This is really important to know when you’re setting up your Active Directory. Basically your server is going to have one IP address and you won’t be able to set a static IP address on it. You’ll just leave the IP address alone. And then on your Windows client, you’ll know the address is 10 .0 .0 .5 or something similar. And you’ll have to set up a host file entry for this. I’ll kind of talk anybody through that that has any questions. But this is the basic idea for setting up virtual machines in Azure. You can also go through the same process to set up an Ubuntu virtual machine. It’s basically the same process as anything else. So if you have any questions or any issues with that, let me know. Otherwise, I’m happy to help. So feel free to ask any questions you have.
Subsections of The Cloud
Introduction
YouTube VideoResources
Video Transcript
Welcome to Module 5! In this module, we’ll learn all about one of the hottest topics in system administration today: the cloud! Many enterprises today are in the process of moving their operations to the cloud, or may have already completely done so. However, some organizations may not find it feasible to use the cloud for their operations, and we’ll discuss some of those limitations.
For the lab assignment, you’ll create a few cloud systems and learn how to configure them for security and usability, We’ll also start creating some cloud resources for an organization, which we’ll continue working with in Lab 6.
As a sidenote, this lab involves working with resources on the cloud, and will require you to sign up and pay for those services. In general, your total cost should be low, usually around $20 total. If you haven’t already, you can sign up for the GitHub Student Developer Pack, linked in the resources below this video, to get discounts on most of these items. If you have any concerns about using these services, please contact me to make alternative arrangements! While I highly recommend working with actual cloud services in this course, there are definitely other ways to complete this material.
As always, if you have any questions or run into issues, please post in the course discussion forums to get help. Good luck!
The Cloud Overview
Note
TODO As of 2020, both KSIS and HRIS have moved to the cloud, leaving very few K-State resources hosted directly on campus. This video will be updated in future semesters to reflect that change. -Russ
Resources
Video Transcript
To begin this module, let’s take a few minutes to discuss its major topic, the cloud. At this point, some of you may be wondering what exactly I’m talking about when I refer to the cloud. My hope is that, by the end of this video, you’ll have a much clearer mental picture of exactly what the cloud is and how it is related to all of the things we’ve been working with in this class so far.
Without giving too much of the answer away, I always like to refer to this comic strip from XKCD when defining the cloud. Take a minute to read it and ponder what it says before continuing with this video.
To start, one way you can think of cloud computing is the applications and resources that you are able to access in the cloud. It could be an email address, social media website, finance tracking application, or even a larger scale computing and storage resource. All of those could be part of the cloud. To access them, we use the devices available to us, such as our computers, laptops, tablets, phones, but even our TVs, game consoles, and media players all access and use the cloud.
One of the core concepts underlying the cloud is the centralization of resources. This is not a new idea by any stretch of the imagination. In fact, many comparisons have been made between the growth of large electric power plants and the growth of the cloud. Here, you can see both of those worlds colliding, as this picture shows Amazon’s founder, Jeff Bezos, standing in front of an old electric generator from the 1890s at a beer brewery in Belgium.
In the early days of electricity, if a company wanted to use electricity in their factory, they usually had to purchase a power generator such as this one and produce their own. Companies really liked this approach, as they could be completely in control of their costs and production, and didn’t have to worry about failures and problems that they couldn’t resolve themselves.
Generating electricity is also a very inefficient process, but it can be made much more efficient by scaling up. A single company may not use all of the electricity they generate all the time, and any issues with the generator could cause the whole operation to slow down until it is resolved. But, if many companies could band together and share their electrical systems, the process can be much more efficient and the power supply more secure than each company could provide on their own.
It was during this time that several companies were formed to do just that: provide a large scale power generation and distribution network. Many companies were initially hesitant to give up their generators, fearing that they would be at the mercy of someone else for the power to run their operations, and that such a large scale system wasn’t sustainable in the long run. However, their fears proved to be false, and within a few decades nearly all of them had switched to the growing power grid.
For K-State, most of our electricity comes from Jeffrey Energy Center near Wamego, KS. It is capable of generating over 2 gigawatts of power, enough to power over one million homes. For most of us, we don’t even take the time to think about where our electricity comes from, we just take it for granted that it will be there when we need it, and that there is more than enough of it to go around.
The cloud was developed for many of those same reasons. This story is detailed in depth in the book “The Big Switch” by Nicholas Carr. I encourage you to check it out if you are interested in the history of the cloud.
The concept of a cloud got its start all the way back in the 1950s with the introduction of time sharing on mainframe computers. This allowed many users to share the same computer, with each running her or his programs when the others were busy writing or debugging. Later on, many networking diagrams started to use a cloud symbol to denote unknown networks, leading to the name “the cloud” referring to any unknown resource on the internet.
In the 1990s, large businesses started connecting their branch offices with virtual private networks, or VPNs. In this way, a branch office in New York could access shared files and resources from the main office in California. Over time, the physical location of the resources became less and less important - if it could be in California, why couldn’t it just be anywhere? By this point, people were ready to adopt the cloud into their lives.
The explosion in popularity came with the rise of Web 2.0 after the dot-com bubble burst, but also in 2006 with the introduction of Amazon’s Elastic Compute Cloud, or EC2. Originally, companies who wanted to have a website or process large amounts of data would purchase large computing systems and place them directly in their own offices. They would also have to hire staff to manage and maintain those systems, as well as deal with issues such as power and cooling. Over time, they also started to realize that they may not be making efficient use of those systems, as many of them would remain idle during slower business periods. At the same time, larger companies with idle computing resources realized they could sell those resources to others in order to recoup some of their costs, and possibly even make a nice profit from it. Other companies realized that they could make money by providing some of those resources as a service to others, such as web hosting and email.
Amazon was one such company. Since they were primarily in the retail business at that time, they had to build a system capable of handling the demands of the busy retail seasons. However, most of the time those resources were idle, and they simply cost the company money to maintain them. So, Amazon decided to sell access to those computing resources to other companies for a small fee, letting them use the servers that Amazon didn’t need for most of the year. They stumbled into a gold mine. This graph shows the total bandwidth used by Amazon’s global websites, and then the bandwidth for Amazon Web Services, part of their cloud computing offerings. Less than a year after it launched, Amazon was using more bandwidth selling cloud resources to others than their own website used, typically one of the top 10 websites in the world. Some people have referred to this graph as the “hockey stick” graph, showing the steep incline and growth of the cloud. Other companies quickly followed suit, and the cloud as we know it today was born.
For many cloud systems today, we use an architecture known as a “service-oriented” architecture. In essence, a cloud company could build their system out of a variety of services, either hosted by themselves or another cloud provider. For example, a social media site might have their own web application code, but the website itself is hosted by Amazon Web Services, and the data is stored in Google’s Firebase. In addition, their authentication would be handled by many different third-parties through OAuth, and even their code and testing is handled via GitHub, Travis and Jenkins. By combining all of those services together, a company can thrive without ever owning even a single piece of hardware. Many start-ups today are doing just this in order to quickly grow and keep up with new technologies.
According to the National Institute of Standards and Technology, or NIST, there are a few primary characteristics that must be met in order for a computer system to be considered a “cloud” system. First, it must have on-demand, self-service for customers. That means that any customer can request resources as needed on their own, without any direct interaction with the hosting company. Secondly, that resource must be available broadly over the internet, not just within a smaller subnetwork. In addition, the system should take advantage of resource pooling, meaning that several users can be assigned to the same system, allowing for better scaling of those resources. On top of that, systems in the cloud should allow for rapid elasticity, allowing users to scale up and down as needed, sometimes at a moment’s notice. Finally, since users may be scaling up and down often, the service should be sold on a measured basis, meaning that users only pay for the resources they use.
Beyond that, there are a few other reasons that cloud computing is a very important resource for system administrators today. First, cloud computing resources are location independent. They could be located anywhere in the world, and as long as they are connected to the internet, they can be accessed from anywhere. Along with resource pooling, most cloud providers practice multi-tenancy, meaning that multiple users can share the same server. Since most users won’t use all of a server’s computing resources all the time, it is much cheaper to assign several different users to the same physical system in order to reduce costs. Also, in many ways a cloud system can be more reliable than a self-hosted one. For cloud systems, it is much simpler for a larger organization to shift resources around to avoid hardware failures, whereas a smaller organization may not have the budget to maintain a full backup system. We’ve already discussed the scalability and elasticity, but for many organizations who are hoping to grow quickly, this is a very important factor in their decision to host resources in the cloud. Finally, no discussion of the cloud would be complete without talking about security. In some ways, the cloud could be more secure, as cloud providers typically have entire teams dedicated to security, and they are able to easily keep up with the latest threats and software updates. However, by putting a system on the cloud, it could become a much easier target for hackers as well.
One of the best examples demonstrating the power of the cloud is the story of Animoto. Animoto is a website that specializes in creating video montages from photos and other sources. In 2008, their service exploded in popularity on Facebook, going from 25,000 users to 250,000 users in three days. Thankfully, they had already configured their system to use the automatic scaling features of AWS, so they were able to handle the increased load. At the peak, they were configuring 40 new cloud instances for their render farm each minute, which was receiving more than 450 render requests per minute. Each render operation would take around 10 minutes to complete. Compare that to a traditional enterprise: there is no way a traditional company would be able to purchase and configure 40 machines a minute, and even if it was possible, the costs would be astronomical. For Animoto, the costs scaled pretty much linearly with their user base, so they were able to continue providing their service without worrying about the costs. Pretty cool, right?
When dealing with the cloud, there are many different service models. Some of the most common are Software as a Service, Infrastructure as a Service, and Platform as a Service. Many times you’ll see these as initialisms such as SaaS, IaaS, and PaaS, respectively. This diagram does an excellent job of showing the difference between these models. First, if you decide to host everything yourself, you have full control and management of the system. It is the most work, but provides the most flexibility. Moving to Infrastructure as a Service, you use computing resources provided by a cloud provider, but you are still responsible for configuring and deploying your software on those services. AWS and DigitalOcean are great examples of Infrastructure as a Service. Platform as a Service is a bit further into the cloud, where you just provide the application and data, but the rest of the underlying system is managed by the cloud provider. Platforms such as Salesforce and Heroku are great examples here. Finally, Software as a Service is the situation where the software itself is managed by the cloud provider. Facebook, GMail, and Mint are all great examples of Software as a Service - you are simply using their software in the cloud.
In the past, there was a great analogy comparing these models to the different ways you could acquire pizza. You could make it at home, do take and bake, order delivery, or just go out and eat pizza at your favorite pizza restaurant. However, a few commentators recently pointed out a flaw in this model. Can you find it? Look at the Infrastructure as a Service model, for take and bake pizza. In this instance, you are getting pizza from a vendor, but then providing all of the hardware yourself. Isn’t that just the opposite of how the cloud is supposed to work?
They propose this different model for looking at it. Instead of getting the pizza and taking it home, what if you could make your own pizza, then use their oven to bake it? It in this way, you maintain the ultimate level of customizability that many organizations want when they move to the cloud, without having the hassle of dealing with maintaining the hardware and paying the utility bills associated with it. That’s really what the cloud is about - you get to make the decisions about the parts you care about most, such as the toppings, but you don’t have to deal with the technical details of setting up the ovens and baking the pizza itself.
Along with the different service models for the cloud, there are a few different deployment models as well. For example, you might have an instance of a cloud resource that is private to an organization. While this may not meet the NIST definition for a cloud resource, most users in that organization really won’t know the difference. A great example of this is Beocat here at K-State. It is available as a free resource to anyone who wants to use it, but in general they don’t have to deal with setting up or maintaining the hardware. There are, of course, public clouds as well, such as AWS, DigitalOcean, and many of the examples we’ve discussed so far. Finally, there are also hybrid clouds, where some resource are on-site and others are in the cloud, and they are seamlessly connected. K-State itself is a really great example of this. Some online resources are stored on campus, such as KSIS and HRIS, while others are part of the public cloud such as Canvas and Webmail. All together, they make K-State’s online resources into a hybrid cloud that students and faculty can use.
Of course, moving an organization to the cloud isn’t simple, and there are many things to be concerned about when looking at the cloud as a possible part of your organization’s IT infrastructure. For example, cloud providers may have insecure interfaces and APIs, allowing malicious users to access or modify your cloud resources without your knowledge. You could also have data loss or leakage if your cloud systems are configured incorrectly. In addition, if the service provider experiences a major hardware failure, you might be unable to recover for several days while they resolve the problem. For example, several years ago K-State’s email system experienced just such a hardware failure, and it was nearly a week before full email access was restored across campus. Unfortunately, this happened about two weeks before finals, so it was a very stressful time for everyone involved.
There are also many security concerns. One of those is the possibility of a side-channel attack. In essence, this involves a malicious person who is using the same cloud provider as you. Once they set up their cloud system, they configure it in such a way as to scan nearby hardware and network connections, trying to get access to sensitive data from inside the cloud provider’s network itself. The recent Spectre and Meltdown CPU vulnerabilities are two great examples of side-channel attacks.
Also, if you are storing data on a cloud provider’s hardware, you may have to deal with legal data ownership issues as well. For example, if the data from a United States-based customer is stored on a server in the European Union, which data privacy laws apply? What if the data is encrypted before it is sent to the EU? What if the company is based on Japan? Beyond that, if there is a problem, you won’t have physical control of the servers or the data. If your cloud hosting provider is sold or goes out of business, you may not even be able to access your data directly. Finally, since cloud providers host many different organizations on the same hardware, you might become a bigger target for hackers. It is much more likely for a hacker to attack AWS then a small organization. So, there are many security concerns to consider when moving to the cloud.
In addition, there are a few roadblocks that may prevent your organization from being able to fully embrace the cloud. You should carefully consider each of these as you are evaluating the cloud and how useful it would be for you. For example, does the cloud provide the appropriate architecture for your application? Are you able to integrate the cloud with your existing resources? Will the change require lots of work to retrain your employees and reshape business practices to take full advantage of the cloud? I highly encourage you to read some of the linked resources below this video to find great discussions of the cloud and how it fits into an organization’s IT infrastructure.
Regardless, many organizations are currently moving toward the cloud, and the rate of adoption is increasing each year. This infographic gives some of the predictions and trends for the cloud from 2015. For me, the big takeaways from this data is that companies are devoting more and more of their IT budgets toward the cloud, but they are hoping to turn that into cost-savings down the road. At the same time, their biggest concern moving to the cloud is finding people with enough experience to manage it properly while avoiding some of the security pitfalls along the way. So, learning how to work with the cloud will help you build a very valuable skill in the IT workplace of the future.
So, back to the question from the beginning of this video: what is the cloud? According to Esteban Kolsky, a cloud marketing consultant, the cloud is really a term for many things. In one way, the cloud is the internet itself, and all of the resources available on it. From Amazon to Yelp and everything in between, each of those websites and applications provides a service to us, their consumers. At the same time, the cloud is a delivery model, or a way to get information, applications, and data into the hands of the people who need it. This class itself is being delivered via the cloud, from that point of view at least. Finally, the cloud can also be seen as a computing architecture. For many organizations today, instead of worrying about the details of their physical hardware setup, they can just use “the cloud” as their computing architecture, and discuss the advantages and disadvantages of that model just like any other system.
For me, I like to think of the cloud as just a point of view. From the consumer’s perspective, any system that they don’t have to manage themselves is the cloud. For a system administrator, it’s not so easy. For example, for many of us, we can consider the K-State CS Linux servers as the cloud, as they are always available, online, and we don’t have to manage them. For our system administrator, however, they are his or her systems to manage, and are definitely not the cloud. Similarly, for Amazon, AWS is just another service to manage. So, I think that the cloud, as a term, really just represents your point of view of the system in question and how closely you have to manage it.
What about you? If you have any thoughts or comments on how you’d define the cloud, I encourage you to post them in the course discussion forums.
In the next videos, we’ll dive into how to set up and configure your first cloud resources, using DigitalOcean as our Infrastructure as a Service provider.
Assignment
Lab 5 - The Cloud
Instructions
Create two cloud systems meeting the specifications given below. The best way to accomplish this is to treat this assignment like a checklist and check things off as you complete them.
If you have any questions about these items or are unsure what they mean, please contact the instructor. Remember that part of being a system administrator (and a software developer in general) is working within vague specifications to provide what your client is requesting, so eliciting additional information is a very necessary skill.
Note
To be more blunt - this specification may be purposefully designed to be vague, and it is your responsibility to ask questions about any vagaries you find. Once you begin the grading process, you cannot go back and change things, so be sure that your machines meet the expected specification regardless of what is written here. –Russ
Also, to complete many of these items, you may need to refer to additional materials and references not included in this document. System administrators must learn how to make use of available resources, so this is a good first step toward that. Of course, there’s always Google!
Time Expectation
This lab may take anywhere from 1 - 6 hours to complete, depending on your previous experience working with these tools and the speed of the hardware you are using. Configuring cloud systems is very time-consuming the first time through the process, but it will be much more familiar by the end of this course.
Info
This lab involves working with resources on the cloud, and will require you to sign up and pay for those services. In general, your total cost should be low, usually around $20 total. If you haven’t already, you can sign up for the GitHub Student Developer Pack to get discounts on most of these items.
You can get $200 credit at DigitalOcean using this link: https://try.digitalocean.com/freetrialoffer/
You can register a .me domain name for free using Namecheap at this link: https://nc.me/
If you have any concerns about using these services, please contact me to make alternative arrangements! –Russ
Task 0: Create 2 Droplets
Create TWO droplets on DigitalOcean. As you set up your droplets, use the following settings:
- Choose the Ubuntu 24.04 x64 distribution as the droplet image
- Select the smallest droplet size ($4-6/mo - you may have to click around and click an arrow to see the smallest option)
- Select any United States region - make sure both are in the same region!
- Enable Virtual Private Cloud (VPC) Networking and Monitoring (this should be the default)
- You may add any existing SSH keys you’ve already configured with DigitalOcean during droplet creation
- Droplet names:
cis527<your eID>-frontendcis527<your eID>-backend
The rest of this assignment will refer to those droplets as FRONTEND and BACKEND, respectively.
Resources
Perform these configuration steps on both droplets, unless otherwise noted:
- Create a cis527 user with administrative (root or sudo) privileges
Warning
DO NOT REUSE THE USUAL PASSWORD ON THIS ACCOUNT! Any system running in the cloud should have a very secure password on each account. Make sure it is a strong yet memorable password, as you’ll need it to run any commands using sudo.
- Install all system updates
- Ensure the timezone is set to UTC
- Enable the firewall. Configure the firewall on both systems to allow connections to the following:
- incoming port 22 (SSH)
- incoming port 80 (HTTP)
- incoming port 443 (HTTP via TLS)
Resources
Task 2: SSH Configuration
Configure your SSH servers and SSH keys as described here:
- You can access the FRONTEND droplet using the virtual terminal in DigitalOcean. If you want to log in via SSH from your local computer (optional):
- On your own computer or a local VM, generate a set of SSH keys if you have not already.
- Add the public key from your computer to the cis527 account on FRONTEND. This should allow you to log in with that key.
- Add the grading SSH key to the cis527 account on FRONTEND.
- On the cis527 account on FRONTEND, generate a set of SSH keys with no passphrase.
- Add the public key from the cis527 account on FRONTEND to the cis527 account on BACKEND. This should allow you to log in with that key
- On the cis527 account on FRONTEND, create an SSH config file such that a user could simply type
ssh backend to connect to the BACKEND droplet.
Tip
Make sure you use the private networking IP address for BACKEND in your config file. Otherwise, it will be blocked by the firewall.
- Once all of the keys are in place, disable password authentication via SSH on both systems.
After doing these steps, you be able to access the cis527 account on FRONTEND via SSH using your SSH key or the grading SSH key, and you should be able to access BACKEND using the SSH key present on the cis527 account on FRONTEND.
Note
You may contact me once you have installed the grading SSH key to confirm that it works correctly. I’d be happy to test it before grading. –Russ
Note
If you are working on campus, you will not be able to use SSH to connect to your FRONTEND droplet since outgoing SSH is blocked by K-State. The ability to log in via SSH to FRONTEND using your key will not be graded, but we’ll use the grading key for testing on our end.
Instead, you can use the Access tab in DigitalOcean to access a virtual console for your droplet. This allows you to connect via SSH through a web browser.
You should ensure that you can access the BACKEND server from FRONTEND using SSH with the correct SSH keys.
Resources
Task 3A: Install Apache on BACKEND
Install the Apache web server on BACKEND. By default, the webserver should serve files from the /var/www/html directory. Place a simple HTML file named index.html in that directory on BACKEND. You may use the contents below as an example. Please modify the file appropriately to make it clear which server it is placed on.
Do not configure virtual hosts at this time, as that will be covered in Task 5.
<html>
    <head>
        <title>CIS 527 Backend</title>
    </head>
    <body>
        <h1>This is my CIS 527 Backend Server!</h1>
    </body>
</html>
To test your system, you should be able to enter the public IP address of your BACKEND droplet in a web browser and be presented with the appropriate file.
Resources
Task 3B: Install Docker on FRONTEND
Install the Docker client, Docker engine, and Docker compose on the droplet named FRONTEND. Make sure you test your setup using the Hello World image to confirm it is working.
Resources
Task 4: Domain Names & DNS
Register and configure a domain name, and add your new droplets to that domain.
Info
If you already have your own domain name, you are welcome to use it for this portion of the lab. It should not conflict with any existing configuration, as long as you are managing your own DNS records. If not, you may need to perform some additional configuration. If you don’t have a domain name yet, this would be a great chance to get one registered. Namecheap will allow you to register a .me domain for free for one year as a student. If you register a domain name, I highly recommend enrolling in WhoisGuard to protect your personal information. It should be enabled for you automatically through Namecheap. If you have any concerns about registering a domain name, or would like to explore options for completing this portion without registering or using a public domain name, please contact me. –Russ
Configure the DNS settings for your domain name as follows:
- If you are using a new domain, make sure it is configured to use your registrar’s DNS servers. You may also configure it to use DigitalOcean’s nameservers, and configure your DNS settings through DigitalOcean.
- Add an A record for host
cis527alpha that points to the public IP address of FRONTEND. - Add an A record for host
cis527bravo that points to the public IP address of FRONTEND. - Add an A record for host
cis527charlie that points to the public IP address of BACKEND.
Tip
After updating your domain’s DNS settings, you may have to wait up to 24 hours for the changes to propagate across the internet due to DNS caching. You may be able to speed this up by restarting your computer and network devices, or by using 3rd party DNS services such as OpenDNS or Google DNS instead of your ISP’s DNS servers. However, in most cases it is better to just be patient and wait than to try and get around it. –Russ
To test your new DNS settings, you should be able to enter http://cis527charlie.<yourdomain>.<tld> in a web browser to access your backend server running Apache. For example, if your domain name is cis527.me, you would visit http://cis527charlie.cis527.me. Since we haven’t configured a server for frontend yet, we aren’t able to test it at this time.
Resources
Now that your domain name is working, configure an appropriate virtual host in Apache on BACKEND. In general, you can follow Step 5 of the guide linked below, but replace example.com with your server’s full domain name, such as cis527charlie.cis527.me in the example from Task 4. You’ll also need to copy the sample HTML file from Task 3 to the appropriate directory as configured in your virtual host. Make sure you disable the default site configuration when you enable the new site.
Finally, you can test your virtual host configuration using the same URL given in Task 4 above.
Resources
On FRONTEND, create a docker-compose.yml file in the home directory of the cis527 user that will create the following infrastructure in Docker:
- Set up two Docker containers running simple web servers.
- You may either use the whoami image from the example, or set up two Nginx containers. If you use Nginx, you’ll need to configure it to host different static content in each container (so it is easy to tell which one is which). See the documentation for how to set this up. Basically, there needs to be an obvious way to tell that you are reaching the correct container.
- These containers should only be connected to an internal Docker network. They should NOT have direct access to the internet, nor should they have any mapped ports.
- Set up a reverse proxy in Docker to handle connections from the outside world (on port 80) to the appropriate containers.
- You may use either Nginx, Nginx-proxy, or Traefik Proxy as shown in the lab module.
- This container should be connected to both the default Docker network as well as the internal network that is connected to the other two containers.
- You should configure one web server container to have hostname
cis527alpha.<yourdomain>.<tld> and the other should have cis527bravo.<yourdomain>.<tld>. - Once configured, you should be able to visit those URLs in a browser and clearly see information coming from the correct Docker container.
Resources
Task 6: Public Key Certificates
Obtain and install a public key certificate for your Apache server on BACKEND. The simplest way to do so is to use Certbot from Let’s Encrypt.
When you install the certificates, direct Certbot to redirect HTTP traffic to HTTPS for your server.
Once it is complete, you can test your certificates using the same URL given in Task 4 above. It should automatically redirect you from HTTP to HTTPS. You may have to clear the cache in your web browser if it does not work correctly. When you access the site, use your web browser to verify that the SSL certificate is present and valid.
You DO NOT have to configure public key certificates on FRONTEND using a reverse proxy. This can be done, but it is a bit more difficult than using Certbot since it requires manual steps or additional configuration. Feel free to attempt it on your own!
Resources
Task 7: Schedule A Grading Time
Contact the instructor and schedule a time for interactive grading. You may continue with the next module once grading has been completed.
Cloud Resource Setup
Note
TODO This video was recorded for Ubuntu 18.04, but works for Ubuntu 22.04 as well. When creating a droplet, simply select the newest version of Ubuntu LTS. This video shows an older version of the DigitalOcean UI, but should be similar to what you see today. –Russ
Resources
Video Transcript
For the rest of this module, you’ll be working with DigitalOcean to create and configure online cloud resources. I chose DigitalOcean primarily because of its ease of use compared to other providers such as AWS, as well as its continuing popularity and great user documentation.
DigitalOcean was first founded in 2011 by Ben and Moisey Uretsky. They felt that most hosting companies of the time were targeting large enterprises, leaving many smaller software developers and startups behind. DigitalOcean was one of the first hosting providers to offer virtual machines exclusively on solid state storage, giving them a performance edge over many of their peers, while often being cheaper overall. Currently, they are the 3rd largest hosting provider in the world, with 12 worldwide datacenters serving over 1 million customers.
In this video, we’ll discuss the first steps for getting your first cloud server, referred to as a “droplet” on DigitalOcean, configured and secured. Let’s get to it!
First, if you haven’t signed up for the GitHub Education Student Developer Pack, I highly encourage you to do so. Among many other perks included in the pack is a $50 credit for new DigitalOcean users. So, if you haven’t used DigitalOcean before, or would like to create a new account for this class, you should take advantage of that resource. In total, the entire class should use less than half of that credit as long as you don’t get behind, so you’ll have plenty left over for other projects. Finally, if you have a friend or colleague already using DigitalOcean, you can contact them for their referral URL before you sign up to do them a solid favor, netting you a $10 sign-up credit, and they’ll get a $25 credit once you spend $25 at DigitalOcean. It’s a win-win for everyone involved!
Once you are logged in, you’ll be ready to create your first droplet. I’m going to walk through the steps here and talk through some of the options, just so you know what is available here.
First, you’ll be prompted to select an image. DigitalOcean offers many different types of images, including Linux distributions, containers, and one-click applications. The last two options are really handy if you need just a particular service or type of machine, but in our case, we’ll select the Ubuntu distribution. Currently, DigitalOcean offers all LTS versions of Ubuntu that are still supported. We’ll choose the “Ubuntu 20.04 x64” option.
Next, you’ll need to select a droplet size. Droplets on DigitalOcean are sized by the amount of memory they offer, as well as the number of virtual CPUs available and the size of the storage disk. There are many different options to fit a variety of needs. For this class, we’ll select the cheapest option, which has 1 GB of memory, 1 virtual CPU, and 25 GB of storage space. It is more than enough for our needs, and only costs $5/month.
DigitalOcean also provides the option to have automatically created backups of your droplets for just an additional fee. I won’t enable that option, but you are welcome to do so if you’d like to have that feature available.
Similarly, they also offer the ability to have your storage volumes separate from your droplets. This is handy if you’ll be building or rebuilding your droplets and want to make sure the stored data is unaffected. We won’t be using this option for this course.
Below that, you’ll be able to choose your datacenter region. In general, it is best to select a region close to you and where you’ll be accessing these droplets. So, I’d recommend selecting one of the New York or San Francisco options. If you are creating multiple droplets, as you will for this class, make sure they are in the same datacenter region so they are able to communicate with one another internally.
There are a few other options you can enable. The first is private networking, which allows droplets in the same datacenter region to communicate on a private network that is internal to DigitalOcean’s datacenter. This is great if you’ll be storing data on one droplet and accessing it via another, as you use the private network to protect that connection from eavesdropping.
Note
Private networking has been replaced by Virtual Private Cloud (VPC) networking, but it works effectively the same.
Next, you can enable IPv6 access to the droplet. Depending on your network infrastructure, you may or may not find this useful. We won’t be enabling it in this course.
The user data option allows you to provide some initial configuration information to your droplet using the cloud-init program. If you are creating many droplets from scratch that all need the same configuration, this can be a very powerful tool. However, for this course we’ll be performing our configuration manually, so we won’t be using this right now.
Finally, DigitalOcean offers advanced droplet monitoring at no extra charge. Let’s enable that option here, and later we’ll look at the information it collects for us.
You can also add SSH keys directly to your droplet. If you do so, the system will be configured to prevent SSH login via password, and you won’t receive the root password via email from DigitalOcean. If you have already configured an SSH key with DigitalOcean, you can add it to your droplet here, but if not, I’ll walk you through the steps to do that later in this video.
Lastly, you can create multiple droplets with the same settings. For the lab, you’ll need to create two droplets, named FRONTEND and BACKEND. For this example, however, I’m just going to create one, and name it EXAMPLE. As part of the lab, you’ll have to extrapolate what I demonstrate here on a single droplet to your setup with multiple droplets.
Finally, I can click the “Create” button to create my droplet. After a few seconds, you should see the IP address of your droplet in your dashboard. Let’s click on it to see additional information about the droplet.
At the top of the page, you’ll see your droplet’s public IP address, as well as the private IP address for the internal network. Notice that the private IP address begins with a 10, which is one of the reserved network segments we discussed in Module 3. On the left of the page, you’ll see several options you can explore. For example, clicking the “Access” option will allow you to launch a virtual console to connect to your server. This is very handy if you accidentally lock yourself out of the droplet via SSH. Of course, you’ll need to actually know a password for an account on the system to log in via the console. Thankfully, if you forget your root password, there is a button below to reset that password and have it emailed to you.
For this example, however, let’s use SSH to connect to our droplet. I’m going to use one of my Ubuntu VMs from the earlier labs for this process, but you are welcome to use tools from your own host machine instead of running it in a VM. Mac and Linux users have easy access to SSH via the terminal already. For Windows users, I recommend using the Windows Subsystem for Linux to get access to SSH through Ubuntu installed directly on Windows. See the video on WSL in the Extras Module for more information on installing and configuring that application.
To connect, you’ll use a command similar to this one:
where <ip_address> is the public IP address of your droplet. When prompted, use the password for the root account you should have received via email from DigitalOcean. If everything works correctly, you should now be logged in as the root user of your droplet.
Of course, if you’ve been paying attention to this class, you should know that it is a very bad idea to use the root account directly on a system. That goes double for working in the cloud! So, the first thing we should do is create a new user named cis527. As you’ll recall from Module 1, you can do so using the adduser command:
It will ask you a few simple questions about that user, and then create that user for you. You’ll need to also give that user administrative privileges:
usermod -a -G sudo cis527
Once that is done, we should log out of the root account and log in as the new account. So, let’s exit for now:
Back on our local machine, we’ll need to set up some SSH keys so that we can log in securely. If you’d like to learn more about this process, please review the SSH video in the Extras Module.
First, if you haven’t already, you’ll need to create a set of SSH keys on this system:
ssh-keygen -t rsa -b 4096
Then, once the key is created, you can copy it to your DigitalOcean droplet using a command similar to this:
ssh-copy-id cis527@<ip_address>
where <ip_address> is the public IP address of your droplet. You’ll be asked to provide the password for the cis527 account you just created, and then it will install your SSH key for that user. Finally, you can log in to the system using SSH:
If everything works correctly, you should not be asked for your password at all, unless you put a passphrase on your SSH key. Of course, at this point you could also create an SSH config file to make this process even easier - the SSH video in the Extras module has details for how to go about doing that.
Once you’ve created your new user and switched to that account, there are a few important security steps you should take to make sure your droplet is properly secured. First, you should configure the firewall to only allow the ports you intend to use on this system. For example, you might allow port 80 for HTTP traffic, port 443 for HTTPS traffic, and port 22 for SSH traffic. In addition, you could restrict the IP addresses that are able to access certain ports. For this example droplet, I’m going to enable those three ports:
sudo ufw allow 22
sudo ufw allow 80
sudo ufw allow 443
Then, I can enable the firewall:
and check the status using:
For the lab assignment, your firewall configuration will be a bit more complex, so make sure you read the assignment carefully before enabling the firewall. If you end up locking yourself out of the system, remember that you can use the console through the DigitalOcean website to get in and fix problems with your firewall configuration.
In addition, I recommend securing your SSH server by disabling password authentication and root login. You can do so by editing the SSH configuration file:
sudo nano /etc/ssh/sshd_config
SSH servers on the internet receive sometimes hundreds or event thousands of login attempts per day from hackers trying to exploit systems with weak passwords. If your system doesn’t even accept passwords, it is just one less way they can potentially get in.
Also, you can change the port that the SSH server is listening on. This is a little bit of “security by obscurity,” which isn’t really security by itself, but it can definitely help cut down on those malicious login attempts. The lab assignment directs you to do just this. Of course, make sure you update your firewall configuration accordingly when you make this change. Once you’ve made your changes, you can restart the SSH server:
sudo systemctl restart ssh
Lastly, you may want to perform steps such as updating the timezone of your server and configuring the Network Time Protocol (NTP) client to make sure the system’s time is synchronized properly.
One other step that you may come across in many guides is enabling swap. Swap in Linux allows you to effectively use more RAM than what is available on your system. This is especially handy if you are dealing with large datasets that won’t fit in RAM. The desktop version of Ubuntu typically does this automatically, but many cloud providers such as DigitalOcean disable this feature. Since they are in the business of providing cloud resources, in general they will just want you to scale your resources accordingly to have enough RAM available instead of using swap. In addition, using swap on a solid-state drive can degrade performance and shorten the life of the drive. So, I don’t recommend enabling swap on your DigitalOcean droplets at all, unless you find a particular use case that would make it worthwhile.
With that information, you should be ready to configure and secure your first cloud server. Next, we’ll look at how to access a cloud resource using a domain name and configuring that resource accordingly.
Domains & Virtual Hosts
YouTube VideoResources
Video Transcript
Now that you’ve set up and configured your first cloud server, let’s discuss how to make that resource easily accessible to you and your organization.
In Module 3, we discussed the Domain Name System, or DNS, as the “phonebook of the internet.” It contains a list of domain names and the associated IP addresses for each one. We already have the IP address of our cloud server, now we must add our own entry to the domain name space as well.
When you register for a domain, you’ll typically be registering for a second-level domain name, which is one step below a top-level domain, or TLD, such as .com, .org, and .net, among others. In this example, wikipedia is the second-level domain name below the .org TLD.
To see it a bit more clearly, here is a diagram showing the breakdown of a common web Uniform Resource Locator, or URL. A URL is written with the top-level domain at the end, and then working backwards to forwards you can see the full hierarchy of the address in the domain name space. At the front is the protocol used to access that resource. In our case, we’ll be registering a domain name, and then creating a few subdomains for our cloud resources.
For this lab assignment, you’ll be asked to register a domain name. I’ll be using Namecheap for my example website, since it is the domain registrar I’ve been using for my personal sites for some time. There are many other registrars out there on the internet, and each one offers different services and prices. You are welcome to use any registrar you like for this lab. Once again, the GitHub Student Developer Pack is an excellent resource, and one of the discounts offered is a free .me domain through Namecheap for one year. Honestly, if you don’t already have a personal domain name, now is a great time to register one!
When registering a domain name, the most important thing to think about, first of all, is the name itself. Most domain registrars offer a search feature to see which domains are available and what the price is. You’ll also notice that the same domain name may be offered for wildly different prices under different TLDs. So, you’ll have to consider your choice of name and TLD carefully.
In addition, you can register the same second-level domain name under a variety of top-level domains, though each one comes at an addition cost, both in terms of price and management. Many large enterprises choose to do this to prevent “cybersquatting,” where another user registers a similar domain name, hoping to profit on it in some way. For example, Google owns many different domain names related to google.com, including gogle.com, goolge.com, and googlr.com in order to make sure that users who type the domain name slightly incorrectly still reach the correct website.
Once you’ve purchased your domain name, you’ll have a choice of how the DNS configuration is hosted. For many users, they are only planning on using the domain name with a particular website hosting service, such as WordPress or GitHub Pages. In that case, you can set up your domain to point to your host’s nameservers, and they’ll manage everything for you.
However, you may want to use this domain name for a variety of uses. In that case, I highly recommend managing your DNS settings yourself. You can choose to use your registrar’s built-in DNS hosting, which is what I’ll do in this example. Many cloud providers, such as DigitalOcean, also offer a hosted DNS service that you can use for this feature. In general, I’ve always kept my domain names and cloud hosting separate, just to add a bit more resiliency in case one provider or the other has a problem.
Finally, whenever you register a domain name, you are legally required to provide contact information, including your name, mailing address, and phone number, for the Whois service, a public service that provides information about all registered domains. In many cases, that would be your own personal information, which would be posted publicly along with the domain name by your registrar. For many individuals, that could create a major privacy and identity theft concern.
Thankfully, many domain registrars offer a privacy service that will replace your contact information with their own in the Whois database. In essence, they post their information publicly on your behalf, and then they will send any official communication to you directly. It helps prevent your personal information from being publicly available. In the case of Namecheap, their WhoisGuard service does just that, and as of this writing it is available free of charge for any users who register a domain name through their service. I highly recommend using one of these services to protect your private information when you register a domain name for your own personal use.
Let’s take a look at how to register and configure a domain name. As I mentioned, I’ll be using Namecheap for this example, but there are many other registrars out there that you can use. First, I’ll use their domain name search tool to see if a particular domain name is available. Let’s search for cis527 and see what’s out there.
As you can see, that domain name is available on a variety of TLDs, and at a variety of prices as well, ranging from less than $1 to more than $60 per year. The price can fluctuate wildly depending on the demand and popularity of a particular TLD. Once you choose your domain name and TLD, you can work through your registrar to register and pay for the domain. You’ll also be asked to provide them with the appropriate information for the Whois service.
Once you’ve registered your domain name, you can usually configure it through your registrar’s website. Most importantly, you’ll be able to define where the nameservers for your domain are located. As we discussed above, I recommend using your registrar’s nameservers or the nameservers of your cloud provider so you can manage the DNS settings yourself. If you are using a particular website hosting service, they may have instructions for configuring this section to point to their nameservers.
Since I’m using Namecheap’s DNS service, I can view the DNS settings right here as well. Looking at these settings, you’ll see that I have several A records already configured for this domain name. Each of these A records could point to a different cloud resource or server that I manage. However, you’ll notice that they all point to the same IP address. So, what’s going on here?
On my cloud server, I’m using the Apache web server. You’ll be using the same software on your own servers in the lab assignment. Thankfully, Apache, as well as most other web servers, has a unique feature that allows you to host multiple websites on the same IP address. This allows you make much more efficient use of your resources. Instead of having one droplet per website you manage, you can host many websites on the same droplet, and they can all share the same computing resource and bandwidth. If you are only hosting very small websites that don’t get much traffic, this is a great option.
In Apache, you can do this by configuring “virtual hosts” on the server. A virtual host defines a domain name and matches it with a folder storing the website’s files. When an incoming request comes to the server, it analyzes the domain name requested in the packet, and then finds the appropriate website to display. Because of this, it is very important to have your DNS settings set correctly for your domain. If you try to access this server by its IP address alone, you’ll generally only be able to see one of the websites it has available.
To configure your system to use virtual hosts, there are a couple of steps. First, in your DNS configuration, you’ll need to add new A records for each website you’d like to host. For this example, I’ll just use the names foo and bar. In each A record, I’ll set the IP address to be the public address of my web server.
Once I save my changes, that record will be updated in my registrar’s DNS servers. However, due to the large amount of caching and redundancy in the worldwide DNS network, it could take up to 24 hours for the changes to fully propagate. In general, you can avoid some of those issues by restarting your system to clear the DNS cache, using 3rd party DNS servers such as OpenDNS or Google DNS, and not querying this DNS entry right away so that the DNS servers don’t cache an invalid entry. However, in many cases you’ll simply have to wait until it starts working before you can continue, and there isn’t a whole lot you can do to make it go faster.
Next, on my DigitalOcean droplet, I’ll install Apache if I haven’t already:
sudo apt update
sudo apt install apache2
and then create a folder to store the first website:
sudo mkdir -p /var/www/foo/html
To make it really simple to see which website is which, I’ll simply place a file that folder, giving the name of the site:
sudo nano /var/www/foo/html/index.html
Now, I’ll need to configure a virtual host file for that website:
sudo nano /etc/apache2/sites-available/foo.russfeld.me.conf
The /etc/apache2/sites-available/ directory stores all of the available site configuration files for Apache by convention. Of course, you’ll need to update the filename to match your domain name. In that file, I’ll place the following information, which I’ve adapted from the DigitalOcean guide on installing Apache linked in the resources section below this video:
<VirtualHost foo.russfeld.me:80>
    ServerAdmin admin@russfeld.me
    ServerName foo.russfeld.me
    DocumentRoot /var/www/foo/html
    ErrorLog ${APACHE_LOG_DIR}/error.log
    CustomLog ${APACHE_LOG_DIR}/access.log combined
</VirtualHost>
Then, I’ll save and close the file. Finally, I’ll need to deactivate the default website, and activate the new site:
sudo a2dissite 000-default
sudo a2ensite foo.russfeld.me
Once I’ve activated it, I can check for any configuration errors:
sudo apache2ctl configtest
If it passes, I can restart the Apache service to reload my changes:
sudo systemctl restart apache2
I’ll do these same steps for the other site, named bar, as well. The DigitalOcean guide for installing Apache includes much more in-depth information about this process, so I encourage you to read it carefully to learn even more about how to configure and work with Apache.
Once I’ve done that, I can test my virtual host configuration and see if it works. To do this, I’ll open a web browser and navigate to http://foo.russfeld.me and see if it takes me to the correct website. I can also try http://bar.russfeld.me to test the other website. As you can see, they both work correctly.
This is just a brief introduction to setting up your own domain name and configuring your cloud resources to use that domain. In the next few lab assignments, you’ll be configuring several virtual hosts similar to these. If you run into issues getting it to work, I encourage you to post a question in the course discussion forums.
Certificates
Note
TODO The video below installs certbot from a PPA, but Ubuntu 22.04 includes certbot in the universe repositories. Refer to the instructions on the DigitalOcean website for updated instructions. –Russ
Resources
Video Transcript
So far, we’ve created a cloud server, a domain name, and connected the two so our users can access our cloud resources. However, we haven’t done anything to secure the connection between our users and our cloud system, which means that any information sent via HTTP to and from our server can be intercepted and read by a malicious third party. As you’ll recall, in Module 3 we showed how simple it is to do just that using Wireshark.
To secure our connections, we want to use HTTPS, which is simply HTTP using TLS to create a secured and encrypted tunnel. We’ve already discussed TLS a bit in Module 3, so feel free to refer to that video if you need a quick refresher of what TLS is and how it works.
As part of the TLS handshake, each system exchanges security information, such as a public key certificate, that is used to verify each other’s identity and construct a shared encryption key for the connection. It is very simple to create one of those certificates on your system, and then instruct your web server to use that certificate to create a secure connection. Those certificates are sometimes referred to as “SSL Certificates” or “TLS Certificates” as well.
However, since you created that certificate yourself, it is known as a “self-signed” certificate, and really can’t be used to confirm your identity directly. For example, you could easily create a certificate that says this system is the server for amazon.com, but that wouldn’t be true. So, how can we use those certificates to confirm a system’s identity?
The solution is to use a “chain of trust” to verify the certificate. Each web browser and operating system has a set of root certificates installed which belong to several trusted entities, called certificate authorities, or CAs, from across the world. They, in turn, can issue intermediate certificates to others acting on their behalf. To validate that intermediate certificate, the root CA signs it using their own certificate. This signature can easily be verified to make sure it is genuine. Then, the intermediate certificates can be used to sign certificates for a website or cloud resource.
When your web browser receives a certificate from a website, it can look at the signatures and verify the “chain of trust” that authenticates the certificate. In most web browsers, you can view this information by clicking on the lock icon next to the URL in the address bar. For example, the certificate for Wikipedia is currently signed by a certificate from “GlobalSign Organization Validation CA,” which in turn is signed by the “GlobalSign Root CA” certificate.
In essence, your web browser says “Well, I trust GlobalSign Root CA’s certificate, and they say they trust GlobalSign Organization Validation CA’s certificate, and the Wikipedia certificate was signed by that certificate, so it must be correct.”
So, as the administrator of resources in the cloud, it is in your best interest to not only use HTTPS to secure your web traffic, but you should also provide a valid certificate that has been signed by a trusted root CA. This helps ensure that your users can trust that the system they are connecting to is the correct one.
Unfortunately, obtaining certificates could be expensive in the past, depending on your needs. Many times you would need to obtain these certificates through your domain registrar, or directly from a variety of certificate authorities on the internet. While those are still options, and in many cases for a large enterprise they are the best options, there is a better way for us to secure our websites.
The Internet Security Research Group created Let’s Encrypt, a free certificate authority that allows the owner of a domain name to request a security certificate free of charge. To make it even easier, the Electronic Frontier Foundation, or EFF, created Certbot, a free tool that helps you configure and secure your websites using Let’s Encrypt. So, let’s see how easy it is to do just that on our cloud server.
I’m going to quickly walk through the DigitalOcean guide for using Let’s Encrypt on Apache, which is linked below this video in the resources section. Feel free to refer to that guide for additional information and discussion about this process.
First, I’ll need to install Certbot by adding the appropriate APT repository and installing the package:
sudo add-apt-repository ppa:certbot/certbot
sudo apt install python-certbot-apache
Next, I’ll need to make sure that the configuration file for my website is stored correctly and has the correct information. For example, if the website I would like to secure is foo.russfeld.me, my configuration file should be stored in /etc/apache2/sites-available/foo.russfeld.me.conf, and inside that file should be a line for ServerName foo.russfeld.me. Make sure that all three are correct before continuing.
In addition, you’ll need to make sure your firewall is configured to allow HTTPS traffic on port 443 through the firewall.
Finally, you can use Certbot to request a certificate for your website. For my example site, the command would be this:
sudo certbot --apache -d foo.russfeld.me
If you’d like to create a certificate for more than one website, you can include them with additional -d flags at the end of this command.
Certbot may ask you a few questions as it requests your security certificates, including your email address. At the end, it will ask you to choose if you’d like to have your site automatically redirected to HTTPS. I always recommend enabling this option, so that anyone who visits your site will be automatically secured.
That’s all there is to it! At this point, I recommend clearing the cache in your web browser to make sure it doesn’t have any cached information from that website. Then, you can visit your website in your browser, and it should automatically redirect you to the HTTPS protocol. You can then examine the certificate to make sure it is valid.
There is really no excuse in this day and age for having a website without a valid, authenticated security certificate, since it is so simple and easy to do. As a system administrator, you should strive to make sure every system you manage is properly secured, and this is one important part of that process.
Scaling & High Availability
YouTube VideoResources
Video Transcript
One of the major selling points of the cloud is its rapid elasticity, or the ability of your cloud resources to grow and shrink as needed to handle your workload. In this video, you’ll learn a bit more about how to configure your cloud resources to be elastic, as well as some of the many design decisions and tradeoffs you’ll face when building a cloud system.
First, let’s talk a bit about scalability. If you have a cloud system, and find that it does not have enough resources to handle your workloads, there are generally two ways you can solve that problem. The first is to scale vertically, which involves adding more CPU and RAM resources to your cloud systems. Effectively, you are getting a bigger, more powerful computer to perform your work. The other option is to scale horizontally by configuring additional cloud systems to increase the number of resources you have available. In this instance, you are just adding more computers to your organization. In many cases, your decision of which way to grow may depend on the type of work you are performing as well as the performance limitations of the hardware. If you are dealing with a large number of website users, you may want to scale horizontally so you have more web servers available. If you are performing large calculations or working with big databases, it may be easier to scale vertically in order to keep everything together on the same system.
In the case of DigitalOcean, you can scale both horizontally and vertically with ease. To scale horizontally, you’ll simply add more droplets to your cloud infrastructure. You may also need to add additional items such as a load balancer to route incoming traffic across multiple droplets. For vertical scaling, you can easily resize your droplets via the DigitalOcean control panel or their API. Unfortunately, to resize a droplet it will need to be rebooted, so you’ll have to deal with a bit of downtime unless you have some existing infrastructure for high availability. We’ll discuss that a bit later in this video.
Unfortunately, DigitalOcean does not support any automated scaling features at this time. However, they do offer a tutorial online for how to build your own scripts to monitor your droplet usages and provision additional droplets if you’d like to scale horizontally. This diagram shows what such a setup might look like. It has a frontend resource with a load balancer as well as a script to manage scaling, and a number of backend web servers to handle the incoming requests. If you are interested in learning about scaling in DigitalOcean, I encourage you to check out the tutorial linked in the resources section below the video.
One major feature that sets Amazon Web Services apart from DigitalOcean is the ability to perform automatic scaling of AWS instances. Through their control panel, it is very simple to set up a scaling plan to optimize your use of AWS resources to match your particular needs in the cloud. Since AWS is primarily targeted at large enterprise customers, it has many of these features available to help them manage large workloads in the cloud. I’ve also linked to information about Auto Scaling in AWS in the resources section below the video if you’d like to learn more.
Finally, beyond scaling, you should also consider how to design your systems for high availability when dealing with the cloud. In many organizations, your overall goal is to make your cloud resources available all of the time, without any noticeable errors or downtime. To do that, however, requires quite a bit of planning and an advanced architecture to make it all work properly. Here is a simple example setup from DigitalOcean, showing how you can use six cloud resources to build a simple, highly available system.
First, there are two load balancers. One is acting as the primary, and is assigned to a floating IP address. The secondary load balancer has a connection to the primary, allowing it to monitor the health of the system. If the secondary load balancer detects an error with the primary, it will switch the floating IP to point to itself to handle incoming requests. This change can happen almost automatically, so the users will not experience much downtime at all. Behind the load balancer is two application servers. The load balancers can forward requests to either application server, but they will, of course, detect if one server is down and route all requests to the other server instead. Finally, each application server is attached to a backend database server, each of which are replicated from the other to maintain data consistency. With this setup, as long as both systems of the same type don’t fail at the same time, the application should always be available to the users.
In the updated assignment for Lab 5, you are asked to create a load balancer between your DigitalOcean droplets to split HTTP traffic between the frontend and backend droplets. Once that is properly set up and configured, you should be able to visit the IP address of the load balancer and see the homepage of one of the two droplets. Then, if you constantly refresh that page, it should swap between the two servers as shown here.
Unfortunately, due to the way we have configured other parts of this lab, it is prohibitively difficult to configure this load balancer to properly handle HTTPS traffic. This is mainly because we are using an external registrar for our domain name so that DigitalOcean cannot manage the domain, and the certificates we are getting from certbot are tied to the actual domain name and not a wildcard. In a production system, we would probably change one of these two things to allow us to send properly secured HTTPS traffic through the load balancer. But, for now, we won’t worry about that.
To put it all together, let’s look at a quick case study for how to build an effective computing architecture in the cloud. Netflix is one of the pioneers in this area, and arguably has one of the most advanced and robust cloud infrastructures on the internet today.
As you know, Netflix has grown by leaps and bounds over the past decade. This graph shows their total monthly streaming video hours from 2008 through 2015. Since that time, it has continued to grow at an even faster rate. In fact, today Netflix is the platform of choice for viewing TV content among most Americans, beating out basic cable and broadcast TV. As Netflix moved into the streaming video arena, they suffered a few major setbacks and outages in their data centers in 2008, prompting them to move to the cloud. As of January 2016, their service is hosted entirely from the cloud, primarily through Amazon Web Services and their own content delivery network, named Netflix Open Connect.
Of course, moving to the cloud brings its own challenges. This graph shows the daily traffic for five days across Netflix’s systems. As you can see, the traffic varies widely throughout the day, peaking and then quickly dropping. To handle this level of traffic, Netflix has a couple of options. They could, of course, scale their system to handle the highest peaks of traffic, and let it set idle during the dips. However, since the cloud should be very elastic, that is a very inefficient use of resources and could end up costing the company a fortune.
In addition, since the traffic peaks and dips so quickly, a reactive scaling approach may not work. According to their technology blog, it can take up to 45 minutes to provision a new cloud resource in their infrastructure, so by the time it is ready to go the traffic may have increased even more. In short, they’d never be able to catch up.
So, Netflix developed Scryer, a predictive scaling tool for their cloud infrastructure. Scryer analyzes traffic patterns and builds a prediction of what the traffic will be in the future, allowing Netflix to proactively scale their resources up before the increase in traffic happens, allowing them to instantly be available when they are needed.
This graph shows the workload predicted by Scryer for a single day as well as the scaling plan that came from that prediction. Netflix has used this to not only improve their performance, but reduce the costs as well.
Of course, scaling is just one piece of the puzzle when it comes to handling large cloud workloads. Many large websites employ high levels of caching, as well as the use of a content distribution network, to lessen the load on their actual cloud infrastructures and reduce the need for scaling. In the case of a content distribution network, or CDN, those websites store their data closer to the users, sometimes directly in the datacenters of internet service providers across the globe. Netflix is no different, and in many cases Netflix has stored content representing 80% or more of its workload directly in the networks of local ISPs. So, while Netflix has all of the data stored on their cloud systems, those systems are usually more involved in sending data to the local content distribution centers than actual individual users.
Finally, Netflix was a pioneer in the area of chaos engineering, or building their systems to expect failure. As they moved into the cloud, they developed tools such as “Chaos Monkey,” “Latency Monkey,” and even “Chaos Gorilla,” all part of their “Simian Army” project, to wreak havoc on their systems. Each of those tools would randomly cause issues with their actual production cloud systems, including shutting down a node, introducing artificial latency, or, in the case of Chaos Gorilla, even cutting off an entire zone. By doing so, Netflix essentially forced itself to build systems that were highly tolerant of failures, to the point that consumers wouldn’t even notice if an entire zone went offline.
In fact, these graphs show just such an event, as simulated by Chaos Gorilla. The top shows global traffic, while the bottom shows traffic during the same time period for both the eastern and western US zones. During the test, traffic to the western zone was blocked, resulting in a large amount of traffic being rerouted to the eastern zone. Looking at the graphs, you can clearly see the switchover in the smaller graphs below, but the global graph stayed steady, meaning that users worldwide wouldn’t have even noticed a blip in service.
While this may be an extreme example of planning for failures, it goes to show the depth to which Netflix has designed their cloud infrastructure to be both highly scalable to handle fluctuating demand, and highly available to mitigate failures and outages. I’ve included a whole section of related reading for this Netflix case study in the resources section below the video if you’d like to know more about these topics.
So, as you move forward and continue designing systems for the cloud, here are a few design considerations I feel that you should think about. First, do you plan on scaling out, or scaling up? In addition, is it better to scale predictively, or reactively. Also, does your system need to be designed for high availability, or is it better to save money and simplify the design at the expense of having a bit of downtime once in a while? Finally, no matter what design you choose, you should always be planning for the inevitable failures and outages, and testing any failover procedures you have in case they do happen. Just like the fire drills you might remember from school, it’s much better to practice for emergency situations that never happen than to have to deal with an emergency you haven’t prepared for in the first place.
That’s all for Module 5! In Module 6, you’ll continue building both cloud systems as well as enterprise networks as we deal with application servers. In the meantime, you should have everything you need to complete Lab 5. As always, if you have any questions, feel free to post in the course discussion forums to get help. Good luck!
Subsections of Containers
Introduction
YouTube VideoResources
Video Transcript
Welcome to module 5 A - the first new module added to this course in several years. In this module, we’re going to explore one of the biggest trends in system administration - containerization. We’ll see how containers have quickly overtaken traditional virtual machines for running workloads in the cloud, and how tools such as Docker make using containers quick and easy. We’ll also learn how we can use containers in our own development workflows, making it much easier to build tools that will work as seamlessly in the cloud as they do on a local system. Finally, we’ll take a look at Kubernetes, which has quickly become the most talked about tool for orchestrating containers in the cloud.
Before we begin, I want to give a huge shout out to the TechWorld with Nana channel on YouTube, which is linked at the top of this page. Her comprehensive video courses on Docker and Kubernetes are the most well organized resources for those tools I’ve come across, and much of the structure of this module is inspired by her work. So, I must give credit where it is due, and I encourage you to check out her resources as well.
We’ll start by taking a look at the architecture of containers in general, and then we’ll dive in to using Docker on our own systems. Let’s get started!
Architecture
YouTube VideoResources
Video Transcript
Up to this point, we’ve been working with traditional virtual machines in our labs. To use a traditional virtual machine, we first install a hypervisor that allows us to run multiple VMs on a single system. That hypervisor may be installed directly on the hardware, as it is in most enterprise settings, or we may install the hypervisor on top of an existing operating system, like we’ve done with VMWare on our own computers. Then, inside of the virtual machine, we install another entire operating system, as well as any of the software we need to run our applications. If we want to have multiple VMs that all run the same operating system, we’ll have to install a full copy of that operating system in each VM, in addition to the operating system that may be installed outside of our hypervisor. Can you spot a possible problem here?
In traditional VM architectures, we may end up wasting a lot of our time and resources duplicating the functions of an operating system within each of our virtual machines. This can lead to very bloated virtual machines, making them difficult to move between systems. In addition, we have to manage an entire operating system, complete with security updates, configuration, and more, all within each virtual machine. While there are many tools to help us streamline and automate all of this work, in many ways it can seem redundant.
This is where containers come in. Instead of a hypervisor, we install a container engine directly on our host operating system. The container engine creates an interface between the containers and the host operating system, allowing them to share many of the same features, so we don’t need to install a full operating system inside of a container. Instead, we just include the few parts we need, such as the basic libraries and command-line tools. Then, we can add our application directly on top of that, and we’re good to go. Containers are often many times smaller than a comparable virtual machine, making them much easier to move between systems, or we can just choose to run multiple instances of the same container to provide additional redundancy. In addition, as we’ll see later, containers are built from read-only images, so we don’t have to worry about any unwanted changes being made to the container itself - a quick restart and we’re back to where we started! With all of those advantages, hopefully you can see why containers have quickly become one of the dominant technologies for virtualization in industry today.
In this course, we’re going to take a deep dive into using Docker to create and manage our containers. Docker is by far the most commonly used container platform, and learning how to work with Docker is quickly becoming a must-have skill for any system administrator, as well as most software developers. So, learning how to use Docker is a great way to build your resume, even if you aren’t planning to work in system administration!
Docker itself consists of three major parts. First, we have the Docker client, which is either the Docker command-line tool or a graphical interface such as Docker Desktop. We use the client to interface with the rest of the system to create and manage our containers. Behind the scenes, we have the Docker engine, also known as the Docker daemon, which handles actually running our containers as well as managing things such as images, networks, and storage volumes. We’ll spend the next several parts of this module exploring the Docker client and engine. Finally, Docker images themselves are stored on a registry such as Docker Hub, allowing us to quickly find and use images for a wide variety of uses. Many code repositories such as GitHub and GitLab also can act as registries for container images, and you can even host your own!
Next, let’s look at the structure of a typical container. A container is a running instance of an image, so we can think of a container like an object in object-oriented programming, which is instantiated from an image, acting like a class in this example. An image consists of several layers, which are used to build the file system of the image. Each time we make a change to the contents of an image, such as installing a piece of software or a library, we generate a new layer of the image. This allows us to share identical layers between many images! For example, if we have multiple images that are build using the same Ubuntu base image, we only have to store one copy of the layers of the Ubuntu base image, and then each individual image just includes the layers that were added on top of the base image! This makes it easy to store a large number of similar images without taking up much storage space, and we can even take advantage of this structure to cache layers as we build our own images!
When we create a container from an image, we add a small, temporary read/write layer on top of the image layers. This is what allows us to instantiate the container and have it act like a running system. As soon as we stop the container, we discard the read/write layer, which means that any data added or changed in the container is lost, unless we make arrangements to have it stored elsewhere. So, this helps us maintain a level of confidence that any container started from an image will always be the same, and we can restart a container anytime to revert back to that state.
So, as we saw earlier, we can easily instantiate multiple copies of the same image into separate containers. Each of those containers will have their own read/write layer, but they’ll share the same base image. This makes it extremely easy to deploy multiple instances of the same container on a single system, allowing us to quickly build in redundancy and additional capacity quickly.
We can also use this to build really interesting infrastructures! Consider developer tools such as GitHub Codespaces or educational tools like Codio - behind the scenes, those platforms are simply instantiating containers based on a shared image that contains all of the development tools and information that the user needs, and once the user is done with their work, the container can be either paused to save computing resources, or it can be destroyed if no longer needed by the user.
So, in summary, why should we consider using containers in our infrastructure instead of the virtual machines we’ve been learning about so far? Well, for starters, we know that images for containers are typically much smaller than traditional virtual machines, and the use of layers and de-duplication allows us to further reduce the storage needed by images that share a common ancestor. In addition, since the image itself is somewhat decoupled from the underlying operating system, it becomes very easy to decouple our applications from the operating system it runs on. We’ve also discussed how containers and images are very portable and scalable, so it is very easy to start and run a container just about anywhere it is needed. Finally, as we’ll see later in this module, there are many tools available to help us orchestrate our containers across many systems, such as Kubernetes.
One topic we really haven’t talked about yet is sandboxing. This is another great feature of containers that really can’t be overlooked. Consider a traditional web-hosting scenario, where a single server has a webserver such as Apache installed, as well as a database, email server, and more. Since all of those applications are installed on the same operating system, a vulnerability in any one of them can allow an attacker access to the entire system! Instead, if each of those applications is running in a separate container, we can easily isolate them and control how they communicate with each other, and therefore prevent a vulnerability in one application from affecting the others! Of course, this depends on us properly configuring our container engine itself, and as we’ll see later in this lab, it is very easy to unintentionally introduce security concerns unless we truly understand what we are doing.
As we’ve already heard in this video, containers are quickly becoming one of the most used tools in system administration today. According to Docker, as of April 2021, there have been over 300 billion individual image downloads from Docker Hub, with 10% of those coming just in the last quarter! There are also over 8.3 million individual image repositories hosted on Docker Hub, meaning that nearly any self-hosted piece of software can probably be found on Docker Hub in some form.
Datadog also publishes their list of the top technologies running in Docker among their clients. Looking here, there aren’t too many surprises - we see that the Nginx webserver, Redis key-value database, and Postgres relational database are the top three images, with many other enterprise tools and data storage platforms close behind.
Hopefully this gives you a good overview of the architecture of containers and some of the technology behind the scenes. In the next few parts of this lab, we’re going to dive directly into using Docker on our own systems.
Docker
YouTube VideoResources
Video Transcript
Now that we’ve covered the general architecture of containers, let’s dive a bit deeper into Docker itself. Docker is by far the most commonly used tool for creating and managing containers on a small scale, and learning how to use it is a super useful skill for just about any one in a system administration or software development field. So, let’s take a look at!
First, let’s go over some general terminology related to containers. Recall that an image is a read-only template that is used to build a container. The image itself consists of several layers, and may be built on top of another existing image.
When we launch an image, it is instantiated into a container. A container is a running instance of an image, and it includes the read/write layer as well as any connections to resources such as networks, volumes, and other tools.
Finally, a volume in Docker is a persistent storage location for data outside of a container. We’ll explore how to create volumes and store data from a container later in this lab.
Docker itself consists of several different components. The Docker engine, also known as the Docker daemon, is the tool that is installed on the system that will host the containers. It manages creating containers from images and connecting them to various resources on the system.
The Docker client is the command-line tool that we use to interface with the Docker engine. On systems with a GUI, we can also install Docker Desktop, which acts as a client for interfacing with Docker, but it also includes the Docker engine. In many cases, installing Docker desktop is the best way to get started with Docker on our own systems, but when working in the cloud we’ll generally install the traditional Docker engine and client.
Along with the Docker client, we have another tool known as Docker compose. Docker compose allows us to build configuration files that define one or more containers that should work together, and we can also use Docker compose to easily start and stop multiple containers quickly and easily. I generally prefer working with Docker compose instead of the Docker client, but it is really just personal preference. There are also 3rd party tools that can interface with Docker, such as Portainer, that can do much of the same work.
Finally, we also need to know about registries for container images. Docker Hub is by far the most well known of these, but it is also important to know that both GitHub and GitLab can act as a registry for Docker images. Some companies, such as Microsoft, also choose to host their own registries, so many of the .NET Docker images must be downloaded directly from Microsoft’s own registry instead of Docker Hub. For this course, we’ll just use Docker Hub and the official images hosted there.
So, to get started with Docker, there are several commands that we’ll end up using. We’ll see these put into practice over the next few parts of this lab, so don’t worry about memorizing them right now, but I want to briefly review them so you’ll know what they are for when you see them used in the later examples.
First, to get an image from an image registry, we use the docker pull command. This will download the image and store it locally on your system. To review the images available on your system, you can use the docker images commands.
Once we have an image, we can instantiate it into a container using the docker run command. Thankfully, docker run is also smart enough to download an image if we don’t have it locally, so in many cases it is sufficient to simply use docker run to both get an image and start a container.
Once a container is created, we can use docker stop and docker start to stop and start an existing container. This is helpful if we want to effectively “pause” a running container without losing any of its configuration.
To see the containers that are currently running, we can use docker ps. We can also see all containers, including those that are stopped, using docker ps -a.
Another very useful command is docker exec, which allows us to run a command within a running container. This is very useful if we need to perform some configuration within the container itself, but we can also use it to open an interactive shell directly within a container.
Finally, most applications running within Docker containers are configured to print logs directly to the terminal, and we can view that output using the docker logs commands. This is very helpful when a container isn’t working like we expect, so we can explore the output produced by the application running in the container to help us debug the problem.
Before we can start a container, we must find an image that we’d like to run. To do that, one of the first things we can do is just head to Docker Hub itself and start searching for an image. However, as we’ve already heard, there are other registries available, so if we can’t find what we are looking for on Docker Hub, we may want to check sites such as GitHub or the application’s website to learn about what images are available.
Once we’ve found an image we’d like to run, we need to consider a couple of other factors. First, images on Docker Hub and other registries are marked with various tags. The tags are used to identify the particular version or architecture of the image. So, let’s take a look at the official image for Nginx to see what tags are available. (Navigate to Nginx).
Here, we see many various versions of Nginx available, including images that are configured to include the perl module, and images based on the Alpine Linux project. If we scroll down the page a bit, we can see a discussion of the various image variants and how they differ.
Most Docker images are based on one of the mainline Linux distributions, usually either Debian or Ubuntu. However, one of the image variants offered by Nginx, as well as many other applications, is based on the Alpine Linux project. Alpine is a very small Linux distribution that uses very compact libraries and doesn’t include a lot of tools, making it ideal as a basis for very small Docker images. However, this can make it more difficult to work with Alpine-based images, since there aren’t many tools included that can help with debugging. Likewise, building an image based on Alpine requires much more knowledge of the system and what libraries need to be included.
Basically, if you aren’t sure, it is generally best to go with an image based on a mainline Linux distribution you are familiar with. However, if you’d like to make your images as small as possible, you can choose to use an Alpine-based image instead.
Finally, if we scroll back to the top of the page, you’ll see that the Nginx image is tagged as a “Docker Official Image” meaning that it is one of the curated repositories that has been reviewed by Docker and will generally be well maintained and updated. You can click on that tag to learn more, and even learn how to search Docker Hub for other official images. When in doubt, it is best to look for one of these official images anytime you want to use a particular application.
For this example, we’re going to use another Docker Official Image called Hello World. This image is a great example of a minimal container, making it an easy place to get started with Docker. So, now that we’ve found the image we want to use, let’s go back to the terminal and learn how to create and run some containers.
Before you begin, you’ll need to install the Docker platform on your system. At the top of this page are links directly to the Docker instructions for installing Docker on various systems. If you are working on your local system or in a virtual machine, you will probably want to install Docker Desktop, since that handles everything for you. For installations in the cloud, you’ll need to install the Docker engine and client directly, and you may also want to add the Docker Compose plugin as well.
[Demo Here]
There we go! That’s a quick overview of using Docker to create and run containers. However, this small example leaves many questions unanswered! For example, how can we access our Nginx server outside of the Docker container itself? What if we want to host our own files in Nginx instead of the default webpage? Also, how can we store data from our containers so that it isn’t lost each time the container restarts. And finally, is there a way to simplify these Docker commands so they are easy to replicate multiple times?
Over the next few parts of this lab, we’ll work on addressing each of these questions.
Orchestration
YouTube VideoResources
Video Transcript
Up to this point, we’ve only looked at how we can start and run containers one at a time on a single platform. While that is great for development and testing, we should know by now that manually doing anything in an enterprise situation is not a great idea. So, let’s explore some of the methods and tools we can use to better orchestrate our containers and automate the creation and deployment of them.
Container orchestration is the overarching term I’ll use for this concept, though it maybe isn’t the most descriptive term. When are orchestrating containers, we are really talking about ways to manage and deploy containers at scale, sometimes on a single node, and sometimes across multiple nodes. For now, we’ll only focus on a single node, and we’ll address working with multiple nodes later in this module.
Orchestration also includes things such as managing the routing of network data and other resource between the various nodes, and possibly automating the ability to restart a node if it fails.
In short, we want to take the same approach we took in Lab 2 related to building individual systems and apply that same idea to working with containers.
Here’s a quick diagram showing what a full-fledge container orchestration setup might look like. At the top, we have a configuration file defining the architecture we want to deploy - in this case, a Docker Compose file, which is what we’ll cover in this lesson. That file is then used to control multiple Docker engines running across multiple individual computing nodes, or servers on the cloud. This allows us to run containers across multiple nodes and handle situations such as load balancing and automated recovery in case of an error.
Underneath the Docker engine, we may have multiple logical “clusters” of nodes or containers, which represent the different environments that our nodes are operating within. For example, we may have a test cluster and a production cluster, or our application may be separated across various physical or logical locations.
Kubernetes follows a similar architecture, but we’ll look at that more in depth later in this module.
So, for this example, let’s look at another Docker tool, Docker Compose. Docker Compose is used to create various isolated Docker environments on a single node, usually representing various application stacks that we need to configure. Using Docker Compose, we can easily record and preserve the data required to build our container infrastructure, allowing us to adopt the “infrastructure as code” principle. Once we’ve created a Docker Compose file, we can easily make changes to the infrastructure described in the file and apply those changes to the existing setup.
Finally, using Docker Compose makes it easy to move an infrastructure between various individual systems. A common use-case is to include a Docker Compose file along with a repository for a piece of software being developed. The Docker Compose file defines the infrastructure of other services that are required by the application, such as a database or message queue.
The Docker Compose tool uses files named docker-compose.yml that are written using the YAML format. Inside of that file, we should see a services heading that defines the various services, or containers, that must be created. This particular file lists two services, nginx and mysql. Those second-level service names can be anything we want them to be, but I’ve found it is easiest to match them closely to the name of the Docker image used in the service. As a minimal example, each service here contains the name of a Docker image to be used, as well as a friendly name to assign to the container. So, this Docker Compose file will create two containers, one running Nginx and another running Mysql. It’s pretty straightforward, but as we’ll soon see, these files can quickly become much more complex.
Once we’ve created a Docker Compose file, we can use the docker compose commands to apply that configuration. Previously, docker-compose was a separate Docker client that was installed individually, but with the release of version 2.0 it was integrated within the main Docker client as a plugin. If you installed Docker Desktop, you should already have docker compose available as well, but if not you may have to install the Docker Compose plugin. The instructions for this are available in the links at the top of this page.
[demo here]
Once major feature of the Docker Compose file format that many users may not be aware of is the ability to extend a service definition from another file. This allows us to create individual files for each service, and them compose them together in a single docker-compose.yml file. We can also use this same technique to share some settings and configuration between many different services within the same file.
In this example, we see our main docker-compose.yml file that contains a service definition for a webserver. That definition extends the basic nginx service that is contained in another file named nginx.yml in the same directory. Using this method, we can create multiple different web servers that all inherit the same basic nginx configuration, but each one can be customized a bit further as needed. This greatly reduces the amount of duplicated code between services, and can also help to greatly reduce the size of the main docker-compose.yml file for very complex setups.
There we go! That’s a quick crash course in using Docker Compose to build a defined configuration for a number of Docker containers. For the rest of this lab, we’ll mainly work in Docker Compose, but we’ll show some basic Docker commands and how they compare to the same setup in Docker Compose.
Resources
YouTube VideoResources
Video Transcript
So far we’ve learned how to pull Docker images from a repository and instantiate them as containers, and also how to use Docker Compose to achieve the same result, but we really haven’t been able to do much with those containers. That’s because we haven’t given our containers any resources to work with. So, let’s do that now.
There are many different resources that can be assigned to containers. We can connect a network port from our host system to a network port on a container, allowing external access into the container from the network. We can also attach containers to various internal networks, allowing specific containers to talk with each other directly. In addition, we can set specific environment variables within a container, which are primarily used by the applications running within the container as configuration parameters, specifying things such as usernames, passwords, and other data needed by the container. Finally, we can attach a storage volume to a container, allowing us to store and persist data even after a container is stopped.
Let’s start with the most common container resource - the networked port. This diagram shows a high-level overview of how this works. Inside of Docker, we might have two containers, one running a database server and the other hosting a web server. Since we want external users to be able to talk to the web server, we can map a network port from our host system, represented by the outer box, to a port on the web container. In this case, we are connecting the external port 8000 with the internal port 5000 on the web container. So, any incoming network traffic to our host on port 8000 will be forwarded to port 5000 on the web container.
To do this in Docker, we can use the -p flag on the docker run command to map a port from the host system to a container. The syntax of this command puts the external port first, then the port on the container. So, in this command, we are connecting port 8080 on our system to port 80 inside the Nginx container.
Below, we see the same system defined in Docker Compose as well. It adds a ports: entry below the service definition, and uses the same syntax as the docker run command. Of course, in both cases we can map multiple ports inside of the container by supplying additional -p entries in docker run or by adding additional elements below the ports: entry in Docker Compose.
So, let’s give this a try and then show that we can access the webserver from outside the container.
[demo here]
Once we’ve mapped a port on a container, we can use the docker ps command to see the various port mappings present on a container. This is a great way to quickly confirm that we mapped the port correctly. I still sometimes get my ports reversed, so this is a quick and easy way to confirm it is set up properly when I’m debugging problems in a container.
Next, lets go from individual ports to entire networks. We can expand the previous example by moving the db container to a separate network within Docker, isolating it from other containers and possibly even the outside world by making the new network internal to Docker.
–
To do this using the Docker client, we can start by creating our container using the docker run command. This will connect the container to the default network in Docker - any container that is started without defining a network will be automatically connected to the default network.
However, we can create a new network using the docker network command as shown here. This will create a new bridge network named redis_network, and it also specifies that it is an internal network, meaning that it won’t be connected to the outside world at all.
Once we’ve created the network, we can attach any existing containers to that network using the docker network connect command.
We can also use the --network flag in the docker run command automatically connect a container to a defined network when we create it. However, it is worth noting that this has two caveats:
- The container will not be connected to the default Docker network
- We can only specify one network in the
docker run command. If we want the container to be attached to multiple networks, we have to attach the rest manually using the docker network connect command.
This Docker Compose file shows the same basic setup as the previous set of Docker commands We start by creating an nignx service that is connected to both the default and redis networks, and it has a port mapping to the outside world. Then, the redis service is only connected to the redis network. Finally, at the bottom of the file, we see a new top-level entry networks that lists the networks used by this configuration. Notice that we don’t have to include the default network here, since it is created for us automatically, though we can list it here if we want to configure it beyond the default settings.
So, let’s go ahead and apply this Docker Compose file to see it in action.
[demo here]
Once we’ve got our containers running, we can use the docker network inspect command to inspect the various networks on our system. If we scroll through the output, we can find the containers connected to each network, as well as other information about how the network is configured. We can also test and make sure the containers can talk with each other, though we’ll leave that to a later example.
Another resource we can give to our Docker containers are environment variables. Many applications that are developed to run in Docker containers use environment variables for configuration. A great example of this is the MySQL Docker image - when we create a container from that image, we can provide a root password for the database as an environment variable. We can also use it to configure a second account and database, making it quick and easy to automate some of the basic steps required when setting up a database for an application. This diagram shows some of the places where environment variables are used in the process of building and instantiating a Docker container.
So, let’s see what that looks like in practice. Here is a set of docker commands that can be used to create two containers - one containing a MySQL database server, and another containing PHPMyAdmin, a program for managing MySQL databases. In both of the docker run commands, we are including an environment variable using the -e flag. For MySQL, we are setting a root password. Then, for the PHPMyAdmin container, we are configuring the hostname where it can find the MySQL server. Notice that the hostname we are giving it is the name of the MySQL container we created earlier, mysql1. This is one of the coolest aspects of networking in Docker! Docker actually handles an internal form of DNS for us, so each Docker container on a network is accessible by simply using the container name as the full hostname on the Docker network. This makes it super simple to connect Docker containers together in a network!
This slide shows the same basic setup in a Docker Compose file. Just like we specify ports and networks in the YML format, we can add another entry for environment that lists all of the environment variables. So, as before, we can create a docker-compose.yml file containing this content, and then use the docker compose up -d command to bring up this configuration in Docker. Let’s do that now to see how it works.
[demo here]
We can also explore our running Docker containers to find the various environment variables that are available to that container. We can use the docker inspect command to inspect the configuration of each individual container. Of course, this presents a unique security vulnerability - notice here that we can easily see the root password for our MySQL server in our Docker environment. This is not good! If anyone has access to the Docker engine, they can potentially find out tons of sensitive information about our containers! So, we should think very carefully about what information we put in the environment variables, and who has access to the Docker engine itself. Thankfully, for orchestrating containers across the network, tools such as Kubernetes include a way to secure this information, so it is less of a concern there.
Now that we have a running MySQL server, along with PHPMyAdmin, let’s take a minute to set up a database and store some information in it.
[demo here]
Now that we’ve stored some information in this database, let’s stop and restart the container and see what happens.
[demo here]
Uh oh! Our information disappeared! This is because the transient read/write layer of a container is discarded when it is stopped, so any changes to the filesystem are not kept. While this is a great feature in many ways, it can also cause issues if we actually want to save that data!
Docker includes two different ways we can store data outside of a container. The first is called a bind mount, which simply connects a directory on our host’s filesystem to a folder path in the container. Then, any data in the container that is written to that folder is actually stored in our host’s filesystem outside of the container, and it will be available even after the container is stopped.
The other method we can use is a Docker volume. A Docker volume is a special storage location that is created and managed by Docker itself. We can think of it like a virtual hard disk that we would use with VMWare - it is stored on the host filesystem, but it isn’t directly accessible outside of Docker itself.
There are many pros and cons for using both bind mounts and volumes in Docker - it really depends on how you intend to use the data. See the Docker documentation for a good discussion about each type of storage and the use-cases where it makes the most sense.
To use a bind mount in Docker, we must first make sure the folder exists in our host filesystem. For this, I’m just going to use the mkdir command to make the directory. We can then add a -v parameter to our docker run command. The first part of the volume entry is the path to the directory on the host system, and then following a colon we see the path within the container’s filesystem where it will be mounted. This is a very similar syntax to the port mappings we learned about earlier. At the bottom of this slide, we see the same configuration in Docker compose - we simply add a volumes entry and list the bind mount there.
To use a volume in Docker, the process is very similar. First, we can use the docker volume create command to make a volume in Docker. Then, in our docker run command, we use the name of the volume as the first part of the -v parameter, followed by the path inside of the container where it should be mounted.
In Docker Compose, the process is very similar. However, in this case, we don’t have to manually use the docker volume create command, as Docker Compose will handle creating the volume for us.
One thing to be aware of is where the volume is mounted within the container. Many Docker images, such as MySQL, include notes in the documentation about where data is stored in the container and which directories should be mounted as volumes to persist the data. So, in this case, the /var/lib/mysql directory in the container is the location given in the MySQL Docker Image documentation for persistent storage, so that’s why we are mounting our volume in that location.
So, let’s update our MySQL container to include a volume for storing data. Once we do that, we’ll show that it will properly store and persist data.
[demo here]
Finally, just like any other resource, we can use the docker inspect commands to see the volumes and bind mounts available on a container.
There we go! That’s a pretty in-depth overview of the various resources that we can add to a Docker container. We’ve learned how to map ports from the host system to ports within a container, connect containers together via various Docker networks, provide data to Docker containers in environment variables, and finally we can now persist data using bind mounts and Docker volumes. At this point, we should have enough information to really start using Docker effectively in our infrastructures. For the rest of this module, we’ll dive into various ways we can use Docker and more advanced configurations.
Building Images
YouTube VideoResources
Video Transcript
So far, we’ve explored how to download and use pre-built Docker images in our infrastructure. In many cases, that covers the vast majority of use cases, but what if we want to build our own Docker images? In this lesson, we’ll explore the process for creating our own Docker images from scratch. The process is pretty simple - we start with a special file called a Dockerfile that describes the image we want to create. In that file, we’ll identify a base image to build on, and then include information to configure that image, add our software and configure it, and then set some last details before building the new image. So, let’s see how that process works in practice!
Normally, we’d probably have our own application that we want to include in the Docker container. However, since this is a course on system administration, we’re going to just use a sample program provided by Docker itself as the basis for our image. So, you can follow along with this entire tutorial by going to the Docker Get Started documentation that is at the URL shown on this slide. We’ll basically be following most of the steps in that tutorial directly.
Our first step is to get a copy of the application code itself. So, on one of our systems that has Docker installed and configured, we can start by cloning the correct repository, and then navigating to the app directory inside of that repository. At this point, we may want to open that entire directory in a text editor to make it easy for us to make changes to the various files in the application. I’m going to open it in Visual Studio Code, since that is what I have set up on this system.
Now that we have our application, we can create a Dockerfile that describes the Docker image that we’d like to create that contains this application. This slide shows the Dockerfile from the tutorial. Let’s go through it line by line to see what it does.
First, we see a FROM line, which tells us what base image we want to build the image from. In this case, we have selected the node:12-alpine image. Based on the context, we can assume that this is a Docker image containing Node.js version 12, and that it was originally built using the Alpine Linux project, so the image is a very minimal image that may not have many additional libraries installed. This also tells us that we’ll need to use commands relevant the Alpine Linux project to install packages, so, for example, we’ll need to use apk add instead of apt install.
The next line is a RUN command, which specifies commands that should be run inside of the image. In this case, we are installing a couple of libraries using the apk add command. Since this command will change the filesystem of the image, it will end up generating a new layer on top of the node:12-alpine image.
Next, we have a WORKDIR entry, which simply sets the working directory that the next commands will be run within. So, in this case, we’ll be storing our application’s code in the /app directory within the Docker image’s file system.
After that we, see a COPY command. This one is a bit confusing, since the copy command in a Dockerfile operates in two different contexts. The first argument, . is interpreted within the host system, and references the current directory where the Dockerfile is stored. So, it will in effect copy all of the contents from that directory into the Docker image. The second argument, also a ., is relative to the Docker image itself. So, these files will be placed in the current directory in the Docker image, which is /app based on the WORKDIR entry above. As you might guess, this also creates a new layer in our created Docker image.
Once we’ve loaded our application files into the image, we see another RUN command. This time, we are using the yarn package manager to install any libraries required for our Node.js application to function. If you are familiar with more recent Node.js applications, this is roughly equivalent to the npm install command for the NPM package manager. This creates a third new layer in our resulting image.
Finally, we see two entries that set some details about the final image itself. The first entry, CMD will set the command that is executed when a container is instantiated using this Docker image. Since we are building a Node.js application, we want to use the node command to run our server, which is stored in the src/index.js file. Notice that this command is also relative to the WORKDIR that was given above!
Finally, we have an EXPOSE entry. This simply tells Docker that the port that should be made available from a container instantiated using this image is port 3000. However, by default this won’t actually create a port mapping to that port - we still have to do that manually! However, there are some tools that can use this information to automatically route data to the Docker container itself, and this EXPOSE entry helps it find the correct port to connect to.
There we go! That’s a basic Dockerfile - it may seem a bit complex, but when we break it down line by line, it is actually very simple and easy to understand.
So, once we’ve created a Dockerfile for our project, we can use the docker build command to actually build our Docker image. In that command, we can use the -t argument to “tag” the image with a simple to understand name so we can easily reference it later. We also need to specify the location of the Dockerfile, which is why we include the . at the end of the command.
Once our Docker image is built, we can use a simple docker run command to instantiate a container based on that image. We’ll also map port 3000 so we can access it from our local machine. If everything works, we can go to a web browser and visit http://localhost:3000 to see our application running!
Now that we’ve built and run our Docker image, let’s make a quick update to the code and see how easy it is to rebuild it and run it again. First, we’ll make a quick edit in the app.js file to change a line of text. Then, we’ll use docker build to rebuild the Docker image. Take note of how long it takes to rebuild that image - we’ll try to make that faster a bit later!
Once it is built, we are ready to use it to instantiate a container. However, before we can run it, we must stop the running container that was built from the previous image using docker stop, and then we can use docker run to instantiate a new container.
At this point, we have a working Docker image that includes our application, but it is just stored on our own computer. If we want to share it with others, we have to upload it to a registry such as Docker Hub. If the project is hosted on GitHub or GitLab, we can use the various continuous integration and delivery features of those tools to automatically build our image and then host it on their registries as well. You can refer to the documentation for various registries if you are interested in hosting your image there. You can also look at some example CI/CD pipelines for both GitHub and GitLab by following the links at the top of this page.
Another task we may want to do after building our image is scanning it for vulnerabilities. Docker includes a quick scanning tool docker scan that will look at the image and try to find various software packages that are vulnerable. It is even able to look at things such as the package.json file for Node.js applications, or the requirements.txt file for various Python programs, among others.
As we can see on this slide, the current version of the Getting Started application actually includes a number of vulnerabilities introduced by an older version of a couple of Node.js libraries, so we may want to work on fixing those before we publish our image.
Likewise, when we download an image from a registry, we may want to scan it first to see what vulnerabilities may be present in the image before we run it. Of course, this isn’t able to catch all possible vulnerabilities, but it is a good first step we can use when reviewing Docker images.
Finally, let’s take a minute to look at the structure of our Dockerfile and see if we can do something to improve it a bit. Previously, our Dockerfile basically created three new layers on top of the base image - one to install packages in the operating system itself, one to add our application files, and a third to install packages for the Node.js environment that our application uses. Thankfully, Docker itself is very good about how it manages layers on an image, and if it is able to determine that a layer can be reused, it will pull that layer from the cache and use it instead of rebuilding it. So, as long as we start with the same base image and install the same software each time, Docker will be able to use that layer from the cache. So, our first layer can easily be loaded from the cache!
However, each time we change any of the code in our application, we will end up having to rebuild the last two layers, and that can greatly slow down the process of building a new image. Thankfully, by changing our Dockerfile just a bit, as shown on this slide, we can take advantage of the caching capability of Docker to make subsequent builds much easier. In this case, we start by just copying the package.json and yarn.lock files to the image, and then run yarn install to install the libraries needed for our application. This will populate the node_modules folder, and it creates a new layer for our image. That layer can be cached, and as long as we don’t make any changes to either the package.json or yarn.lock files in our application, Docker will be able to reuse that cached layer!
From there, we can copy the rest of our application files into the image and then we are good to go. However, since we’ve already installed our libraries, we don’t want to overwrite the node_modules folder. So, we can create a special file named .dockerignore to tell Docker to ignore various files when creating our image. It works the same way as a .gitignore file. So, we can just tell Docker to ignore the node_modules folder when it copies files into our image!
Try it yourself! Build an image with this new Dockerfile, then make a change somewhere in the application itself and rebuild the image. You should now see that Docker is able to reuse the first two layers from the cache, and the build process will be much faster. So, by thinking a bit about the structure of our application and how we write our Dockerfile, we can make the build process much more efficient.
Docker has some language-specific guides in their documentation that give Dockerfile examples for many common languages, so you can easily start with one of their guides whenever you want to build your own images. The Docker extension for Visual Studio Code also has some great features for building a Dockerfile based on an existing project.
That should give you everything you need to start building your own Docker images!
Developing with Containers
YouTube VideoResources
Video Transcript
Docker is obviously a very useful tool for system administration, as we’ve seen throughout this module. In this lesson, however, let’s take a minute to talk about how we can use Docker in the context of software development. Depending on the application we are developing and how it will eventually be packaged and deployed, Docker can be used at nearly every stage of the development process.
First, for applications that may be packaged inside of a Docker image and deployed within a container, we may wish to create a Dockerfile and include that as part of our source code. This makes it easy for us to use Docker to run unit tests in a CI/CD pipeline, and we can even directly deploy the finalized image to a registry once it passes all of our tests.
This slide shows a sample Dockerfile for a Python application written using the Flask web framework. It is very similar to the Node.js example we saw earlier in this module. By including this file in our code, anyone can build an image that includes our application quickly and easily.
Another great use of Docker in software development is providing a docker-compose.yml file in our source code that can be used to quickly build and deploy an environment that contains all of the services that our application depends on. For example, the Docker Compose file shown in this slide can be included along with any web application that uses MySQL as a database. This will quickly create both a MySQL server as well as a PHPMyAdmin instance that can make managing the MySQL server quick and easy. So, instead of having to install and manage our own database server in a development environment, we can simply launch a couple of containers in Docker.
In addition, this file can be used within CI/CD pipelines to define a set of services required for unit testing - yet another way we can use the power of Docker in our development processes.
A more advanced way to use Docker when developing software is to actually perform all of the development work directly within a Docker container. For example, if we are using a host system that has one version of a software installed, but we need to develop for another version, we can set up a Docker container that includes the software versions we need, and then do all of our development and testing directly within the container. In this way, we are effectively treating it just like a virtual machine, and we can easily configure multiple containers for various environments quickly and easily.
The Visual Studio Code remote extension makes it easy to attach to a Docker container and run all of the typical development tools directly within a container. For more information about how that works, see the links in the resources section at the top of this page.
Finally, as I’ve alluded to many times already, we can make use of Docker in our continuous integration and continuous delivery, or CI/CD, pipelines. Both GitHub and GitLab provide ways to automate the building and testing of our software, and one of the many tasks that can be performed is automatically creating and uploading a Docker image to a registry. This slide shows an example of what this looks like using GitHub actions. All that is required is a valid Dockerfile stored in the repository, and this action will do the rest.
Similarly, GitLab allows us to create runners that can automate various processes in our repositories. So, this slide shows the same basic idea in a GitLab pipeline. In fact, this pipeline will be run within a Docker container itself, so we are effectively running Docker in Docker to create and push our new Docker image to a registry.
At the top of this page are links to a couple of sample repositories that contain CI/CD pipelines configured in both GitHub and GitLab. In each repository, the pipeline will create a Docker image and publish it to the registry attached to the repository, so we can easily pull that image into a local Docker installation and run it to create a container.
This is just a small sample of how we can use Docker as a software developer. By doing so, we can easily work with a variety of different services, automate testing and packaging of our software, and make it easy for anyone else to use and deploy our applications within a container. So, I highly encourage you to consider integrating Docker into your next development project.
Reverse Proxy
YouTube VideoResources
Video Transcript
As we’ve seen, deploying services using Docker can make things very easy. Unfortunately, one major limitation of Docker is that the only way connect a running container to the outside world is by mapping a port on the host system to a port on the container itself. What if we want to run multiple containers that all host similar services, such as a website? Only one container can be mapped to port 80 - any other containers would either have to use a different port or be running on another host. Thankfully, one way we can get around this is by using a special piece of software known as a reverse proxy. In a nutshell, a reverse proxy will take incoming requests from the internet, analyze them to determine which container the request is directed to, and then forward that request to the correct container. It will also make sure the response from the container is directed to the correct external host. We call this a reverse proxy since it is acting as a connection into our Docker network, instead of a traditional proxy that helps containers reach the external internet.
As it turns out, the Nginx web server was originally built to be a high-performance reverse proxy, and that is still one of the more common uses of Nginx even today. In addition, there are many other Docker images that can help us set up and manage these reverse proxy connections. In this lesson, we’ll review three different ways to create a reverse proxy in our Docker infrastructures.
The first option is to use Nginx directly. For this, we’re going to set up a Docker Compose file that contains 3 different containers. First, we have a standard Nginx container that we are naming proxy, and we are connecting port 8080 on our host system to port 80 on this container for testing. In practice, we’d generally attach this container to port 80 on our host system as well. Notice that this is the only container connected to the default Docker network, so it is the only one that is meant to access the internet itself. Finally, we’re using a bind mount on a volume that will contain a template configuration file for Nginx - we’ll look at that a bit later.
The other two containers are simple whoami containers. These containers will respond to simple web requests and respond with information about the container, helping us make sure we are reaching the correct container through our reverse proxy. These two containers are both connected to the internal network, which is also accessible from the proxy container as well.
To configure the Nginx server as a reverse proxy, we need to provide a template for configuration. So, inside of the folder mounted as a volume in the container, we need to create a file named default.conf.template that will be used by Nginx to generate it’s configuration file. The contents of that file are shown here on the slide.
In effect, we are creating two different servers, one that listens for connections sent to hostname one.local, and the other will look for connections to two.local. Depending on which hostname is specified in the connection, it will forward those connections to either container whoami1 or whoami2. We also include a bunch of various headers and configuration settings for a reverse proxy - these can be found in the Nginx documentation or by reading some of the tutorials linked at the top of this page.
So, now that we’ve set up our environment, let’s get it running using docker compose up -d. After all of the containers are started, we can use docker ps to see that they are all running correctly.
Now, let’s test a connection to each container. We’ll use the simple curl utility for this, and include the -H parameter to specify a hostname for the connection. So, by sending a connection to localhost on port 8080 with the hostname one.local specified, we should get a response from container whoami1. We can confirm that this is correct by checking the response against the output of docker ps. We can do the same to test host two.local as well. It looks like it is working!
So, with this setup in place, we can replace the two whoami containers with any container that has a web interface. It could be a static website, or an application such as PHPMyAdmin that we’d like to include as part of our infrastructure. By setting up a reverse proxy, we can access many resources on the same host and port, simply by setting different hostnames. So, all we’d need to do is register the various hostnames in our DNS configuration, just like we did when working with virtual hosts in Apache as part of Lab 5, and point them all at the same IP address where our Docker infrastructure is hosted. That’s all it takes!
Another option for setting up a reverse proxy in Nginx is to use the nginx-proxy Docker image. This image includes some special software that can analyze our Docker configuration and automatically set up the various configurations needed for a reverse proxy in Nginx. This Docker Compose file shows the basic way this setup works.
First, we are creating a new Docker container named proxy based on the nginx-proxy image. We’re still mapping port 80 inside of the container to port 8080 on our host system, and connecting it to the same networks as before. However, this time instead of mounting a volume using a bind mount that stores our Nginx configuration templates, we are creating a bind mount directly to the docker.sock socket. This is how the Docker client is able to communicate with the Docker engine, and we are effectively giving this Docker container access to the underlying Docker engine that it is running on. This introduces a security concern, which we will address later in this lesson.
The only other change is the environments for the two whoami containers. Notice that each container now contains a VIRTUAL_HOST and VIRTUAL_PORT entry, denoting the hostname that the container should use, and the port within the container where the connections should be sent to.
Now, when we bring up this infrastructure using docker compose up -d, we should be able to do the same test as before to show that the connections for one.local and two.local are being directed to the correct containers. As we can see here, it looks like it worked! But, how does nginx-proxy know how to configure itself?
Basically, the nginx-proxy software will inspect the configuration of the various containers available in the Docker engine, using the bind-mounted connection directly to the docker.sock socket. By doing so, it will see containers that have a VIRTUAL_HOST environment variable, and optionally a VIRTUAL_PORT variable, and it will configure a reverse proxy to that container using the hostname and port specified. So, if we add a third container to our Docker infrastructure, as long as it has a VIRTUAL_HOST environment variable set, nginx-proxy will automatically see it as soon as it starts, and it will set up a new reverse proxy to that container. This is very handy, as it allows us to start and stop containers as needed, and a reverse proxy will always be available without any additional configuration needed!
Unfortunately, as I mentioned earlier, there is a major security concern introduced when we allow a Docker container to have access to the docker.sock socket on the host system. As we already saw, this allows the software running in the Docker container to access the underlying Docker engine, which is great since it can basically perform all of the configuration we need automatically, and it can even detect when new containers are started.
However, there is nothing at all preventing the software in that container, or a malicious actor who has gained access inside of the container, from performing ANY other actions on the Docker engine. So, anyone with access inside of that container could start new containers, stop running containers, change the configuration of an existing container, and so much more.
In addition, in most installations the Docker engine runs as the root user of the host system! This means that anyone who has access to the Docker engine and armed with an unpatched flaw in Docker could easily gain root access to the entire host system! In short, if you have root access in a container that has access to the Docker socket, you can effectively end up with root access on the host system.
Obviously this is a very major security concern, and one that should definitely be taken into account when using Docker containers that need access to the underlying Docker engine. Thankfully, there are a few mitigation methods we can follow. For instance, we can protect access to the Docker socket with a TLS certificate, which prevents unauthorized access by any Docker clients who don’t have the certificate. We can also protect access to the Docker socket by running it through a proxy that acts like a firewall, analyzing requests from Docker clients and determining if they are allowed. Finally, in many cases, we may not want to directly expose any container with access to the Docker engine directly to the internet itself, though in this case it would basically nullify the usefulness of Nginx Proxy.
So, it ends up being a bit of a tradeoff. If we want to use tools such as nginx-proxy in our environments, we’ll have to analyze the risk that is presented by having the Docker engine available to that container, and either take additional precautions or add additional monitoring to the system.
A third option for setting up a reverse proxy would be to use a Docker image designed specifically for that purpose. There are many of them available, but the most popular at this point is the Traefik Proxy server. Traefik Proxy is very similar to Nginx Proxy, since it also will examine the underlying Docker engine to configure reverse proxies. However, it includes many additional features, such as the ability to proxy any TCP request, introduce middleware, and automatically handle requesting TLS certificates from a provider like Let’s Encrypt.
The Docker Compose file shown here is a minimal setup for the Traefik Proxy server. In the proxy container, we see that we are customizing the startup command by providing two options, --api.insecure=true and --providers.docker. This will allow us to access the Traefik Proxy dashboard, and tells Traefik to look at Docker for information about proxies to be created. We’re also mapping two ports to the Traefik proxy - first we are connecting port 8080 on the host to port 80 on the proxy, which will handle HTTP traffic. In addition, we are connecting port 8081 on the host to port 8080 inside of the container, which is the port where we can access the Traefik Proxy dashboard. We’ll take a look at that a bit later.
Then, we set up two whoami images just like before. However, this time, instead of setting environment variables, we add a couple of labels to the containers. These labels are used to tell Traefik Proxy what hostname and port should be used for the reverse proxy, just like we saw earlier in our configuration for Nginx Proxy.
So, just like before, we can use docker compose up -d to start these containers. Once they are up and running, we can once again use docker ps to see the running containers, and we can use curl to verify that the proxy is working and connecting us to the correct containers.
To explore the configuration of our Traefik Proxy, we can also load the dashboard. To do this, we’ll simply open a web browser and visit http://localhost:8001. This slide shows a screenshot of what it may look like for our current configuration.
Just like with Nginx Proxy, Traefik will automatically add proxy routes for any new containers that have the correct labels, and we can see them update here on this dashboard in real time. Of course, right now this dashboard is completely unsecured and totally open to anyone who has access to our system, so in practice we’ll probably want to secure this using some form of authentication. The Traefik Proxy documentation includes information for how to accomplish that.
So, in summary, setting up a reverse proxy is a great way to allow users from the outside internet to have access to multiple servers running on the same Docker host. In effect, we are able to easily duplicate the features of Virtual Hosts in traditional webservers, but instead of loading files from a different directory, we are directing users to a different Docker container inside of our infrastructure.
We looked at three reverse proxies - Nginx itself, Nginx Proxy, and Traefik Proxy. Of course, there are many others out there that we can choose from - these are just three that are pretty well known and used often today.
Finally, it is worth noting that a reverse proxy such as this is generally only needed for Docker containers hosted on a single host. If we choose to use orchestration platforms such as Kubernetes, much of this is handled by the platform itself. So, in the next lesson, we’ll explore Kubernetes a bit and see how it differs from what we’ve seen so far in Docker.
Kubernetes
YouTube VideoResources
Video Notes
Note
Instead of creating and recording my own video overview of Kubernetes, I decided it would be best to just include an existing video that does an excellent job of covering that topic. My video would have been very similar, but probably with fewer graphics and a bit more condensed.
I encourage you to watch the video above through at least the “Kubernetes Architecture” portion (around 35 minutes) to get a good feel for how Kubernetes builds upon what we’ve done in Docker and Docker Compose. If you want to get some hands-on experience with Kubernetes, you can continue in the video to the tutorial using Minikube.
If you know of a better introduction to Kubernetes video that you think would fit here, feel free to let me know. I may consider including it in a future semester.
You aren’t required to use Kubernetes for any of the labs in this course, but if you are comfortable with it you are welcome to give it a try. That said, if you need help debugging it beyond my skill, I may ask you to switch back to Docker and Docker Compose instead of pushing ahead with Kubernetes. –Russ
Subsections of Application Servers
Introduction
YouTube VideoResources
Video Transcript
Welcome to Module 6! In this module, we’ll discuss the various types of servers that you may come across in a large organization. This could include file servers, web servers, application servers, database servers, and more!
In the lab assignment, you’ll set up a file server on both Windows and Ubuntu, and deal with automatically providing access to those resources for your users. You’ll also configure the IIS and Apache web servers, and learn about installing an application on each. Finally, we’ll discuss some of the considerations for configuring a database server, and you’ll work with setting up a database server on Ubuntu as well.
This lab is quite a bit more open-ended than previous assignments, as you’ll have the ability to work with a web application of your choice. However, that can also make the lab a bit trickier, since each student may go about completing it in a slightly different way. This very closely mirrors what you’d find in a real-world scenario, as every organization’s needs are different, too.
As always, if you have any questions or run into issues, please post in the course discussion forums to get help. Good luck!
Application Servers Overview
YouTube VideoResources
Video Transcript
This module is all about application servers. So, before we begin talking about them in-depth, we should first discuss what an application server actually is.
In this class, I’ll be referring to an application server as any server that runs an enterprise application. So far, in this course we’ve dealt with setting up workstations, centralized authentication systems, network services, and cloud resources, but most of those are just the infrastructure for our enterprise. Most of the activity in our organization will happen on top of that infrastructure in a variety of application servers. They handle the backend processing and storage of data, as well as the frontend interface that our users will see, either on a website, mobile application, or custom software tool. In general, application servers, are the always on, always available resources that our infrastructure provides to our users.
There are many different types of application servers that your organization may use. These could include web servers such as Apache or IIS, database servers such as MySQL or Microsoft SQL Server, email servers, and even some file servers. Those servers could also run specialized application such as customer relationship management or CRM, inventory, accounting, and more. In this course, we’ll primarily be dealing with web servers, file servers, and database servers, as they are most commonly used in a variety of enterprises.
One of the major tasks that any system administrator may face is to help your organization evaluate and choose new software. The choice of enterprise software is a very important decision, and can have a major impact on your organization’s budget, flexibility, and success in the future. So, in this video, I’ll discuss some considerations you should have in mind if you are ever asked to evaluate software for your organization.
The first step is to perform an evaluation of the software packages available for your needs, before you ever download or install them. Some things you might look at in this phase are the source of the software itself: is it a reputable company, an open-source project, or an unknown entity. Likewise, you could look at the available support offerings, knowledgebase, and user community around the software. If the community is active and the support documentation is well written, it is generally a very good sign. You might also look at the company’s history and coding practices if you can find any information about either of those. If the company has a history of good software, or, conversely a history of major flaws and bugs, that should weigh into your decision as well. Depending on your needs, you might also explore options for extending the software and integrating it into your existing infrastructure. Finally, it’s always a good idea to read some reviews and seek recommendations from others. If your organization works in a unique field, it might be worth contacting some of your peers to see what they are using and what their experience has been. In many cases, they can direct you to the best option available, or let you avoid the mistakes they’ve made along the way. And all of this comes before you’ve even looked at the software itself!
Once you have a few candidates that you’d like to test, you should go through the process of installing or using each one. As you do so, you’ll want to make a note of any other software or tools that are needed to work with the application you are reviewing. You’ll also be on the lookout for system requirements, such as storage, RAM and CPU usage. In addition, you should look at how easy it is to get data in and out of the system. One of the major frustrations with enterprise software is “vendor lock-in,” which happens when all of your data is tied to a particular software program or vendor, and there is no easy way to move to a new system. Next, you’ll want to consider how easy it was to configure the software. Does it have all the options you need, or are there parts of the system that are difficult to work with for you as an administrator, or possibly for your users. Finally, as you work with the software, you’ll definitely want to use tools such as Wireshark to monitor any network traffic on your systems. While it is rare, some applications can have major security flaws or even be compromised before installation, so you should always be on the lookout for unusual network traffic when evaluating new software.
Lastly, you’ll need to extensively test the software for usability with your users and customers. Even if the software itself is high quality, if your users are unable to use it effectively, it could be worse than not having any software at all. As you work with a group of users to beta test the system, you’ll want to monitor many aspects of how the system performs, such as the system load and load balancing needed. You should also continue to monitor the network traffic, and ensure that any data sent across the network is properly encrypted. Remember our example from Lab 3 with Apache authentication - just because it is unreadable doesn’t mean that it is properly encrypted, so you may have to consult the documentation or a security expert if you aren’t sure.
In addition, you may also want to look at how easy it is to deploy updates to the system. Does it require a large amount of downtime, or is it relatively seamless? You could also look at features such as logging and accountability. Are you able to tell which users are accessing the system, and what they are doing? It could help you diagnose problems, but also detect when users are acting maliciously. In many cases, security issues are the result of insider threats, so having a good idea of what your users are doing is very important. Finally, you should always evaluate the accessibility of the software. Does it work well with assistive devices such as a screen reader or alternative input devices? Would colorblind users have issues interacting with the software? Sometimes this can be as simple as having red and green buttons or icons with no text on them - a colorblind user would not be able to tell the difference between them.
Of course, there are many, many more things you should consider when choosing software for any organization. My hope is that this will give you at least some idea of what that process looks like. The rest of this module will deal primarily with how to configure and work with a variety of application servers, including file servers, web servers, and database servers.
Assignment
Lab 6 - Application Servers
Instructions
Create two cloud systems and four virtual machines meeting the specifications given below. The best way to accomplish this is to treat this assignment like a checklist and check things off as you complete them.
If you have any questions about these items or are unsure what they mean, please contact the instructor. Remember that part of being a system administrator (and a software developer in general) is working within vague specifications to provide what your client is requesting, so eliciting additional information is a very necessary skill.
Note
To be more blunt - this specification may be purposefully designed to be vague, and it is your responsibility to ask questions about any vagaries you find. Once you begin the grading process, you cannot go back and change things, so be sure that your machines meet the expected specification regardless of what is written here. –Russ
Also, to complete many of these items, you may need to refer to additional materials and references not included in this document. System administrators must learn how to make use of available resources, so this is a good first step toward that. Of course, there’s always Google!
Time Expectation
This lab may take anywhere from 1 - 6 hours to complete, depending on your previous experience working with these tools and the speed of the hardware you are using. Configuring application servers is very time-consuming the first time through the process, but it will be much more familiar by the end of this course.
Info
This lab involves working with resources on the cloud, and will require you to sign up and pay for those services. In general, your total cost should be low, usually around $20 total. If you haven’t already, you can sign up for the GitHub Student Developer Pack to get discounts on most of these items. If you have any concerns about using these services, please contact me to make alternative arrangements! –Russ
Task 0: Droplets & Virtual Machines
For this lab, you will continue to use the two DigitalOcean droplets from Lab 5, labelled FRONTEND and BACKEND, respectively. This assignment assumes you have completed all steps in Lab 5 successfully; if not, you should consult with the instructor to resolve any existing issues before continuing.
You will also need a Windows Server 2022 VM configured as an Active Directory Domain Controller, along with a Windows 11 VM added as a client computer on that domain. In general, you may continue to use the resources created in Lab 4, but you may choose to recreate them as directed in Lab 4 if desired.
In addition, you will need two Ubuntu VMs, one labelled SERVER and the other labelled CLIENT. You may continue to use the Ubuntu VMs from Labs 3 and 4, or create new VMs for this lab. This lab does not assume any existing setup on these VMs beyond what is specified in Labs 1 and 2. You should also make sure your Ubuntu VM labelled SERVER has a static IP address.
Task 1: Windows File Server
Configure a file server on your Windows Server 2022 VM. It should have the following features:
- A new group in the domain called NetworkAdmins that has the domain’s
Administrator account added to it (and Admin if created - see below), but not your other domain user account - A shared folder on the server named
public and stored at C:\public that should be accessible by all users on your domain - A shared folder on the server named
admins and stored at C:\admins that should only be accessible to users in the NetworkAdmins group in your domain
Tip
As of Summer 2021, there was a bug in Windows Server that prevented the built-in Administrator account from changing some settings, specifically network settings, once the server is promoted to a domain controller. This can make it difficult to fix networking issues in this or future labs. The easy fix for this is to copy the Administrator account in the Active Directory User and Computers tool and give the new copy a different name, such as Admin, and then use that account to log on to the server.
Resources
Task 2: Windows Group Policy
Configure group policy objects (GPOs) on your Windows Active Directory domain to perform the following tasks:
- All domain users should get the
public folder automatically mapped to the Z:\ drive on any system they log into. - Users in the
NetworkAdmins group should also get the admins folder automatically mapped to the Y:\ drive on any system they log into.- That drive should not be mapped for any user that is not a member of the
NetworkAdmins group.
- Make sure you test your drive maps on your Windows 11 Client system using different user accounts (feel free to create more domain accounts as needed) and be prepared to show that the correct drives are mapped for each user after logging in.
Tip
Pay close attention to how you attach and target these GPOs in the domain. You can use the domain Administrator account and the other domain account created in Lab 4 to test these on your Windows 11 client. –Russ
Resources
Task 3: Ubuntu File Server
Configure a file server using Samba on your Ubuntu VM labelled SERVER. It should have the following features:
- A shared folder on the server named
public and stored at /public that should be accessible by all Samba users - Enable shared home directories in Samba using the default
[homes] share.- Read the configuration file carefully and make sure you enable the security settings as well, which will prevent other users from accessing a
home share for a particular user.
- Enable the
cis527 user in the Samba password database. It should use the same cis527_linux password as the actual cis527 account.
Of course, you may need to modify your firewall configuration to allow incoming connections to the file server! If your firewall is disabled and/or not configured, there will be a deduction of up to 10% of the total points on this lab
Resources
Task 4: Ubuntu Drive Mapping
Configure your Ubuntu VM labelled CLIENT to automatically access the Samba shares in the following manner:
- Add an entry to
\etc\fstab to automatically mount the public folder to /mnt/public at system boot. It should be readable and writable by all users. - Use
libpam-mount to automatically mount a user’s homes share from the server at login. This only needs to work for the cis527 user, as that user should be present on both systems and Samba.
Note
To be honest, this last part can be pretty tricky. I recommend following the instructions in this video in this module very carefully. If you have any issues, you can enable debugging and review /var/log/syslog for errors. –Russ
Resources
Task 5: Windows Web Application Server
For this task, you will install and configure a .NET web application for IIS on your Windows Server 2022 VM. First, choose an application to install from the following list:
- BlogEngine.NET
- NOTE: If you choose BlogEngine.NET, make sure you read their site carefully. You don’t have to sign up for anything on their site to download the software itself, but the download link tends to be hidden in favor of their hosted options. As a sysadmin, you should definitely get into the habit of carefully reading and considering what you find online before you click!
If you would like to work with an application not listed here, please contact the instructor. The application should have some sort of functionality beyond just displaying static pages. Any approved application can be added to this list for you to use. You are not allowed to use JitBit’s .NET Forum, as that was demonstrated in the video in this module.
Once you have selected your application, perform the following configuration steps:
- Create two websites in IIS:
blog.<your eID>.cis527.org and site.<your eID>.cis527.org. They should be stored in C:\inetpub\blog and C:\intepub\site, respectively. For the blog site, make sure you choose the .NET v4.5 Application Pool! - Add a DNS forward lookup zone for
<your eID>.cis527.org to the Windows DNS server, and then add A records for the two sites described above. They should both point to the Windows Server’s IP address ending in .42. - Place a static HTML file inside of the
C:\intepub\site folder and confirm that you can access it using Firefox at http://site.<your eID>.cis527.org - Follow the instructions to install and configure your chosen application in
C:\inetpub\blog. Pay special attention to any file permissions required. Use the IIS_IUSRS group when adding write permissions to any folders as described in the instructions. You should be able to access it at http://blog.<your eID>.cis527.org using Firefox. - Create a self-signed SSL certificate and attach it to both websites by adding an additional binding for HTTPS. Make sure you can access both websites using
https://. - Use the URL Rewrite module to configure URL redirection to automatically direct users from HTTP to HTTPS for both websites.
Once these steps are complete, visiting http://blog.<your eID>.cis527.org in your web browser should automatically redirect you to https://blog.<your eID>.cis527.org and it should be secured using your self-signed certificate. You should also be able to demonstrate that the application is working properly by interacting with it in some meaningful way, such as logging in and making a new post on a blog. Finally, if you visit http://site.<your eID>.cis527.org you should see the static content from that site instead of the blog, and it should also properly redirect to HTTPS.
Note
I recommend using Firefox for testing. Edge & Internet Explorer on Windows Server are locked-down by default and can be very frustrating to work with. See, I knew you’d appreciate having Firefox installed on your Windows server! –Russ
Resources
Task 6: Ubuntu Web Application Server
For this step, you will install and configure a web application running in Ubuntu on your DigitalOcean droplets. First, choose an application to install from the following list:
If you would like to work with an application not listed here, please contact the instructor. The application should have some sort of functionality beyond just displaying static pages, and must support using a MySQL database on a separate host from the web server. In addition, the application must be installed manually - using pre-built images or Apt packages is not allowed here. Any approved application can be added to this list for you to use. You are not allowed to use phpBB, as that was demonstrated in the video in this module.
Warning
MySQL Version 8 and later requires at least 1 GB of RAM to run properly. I recommend resizing the droplet you will use for MySQL to have at least 1 GB of RAM for this step. How to Resize Droplets.
Alternatively you can use MySQL 5.7 via Docker in Option 2, or add swap space on Ubuntu (not recommended).
Once you have selected your application, choose ONE of the following configuration options:
Option 1: Docker (Recommended)
- Create two Docker containers on FRONTEND, one containing MySQL and another containing Wordpress. You may optionally add a container running phpMyAdmin if desired. The MySQL container must be isolated on its own internal network that cannot access the outside internet.
- It is highly recommended to use Docker Compose for this, as it allows you to easily replicate an environment and make incremental changes. You might even find some sample configurations in the official Wordpress documentation!
- Add an appropriate A record to your domain name created in Lab 5 for this docker container. You will also need to update your reverse proxy to properly route traffic to the Wordpress container.
- Make sure that Wordpress is properly configured via environment variables in Docker.
Option 2: Bare Hardware
- Install MySQL (and optionally phpMyAdmin) on your Ubuntu droplet labelled BACKEND and configure an appropriate username and database for your application. You should also enable SSL/TLS encryption on connections to the server if it is not already enabled in MySQL (this should be enabled by default in Ubuntu 20.04). When creating the user account in MySQL, make sure it is set to log in from the private network IP address of FRONTEND.
Tip
You may need to configure MySQL to listen on an external network interface. Make sure you use the private network IP address only - it should not be listening on all network interfaces. In addition, you will also have to open ports on the firewall, and you should restrict access to those ports to only allow connections from the private network IP address of FRONTEND. Points will be deducted for having a MySQL server open to the internet! –Russ
- Install Apache and configure a new virtual host in Apache for your web application on FRONTEND. Also, add an appropriate A record to your domain name created in Lab 5 for this virtual host. You may shut down any Docker containers from Lab 5 that interfere with this configuration.
- Install your web application on your Ubuntu droplet labelled FRONTEND following the application’s installation instructions. When configuring the database for your application, you should have it use the MySQL database on BACKEND via the private network IP address.
- Of course, you may need to modify your firewall configuration to allow incoming connections to the database server! If your firewall is disabled and/or not configured, there will be a deduction of up to 10% of the total points on this lab
Once these steps are complete, you should be able to visit your web application via HTTP and then interact with the application in some meaningful way to confirm that the database connection is working.
Resources
Task 7: Make Snapshots
In each of the virtual machines created above, create a snapshot labelled “Lab 6 Submit” before you submit the assignment. The grading process may require making changes to the VMs, so this gives you a restore point before grading starts.
Task 8: Schedule A Grading Time
Contact the instructor and schedule a time for interactive grading. You may continue with the next module once grading has been completed.
File Servers Overview
YouTube VideoResources
Video Transcript
The first type of application server we will cover in this module is the file server. In essence, a file server is simply a system on the network that is responsible for sharing files and storage resources to users in our organization. While that may seem simple on the surface, there is quite a bit going on behind the scenes.
Of course, the major component of any storage server is the actual storage medium itself. Typically most servers today use either the traditional, rotational hard disk drive, or HDD, or the newer solid state drives, or SSD. Each one has significant tradeoffs in terms of storage size, price, and performance, so you should look at each option closely to determine which one is best for your organization.
Once you have your storage, you’ll also need to understand how it is viewed by your computer or operating system. Typically storage devices can be accessed in one of three ways. Most computers use a file storage system, where data is stored and represented as files in a hierarchical file system. This is what we have been dealing with so far in this course. However, you can also use storage devices as block storage, which stores binary data in identically sized blocks. In fact, the file systems you are familiar with are actually just abstractions on top of a block-based storage device. However, block storage might be preferred for some uses, such as databases or large files. Finally, you can also treat a storage device as an object store, where data is stored as independent objects on the disk, regardless of any underlying block structure. This is very uncommon right now, but it may become more common going forward. Amazon’s Simple Cloud Storage Service, or S3, is a great example of object storage.
Another major concept in file servers is the use of RAID. RAID originally stood for “Redundant Array of Inexpensive Disks,”, but more recently it has been referred to as “Redundant Array of Independent Disks” as well. In a RAID, multiple disks are combined in unique ways to either increase the overall performance of the system, or to provide for better data protection in case of a failure. In some cases, RAID can even be used to achieve both goals. While you may not deal with RAID in a cloud environment, it is still very common on certain storage devices, so it is helpful to understand what it is.
RAID uses a variety of “levels” to determine how the disks are combined. There are several commonly used RAID levels, so I’ll cover just a few of them. First is RAID 0, commonly known as “striping.” In this setup, each data file is split, or “striped” across two drives. In this way, any attempts to read or write the file are much faster than on a single drive, since they can work in tandem. However, if either drive experiences a failure, the data on both drives will be unusable. So, you gain performance, but it increases the risk of data loss.
RAID 1 is known as “mirroring,” and is effectively the opposite of RAID 0. In RAID 1, each data file is written in its entirety to each disk. So, the disks are perfect copies of each other. If one disk fails, the system can continue to run using the other disk, often without the user even noticing the difference. With RAID 1, you gain increased resistance to data loss, but it doesn’t add any performance. Thankfully, RAID 1 can generally perform just about as well as a single drive, so there isn’t much of a performance loss, either.
The next most commonly used RAID is RAID 5. Yes, RAID 2 through RAID 4 exist, but they aren’t used very much in practice today. They are somewhat like B batteries in that regard. In RAID 5, typically four disks are used. When data is stored to the drive, it is written across three of them, with the fourth drive containing a “parity” section that can be used to verify the data. That parity sections are spread across each of the four drives, making read and write performance higher than if it was stored on a single drive. With this setup, if any one drive experiences a failure, the data on it can be reconstructed using the information present on the other three drives. With this setup, you can gain some performance over using a single drive, while still getting better data protection as well. Unfortunately, you have to give up one quarter of your storage space for this to work, but I’d say it is probably worth it.
So, what is parity? At its core, parity is just a checksum value that is based on the other values in the data. For binary, typically we use either Even Parity or Odd Parity. In Even Parity, we would make sure that the data plus the parity bit has an even number of 1s, while in Odd Parity we would make sure there are an odd number of 1s. So, in this example, looking at the second line, we see that the data includes five 1s. To make it an even number of 1s, we would set the Even Parity bit to 1. If we are using Odd Parity instead, we would set it to 0. Then, if we lost any single bit in the original data, we could determine what it was just by looking at the remaining data and the parity bit. With RAID levels such as RAID 5, we can use that same trick to reconstruct data on a drive that failed, just by looking at the remaining drives. Pretty neat, right?
Back to RAID levels, RAID 6 is very similar to RAID 5, but with two different parity sections spread across typically 5 or more drives. RAID 6 is designed in such a way that any two drives can fail and the data will still be secure. As with RAID 5, RAID 6 also includes some performance boosts as well.
Lastly, RAID levels can sometimes be combined in unique ways. For example, RAID 1+0 is a RAID 0 made up of two RAID 1 setups. In this way, you can gain the performance boost of striping with the enhanced data protection of mirroring, all in a single RAID. There are many other ways that this can be done, depending on the number of disks you have available and the characteristics you’d like your RAID to have.
Ok, so once you’ve determined how to configure your disks, the next step is to create partitions. A partition is a division of a physical disk into multiple parts. Each partition can be used for different things, such as block storage, different file systems or operating systems, or even as swap space. Years ago, it was very common to partition disks several ways in order to store multiple operating systems on the same disk, or to separate the operating system from the data. However, as hard drives have grown in size and dropped in price, coupled with the rise of virtualization, it is very uncommon to have multiple data partitions on the same disk today. Your operating system may automatically manage a few small partitions for system recovery and boot information, but in general, you probably won’t be dealing with partitions much in the future.
As you set up your file server, you may also have to deal with the various protocols that can be used to access the files. Most servers today typically use the Windows-based protocol Server Message Block or SMB, which is sometimes also referred to as the Common Internet File System or CIFS. Windows servers and clients natively use these protocols to share files, and Linux-based systems can use Samba to do the same. If files are being shared between multiple Linux systems, they could also use the Network File System or NFS protocol. In the lab assignment, you’ll learn how to set up servers using the SMB protocol using Windows Server and Samba.
In addition, there are protocols for sharing files over the internet. The most commonly used are the File Transfer Protocol, or FTP, and the SSH File Transfer Protocol, or SFTP, which transfers files via an SSH-secured tunnel. Finally, some storage devices maybe accessed using lesser-known protocols such as the Internet Small Computer Systems Interface, or iSCSI, and the Fibre Channel Protocol, or FCP. These are typically used in storage area networks to access data stored on block devices, as well see a bit later in this video.
Another concern that comes with storage is the location of the storage itself. There are typically three ways to think about where to locate your storage. First, you can use DAS, or direct-attached storage. This would be large storage devices connected directly to your system, such as a large external hard drive. In some cases, this might be the best option since it is generally the simplest and cheapest. However, it isn’t very flexible if you need to share that information with multiple systems.
The other two options are NAS, or network attached storage, and SAN, or a storage area network. As you can probably tell, these two terms are often confusing, so I’ll try to explain them in detail.
This graphic shows the major difference between a NAS and a SAN. Network attached storage simply refers to storage that is available via a network. Typically, NAS is accessed at the file level, using protocols such as SMB or NFS. In essence, you can think of any dedicated file server as a NAS device. A SAN, on the other hand, is a collection of storage devices that are typically accessed at the block level by a file server, using protocols such as iSCSI or FCP. If a file server needs access to a large amount of storage, you might set up a SAN inside your datacenter, with several large-scale block storage devices that actually handle the storage of the data. Hopefully this helps you make sense of these two similar terms.
Lastly, I’d like to introduce one major trend in storage, which is the concept of storage virtualization. Just like with hardware virtualization, it is possible to add a virtual layer between the physical storage devices and the systems using those devices. In that way, you could seamlessly migrate storage across multiple physical systems without interrupting access to the data. This diagram does a great job of showing how you could use different disks across a variety of hardware setups to create virtual datastores for your data. However, storage virtualization does come with a downside, being that the virtualization layer could represent a single point of failure in your infrastructure. So, you may have to carefully analyze the risks that such as setup would bring compared to the added flexibility it provides.
That should give you a pretty good overview of some common terms and concepts you’ll come across when dealing with file servers. The next two videos will discuss some of the implementation steps for setting up your own file server in both Windows and Samba on Ubuntu.
Windows File Server
YouTube VideoResources
Video Transcript
In this video, I’ll briefly walk you through the steps of setting up a file server in Windows Server 2016, as well as how to access those resources from a Windows 10 client on the same network. Finally, I’ll discuss a bit of information about how to automatically map those resource as network drives on the client using Group Policy.
First, let’s take a look at our server. I’m using the same VMs from Lab 4 to continue this example. Your server probably already has the File Server role installed, but if not you can install it following the same process used to install the Active Directory Domain Services role in Lab 4.
In the Server Manger, you can click on the File and Storage Services role to view information about your server. There, you can see information about the storage volumes available on your server, as well as the shared folders. You should already see two shared folders on your system, named NETLOGON and SYSVOL. These are created for the Active Directory Domain Controller role, as they store important information about the domain, such as Group Policy Objects, or GPOs, that should be replicated to other systems on the domain. So, you shouldn’t modify those shares!
If you’d like to create a new shared folder, the first step is to create that folder on your system. I’ll just create a folder in the root of the C:\ drive called share. I’ll also create a simple text file in that folder, just so it isn’t empty. Next, I can either right-click the folder and configure the sharing options there, or I can share it through the wizard in the Server Manager. I’ll do the second option, since it gives me a bit more control over the configuration for the shared folder.
In that wizard, I’ll choose the “SMB Share - Quick” option since I don’t need to set any advanced settings. Next, I’ll set the location of the shared folder. In this case, since I’ve already created it, I can click the Browse button at the bottom to select that folder. On the following screen, I can set some basic information about the shared folder, including the name and description of the share.
There are a few additional settings you can configure for the share, such as hiding files based on a user’s permissions in the shared folder. I’ll make sure I checkmark the option to “Encrypt data access” to protect any remote connections to this shared folder.
Next, you can set the permissions to access the share. To change them, click the Customize Permissions button. It is important to understand that a shared folder effectively has two sets of permissions - one set affecting access to the files and the folder itself, and another set, seen on the Share tab, that affects remote access to the files. In effect, you can limit who can access the files remotely, even if those users have permissions to access the files directly. I won’t make any changes at this point, but for one of the shares in the lab assignment you may need to update the permissions at this point.
Finally, once everything is set correctly, I can click Create to create the shared folder. After it is created, I can see it in the Shares list inside the Server Manager.
There are a couple of ways to access the shared folder from a client on the same network. If network discovery is enabled, you can click the Network option on the left side of the Windows Explorer application to view servers on the network. However, in my experience, this option is usually the least successful, as Windows doesn’t have a great history of being able to easily locate shared resources on the network.
Alternatively, you can always type two backslashes \, followed by either the computer name or IP address in the address bar of Windows Explorer to view the shares available on that system. So, for my example setup, I would enter either \\cis527d-russfeld or \\192.168.40.42 to view the shares. I can then click on the shared folder name to view the files.
However, doing so might be a bit of a hassle for your users, so thankfully there are a few ways to make this process simpler. First, you can right-click on any shared drive and select the Map Network Drive option to create a mapped drive on your computer. In effect, this creates a shortcut in Windows Explorer directly to the shared folder, and it will assign it a drive letter just like the local disks on your system. For many users, this is a very simple way to make those network resources available.
However, you’d have to do this process manually for each user who would like to have the network drive mapped, and on each computer they would access it from. That seems very inefficient, right? Thankfully, there is an even better way to handle this using a Group Policy Object.
In the Group Policy editor, there is an option to create drive maps as part of a Group Policy Object. Here, I’ve configured a drive map to map that shared drive. Notice that I’m referencing it by IP address instead of the server name. This helps the system find the drive quickly, since that IP address should always work without needing to query the domain to find the server on the network.
Once I’ve created and enforced that Group Policy on the domain, I can switch back to the client and see if it works. One way to do so is to simply reboot the client and then log in again. When it reboots, it should receive the updated Group Policy Objects for the domain. However, if you’d like to test it immediately, you can open a Command Prompt or PowerShell window, and use the command gpupdate /force to force a Group Policy update from the Domain Controller.
Once you’ve updated the Group Policy, you should now see your newly mapped network drive in Windows Explorer. That’s all it takes! From there, you should be able to complete the Windows File Server portion of Lab 6. Make sure you pay special attention to the permissions for each shared folder. You may also want to review the information from Module 4 regarding Windows Group Policy for a quick refresher.
Ubuntu File Server
YouTube VideoResources
Video Transcript
In this video, I’ll walk you through the steps to set up a file server on Ubuntu using Samba. You’ll learn how to share a particular folder, and I’ll discuss what it takes to share the home folders for each user as well. Finally, I’ll show you a bit of the process for making those shared folders available to your users on an Ubuntu client.
As before, I’ll continue to use the VMs from Lab 4 for this example. Let’s start on the server VM. First, if you haven’t already, you’ll need to install the Samba server:
sudo apt update
sudo apt install samba
Next, I’ll need to create a folder to share, as well as a file in that folder just so it isn’t empty:
sudo mkdir /shared
sudo touch /shared/file.txt
Finally, since that folder should be accessible to everyone, I’ll set the permissions on that folder accordingly:
sudo chmod -R 777 /shared
Now that I have created my folder, I can work with Samba to share it with users on the network. There are a couple of different ways to accomplish this task. First, just like in Windows, you can right-click on the folder in Nautilus and access the sharing options there. For many users, this is the quickest and easiest way to share a folder on the network. However, for this example I’ll show you how to share the folder directly in the Samba configuration file, which will give you a bit more control over the configuration.
So, let’s open the Samba configuration file in Nano:
sudo nano /etc/samba/smb.conf
As you scroll through that file, you’ll see that there are many different settings that you can customize on your Samba server. Pay special attention to the section for sharing user home directories, as that will be very useful as you complete the lab assignment later.
To add a new share, I’m going to add a few lines at the bottom of the file:
[shared]
  comment = Shared Files
  path = /shared
  browseable = yes
  guest ok = no
  read only = no
  create mask = 0755
Once you’ve made your edits, you should test your configuration file’s syntax:
If everything looks as it should, then you can restart the Samba server to enable your new configuration:
sudo systemctl restart smbd
At this point, you may also need to adjust your firewall configuration to allow other systems on the network to access these shared resources. For this example, I have disabled my firewall for simplicity, but you’ll need to make sure it is configured properly to receive full credit on your lab assignment.
Finally, we need to add users to our Samba server so they can access the resource remotely. Samba maintains a separate database of users since it cannot directly decrypt the password hashes stored in /etc/shadow, so it takes an extra step to enable our existing users to access shared resources via Samba. It is possible to configure Samba to use OpenLDAP for authentication, but the process is quite complex. I chose to leave that out of this exercise, but in an enterprise setting you may choose to do so.
To create and enable the cis527 user in Samba, you can use the following commands:
sudo smbpasswd -a cis527
sudo smbpasswd -e cis527
The first command will ask you to enter a password for this user. This password can be different from the user’s password on the system. However, I recommend setting this to be the same password that the user would use to login via LDAP or locally on their system. This will allow the system to automatically mount that user’s home folder shared from Samba, as we’ll see later in this video.
Now, let’s switch over to our Ubuntu client and see how to access a shared folder. First, in Nautilus, you can click the Other Locations option on the left to see the available servers on the network. If network discovery is working properly, you may see your Ubuntu server listed there and be able to click on it.
If not, you can search for the server just like you would on Windows. At the bottom of Nautilus, there should be a Connect to Server box. In that box, you would enter smb:// followed by the name or IP address of the system you’d like to connect to. So, in my example network, I would enter smb://192.168.40.41 to find my server.
Once you can see the shares on the server, you can double-click a shared folder to mount it on your system. It should pop up a window asking for a username and password. If your shared folder supports guest access, you can select the “Anonymous” option at the top to open the folder as a guest user. Otherwise, choose the “Registered User” option and enter your Samba username and password in the appropriate boxes. You can generally leave the Domain box alone unless you have a specific domain or workgroup configured on your Samba server.
Also, note that if you enter the incorrect username and/or password, you might get a strange error stating “Failed to mount Windows share: File Exists.” This error simply means that it was unable to access the shared resource, and most likely it is due to an authentication error. It isn’t really a helpful error message, is it?
Once you’ve connected to the shared folder, you should see a shortcut to that folder appear on your Ubuntu desktop. You can also access that folder via Terminal, but it is quite buried. The folder is typically mounted in /run/user/<UID>/gvfs/ where <UID> is the numerical user ID of your user on Ubuntu.
Thankfully, there are a few other ways to mount these shared folders on your system. First, using the Terminal, you’ll need to install the cifs-utils package:
sudo apt update
sudo apt install cifs-utils
Then, you can mount that shared folder to the location of your choosing. I recommend first creating an empty folder in /mnt to act as a mount point:
Then, you can use the mount command to mount the shared folder as a drive. For my example setup, I would use this command:
sudo mount -t cifs -o username=cis527,dir_mode=0777,file_mode=0777 //192.168.40.41/shared /mnt/shared
Of course, you’ll have to adjust the command to fit your setup. Now, I can access those shared files at /mnt/shared in Terminal as well.
Once I am finished, I can unmount that share using the Terminal as well:
To further automate this process, you can add an entry to the /etc/fstab file that gives the details for a shared folder that should be mounted automatically for each user on the system. You’ll do just that for your lab assignment, so I won’t cover the specific details here. As long as you are able to mount it using the commands above, it should be pretty straight-forward to adapt those settings to work in the /etc/fstab file.
Finally, you can also use libpam-mount to automatically mount drives on a per-user basis at login. This is especially useful if you want to automatically mount a user’s home folder from a Samba server directly into their own home folder locally. To start, you’ll need to install that library:
sudo apt update
sudo apt install libpam-mount
Next, you can configure it by editing its configuration file:
sudo nano /etc/security/pam_mount.conf.xml
As you look through that file, you’ll see quite a few default options already in place. Unfortunately, since the file is in an XML format, it is a bit difficult to read. You’ll need to make a couple of changes. First, look for the entry:
and change it to
to enable debugging. By doing so, you’ll be able to see output in /var/log/syslog if this process doesn’t work, and hopefully you’ll be able to diagnose the error using that information.
Next, look for the line:
<!-- Volume definitions -->
and, right below that line, you’ll add a line to define the shared folder you’d like to mount automatically. For my example setup, I would use the following definition:
<volume fstype="cifs" server="192.168.40.41" path="homes" mountpoint="/home/%(USER)/server" />
You’ll have to adjust the options in that line to match your particular environment. Once you’ve added your information, save and close the file.
Next, we’ll need to make sure that the system is configured to use that module. To do so, examine the common-session configuration file:
cat /etc/pam.d/common-session
and look for this line in that file:
session optional pam_mount.so
If it isn’t there, you’ll need to add that line to the bottom of that file.
That should do it! To test your configuration, simply log out and log in again. If it works, you should now be able to see that user’s home folder from the Samba server in the server folder in the home directory. It should also create shortcut on the Ubuntu desktop as well.
If it doesn’t work, you’ll want to review any error messages in the system log, The easiest way to find them is to search the system log for mount using the following command:
cat /var/log/syslog | grep mount
For the lab assignment, you’ll perform these steps for your environment in much the same way. It can be very tricky to get this working the first time, so be very careful as you edit these configuration files. If you aren’t able to get it working, please post in the course discussion forums on Canvas to get assistance.
Web Servers Overview
YouTube VideoResources
Video Transcript
Another common type of application server in many enterprises is a web server. A web server is the software that is used to make websites available on the World Wide Web. So, it is responsible for listening and responding to HTTP requests. The software is typically designed so it can handle many simultaneous connections, and even serve multiple websites as we saw in Lab 5. Additionally, many web servers support features for caching and server-side scripting languages, making them a truly versatile platform for serving both web pages and web-based applications.
There are a three web servers that are currently the most commonly used on the internet today. We’ll be looking at two of them in this module. The first is Apache. It was one of the earliest web servers, and because it was free and open source, it drove much of the early expansion of the web in the 1990s and 2000s. While Apache is technically available for a number of different platforms, it is most commonly found running on Linux systems. As of September 2018, it runs 23% of all websites on the internet, and 34% of all domain names use Apache, according to Netcraft. While it has been declining in market share over the past several years, Apache is still one of the most commonly used web servers on the internet today.
On many systems, Apache is typically part of the larger LAMP software stack. LAMP typically stands for “Linux, Apache, MySQL, PHP” but other databases and scripting languages also fit the initialism. As part of this lab’s assignment, you’ll install a LAMP stack and a web application running on that platform.
The next web server we should discuss is Nginx (pronounced “engine-x”). Nginx was developed as a successor to Apache, with a focus on high throughput and the ability to handle a large number of simultaneous connections. According to the documentation, it is able to handle 10,000 inactive connections on just 2.5 MB of RAM. While Nginx doesn’t support as many scripting languages and plugins as Apache, it’s high performance makes it a very popular choice for websites expecting a large amount of traffic. As of September 2018, Nginx powered 19% of websites and 23% of all domains on the internet, and it has been slowly climbing the ranks since its release.
The last web server we’ll work with during this lab assignment is Microsoft’s Internet Information Services, or IIS. IIS is included in all versions of Windows, though typically it is not installed by default on the consumer versions of the operating system. Like Apache, IIS is able to support web applications written in the .NET family of languages. As of September 2018, IIS powers 36% of websites on the internet, making it the most popular web server in that regard. However, it is only present on 26% of domains, putting it behind Apache in that metric.
As mentioned earlier, both Apache and IIS, as well as Nginx through the use of some additional software, are able to support a large range of scripting languages to power interactive web applications. Some of the more commonly used languages are listed here, from PHP and Python to the .NET family of languages, and even Java and JavaScript. As you work on this lab assignment, you’ll get to learn a bit about how to work with web applications written in a couple of these languages.
The next few videos will cover the steps needed to complete the rest of this lab assignment. First, you’ll need to make sure the web server is installed and configured properly. You’ll also have to configure the domain name for the website, and handle installing a security certificate. Finally, you’ll be able to install an application that uses one of the scripting languages supported by the server, and see how it all works together to present a web application to your users.
Database Servers
YouTube VideoResources
Video Transcript
One of the other most commonly used application servers in an enterprise is a database server. You may also see the term “Database Management System” or “DBMS” used in some areas to refer to the same thing. A database server is typically the backbone of your organization’s data storage, as it can be used to store and retrieve a large amount of data very efficiently. Depending on the server software, the data may be stored in large files on the file system, or the database server may work directly with a block-level storage device for even more performance.
Of course, since a database server is constantly reading and writing data, it has some very unique performance and storage needs. We’ll discuss a few of those at the end of this video. In addition, as a system administrator, you’ll definitely be tasked with creating backups, and you may also handle replication across multiple database servers. We’ll spend a bit of time discussing backups in Module 7.
Unfortunately, working with database servers can be one of the most complex tasks a system administrator handles, and, in fact, many organizations use a different title, “database administrator” or “DBA,” to refer to staff who are primarily responsible for working with database servers. Because it is such a complex topic, we really won’t be spending much time working directly with database servers other than performing basic setup and configuration. If you are interested in working with a particular database server, I encourage you to read some of the information in the resources section below the video to learn more about this topic.
There are a few different database systems that are commonly used in industry today. Unlike web servers, where the vast majority of organizations use one of just three systems, there are many more database servers widely in use today. I’ll briefly talk about a few of the most common that you’ll come across today.
First is MySQL, and its fork, MariaDB. MySQL was originally developed in the late 1990s as an open source project, freely licensed under the GPL. As with Apache, it gained widespread use and acceptance among Linux enthusiasts, and was a commonly used database in many open source projects such as WordPress and Drupal, as well as major websites such as Flickr, YouTube, and Twitter. In 2010, MySQL was acquired by Oracle, and while it still retains its open source status at this time, many developers feared that Oracle may eventually move the software to a proprietary license. So, MariaDB was created as a fork of MySQL to maintain a public license. MariaDB maintains full compatibility with MySQL, and the two systems can be used pretty much interchangeably in practice. As part of this lab assignment, you’ll install and work with MySQL in the cloud.
Another commonly used database system is Postgres. Postgres is very similar to MySQL in terms of licensing and features, but it aims to be as “standards compliant” as possible. Because of this, many professionals prefer Postgres due to the fact that it meets some of the standards that MySQL does not.
Microsoft also has their own database server, named Microsoft SQL Server. This is typically used along with the .NET family of programming languages on Windows systems. While we won’t work directly with Microsoft SQL Server, as part of the lab assignment you’ll install a .NET web application which most likely uses a local database that is similar to Microsoft SQL Server.
Oracle, of course, is another major database system in use today. They are well known for providing enterprise-level database software, and have been doing so since the 1970s. Because of this, many older organizations have been using Oracle’s database software for some time, including K-State. Most of K-State’s central systems, including KSIS and HRIS, are built on top of Oracle database products.
Lastly, there are a number of new database systems that include features such as document or object storage and “NoSQL” schemas. One of the most popular of those is MongoDB. These systems are most commonly used with web applications and some big data analytics packages.
As I mentioned earlier, working with a database server presents some very interesting and unique performance considerations that you may have to deal with as a system administrator. First, you’ll definitely be concerned with the amount of RAM that the system has available. Ideally, you’d like to have plenty of RAM available for the system so that it can hold a large amount of data and indexes directly in memory, making requests as fast as possible. You’ll also want to prevent paging of data if at all possible. If the server is unable to store everything it needs directly in RAM, it can make your server up to 50 times slower as it handles paging.
Your CPU speed is also a factor, as that impacts how quickly the system can perform indexing and querying of the data, especially if many complex queries are needed. In addition, another major concern is the read and write speeds of the filesystem. You may want to consider using high performance SSDs in your database server, coupled with a RAID configuration using RAID 1+0 or RAID 6 to gain additional performance and data security. There is a great discussion of these storage considerations linked in the resources section below the video.
Beyond the hardware, you may also have to deal with issues such as the network speed and throughput to your database server. In some cases, you may even need to install multiple network interfaces for a database system if you find that the network interface is constantly saturated but the database server itself is not running near capacity. Also, many database servers maintain a separate log file from the data, which is used to verify that data updates are made properly. For large systems, it is generally recommended to store that log file in a separate location, so that updates to both the data and the log file can be done in parallel. Finally, as with any system, you’ll want to set up plenty of monitoring and alerts on your database server, so you can quickly respond to problems as they arise. We’ll discuss a bit of information about monitoring in Module 7.
You’ll also need to spend some time thinking about the security of your database server. Just like with any other system, you’ll want to make sure any network connections to and from this server are properly secured. Most database servers support using TLS to secure the connection between a database server and the application using it, but in many cases it must be configured and is not enabled by default. In general, it is also recommended to prevent external access to your database server. This is generally done through a firewall that only allows incoming connections from the application servers or a select number of internal IP addresses.
Another major concern with database servers is encryption. Depending on the type of data you are working with, there may be two different levels of encryption to consider. First, you should consider encrypting the data when it is at rest, or stored on the disk itself. Typically this is handled through full-disk encryption, file system encryption, or even encryption of the database tables themselves through the database server software. Each option comes with tradeoffs in terms of performance and security, so you should carefully research the options to determine the best choice for your environment.
Encrypting the data at rest, unfortunately, does not protect the data if a malicious user manages to gain access to the database system itself while it is running. So, you may also want to encrypt data stored in the tables themselves so that it is only readable by the application using the data. Some examples of data you may want to encrypt are usernames, email addresses, phone numbers, and any other personal information for your users. The details of how to do this properly are definitely outside the scope of this course, but there are many great resources online and elsewhere to learn how to secure data stored in an application.
Lastly, as a system administrator, you may want to keep an eye out for data being copied from your database server in an unexpected way. Typically, when a malicious user gains access to a database server, the first thing she or he will do is try to get a copy of that data on their own systems. This is called “exfiltration,” and is a major concern for enterprises. As part of your security and monitoring of your database server, you may want to watch for unexpected network connections leading outside of your organization, especially if they are coupled with an unusually large amount of network traffic. It could be a sign that someone is trying to get a copy of your databases.
As I mentioned earlier, this is just a brief introduction to working with database servers. You’ll get a bit of experience with MySQL in this lab assignment, but if you are interested in learning more, I encourage you to take courses in database systems and seek additional resources online. Database administrators are always in demand, and it is a great career path to pursue.
Windows Web Server
Note
The first part of this video references ASP.NET 4.6, which has been replaced by ASP.NET 4.7 in Windows Server 2019.
Resources
Video Transcript
In this video, I’ll discuss some of the steps for installing and configuring the Internet Information Services, or IIS, web server on Windows Server 2016. This will set the stage for the next video, which will discuss the process for installing a .NET-based web application.
As before, I’ll continue to use my Windows Server 2016 VM from previous labs. To install IIS, click on the Manage button in the Server Manager application, and select Add Roles and Features. From there, you’ll follow the same steps you did when you installed the Active Directory Domain Services role, but this time choose the “Web Server (IIS)” role instead. Then, click Next a couple of times until you reach the Select Role Services page. There, you’ll need to checkmark the option for “HTTP Redirection,” which can be found under the “Web Server > Common HTTP Features” list items. Also, enable the option for “ASP.NET 4.6” found under the “Web Server > Application Development” list items. When you do so, it may enable a few additional options. Finally, click Next once again, then click Install to install the new server role.
Once it has been installed, you should now see the new IIS option on the left side of the Server Manager application. Click that option to see information about your IIS server. To access the configuration options for that server, let’s open the Internet Information Services (IIS) Manager, which can be found on the Tools menu in Server Manager, or by right-clicking the entry here.
IIS Manager provides a convenient way to manage and configure your IIS server. Starting on the home page, you’ll see icons for a variety of features that you may want to configure for your server. For this video, I’m going to go through the process of adding a new website to this server, as well as the steps to properly configure and secure it.
First, let’s create the directory for our new site. I’m going to create a new folder at C:\inetpub\example to store the website. The C:\inetpub folder on Windows is the default location for IIS to place files, so it is a good logical place for this to be stored. Then, inside of that folder, I can place a simple file named index.html to act as the homepage for this website. I’ll add a bit of text to the file as well, just so it is clear that we are accessing the correct file when we navigate to it later.
In the list on the left side of IIS Manager, expand the entry for your server, and then right-click the Sites folder and select Add Website. In the window that appears, give your website a name and a path. I’m going to point it at the folder I created at C:\inetpub\example for this website. Lastly, I’m going to configure the binding for the site by entering the host name I’d like to use for this website. I’m going to use example.local for this website. Finally, I’ll click OK to create the site.
Once the site is created, I can open up a web browser and navigate to http://localhost to see what the web server shows. Unfortunately, right now it just shows the default IIS page that we’ve seen before. This is because we still have the default site enabled on our system. If we try to navigate to http://example.local to access our site, that doesn’t work either. This is because our web browser will try to use DNS to look up that website, but currently .local is not a valid TLD.
So, to test this website, we’ll need to add a few entries to our DNS server.
Since our Windows server is a domain controller, it also includes a built-in DNS server. So, we can add a few A records to our DNS server to point to our websites. To access the DNS information in Windows Server, we’ll go to the Server Manager, and then look for the DNS entry on the left side. This will show information about the DNS servers in our domain. Right now there is just one, our domain controller. To modify the DNS information, we can right-click on that server and choose the DNS Manager option.
In this window, we can expand the entry for our server on the left, and then we should see some information that looks familiar to us based on what we learned in Lab 3. The Windows DNS server uses the same concept of forward and reverse zones, just like we saw in Bind. So, let’s go to the Forward Lookup Zones option.
Here, we can see a couple of zones for our Active Directory, which are automatically maintained by the Active Directory Server. So, we will just leave these alone. Instead, let’s create a new forward zone. In the wizard, we want to create a new primary zone, but we don’t want to store that information in the Active Directory. If we don’t uncheck this option, we are limited to only creating zones within our AD domain, which we don’t want. In the next page, we’ll use the zone name local to allow us to create DNS entries with the .local suffix. Of course, for the lab assignment, you may have to modify this to fit your environment. Finally, we’ll choose to create a new zone file, and we’ll disable dynamic updates to this DNS zone. Then, we can click Finish to create the zone.
Once the zone is created, we can open it and choose to add a New Host (A or AAAA) record. This is pretty simple - we’ll just give it a host name and an IP address, just like we would expect. So, I’ll use example as the host name, and 192.168.40.42 as the IP address to match my example.
There we go! No, we can open Firefox and navigate to http://example.local and it should open our webpage! This works because our Windows server was set to use itself as its primary DNS server way back in Lab 4, so it will look up these DNS names using the DNS server we just configured.
Next, let’s configure this website to use a secure connection and a public key certificate. Back in IIS Manager, select the server in the list of items on the left side, then open the Server Certificates option to the right. Here, I can click the Create Self-Signed Certificate option on the right-hand side to create a new certificate for our server. In the window that appears, I can give the certificate a name. In this case, I’ll just use the name of my website, example.local. That’s all it takes! We now have certificate we can use.
Next, we’ll need to assign it to our site. To do this, right-click on your site in the left-hand list in IIS Manager, and select Edit Bindings. There, we’ll add a new binding for type “https” and the same host name as before. Finally, at the bottom, we can select the certificate we just created as the security certificate for this website. Finally, click OK to save those changes.
We can test those settings by opening a web browser and navigating to https://example.local. However, at this point, most web browsers will complain about the connection being insecure. This is a bit misleading, as the connection will be properly encrypted just fine. However, since your browser cannot establish a chain of trust for the certificate, it is warning you that the website could be compromised and a malicious third-party could be on the other end of your connection. In this case, we know that the connection is safe, so I’ll just click the option to add a security exception for this site. That should allow you to see the website once again, this time via HTTPS.
Finally, let’s configure this website to automatically redirect users from HTTP to HTTPS, just like we’ve done previously with Apache using Certbot. There are many ways to do this, but one of the simplest is to install the “URL Rewrite” module for IIS. I’ll be closely following the guide from Namecheap that is linked in the resources section below the video, so feel free to refer to it as well for screenshots of this process.
First, I’ll need to download and install the module. You can also find it linked in the resources section below this video. Once it is installed, you’ll need to close and reopen IIS Manager. Now, if you select your site in the list on the left, you should see a new URL Rewrite option in the list of icons. To add a rule, double-click that icon to open its settings, then click the Add Rules option to the right.
From here, you should be able to follow the guide from Namecheap to set up the redirect rule. I won’t demonstrate that full process here, as you’ll need to do that as part of your lab assignment.
Now, let’s test this setup. First, clear the cache of the web browser you are using for testing, just to be sure that we aren’t still reading any cached information from that site. Then, navigate to http://example.local, and hopefully you should be redirected to https://example.local automatically.
As you can see, working with IIS is very similar to working with Apache. Some things are a bit easier to configure in IIS, while others are simpler in Apache in my opinion. Thankfully, many of the concepts are the same across all web browsers, so it is easy to adapt your knowledge to fit the current software you are using.
In the next video, I’ll discuss the steps for installing a .NET web application on this server.
Windows Web Application
Note
Unfortunately the software used in this example is no longer available publicly, so you won’t be able to follow along directly with the video.
Resources
Video Transcript
In this video, I’ll go through some of the basic steps to install a .NET web application on your server. For this example, I’ll be using a trial version of the JitBit .NET Forum software, as it is a good representative example of what it takes to deploy an existing .NET application to your server.
First, I’ll need to install Microsoft SQL Server Express Edition to use as the database server for this application. This is a compact version of the full Microsoft SQL Server that is designed for smaller applications and development. You can find a link to download that software in the resources section below this video. Once it has finished installing, you can click Close to exit the installer.
Next, I’ll need to download the JitBit .NET Forum software from their website. I’ve provided a link to that software in the resources section below this video as well. Feel free to download that software and follow along if you’d like. However, you won’t be able to use JitBit’s .NET Forum as your web application for the lab assignment, as I’d like you to demonstrate you can install a web application independently.
Once I’ve downloaded the software, I can extract the ZIP file into my downloads directory. When you open that directory, you’ll see a file that is very obviously the “README” for this application. In general, many applications will provide installation instructions either via their website or as part of the downloaded software. After all, if customers aren’t able to install your software, they are not very likely to use it either. However, that doesn’t mean that the installation instructions are always good, nor will they always exactly fit your needs either. So, you’ll need to learn how to read the instructions and adapt them to fit your situation.
In this case, I’m going to install this software on top of the existing website example.local that I created in the last video. So, I’ll adapt these instructions just a bit to fit that setup.
First, I’ll need to copy all of these files to the folder I created for this website, which is stored at C:\inetpub\example. You’ll notice when you do so that it will overwrite the file named web.config, so we’ll have to deal with that a bit later. Finally, I’ll also need to delete the file named index.html that I created earlier.
Next, I’ll need to convert the existing website to an application in IIS Manager. To do that, right-click the Example website in IIS Manager and choose Add Application. There, you’ll give the application an alias, as well as the physical path to the files for this application. In addition, you’ll need to choose the application pool. Since this application is using .NET 4.0, I can just use the “DefaultAppPool” here. When you click OK you should see your application appear in the menu to the left.
I’ll also need to confirm that the website itself is configured to use the same application pool. You can do so by clicking the website in the list on the left, and then clicking the Basic Settings option on the far right.
Once you’ve created your application, you’ll need to change some file permissions. The official guide from JitBit recommends that you change the user identity used by your application pool, and then assign that account the permissions needed. So, to do that, I’ll click on the Application Pools option on the left side of IIS Manager, and then right-click the DefaultAppPool and select Advanced Settings. In that window, find the Identity option, and change it to use the NetworkService built-in account. Click OK to save that setting.
Once that is done, I’ll fully restart my IIS server to make sure the changes take effect. I can do so by right-clicking the server name in the list on the left, and then choosing Stop. I can then right-click it again and choose Start to start it again.
Now, navigate to where you stored the files for .NET Forum, and give the NetworkService account full control of the files in the App_Data folder. This allows your web application to store files in that folder.
Lastly, you’ll need to configure the database connection. That information can be found in the web.config file in your application’s directory. The instructions give a variety of options for configuring the database, but in general we can just use the default option to use SQL Server Express.
To test your application, clear the cache in your web browser once again, then navigate to http://example.local. You should see the application load with the title “Acme Forum” on the page. To test the application, you can log in with the default credentials listed in the instructions, and then create a new forum. If everything is working correctly, it should allow you to do this without any problems.
However, you should hopefully have noticed that it no longer redirected you to HTTPS when you loaded the website. Did you? When we created that URL redirect, it stored the settings in the web.config file that was previously located in this folder. So, we’ll have to set that up again.
Once you do so, you should test it once again. Hopefully this time it should redirect properly. If you’d like, you can also review the contents of the web.config file in the web application’s directory to see the additional information added to that file by the URL Rewrite module.
That should do it! You’ve now configured and deployed your first .NET web application in IIS. This example shows some of the details you may have to deal with when deploying a web application in IIS, but each application is different. In short, you’ll always have to read the documentation carefully, but use your own knowledge and experience to adapt the instructions to match your own server’s configuration. In addition, don’t be afraid to search for additional information on the internet. All of those resources will help you to complete your task.
Ubuntu Web Server
Note
It appears that MySQL will now be installed with TLS enabled on Ubuntu 20.04, so you may not have to do that step. –Russ
Resources
Video Transcript
In this video, I’m going to discuss some of the steps needed to prepare your Ubuntu servers running in the cloud to act as web application servers. For this example, I’ll be using a single server as both my web and database server, but for the lab assignment you’ll need to adapt this configuration to have the web application installed on your FRONTEND server access the database server on your BACKEND server.
At this point, you should already have Apache installed, as well as a couple of sites and virtual hosts created from Lab 5. I’m going to use one of those existing virtual hosts as the basis for this web application. Remember that, for the lab assignment, you’ll be creating another new virtual host for this application.
First, you’ll need to install PHP and it’s associated Apache module on your FRONTEND server:
sudo apt update
sudo apt install php libapache2-mod-php
That will install and configure PHP on your system. To test it, you can create a new file in the web directory of one of your virtual hosts named test.php and add the following content:
Then, navigate to that virtual host and load the test.php file from that website. For my example, I would go to http://foo.russfeld.me/test.php. Hopefully you should see a website showing all of the PHP configuration information for your system. Once you confirm it is working, it is always a best practice to delete this test.php test file, as the information it provides could be used by a malicious person to attack your server.
Now that we’ve confirmed that PHP is working, it is time to install the MySQL database server. This time, on your BACKEND server, do the following:
sudo apt update
sudo apt install mysql-server
That will install the MySQL server on your system. However, by default it is configured very insecurely, so you’ll need to reconfigure it to be more secure. Thankfully, there is a script to do just that:
sudo mysql_secure_installation
That script will ask you a series of questions to help you secure your MySQL server. In general, you should answer “Yes” to all of the questions, and set the password policy to at least “MEDIUM” security. In addition, you’ll be asked to set a password for the root account on the server. As before, make sure it is very memorable password, and do not reuse any of the passwords we’ve previously used in this course.
Once that is finished, you can test the connection to MySQL using the following command:
It should take you to a new prompt that begins with mysql>. Once there, we should create a new user for us to use for development. So, enter these commands at that prompt:
CREATE USER 'admin'@'localhost' IDENTIFIED BY '<password>';
GRANT ALL PRIVILEGES ON *.* TO 'admin'@'localhost' WITH GRANT OPTION;
where <password> is the password you’d like to use for that account. Once that is done, you can enter:
to close that connection. Now, you can test the new connection without using sudo as follows:
mysql -u admin -p -h 127.0.0.1
It should ask you for a password, and once you enter the password you created for the admin account above, it should take you back to the mysql> prompt. While there, enter the following command:
to see the connection information. You’ll notice that TLS (SSL) is not enabled. To enable that, follow the steps in the guide from DigitalOcean linked in the resources section below this video. I won’t walk through those steps here since you’ll doing that as part of your lab assignment. In addition, you’ll want to follow the steps in that guide for configuring access for remote clients, as we’ll be doing that to configure a web application in the next video.
That should cover everything you need to prepare your system for a web application that uses PHP and MySQL. In the next video, we’ll go through the process of installing a simple application in this environment.
Ubuntu Web Application
YouTube VideoResources
Video Transcript
In this video, I’ll discuss the steps you’ll need to follow in order to install a new web application that uses PHP and MySQL on the environment we created in the last video. As with the previous videos discussing web applications on a Windows server, you’ll have to adapt these steps to match the application you are installing and the particular configuration of your environment.
First, we’ll need to create a new database and user for this application on our database server. So, first you’ll need to log on to the MySQL server using one of the methods we discussed in the previous video to get to a mysql> prompt. I recommend using either the root or admin user for this step, as they both should have the permissions needed to add another user and database.
Once you are at the mysql prompt, you can create a database and user for your application:
CREATE DATABASE <database>
CREATE USER '<user>'@'<ip_address>' IDENTIFIED BY '<password>';
GRANT ALL PRIVILEGES ON <database>.* TO '<user>'@'<ip_address>';
FLUSH PRIVILEGES;
This command is a bit complex, so let’s walk through it. In the first line, you’ll create a database, replacing <database> with the name you’d like to use for that database. In general, it is a good idea to use the name of your application for the database name. On the second line, you are creating a user to access that database, so replace <user> with the username you’d like. Again, I recommend using the application name here as well. The <ip_address> entry should be the IP address that the user will be accessing this database from. For the lab assignment, you’ll be using the private network IP address of FRONTEND here. Since I’m working on a single server, I’ll just use localhost here. Of course, replace <password> with the password you’d like to use. The following line grants that user all privileges on that database, so replace the entries on that line to match what you used above. Finally, the last line will flush the permissions cache, so the new ones will take effect. Once you are done, you can type exit to exit the MySQL console.
If you’d like to test this connection, on your FRONTEND server, you can use the mysql command in a similar way:
mysql -u <user> -p -h <ip_address> <database>
In this command, the <ip_address> is the private network IP address of your BACKEND server. If it works correctly, it should allow you to log in to the MySQL console using that command. If this doesn’t work, you should diagnose the problems with your MySQL configuration before continuing.
Now that we have our database configured, it’s time to install our application. For this example, I’m going to use phpBB, a bulletin board software built in PHP. It is a very simple example of a PHP web application. First, I’ll need to download the software onto my cloud server. The simplest way to do this is to navigate to the Downloads page on the phpBB website and copy the download URL. Then, in my SSH session connected to my server, I can type the following commands:
where <url> is the download URL I copied from the phpBB site. I made sure I was at my user’s home folder first, so I knew where the file would be downloaded to. Next, I’ll need to install the unzip program, and use it to extract the downloaded file:
sudo apt update
sudo apt install unzip
unzip <file>
where <file> is the name of the file that was just downloaded. On my system, it extracted all of its files to the ~\phpBB3 directory.
At this point, we should begin following the instructions for installing and configuring phpBB from their website. I’ll generally follow their recommended steps, so feel free to refer to their documentation as well if you are following along.
Now, we need to copy all of those files to the appropriate virtual host root directory. Since I’m reusing an existing virtual host, I’ll need to make sure that it is empty before I do so. Remember that the lab assignment directs you to create a new virtual host for this application, so you won’t have to worry about that. For my example, I’m going to use the foo virtual host:
sudo rm -rv /var/www/foo/html/
sudo cp -r ~/phpBB3/* /var/www/foo/html/
Next, while the instructions don’t have you do this, I’m going to change the ownership of all of these files to the Apache user, which is www-data. This will make assigning permissions in the next step a bit simpler:
sudo chown -R www-data:www-data /var/www/foo/html
Next, the instructions direct you to access your site’s URL via a web browser. So, I’ll need to navigate to http://foo.russfeld.me to continue this process.
On the first page of the installation process, it will check to see if the server meets the necessary requirements for this software. Unfortunately, that isn’t the case yet. If you receive any error messages about directories that aren’t writable, you may need to adjust your permissions for those directories. By setting the owner and group to www-data earlier, I have bypassed most of those errors.
However, it complains that I don’t have XML/DOM support, and I don’t have a PHP database module installed. So, I’ll need to install those items. A quick Google search should help you locate them if you aren’t sure what packages you need to install. In my case, I’ll do the following:
sudo apt update
sudo apt install php-xml php-mysql
sudo systemctl restart apache2
Warning
Update 2019-07-30: You may need to install the version of php-mysql that matches your PHP version. So, for PHP 7.2, you can install php7.2-mysql. -Russ
Once that is done, I should be able to retest the requirements and get to the next step. Here, it will ask for the information to create an Administrator account. I’ll enter some default information here.
Next, you’ll need to configure the database for this system. I’ll enter the information for the database and user I created earlier. I’ll also enter the IP address 127.0.0.1 for my server hostname. For the lab assignment, you’ll need to use the private network IP address of BACKEND here. On the next screens, I’ll configure some additional options unique to phpBB, selecting the appropriate options for my environment and how I’d like to use the application. Finally, it will go through the installation procedure. If everything works properly, it should be able to connect to your database and install the application.
Now, I can go to the control panel for phpBB and create a new forum, just to make sure that it is working properly.
Finally, you may have to do additional configuration to set up your Virtual Host to use a security certificate and redirect to HTTPS using Certbot, if you haven’t already.
There you go! You’ve now successfully installed and configured a web application using PHP on Apache, and connected it to a MySQL database running on a different system. In addition, everything is properly secured using TLS, firewalls, and other state-of-the-art security settings. Feels pretty good, doesn’t it?
That should give you everything you need to complete this lab assignment. This lab is quite a bit more open-ended than previous assignments, since you’ll have the ability to work with a web application of your choice. If you have any questions or run into any issues getting this lab assignment completed, please post in the course discussion forums as always to get help. Good luck!
Subsections of Backups, Monitoring & DevOps
Introduction
YouTube VideoResources
Video Transcript
Welcome to Module 7! In this module, we’ll discuss several additional topics related to system administration. Honestly, each of these items probably deserves a module unto themselves, if not an entire course. However, since I am limited in the amount of things I can reasonably cover in a single course, I’ve chosen to group these items together into this single module.
First, we’ll discuss DevOps, or development operations, a relatively new field blending the skills of both system administrators and software developers into a single unit. We’ll also discuss a bit of the theory related to system administration, including ITIL, formerly the Information Technology Infrastructure Library, a very standard framework for system administrators to follow.
Then, we’ll cover information related to monitoring your systems on your network and in the cloud, and how to configure some of those tools in our existing infrastructure from previous lab assignments. Finally, we’ll discuss backups, and you’ll perform a couple of backup and restore exercises as part of the lab assignment.
As always, if you have any questions or run into issues, please post in the course discussion forums to get help. Good luck!
DevOps
YouTube VideoResources
Video Transcript
One of the hottest new terms in system administration and software development today is DevOps. DevOps is a shortened form of “Development Operations,” and encompasses many different ideas and techniques in a single term. I like to think of it as the application of the Agile software development process to system engineering. Just as software developers are focusing on more frequent releases and flexible processes, system administrators have to react to quickly changing needs and environments. In addition, DevOps engineers are responsible for automating much of the software development lifecycle, allowing developers to spend more time coding and less time running builds and tests manually. Finally, to accommodate many of these changes, DevOps engineers have increasingly adapted the concept of “infrastructure as code,” allowing them to define their system configurations and more using tools such as Puppet and Ansible in lieu of doing it manually. As we saw in Module 2, that approach can be quite powerful.
Another way to think of DevOps is the intersection of software development, quality assurance, and operations management. A DevOps engineer would work fluidly with all three of these areas, helping to automate their processes and integrate them tightly together.
There are many different ways to look at the DevOps toolchain. This graphic gives one, which goes through a process of “plan, create, verify, package, release, configure, and monitor.” The first four steps deal with the development process, as developers work to plan, test, and package their code for release. Then, the operations side takes over, as the engineers work to make that code widely available in the real world, dealing with issues related to configuration and monitoring.
For this lecture, I’ll look at a slightly modified process, consisting of these seven steps. Let’s take a look at each one in turn and discuss some of the concepts and tools related to each one.
First is code. As software developers work to create the code for a project, DevOps engineers will be configuring many of the tools that they use. This could be managing a GitHub repository, or even your own GitLab instance. In addition, you could be involved in configuring their development and test environments using tools such as Vagrant and Puppet, among others. Basically, at this phase, the responsibility of a DevOps engineer is to allow developers to focus solely on creating code, without much worry about setting up the environments and tools needed to do their work.
The next steps, build and test, are some of the most critical for this process. As developers create their code, they should also be writing automated unit tests that can be run to verify that the code works properly. This is especially important later on, as bugfixes may inadvertently break code that was previously working. With a properly developed suite of tests, such problems can easily be detected. For a DevOps engineer, the most important part is automating this process, so that each piece of code is properly tested and verified before it is used. Generally, this involves setting up automated building and testing procedures using tools such as Travis and Jenkins. When code is pushed to a Git repository, these tools can automatically download the latest code, perform the build process, and run any automated tests without any user intervention. If the tests fail, they can automatically report that failure back to the developer.
Once the product is ready for release, the package and release processes begin. Again, this process can be fully automated, using tools in the cloud such as Heroku, AWS, and Azure to make the software available to the world. In addition, there are a variety of tools that can be used to make downloadable packages of the software automatically. For web-based applications, this process could even be chained directly after the test process, so that any build that passes the tests is automatically released to production.
Of course, to make a package available in production requires creating an environment to host it from, and there are many automated configuration tools to help with that. We’ve already covered Puppet in this class, and Ansible and SaltStack can perform similar functions in the cloud. In addition, you may choose to use container tools such as Docker to make lightweight containers available, making deployment across a variety of systems quick and painless.
Lastly, once your software is widely available, you’ll want to continuously monitor it to make sure it is available and free of errors. There are many free and paid tools for performing this task, including Nagios, Zabbix, and Munin. As part of this lab’s assignment, you’ll get to set up one of these monitoring tools on your own cloud infrastructure, just to see how they work in practice.
Of course, one of the major questions to ask is “Why go to all this trouble?” There are many reasons to consider adopting DevOps practices in any organization. First and foremost is to support a faster release cycle. Once those processes are automated, it becomes much easier to quickly build, test, and ship code. In addition, the whole process can be more flexible, as it is very easy to change a setting in the automation process to adapt to new needs. This supports one of the core tenets of the agile lifecycle, which focuses on working software and responding to change. In addition, DevOps allows you to take advantage of the latest developments in automation and virtualization, helping your organization stay on top of the quickly changing technology landscape. Finally, in order for your environment to be fluidly scalable, you’ll need to have a robust automation architecture, allowing you to provision resources without any human interaction. By adopting DevOps principles, you’ll be ready to make that leap as well.
Finally, to give you some experience working with DevOps, let’s do a quick example. I’ve named this the “Hello World” of DevOps, as I feel it is a very good first step into that world, hopefully opening your eyes to what is possible. You’ll perform this activity as part of the assignment for this lab as well.
First, you’ll need to create a project on the K-State CS GitLab server, and push your first commit to it. You can refer to the Git video in the Extras module for an overview of that process. I’m going to use an existing project, which is actually the source project for this course. We’ll be using the Webhooks feature of this server. When certain events happen in this project, we can configure the server to send a web request to a particular URL with the relevant data. We can then create a server to listen for those requests and act upon them.
You will also need to either configure SSH keys for your GitLab repository, or configure the repository to allow public access.
Next, we’ll need to install and configure the webhook server on our DigitalOcean droplet. It is a simple server that allows you to listen for those incoming webhooks from GitHub and GitLab, and then run a script when they are received. Of course, in practice, many times you’ll be responsible for writing this particular piece yourself in your own environment, but this is a good example of what it might look like.
On my Ubuntu cloud server, I can install webhook using APT:
sudo apt update
sudo apt install webhook
Next, I’ll need to create a file at /etc/webhook.conf and add the content needed to create the hook:
[
  {
    "id": "cis527online",
    "execute-command": "/home/cis527/bin/cis527online.sh",
    "command-working-directory": "/var/www/bar/html/",
    "response-message": "Executing checkout script",
    "trigger-rule":
    {
      "match":
      {
        "type": "value",
        "value": "f0e1d2c3b4",
        "parameter":
        {
          "source": "header",
          "name": "X-Gitlab-Token"
        }
      }
    }
  }
]
You can find instructions and sample hook definitions on the webhook documentation linked in the resources section below this video. You’ll need to configure this file to match your environment. Also, you can use this file to filter the types of events that trigger the action. For example, you can look for pushes to specific branches or tags.
Since this file defines a script to execute when the Webhook is received, I’ll need to create that script as well:
#!/bin/bash

git pull
exit 0
This script is a simple script that uses the git pull command to get the latest updates from Git. I could also place additional commands here if needed for this project.
Once I create the script, I’ll need to modify the permissions to make sure it is executable by all users on the system:
chmod a+x bin/cis527online.sh
Once everything is configured, I can restart the webhook server using this command:
sudo systemctl restart webhook
Then, if everything is working correctly, I can test it using my cloud server’s external IP address on port 9000, with the correct path for my hook. For the one I created above, I would visit http://<ip_address>:9000/hooks/cis527online. You should see the response Hook rules were not satisfied displayed. If so, your webhook server is up and running. Of course, you may need to modify your firewall configuration to allow that port.
Lastly, if my repository requires SSH keys, I’ll need to copy the public and private keys into the root user’s .ssh folder, which can be found at /root/.ssh/. Since webhook runs as a service, the Git commands will be run as that user, and it’ll need access to that key to log in to the repo. There are more advanced ways of doing this, but this is one way that works.
I’ll also need to download a copy of the files from my Git repository onto this system in the folder I specified in webhook.conf
sudo rm /var/www/bar/html/*
sudo git checkout <repository_url> /var/www/bar/html
Now, we can go back to the K-State CS GitLab server and configure our webhook. After you’ve opened the project, navigate to Settings and then Integrations in the menu on the left. There, you can enter the URL for your webhook, which we tested above. You’ll also need to provide the token you set in the webhook.conf file. Under the Trigger heading, I’m going to checkmark the “Push events” option so that all push events to the server will trigger this webhook. In addition, I’ll uncheck the option for “Enable SSL verification” since we have not configured an SSL certificate for our webhook server. Finally, I’ll click Add webhook to create it.
Once it is created, you’ll see a Test button below the list of existing webhooks. So, we can choose that option, and Select “Push events” to test the webhook. If all works correctly, it should give us a message stating that the hook executed successfully.
However, the real test is to make a change to the repository, then commit and push that change. Once you do, it should automatically cause the webhook to fire, and within a few seconds you should see the change on your server. I encourage you to test this process for yourself to make sure it is working correctly.
There you go! That should give you a very basic idea of some of the tools and techniques available in the DevOps world. It is a quickly growing field, and it is very useful for both developers and system administrators to understand these concepts. If you are interested in learning more, I encourage you to read some of the materials linked in the resources section below this video, or explore some of the larger projects hosted on GitHub to see what they are doing to automate their processes.
ITIL
YouTube VideoResources
Video Transcript
In this video, I’ll be taking a detour from all of the technical topics in this class to discuss a more philosophical topic: the art of system administration. Specifically, this video will introduce you to ITIL, one of the core resources for many IT organizations worldwide.
First, you might be wondering what ITIL is. Originally, it was an acronym for the “Information Technology Infrastructure Library,” but it has since been officially shortened to just ITIL. ITIL is a comprehensive set of standards and best practices for all aspects of an IT infrastructure. Many organizations refer to this as “IT Service Management” or “ITSM” for short. By making use of the information found in the ITIL resources, you should be able to keep your IT systems running and make your customers happy.
This slide gives a brief history of ITIL. It was originally a set of recommendations developed by the UK Central Computer & Telecommunications Agency in the 1980s. That information was shared with many government and private entities, and they found it to be a very useful resource. By the 1990s, it was expanded to include over 30 volumes of information on a number of IT processes and services. As the technology matured, those volumes were collected into 9 sets of guidelines in the early 2000s, and by 2007, a complete rework was released, consisting of just 5 volumes encompassing 26 processes in all. This version is known as ITIL Version 3.
In 2011, a small update to version 3 was released by the UK Office of Government Commerce, the maintainers of ITIL at that time. However, starting in 2013, the licensing and maintenance of ITIL was handed over to Axelos. They also handle ITIL certifications. Recently, Axelos announced that they are working on ITIL 4, which should be released sometime in the next year.
As mentioned before, the current version of ITIL consists of 5 volumes: Service Strategy, Service Design, Service Transition, Service Operation, and Continual Service Improvement.
These volumes are interrelated, forming the backbone of any IT organization. This diagram shows how they all fit together. At the core is strategy, which defines the overall goals and expectations of the IT organization. Next, design, transition, and operation deal with how to put those strategies into practice and how to keep them running smoothly. Finally, Continual Service Improvement is all about performing an introspective look at the organization to help it stay ahead of trends in technology, while predicting and responding to upcoming threats or issues.
To break it down even further, this diagram lists most of the 26 processes included in ITIL. “Supplier Management” under “Design” is omitted for some reason. As you can see, there are quite a variety of processes and related items contained in each volume of ITIL.
However, I’ve found one of the easiest ways to discuss ITIL is to relate it to a restaurant. This analogy is very commonly found on the internet, but the version I am using can be most closely attributed to Paul Solis. So, let’s say you want to open a restaurant, but you’d like to follow the ITIL principles to make sure it is the best, most successful restaurant ever. So, first you’ll work on your strategy. That includes the genre of food you’d like to serve, the location, and an analysis of future trends in the restaurant business. You don’t want to enter a market that is already saturated, or serve a food genre that is becoming less popular.
Next, you’ll discuss details in the design. This includes determining specific menu items, the hours of operation, staffing needs, and how you’ll go about hiring and training the people you need.
Once you have everything figured out, its time to enter the transition phase. During this phase, you’ll test the menu items, maybe have a soft open to make sure the equipment and staff are all functioning properly, and validating any last-minute details of your design before the grand opening.
Once the restaurant is open for business, it’s time to enter the operational phase. In this phase, you’ll be looking at the details in the day-to-day operations of the restaurant, such as how customers are greeted and seated when they enter, how your wait staff enters the food orders, how the kitchen prepares the food, and finally how your clients are able to pay and be on their way. You’ll always be looking for issues in any of these areas, and work diligently to correct them as quickly as possible.
In addition, great restaurants will undergo continual service improvement, always looking for ways to be better and bring in more business. This includes surveys, market research, testing new recipes, and even undergoing full menu changes to keep things fresh and exciting.
Overall, if you follow these steps, you should be able to build a great restaurant. If you’d like a great exercise applying this in practice, I encourage you to watch an episode or two of a TV show that focuses on fixing a failing restaurant, such as “Restaurant Impossible” or “Kitchen Nightmares,” and see if you can spot exactly where in this process the restaurant started to fail. Was the menu too large and confusing? Were the staff not trained properly? Did they fail to react to customer suggestions? Did the market change, leaving them behind? I’ve seen all of those issues, and more, appear during episodes of these TV shows, but each one always links directly back to one of the volumes and processes in ITIL. My hope is that you can see how these same issues could affect any IT organization as well.
ITIL also proposes a maturity model, allowing organizations to rate themselves based on how well they are conforming to ITIL best practices. Level 0 represents the total absence of a plan, or just outright chaos. At Level 1, the organization is starting to formulate a plan, but at best it is just a reactive one. I like to call this the “putting out fires” phase, but the fires are starting as fast as they can be put out. At Level 2, the organization is starting to be a bit more active in planning, so at this point they aren’t just putting out fires, but they are getting to the fires as fast as they develop.
By Level 3, the organization is becoming much more defined in its approach, and is working proactively to prevent fires before they occur. There are still fires once in a while, but many of them are either predicted or easily mitigated. At Level 4, most risks are managed, and fires are minimal and rare. Instead, they are preemptively fixing problems before they occur, and always working to provide the best service possible. Lastly, at Level 5, everything is fully optimized and automated, and any error that is unexpected is easily dealt with, usually without the customers even noticing. I’d say that Netflix is one of the few organizations that I can say is very comfortably at Level 5, based on the case-study from Module 5. Most organizations are typically in the range of Level 3 or 4.
There are a variety of factors that can limit and organization’s ITIL maturity level, but in my opinion, they usually come down to cost. For an organization to be at level 5, it requires a large investment in IT infrastructure, staff, and resources. However, for many large organizations, IT is always seen as a “red line” on the budget, meaning that it costs the organization more money than it brings in. So, when the budget gets tight, often IT is one of the groups to be downsized, only to lead to major issues down the line. Many companies simply don’t figure the cost of an IT failure into their budget until after it happens, and by then it is too late.
Consider the recent events at K-State with the Hale Library fire. If K-State was truly operating at Level 5, there would most likely have to be a backup site or distributed recovery center, such that all systems could be back online in a matter of hours or minutes after a failure. However, that would be an astronomical cost to the university, and often it is still cheaper to deal with a few days of downtime instead of paying the additional cost to maintain such a system.
So, in summary, why should an IT organization use ITIL? First, IT is a very complex area, and it is constantly changing. At the same time, user satisfaction is very important, and IT organizations must do their best to keep customers happy. Even though it is a very technical field, IT can easily be seen as a service organization, just like any restaurant. Because of that, many IT organizations can adopt some of the same techniques and processes that come from those more mature fields, and ITIL is a great reference that brings all of that industry knowledge and experience to one place. Lastly, poor management can be very expensive, so even though it may be expensive to maintain your IT systems at a high ITIL maturity level, that expense may end up saving money in the long run by preventing catastrophic errors. If you’d like to know more, feel free to check out some of the resources linked below the video in the resources section. Unfortunately, the ITIL volumes are not freely available, but many additional resources are.
I wanted to come back to this lecture and add a bit more information at the end to clarify a few things regarding the relationship between ITIL and a different term, IT Service Management or ITSM. I added a couple of links below this video that provide very good discussions of what ITSM is and how it relates to ITIL.
In short, IT service management is the catch-all term for how an IT organization handles its work. It could deal with everything from the design of systems to the operational details of keeping it up and running and even the management of changes that need to be applied.
Within the world of ITSM, one of the most common frameworks for IT Service Management is ITIL. So, while I focus on ITIL in this video as the most common framework, it is far from the only one out there, and it has definite pros and cons.
So, as you move into the world of IT, I recommend looking a bit broader at IT Service Management as a practice, and then evaluate the many frameworks that exist for implementing that in your organization.
Assignment
Lab 7 - Backups, Monitoring & DevOps
Instructions
Create two cloud systems meeting the specifications given below. The best way to accomplish this is to treat this assignment like a checklist and check things off as you complete them.
If you have any questions about these items or are unsure what they mean, please contact the instructor. Remember that part of being a system administrator (and a software developer in general) is working within vague specifications to provide what your client is requesting, so eliciting additional information is a very necessary skill.
Note
To be more blunt - this specification may be purposefully designed to be vague, and it is your responsibility to ask questions about any vagaries you find. Once you begin the grading process, you cannot go back and change things, so be sure that your machines meet the expected specification regardless of what is written here. –Russ
Also, to complete many of these items, you may need to refer to additional materials and references not included in this document. System administrators must learn how to make use of available resources, so this is a good first step toward that. Of course, there’s always Google!
Time Expectation
This lab may take anywhere from 1 - 6 hours to complete, depending on your previous experience working with these tools and the speed of the hardware you are using. Working with each of these items can be very time-consuming the first time through the process, but it will be much more familiar by the end of this course.
Info
This lab involves working with resources on the cloud, and will require you to sign up and pay for those services. In general, your total cost should be low, usually around $20 total. If you haven’t already, you can sign up for the GitHub Student Developer Pack to get discounts on most of these items. If you have any concerns about using these services, please contact me to make alternative arrangements! –Russ
Task 0: Droplets & Virtual Machines
For this lab, you will continue to use the two DigitalOcean droplets from Labs 5 and 6, labelled FRONTEND and BACKEND, respectively. This assignment assumes you have completed all steps in the previous labs successfully; if not, you should consult with the instructor to resolve any existing issues before continuing.
Task 1: Backup Ubuntu Web Application
For this task, you will perform the steps to create a backup of the web application installed on your Ubuntu droplet in Lab 6. To complete this item, prepare an archive file (.zip, .tar, .tgz or equivalent) containing the following items:
- Website data and configuration files for the web application. This should NOT include the entire application, just the relevant configuration and data files that were modified after installation. For Docker installations, any information required to recreate the Docker environment, such as a Docker Compose file, should also be included.
- Relevant Apache or Nginx configuration files (virtual hosts, reverse proxy, etc.)
- A complete MySQL server dump of the appropriate MySQL database. It should contain enough information to recreate the database schema and all data.
- Clear, concise instructions in a README file for restoring this backup on a new environment. Assume the systems in that new environment are configured as directed in Lab 5. These instructions would be used by yourself or a system administrator of similar skill and experience to restore this application - that is, you don’t have to pedantically spell out how to perform every step, but you should provide enough information to easily reinstall the application and restore the backup with a minimum of effort and research.
Resources
Task 2: Ubuntu Monitoring
For this task, you will set up Munin to monitor your servers.
- Configure the Ubuntu droplet named FRONTEND as the primary host for Munin.
- Then, add the FRONTEND and BACKEND droplets as two monitored hosts
- Send the URL of the Munin dashboard and the password in your grading packet. Make sure that both FRONTEND and BACKEND are appearing in the data.
Of course, you may need to modify your firewall configuration to allow incoming connections on the correct port for this to work!
Tip
By default, Munin only allows access to the Munin dashboard from localhost. You’ll need to modify the file /etc/munin/apache24.conf to allow access to external clients by removing any references to Require Local and adding different permissions instead. This StackOverflow Answer gives the details.
Once Munin is working, it may take a while for data to populate in the graphs. I generally check the “Memory usage - by day” graph as it seems to update the most frequently.
Resources
Task 3: DevOps
Setup an automatically deployed Git repository on your Ubuntu droplet. For this task, perform the following.
Option 1 - CS GitLab
- Create a GitLab repository on the K-State CS GitLab instance. That repository must be public and clonable via HTTPS without any authenication. Unfortunately K-State blocks cloning repositories via SSH.
- Clone that repository on your own system, and verify that you can make changes, commit them, and push them back to the server.
- Clone that repository into a web directory on your Ubuntu droplet named BACKEND. You can use the default directory first created in Lab 5 (it should be
cis527charlie in your DNS). - Create a Bash script that will simply use the
git pull command to get the latest content from the Git repository in the current directory. - Install and configure webhook on your Ubuntu droplet named BACKEND. It should listen for all incoming webhooks from GitLab that match a secret key you choose. When a hook is received, it should run the Bash script created earlier.
- Configure a webhook in your GitLab repository for all Push events using that same secret key and the URL of webhook on your server. You may need to make sure your domain name has an A record for the default hostname
@ pointing to your BACKEND server. - To test this setup, you should be able to push a change to the GitLab repository, and see that change reflected on the website automatically.
- For offline grading, add the instructor (@russfeld) to the repository as maintainers, and submit the repository and URL where the files can be found in your grading packet. Provided the webhook works correctly, they should be able to see a pushed change to the repository update the website.
Of course, you may need to modify your firewall configuration to allow incoming connections for Webhook! If your firewall is disabled and/or not configured, there will be a deduction of up to 10% of the total points on this lab
Tip
In the video I use SSH to connect to GitLab, but that is no longer allowed through K-State’s firewall. You’ll need to create a public repository and clone it using HTTPS without authentication for this to work. Alternatively, you can use Option 2 below to configure this through GitHub instead.–Russ
Option 2 - GitHub
- Create a GitHub repository on the GitHub instance. That repository may be public or private. If private, the repository should be set up to be cloned via SSH.
- Clone that repository on your own system, and verify that you can make changes, commit them, and push them back to the server.
- Clone that repository into a web directory on your Ubuntu droplet named BACKEND. You can use the default directory first created in Lab 5 (it should be
cis527charlie in your DNS). - Create a Bash script that will simply use the
git pull command to get the latest content from the Git repository in the current directory. - Install and configure webhook on your Ubuntu droplet named BACKEND. It should listen for all incoming webhooks from GitHub that match a secret key you choose. When a hook is received, it should run the Bash script created earlier.
- Configure a webhook in your GitHub repository for all Push events using that same secret key and the URL of webhook on your server. You may need to make sure your domain name has an A record for the default hostname
@ pointing to your BACKEND server.- Alternatively, you may configure a GitHub Action to send the webhook. I recommend using Workflow Webhook Action or HTTP Request Action.
- To test this setup, you should be able to push a change to the GitHub repository, and see that change reflected on the website automatically.
- For offline grading, add the instructor (@russfeld) to the repository as maintainers, and submit the repository and URL where the files can be found in your grading packet. Provided the webhook works correctly, they should be able to see a pushed change to the repository update the website.
Of course, you may need to modify your firewall configuration to allow incoming connections for Webhook! If your firewall is disabled and/or not configured, there will be a deduction of up to 10% of the total points on this lab
Tip
Since the Webhook process runs as the root user on BACKEND, you’ll need to make sure a set of SSH keys exist in the root user’s home folder /root/.ssh/ and add the public key from that directory to your GitHub account. You should then use the root account (use sudo su - to log in as root) to run git pull from the appropriate directory on BACKEND at least once so you can accept the SSH fingerprint for the GitHub server. This helps ensure that root can properly run the script. –Russ
Resources
Task 4: Logging
Note
This activity is new in 2025. There may be some small hiccups as we refine it for use the first time. Please be patient and ask questions if something doesn’t make sense! - Russ
Set up a Seq Log Aggregator and send logs from from both FRONTEND and BACKEND to the Seq system.
- Install Seq and Seq-Input-Syslog as Docker Containers on FRONTEND.
- See the sample Docker Compose file on Seq-Input-Syslog as a good starting point.
- Read the documentation to figure out what environment variables should be set on both containers to secure the system!
- Configure the Seq web dashboard to be accessible at
cis527seq.<yourdomain>.<tld> either by directly mapping ports from Docker or using a reverse proxy as configured in Lab 5. - Configure rsyslog on both FRONTEND and BACKEND to forward the
auth.* logs to Seq.- This can be done by simply adding a line
auth.* @<ip_address>:514 to the bottom of /etc/rsyslog.conf. - Make sure that the Seq-Input-Syslog is port-mapped to port 514/UDP on FRONTEND. You can confirm by checking the output of
ss -lnup - Make sure the firewall on FRONTEND is configured to allow incoming connections on port 514/UDP only from the BACKEND server (unless you want someone to really spam your system).
- Configure rsyslog on BACKEND to forward the
apache2 logs to Seq. See below for a sample configuration file.
Sample apache.conf file to be placed in /etc/rsyslog.d:
module(load="imfile")

input(type="imfile"
    File="/var/log/apache2/access.log"
    Tag="apache_access"
    Severity="info"
    Facility="local6")

input(type="imfile"
    File="/var/log/apache2/error.log"
    Tag="apache_error"
    Severity="error"
    Facility="local6")

local6.* @<ip_address>:514
Remember to restart the rsyslog service after making any configuration changes!
Tip
If you see lots of errors in /var/log/syslog about rsyslogd being suspended and resumed, it may be due to a missing ufw.log file. You can create it by running sudo touch /var/log/ufw.log followed by sudo chown syslog:syslog /var/log/ufw.log to create that missing log file, then restart rsyslog to resovle the error.
Once you have Seq configured, perform the following exercise:
- Ensure you are getting the correct logs by performing the following actions and finding them in your logs:
- Log in as
cis527 to FRONTEND via SSH or another method - Log in as
cis527 to BACKEND via SSH or another method - Generate a failed login to both FRONTEND and BACKEND via SSH using a unique username (that would be easy to find in the logs)
- Successfully access your
cis527charlie site on BACKEND and see the web request in the log - Generate an Apache 404 error by visiting a unique URL on your
cis527charlie site (that would be easy to find in the logs). For example, try to visit https://cis527charlie.<domain>.<tld>/this_is_a_bad_website
- Leave Seq running for at least one hour, and up to a few hours.
- Review the contents of the collected logs.
Then, you will submit a writeup describing what you see (~1 page or so). What usernames are common in the auth logs? What web URLs seem to be common? Where do you think those are coming from? What might you do to further protect your system? Are these logs telling you anything in particular about what malicious users might be doing to try and access your system. Include some screenshots/images/excerpts of the logs to add to your explanation.
Note
If you are unable to get Seq running, you can still gain most of the points for this section by simply reviewing the logs /var/log/auth.log, /var/log/apache2/access.log and /var/log/apache2/error.log on your systems and writing about what you see.-Russ
Warning
There are malicious actors out there on the internet, and one of the things they will try to do is insert interesting looking items in your logs, hopefully enticing you to explore more by visiting any URLs you see in the logs. DO NOT DO THIS! For example, when testing Seq I had a malicious log entry appear within about 10 minutes via the unsecured Seq API telling me my system was insecure and I should visit to see how to fix it. That website is obviously not safe to visit.
Task 5: Submit Files
This lab may be graded completely offline. To do this, submit the following items via Canvas:
- Task 1: An archive file containing a README document as well as any files or information needed as part of the backup of the Ubuntu web application installed in Lab 6.
- Task 2: The URL of your Munin instance, clearly showing data from both FRONTEND and BACKEND.
- Task 3: A GitLab/GitHub repository URL and a URL of the website containing those files. Make sure the instructor is added to the repository as maintainers. They should be able to push to the repository and automatically see the website get updated.
- Task 4: A writeup about what you observed in your system logs on Seq or by directly analyzing them.
If you are able to submit all 4 of the items above, you do not need to schedule a grading time. The instructor or TA will contact you for clarification if there are any questions on your submission.
For Tasks 2 - 3, you may also choose to do interactive grading, especially if you were unable to complete it and would like to receive partial credit.
Task 6: Schedule A Grading Time
If you are not able to submit information for all 4 tasks for offline grading, you may contact the instructor and schedule a time for interactive grading. You may continue with the next module once grading has been completed.
Monitoring
YouTube VideoResources
Video Transcript
One major part of any system administrator’s job is to monitor the systems within an organization. However, for many groups, monitoring is sometimes seen as an afterthought, since it requires additional time and effort to properly set up and configure a monitoring system. However, there are a few good reasons to consider investing some time and effort into a proper monitoring system.
First and foremost, proper monitoring will help you keep your systems up and running by alerting you to errors as soon as they occur. In many organizations, systems are in use around the clock, but often IT staff are only available during the working day. So, if an error occurs after hours, it might take quite a while for the correct person to be contacted. A monitoring system, however, can contact that person directly as soon as an error is detected. In addition, it will allow you to more quickly respond to emergencies and cyber threats against your organization by detecting them and acting upon them quickly. Finally, a proper monitoring system can even save money in the long run, as it can help prevent or mitigate large system crashes and downtime.
When monitoring your systems, there are a number of different metrics you may be interested in. First, you’ll want to be able to assess the health of the system, so knowing such things as the CPU, memory, disk, and network usage are key. In addition, you might want to know what software is installed, and have access to the log files for any services running on the system. Finally, many organizations use a monitoring system to help track and maintain inventory, as systems frequently move around an organization.
However, beyond just looking at individual systems themselves, you may want to add additional monitoring to other layers of your infrastructure, such as network devices. You may also be involved in monitoring physical aspects of your environment, such as temperature, humidity, and even vibrations, as well as the data from security cameras and monitors throughout the area. In addition, many organizations set up external alerts, using tools such as Google Analytics to be alerted when their organization is in the news or search traffic suddenly spikes. Finally, there are many tools available to help aggregate these various monitoring systems together into a single, cohesive dashboard, and allow system administrators to set customized alert scenarios.
One great example of a system monitoring system is the one from K-State’s own Beocat supercomputer, which is linked in the resources section below this video. They use a frontend powered by Ganglia to provide a dashboard view of over 400 unique systems. I encourage you to check it out and see how much interesting data they are able to collect.
Of course, there are many paid tools for this task as well. This is a screenshot of GFI LanGuard, one of many tools available to perform system monitoring and more. Depending on your organization’s needs, you may end up reviewing a number of tools such as this for your use.
In the next few videos, I’ll discuss some monitoring tools for both Windows and Linux. As part of your lab assignment, you’ll install a monitoring system on your cloud servers running on DigitalOcean, giving you some insight into their performance.
Windows Monitoring
YouTube VideoResources
Video Transcript
In this video, I’m going to review some of the tools you can use to help monitor the health and performance of your Windows systems. While some of these tools support collecting data remotely, most of them are designed for use directly on the systems themselves. There are many paid products that support remote data collection, as well as a few free ones as well. However, since each one is unique, I won’t be covering them directly here. If you’d like to use such a system, I encourage you to review the options available and choose the best one for your environment.
First, of course, is the built-in Windows Task Manager. You can easily access it by right-clicking on the taskbar and choosing it from the menu, or, as always, by pressing CTRL+ALT+DELETE. When you first open the Task Manager on a system, you may have to click a button to show the more details. The Task Manager gives a very concise overview of your system, listing all of the running processes, providing graphs of system performance and resource usage, showing system services and startup tasks, and even displaying all users currently logged-in to the system. It serves as a great first tool to give you some quick insight into how your system is running and if there are any major issues.
From the Performance tab of the Task Manager, you can access the Resource Monitor. This tool gives more in-depth details about a system’s resources, showing the CPU, memory, disk, and network usage graphs, as well as which processes are using those resources. Combined with the Task Manager, this tool will help you discover any processes that are consuming a large amount of system resources, helping you diagnose performance issues quickly.
The Windows Performance Monitor, which can be found by searching for it via the Start Menu, also gives access to much of the same information as the Resource Monitor. It also includes the ability to produce graphs, log files, and remotely diagnose another computer. While I’ve found that it isn’t quite as useful as the Resource Monitor, it is yet another tool that could be used to help diagnose performance issues.
Finally, the Windows Reliability Monitor, found on the Control Panel as well as via the Start Menu, provides a combined look at a variety of data sources from your system. Each day, it rates your system’s reliability on a scale of 1 to 10, and gives you a quick look at pertinent log entries related to the most recent issues on your system. This is a quick way to correlate related log entries together and possibly determine the source of any system reliability issues.
The Sysinternals Suite of tools available from Microsoft also includes several useful tools for diagnosing and repairing system issues. While I encourage you to become familiar with the entire suite of tools, there are four tools in particular I’d like to review here.
First is Process Explorer. It displays information about running processes on your system, much like the Task Manager. However, it provides much more information about each process, including the threads, TCP ports, and more. Also, Process Explorer includes an option to replace Task Manager with itself, giving you quick and easy access to this tool.
Next is Process Monitor. We’ve already discussed this tool way back in Module 1. It gives you a deep view into everything your Windows operating system is doing, from opening files to editing individual registry keys. To my knowledge, no other tool gives you as much information about what your system is doing, and by poring over the logged information in Process Monitor, you can discover exactly what a process is doing when it causes issues on your system.
Another tool we’ve already discussed is TCPView, which allows you to view all TCP ports open on your system, as well as any connected sockets representing ongoing network connections on your system. If a program is trying to access the network, this tool is one that will help you figure out what is actually happening.
Lastly, Sysinternals includes a tool called Autoruns, which allows you to view all of the programs and scripts that run each time your system is started. This includes startup programs in the Start Menu, as well as programs hidden in the depths of the Windows Registry. I’ve found this tool to be particularly helpful when a pesky program keeps starting with your system, or if a malicious program constantly tries to reinstall itself because another hidden program is watching it.
Windows also maintains a set of log files that keep track of system events and issues, which you can easily review as part of your monitoring routine. The Windows logs can be found by right-clicking on the Start Button, selecting Computer Management, then expanding the Event Viewer entry in the left-hand menu, and finally selecting the Windows Logs option there. Unlike log files in Ubuntu, which are primarily text-based, the Windows log files are presented in a much more advanced format here. There are a few logs available here, and they give quite a bit of useful information about your system. If you are fighting a particularly difficult issue with Windows, the log files might contain useful information to help you diagnose the problem. In addition, there are several tools available to export these log files as text, XML, or even import them into an external system.
Finally, you can also install Wireshark on Windows to capture network packets, just as we did on Ubuntu in Module 3. Wireshark is a very powerful cross-platform tool for diagnosing issues on your network.
This is just a quick overview of the wide array of tools that are available on Windows to monitor the health and performance of your system. Hopefully you’ll find some of them useful to you as you continue to work with Windows systems, and I encourage you to search online for even more tools that you can use in your work.
Ubuntu Monitoring
YouTube VideoResources
Video Transcript
Ubuntu also has many useful tools for monitoring system resources, performance, and health. In this video, I’ll cover some of the more commonly used ones.
First and foremost is the System Monitor application. It can easily be found by searching for it on the Activities menu. Similar to the Task Manager on Windows, the System Monitor allows you to view information about all the running processes, system resources, and file systems on Ubuntu. It is a very useful tool for discovering performance issues on your system.
Of course, on Ubuntu there is an entire universe of command-line tools that can be used to monitor the system as well. Let’s take a look at a few of them.
First is top. Similar to the System Monitor, top allows you to see all running processes, and it sorts them to show the processes consuming the most CPU resources first. There are commands you can use to change the information displayed as well. In addition, you may also want to check out the htop command for a more advanced view into the same data, but htop is not installed on Ubuntu by default.
In addition to top, you may also want to install two similar commands, iotop and iftop. As you might expect, iotop shows you all processes that are using IO resources, such as the file systems, and iftop lists the processes that are using network bandwidth. Both of these can help you figure out what a process is doing on your system and diagnose any misbehavior.
To view information about memory resources, you can use either the vmstat or free commands. The free command will show you how much memory is used, and vmstat will show you some additional input and output statistics as well.
Another command you may want to install is iostat, which is part of the sysstat package. This command will show you the current input and output information for your disk drives on your system.
In addition, you can use the lsof command to see which files on the system are open, and which running process is using them. This is a great tool if you’d like to figure out where a particular file is being used. I highly recommend using the grep tool to help you filter this list to find exactly what you are looking for.
In Module 3, we discussed a few network troubleshooting tools, such as the ip and ss commands, and Wireshark for packet sniffing. So, as you are working on monitoring your system, remember that you can always use those as well.
Finally, you can also use the watch command on Ubuntu to continuously run a command over and over again. For example, I could use watch tail /var/log/syslog to print the last few lines of the system log, and have that display updated every two seconds. This command is very handy when you need to keep an eye on log files or other commands as you diagnose issues. If you are running a web server, you may also want to keep an eye on your Apache access and error logs in the same manner.
There are also a few programs for Ubuntu that integrate several different commands into a single dashboard, which can be a very useful way to monitor your system. The two that I recommend using are glances and saidar. Both can easily be installed using the APT tool. Glances is a Python-based tool that reads many different statistics about your system and presents them all in a single, unified view. I especially like running it on systems that are not virtualized, as it can report information from the temperature sensors built-in to many system components as well. It even has some built-in alerts to help you notice system issues quickly. Saidar is very similar, but shows a slightly different set of statistics about your system. I tend to use both on my systems, but generally I will go to Glances first.
As I mentioned a bit earlier, Ubuntu stores a plethora of information in log files stored on the system. You can find most of your system’s log files in the /var/log directory. Some of the more important files there are auth.log which tracks user authentications and failures, kern.log which reports any issues directly from the Linux kernel, and syslog which serves as the generic system log for all sorts of issues. Some programs, such as Samba and Apache, may create their own log files or directories here, so you may want to check those as well, depending on what your needs are. As with Windows, there are many programs that can collect and organize these log files into a central logging system, giving you a very powerful look at your entire infrastructure.
Lastly, if you are running systems in the cloud, many times your cloud provider may also provide monitoring tools for your use. DigitalOcean recently added free monitoring to all droplets, as long as you enable that feature. You can view the system’s monitoring output on our DigitalOcean dashboard under the Graphs option. In addition, you can configure alert policies to contact you when certain conditions are met, such as sustained high CPU usage or low disk space. I encourage you to review some of the available options on DigitalOcean, just to get an idea of what is available to you.
That should give you a quick overview of some of the tools available on an Ubuntu system to monitor its health and performance. There are a number of tools available online, both free and paid, that can also perform monitoring tasks, collect that data into a central hub, and alert you to issues across your system. As part of the lab assignment, you’ll configure either Munin or Ganglia to discover how those tools work.
Backups
YouTube VideoResources
Video Transcript
Backups are an important part of any system administrator’s toolkit. At the end of the day, no amount of planning and design can completely remove the need for high quality, reliable backups of the data that an organization needs to function. As a system administrator, you may be responsible for designing and executing a backup strategy for your organization. Unfortunately, there is no “one size fits all” way to approach this task, as each organization’s needs are different. In this video, I’ll discuss some different concepts and techniques that I’ve acquired to help me think through the process of creating a backup strategy.
To begin, I like to ask myself the classic questions that any journalist begins with: “Who? What? When? Where? Why? How?” Specifically, I can phrase these to relate to the task of designing a backup strategy: “Who has the data? What data needs to be stored? When should it be backed up? Where should those backups be stored? Why can data loss occur in this organization? How should I create those backups?” Let’s look at each question in turn to see how that affects our overall backup strategy.
First, who has the data? I recommend starting with a list of all of the systems and people in your organization, and getting a sense of what data each has. In addition, you’ll need to identify all of the servers and network devices that will need analyzed. Beyond those systems, there may be credentials and security keys stored in safe locations around the organization that will need to be considered. Finally, especially when dealing with certain types of data, you may also need to consider ownership of the data and any legal issues that may be involved, such as HIPAA for health data, or FERPA for student data. Remember that, storing data for your customers doesn’t mean that you have any ownership of that data or the intellectual property within it.
Next, once you’ve identified where the data may be stored, you’ll need to consider the types of data that need to be stored. This could include accounting data and personnel files to help your organization operate smoothly, but also the web assets and user data that may be stored on your website. Beyond that, there is a plethora of data hiding on your systems themselves, such as the network configuration, filesystems, and even the metadata for individual files stored on the systems. At times, this can be the most daunting step once you start to consider the large amount of decentralized data that most organizations have to deal with.
Once you have a good idea of the data you’ll need to back up, the next question you’ll have to consider is when to make your backups. There are many obvious options, from yearly all the way down to instantaneously. So, how do you determine which is right for your organization?
One way to look at it is to consider the impact an issue might have on your organization. Many companies use the terms Recovery Point Objective, or RPO, and Recovery Time Objective, or RTO, to measure these items. RPO refers to how much data may be lost when an issue occurs, and RTO measures how long the systems might be unavailable while waiting for data and access to be restored. Of course, these are goals that your organization will try to meet, so the actual time may be different for each incident.
This timeline shows how they are related. In this example, your organization has created a backup at the point in time labelled “1” in this timeline. Then, some point in the future, an incident occurs. From that point, your organization has an RPO set, which is the maximum amount of data they would like to lose. However, the actual data loss may be greater, depending on the incident and your organization’s backup strategy. Similarly, the RTO sets a desired timeline for the restoration of data and service, but the actual time it takes to restore the data may be longer or shorter. So, when creating a backup strategy, you’ll need to choose the frequency based on the RPO and RTO for your organization. Backups made less frequently could result in a higher RPO, and backups that are less granular or stored offline could result in a higher RTO.
You will also have to consider where you’d like to store the data. One part of that equation is to consider the type of storage device that will be used. Each one comes with its own advantages and disadvantages, in terms of speed, lifetime, storage capacity, and, of course, cost. While it may seem counter-intuitive, one of the leading technologies for long-term data storage is still the traditional magnetic tape, as it already has a proven lifetime of over 50 years, and each tape can hold several terabytes of data. In addition, tape drives can sustain a very high read and write speed for long periods of time. Finally, for some very critical data, storing it in a physical, on-paper format, may not be a bad idea either. For passwords, security keys, and more, storing them completely physically can prevent even the most dedicated hacker from ever accessing them.
Beyond just the storage media, the location should also be considered. There are many locations that you could store your backup data, relative to where the data was originally stored. For example, a backup can be stored online, which means it is directly and readily accessible to the system it came from in case of an incident. Similarly, data can be stored near-line, meaning that it is close at hand, but may require a few seconds to access the data. Backups can also be stored offline, such as on a hard disk or tape cartridge that is disconnected from a system but stored in a secure location.
In addition, data can be stored in a variety of ways at a separate location, called an offsite backup. This could be as simple as storing the data in a secure vault in a different building, or even shipping it thousands of miles away in case of a natural disaster. Lastly, some organizations, such as airlines or large retail companies, may even maintain an entire backup site, sometimes called a “disaster recovery center,” which contains enough hardware and stored backup data to allow the organization to resume operations from that location very quickly in the event of an incident at the primary location.
When storing data offsite or creating a backup site, it is always worth considering how that site is related to your main location. For example, could both be affected by the same incident? Are they connected to the same power source? Would a large hurricane possibly hit both sites? Do they use the same internet service provider? All of these can be a single point of failure that may disable both your primary location and your backup location at the same time. Many companies learned this lesson the hard way during recent hurricanes, such as Katrina or Sandy. I’ve posted the story of one such company in the resources section below this video.
Optimization is another major concern when considering where to store the data. Depending on your needs, it may be more cost-effective or efficient to look at compressing the backup before storing it, or performing deduplication to remove duplicated files or records from the company-wide backup. If you are storing secure data, you may also want to encrypt the data before storing it on the backup storage media. Finally, you may even need to engage in staging and refactoring of your data, where backup data is staged in a temporary location while it is being fully stored in its final location. By doing so, your organization can continue to work with the data without worrying about their work affecting the validity of the backup.
Another important part of designing a backup strategy is to make sure you understand the ways that an organization could lose data. You may not realize it, but in many cases the top source of data loss at an organization is simply user error or accidental deletion. Many times a user will delete a file without realizing its importance, only to contact IT support to see if it can be recovered. The same can happen to large scale production systems, as GitLab experienced in 2017. I’ve posted a link to their very frank and honest post-mortem of that event in the resources section below this video.
There are many other ways that data could be lost, such as software or hardware failure, or even corruption of data stored on a hard drive itself as sectors slowly degrade over time. You may also have to deal with malicious intent, either from insiders trying to sabotage a system, all the way to large-scale external hacks. Lastly, every organization must consider the effect natural disasters may have on their data.
Finally, once you’ve identified the data to be backed up, when to create the backups, and where to store them, the last step is to determine how to create those backups themselves. There are many different types of backups, each with their own features and tradeoffs. First, many companies still use an unstructured backup, which I like to think of as “just a bunch of CDs and flash drives” in a safe. In essence, they copy their important files to an external storage device, drop it in a safe, and say that they are covered. While that is definitely better than no backup at all, it is just the first step toward a true backup strategy.
Using software, it is possible to create backups in a variety of ways. The first and simplest is a full backup. Basically, the system makes a full, bit by bit, copy of the data onto a different storage device. While this may be simple, it also requires a large amount of storage space, usually several times the size of the original data if you’d like to store multiple versions of the data.
Next, software can help you create incremental backups. In this case, you start with a full backup, usually made once a week, then each following day’s backup only stores the data that has changed in the previous day. So, on Thursday, the backup only stores data that has changed since Wednesday. Then, on Friday, if the backup needs to be restored, the system will need access to all backups since the full backup on Monday in order to restore the data. So, if any incremental backup is lost, the system may be unrecoverable to its most recent state. However, this method requires much less storage than a full backup, so it can be very useful.
Similarly, differential backups can also be used. In this case, each daily backup stores the changes since the most recent full backup. So, as long as the full backup hasn’t been lost, the most recent full backup plus a differential backup is enough to restore the data. This requires a bit more storage than an incremental backup, but it can also provide additional data security. It is also possible to keep fewer full backups in this scenario to reduce the storage requirements.
Finally, some backups systems also support a reverse incremental backup system, sometimes referred to as a “reverse delta” system. In this scenario, each daily backup consists of an incremental backup, then the backup is applied to the existing full backup to keep it up to date. Then, the incremental backups are stored as well, allowing those changes to be reversed if needed. This allows the full backup to be the most recent one, making restoration much simpler than traditional incremental or differential backups. In addition, only the most recent backup is needed to perform a full recovery. However, as with other systems, older data can be lost if the incremental backups are corrupted or missing.
Lastly, there are a few additional concerns around backup strategies that we haven’t discussed in this video. You may need to consider the security of the data stored in your backup location, as well as how to go about validating that the backup was properly created. Many organizations perform practice data recoveries often, just to make sure the process works properly.
When creating backups, your organization may have a specific backup window, such as overnight or during a planned downtime. However, it may be impossible to make a backup quickly enough during that time. Alternatively, you may need to run backups while the system is being used, so there could be significant performance impacts. In either case, you may need to consider creating a staging environment first.
Also, your organization will have to consider the costs of buying additional storage or hardware to support a proper backup system. Depending on the metric used, it is estimated that you may need as much as 4 times the storage you are using in order to create proper backups. Lastly, as we discussed earlier, you may need to consider how to make your systems available in a distributed environment, in case of a large-scale incident or natural disaster.
Of course, don’t forget that backups are just one part of the picture. For many organizations, high availability is also a desired trait, so your system’s reliability design should not just consist of backups. By properly building and configuring your infrastructure, you could buy yourself valuable time to perform and restore backups, or even acquire new hardware in the case of a failure, just by having the proper system design.
Hopefully this overview of how to create a backup strategy has given you plenty of things to consider. As part of the lab assignment, you’ll work with a couple of different backup scenarios in both Windows and Ubuntu. I also encourage you to review your own personal backup plan at this point, just to make sure you are covered. Sometimes it is simple to analyze these issues on someone else’s environment, but it is harder to find our own failures unless we consciously look for them.
Windows Backups
YouTube VideoResources
These resources mostly refer to Windows Server 2012 or 2016, but should work for 2019 as well.
Video Transcript
Windows includes several tools for performing backups directly within the operating system. In this video, I’ll briefly introduce a few of those tools.
First is the Windows File History tool. You can find it in the Settings app under Update & Security. Once there, choose the Backup option from the menu on the left. To use File History, you’ll need to have a second hard drive available. It can be either another internal drive, another partition on the same drive, or an external hard drive or flash drive. Once it is configured, File History will make a backup of any files that have changed on your system as often as you specify, and it will keep them for as long as you’d like, provided there is enough storage space available. By default, it will only back up files stored in your user’s home directory, but you can easily add or exclude additional folders as well.
Right below the File History tool is the Backup and Restore tool from Windows 7. This tool allows you to create a full system image backup and store it on an external drive. This is a great way to create a single full backup of your system if you’d like to store one in a safe location. However, since Windows 10 now includes options to refresh your PC if Windows has problems, a full system image is less important to have now than it used to be.
However, one tool you may want to be familiar with is the System Restore tool. Many versions of Windows have included this tool, and it is a tried and true way to fix some issues that are caused by installing software or updates on Windows. You can easily search for the System Restore tool on the Start Menu to find it. In essence, System Restore automatically creates restore points on your system when you install any new software or updates, and gives you the ability to undo those changes if something goes wrong. System Restore isn’t a full backup itself, but instead is a snapshot of the Windows Registry and a few other settings at that point in time. If it isn’t enabled on your system, I highly recommend enabling it, just for that extra peace of mind in case something goes wrong. As a side note, if you’ve ever noticed a hidden folder named “System Volume Information” in Windows, that folder is where the System Restore backups are stored. So, I highly recommend not touching that folder unless you really know what you are doing.
In the rare instance that your operating system becomes completely inoperable, you can use Windows to create a system recovery drive. You can then use that drive to boot your system, perform troubleshooting steps, and even reinstall Windows if needed. However, in most instances, I just recommend keeping a copy of the standard Windows installation media, as it can perform most of those tasks as well.
Windows also has many tools for backing up files to the cloud. For example, Windows has Microsoft’s OneDrive software built-in, which will allow you to automatically store files on your system in the cloud as well. While it isn’t a true backup option, it at least gives you a second copy of some of your files. There are many other 3rd-party tools that perform this same function that you can use as well.
Finally, Windows Server includes the Windows Server Backup tool, which is specifically designed for the types of data that might be stored on a server. You can use this tool to create a backup of your entire server, including the Active Directory Domain Services data. Losing that data could be catastrophic to many organizations, so it is always recommended to have proper backups configured on your domain controllers. As part of the lab assignment, you’ll use this tool to backup your Active Directory Domain, and then use that backup to restore an accidentally deleted entry, just to make sure that it is working properly.
Of course, there are many other backup tools available for Windows, both free and paid, that offer a variety of different features. If you are creating a backup strategy for your organization, you may also want to review those tools to see how well they meet your needs.
Ubuntu Backups
YouTube VideoResources
Video Transcript
There are many different ways to back up files and settings on Ubuntu. In this video, I’ll discuss a few of the most common approaches to creating backups on Ubuntu.
First, Ubuntu 18.04 includes a built-in backup tool, called “Déjà Dup,” that will automatically create copies of specified folders on your system in the location of your choice. It can even store them directly on the cloud, using either Google or Nextcloud as the default storage location, as well as local or network folders. This feature is very similar to the File History feature in Windows 10.
In addition, many system administrators choose to write their own scripts for backing up files on Ubuntu. There are many different ways to go about this, but the resources from the Ubuntu Documentation site, linked below the video, give some great example scripts you can start with. You can even schedule those scripts using Cron, which is covered in the Extras module, to automatically perform backups of your system.
When backing up files on your system, it is very important to consider which files should be included. On Ubuntu, most user-specific data and settings are stored in that user’s home folder, though many of them are included in hidden files, or “dotfiles.” So, you’ll need to make sure those files are included in the backup. In addition, most system-wide settings are stored in the /etc folder, so it is always a good idea to include that folder in any backup schemes. Finally, you may want to include data from other folders, such as /var/www/ for Apache websites.
If you are running specific software on your system, such as MySQL for databases or OpenLDAP for directory services, you’ll have to consult the documentation for each of those programs to determine the best way to back up that data. As part of this module’s lab assignment, you’ll be creating a backup of a MySQL database to get some experience with that process.
There are also some tools available for Ubuntu to help create backups similar to the System Restore feature of Windows. One such tool is TimeShift. I’ve linked to a description of the tool in the resources section below the video if you’d like to know more.
Finally, as with Windows, there are a large number of tools, both paid and free, available to help with creating, managing, and restoring backups on Ubuntu and many other Linux distributions. As you work on building a backup strategy for an organization, you’ll definitely want to review some of those tools to see if they adequately meet your needs.
That concludes Module 7! As you continue to work on the lab assignment, feel free to post any questions you have in the course discussion forum on Canvas. Good luck!
Subsections of Extras
Introduction
YouTube VideoVideo Transcript
Greetings everyone! This module contains additional materials and helpful information for system administrators. You are not required to view all of these videos, but I encourage you to do so if there are any topics here you find interesting.
Also, feel free to suggest any topics you’d like to see covered in this section as you go through the course. Any suggestions may be considered toward the extra credit assignment in this course.
Enjoy!
SSH
YouTube VideoResources
Video Transcript
In this video, I’ll discuss how to use the Secure Shell, or SSH, remote server and client. You’ll be using it throughout the semester to connect to various computers, and there are a few things you should know that will help make your experience a much more pleasant one.
If you’d like to know more about the technical details of how SSH works, refer to the links in the resources section below the video.
First, let’s look at the SSH client program, available as the ssh command on most Linux systems. It is typically installed by default, but if not you can install it using the apt command:
sudo apt install openssh-client
Once it is installed, you can connect to any server you wish by simply using the ssh command followed by the host you’d like to connect to. Optionally, you may need to provide a different username, in which case you would put the username before the host, connecting the two with an @ symbol, much like an email address. If you’d like to try it yourself, you can try to connect to the CS Linux servers using a command similar to the following:
ssh russfeld@cslinux.cs.ksu.edu
Obviously, you’ll need to replace russfeld with your own username.
If this is the first time you are connecting to a particular server, you’ll receive an error message similar to the following:
The authenticity of host ‘cislinux.cs.ksu.edu (129.130.10.43)’ can’t be established.
ECDSA key fingerprint is SHA256: <random_text>.
Are you sure you want to continue connecting (yes/no)?
As a security feature, the SSH client will remember the identity of each server you connect to using this fingerprint. Since this is the first time you have connected to this server, it doesn’t have a fingerprint stored, and it will ask you to confirm that the one presented is correct. If you wanted to, you could contact the owner of the server and ask them to verify that the fingerprint is correct before connecting, but in practice that is usually not necessary. However, once you’ve accepted the fingerprint, it will store it and check the stored fingerprint against the one presented on all future connections to that server.
If, at any point in the future, the fingerprints don’t match, you will be presented with a similar error message. In that case, however, you should be very cautious. It could be the case that the server was recently reset by its owner, in which case you can easily contact them to verify that fact. However, it could also be the case that someone is attempting to either listen to your connection or have you connect to a malicious server. In that case, you should terminate the connection immediately, or else they could possibly steal your credentials or worse.
In any case, since this is our first time connecting, just type yes to store the fingerprint and continue connecting. You’ll then be asked to provide your password. Note that when you enter your password here it will not show any indication that you are entering text, so you must type carefully. If the password is accepted, you’ll be given access to the system.
On that system, you can run any command that you normally would. You can even run graphical programs remotely via SSH, but that requires a bit more configuration and software which I won’t go into here. Once you are finished, you can type exit to close the remote session and return to your own computer.
Next, let’s discuss the SSH server. It is available as open-source software for Linux, and can easily be installed on any system running Ubuntu Linux using the apt command:
sudo apt install openssh-server
Once it has been installed, you can verify that it is working by using the ssh command to connect to your own system:
If this is the first time you have done so, you should get the usual warning regarding host authenticity. You can simply type yes to continue connecting, then provide your password to log on to the system. Once you have verified that it is working, type exit to return to the local terminal. If your server is connected to a network, you can use ssh to connect to it just like you would any other server. Note that you may have to configure your firewall to allow incoming SSH connections, typically on port 22.
The SSH server has many options that you can configure. You can edit the configuration file using this command:
sudo nano /etc/ssh/sshd_config
There are many great resources online to help you understand this file. In general you can use the default settings without any problems, but there are a couple of lines you may want to change. Note that any line prefixed with a hash symbol # is a code comment, so you will need to remove that symbol for the change to be read. The commented lines reflect the default settings, which can be overridden by un-commenting the line and changing the value.
The first line you may want to change is:
This line defines the port that SSH listens on. By default, SSH uses port 22, a well-known port for that service. However, since everyone knows that SSH uses port 22, it is very common for servers connected to the internet to receive thousands of malicious login attempts via that port in an attempt to discover weak passwords and usernames. By changing the SSH port to a different port, you can eliminate much of that traffic. Of course, if you change this port here, you may also need to update your firewall rules to allow the new port through the firewall.
The other line worth looking at is:
#PasswordAuthentication yes
By changing this line to no you can require that all users on your system use SSH keys to log in, which are generally much more secure than passwords. We’ll discuss SSH keys shortly. Remember to make sure your own SSH key is properly configured before changing this setting, or you may lock yourself out from your own system.
If you make any changes to the configuration file, you can restart the server using the following command:
sudo systemctl restart ssh
You can also always check the status of the server using this command:
sudo systemctl status ssh
To make your life a bit easier, let’s discuss SSH keys. Instead of providing a password each time you want to log on to a system with SSH, you can have your computer automatically provide a key to prove your identity. Not only is this simpler for you, but in many cases it is much more secure overall.
To use SSH keys, you must first generate one. You’ll need to perform this step on the computer you plan to connect from, not on the server you’ll connect to. In Terminal, type the following command to start the process:
ssh-keygen -t rsa -b 4096
This will generate a public & private RSA keypair with a 4096 bit size, generally regarded as a very secure key by most standards.
The command will first ask you where to store the key. It defaults to ~/.ssh/id_rsa which is the standard location, so just press enter to accept the default.
Next, it will ask you to set a passphrase for your key. If you are setting up the key on a secure computer that only you would have access to, you can leave this blank to not set a passphrase on the key. In that way, you won’t have to enter any passwords to use SSH with this key. However, if anyone gains access to the key file itself, they can easily log in to any system as you with that key until you revoke access. If you want your keys to be more secure, you can set a passphrase to lock the key. The downside is that you’ll have to provide the passphrase for the key in order to use it, but it is still more secure than providing the password to the user account itself.
Once the key is created, it will give you some information about where it is stored. You can view those files by typing the following:
There should be at least two files here. The first, id_rsa, is your private key. Do not share that file with anyone! You may choose to make a backup of that file for your own use, if desired. However, if the key was not protected with a passphrase when it was created, you should protect that file as closely as if it contained all of your passwords in plain text.
The second file, id_rsa.pub, is your public key. This is the file we’ll need to give to other servers so that we can log on using our private key. There are a couple of ways to do so. First, I’ll show you the automatic way, then I’ll discuss what it does so you could do it manually if needed.
To send your public key to a remote server, we’ll use the ssh-copy-id command. Its syntax is very similar to the normal SSH command. For example, to send my new public key to the CS Linux server, I would do the following:
ssh-copy-id russfeld@cslinux.cs.ksu.edu
It will prompt you for your password, and if it succeeds it will install the key on that server. You can then verify that it worked by using the normal SSH command to connect. It should succeed without asking you to provide any password, except possibly the passphrase for your SSH key.
Once on that server, we can see where the key gets installed. It is usually placed in a file at ~/.ssh/authorized_keys. On some systems, it may be ~/.ssh/authorized_keys2 due to a security vulnerability, or both files may be present. This is configurable in the SSH Server configuration file.
In that authorized_keys file, you’ll see a copy of your public key on a single line. To add additional keys to the system, you can either use the ssh-copy-id command from the system containing the new key, or copy and paste the public keys directly into this file, one per line. To remove a key, simply delete the corresponding line from this file. Note that at the end of the line you can see the username and computer name from the machine where the key was created, which can be very helpful in identifying keys.
Finally, there is one other trick you can use to make working with SSH servers much more useful, and that is through the use of an SSH config file. First, make sure you are back on your local computer and not on any remote servers. Check the command prompt carefully, or type exit a few times to make sure you have closed all SSH sessions. On your local computer, open a new SSH config file using the following command:
By convention, your SSH config file should reside in that location. In that file, you can configure a wide variety of host settings for the servers you connect to. For example, here is one entry from my own SSH config file:
Host cs
    HostName cslinux.cs.ksu.edu
    Port 22
    User russfeld
    IdentityFile ~/.ssh/id_rsa
The first line gives the short name for the host. Then, all lines below it give configuration information for that host. For example, here I’ve given the hostname (you can also use an IP address), the port, the username, and the private key file that should be used when connecting to this host. These are all options that you’d normally have to provide on the command line when using the ssh command. By placing them here, you can just reference the host by its short name, and all of this information will automatically be used when you connect to that system.
With this in place, all I have to do to connect to the CS Linux servers is type:
and all my other options are read from this configuration file. Pretty nifty, right?
There are many other options you can include in your SSH config file. I recommend checking out the links in the resources section for more information.
I hope this video will be very useful to you as you work with SSH throughout this semester and in the future. I know much of this information has been very helpful to me in my career thus far.
Bash Scripting
YouTube VideoResources
Video Transcript
In this video, I’ll introduce the concepts for scripting using the Bash shell in Ubuntu Linux. In essence, scripting allows you to automate many common tasks that you would perform using the terminal in Linux. It is a very powerful skill for system administrators to learn.
First, I’m going to create a bin folder inside of our home folder (this will become useful later).
In that command, the tilde ~ character represents your home folder. It is one of the special folder paths that you can use on the terminal in Linux. Now, we can open that folder:
To begin, let’s open a text file using Nano in the terminal. I’m going to use the .sh file extension to make it clear that this is a script, but that is not necessary on Linux.
At the top of the file, we must define the script interpreter we would like to use. For Bash, place this line at the very top of the file:
Some experienced system administrators will refer to the start of that line as a “sha-bang,” which may make it easy to remember. It is actually a two-byte magic number that tells Linux what type of file it is reading, and then the rest of the line gives the path to the program that can interpret that file. This allows Linux to determine the type of the file even without checking the file extension, which is what Windows does.
Below that line, you can simply place terminal commands, one per line, that you wish to have the script perform. For example, here is a simple Hello World script:
#!/bin/bash

echo "Hello World"
exit 0
The echo command is pretty self-explanatory - it just prints text to the console. The final line gives the exit condition for the script. Returning zero 0 indicates that the script completed successfully. Any non-zero value is treated as an error, and can be used to diagnose failing scripts. See Chapter 6 of the Advanced Bash-Scripting Guide from TDLP for more information on exit conditions.
To run the script, save and exit the file using CTRL+X, then Y, then ENTER. Then, you can simply type:
and see if it works. Here, we are using the dot, or period ., as part of the path to the script. A single dot represents the current directory, so putting ./ in front of a file indicates that we want to run the script with that name from the current directory. At the end of the video, we’ll discuss how to modify your system so you don’t have to include the path to the script.
Unfortunately, it doesn’t run. This is because Linux has a separate file permission to allow files and scripts to be executed. By default, most files aren’t given that permission, so we have to manually add it before executing the script. To do so, type:
This will give the owner of the file u the execute permission +x. Then, try to run it again:
It should display “Hello World” on the screen. Congratulations, you’ve written your first Bash script!
Now, let’s take a look at a more complex script. This is one I actually wrote years ago when I first interviewed for an instructor position here at K-State:
#!/bin/bash
#batman.sh

if (( $# < 1 || $# > 1 )); then
  echo "Usage: batman.sh <name>"
  exit 1
fi

if [ "$1" = "Batman" ]; then
  echo "Hello Mr. Wayne"
elif [ "$1" = "Robin" ]; then
  echo "Welcome back Mr. Grayson"
else
  echo "Intruder alert!"
fi
exit 0
There is quite a bit going on in this script, so let’s break it down piece by piece. First, this script includes parameters. The $1 variable references the first parameter, and obviously $2 would be the second, and so on. For parameter values above 9, include the number in curly braces, such as ${10} and ${11}.You can also access the number of parameters provided using $#, and the entire parameter string as $*.
Below that, the first if statement:
if (( $# < 1 || $# > 1 )); then
  echo "Usage: batman.sh <name>"
  exit 1
fi
uses double parentheses, representing arithmetic evaluation. In this case, it is checking to see if the number of parameters provided is either greater than or less than 1. If so, it will print an error message. It will also exit with a non-zero exit condition, indicating that the script encountered an error. Lastly, note that if statements are concluded with a backwards if, or “fi”, indicating the end of the internal code block. In many other programming languages, curly braces ({ and }) are used for this purpose.
The next if statement:
if [ "$1" = "Batman" ]; then
  echo "Hello Mr. Wayne"
elif [ "$1" = "Robin" ]; then
  echo "Welcome back Mr. Grayson"
else
  echo "Intruder alert!"
fi
uses square brackets for logical test comparisons. This is equivalent to using the Linux “test” command on that statement. Here, the script is checking to see if the string value of the first parameter exactly matches “Batman”. If so, it will print the appropriate welcome message.
So, this simple script introduces two different methods of comparison, as well as conditional statements and parameters.
Here’s another simple script to introduce a few other concepts:
#!/bin/bash
#listfiles.sh

files=`ls $* 2> /dev/null`
for afile in "$files"; do
    echo "$afile"
done
exit 0
The first line of the script:
files=`ls $* 2> /dev/null`
declares a new variable $files, and sets its value to the output of the command contained in backticks `. Inside of a script, any commands contained in backticks will be converted to the output of that script, which can then be stored in a variable for later use.
The next line:
for afile in "$files"; do
represents a “foreach” loop. It will execute the code inside of that statement once for each item in the $files variable. Note that when variables are declared and assigned, they don’t require the dollar sign $ in front of them, but when they are used it must be included. The loop is concluded with a “done” line at the bottom.
Finally, let’s review a couple more scripts:
#!/bin/bash
#simplemenu.sh

OPTIONS="Build Run Clean Quit"

select opt in $OPTIONS; do
  if [ "$opt" = "Build" ]; then
    echo "Building project..."
  elif [ "$opt" = "Run" ]; then
    echo "Running project..."
  elif [ "$opt" = "Clean" ]; then
    echo "Cleaning project..."
  elif [ "$opt" = "Quit" ]; then
    echo "Exiting..."
    break
  else
    echo "Invalid Input"
  fi
done
exit 0
This script creates a simple menu with four options, stored in the $OPTIONS variable at the top. It then uses a “select” statement, telling the terminal to ask the user to choose one of the options provided, and then inside the select statement is a set of “if” statements determining which option the user chose. This is very similar to a “case” statement in many other programming languages. When you run this script, note that it repeats the options until it hits an option containing a “break” statement, so it is not necessary to encapsulate it in a loop.
Lastly, Bash scripts also provide the ability to read input from the user directly, instead of using command-line parameters:
#!/bin/bash
#simpleinput.sh

echo "Input your name and press [ENTER]"
read name
echo "Welcome $name!"
exit 0
This script uses the “read” command to read input from the user and store it in the $name variable. Pretty simple, right?
If you plan on writing scripts for your own use, there is one thing you can do to greatly simplify the process of using them. Notice that, currently, you must provide the full path to the script using either ./ or some other path. This is because, by default, Linux will look for commands and scripts in all of the folders contained in your PATH environment variable, but not the current folder. So, we must simply add the folder containing all of our scripts to the PATH variable.
In recent versions of Ubuntu, all you have to do is create a bin folder in your home folder, as we did above. Then, restart the computer and it should automatically add that folder to your path. This is because of a setting hidden in your Bash profile configuration file, usually stored in ~/.profile. The same process works for the Windows Subsystem for Linux (WSL) version of Ubuntu as well.
You can check the current PATH variable using the following command:
If you don’t see your ~/bin folder listed there after you’ve created it and rebooted your computer (it will usually have the full path, as in /home/cis527/bin or similar), you’ll need to add it manually. To do this, open your Bash settings file:
And, at the very bottom of the file, add the following line:
export PATH=$PATH:$HOME/bin/
Then, save the file, close, and reopen your terminal window. You can check your PATH variable once again to confirm that it worked.
Now, you can directly access any script you’ve created and stored in the ~/bin folder without providing a path. So, for example, the very first script we created, stored in ~/bin/script.sh, can now be accessed from any folder just by typing
on the terminal.
This is a very brief introduction to Bash scripting. I highly recommend reading the Advanced Bash-Scripting Guide from The Linux Documentation Project (TLDP) if you’d like to learn even more about scripting.
Cron (Linux Scheduled Tasks)
YouTube VideoResources
Video Transcript
This video introduces the Cron tool on Linux, which can be used to run tasks automatically at specific times on your system. It is a very handy piece of software, but a little confusing at first.
To view the current list of scheduled tasks for your user, use the following command:
Generally, you probably won’t see anything there at first. You can also view the list for the root user using the sudo command
Depending on the software installed on your system, you may already see a few entries there.
To edit the schedule, use the same command with a -e option:
It should open the file with your default text editor, usually Nano. At the top of the file, it gives some information about how the file is constructed. At the bottom, you can add lines for each command you’d like to run. There are 6 columns present in the file, in the following order:
m - minute (0-59)h - hour (0-23)dom - day of month (1-31)mon - month (1-12)dow - day of week (0=Sunday, 1=Monday, … 7=Sunday)command - full path to the command to be run, followed by any parameters
The Linux Cron Guide from LinuxConfig.org has a great graphic describing these columns as well. All you have to do is add your entries and save the file, and the new settings will be applied automatically.
Honestly, the best way to learn cron is by example. For example, assume we have a script at /home/cis527/bin/script.sh that we’d like to run. If we add the following entry:
15 5 * * * /home/cis527/bin/script.sh
it will run the script at 5:15 AM every day. Note that the amount of whitespace between each column doesn’t matter; it will treat any continuous sequence of spaces and tabs as a single whitespace, much like HTML. So, feel free to align your columns however you choose, as long as they are in the correct order and separated by at least one whitespace character.
Let’s look at some other examples:
0 */6 * * * /home/cis527/bin/script.sh
This will run the script every six hours (note the */6, meaning that every time the hour is divisible by 6, it will run the script). So, it will run at 12 AM, 6 AM, 12 PM, and 6 PM each day.
10,30,50 * 15 * 5 /home/cis527/bin/script.sh
This will run every hour at 10, 30 and 50 minutes past the hour, but only on the 15th day of each month and every Friday. Note that the day of week option is generally separate from the day of month option. If both are included, it will run on each indicated day of the week, as well as the indicated day of the month.
0 5 * * 1-5 /home/cis527/bin/script.sh
This will run at 5:00 AM each weekday (Monday=1 through Friday=5)
@reboot /home/cis527/bin/script.sh
This will run once each time the system starts up.
There are many, many more ways to use cron, but hopefully this video gives you enough information to get started. Good luck!
PowerShell Scripting
YouTube VideoResources
Video Transcript
This video introduces the Windows PowerShell Integrated Scripting Environment (ISE) and covers the basics for creating and running your own scripts in Windows PowerShell.
Before we begin, we must change one system setting to allow unsigned PowerShell scripts to run. To do this, you’ll need to open a PowerShell window using the Run as Administrator option, and then enter the following command:
Set-ExecutionPolicy Unrestricted
However, be aware that this makes your system a bit more vulnerable. If you or a malicious program tries to run a malicious PowerShell script that is unsigned, the system will not try to stop you. It would be a very rare occurrence, but it is something to be aware of.
Now, let’s open the PowerShell ISE to start writing scripts. To find it, simply search for PowerShell ISE on your Start Menu. It should be included by default on all versions of Windows 10.
When you first open the PowerShell ISE, you may have to click the Script button in the upper-right corner of the window to view both the scripting pane and the command window. To write your scripts, you can simply write the text in the upper window, then save the file and run the program using the Run script button on the top toolbar. You can also run the script in the command window below.
To begin, let’s take a look at a simple Hello World script:
Write-Host "Hello World"
return
This script should be pretty self-explanatory. The Write-Host command simply displays text on the terminal, and the return line ends the script. As with any programming language, it is good practice to include a return at the end of your script, but it is not necessarily required.
Let’s look at a more advanced script to see more features of the Windows PowerShell scripting language.
Param(
    [string]$user
)

if ( -not ($user)){
    Write-Host "Usage: batman.ps1 <name>"
    return
}

if ($user.CompareTo("Batman") -eq 0){
    Write-Host "Hello Mr. Wayne"
}else{
    if ($user.CompareTo("Robin") -eq 0){
        Write-Host "Welcome back Mr. Grayson"
    }else{
        Write-Host "Intruder alert!"
    }
}
return
At the top of this script, there is a special Param section. In PowerShell, any parameters expected from the user must be declared here, with the data type in square brackets ([ and ]), followed by the variable name prefixed with a dollar sign $. In this script, we have declared one command line parameter $user of type string.
Below that, we have the first if statement:
if ( -not ($user)){
    Write-Host "Usage: batman.ps1 <name>"
    return
}
This will check to see if the $user parameter was provided. If it was not, it will print an error message and return to end the script.
The next if statement:
if ($user.CompareTo("Batman") -eq 0){
    Write-Host "Hello Mr. Wayne"
}else{
    if ($user.CompareTo("Robin") -eq 0){
        Write-Host "Welcome back Mr. Grayson"
    }else{
        Write-Host "Intruder alert!"
    }
}
performs a string comparison between the $user parameter and the string “Batman”, if the comparison returns 0, they are equal. This is very similar to other string comparison functions in C# and Java. One interesting item to note here is the use of -eq to denote equality. For some reason, PowerShell uses short textual comparison operators instead of the common symbols for boolean comparisons. I really don’t know why that particular design decision was made, but I encourage you to look at the documentation to see what options are available for comparison.
Here is another simple script:
Param(
    [string]$path
)

$files = Get-ChildItem $path

foreach($file in $files){
    Write-Host $file.name
}
This is an example of a simple looping script. In this script, it will get a path from the user as an argument, then store a list of all the child items on that path in $files variable. Then, it will use a “foreach” loop to print out the name of each of those files. Thankfully, if you’ve done any programming in the .NET family of languages, most of this syntax will be very familiar to you.
You can also use PowerShell to create a simple menu for your script. This is a bit more involved than the example from the Linux Bash scripting video, but it is pretty straightforward:
$title = "Select Options"
$message = "Choose an option to perform"

$build = New-Object System.Management.Automation.Host.ChoiceDescription "&Build", "Build the project"
$run = New-Object System.Management.Automation.Host.ChoiceDescription "&Run", "Run the project"
$clean = New-Object System.Management.Automation.Host.ChoiceDescription "&Clean", "Clean the project"
$quit = New-Object System.Management.Automation.Host.ChoiceDescription "&Quit", "Quit"

$options = [System.Management.Automation.Host.ChoiceDescription[]]($build, $run, $clean, $quit)

$result = $host.ui.PromptForChoice($title, $message, $options, 0)
switch ($result)
{
    0 {
        Write-Host "You selected Build"
    }
    1 {
        Write-Host "You selected Run"
    }
    2 {
        Write-Host "You selected Clean"
    }
    3 {
        Write-Host "You selected Quit"
    }
}
At the top of the script, the first two variables define the text that will be shown as the title of the menu and the message displayed to the user before the menu options. The next four variables define the menu choices available. Looking at the first one, the &Build gives the title of the option, with the ampersand & before the ‘B’ indicating which letter should be the shortcut to choose that option. The next string gives a longer description of the option. Finally, we put it all together in the $options variable as an array of available options, then use the PromptForChoice function to display the menu to the user, storing the user’s choice in the $result variable. Finally, we use a simple “switch” statement to determine which option the user chose and then perform that task.
If you are having trouble understanding what each part does, I recommend just running the script once and then matching up the text displayed in the menu with the script’s code. It may seem a bit daunting at first, but it is actually pretty simple overall. As a quick aside, if you run this on a system with a GUI, you may get an actual pop-up menu instead of a textual menu, but rest assured that it will display the textual version on system’s without a GUI.
Finally, here is a quick script demonstrating how to get user input directly within the script:
$name = Read-Host "Input your name and press [ENTER]"
Write-Host "Welcome $name!"
It’s as simple as that! Of course, that is just a very small taste of what PowerShell is capable of. Hopefully this introduction gives you some idea of what is available, but I encourage you to consult the online documentation for PowerShell to learn even more about it.
Windows Subsystem for Linux
YouTube VideoResources
Video Transcript
In this video, I will briefly introduce the Windows Subsystem for Linux, or WSL, which was one of the most highly anticipated features added to Windows 10 in the last couple of years. WSL allows you to install a full Linux distribution right inside your Windows 10 OS, giving you terminal access to some of your favorite Linux programs and tools. You can even run services such as sshd, MySQL, Apache, and more directly in WSL.
First, you must enable the feature on Windows. The simplest way to do this is to open a PowerShell window using the Run as Administrator option, then enter the following command:
Enable-WindowsOptionalFeature -Online -FeatureName Microsoft-Windows-Subsystem-Linux
Once it is complete, you will need to reboot your computer to enable to feature.
Once you have rebooted, you can go to the Windows Store and install the distribution of your choice. There are many to choose from, and you can even have multiple distributions installed at the same time. For this example, I’ll choose Ubuntu.
Once it has finished installing, you must open it once to complete the initialization. During that process, you’ll be asked to create a username and password for your Linux system. It doesn’t have to be the same as your Windows user account, and it will not be synchronized with your Windows password either.
As soon as it is complete, you’ll be taken to your Linux distribution’s shell. Pretty neat, right?
So, what can you do from here? Pretty much anything! Here are a few things I suggest doing right off the bat.
First, you can update your system just like any other Linux system:
sudo apt update
sudo apt upgrade
You can also set up SSH keys so you can use SSH from WSL instead of dealing with PuTTY or other Windows-based terminal programs. Refer to the Extra - SSH page for more information on how to do that.
On WSL, you can find your normal Windows drives at /mnt by doing:
To get easy access to your Windows files, you can add a symbolic link to your Windows user folder, or any folder you choose. For example, if your Windows username is cis527 you can use the following command to add a shortcut in your Windows home folder within your WSL home folder:
ln -s /mnt/c/Users/cis527/ ~/cis527
You can verify that it worked using this command:
I’ve used this to create a few useful shortcuts to allow me to easily access my Windows files.
Finally, since I am a big fan of using Git on command line, I usually install Git on my WSL to allow me to easily manage my repositories just like I normally do on my Linux based development systems.
I hope you enjoy working with WSL as much as I have. If you have any suggestions of cool uses for WSL that I missed, feel free to send them to me. You just might get some extra credit points and see your idea featured here in a future semester!
Git
YouTube VideoResources
Video Transcript
This video provides a brief introduction to the Git source control program used by many system administrators. While this video is not intended to provide a full introduction to Git as a programmer would use it, it should serve as a quick introduction to the ways that system administrators might come across Git in their workloads.
For this example, I’ll be working with the command-line git program. There are many graphical programs that can be used to interact with Git as well, such as GitHub Desktop and Git Krakken
If you haven’t already, you’ll need to install the Git command-line tool. You can do so using apt:
sudo apt update
sudo apt install git
Also, if you have not used Git on this system, you’ll want to configure your name and email address used when you create commits:
git config --global user.name "Your Name"
git config --global user.email username@emailprovider.tld
Now, let’s create a new Git repository on our computer. To do that, I’m going to create a new folder called git-test and add a couple of files to it:
mkdir ~/git-test
cd ~/git-test
echo "File 1" > file1.txt
echo "File 2" > file2.txt
Next, let’s initialize an empty Git repository in this folder. This is the first step to adding an existing folder to Git. You can also use this command in an empty folder before you begin adding content.
Once you’ve done that command, let’s look at the directory and show all the hidden files:
As you can see, there is now a folder .git in this directory. That folder contains the information for this Git repository, including all of the history and changes. DO NOT MODIFY OR DELETE THIS FOLDER! If you change this folder, it may break your Git repository.
To see the status of a Git repository, you can use the git status command:
Here you’ll see that there are two files that are not included in the repository, which are the files we added earlier. To add a file to a Git repository, there are three steps. First, you must create or modify the file on the filesystem inside a git repository, which will cause Git to see the file as modified or “dirty.” Then, any changes you’d like to add to the Git repository will need to be “staged” using the git add command. Finally, those changes which are staged are “committed” using the git commit command.
So, to perform this process on the two files currently in our directory, we’ll do this command to stage them:
git add file1.txt file2.txt
Once they are staged, we can check the status to make sure they are ready to commit:
If everything looks correct, we can commit those changes:
git commit -m "First Commit"
The -m flag on the git commit command allows us to specify a commit message on the command line. If you omit that option, you’ll be taken to your system’s default text editor, usually Nano or Vim, and be able to write a commit message there. Once you are done, just save and close the file as you normally would, and the git command will proceed to commit the changes.
Finally, once you have committed your changes, you can review the status of your repository again:
You can also review the Git log to see a log of your commits:
Now that we’ve created a Git repository and added our first commit, let’s talk about remotes. A remote in Git is a remote copy of a repository, which can be used as a backup for yourself, or as a way to share a repository with other developers. Most commonly, your remote will be an online service such as GitHub or GitLab, but there are many others as well. For this example, I’ll show you how to work with the GitLab instance hosted by K-State CS. The instructions are very similar for GitHub as well.
First, you’ll need to navigate to http://gitlab.cs.ksu.edu and sign-in with your K-State CS username and password. Once you’ve logged in, go to your account settings, and look for the SSH Keys option. In order to authenticate your system with GitLab, you’ll need to create an SSH key and copy-paste the public key here. See the SSH video in the Extras module for detailed instructions on creating those keys. I’ll perform the steps quickly for this example as well. Once you are done, you can click the logo in the upper-left to go back to the dashboard.
On the dashboard, you can click the New Project button to create a new project. To make it simple, I’m going to give it the same name as my folder, git-test. I can also give it a description, and I’ll need to set the visibility level for this project. I’m going to use the Private option for now, so I’ll be the only one able to see this project.
Once your project is created, it will give you some handy instructions for using it. We’re going to do the last option, which is to use an existing Git repository. So, at any time in the future, you can easily follow those instructions to get everything set up correctly.
Back on the terminal, we’ll need to add a remote to our Git repository. The command for this is:
git remote add origin <url>
Then, we’ll need to push our repository to the remote server. Since we don’t have any locally created branches or tags, we can just use this command:
git push -u origin master
If you have already created branches or tags in this repository, you can push them to the remote server using these commands:
git push -u origin --all
git push -u origin --tags
There you go! Your Git repository is set to be tracked by a remote server. If you open the GitLab page, you can now see your files here as well. You can now use that remote server to share this repository across multiple computers, or even with multiple developers. For example, let’s see how we could get a copy of this repository on another computer, make changes, and share those changes with both systems.
First, on the other computer, you’ll need to also create an SSH key and add it to your account on GitLab. I’ve already done so for this system.
Next, we’ll need to get a copy of the repository from the remote server using this command:
That will create a copy of the repository in a subfolder of the current folder. Now, we can open that folder and edit a file:
cd git-test
echo "Some Changes" >> file1.txt
As you make edits, you can see all of the changes since your last commit using a couple of commands. First:
will give you a list of the files changed, created, or deleted since the last commit. You can see the details of the changes using:
which will show you all of the changed files and those changes since the last commit.
Now, we can stage any changes using:
which will automatically add any changed, added, or removed files to the index. This command is very handy if you want to add all changed files to the repository at once, since you don’t have to explicitly list each one. Then, we can commit those changes using:
git commit -m "Modified file1.txt"
and finally, we can upload those changes to the remote server using:
If we view the project on GitLab, we can see the changes there as well. Finally, on our original computer, we can use this command to download those changes:
If you have made changes on both systems, it is a good idea to always commit those changes to the local repository before trying to use git pull to download remote changes. As long as the changes don’t conflict with each other, you’ll be in good shape. If they conflict, you’ll have to fix them manually. I’ll discuss how to do that a bit later as we deal with branching and merging.
Another major feature of Git is the ability to create branches in the repository. For example, you might have a really great idea for a new feature as you are working on a project. However, you are worried that it might not work, and you don’t want to lose the progress you have so far. So, you can create a branch of the project and develop your feature there. If it works, you can merge those changes back into the master branch of your project. If it doesn’t, you can just switch back to the master branch without merging, and all of your original code is just as you left it.
To create and switch to a new branch, you can use these commands:
git branch <branch_name>
git checkout <branch_name>
It should tell you that you switched to your new branch. You can also run
at any time to see what branch you are currently on. Now, let’s make some changes:
echo "File 12" > file1.txt
echo "More Changes" >> file2.txt
Here, you’ll note that I am overwriting the contents in file1.txt since I only used one > symbol, while I am adding a third line of content to file2.txt since I used >> to append to that file. You can always see the changes using:
Now, let’s commit those changes:
git add .
git commit -m "Branch Commit"
git push -u origin <branch_name>
Notice that the first time you push to a new branch, you’ll need to provide the -u <branch_name> option to tell Git which branch to use. Once you’ve done that the first time, you can just use git push in the future.
Now, let’s switch back to the master branch and make some changes there as well:
git checkout master
echo "File 13" > file1.txt
git add .
git commit -m "Master Commit"
git push
At this point, let’s try to merge the changes from my new branch back into the master branch. To merge branches, you’ll need to switch to the destination branch, which I’ve already done, then use this command:
If none of the changes cause a conflict, it should tell you that it was able to merge the branches successfully. However, in this case, we have created a conflict. This is because we have modified file1.txt in both branches, and Git cannot determine how to merge them together in the best way. While Git is very smart and able to merge modified files in many cases, it isn’t able to do it when the same lines are changed in both files and it can’t determine which option is correct. So, it will require you to intervene and make the changes.
So, let’s open the file:
Here, you should see content similar to this
<<<<<<< HEAD
File 13
=======
File 12
>>>>>>> new_branch
The first section, above the line of equals signs =, is the content that is in the destination branch, or the branch that you are merging into. The section below that shows the content in the incoming branch. To resolve the conflict, you’ll need to delete all of the lines except the ones you want to keep. So, I’ll keep the change in the incoming branch in this case:
and then I’ll save and close the file using CTRL+X, then Y, then ENTER. Once I’ve resolved all of the conflicts, I’ll need to commit them:
git add .
git commit -m "Resolve Merge Conflicts"
git push
Congratulations! You’ve now dealt with branching and merging in Git.
Finally, there are a couple of handy features of Git that I’d like to point out. First is the tagging system. At any time, you can create a tag based on a commit. This is typically used to mark a particular version or release of a program, or maybe even an assignment in a course. It makes it easy to find that particular commit later on, in case you need to jump back to it. To create and push a tag, you can do the following commands:
git tag -a <tag_name> -m <message>
git push
You can see the tags on GitLab too. It is a very handy feature when working with large projects.
Also, if you have some files that you don’t want Git to track, you can use a .gitignore file. It is simply a list of patterns that specify files, folders, paths, file extensions, and more that should be left out of Git’s index. I encourage you to read the documentation for this feature, which is linked in the resources section below the video. There are also some great sample .gitignore templates from GitHub linked there as well.
I hope this video has given you a brief introduction of Git and how you could use it as a system administrator. If you’d like to learn even more about Git, I encourage you to review the links in the resources section below this video for even more information and examples of how you can use Git.
CS 615 @ Stevens
If you’d like to dive even deeper into System Administration, I highly recommend checking out the CS 615 course at Stevens taught by Jan Schaumann.
All lectures and materials are available online at https://stevens.netmeister.org/615/.

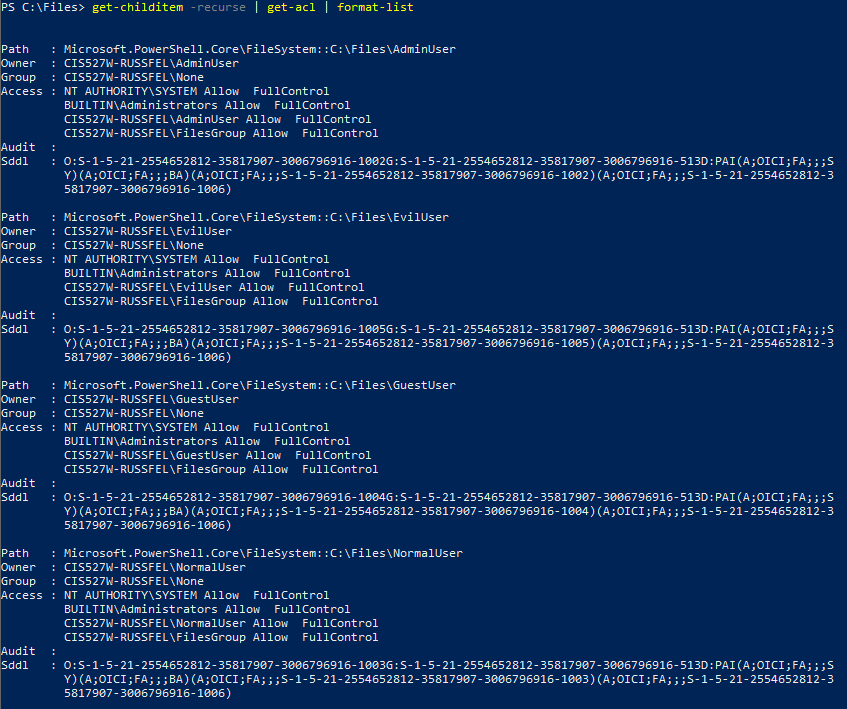
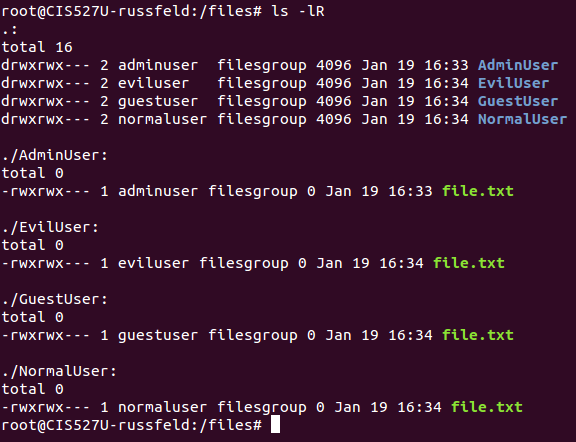