Sprites
Who are you calling a fairy?
Who are you calling a fairy?
The term “sprite” refers to a graphical element within a two-dimensional game that moves around the screen - often representing a character, powerup, or other actor. The term likely was coined in relation to its older definition - a small fairy creature.
Traditionally, sprites are a part of two-dimensional games, and are a raster graphic (one composed of a regular grid of pixels, aka a bitmap). As the sprites are simply an array of bits representing pixels, and the scene being presented on screen is also just an array of bits representing pixels, we can place a sprite on-screen by simply copying its bits into the right location.
The earliest implementations of sprites did this by substituting the sprite bits for background image bits as the bits were streamed to the screen as part of an analog frame signal. This was done by specialized hardware that supported a limited number of sprites (hence the name hardware sprites).
Later games used bit blitting (an abbreviation for bit-boundary block transfer), a technique for copying a smaller bit array into a larger one. Early graphics hardware implemented bit blitting as a hardware instruction, meaning it could be performed very fast, provided the sprite was drawn to scale.
Modern games (and MonoGame) often use the 3D hardware to render sprites, which means they are represented as textured quads. A textured quad is essentially a rectangle composed of two triangles that always faces the screen.
While it is more complex than traditional sprites, there are several benefits to this approach:
In this chapter, we’ll examine how the MonoGame implementation of textured quads works.
MonoGame provides the SpriteBatch class to help mitigate the complexity of implementing textured quad sprites. It provides an abstraction around the rendering process that lets us render sprites with a minimum of fuss, with as much control as we might need.
As the name suggests, the SpriteBatch batches sprite draw requests so that they can be drawn in an optimized way. We’ll explore the different modes we can put the SpriteBatch in soon. But for now, this explains why every batch begins with a call to SpriteBatch.Begin(), then an arbitrary number of SpriteBatch.Draw() calls, followed by a SpriteBatch.End() call.
We’ve already used this pattern in our Hello Game example from chapter 1:
    _spriteBatch.Begin();
    _spriteBatch.Draw(_ballTexture, _ballPosition, Color.White);
    _spriteBatch.End();
In this example, we draw a single sprite, using the _ballTexture, and drawing the graphic it represents with the upper-right corner at _ballPosition, and blend white (Color.White) with the sprite texture’s own colors.
The SpriteBatch.Draw() method actually has a seven available overrides for your use:
public void Draw(Texture2D texture, Rectangle destinationRectangle, Color color)public void Draw(Texture2D texture, Rectangle destinationRectangle, Rectangle? sourceRectangle, Color color)public void Draw(Texture2D texture, Rectangle destinationRectangle, Rectangle? sourceRectangle, Color color, float rotation, Vector2 origin, SpriteEffects effects, float layerDepth)Draw(Texture2D texture, Vector2 position, Color color)Draw(Texture2D texture, Vector2 position, Rectangle? sourceRectangle, Color color)Draw(Texture2D texture, Vector2 position, Rectangle? sourceRectangle, Color color, float rotation, Vector2 origin, Vector2 scale, SpriteEffects effects, float layerDepth)Draw(Texture2D texture, Vector2 position, Rectangle? sourceRectangle, Color color, float rotation, Vector2 origin, float scale, SpriteEffects effects, float layerDepth)Rather than explain each one individually, we’ll explore what the various parameters are used for, and you can select the one that matches your needs.
The texture parameter is a Texture2D containing the sprite you want to draw. Every override includes this parameter. If the texture has not been loaded (is null), then invoking Draw() will throw an ArgumentNullException.
The destinationRectangle is a rectangle whose coordinates are where the sprite should be drawn, in screen coordinates. If the rectangle’s dimensions are not the same as those of the source image (or the sub-image specified by sourceRectangle), it will be scaled to match. If the aspect ratios are different, this will result in a stretched or squished sprite. Note that the Rect uses integers for coordinates, so calculated floats used to place the sprite will potentially be truncated.
The color parameter is a Color that will be blended with the colors in the texture to determine the final color of the sprite. Using Color.White effectively keeps the texture color the same, while using Color.Red will make the sprite’s pixels all redder, Color.Yellow will make them more yellow, etc. This parameter can be utilized to make the sprite flash different colors for damage, invulnerability, etc.
As an alternative to the destinationRectangle, a sprite’s position on-screen can be specified with position, which is a Vector2. This position specifies the upper-left hand corner of where the sprite will be drawn on-screen (unless the origin parameter is set). Note that when we use the position parameter, the width and height matches that of the texture (or sub-image specified by the sourceRectangle), unless a scale is also provided.
The sourceRectangle is a rectangle that defines a subarea of the source texture (texture) to use as the sprite. This is useful for texture atlases, where more than one sprite appear in the same texture, and also for sprite animation where multiple frames of animation appear in the same texture. We’ll discuss both of these approaches soon.
Note that the question mark in Rectangle? indicates it is a nullable type (i.e. it can be null as well as the Rectangle struct). When it is null, the entire texture is used as the sourceRectangle.
The rotation is a rotation value measured in radians that should be applied to the sprite. This is one of the big benefits of textured quad sprites, as the graphics hardware makes rotations a very efficient operation (without this hardware, it becomes a much more difficult and computationally expensive operation). This rotation is about the origin of the sprite, which is why all the overrides that specify the rotation also specify the origin.
The origin is the spot within the sprite where rotations and scaling are centered. This also affects sprite placement - the position vector indicates where the origin of the sprite will fall on-screen. It is a vector measured relative to the upper-left-hand-corner of the sprite, in texture coordinates (i.e. pixels of the source texture).
Thus, for our 64x64 pixel ball texture, if we wanted the origin to be at the center, we would specify a value of new Vector2(32,32). This would also mean that when our ball was at position
$ (0,0) $, it would be centered on the origin and 3/4 of the ball would be off-screen.
The scale is a scalar value to scale the sprite by. For example, a value of
$ 2.0f $ will make the sprite twice as big, while
$ 0.5f $ would make it half as big. This scaling is in relation to the origin, so if the origin is at the center of the sprite grows in all directions equally. If instead it is at
$ (0,0) $, the sprite will grow to the right and down only.
The scale can also be specified as a Vector2, which allows for a different horizontal and vertical scaling factor.
The effects parameter is one of the SpriteEffects enum’s values. These are:
SpriteEffects.None - the sprite is drawn normallySpriteEffects.FlipHorizontally - the sprite is drawn with the texture flipped in the horizontal directionSpriteEffects.FlipVertically - the sprite is drawn with the texture flipped in the vertical directionNote you can specify both horizontal and vertical flipping with a bitwise or: SpriteEffects.FlipHorizontally | SpriteEffects.FlipVertically
The layerDepth is an integer that indicates which sprites should be drawn “above” or “below” others (i.e. which ones should obscure the others). Think of it as assembling a collage. Sprites with a higher layerDepth value are closer to the top, and if they share screen space with sprites with a lowerDepth, those sprites are obscured.
A texture atlas is a texture that is used to represent multiple sprites. For example, this texture from Kinney’s 1Bit Pack available on OpenGameArt contains all the sprites to create a roguelike in a single texture:
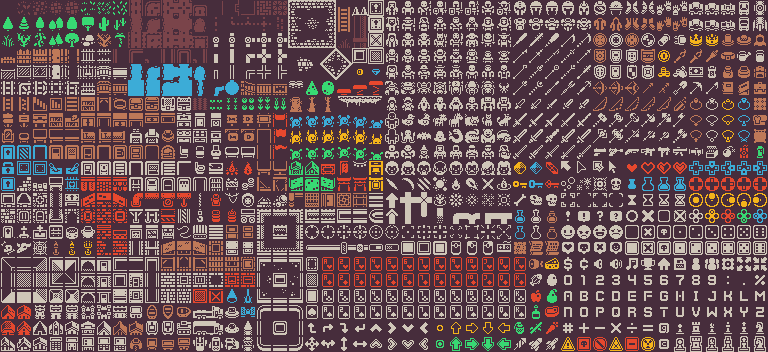
In this case, each sprite is 15x15 pixels, with a 1 pixel outline. So to draw the cactus in the second row and sixth column of sprites, we would use a source rectangle:
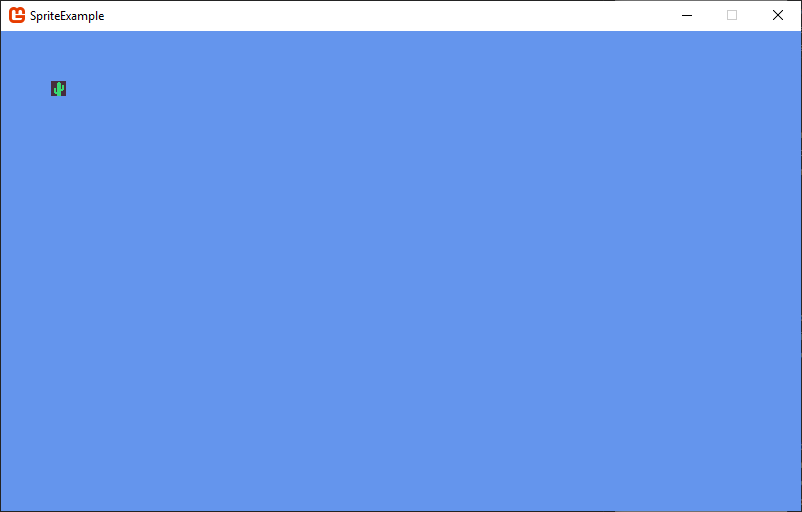
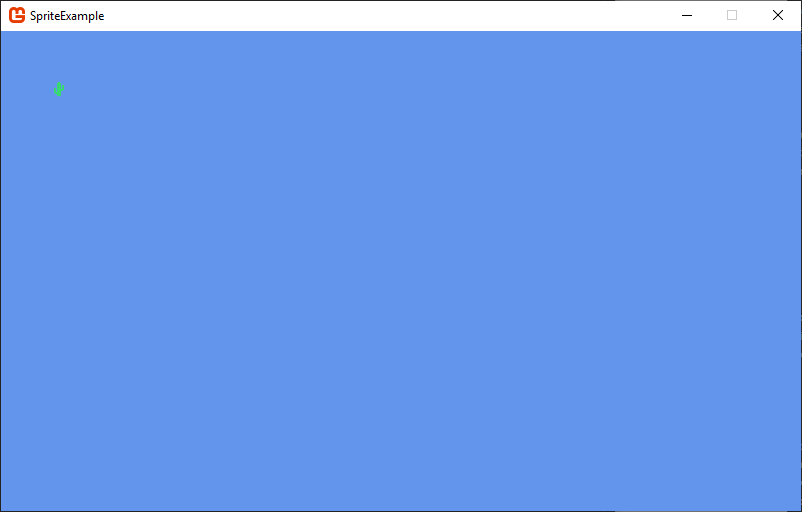
var sourceRect = new Rectangle(16, 96, 16, 16);Thus, to draw the sprite on-screen at position $ (50,50) $ we could use:
protected override void Draw(GameTime gameTime)
{
    GraphicsDevice.Clear(Color.CornflowerBlue);

    // TODO: Add your drawing code here
    spriteBatch.Begin();
    spriteBatch.Draw(atlas, new Vector2(50, 50), new Rectangle(96, 16, 15, 15), Color.White);
    spriteBatch.End();

    base.Draw(gameTime);
}
And we’d see:
This texture atlas is laid out in 16x16 tiles, which makes calculating the X and Y of our source rectangle straightforward:
var x = xIndex * 16;
var y = yIndex * 16;
The formula involved for a particular texture atlas will depend on the size and spacing between sprites. Also, some texture atlases are not evenly spaced. In those cases, it may be useful to define a Rectangle constant for each one, i.e.
const Rectangle helicopterSource = new Rectangle(15, 100, 200, 80);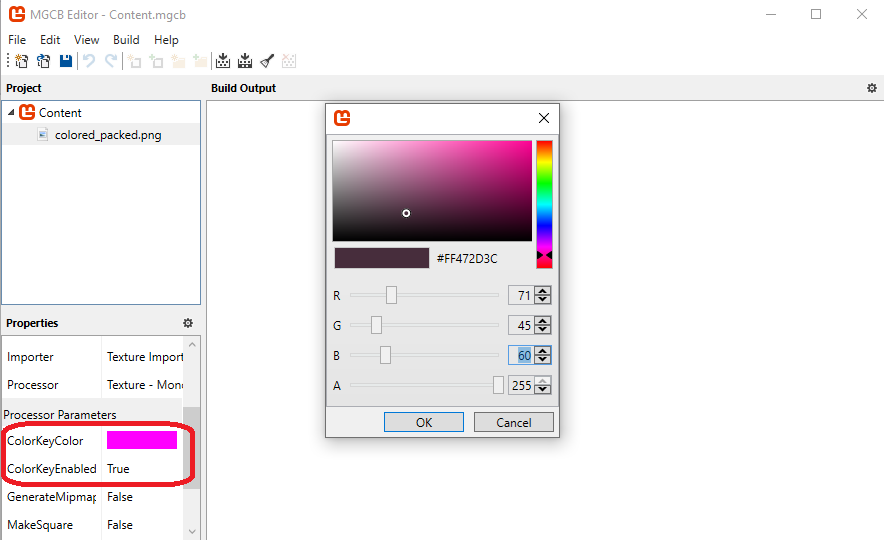
const Rectangle missileSource = new Rectangle(30, 210, 10, 3);The texture used in the above example has a brown background. If you would like to replace this with transparent black, you can set a color key color in the mgcb content editor. Any pixel this color in the source image will be turned into transparent black when the content is compiled. In this case, our color’s RGB values are (71, 45, 60):
The result is that sprites rendered from the texture now have a transparent background:
To animate a sprite, we simply swap the image it is using. Animated sprites typically lay out all their frames in a single texture, just like a texture atlas. Consider this animated bat sprite by bagzie from OpenGameArt:
![]()
![]()
The images of the bat are laid out into a 4x4 grid of 32x32 pixel tiles. We can create the illusion of motion by swapping which of these images we display. However, we don’t want to swap it every frame - doing so will be too quick for the viewer to follow, and destroy the illusion. So we also need a timer and an idea of the direction the sprite is facing.
To represent the direction, we might define an enum. And since the enum can represent a numerical value, let’s assign the corresponding row index to each direction:
/// <summary>
/// The directions a sprite can face
/// </summary>
public enum Direction {
    Down = 0,
    Right = 1,
    Up = 2,
    Left = 3
}
With this extra state to track, it makes sense to create a class to represent our sprite:
/// <summary>
/// A class representing a bat
// </summary>
public class BatSprite
{
    // The animated bat texture
    private Texture2D texture;

    // A timer variable for sprite animation
    private double directionTimer;

    // A timer variable for sprite animation
    private double animationTimer;

    // The current animation frame
    private short animationFrame;

    ///<summary>
    /// The bat's position in the world
    ///</summary>
    public Vector2 Position { get; set; }

    ///<summary>
    /// The bat's direction
    /// </summary>
    public Direction Direction { get; set; }
}
We’ll need a LoadContent() method to load our texture:
/// <summary>
/// Loads the bat sprite texture
/// </summary>
/// <param name="content">The ContentManager</param>
public void LoadContent(ContentManager content)
{
    texture = content.Load<Texture2D>("32x32-bat-sprite.png");
}
Let’s make our bat fly in a regular pattern, switching directions every two seconds. To do this, we would want to give our bat an Update() method that updates a timer to determine when it is time to switch:
public void Update(GameTime gameTime)
{
    // advance the direction timer
    directionTimer += gameTime.ElapsedGameTime.TotalSeconds;

    // every two seconds, change direction
    if(directionTimer > 2.0)
    {
        switch(Direction)
        {
            case Direction.Up:
                Direction = Direction.Down;
                break;
            case Direction.Down:
                Direction = Direction.Left;
                break;
            case Direction.Left:
                Direction = Direction.Right;
                break;
            case Direction.Right:
                Direction = Direction.Up;
                break;
        }
        // roll back timer
        directionTimer -= 2.0;
    }

    // move bat in desired direction
    switch (Direction)
    {
        case Direction.Up:
            Position += new Vector2(0, -1) * 100 * (float)gameTime.ElapsedGameTime.TotalSeconds;
            break;
        case Direction.Down:
            Position += new Vector2(0, 1) * 100 * (float)gameTime.ElapsedGameTime.TotalSeconds;
            break;
        case Direction.Left:
            Position += new Vector2(-1, 0) * 100 * (float)gameTime.ElapsedGameTime.TotalSeconds;
            break;
        case Direction.Right:
            Position += new Vector2(1, 0) * 100 * (float)gameTime.ElapsedGameTime.TotalSeconds;
            break;
    }
}
We’ll use a similar technique to advance the animation frame - once every 16th of a second, in the Draw() method:
public void Draw(GameTime gameTime, SpriteBatch spriteBatch) {
    // advance the animation timer
    animationTimer += gameTime.ElapsedGameTime.TotalSeconds;

    // Every 1/16th of a second, advance the animation frame
    if(animationTimer > 1/16)
    {
        animationFrame++;
        if(animationFrame > 3) animationFrame = 0;
        animationTimer -= 1/16;
    }

    // Determine the source rectangle
    var sourceRect = new Rectangle(animationFrame * 32, (int)Direction * 32, 32, 32);

    // Draw the bat using the current animation frame
    spriteBatch.Draw(texture, Position, sourceRect, Color.White);
}
Notice because our Direction enum uses integer values, we can cast it to be an int and use it to calculate the sourceRect’s x-coordinate.
We can then construct a bat (or multiple bats) in our game, and invoke their LoadContent(), Update(), and Draw() methods in the appropriate places.
You may have noticed that our BatSprite can be thought of as a state machine, or the state pattern. You could argue that we have four possible states for each of the directions that bat is flying. Moreover, you could argue that each of those states has four sub-states for the animation frame that is being displayed. These are both accurate observations - the state pattern is an extremely useful one in game design.
Text in videogames is challenging. In the early days of computing, video cards had a limited number of modes - the most common was for displaying text that was streamed to the video card as ASCII character data. This is also how the command prompt and terminals work - they operate on streams of character data.
But games used different modes that used the limited memory of the card to supply pixel data in a variety of formats. Notably, text support was non-existent in these modes.
Fast-forward to the modern day. Now text is typically handled by the operating system and its windowing libraries. Which are notably unusable within a DirectX rendering context. So we still use the same techniques used in those earliest video games to render text. Bitmap fonts.
A bitmap font is one in which each character is represented by a raster graphic - a bitmap. Much like sprites, these are copied into the bitmap that is the scene. Thus, we have to bit blit each character one at a time. This is in contrast to the fonts used by modern operating systems, which are vector based. A vector font contains the instructions for drawing the font characters, so it can be drawn at any scale.
MonoGame provides some support for drawing text through the SpriteBatch. But to use this functionality, we first need to create a SpriteFont
A SpriteFont object is similar to the sprite BatSprite class we worked on in the last section. It wraps around a texture containing rendered font characters, and provides details on how to render each character. However, we don’t construct SpriteFont objects ourselves, rather we load them through the ContentManager and the content pipeline.
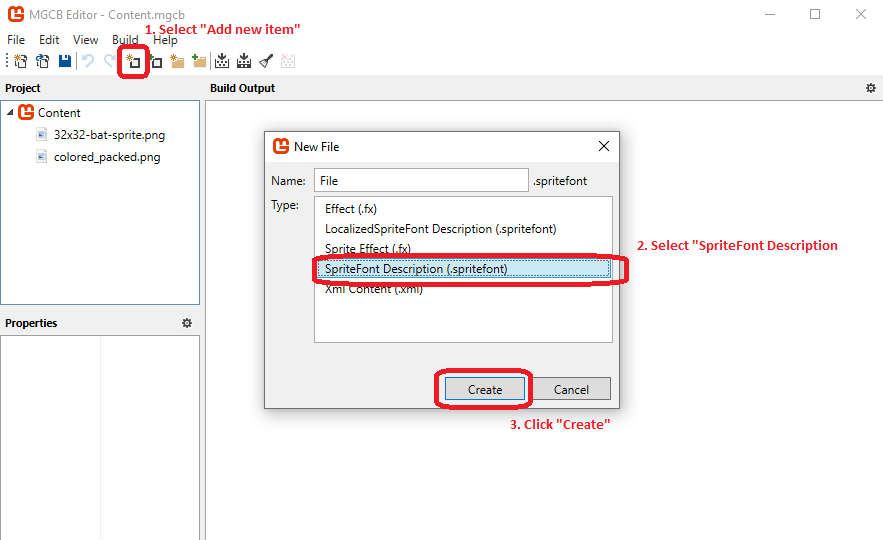
The content pipeline creates a sprite font from an existing font installed on your computer. Essentially, it renders each needed character from the font into a texture atlas, and combines that with information about where each character is in that atlas. To create your sprite font, choose the create new item from the MGCB Editor, and then select “SpriteFont Description (.spritefont)”:
This will create a SpriteFont Description, which will be compiled into a SpriteFont. It also adds this description into your Content folder. Open it, and you will see it is nothing more than an XML file, which specifies some details of the font:
<?xml version="1.0" encoding="utf-8"?>
<!--
This file contains an xml description of a font, and will be read by the XNA
Framework Content Pipeline. Follow the comments to customize the appearance
of the font in your game, and to change the characters which are available to draw
with.
-->
<XnaContent xmlns:Graphics="Microsoft.Xna.Framework.Content.Pipeline.Graphics">
<Asset Type="Graphics:FontDescription">
<!--
Modify this string to change the font that will be imported.
-->
<FontName>Arial</FontName>
<!--
Size is a float value, measured in points. Modify this value to change
the size of the font.
-->
<Size>12</Size>
<!--
Spacing is a float value, measured in pixels. Modify this value to change
the amount of spacing in between characters.
-->
<Spacing>0</Spacing>
<!--
UseKerning controls the layout of the font. If this value is true, kerning information
will be used when placing characters.
-->
<UseKerning>true</UseKerning>
<!--
Style controls the style of the font. Valid entries are "Regular", "Bold", "Italic",
and "Bold, Italic", and are case sensitive.
-->
<Style>Regular</Style>
<!--
If you uncomment this line, the default character will be substituted if you draw
or measure text that contains characters which were not included in the font.
-->
<!-- <DefaultCharacter>*</DefaultCharacter> -->
<!--
CharacterRegions control what letters are available in the font. Every
character from Start to End will be built and made available for drawing. The
default range is from 32, (ASCII space), to 126, ('~'), covering the basic Latin
character set. The characters are ordered according to the Unicode standard.
See the documentation for more information.
-->
<CharacterRegions>
<CharacterRegion>
<Start> </Start>
<End>~</End>
</CharacterRegion>
</CharacterRegions>
</Asset>
</XnaContent>You can edit the values of the various elements to control the font, as well as attributes like size and style that will be used to create the raster representation. Any font installed on your development machine can be used (though for uncommon fonts, it is a good idea to include the font’s file, usually a .ttf, in your repository so you can install it on other development machines).
The SpriteFont can then be loaded with the ContentManager:
SpriteFont spriteFont = Content.Load<SpriteFont>("name-of-spritefont");Where the supplied string is the same name as the .spritefont file, without the extension.
Once loaded, text can be drawn to the screen with SpriteBatch.DrawString(SpriteFont spriteFont, Vector2 position, Color color). There are several overrides to choose from:
DrawString(SpriteFont spriteFont, string text, Vector2 position, Color color)DrawString(SpriteFont spriteFont, string text, Vector2 position, Color color, float rotation, Vector2 origin, Vector2 scale, SpriteEffects effects, float layerDepth)DrawString(SpriteFont spriteFont, string text, Vector2 position, Color color, float rotation, Vector2 origin, float scale, SpriteEffects effects, float layerDepth)DrawString(SpriteFont spriteFont, StringBuilder text, Vector2 position, Color color)DrawString(SpriteFont spriteFont, StringBuilder text, Vector2 position, Color color, float rotation, Vector2 origin, Vector2 scale, SpriteEffects effects, float layerDepth)DrawString(SpriteFont spriteFont, StringBuilder text, Vector2 position, Color color, float rotation, Vector2 origin, float scale, SpriteEffects effects, float layerDepth)As with SpriteBatch.Draw(), we’ll explore what the various parameters are used for, and you can select the one that matches your needs.
The spriteFont parameter is a SpriteFont object describing the font you want to write with. If the SpriteFont has not been loaded (is null), then invoking DrawText() will throw an ArgumentNullException.
The text parameter is the string you want to draw onto the screen.
Optionally, a StringBuilder object can be supplied as the text parameter.
This position specifies the upper-left hand corner of where the text will be drawn on-screen (unless the origin parameter is set).
The color parameter is a Color the text will be rendered in (this is actually blended as is with sprites, but the base color is white, so whatever color you choose is the color that will be displayed)
The rotation is a rotation value measured in radians that should be applied to the text. This rotation is about the origin of the sprite, which is why all the overrides that specify the rotation also specify the origin.
The origin is the spot within the text where rotations and scaling are centered. This also affects text placement - the position vector indicates where the origin of the text will fall on-screen. It is a vector measured relative to the upper-left-hand-corner of the text, in texture coordinates (i.e. pixels of the source texture).
The scale is a scalar value to scale the text by. For example, a value of
$ 2.0f $ will make the text twice as big, while
$ 0.5f $ would make it half as big. This scaling is in relation to the origin, so if the origin is at the center of the text grows in all directions equally. If instead it is at
$ (0,0) $, the text will grow to the right and down only.
The scale can also be specified as a Vector2, which allows the horizontal and vertical scaling factors to be different.
The effects parameter is one of the SpriteEffects enum’s values. These are:
SpriteEffects.None - the text is drawn normallySpriteEffects.FlipHorizontally - the text is drawn with the texture flipped in the horizontal directionSpriteEffects.FlipVertically - the text is drawn with the texture flipped in the vertical directionNote you can specify both horizontal and vertical flipping with a bitwise or: SpriteEffects.FlipHorizontally | SpriteEffects.FlipVertically
The layerDepth is an integer that indicates which sprites should be drawn “above” or “below” others (i.e. which ones should obscure the others). Think of it as assembling a collage. Sprites with a higher layerDepth value are closer to the top, and if they share screen space with sprites with a lowerDepth, those sprites are obscured.
Note that with SpriteFont, there is no way to specify the width the text should be drawn - it is entirely dependent on the font, the string to render, and any scaling factors applied. Nor is there any automatic word wrapping.
However, the SpriteFont class does expose a method SpriteFont.Measure(string text) and override SpriteFont.Measure(StringBuilder text) which given a string or StringBuilder return a Vector2 indicating the size at which that text would be rendered.
When drawing sprites, we often refer to the Painter’s Algorithm. This algorithm simply involves drawing the most distant part of the scene first (i.e. background elements) before drawing the closer elements. This way the closer elements are drawn on top of the elements behind them, as when we draw we are literally copying over the existing pixel color values.
This is even more important when working with translucent (partially transparent) sprites, as we mix the translucent color with the color(s) of the elements underneath the translucent sprite. If those colors have not yet been set, this blending will not happen.
The SpriteBatch assumes that we batch sprites in the order we want them drawn, i.e. the most distant sprites should have their Draw() calls first. For many games, this is simple to accomplish, but there are some where it becomes significantly challenging (i.e. tilemap games where some tiles are “above” the background layer). For these games, we can utilize the SpriteBatch’s built-in sorting.
This is activated by calling SpriteBatch.Begin(SpriteSortMode.BackToFront) instead of SpriteBatch.Begin(). This replaces the default sorting mode, SpriteSortMode.Deferred with the back-to-front sorting, based on the depthLayer specified in the sprite’s Draw() call. When using this mode, the SpriteBatch sorts the sprites immediately before it renders them.
A couple of things to remember about this sorting:
depthLayer value.There is also a SpriteSortMode.FrontToBack mode that sorts sprites in the opposite order. It can be helpful when your game specifies the depthLayer values opposite the expected order (larger numbers to the back).
In addition to these depth-sorting options, there is a SpriteSortMode.Immediate which, instead of batching the sprites draws them immediately when the Draw() call is made. This can be less efficient as it requires the sprite drawing effect (a shader program) to be loaded into the graphics card for each sprite (rather than once for all sprites).
Finally, there is a SpriteSortMode.Texture option that orders sprites by their source texture. As swapping textures is an expensive operation for the graphics card, arranging all sprites that use each texture to be drawn together can result in better efficiency. However, this approach can make layered sprites be drawn out-of-order. Thus, when possible it is better to use texture atlases to minimize texture swaps.
The SpriteBatch.Begin() has additional settings that can be overridden - we’ll examine some of these in the lessons to come.
In this section we discussed the history of sprite implementations in video games, and saw the specific methods employed by MonoGame - textured quads rendered using the 3D hardware, and abstracted through the interface supplied by the SpriteBatch class. We saw how textures can be rendered as sprites through SpriteBatch.Draw() calls, and how those calls can be customized to position, scale, rotate, recolor, and order the sprites.
We also saw how to optimize our sprite usage with texture atlases, where multiple sprite images are placed in a single texture, and drawn by specifying a source rectangle. We also saw how this approach can be used to create sprite animation by combining a texture atlas populated with frames of animation with a timer controlling which frame of the animation is displayed.
We also saw how the SpriteBatch and content pipeline provide a means for transforming a modern font into a bitmap font that can be utilized within our games to draw arbitrary strings. We also saw that these can also be customized similar to regular sprites. Finally, we examined the various sorting modes available with the SpriteSortMode enum.