SpriteBatch Transforms
Moving in place…
Moving in place…
When we introduced the SpriteBatch, we mentioned that the SpriteBatch.Begin() had some additional arguments we could take advantage of. One of these is for a transformation matrix. This is a matrix that represents the transformation applied to convert the 3D world representation into two dimensions (remember, in MonoGame we’re using 3D hardware to render a 2D game). For many games, the default setting for this transformation matrix is fine - but if we override this, we can create many powerful effects, including:
Before we delve into using the SpriteBatch, let’s quickly revisit the concept of Transformations using Matrices. Our MonoGame games use 3D hardware to render 2D scenes, and the individual sprites are represented as textured quads - a polygon consisting of two triangles arranged in a rectangle. The SpriteBatch computes the coordinates of the corners of this quad from the SpriteBatch.Draw() parameters. These vectors are then transformed for the final drawing process by multiplying them by a matrix specified in the SpriteBatch.Begin() method.
By default, the matrix used by the SpriteBatch is the identity matrix:
Any vector multiplied by this matrix will be the same vector (This is why it is called the identity matrix, by the way):
$$ V_i = V_0 * I = \begin{vmatrix} 4 \\\ 3 \\\ 8 \\\ 1\end{vmatrix} * \begin{vmatrix} 1 & 0 & 0 & 0 \\\ 0 & 1 & 0 & 0 \\\ 0 & 0 & 1 & 0 \\\ 0 & 0 & 0 & 1 \end{vmatrix} = \begin{vmatrix}4 \\\ 3 \\\ 8 \\\ 1 \end{vmatrix} $$But we can substitute a different matrix for the identity matrix. The most common includes scaling, translation, and rotation matrices. While it is possible to define the transformation matrices by hand by calling the Matrix constructor, MonoGame provides several methods for creating specific transformation matrices.
A Scale matrix is similar to the Identity matrix, but instead of 1s on the diagonal, it provides scaling values:
$$ S = \begin{vmatrix} x & 0 & 0 & 0 \\\ 0 & y & 0 & 0 \\\ 0 & 0 & z & 0 \\\ 0 & 0 & 0 & 1 \end{vmatrix} $$Any vector multiplied by this matrix will have its components scaled correspondingly:
$$ V_s = V_0 * S = \begin{vmatrix} 4\\\ 3\\\ 8\\\ 1\end{vmatrix} * \begin{vmatrix} x & 0 & 0 & 0\\\ 0 & y & 0 & 0 \\\ 0 & 0 & z & 0 \\\ 0 & 0 & 0 & 1 \end{vmatrix} = \begin{vmatrix}4x\\\ 3y\\\ 8z\\\ 1\end{vmatrix} $$In MonoGame, a scale matrix can be created with one of the following methods:
Matrix.CreateScale(float x, float y, float z) - A scaling matrix using x, y, and z to scale in the corresponding axesMatrix.CreateScale(Vector3 scale) - A scaling matrix using the x, y, and z components of the Vector3 to scale in the corresponding axesMatrix.CreateScale(float scale) - A scaling matrix that scales equally along the x, y, and z axis by the scale providedA Translation matrix also begins with an identity matrix, and adds translation values in the x, y, and z in the fourth row (which is why transforms for 3D math use 4x4 matrices):
$$ T = \begin{vmatrix} 1 & 0 & 0 & 0\\\ 0 & 1 & 0 & 0 \\\ 0 & 0 & 1 & 0 \\\ t_x & t_y & t_z & 1 \end{vmatrix} $$Any vector multiplied by this matrix will have its components translated accordingly:
$$ V_t = V_0 * T = \begin{vmatrix}4\\\ 3\\\ 8\\\ 1\end{vmatrix} * \begin{vmatrix} 1 & 0 & 0 & 0\\\ 0 & 1 & 0 & 0 \\\ 0 & 0 & 1 & 0 \\\ t_x & t_y & t_z & 1 \end{vmatrix} = \begin{vmatrix}4+t_x\\\ 3+t_y\\\ 8+t_z\\\ 1\end{vmatrix} $$A rotation matrix is a bit more involved, and there are separate matrices for each primary axis. In a 2D game, we typically only rotate around the z-axis, whose rotation matrix is:
$$ R_z = \begin{vmatrix} \cos{\theta} & \sin{\theta} & 0 & 0\\\ -\sin{\theta} & \cos{\theta} & 0 & 0 \\\ 0 & 0 & 1 & 0 \\\ 0 & 0 & 0 & 1 \end{vmatrix} $$Here $ \theta $ is the rotation measured in radians in the clockwise direction.
In MonoGame, a z-Rotation matrix can be created with one of the following method:
Matrix.CreateRotationZ(float angle) - A rotation matrix about the z-axis using the supplied angleAdditionally, rotations about the x and y axes can be created with:
Matrix.CreateRotationX(float angle) - A rotation matrix about the x-axis using the supplied angleMatrix.CreateRotationY(float angle) - A rotation matrix about the y-axis using the supplied angleMoreover, we can combine multiple operations by multiplying their matrices together. I.e. given the translation matrix $ T $ and the rotation matrix $ R $, we could apply the translation followed by the rotation by computing a composite matrix $ C $ that combines the operations:
$$ C = T * R $$In MonoGame we can multiply matrices with Matrix.Multiply() or by using the * operator. I.e. to perform the translation described above we could use either:
var compositeTransform = Matrix.Multiply(Matrix.CreateTranslation(x, y, z), Matrix.CreateRotation(angle));or
var translation = Matrix.CreateTranslation(x, y, z);
var rotation = Matrix.CreateRotation(angle);
var compositeTransform = translation * rotation;The order the matrices are concatenated in determines the order in which the operations are performed! DirectX (and hence, MonoGame) uses left-to-right order, i.e. the leftmost matrix effect happens first, and the rightmost last.
Now let’s put this knowledge of transforms to practical use.
Perhaps the most common use of transforms with the sprite batch is to support screen scrolling, i.e. shifting the viewport (the visible part of the game world) around to allow for larger game worlds.
Consider what it would take to shift the game world using just what we’ve learned about sprites. We’d need to keep track of an offset for where the viewport begins relative to the world:
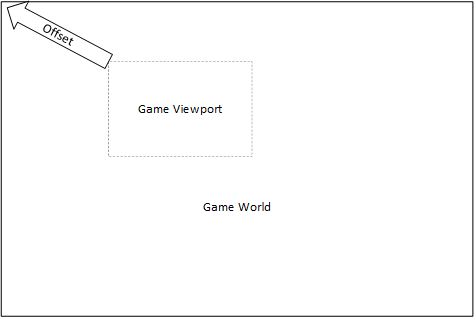
Then, when we draw our game objects (like sprites), we’d need to add this offset vector to the position of each as we draw them:
public void Draw(GameTime gameTime)
{
    spriteBatch.Begin();
    foreach(var sprite in Sprites)
    {
        spriteBatch.Draw(sprite.Texture, sprite.Position + offset, Color.White);
    }
    spriteBatch.End();
}
This doesn’t look too bad… but what about when we use a different SpriteBatch.Draw() override? Or we position some sprites with a Rectangle instead of a Vector2? We now need to start handling special cases, which can make our code quite a bit more complex and difficult to read.
However, the SpriteBatch.Begin() call takes an optional transformation matrix as a parameter, and applies its transform to all sprites drawn within the batch. Thus, we can create a single transformation matrix to represent our offset, and apply it to the SpriteBatch. Then we can use whatever SpriteBatch.Draw() override we want, and we don’t need to worry about adjusting positioning of sprites - we just draw them where they go in the world, and the SpriteBatch only draws the portion of the world we want to show:
public void Draw(GameTime gameTime)
{
    // Create the translation matrix representing the offset
    Matrix transform = Matrix.CreateTranslation(offset.X, offset.Y, 0);
    // Draw the transformed game world
    spriteBatch.Begin(transformMatrix: transform);
    // TODO: Draw game sprites within the world, however you need to.
    spriteBatch.End();
}To build an auto-scrolling game (one where the screen is constantly scrolling at a set speed), you simply need to update the offset vector every frame, just as you would any moving object. For example, to auto-scroll the screen vertically at a constant speed, we could use:
public void Draw(GameTime gameTime)
{
    // Vertical auto-scrolling
    offset.Y += Vector2.UnitY * (float)gameTime.ElapsedGameTime.TotalSeconds * SCROLL_SPEED;

    // Create the translation matrix representing the offset
    Matrix transform = Matrix.CreateTranslation(offset.X, offset.Y, 0);
    // Draw the transformed game world
    spriteBatch.Begin(transformMatrix: transform);
    // TODO: Draw game sprites within the world, however you need to.
    spriteBatch.End();
}
You can of course vary the scrolling speed as well - perhaps scrolling faster as the game progresses, or varying scrolling speed based on some player state (like firing thrusters).
A second possibility is to keep the player centered in the screen by scrolling the world around them. For this, you need to know a vector from the player to the origin of the screen (PlayerOffset) and the position of the player in the world (PlayerPosition). The ViewportOffset is the difference of these:
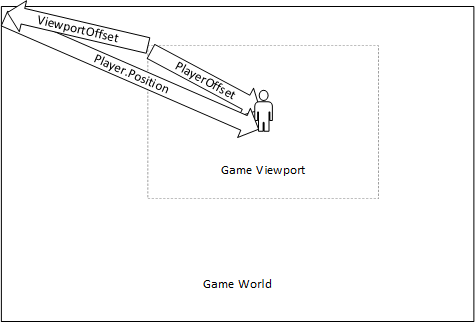
Thus, each frame you update the offset vector based on the offset and the player’s current position in the world:
public void Draw(GameTime gameTime)
{
// Player-synched scrolling
offset = PlayerOffset - Player.Position;
// Create the translation matrix representing the offset
Matrix transform = Matrix.CreateTranslation(offset.X, offset.Y, 0);
// Draw the transformed game world
spriteBatch.Begin(transformMatrix: transform);
// TODO: Draw game sprites within the world, however you need to.
spriteBatch.End();
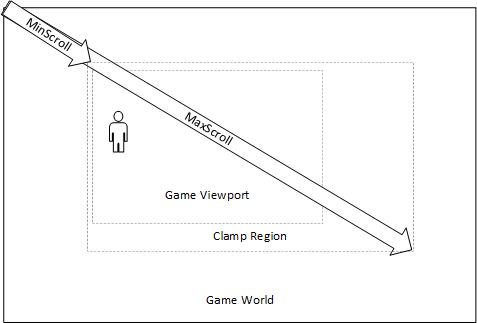
}If we want our player to be able to reach the edge of the screen without the “blank space” at the edge of the game world showing, we can clamp the offset vector to a region defined by a MinScroll and MaxScroll vector:
public void Draw(GameTime gameTime)
{
    // Player-synched scrolling
    offset = Player.Position - PlayerOffset;
    // Clamp the resulting vector to the visible region
    offset = Vector2.Clamp(offset, MinScroll, MaxScroll);

    // Create the translation matrix representing the offset
    Matrix transform = Matrix.CreateTranslation(offset.X, offset.Y, 0);
    // Draw the transformed game world
    spriteBatch.Begin(transformMatrix: transform);
    // TODO: Draw game sprites within the world, however you need to.
    spriteBatch.End();
}Regardless of how we determine what part of the game world is visible, we only need to draw the content (i.e. sprites) that fall within that region. If we invoke SpriteBatch.Draw() for items that fall off-screen, we create extra, unnecessary work. It can be helpful to use some form of the Spatial Partition Pattern to identify the objects that fall on-screen, and only attempt to draw those.
Once we have spatial partitioning set up, we may also choose to only update game objects that fall on-screen (or near to the screen) as a further optimization.
A further refinement of screen scrolling is parallax scrolling, where we seek to emulate depth in our world by scrolling different layers of the game at different speeds, as shown in this example:

This mimics our perceptions of the world - think to the last time you took a long car trip. How quickly did objects in the distance seem to move relative to your car? How about nearer objects (i.e. fenceposts or power poles)? And how large did each seem?
Essentially, objects in the distance seem both smaller and to move slower relative to our position than nearer objects. To accomplish parallax scrolling we break our game sprites into different layers, and render each layer using a different SpriteBatch batch, i.e.:
public void Draw(GameTime gameTime)
{
    // Create the translation matrix representing the first layer's offset
    Matrix transform = Matrix.CreateTranslation(offset[2].X, offset[2].Y, 0);
    // Draw the transformed game world
    spriteBatch.Begin(transformMatrix: transform);
    // TODO: Draw third layer's sprites
    spriteBatch.End();

    // Create the translation matrix representing the second layer's offset
    Matrix transform = Matrix.CreateTranslation(offset[1].X, offset[1].Y, 0);
    // Draw the transformed game world
    spriteBatch.Begin(transformMatrix: transform);
    // TODO: Draw second layer's sprites
    spriteBatch.End();

    // Create the translation matrix representing the first layer's offset
    Matrix transform = Matrix.CreateTranslation(offset[0].X, offset[0].Y, 0);
    // Draw the transformed game world
    spriteBatch.Begin(transformMatrix: transform);
    // TODO: Draw first layer's sprites
    spriteBatch.End();
}
Unless we are using a SpriteSortMode that sorts sprites by depth values (i.e. SpriteSort.BackToFront or SpriteSort.FrontToBack), it is important that we draw the rearmost layer first, and then the layers in front. The above example assumes that layer 0 is the front-most layer.
The offset vector for the layer in which the player is drawn is determined similarly to the offset for regular screen scrolling. The remaining offset vectors are scaled from this vector. Layers behind the player are scrolled at a slower speed, and hence scaled to be smaller. So if in our example the player is in layer 0, we would update our offsets accordingly - maybe the second layer scrolls at 2/3 speed, and the rearmost at 1/3 speed:
public void Draw(GameTime gameTime)
{
    // assuming offset is the calculated offset

    offsets[0] = offset;
    offsets[1] = 0.666f * offset; // 1/3 the main layer's speed
    offsets[2] = 0.333f * offset; // 2/3 the main layer's speed

    // Create the translation matrix representing the first layer's offset
    Matrix transform = Matrix.CreateTranslation(offset[2].X, offset[2].Y, 0);
    // Draw the transformed game world
    spriteBatch.Begin(transformMatrix: transform);
    // TODO: Draw third layer's sprites
    spriteBatch.End();

    // Create the translation matrix representing the second layer's offset
    Matrix transform = Matrix.CreateTranslation(offset[1].X, offset[1].Y, 0);
    // Draw the transformed game world
    spriteBatch.Begin(transformMatrix: transform);
    // TODO: Draw second layer's sprites
    spriteBatch.End();

    // Create the translation matrix representing the first layer's offset
    Matrix transform = Matrix.CreateTranslation(offset[0].X, offset[0].Y, 0);
    // Draw the transformed game world
    spriteBatch.Begin(transformMatrix: transform);
    // TODO: Draw first layer's sprites
    spriteBatch.End();
}
Similarly, if you add layers in front of the player are scrolled faster, and hence should be larger.
If your art is not drawn pre-scaled for the layer we are using it on, we can combine the translation operation with a scaling operation by concatenating two matrices. This also has the practical benefit of scaling the scrolling speed in the same operation (and thus, you only need a single offset vector). Thus, the above example would be refactored as:
public void Draw(GameTime gameTime)
{
    // assuming offset is the calculated offset

    // Create the translation matrix representing the third layer's offset and resizing
    Matrix transform = Matrix.CreateTranslation(offset.X, offset.Y, 0) * Matrix.CreateScale(0.333f);
    // Draw the transformed game world
    spriteBatch.Begin(transformMatrix: transform);
    // TODO: Draw third layer's sprites
    spriteBatch.End();

    // Create the translation and scale matrix representing the second layer's offset and resizing
    Matrix transform = Matrix.CreateTranslation(offset[1].X, offset[1].Y, 0) * Matrix.CreateScale(0.666f);
    // Draw the transformed game world
    spriteBatch.Begin(transformMatrix: transform);
    // TODO: Draw second layer's sprites
    spriteBatch.End();

    // Create the translation matrix representing the first layer's offset
    Matrix transform = Matrix.CreateTranslation(offset.X, offset.Y, 0);
    // Draw the transformed game world
    spriteBatch.Begin(transformMatrix: transform);
    // TODO: Draw first layer's sprites
    spriteBatch.End();
}
Note that this approach assumes all art is drawn to the same scale, thus, a background that is scaled in half needs to be twice as big as the foreground! For this reason, we don’t normally see this version used outside of tile maps. However, with tiles it can maximize the use of tile resources at little extra cost. We’ll explore the use of tile maps in an upcoming chapter.
One of the challenges of creating a computer game in the modern day is deciding the resolution you will display the game at. We discussed this previously in our coverage of the game window. But instead of forcing a single resolution, we can instead use a scaling matrix with our SpriteBatch.Begin() call to adapt to the monitor resolution.
Let’s begin by assuming we want to display our game full-screen using the monitor’s default resolution. We can get this from the GraphicsAdapter class (which represents the graphics hardware), and then use that as our preferred back buffer width and height. This code in the constructor will accomplish this goal:
// Use full-screen at screen resolution
DisplayMode screen = GraphicsAdapter.DefaultAdapter.CurrentDisplayMode;
_graphics.IsFullScreen = true;
_graphics.PreferredBackBufferWidth = screen.Width;
_graphics.PreferredBackBufferHeight = screen.Height;
Note that if you do this later (i.e. not in your Game class constructor), you’ll need to also apply your changes with:
_graphics.ApplyChanges();This is because as the game is constructed, the graphics device has not yet been initialized. But once it is initialized, it will have to be reset.
Next you need to decide at what resolution you will design the game for. This resolution is the size of your viewport as you are calculating it relative to the game world. So if your entire world should be displayed on-screen, this is the size of the world. This also determines the ideal dimensions of your sprites and other art in the game - these should all be drawn based on the design resolution.
Ideally, you want your design resolution to be close to the resolution you expect your game to be displayed most commonly, as the game will be scaled to account for any difference between the monitor and game resolution. You might consider one of the common television resolutions:
You probably want to pick a resolution equal or smaller than your lower-end target devices, as this means your assets will also be designed at a smaller resolution (and therefore require less memory to store). When rendering your game, you will scale the game up to the actual device resolution.
Now, there are two primary strategies we might want to use for this scaling - scaling our game so that it fits or fills the available screen real estate. If we are fitting to the screen, and our game uses a different aspect ratio than the monitor, we will have letterboxing (black bars on either the top and bottom or left and right sides of the screen). Alternatively, if we are filling the screen and the aspect ratios don’t match, then part of the game scene will not appear on-screen.
To fit the screen, we need to scale the game until the bigger dimension matches the corresponding screen dimension. Then we need to translate our game so it is centered in the other dimension. Which dimension is bigger depends on the aspect ratios of both your game and screen. Once we know the larger dimension (our primary dimension), we determine a scaling factor by dividing the corresponding screen dimension by the corresponding game dimension:
$$ scale = \frac{screen_{primary}}{game_{primary}} $$We will scale both game dimensions using this scaling factor, so that our game maintains its aspect ratio. If we wish our screen to be centered in the other dimension, we’ll need to calculate an offset based on the other dimension (accounting for the scaling of the game screen):
$$ offset_{other} = \frac{(screen_{other} - game_{other} * scale)}{2} $$We divide the leftover space in half, which determines how far down or over on the screen we need to start rendering our game.
To accomplish this in MonoGame, we might use:
 if (screen.AspectRatio < game.AspectRatio)
{
    // letterbox vertically
    // Scale game to screen width
    _gameScale = (float)screen.Width / game.Width;
    // translate vertically
    _gameOffset.Y = (screen.Height - game.Height * _gameScale) / 2f;
    _gameOffset.X = 0;
}
else
{
    // letterbox horizontally
    // Scale game to screen height
    _gameScale = (float)screen.Height / game.Height;
    // translate horizontally
    _gameOffset.X = (screen.Width - game.Width * _gameScale) / 2f;
    _gameOffset.Y = 0;
}If instead we wish to fill all available screen space, and our aspect ratios of the game and screen do not match, some of the game will fall off-screen and not be visible. The process is very similar - first we determine our primary dimension (which is now the smaller dimension - opposite of the scale to fill approach). Once we know it, we calculate the scale the same way:
$$ scale = \frac{screen_{primary}}{game_{primary}} $$And we calculate the offset in the other dimension the same way as well:
$$ offset_{other} = \frac{(screen_{other} - game_{other} * scale)}{2} $$Note that in this case, because the scaled game is larger in the other dimension, this offset is negative.
Example code for MonoGame:
// 1. Determine which dimension must overflow screen
if(screen.AspectRatio < game.AspectRatio)
{
    // overflow horizontally
    // Scale game to screen height
    _gameScale = (float)screen.Height / game.Height;
    // translate horizontally
    _gameOffset.X = (screen.Width - game.Width * _gameScale) / 2f;
    _gameOffset.Y = 0;
}
else
{
    // overflow vertically
    // Scale game to screen width
    _gameScale = (float)screen.Width / game.Width;
    // translate vertically
    _gameOffset.Y = (screen.Height - game.Height * _gameScale) / 2f;
    _gameOffset.X = 0;
}Once we’ve calculated our scale and offset, we can use these when invoking SpriteBatch.Begin() to automatically scale and position the game within the available screen real estate. We first must create a scaling matrix, which will scale up the game scene to our screen, and then we must translate based on our calculated offset to position the game screen within the screen:
 // Determine the necessary transform to scale and position game on-screen
Matrix transform =
    Matrix.CreateScale(_gameScale) * // Scale the game to screen size
    Matrix.CreateTranslation(_gameOffset.X, _gameOffset.Y, 0); // Translate game to letterbox position
Then we can apply this transformation to any SpriteBatch.Begin() call used to render game sprites:
// Draw the game using SpriteBatch
_spriteBatch.Begin(transformMatrix: transform);
   //TODO: Draw Calls
_spriteBatch.End();Note that you may choose to not transform and scale some SpriteBatch operations - such as when drawing your GUI. You can use a separate batch for those (but remember, the bounds of the screen viewport may be different depending on your screen resolution, so you may want to position elements relative to the available space). Or, you could use the scale-to-fill strategy for your game and the scale-to-fit strategy for your GUI.
Another alternative is that instead of determining the resolution based on the graphics adapter default, you can allow the user to select resolutions from a menu.
I’ve posted an example project that allows you to explore these concepts on GitHub: https://github.com/zombiepaladin/scale-to-screen
While the discussion here focused on games which are sized to the screen, it can also apply to games in which the world is larger than the screen, and the displayed portions of the game scroll with the player. In those cases, you still need to define your game’s design resolution, which determines how much of the game will appear on-screen at any given time.
You just need to combine the ideas from this approach with those handling scrolling, which we’ll talk about next.
In addition to the more practical uses like scrolling, combining matrix transformations with the SpriteBatch can be used to create a variety of special effects, i.e. zooming into and out of the scene, rotating game worlds, screen shaking, and probably many others.
To zoom into the scene, we simply scale up all the elements. However, we need this scaling to occur from the center of the viewport (the part of the game we see). If we simply used a scale matrix, the scaling would be centered on the world origin, so we would end up displaying a different part of the world.
Consider two maps - one at twice the scale of the first. If you laid the two maps so that the the two upper-left hand corners were aligned, and then put a pin through a city in the smaller map, the corresponding city in the larger map would actually be to the right and below the pin. Instead of lining up the corners, you would need to line up the two cities.
We can do the same thing in MonoGame by translating everything in our world so that the origin is now at the center of our screen. Consider the case where our game’s viewport is 760x480, and the distance it’s top-left corner is from the origin of the world is represented by the offset vector. We can create a translation matrix that would move the center of that viewport to the origin with:
Matrix zoomTranslation = Matrix.CreateTranslation(-offset.X - 760f/2, -offset.Y - 480f/2, 0);And our scale matrix with:
Matrix zoomScale = Matrix.CreateScale(zoom);Where zoom is our zoom factor (1.0f indicating no zoom, > 1 indicating zooming in, and < 1 indicating zooming out).
The transformation matrix we would use to zoom would then be the translation matrix multiplied by our scale matrix, then multiplied by the inverse of the translation matrix. Basically, we move the world to the origin, scale, and then move it back:
Matrix zoomTransform = zoomTranslation * zoomScale * Matrix.Invert(zoomTranslation);We can then plug this matrix into our SpriteBatch.Begin() method as the transformMatrix parameter:
_spriteBatch.Draw(transformMatrix: zoomTransform);Another interesting technique is to spin the game world. For example, we might have a platform-style game where the player walks around a rotating planetoid. For this, we simply use a rotation matrix. But, as with scaling, we need to first translate the world to the origin of our rotation (the center of our planetoid), rotate, and translate back:
Matrix spinTranslation = Matrix.CreateTranslation(-860, -908, 0);
Matrix spinRotation = Matrix.CreateRotationZ(_rotation);
Matrix spinTransform = spinTranslation * spinRotation * Matrix.Invert(spinTranslation);A third technique that can create an interesting effect is to shake the game world. This could be used to visually represent an earthquake, rocket launch, or other intense action. Basically we want to create small changes in the position of the viewport each frame. This could be done completely randomly, but using a function like $ sine $ or $ cosine $ yields more predictable results (remember, the output of these functions falls the range $ (-1 .. 1) $ and are the inverse of the other).
We can combine those functions with a timer to create a shaking effect, i.e.:
Matrix shakeTransform = Matrix.Identity;
if (_shaking)
{
    _shakeTime += (float)gameTime.ElapsedGameTime.TotalMilliseconds;
    shakeTransform = Matrix.CreateTranslation(10 * MathF.Sin(_shakeTime), 10 * MathF.Cos(_shakeTime), 0);
    if (_shakeTime > 3000) _shaking = false;
}
Will create a three-second shaking of the screen, when the resulting translation matrix is use with the SpriteBatch. This results in a 20-pixel variation on the position items are rendered in the game world. You could elaborate upon this simple technique by applying easing (making the magnitude of the shake grow and fall during the shake duration).
You can of course combine these effects into a composite operation. I’ve posted an example project doing just that on GitHub: https://github.com/zombiepaladin/spritebatch-transform-special-effects for your perusal. And this is just a small sampling of what you could possibly do.
In this chapter we explored using the transformMatrix parameter of SpriteBatch.Begin() to apply a transformation matrix to an entire batch of sprites we are rendering. This provides us with an easy mechanism for implementing a scrolling world in our games. We also looked at how we could clamp that scrolling to keep the edges of the game world on-screen.
Building upon the scrolling idea, we also examined parallax scrolling, where we create the illusion of depth by scrolling multiple layers at different speeds. When implemented with SpriteBatch, each layer used a different batch of sprites and its own transform matrix.
We also explored other ideas for manipulating the SpriteBatch transform, including effects like zooming, spinning the game world, and shaking the scene. We saw how these could be combined through simple matrix multiplication to create composite effects.
Finally, we saw how we could use scaling to adapt our game to any monitor resolution while preserving our games’ designed aspect ratio.