Tile Maps
I feel like we’ve passed that tree before…
I feel like we’ve passed that tree before…
While the earliest video games often featured worlds that were sized to the dimensions of the screen, it was not long before game worlds were to grow larger. This brought serious challenges to game development, as the platforms of the time did not have very large memory resources to draw upon.
A similar problem existed in storing raster images in early computers, where memory space was a premium. Remember, raster images have three or four color channels - Red, Green, Blue, and sometimes Alpha. If each channel is 8 bits, and an image is 13 x 21 pixels like the one below, our total memory consumption would be 8 x 4 x 13 x 21 = 8,736 bits, about 1 KB. But the image only contains three colors! Given that, can you think of a way to represent it with a smaller memory footprint?
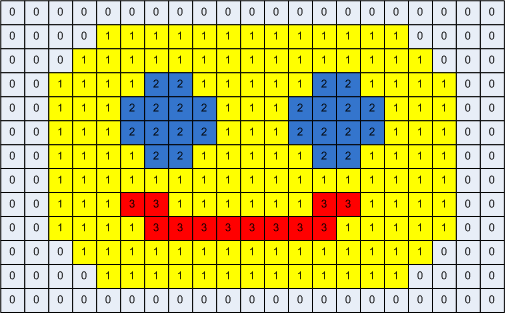
The answer they adopted was the use of a color palette, a collection of 8, 16, or 32 colors. This collection was 0-indexed (so the first color was represented by a 0, the next by a 1, and so on…). This meant you needed to sore 8 x 4 x 8 = 245 bits for a 8-color palette, and the actual image could be represented as a list of 3-bit color keys (3 bits can represent 0-7, the full range of keys for a 8-color palette). So we only need an additional 3 x 13 x 21 = 819 bits to represent the image data. The actual image therefore could be represented by only 1,064 bits - about 1/8th a KB. The memory savings grow larger the larger the image represented.
With the concept of palettized image formats in mind, let’s look at an example of an early game - Super Mario Bros. Do you notice anything about the game world that harkens back to our earlier use of palettes?
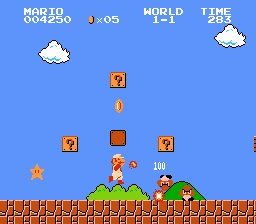
Notice how so much of the scene seems to be the same texture repeated? Much like the color palette applies a collection of colors on a regular grid, a tile engine applies a collection of tile textures on a regular grid. This allows a large level to be drawn with only a handful of textures. Moreover, these textures are typically stored in a texture atlas (i.e. all the tiles appear in a single texture).
Let’s look at how we can implement this strategy in our own games.
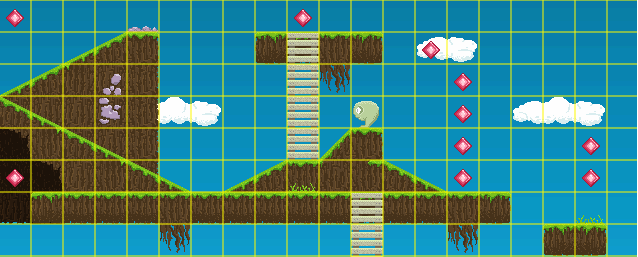
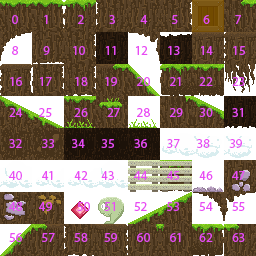
Let’s start from a purely conceptual level, with some diagrams using tile assets created by Eris available from OpenGameArt. A tile map could be thought of as a grid of tiles, as demonstrated in this image:
Along with the map is the tile set, which defines the individual tiles that can be used within the map, i.e.:
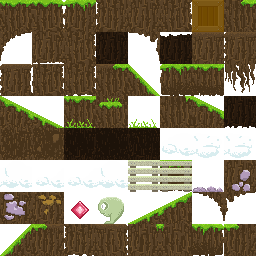
We assign a number to each tile in the tile set:
We can then specify what tile fills a grid cell in the tile map with the same number, i.e.:
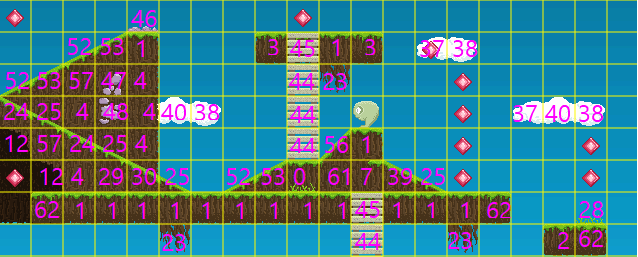
You can see that a relatively complex map can be quickly assembled from a relative handful of tiles. Looking at the image above, you may naturally consider a 2-dimensional array:
int map = new int[,]
{
  {-1,-1,-1,-1,46,-1,-1,-1,-1,-1,-1,-1,-1,-1,-1,-1,-1,-1,-1,-1},
  {-1,-1,52,53, 1,-1,-1,-1, 3,45, 1, 3,-1,37,38,-1,-1,-1,-1,-1},
  {52,53,57,47, 4,-1,-1,-1,-1,44,23,-1,-1,-1,-1,-1,-1,-1,-1,-1},
  {24,25, 4,48, 4,40,38,-1,-1,44,-1,-1,-1,-1,-1,-1,37,40,38,-1}
  {12,57,24,25, 4,-1,-1,-1,-1,44,56, 1,-1,-1,-1,-1,-1,-1,-1,-1},
  {-1,12, 4,29,30,25,-1,52,53, 0,61, 7,39,25,-1,-1,-1,-1,-1,-1},
  {-1,62, 1, 1, 1, 1, 1, 1, 1, 1, 1,45, 1, 1, 1,62,-1,-1,28,-1},
  {-1,-1,-1,-1,-1,23,-1,-1,-1,-1,-1,44,-1,-1,23,-1,-1, 2,62,-1}
}
And to draw the map, we would iterate over this array, drawing the corresponding tile from the tileset:
for(int x = 0; x < map.GetLength(0); x++)
{
  for(int y = 0; y < map.GetLength(1); y++)
  {
    int tileIndex = map[x,y];
    if(tileIndex == -1) continue; // -1 indicates no tile, so skip drawing
    DrawTile(x, y, tileIndex);
  }
}
So you can see we need to implement classes corresponding to 1) the set of available tiles, and 2) the tile map, which is really just a collection of indices for the tile set. But before we do that, we need to discuss 2d and 1d arrays in a bit more detail.
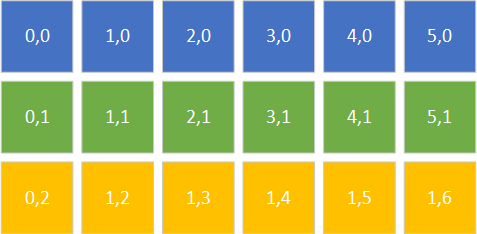
Let’s talk briefly about how a 2d array is actually stored in memory. We like to think of it as looking something like this visualization:
But in reality, it is stored linearly, like this:

To access a particular element in the array, the 2d coordinates must be transformed into a 1d index. Note that each row follows the proceeding rows, so the starting index of each row would be the width of the row, plus the x-coordinate, i.e. the index of $ (3,1) $ would be $ 1 * width + 3 $:

This can be generalized into the equation:
$$ i = y * width + x $$And the reverse operation, converting an index into 2d coordinates, would be:
$$ x = i \\\% width $$ $$ y = i / width $$
Note that we are using integer division and modulus in these equations, as the $ y $ value is the number of full rows (i.e. $ width $), and the $ y $ is the distance into the partial row (i.e. the remainder).
Thus, all we need to treat a 1d array as a 2d array (in addition to the data) is the width of the array. The height is only needed to calculate the array size (and thus the upper bound), which would be:
$$ size = width * height $$The C# Multidimensional Array simply builds on this concept, wrapping the array data in an object (note that for each dimension, you will have a corresponding size for that dimension, i.e. width, height, and depth for a 3d array).
Now, a note on efficiency - iterating through a C# multi-dimensional array is slower than the corresponding 1d array, as the interpreter optimizes 1d array operations (see What is Faster In C#: An int[] or an int[,] for a technical discussion of why). With that in mind, for a game we’ll always want to use a 1d array to represent 2d data.
A second note on efficiency. The order in which you iterate over the array also has an impact on efficiency. Consider an arbitrary 2d array arr implemented as a 1d array with width and height.
What would be the difference between loop 1:
int sum = 0;
for(int x = 0; x < width; x++)
{
  for(int y = 0; y < height; y++)
  {
    sum += arr[y * width + x]
  }
}
And loop 2:
int sum = 0;
for(int y = 0; y < height; y++)
{
  for(int x = 0; x < width; x++)
  {
    sum += arr[y * width + x]
  }
}
You probably would think they are effectively the same, and logically they are - they both will compute the sum of all the elements in the array. But loop 2 will potentially run much faster. The reason comes down to a hardware detail - how RAM and the L2 and L1 caches interact.
When you load a variable into a hardware register to do a calculation, it is loaded from RAM. But as it is loaded, the memory containing it, and some of the memory around it is also loaded into the L2 and L1 caches. If the next value in memory you try to access is cached, then it can be loaded from the cache instead of RAM. This makes the operation much faster, as the L2 and L1 caches are located quite close to the CPU, and RAM is a good distance away (possibly many inches!).
Consider the order in which loop 1 accesses the array. It first accesses the first element in the first row. Then the first element in the second row, and then the first element in the third row, then the second element in the first row, and so on… You can see this in the figure below:

Now, consider the same process for Loop 2:

Notice how all the memory access happens linearly? This makes the most efficient use of the cached data, and will perform much better when your array is large.
Now that we have a good sense of what a tile map consists of, as well as how to effectively use a 1-dimensional array as a 2-dimensional array, let’s discuss actual implementations. As we discussed conceptually, we need: 1) a set of tiles, and 2) the arrangement of those tiles into a map.
Let’s start by thinking about our tiles. To draw a tile, we need to know:
To determine this information, we need several other items:
And we can simplify the problem with some assumptions:
Given this understanding, we can determine some fields we’ll need to keep track of the data:
/// <summary>The map filename</summary>
private string _mapFilename;

/// <summary>The tileset texture</summary>
private Texture2D _tilesetTexture;

/// <summary>The map and tile dimensions</summary>
private int _tileWidth, _tileHeight, _mapWidth, _mapHeight;

/// <summary>The tileset data</summary>
private Rectangle[] _tiles;

/// <summary>The map data</summary>
private int[] _map;Now let’s turn our attention to how we can populate those fields. Let’s first consider how we might write the data for a tilemap in a text file:
tileset
64, 64
10, 10
3, 3, 3, 3, 3, 3, 3, 3, 3, 3, 4, 4, 4, 2, 2, 2, 2, 2, 2, 3, 3, 2, 4, 4, 1, 4, 2, 2, 2, 3, 3, 2, 2, 2, 2, 4, 4, 4, 2, 3, 3, 2, 2, 2, 2, 2, 2, 1, 2, 3, 3, 3, 1, 3, 2, 2, 2, 4, 4, 3, 3, 2, 2, 3, 2, 3, 2, 2, 4, 4, 3, 2, 2, 3, 2, 3, 2, 2, 2, 3, 3, 3, 3, 3, 3, 3, 2, 2, 2, 3, 3, 3, 3, 3, 3, 3, 3, 3, 3, 3
In this example, the first line is the name of the tileset image file (which is loaded through the content pipeline, so it has no extension). The second line is the width and height of a tile, and the third line is the width and height of the map (measured in tiles). The last line is the indices of the tiles from the tileset image.
Loading the data from this file requires a method like this:
public void LoadContent(ContentManager content)
{
    // Read in the map file
    string data = File.ReadAllText(Path.Join(content.RootDirectory, _mapFilename));
    var lines = data.Split('\n');

    // First line is tileset image file name
    var tilesetFileName = lines[0].Trim();
    _tilesetTexture = content.Load<Texture2D>(tilesetFileName);

    // Second line is tile size
    var secondLine = lines[1].Split(',');
    _tileWidth = int.Parse(secondLine[0]);
    _tileHeight = int.Parse(secondLine[1]);

    // Now that we know the tile size and tileset
    // image, we can determine tile bounds
    int tilesetColumns = _tilesetTexture.Width / _tileWidth;
    int tilesetRows = _tilesetTexture.Height / _tileWidth;
    _tiles = new Rectangle[tilesetColumns * tilesetRows];
    for (int y = 0; y < tilesetRows; y++)
    {
        for (int x = 0; x < tilesetColumns; x++)
        {
            _tiles[y * tilesetColumns + x] = new Rectangle(
                x * _tileWidth, // upper left-hand x cordinate
                y * _tileHeight, // upper left-hand y coordinate
                _tileWidth, // width
                _tileHeight // height
                );
        }
    }

    // Third line is map size (in tiles)
    var thirdLine = lines[2].Split(',');
    _mapWidth = int.Parse(thirdLine[0]);
    _mapHeight = int.Parse(thirdLine[1]);

    // Fourth line is map data
    _map = new int[_mapWidth * _mapHeight];
    var fourthLine = lines[3].Split(',');
    for(int i = 0; i < _mapWidth * _mapHeight; i++)
    {
        _map[i] = int.Parse(fourthLine[i]);
    }
}
While there is a lot going on here, it is also mostly basic File I/O based on the structure of the file.
Finally, drawing the map involves iterating over the data and invoking SpriteBatch.Draw() for each tile that needs drawn.
public void Draw(GameTime gameTime, SpriteBatch spriteBatch)
{
    for(int y = 0; y < _mapHeight; y++)
    {
        for(int x = 0; x < _mapWidth; x++)
        {
            // Indexes start at 1, so shift for array coordinates
            int index = _map[y * _mapWidth + x] - 1;
            // Index of -1 (shifted from 0) should not be drawn
            if (index == -1) continue;
            spriteBatch.Draw(
                _tilesetTexture,
                new Vector2(
                    x * _tileWidth,
                    y * _tileHeight
                ),
                _tiles[index],
                Color.White
            );
        }
    }
}
Organizing these fields and methods into a class gives us a simple tile engine. This can be expanded to address a lot of different games’ needs. However, it does require building the map file by hand, using raw tile indices. This gets challenging quickly, which leads us to our next topic - using a tilemap editor.
Once we start thinking in terms of large, complex maps editing the map by hand becomes a daunting task. Instead, we want a tool to edit the map visually. One of the best free tools to do so is the Tiled Map Editor. Tiled is free, open-source, and widely used in the games industry. It allows you to quickly create a tilemap by importing tilesets and drawing the map using a suite of visual tools. You can read more about Tiled and its functionality in the documentation and covered in this video series by GamesfromScratch.
However, it adds additional concepts to tile maps that we have not yet discussed.
Because Tiled is intended to be usable in a wide variety of games, it allows properties to be defined on almost everything. In Tiled, properties are simply key/value pairs, i.e. "Opacity" might be set to 0.5. There are no pre-defined keys, instead you decide what properties you need for your game. The properties are stored in collections, essentially a Dictionary<string, string>, which is how we’ll interpret them in our C# code.
Tilesets are implemented in a similar fashion to our earlier discussions, however:
Instead of a single 2d array of tiles, Tiled allows you to create maps with multiple layers, each with its own 2d array. This can be used in a variety of ways:
Conceptually, a map layer is implemented the same way as the simple tile map we discussed earlier. It is a 2d array of tile indices implemented as a 1d array, along with storing the width, height, and any properties that apply to the entire layer.
In addition to layers of tiles, Tiled also supports image and object layers.
An image layer represents an image that is not a tile. This can be used for large bitmaps that cover the entire layer, or smaller ones that appear in a particular spot. Images can also repeat to fill the layer or defined space.
In addition to tiles, and images, Tiled allows you to place “objects” in a map. These are represented by boxes that do not correspond to the grid system of the tiles. Objects are simply a rectangle plus properties, and can be used to represent anything you need to place in the game world - spawn positions, event triggers, doors, etc.
Objects are organized into object layers, which are essentially a collection of objects.
Tiled uses an XML file format, TMX. Thus, you can load a TMX file and then parse it with an XML parsing library. In fact, Tiled was released with an example engine that does this, created by Kevin Gadd. This was later converted into C# for use with XNA by Stephen Balanger and Zach Musgrave.
I further converted this for use with the current version of MonoGame, with additional documentation. It can be found on GitHub.
In this chapter we learned about tile maps, an important technique for creating large game worlds with small memory footprints. We also examined the Tiled map editor and saw an example of loading a Tiled map. However, this approach used traditional File I/O. In our next chapter, we’ll learn how to use the Content Pipeline to process the TMX file directly.