Lighting and Cameras
Lights, Camera, Action!

Lights, Camera, Action!
You’ve now seen how vertices are grouped into triangles and rendered using accelerated hardware, how we can use a mesh of triangles to represent more complex objects, and how we can apply a texture to that mesh to provide visual detail. Now we need to add light sources that can add shading to our models, and a camera which can be shared by all objects in a scene to provide a common view and projection matrix.
We’ll once again be working from a starter project, which provides our needed content resources. You can clone the starter from GitHub here: https://github.com/ksu-cis/lighting-and-cameras-starter
The first thing we’ll want to add is something to render. For this example we’ll employ a very common game prop - a crate. As you might expect, a crate is little more than a cube with a texture applied. However, we will need to make a few changes from our previous Cube class.
One of these is adding a texture - but we actually have three possible textures to choose from: “crate0_diffuse”, “crate1_diffuse”, and “crate2_diffuse”. Let’s make our single class represent all three possible crates, and use an enumeration to define which crate to create:
/// <summary>
/// The type of crate to create
/// </summary>
public enum CrateType
{
    Slats = 0,
    Cross,
    DarkCross
}
If we mark the first enum value as 0, then the second and third will be 1 and 2 respectively. Thus, we can convert an enum value into a filename through casting and concatenation: $"crate{(int)value}_diffuse". We’ll use this approach in our constructor.
Before we get to that, let’s definine the class and its fields:
/// <summary>
/// A class representing a crate
/// </summary>
public class Crate
{
    // The game this crate belongs to
    Game game;

    // The VertexBuffer of crate vertices
    VertexBuffer vertexBuffer;

    // The IndexBuffer defining the Crate's triangles
    IndexBuffer indexBuffer;

    // The effect to render the crate with
    BasicEffect effect;

    // The texture to apply to the crate
    Texture2D texture;
}
No surprises here - it looks very much like our prior shapes.
But we’ll use a different vertex format for our vertices, VertexPositionNormalTexture. This vertex includes a Position (a Vector3), a Normal (a Vector3 that is perpendicular to the surface at the vertex), and a TextureCoordinate (a Vector2):
    /// <summary>
    /// Initializes the vertex of the cube
    /// </summary>
    public void InitializeVertices()
    {
        var vertexData = new VertexPositionNormalTexture[] {
            // Front Face
            new VertexPositionNormalTexture() { Position = new Vector3(-1.0f, -1.0f, -1.0f), TextureCoordinate = new Vector2(0.0f, 1.0f), Normal = Vector3.Forward },
            new VertexPositionNormalTexture() { Position = new Vector3(-1.0f,  1.0f, -1.0f), TextureCoordinate = new Vector2(0.0f, 0.0f), Normal = Vector3.Forward },
            new VertexPositionNormalTexture() { Position = new Vector3( 1.0f,  1.0f, -1.0f), TextureCoordinate = new Vector2(1.0f, 0.0f), Normal = Vector3.Forward },
            new VertexPositionNormalTexture() { Position = new Vector3( 1.0f, -1.0f, -1.0f), TextureCoordinate = new Vector2(1.0f, 1.0f), Normal = Vector3.Forward },

            // Back Face
            new VertexPositionNormalTexture() { Position = new Vector3(-1.0f, -1.0f, 1.0f), TextureCoordinate = new Vector2(1.0f, 1.0f), Normal = Vector3.Backward },
            new VertexPositionNormalTexture() { Position = new Vector3( 1.0f, -1.0f, 1.0f), TextureCoordinate = new Vector2(0.0f, 1.0f), Normal = Vector3.Forward },
            new VertexPositionNormalTexture() { Position = new Vector3( 1.0f,  1.0f, 1.0f), TextureCoordinate = new Vector2(0.0f, 0.0f), Normal = Vector3.Forward },
            new VertexPositionNormalTexture() { Position = new Vector3(-1.0f,  1.0f, 1.0f), TextureCoordinate = new Vector2(1.0f, 0.0f), Normal = Vector3.Forward },

            // Top Face
            new VertexPositionNormalTexture() { Position = new Vector3(-1.0f, 1.0f, -1.0f), TextureCoordinate = new Vector2(0.0f, 1.0f), Normal = Vector3.Up },
            new VertexPositionNormalTexture() { Position = new Vector3(-1.0f, 1.0f,  1.0f), TextureCoordinate = new Vector2(0.0f, 0.0f), Normal = Vector3.Up },
            new VertexPositionNormalTexture() { Position = new Vector3( 1.0f, 1.0f,  1.0f), TextureCoordinate = new Vector2(1.0f, 0.0f), Normal = Vector3.Up },
            new VertexPositionNormalTexture() { Position = new Vector3( 1.0f, 1.0f, -1.0f), TextureCoordinate = new Vector2(1.0f, 1.0f), Normal = Vector3.Up },

            // Bottom Face
            new VertexPositionNormalTexture() { Position = new Vector3(-1.0f, -1.0f, -1.0f), TextureCoordinate = new Vector2(1.0f, 1.0f), Normal = Vector3.Down },
            new VertexPositionNormalTexture() { Position = new Vector3( 1.0f, -1.0f, -1.0f), TextureCoordinate = new Vector2(0.0f, 1.0f), Normal = Vector3.Down },
            new VertexPositionNormalTexture() { Position = new Vector3( 1.0f, -1.0f,  1.0f), TextureCoordinate = new Vector2(0.0f, 0.0f), Normal = Vector3.Down },
            new VertexPositionNormalTexture() { Position = new Vector3(-1.0f, -1.0f,  1.0f), TextureCoordinate = new Vector2(1.0f, 0.0f), Normal = Vector3.Down },

            // Left Face
            new VertexPositionNormalTexture() { Position = new Vector3(-1.0f, -1.0f,  1.0f), TextureCoordinate = new Vector2(0.0f, 1.0f), Normal = Vector3.Left },
            new VertexPositionNormalTexture() { Position = new Vector3(-1.0f,  1.0f,  1.0f), TextureCoordinate = new Vector2(0.0f, 0.0f), Normal = Vector3.Left },
            new VertexPositionNormalTexture() { Position = new Vector3(-1.0f,  1.0f, -1.0f), TextureCoordinate = new Vector2(1.0f, 0.0f), Normal = Vector3.Left },
            new VertexPositionNormalTexture() { Position = new Vector3(-1.0f, -1.0f, -1.0f), TextureCoordinate = new Vector2(1.0f, 1.0f), Normal = Vector3.Left },

            // Right Face
            new VertexPositionNormalTexture() { Position = new Vector3( 1.0f, -1.0f, -1.0f), TextureCoordinate = new Vector2(0.0f, 1.0f), Normal = Vector3.Right },
            new VertexPositionNormalTexture() { Position = new Vector3( 1.0f,  1.0f, -1.0f), TextureCoordinate = new Vector2(0.0f, 0.0f), Normal = Vector3.Right },
            new VertexPositionNormalTexture() { Position = new Vector3( 1.0f,  1.0f,  1.0f), TextureCoordinate = new Vector2(1.0f, 0.0f), Normal = Vector3.Right },
            new VertexPositionNormalTexture() { Position = new Vector3( 1.0f, -1.0f,  1.0f), TextureCoordinate = new Vector2(1.0f, 1.0f), Normal = Vector3.Right },
        };
        vertexBuffer = new VertexBuffer(game.GraphicsDevice, typeof(VertexPositionNormalTexture), vertexData.Length, BufferUsage.None);
        vertexBuffer.SetData<VertexPositionNormalTexture>(vertexData);
    }
Defining the vertices is not much differen than we did for our Cube, except that we now need to include texture coordinates. This does mean that we can no longer share vertices between faces, as they will have different texture coordinates. Similarly, the different faces have different normals, which are a vector out of the face - hence the Vector3.Up (0, 1, 0) for the top face, Vector3.Right (1, 0, 0) for the right face, and so on.
We’ll copy these values into our vertexBuffer for later use.
The index buffer is handled similarily:
    /// <summary>
    /// Initializes the Index Buffer
    /// </summary>
    public void InitializeIndices()
    {
        var indexData = new short[]
        {
            // Front face
            0, 2, 1,
            0, 3, 2,

            // Back face
            4, 6, 5,
            4, 7, 6,

            // Top face
            8, 10, 9,
            8, 11, 10,

            // Bottom face
            12, 14, 13,
            12, 15, 14,

            // Left face
            16, 18, 17,
            16, 19, 18,

            // Right face
            20, 22, 21,
            20, 23, 22
        };
        indexBuffer = new IndexBuffer(game.GraphicsDevice, IndexElementSize.SixteenBits, indexData.Length, BufferUsage.None);
        indexBuffer.SetData<short>(indexData);
}And our effect is handled as with the textured quad:
    /// <summary>
    /// Initializes the BasicEffect to render our crate
    /// </summary>
    void InitializeEffect()
    {
        effect = new BasicEffect(game.GraphicsDevice);
        effect.World = Matrix.CreateScale(2.0f);
        effect.View = Matrix.CreateLookAt(
            new Vector3(8, 9, 12), // The camera position
            new Vector3(0, 0, 0), // The camera target,
            Vector3.Up            // The camera up vector
        );
        effect.Projection = Matrix.CreatePerspectiveFieldOfView(
            MathHelper.PiOver4,                         // The field-of-view
            game.GraphicsDevice.Viewport.AspectRatio,   // The aspect ratio
            0.1f, // The near plane distance
            100.0f // The far plane distance
        );
        effect.TextureEnabled = true;
        effect.Texture = texture;
}As is drawing:
    /// <summary>
    /// Draws the crate
    /// </summary>
    public void Draw()
    {
        // apply the effect
        effect.CurrentTechnique.Passes[0].Apply();

        // set the vertex buffer
        game.GraphicsDevice.SetVertexBuffer(vertexBuffer);
        // set the index buffer
        game.GraphicsDevice.Indices = indexBuffer;
        // Draw the triangles
        game.GraphicsDevice.DrawIndexedPrimitives(
            PrimitiveType.TriangleList, // Tye type to draw
            0,                          // The first vertex to use
            0,                          // The first index to use
            12                          // the number of triangles to draw
        );
}When we construct the crate is where we see the next change - we’ll need to determine which texture to load:
    /// <summary>
    /// Creates a new crate instance
    /// </summary>
    /// <param name="game">The game this crate belongs to</param>
    /// <param name="type">The type of crate to use</param>
    public Crate(Game game, CrateType type)
    {
        this.game = game;
        this.texture = game.Content.Load<Texture2D>($"crate{(int)type}_diffuse");
        InitializeVertices();
        InitializeIndices();
        InitializeEffect();
}And, as before, we’ll add our crate to the game and draw it. We’ll need an instance variable:
    // our crate
    Crate crate;
Which we’ll initialize in Game.LoadContent():
    // initialize the crate
    crate = new Crate(this, CrateType.Slats);
And render in our Game.Draw() method:
crate.Draw();If you run the game now, you should see our crate appear!
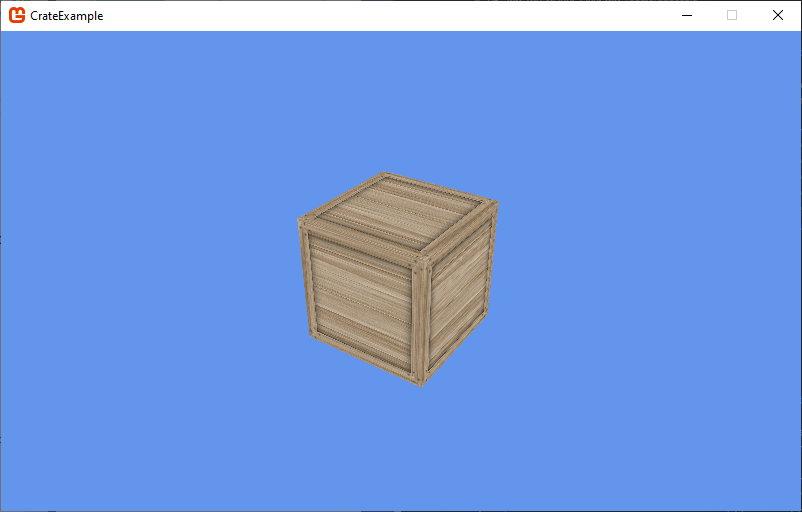
Well, we have a crate. Let’s make it more interesting by adding some lights. To start with, we’ll use the BasicEffect’s default lights. Add the line:
effect.EnableDefaultLighting();Into your Crate.IntializeEffect() method. Then run the program again. Notice a difference?
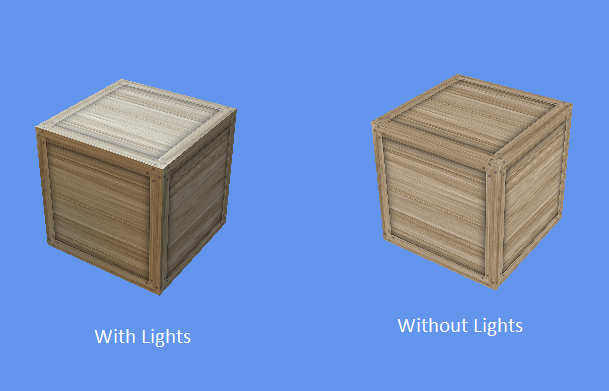 .
.
The default lighting is useful to quickly see what our object will look like illuminated, but ultimately, we’ll want to define our own lights and how they interact with our objects.
The BasicEffect uses the Phong shading model (named after its inventor, Bui Tuong Phong). This model approximates shading accounting for the smoothness of the object. It uses an equation to calculate the color of each pixel. This equation appears in the image below:
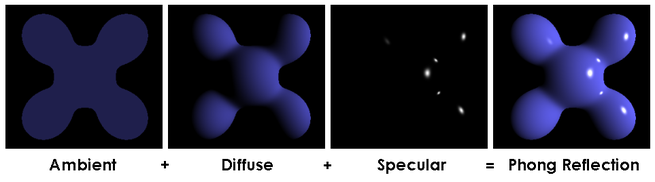
Essentailly, the Phong approach calculates three different lighting values, and combines them into shading values to apply to a model. Each of these is based on the behavior of light, which is a particle (and a wave) that travels in (largely) stright lines. We can think of these lines as rays.
The first is ambient light, which reprsents light that has been bouncing around the scene so much that it is hitting our object from all directions. Rather than try to capture that chaos, the Phong model simply substitutes a single flat value that is applied to all surfaces in the scene. In a brightly lit scene, this might be a high value; for a creepy night scene, we would use a very low value to provide only dim illumination away from light sources.
The second is diffuse light, which is the light that strikes a surface and scatters. We choose the strength of this light based on the characteristics of the material. Rough materials have more diffuse light, as the light striking the surface bounces off in all directions, so only some of it is toward the observer.
The third is specular light, which is also light that strikes a surface and bounces off, and is chosen by the properties of the material. However, high specular light corresponds to smooth surfaces - because they are smooth, light rays that strike near one another tend to bounce the same direction. Hence, light that is striking at the right angle will all bounce towards the veiwer, creating “hot spots” of very bright color.
These calculations are based on the angle between the surface and the viewer - this is why we need to provide a normal, as well as a direction the camera is looking and a direction the light is coming from; the angles between these vectors are used in calculating these lighting components.
The BasicEffect uses the DirectionalLight class to represent lights. You define the diffuse and specular color as Vector3 objects (where the x,y,and z correspond to rgb values, within the range [0..1] where 0 is no light, and 1 is full light). You also define a direction the light is coming from as a Vector3. Since ambient light doesn’t have a direction, you simply represent it with a color Vector3. When the object is rendered, the shader combines those color contributions of each light additively with the colors sampled from the texture(s) that are being applied. We can define up to three directional light sources with the BasicEffect.
Let’s see this in action. Delete the effect.EnableDefaultLighting() line in your Crate.InitializeEffect() and replace it with:
    // Turn on lighting
    effect.LightingEnabled = true;
    // Set up light 0
    effect.DirectionalLight0.Enabled = true;
    effect.DirectionalLight0.Direction = new Vector3(1f, 0, 1f);
    effect.DirectionalLight0.DiffuseColor = new Vector3(0.8f, 0, 0);
    effect.DirectionalLight0.SpecularColor = new Vector3(1f, 0.4f, 0.4f);
Notice the difference? We’re shining a red light onto our crate from an oblique angle, above and to the left.
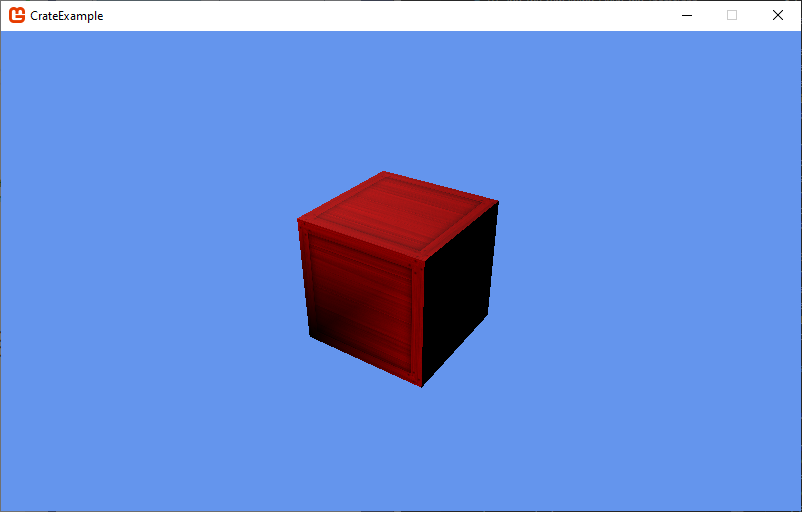
Notice how one face of the crate is in complete shadow? Let’s add some ambient light with the command:
effect.AmbientLightColor = new Vector3(0.3f, 0.3f, 0.3f);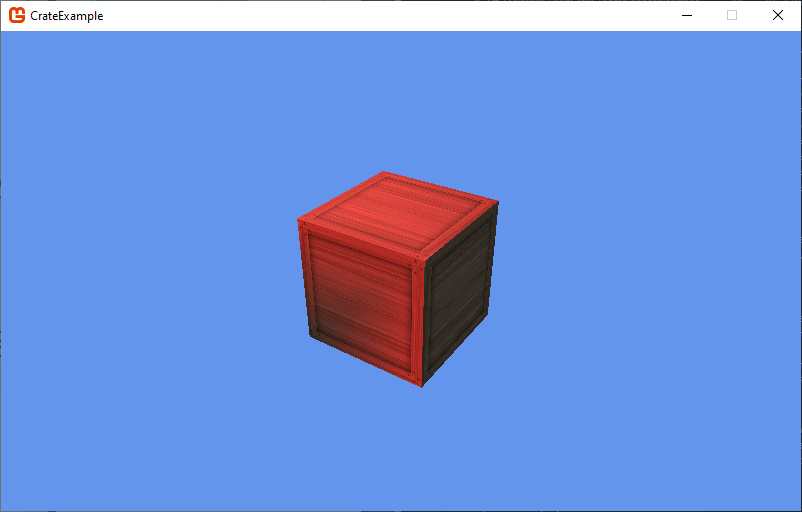
Notice how the shadowed face is now somewhat visible?
Go ahead and try tweaking the values for AmbientLightColor and DirectionalLight0, and see how that changes the way your crate looks. You can also set the properties of DirectionalLight1 and DirectionalLight2.
So far we’ve set the World, View, and Transform matrix of each 3D object within that object. That works fine for these little demo projects, but once we start building a full-fledged game, we expect to look at everything in the world from the same perspective. This effectively means we want to use the same view and perspective matrices for all objects in a scene. Moreover, we want to move that perspective around in a well-defined manner.
What we want is a camera - an object that maintains a position and derives a view matrix from that position. Our camera also should provide a projection matrix, as we may want to tweak it in response to game activity - i.e. we might swap it for another matrix when the player uses a sniper rifle.
In fact, we may want multiple cameras in a game. We might want to change from a first-person camera to an overhead camera when the player gets into a vehicle, or we may want to present a fly-through of the level before the player starts playing. Since each of these may work in very different ways, let’s start by defining an interface of their common aspects.
Those commonalities are our two matrices - the view and the perspective. Let’s expose them with read-only properties (properties with only a getter):
/// <summary>
/// An interface defining a camera
/// </summary>
public interface ICamera
{
    /// <summary>
    /// The view matrix
    /// </summary>
    Matrix View { get; }

    /// <summary>
    /// The projection matrix
    /// </summary>
    Matrix Projection { get; }
}
Now let’s define some cameras.
To start with, let’s duplicate something we’ve already done. Let’s create a camera that just spins around the origin. We’ll call it CirclingCamera:
/// <summary>
/// A camera that circles the origin
/// </summary>
public class CirclingCamera : ICamera
{

}
We know from our previous work, we’ll need to keep track of the angle:
    // The camera's angle
    float angle;
We might also hold a vector for the camera’s position:
    // The camera's position
    Vector3 position;
And a rotation speed:
    // The camera's speed
    float speed;
And the Game (which we need to determine the aspect ratio of the screen):
    // The game this camera belongs to
    Game game;
We’ll also define private backing variables for our view and perspective matrices:
    // The view matrix
    Matrix view;

    // The projection matrix
    Matrix projection;
And fulfill our interface by making them accessible as properties:
    /// <summary>
    /// The camera's view matrix
    /// </summary>
    public Matrix View => view;

    /// <summary>
    /// The camera's projection matrix
    /// </summary>
    public Matrix Projection => projection;
Then we can add our constructor:
    /// <summary>
    /// Constructs a new camera that circles the origin
    /// </summary>
    /// <param name="game">The game this camera belongs to</param>
    /// <param name="position">The initial position of the camera</param>
    /// <param name="speed">The speed of the camera</param>
    public CirclingCamera(Game game, Vector3 position, float speed)
    {
        this.game = game;
        this.position = position;
        this.speed = speed;
        this.projection = Matrix.CreatePerspectiveFieldOfView(
            MathHelper.PiOver4,
            game.GraphicsDevice.Viewport.AspectRatio,
            1,
            1000
        );
        this.view = Matrix.CreateLookAt(
            position,
            Vector3.Zero,
            Vector3.Up
        );
    }
This just sets our initial variables. Finally, we can write our update method:
    /// <summary>
    /// Updates the camera's positon
    /// </summary>
    /// <param name="gameTime">The GameTime object</param>
    public void Update(GameTime gameTime)
    {
        // update the angle based on the elapsed time and speed
        angle += speed * (float)gameTime.ElapsedGameTime.TotalSeconds;

        // Calculate a new view matrix
        this.view =
            Matrix.CreateRotationY(angle) *
            Matrix.CreateLookAt(position, Vector3.Zero, Vector3.Up);
    }
Since our rotation is around the origin, we can simply multiply a lookat matrix by a rotation matrix representing the incremental change.
Finally, we’ll need to add our camera to the Game1 class:
    // The camera
    CirclingCamera camera;
Initialize it in the Game.LoadContent() method:
    // Initialize the camera
    camera = new CirclingCamera(this, new Vector3(0, 5, 10), 0.5f);
Update it in the Game1.Update() method:
    // Update the camera
    camera.Update(gameTime);
And in our draw method, we’ll need to supply this camera to our crate. Replace the line crate.Draw() with:
crate.Draw(camera);This of course means we’ll need to tweak the Draw method in Crate. Change it to this:
    /// <summary>
    /// Draws the crate
    /// </summary>
    /// <param name="camera">The camera to use to draw the crate</param>
    public void Draw(ICamera camera)
    {
        // set the view and projection matrices
        effect.View = camera.View;
        effect.Projection = camera.Projection;

        // apply the effect
        effect.CurrentTechnique.Passes[0].Apply();

        // set the vertex buffer
        game.GraphicsDevice.SetVertexBuffer(vertexBuffer);
        // set the index buffer
        game.GraphicsDevice.Indices = indexBuffer;
        // Draw the triangles
        game.GraphicsDevice.DrawIndexedPrimitives(
            PrimitiveType.TriangleList, // Tye type to draw
            0,                          // The first vertex to use
            0,                          // The first index to use
            12                          // the number of triangles to draw
        );

    }
Now if you run your code, you should find yourself circling the lit crate.
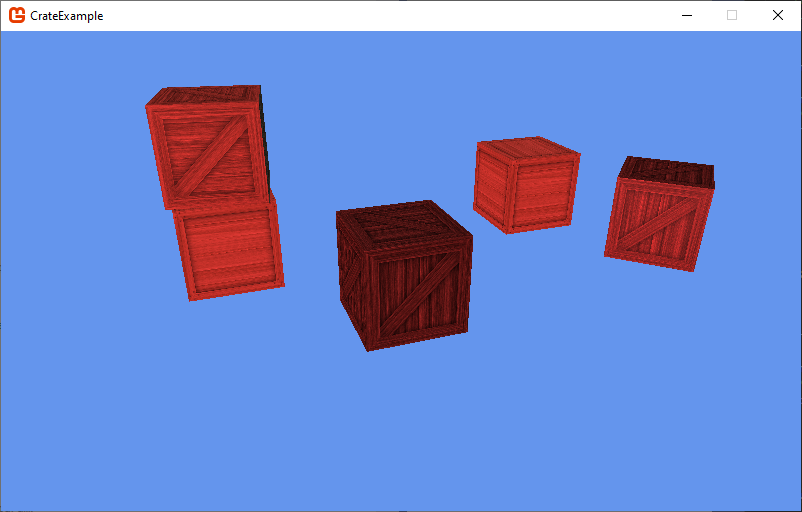
Let’s up the ante a bit, and add multiple crates to the game.
We don’t want all of our crates in the same spot, so it’s time to change our world matrix. Let’s refactor our Crate so we can pass a matrix in through the constructor:
    /// <summary>
    /// Creates a new crate instance
    /// </summary>
    /// <param name="game">The game this crate belongs to</param>
    /// <param name="type">The type of crate to use</param>
    /// <param name="world">The position and orientation of the crate in the world</param>
    public Crate(Game game, CrateType type, Matrix world)
    {
        this.game = game;
        this.texture = game.Content.Load<Texture2D>($"crate{(int)type}_diffuse");
        InitializeVertices();
        InitializeIndices();
        InitializeEffect();
        effect.World = world;
    }
It is important that we set the effect.World only after we have constructed it in InitializeEffect().
Let’s use our refactored Crate by changing the variable crate in your Game1 class to an array:
    // A collection of crates
    Crate[] crates;
And initialize them in the Game1.LoadContent() method:
    // Make some crates
    crates = new Crate[] {
        new Crate(this, CrateType.DarkCross, Matrix.Identity),
        new Crate(this, CrateType.Slats, Matrix.CreateTranslation(4, 0, 5)),
        new Crate(this, CrateType.Cross, Matrix.CreateTranslation(-8, 0, 3)),
        new Crate(this, CrateType.DarkCross, Matrix.CreateRotationY(MathHelper.PiOver4) * Matrix.CreateTranslation(1, 0, 7)),
        new Crate(this, CrateType.Slats, Matrix.CreateTranslation(3, 0, -3)),
        new Crate(this, CrateType.Cross, Matrix.CreateRotationY(3) * Matrix.CreateTranslation(3, 2, -3))
    };
And draw the collection in Game1.Draw():
    // Draw some crates
    foreach(Crate crate in crates)
    {
        crate.Draw(camera);
    }
Try running your code now - you should see a collection of crates.
Let’s go ahead and create a camera that the player can actually control. This time, we’ll adopt a camera made popular by PC first-person shooters, where the player’s looking direction is controlled by the mouse, and the WASD keys move forward and back and strife side-to-side.
Let’s start by defining our class, FPSCamera:
    /// <summary>
    /// A camera controlled by WASD + Mouse
    /// </summary>
    public class FPSCamera : ICamera
    {
}This camera is somewhat unique in it partially the splits vertical from horizontal axes; the vertical axis only controls the angle the player is looking along, while the horizontal axis informs both looking and the direction of the player’s movement. Thus, we’ll need to track these angles separately, and combine them when needed:
    // The angle of rotation about the Y-axis
    float horizontalAngle;

    // The angle of rotation about the X-axis
    float verticalAngle;
We also need to keep track of the position of the camera in the world:
    // The camera's position in the world
    Vector3 position;
And we need to know what the previous state of the mouse was:
    // The state of the mouse in the prior frame
    MouseState oldMouseState;
And an instance of the Game class:
    // The Game this camera belongs to
Game game;We need to define the View and Projection matrices to meet our ICamera inteface requirements:
    /// <summary>
    /// The view matrix for this camera
    /// </summary>
    public Matrix View { get; protected set; }

    /// <summary>
    /// The projection matrix for this camera
    /// </summary>
    public Matrix Projection { get; protected set; }
We’ll keep the setters protected, as they should only be set from within the camera (or a derived camera).
We also will provide a Sensitivity value for fine-tuning the mouse sensitivity; this would likely be adjusted from a menu, so it needs to be public:
    /// <summary>
    /// The sensitivity of the mouse when aiming
    /// </summary>
    public float Sensitivity { get; set; } = 0.0018f;
We’ll likewise expose the speed property, as it may be changed in-game to respond to powerups or special modes:
    /// <summary>
    /// The speed of the player while moving
    /// </summary>
public float Speed { get; set; } = 0.5f;Constructing the FPSCamera requires a Game instance, and an initial position:
    /// <summary>
    /// Constructs a new FPS Camera
    /// </summary>
    /// <param name="game">The game this camera belongs to</param>
    /// <param name="position">The player's initial position</param>
    public FPSCamera(Game game, Vector3 position)
    {
        this.game = game;
        this.position = position;
    }
Inside the constructor, we’ll initialize our angles to 0 (alternatively, you might also add a facing angle to the constructor so you can control both where the player starts and the direction they face):
    this.horizontalAngle = 0;
    this.verticalAngle = 0;
We’ll also set up our projection matrix:
this.Projection = Matrix.CreatePerspectiveFieldOfView(MathHelper.PiOver4, game.GraphicsDevice.Viewport.AspectRatio, 1, 1000);And finally, we’ll center the mouse in the window, and save its state:
    Mouse.SetPosition(game.Window.ClientBounds.Width / 2, game.Window.ClientBounds.Height / 2);
    oldMouseState = Mouse.GetState();
The Update() method is where the heavy lifting of the class occurs, updating the camera position and calculating the view matrix. There’s a lot going on here, so we’ll assemble it line-by-line, discusing each as we add it:
    /// <summary>
    /// Updates the camera
    /// </summary>
    /// <param name="gameTime">The current GameTime</param>
    public void Update(GameTime gameTime)
    {
    }
First up, we’ll grab current input states:
    var keyboard = Keyboard.GetState();
    var newMouseState = Mouse.GetState();
Then we’ll want to handle movement. Before we move the camera, we need to know what direction it is currenlty facing. We can represent this with a Vector3 in that direction, which we calculate by rotating a forward vector by the horizontal angle:
    // Get the direction the player is currently facing
    var facing = Vector3.Transform(Vector3.Forward, Matrix.CreateRotationY(horizontalAngle));
Then we can apply forward and backward movement along this vector when the W or S keys are pressed:
    // Forward and backward movement
    if (keyboard.IsKeyDown(Keys.W)) position += facing * Speed;
    if (keyboard.IsKeyDown(Keys.S)) position -= facing * Speed;
The A and D keys provide strifing movement, movement perpendicular to the forward vector. We can find this perpendicular vector by calculating the cross product of the facing and up vectors:
    // Strifing movement
    if (keyboard.IsKeyDown(Keys.A)) position += Vector3.Cross(Vector3.Up, facing) * Speed;
    if (keyboard.IsKeyDown(Keys.D)) position -= Vector3.Cross(Vector3.Up, facing) * Speed;
That wraps up moving the camera’s position in the world. Now we need to tackle where the camera is looking. This means adusting the vertical and horizontal angles based on mouse movement this frame (which we caculate by subtracing the new mouse position from the old):
    // Adjust horizontal angle
    horizontalAngle += Sensitivity * (oldMouseState.X - newMouseState.X);

    // Adjust vertical angle
    verticalAngle += Sensitivity * (oldMouseState.Y - newMouseState.Y);
From these angles, we can calculate the direction the camera is facing, by rotating a forward-facing vector in both the horizontal and vertical axes:
var direction = Vector3.Transform(Vector3.Forward, Matrix.CreateRotationX(verticalAngle) * Matrix.CreateRotationY(horizontalAngle));With that direction, we can now calculate the view matrix using Matrix.CreateLookAt(). The target vector is the direction vector added to the position:
    // create the veiw matrix
    View = Matrix.CreateLookAt(position, position + direction, Vector3.Up);
Lastly, we reset the mouse state. First we re-center the mouse, and then we save its new centered state as our old mouse state. This centering is important in Windowed mode, as it keeps our mouse within the window even as the player spins 360 degrees or more. Otherwise, our mouse would pop out of the window, and could interact with other windows while the player is trying to play our game.
    // Reset mouse state
    Mouse.SetPosition(game.Window.ClientBounds.Width / 2, game.Window.ClientBounds.Height / 2);
    oldMouseState = Mouse.GetState();
This does mean that you can no longer use the mouse to close the window, so it is important to have a means to exit the game. By default, the Game1 class uses hitting the escape key to do this. In full games you’ll probably replace that functionality with a menu that contains an exit option.
Of course, to use this camera, you’ll need to replace the CirclingCamera references in Game1 with our FPSCamera implementation. So you’ll define a private FPSCamera reference:
    // The game camera
    FPSCamera camera;
Initialize it with its starting position in the LoadContent() method:
    // Initialize the camera
    camera = new FPSCamera(this, new Vector3(0, 3, 10));
Update it in the Update() method (which isn’t really a change):
    // Update the camera
    camera.Update(gameTime);
And provide it to the crates in the Draw() method (again, this shouldn’t be a change from the CirclingCamera implementation):
    // Draw some crates
    foreach(Crate crate in crates)
    {
        crate.Draw(camera);
    }
Now if you run the game, you should be able to move around the scene using WASD keys and the mouse.
In this lesson, we’ve seen how to apply Phong lighting using the BasicEffect, and how to set up cameras. Armed with this knowledge, you’re ready to start building explorable game environments.
A good next step is to think about what other kinds of cameras you can create. What about an over-the-shoulder camera that follows the player? Or a first-person camera that uses GamePad input? As you now know, a game camera is nothing more than code to determine where the camera is in a scene, and where it is pointed. From that, you can create a View matrix. You might also try expanding the options for the Perspective matrix from the default implementation we’ve been using.