Using the Terrain
Let’s see our terrain in action. First we’ll need to make some changes in our ExampleGame class. We’ll add a Terrain field:
    // The terrain
    Terrain terrain;
In our ExampleGame.LoadContent(), we’ll load the heightmap and construct our terrain:
    // Build the terrain
    Texture2D heightmap = Content.Load<Texture2D>("heightmap");
    terrain = new Terrain(this, heightmap, 10f, Matrix.Identity);
And in our ExampleGame.Draw() we’ll render it with the existing camera:
// Draw the terrain
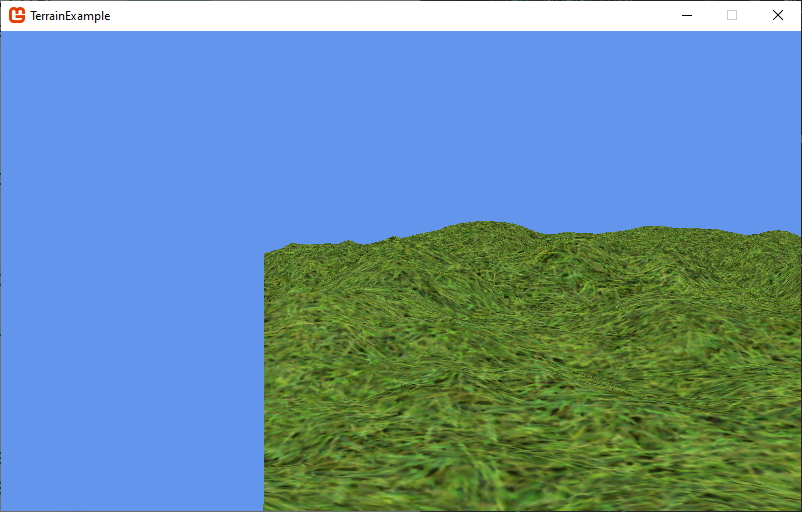
terrain.Draw(camera);Now if you run the game, you should see your terrain, and even be able to move around it using the camera controls (WASD + Mouse).
You’ll probably notice that your camera does not change position as you move over the terrain - in fact, in some parts of the map you can actually end up looking up from underneath!
Clearly we need to do a bit more work. We need a way to tell the camera what its Y-value should be, based on what part of the terrain it is over.
The IHeightMap Interface
Rather than linking our camera directly to our terrain implementation, let’s define an interface that could be used for any surface the player might be walking on. For lack of a better name, I’m calling this interface IHeightMap:
    /// <summary>
    /// An interface providing methods for determining the
    /// height at a point in a height map
    /// </summary>
    public interface IHeightMap
    {
        /// <summary>
        /// Gets the height of the map at the specified position
        /// </summary>
        /// <param name="x">The x coordinate in the world</param>
        /// <param name="z">The z coordinate in the world</param>
        /// <returns>The height at the specified position</returns>
        float GetHeightAt(float x, float z);
    }
The interface defines a single method, GetHeightAt(). Note that we take the X and Z coordinate - these are world coordinates in the game. The return value is the Y world coordinate corresponding to the elevation of the terrain at x and z.
Refactoring FPSCamera
We can then use this interface within our FPSCamera class to change its height based on its X and Z. We’ll start by adding a property of type ICamera:
    /// <summary>
    /// Gets or sets the heightmap this camera is interacting with
    /// </summary>
    public IHeightMap HeightMap { get; set; }
And we’ll modify our FPSCamera.Update() to use the HeightMap’s height at the camera position, added to the camerea’s HeightOffset to determine the camera’s actual Y position:
    // Adjust camera height to heightmap
    if(HeightMap != null)
    {
        position.Y = HeightMap.GetHeightAt(position.X, position.Z) + HeightOffset;
    }
This should be done before we set the updated View matrix.
Notice that we wrap this in a null check. If there is no heightmap, we want to keep our default behavior.
Refactoring ExampleGame
Since the HeightMap is a property of the FPSCamera, we’ll need to set it to our terrain in the ExampleGame.LoadContent() method after both the camera and terrain have been created:
camera.HeightMap = Terrain;Refactoring Terrain
Now we need to implement the IHeightMap interface in our Terrain class. Add it to the class definition:
public class Terrain : IHeightMap {
    ...
}
And add the method it calls for:
    /// <summary>
    /// Gets the height of the terrain at
    /// the supplied world coordinates
    /// </summary>
    /// <param name="x">The x world coordinate</param>
    /// <param name="z">The z world coordinate</param>
    /// <returns></returns>
    public float GetHeightAt(float x, float z)
    {}
Now, let’s talk through the process of finding the height. As our comments suggest, we’re using world coordinates, not model coordinates. As long as the world matrix remains the identity matrix, these are the same. But as soon as that changes, the world coordinates no longer line up. So the first thing we need to do is transform them from world coordinates to model coordinates.
Since multiplying a vector in model coordinates by the world matrix transforms them into world coordinates, the inverse should be true. Specifically, multiplying world coordinates by the inverse of the world matrix should transform them into model coordinates.
The Matrix.Invert() method can create this inverse matrix:
Matrix inverseWorld = Matrix.Invert(effect.World);We’ll also need the world coordinates as a Vector3 to transform:
Vector3 worldCoordinates = new Vector3(x, 0, z);Here we don’t care about the y value, so we’ll set it to 0.
Then we can apply the transformation with Vector3.Transform():
Vector3 modelCoordinates = Vector3.Transform(worldCoordinates, inverseWorld);At this point, modelCoordinates.X and modelCoordinates.Z correspond to the x and -y indices of our heights array, respectively. The y coordinate needs to be inverted, because our terrain was defined along the negative z-axis (as the positive z-axis is towards the screen). Let’s save them in float variables so we don’t have to remember to invert the z as our y coordinate:
    float tx = modelCoordinates.X;
    float ty = -modelCoordinates.Z;
These should correspond to the x and y indices in the heights array, but it is also possible that they are out-of-bounds. It’s a good idea to check:
if (tx < 0 || ty < 0 || tx >= width || ty >= height) return 0;If we’re out-of-bounds, we’ll just return a height of 0. Otherwise, we’ll return the value in our heights array:
return heights[(int)tx, (int)ty];Now try running the game and exploring your terrain. The camera should now move vertically according to the elevation!