Compression & Error Checking
In this module, we will spend a lot of time talking about compression and error checking in our computers. We’ve already talked about compression a little bit in the data encoding module earlier this semester. But now we’re going to spend an entire module talking about just these two topics. First, we’re going to talk about in compression. What do you think compression is and why do you think it’s useful? As you might recall, compression is reducing the amount of space a particular piece of data needs to be stored on a computer. And if we think about that, that may not even really make sense, how can we take the piece of data and store it in fewer Bits and Bytes than what it originally was? It turns out, there are a lot of different ways to do that. We can do all sorts of different things by replacing repeated chunks of data or re-encoding the data in such a way that we can interpret it differently in our computer systems. And we’ll take a look at that in this module.
Why do you think we would do that? Well, computer resources are very expensive. For example, think about the storage space in your computer. While you might have a couple of terabytes. If you’ve ever played video games, or downloaded a lot of videos, you’ll find that that space gets eaten up very, very quickly by those large files. And so we can use compression to reduce the amount of space that those files take up and store them in fewer hard drives than it would take to store the raw files. Likewise, we can think about transmission bandwidth across the internet. If we need to send a large file across the internet. If our internet connection is very slow, it might be better to compress the file before we send it and then allow the other user on the other end to decompress that file when they receive it. However, of course, this does create a trade off, we’re spending computation time to compress and decompress the data in hopes of saving transmission time in storage space when we actually store or transmit the file. And so depending on the amount of computational power we have, and the amount of transmission or storage space we have available, it may or may not make sense to compress data. But in general, compression is usually a good thing and helps us save more data in a smaller amount of space, and transmit lots of data very quickly across the internet.
So let’s take a look at one example of compression called run length encoding. In run length encoding, we’re looking for runs or repeated sequences in our data. And then we’re going to going to replace them with a shorter version of that data in our actual store data itself. Usually that shorter version would be the sequence that we’re repeating, and account of how many times it gets repeated. So let’s take a look. Here’s an example of data that we could send via run length encoding, we’re using characters and recall of course, the characters can be stored as binary values using ASCII the American Standard Code for Information Interchange. So while we’re representing this data as text, it would actually be stored and transmitted as binary on our computers.
So in run length encoding, we would look for repeated characters and try and replace them with shorter versions of themselves. For example, if we look at these W’s at the top, we can see that they’re an awful lot of them. So let’s count them, we have 1 2 3 4 5 6 7 8 9 10 11 12, there are 12 W’s. So in our in our data, we would say that we have 12 W, then we have one B, so we just write one B, then we have 12 more W’s. So if you count those out, there will be 12, W’s, and so on. And so with run length encoding, we would be able to count the number of each characters and put a number followed by the character that shows up. So if we encode all of this data with run length encoding, we would get 12 W, 1 B, 12 W, 3 B, 24 W, 1 B, 15 W.
As we talked about earlier, the characters W and B can also be stored as binary. And of course, these numbers can be stored as binary. So it should be pretty easy to figure out how we can convert this particular string of data into a binary string that we would send along with our data.
But there might be a problem. If we think about all of that being one long string of binary numbers, how could we tell which parts of it are the numbers and which parts of it are text. And remember, the text itself is just numbers as well. So maybe we need to come up with some sort of a scheme that allows us to structure that data so that we know where the numbers are and where the text is. So let’s take a look at that.
Here’s that same example again, but how do you think we could write it so that we can easily tell which ones are the text and which ones are the numbers? Take a minute to think about that before you move on. A better way to think about this would be to use escape sequences. So in escape coding, what we would do is we would have a double character representing an escape sequence. For example WW; the WW being a repeated character would reduce down to just a single W. But then afterwards, we would have a number. And so looking at this bottom, we see WW followed by 12. The ww is our escape sequence saying we are going to repeat the letter W. And the next bit of binary data is going to be the number of times we repeat that character. So we see WW 12. Then we see just one B. And because B is not repeated, we just assume that that is text.
Next, we have WW again. And since that’s a repeated character, that will tell us that we’re going to repeat W and the next bit of data is going to be binary, that is the number of times we repeat that character. So then we have WW 12. Now we have three B’s, so we have BB 3. Then we have WW 24, a single B, then WW 15. So if you look at this, that is a little bit longer than the example we saw earlier, because we have to double some of the characters. But this example is much easier to read for our computer. We know that every character is text, except if we see the same character twice. And then we will know that the eight bits after that represent a number that we could use to repeat that character that many times. So now that we’ve seen an example of run length encoding, we’re going to let you give it a try in the next quiz.
Next, let’s take a look at another form of compression called Huffman coding. Huffman coding uses the frequency of the letters in a piece of text to reduce the amount of space that they take up in the encoded data. To do this, we will count the occurrences of each character in our text. And we’ll use that count to make a binary tree with the data. Then the paths of the tree to each character give the codes that we use for the Huffman encoded data. This is a little bit complex.
But let’s take a look at an example and see how this works. Let’s say we’d like to send this particular text using a Huffman tree. This is an example of a Huffman tree. If we count this just as plain ASCII characters, it would take 298 bits, which is 8 times 36 characters to send this data. So now let’s look at how we would encode it into a Huffman tree. The first thing we would do is we would count the number of occurrences of each character.
So let’s look at an example of how we would convert this into a Huffman tree. The first thing we would do is we would count the frequency of each character. So let’s take a look at the spaces we have 1 2 3 4 5 6 7. So we have seven space characters in this particular example, so we can make a list. On this slide, we see the list of some of the most common characters in that text. There are seven spaces, 4 letter A’s, 4 letter E’s, 3 F’s, 2 H’s, 2 I’s, 2 M’s, 2 n’s, and so on.
So with that data, we can then construct a binary tree by using the frequency of the characters to determine where they go in the binary tree. Since the space is the most frequent character, we’re going to put it at the very top of the tree, whereas least frequent characters, for example, a p would go toward the bottom of the tree. So if we follow the Huffman example algorithm, we’ll see that we create a binary tree that looks something like this. And this is pretty complex. And we’re not going to exactly talk about how to build this binary tree. But there is a very unique algorithm that you’ll learn about later on that can allow you to do this.
So now we look at this tree. And we see that the space character is way over here. We mark it for you. So the space characters right here. So to get to that space character, we will make right, here, right here, and right here. So the space character, in terms of directions would be RRR. Likewise, the E, we would go left, left, left. So E is going to be left, left left. This is the space, this is the E. And so in Huffman coding, we would use the direction that we go in the binary tree to become our data. So if we encode this, so that right is ones, we would do 111 for the space, for the E, it would be 000. Pretty cool, isn’t it?
Likewise, if we want to get to the letter A, we would go left, then right, then left, so A would be left, right left to get A. So that would be 010. Pretty cool, isn’t it. So we’ve taken characters that normally need eight binary values to represent them. And we can represent them here with this tree in anywhere from three to five characters. So if we look at this Huffman example, broken up, we’ll see something like this, the letter team becomes 0110, H is 1010. And if we go on, we can eventually find the A, which is going to be this one right here, th, this, space, is, space, A n, space, example, we saw that he was 000. So right here, we’ve got a really big improvement. We’ve gone from 288 bits of data all the way down to 135 bits of data. So we’ve nearly cut it in half a little bit more than half actually, to make this work.
Now, of course, Huffman trees do come with one particular caveat that we have to talk about. If we want to transmit this data encoded using a Huffman tree, we would also have to send a representation of the Huffman tree itself to allow this data to be decoded. And that can add a significant amount of overhead on small texts like this. In fact, the amount of data we would need to send this Huffman tree would be way more data than we needed to encode the original message even completely uncompressed. So while Huffman tree is a very powerful encoding system, It really works well when you’re sending large amounts of text like an entire book, then using a Huffman tree to encode that you can get significant savings in your compression. So once again, we’ve got a little example of the Huffman tree encoding problem that you can try on the next quiz.
Now let’s talk about error checking. What do you think error checking means when we’re talking about sending and retrieving data? And why do you think it would be useful? Well, let’s take a look at an example. When we send data, such as this text, hello there, sometimes the data might get garbled in transmission. When you were a kid, if you played with radios or walkie talkies, or anything like that, you might have had trouble understanding what other people say, Heck, even it happens today, sometimes on cell phone calls. So if there was a way that we could confirm that the data we’re receiving is the data that was actually sent without adding too much overhead to the data, that might be a really powerful tool, a great intuition to think of is squeezing the data into a smaller space, and then using that to check and see if we got the right answer.
So if we start with the text, hello there, and we squeeze the kerning, between the characters really narrow, we get this image shown below, that we can use as a little check to make sure that the data that we received was the same thing. So on the receiving end, if instead of receiving Hello, there we see Hello, ghere. If we squeeze that together the same way, we noticed that the squeezed image does not look the same as the squeezed image above. And so by sending the squeezed image above, we would know that we didn’t get the right data. And that squeezed image doesn’t take up a whole lot of space. That’s really the intuition behind error checking, we’re trying to send a little bit more data along with a larger transmission. And we can use that little bit of extra data to make sure the transmission itself was received without errors. That’s the real intuition behind this.
So let’s take a look at an example. One of the best ways we could do this is simply adding together the numbers. So if we take the sentence Hello there, and we convert it to ASCII, we see that a capital H is 72, e is 101, L is 108, and so on and so forth. So if we take all of those numbers, we could just add them up, and send all of that ASCII text plus the number 1101. Pretty cool, isn’t it, then on the receiving end, if the T got replaced with a G, obviously, the sum we would get would be different. And we would know that somehow that message got corrupted. Of course, this might be a little bit complex, for example, 1101 doesn’t fit in an eight bit binary number, so we may have to truncate it a bit or use modulo, to reduce it down to a number that fits into an eight bit binary value. Now, of course, this is a very simple form of error checking, and it does have some flaws. So let’s talk about some of these different questions. For example, if we only have the sum that came along with that message, could we use that to recover the original? So if I just gave you 1101? Could you tell me what original message produced that sum? Probably not. It would be really, really difficult to do. So we can’t use it to recover the original.
How well does it detect errors? Well, if we change the T to a G, we would probably detect that. But what if we replaced an L with an M and another L with the letter right before L? How well does this detect errors? Well, let’s consider the case where one of the L’s in hello gets replaced with an M, and the other L gets replaced with a K. M is one greater than L. But K is one less than L. And so when we sum those together, we would still get the exact same sum. So it is possible for us to create an error that the sum itself does not catch, that’s not really good. So as we can see, are the areas that cannot detect absolutely, we could swap characters, we could rearrange the characters, they would all still sum up to the exact same value. There’s tons of ways that we could do this. And of course, we talked about this a little bit already, but 1101 is larger than eight bits. How should we handle that? Well, we could use modular division where we divide it by 256. And keep the remainder, which would be the modulo operation that you learn about in your programming courses that would allow that number to fit in just eight bits. But of course, the big question we always ask in this class, can we do better. And I would argue that there are ways that we can definitely do better than a simple addition error checking.
So let’s take a look at another example of error checking. In this case, it’s called pinpoint error checking. Here, we’ve received a number 483754. So very large number, and we’ve taken that number and we’ve arranged it in a four by four grid. And then we’ve added a column in a row to the end of the grid that we can use to calculate what we call our checks up, which is the sum that we’re going to create to make sure that these numbers are correct. To create that checksum, what we will do is we will sum up each row and each column and then we will keep just the ones place of that value in this call. So for exam We have 4 plus 8 is 12, plus 3 is 15 plus 7 is 22. So here we would put 2, here we have 5 + 4 is 9, + 3 is 12, + 3 is 18. So we would keep the 8. Likewise, we could go down, we have 4 + 5 is 9, + 2 is 11, + 3 is 14. So we would keep the 4, here we have 8 + 4 is 12, + 2 is 14, + 9 is 23. So we would keep 3. And we could do this all the way through until we got all of these numbers, which we see right here, we see 4306 along the bottom, and 2858 along the side, then when we send the message, we could simply add those numbers in where they go, we see down here are 4837 of our original number, plus this 2 for our checksum 5436, plus an 82256, plus a 53397, plus an 8. And then we have 4306, which is our bottom checksum. So we have a 16 digit number. And we’ve added 8 more digits to it to provide a checksum. So it’s gotten a little bit bigger, it’s about 50%, bigger than it was.
But what can we do with this checksum that’s very, very powerful. So here, we’ve received a message. And we have in gray, our original checksum. And then in red, we have the checksum that we calculated from the message that we received. So take a look at this and see if you can figure out exactly where the error is in this received message. All right, let’s see if we can find the error. So we look at our checksum for matches up. 3…, uh-oh, this one doesn’t match up. So we’re going to circle this one. Zero matches up, six matches up, two matches up, eight matches up, uh-oh, here, 5 and the 0 don’t match up, and then the 8 matches up. So if we look at the row and the column, we know that this one is incorrect. Now the big question is, can we use this to restore that value to what it originally was, we know here that this value should be eight larger, or should be five larger, and we know that this value should be there, five larger five smaller. So with this number, if we add five to it, and just keep the ones place, we know that this number should probably have been a two. So let’s look at our original. Uh huh. It was a two. So using this pinpoint checksum by adding a little bit more data to the data that we’re transmitting, not only can we detect an error, but we can actually correct an error. And there are some different ways we can measure this. For example, we can detect a lot of different errors, but we may not be able to correct as many errors as we can detect. And that’s one of the important things to remember about checksum such as this. So now that you’ve seen an example, we’ll have a little quiz after this where you can do another example on your own just to see how this works.
The C2 total on the slide at 0:54 - 2:10 is incorrect. The total is 7336 but that value modulo 255 is 196, not 96 as shown in the video.
Let’s look at an even better way to do a checksum to check and see if our data is correct. This is called Fletcher’s checksum. And here we’re giving a quick pseudocode of the algorithm that is used to generate Fletcher’s checksum. Basically, the way it works is you divide the word into a sequence of equally sized blocks. And we’ll just use the individual characters for this. And we’ll start with two checksums, one of them, C1 starts at zero, the other to also starts at zero, then for every block, we’ll add the value of the block to the first check sum. And then we’ll add the new value of that checksum to the second checksum. And then finally, while we’re done, we will calculate the values of the checksum mod 255 to reduce them to an eight bit binary value. And we’ll return those two checksums.
So let’s take a look at an example of how we would do Fletcher’s checksum. We’ll start with our same messages always and divided into blocks where each character is its own block. So the first character, the capital H is a value 72. So we’ll add 72 to the first checksum. And then we will add that checksum value to the second checks up. So after the first character, they’re both the same. The second character, the lowercase E is 101. So we’ll add 101 to the first checksum to get 173. But now we will add this new checksum 173 to the value of 72 and the second checksum to get 245. Likewise, we’ll add 108 to 173 to get 281, then we’ll add 281 to 245 to get 526. And we’ll continue this process until we’ve done all the letters. And then at the end, you’ll see that we still get the same checksum that we found earlier 1101, which becomes 81 when we do mod, and then the second checksum becomes 7336, which is 96 when we do them on. So now we only have to send along two additional numbers along with our text. And that will tell us a lot more about the text in the errors. So let’s take a look at that and see how many errors this can find. Let’s consider the case of just doing these first three characters. So we know that the checksum for 72, 101 ,108. If we look back here should be 281 and 526. So we would have 281 and 526. So let’s look at this first example. We have 72 108 101. Well, that changed the first checksum? No, it’s the exact same value, it will be to 81. However, will it change the 526? Well, we start with 72. And then we will add 72 plus 108, which is going to be eight 180. So the second check sum will be 180. So we’re going to add 180 here, 180 here, which is going to be 252. And then to the 180, we’re going to add 101. So the second checksum is still going to be 281. But if we add 281. Here, we’re going to get 331, we get 533.
So in this example, by switching these two characters, the first checksum did not change, but the second checksum definitely changes. And that’s because the order changed. Likewise, when we look at all of these examples, we see that all of them add up to the same set of characters. So the first checksum will always be 281. But the second checksum will be different every single time. And that’s because we’re adding this first checksum to the second checksum every single time so it captures the ordering of the characters as well as the values that they may change based on those different values. So even by adding a zero in there, we would get a different value for that second checksum. So once again, there will be a quiz after this video where you can try a little bit of Fletcher’s checksum just to see how it works.
Let’s go over a couple other error checking methods that you might run across, we’re not going to go into these in too much detail because they are kind of complex at this level. But we’ll give you an idea of what’s out there, just so you can say you’ve seen it. One interesting example is the cyclic redundancy check or CRC. With CRC will have some sort of binary value. And we’ll use a particular checksum to verify it. So we’ll start with this binary value on a checksum. And we will compute the XOR of the checksum, and that binary value. So we start with 1010. And we XOR that with 1011. So we’ll get 1. And this works a lot like long division, we just keep working down the value until we get left with something that is smaller than our checksum. And so with this input 101000001001, we would send along these three bits 011 as our checksum. And then once we’ve received it, we can do this same division again, and make sure that we get the same checksum to know that the error hasn’t been introduced in our code.
Another method of error checking is hash codes. And hash codes are really complex. But they basically are a one way algorithm to take any piece of data and convert it into a single value. So for example, we would choose some sort of a hash base like 2 or 10, or 37. And then if we have a whole bunch of numbers, we would calculate the hash as the first number times our base to the value in plus the second number times the base to the power n minus one, and so on, and so forth. So if we have the word 456, if our base is 10, obviously, our hash should be 456. If our base is 100, we get 4056. If our bases, just five, it would be 126. But if we choose some interesting other numbers, we would get different hash codes. Later on, if you start taking programming courses, one of the data structures you’ll learn about is a hash table, sometimes known as a dictionary or a hash map. And to do that, what it does is it takes a piece of data and it computes the hash of that data, and then uses that to store the data in a unique way so that it can be quickly retrieved. But we can also use those hashes to verify data.
Another really common use of hashes would be password store. For example, md5 is a commonly used pass password hashing algorithm, or at least it was it’s been cracked since then. But you could take any text and calculate the md5 hash of that text and store that number. Then if anyone tried to input a password, you would simply take their password, re-compute the hash. And if it created the same hash as the actual password, then you know that that user inputed the create the correct password, and you could allow them access. Here’s another quick example of hash codes, just showing what it would look like for some other input data.
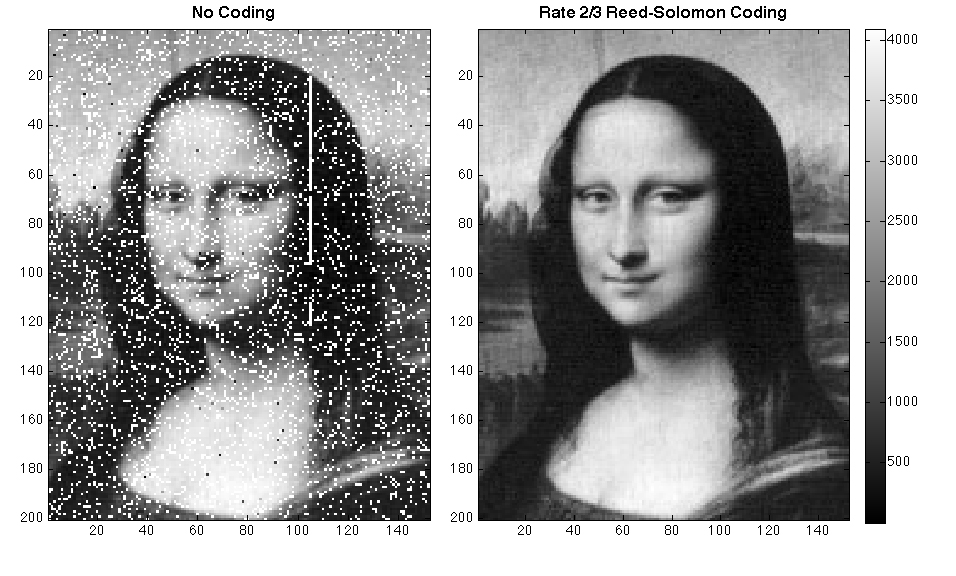
Another form of error checking you might run into is called a hamming code. And a hamming code is kind of complex. But what it does is it takes the data bits that you want to send and it calculates what are called parity bits for those data bits. A parity bit is basically a bit that’s designed to make all of those data bits plus the parity bit come up to an even number of ones. So if we want to send the data in bits, 3,5,6, and 7, for example, we want to send 0100, we calculate these three Hamming parity bits. The first one is 3,5,7. So we look at 3,5,7, there’s only a single one there. So that parity bit would be a one, the bits 3, 6, and 7 would be 3,6,7. There’s no one so we put a zero there. And then for 5,6,7, there’s a single one, so we need to add one more one to get to an even number of ones. Then to construct the actual hamming code, we have our first parity bit, our second parity bit, so one, zero, then we have our first data bit zero, then our last parity bit one, and then the last three bits of our data Five, six, and seven. It’s a little complex. But the concept behind Hamming codes is to create data words that are so far apart from each other that a single bit error, you can almost just round it to the closest binary value that makes sense for the hamming code that you’re using, and use that as your way to solve different errors. In this module, we’ve covered a lot of different ways that you can compress and do error checking on data that you send and receive or data that you store in your computer’s while a lot of this can be kind of complex and math heavy.
I’m hoping this opens your eyes a little bit to some of the things that go on behind the scenes on your computer that you might be aware of, but really didn’t understand how they work. We deal with things like zip files and JPEG images all the time. And those are all examples of compression. Error checking is a little bit more behind the scenes, but it’s really the backbone of how we can send and receive data across the internet using these unreliable connections and packets that might be dropped and still be able to recover and understand the data that we receive on the other side.
Nine Algorithms that Changed the Future Ch 1 - Introduction
Nine Algorithms that Changed the Future Ch 5 - Error Correcting Codes
Nine Algorithms that Changed the Future Ch 7 - Data Compression