Chapter 10
Subsections of Pseudocode Loops
While Loops
YouTube VideoResources
The first type of loop we’ll explore in pseudocode is the while loop. A while loop is an iteration statement that will constantly repeat the code inside of it while a Boolean expression evaluates to true. This is very similar to how an if statement is constructed - we know that the code inside an if statement is only executed if the associated Boolean expression is true. In the case of a while loop, we do basically the same thing, but at the end of the code inside the loop, we go back to the top and check the Boolean expression again. If it is still true, then we execute the code inside it over and over until it evaluates to false.
In pseudocode, the basic structure of a while loop is shown here:
REPEAT WHILE(<boolean expression>)
{
    <block of statements>
}
When we encounter a while loop, we first evaluate the <boolean expression> inside the parentheses to see if it is true. If so, we enter the loop and execute all of the code in the <block of statements> between the curly braces {}. Once we’ve reached the end of the block, where the closing curly brace } is found, we then go back to the top and evaluate the <boolean expression> again. If it evaluates to true, we run the code inside the loop again.
We keep doing this until the <boolean expression> evaluates to false. As soon as it does, we jump down to the code immediately following the closing curly brace } at the end of the loop - we don’t execute the code inside the loop again.
This also means that when we initially reach the loop, we could run into the situation where the <boolean expression> evaluates to false the first time we see it. In that case, we just jump to the end of the loop and start executing the code after the closing curly brace }. There is no guarantee that we’ll ever execute the code inside the loop, just like in an if statement.
Code Tracing Example
To understand how a while loop works in practice, let’s code trace an example program. Consider the pseudocode program shown here:
PROCEDURE main()
{
    DISPLAY("Enter a number: ")
    x <- NUMBER(INPUT())
    y <- 1
    REPEAT WHILE(y <= x / 2)
    {
        IF(x MOD y = 0)
        {
            DISPLAY(x + " is divisible by " + y + "\n")
        }
        y <- y + 1
    }
}

main()
Before we run a code trace on this program, take a moment to read it and see if you can guess what it does!
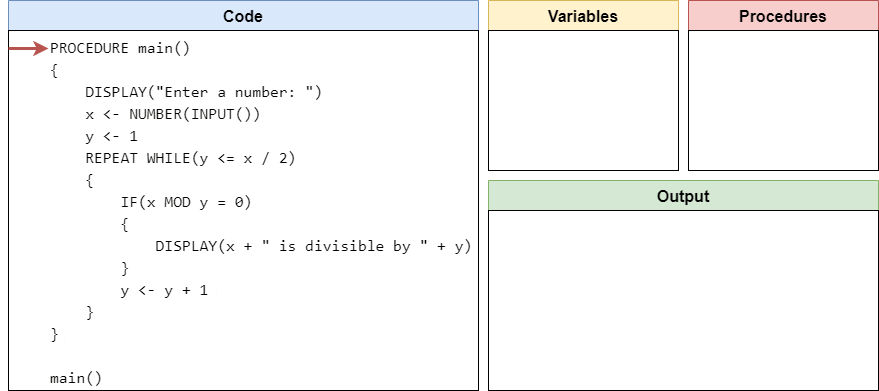
As always, we’ll start our code trace by reviewing the code and keeping track of variables and procedures, as well as output. So, our initial setup will look like this:

As we scan through the program, we’ll find the main() procedure and record it in our list of procedures.
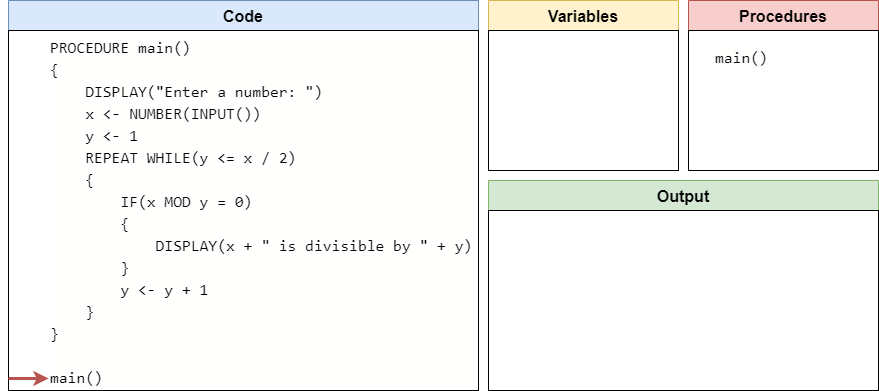
At the bottom of the program, we’ll find a call to the main() procedure, so we’ll jump to that procedure’s code and start executing it.
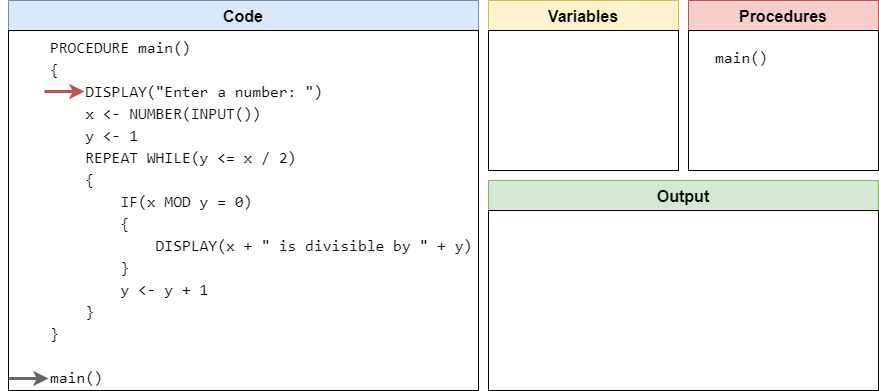
The first two lines of the main() procedure simply prompt the user for input and then store that input in the variable x. In this example, let’s assume the user inputs the string "12" as input. So, we’ll store the number $12$ in the variable x
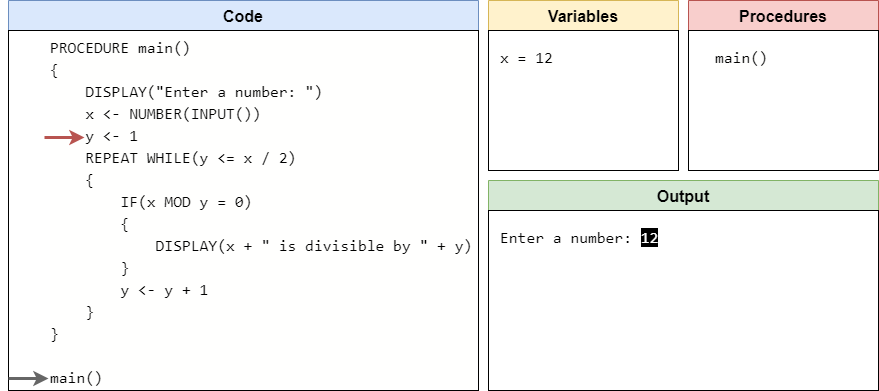
Next, we’ll store the value $1$ in the variable y.
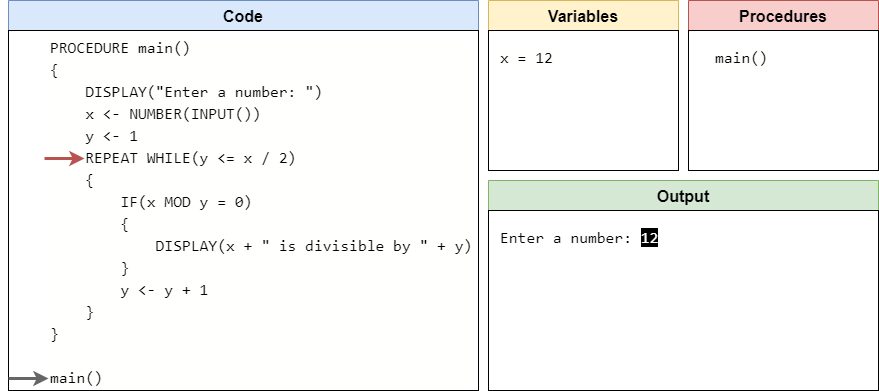
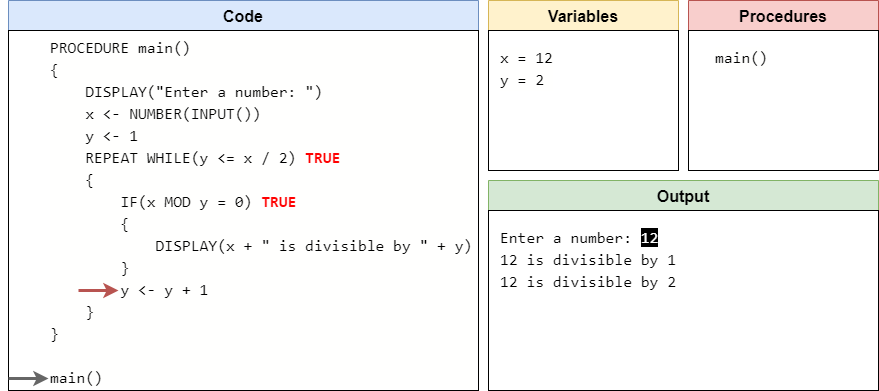
At this point, we’ve reached the start of our loop. So, first we need to determine if the Boolean expression inside of the parentheses is true or false. Looking at the expression, it is checking if the value in y is less than or equal to half of the value stored in x. Since x is currently storing $12$, we know that half of x is $6$. Because y is only storing $1$, we know that y is definitely less than or equal to $6$, and the Boolean expression evaluates to true. Therefore, we should enter the loop and start executing the code inside.
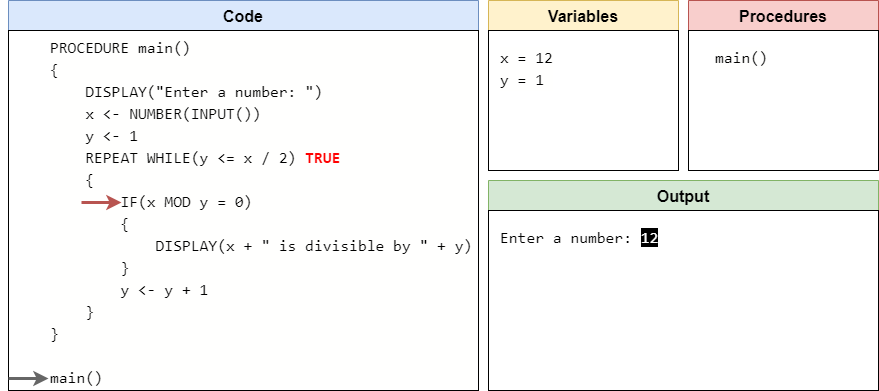
Inside of the loop, we find an if statement. So, we must determine if the Boolean expression inside of the if statement is true as well. In this case, we are checking if the remainder of dividing x by y is $0$ using the MOD operator. This is the same as checking to see if x can be evenly divided by y. Since y is currently $1$, we know that any integer divided by $1$ is itself with no remainder. So, this Boolean expression will evaluate to true and we should execute the code inside the if statement.
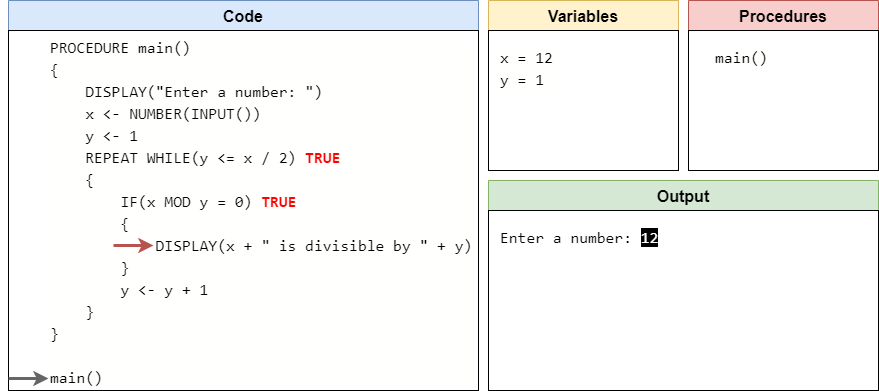
Here, we find a DISPLAY() statement, so we’ll just add that to our output and then exit the if statement below.

Below the if statement, we see a simple assignment statement that will increase, or increment, the value of y by $1$. So, the variable y is now storing the value $2$.
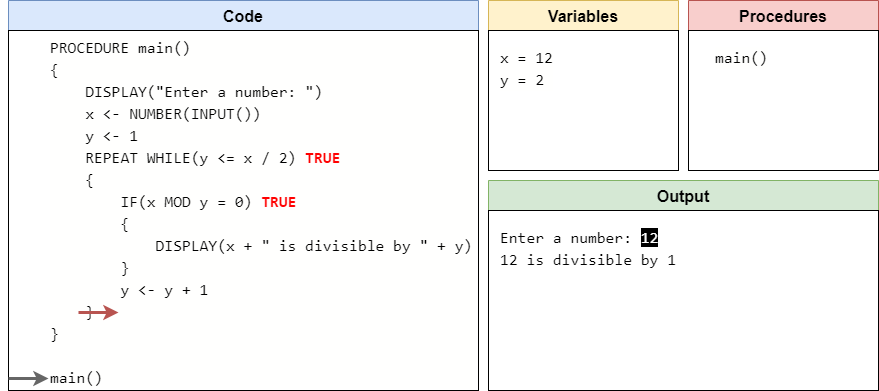
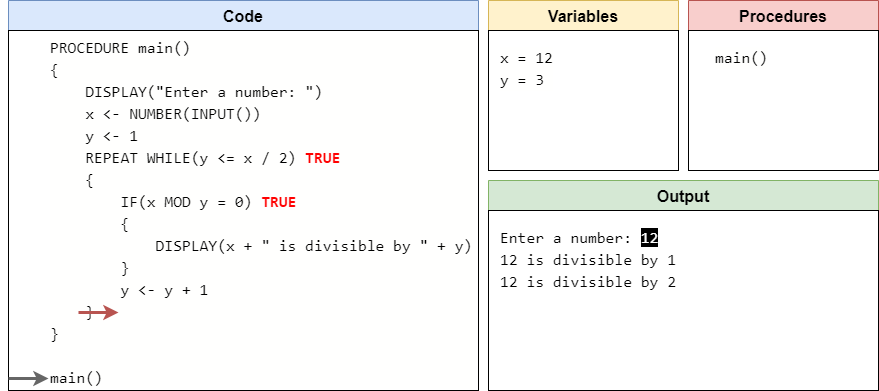
At this point, we’ve reached the end of the while loop. So, we need to loop back up to the beginning of the loop and start over again.
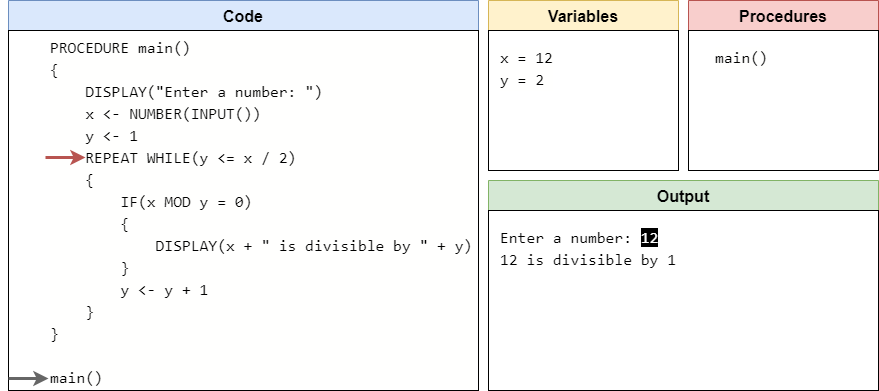
Here, we need to once again evaluate the Boolean expression inside of the while loop. Since the value of y has changed, it might be different this time. However, we see that the $2$ store in y is still less than or equal to half of the value $12$ stored in x, so we enter the loop again.

Inside the loop, we repeat the same process as before. We start by evaluating the Boolean expression inside of the if statement. Since $12$ is evenly divisible by $2$, that expression is true and we should enter the if statement.

So, once again we’ll print some output to the terminal:
And then we’ll leave the if statement and increment the value stored in y by $1$.
We’re at the bottom of the loop, so we’ll need to repeat by going back to the top once again.
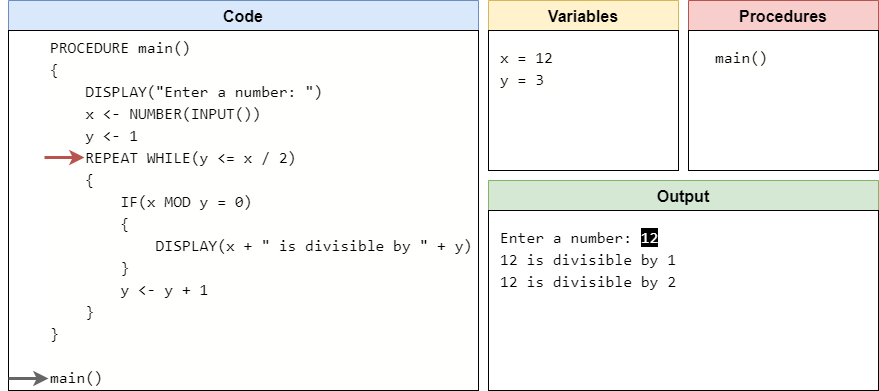
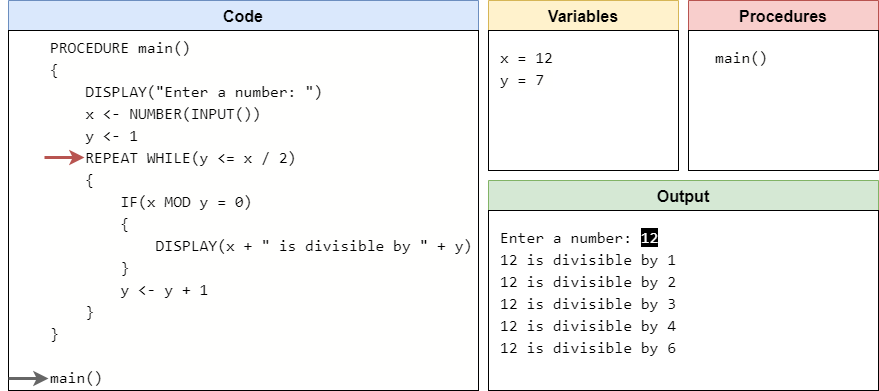
Hopefully by this point we have a pretty good idea of how this loop is working. We first check to see that $3$ stored in y is less than or equal to half of the value in x. Since it is, we’ll continue the loop, and in the if statement inside we’ll find that $12$ is evenly divisible by $3$, so we’ll print some output, increment y by $1$, and loop back to the top. So, after that whole iteration, we should see the following in our code trace:
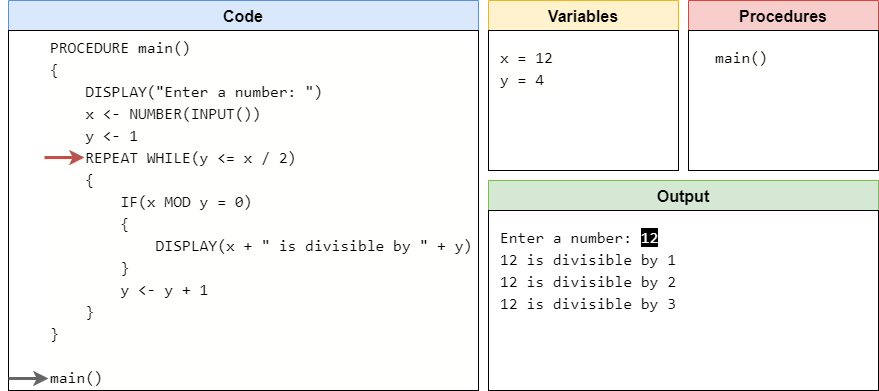
With small, simple loops like this one, once we know what it does, we can typically just treat the whole loop like a single statement in our mental model of a computer. We know that it will increment the value of y each time, and if the value of x is equally divisible by y, it will print some output. Finally, we know we should keep repeating this step until y is greater than half the value of x. In many cases, we can simply refer to each iteration of the loop by the values of the variables used in the loop itself. So, after the iteration where y is equal to $4$, we’ll see this state:

Likewise, after the iteration where y is $5$, we’ll see this state:

Notice that this iteration did not produce any output, since $12$ is not evenly divisible by $5$. At this point, y is storing the value of $6$. Since that is exactly half of $12$, it still makes the Boolean expression true so we should execute the code in the loop again. After that iteration, we’ll see the following state:
At this point, y is now storing the value $7$. Since $7$ is not less than or equal to half of $12$, the Boolean expression inside the while loop will evaluate to false and we’ll jump down to the bottom of the loop.
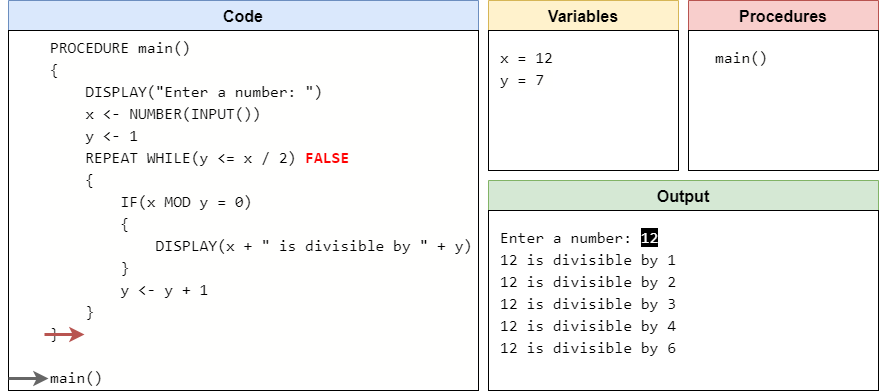
Since there is no more code in the main() procedure, we’ll return back to where the procedure was called, and then we’ll see that we’re at the end of the program! An entire trace of the program is shown in this animation.
As we can see, this program will determine all of the possible factors of the value that is provided by the user as input, and it will print them one at a time to the output.
While Loop Flowchart
Another way to visualize a while loop is using a flowchart. The pseudocode program above can be represented as the following flowchart:

In this flowchart, we once again begin at the top at the circle labeled “Start”. From there, we see that our program will read input and store it in the variable x. We also create the variable y and store the initial value of $1$ there. At this point, we hit a diamond-shaped decision node, representing the while loop. If the Boolean expression in that decision node is true, then we follow the branch to the right that enters the loop. Here, we see yet another decision node that represents the if statement inside of the loop. When we see a loop and an if statement side by side in a flowchart like this, it is very easy to see how similar they actually are.
After the if statement, we increment the value stored in y, and then we see the flowchart path will loop back up to the beginning of the while loop, starting with the decision node at the top. This is the key concept in a while loop - once we reach the end of an iteration, we must go back to the top and enter the decision node once again.
When we reach a point where the Boolean expression evaluates to false, our flowchart will then finish at the circle labeled “End”.
So, just like we saw with conditional statements, using flowcharts is another great way we can try to understand the control flow in our programs. Feel free to make use of any of these tools as we continue to develop more complex programs in this course.
note-1
In the Official AP Pseudocode
, the REPEAT WHILE loop is instead replaced with a REPEAT UNTIL loop. The concept is the same, except that the loop will repeat until the Boolean expression is true, instead of while the Boolean expression is true. We feel it is worth highlighting this change, since it does deviate from the official standard.
This is a very subtle change, and it is easy to translate between the two by simply adding a Boolean NOT operator to the Boolean expression. However, we chose to introduce loops using REPEAT WHILE instead of REPEAT UNTIL because most programming languages, including Python, only use while loops. There are few, if any, modern languages that use an “until” loop, and we feel that it adds an unnecessary complication to our pseudocode language. So, we’ve chosen to stick more closely to Python’s loop structures than the ones introduced in the AP Pseudocode.
Subsections of While Loops
For Loops
YouTube VideoResources
Another type of loop that is commonly used in programming is the for loop. Instead of a while loop, which only uses a Boolean expression to determine if a loop repeats, a for loop is typically used to iterate a defined number of times, either by counting up or by iterating across a data structure such as a list. We’ll learn more about how to use for loops with lists later in this course.
In pseudocode, a for loop is used to iterate a specific number of times. The basic syntax for a for loop is shown here:
REPEAT <n> TIMES
{
    <block of statements>
}
In this example, the placeholder <n> is used to represent a number, typically a positive integer, that gives the number of times the loop should be executed. Then, we will execute the statements in the <block of statements> the given number of times. Put another way, we can say that this loop will execute the <block of statements> for n times - this is why we call this a for loop.
Code Tracing Example
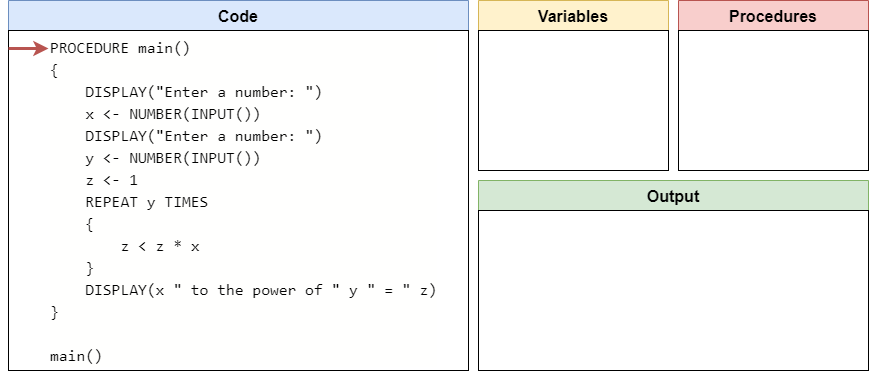
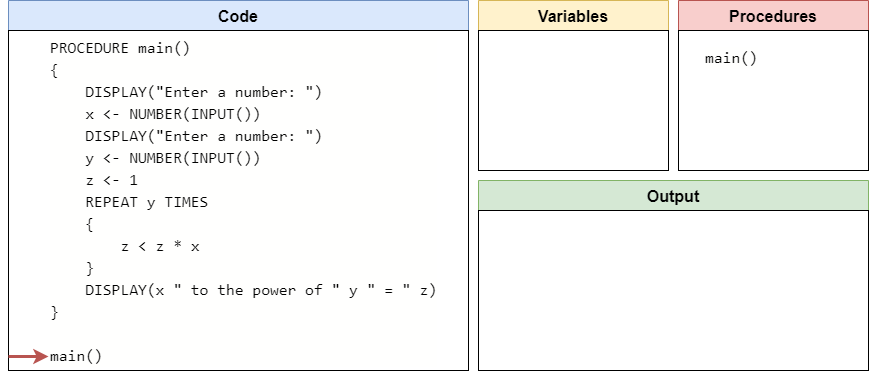
Let’s look at a quick example program to see how a for loop works in practice. Consider the following pseudocode program:
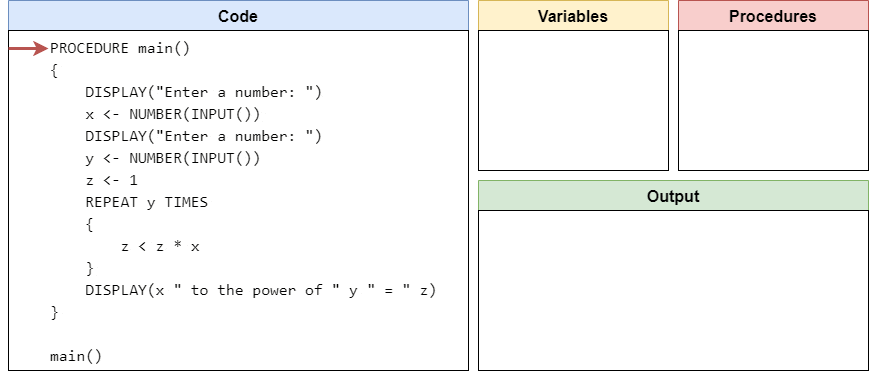
PROCEDURE main()
{
    DISPLAY("Enter a number: ")
    x <- NUMBER(INPUT())
    DISPLAY("Enter a number: ")
    y <- NUMBER(INPUT())
    z <- 1
    REPEAT y TIMES
    {
        z < z * x
    }
    DISPLAY(x " to the power of " y " = " z)
}

main()
Just like before, take a minute to read this program and see if you can determine how it works before continuing to the description below.
Once again, we’ll begin by setting up or code tracing structure as shown here:
First, we’ll find the main() procedure, and record it in the list of procedures.
Then, we’ll encounter a call to the main() procedure, so we’ll move our execution to the first line of code inside of that procedure.
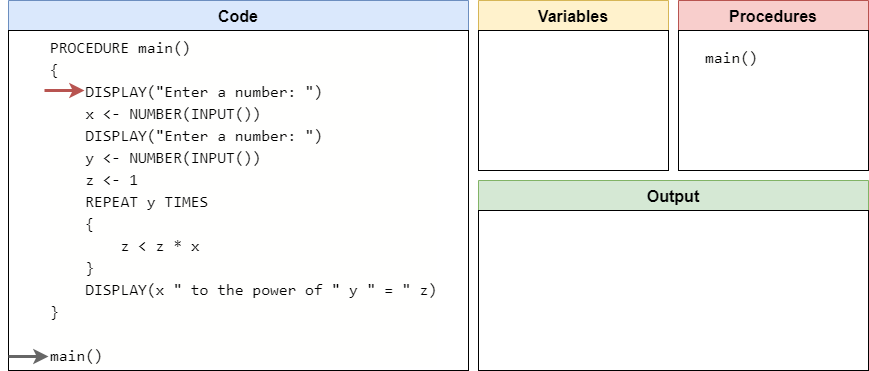
Here, the first two lines will prompt the user to input a number, and then that number will be stored in the variable x. For this example, let’s assume the user inputs the string "5", so the number $5$ will be stored in the variable x.
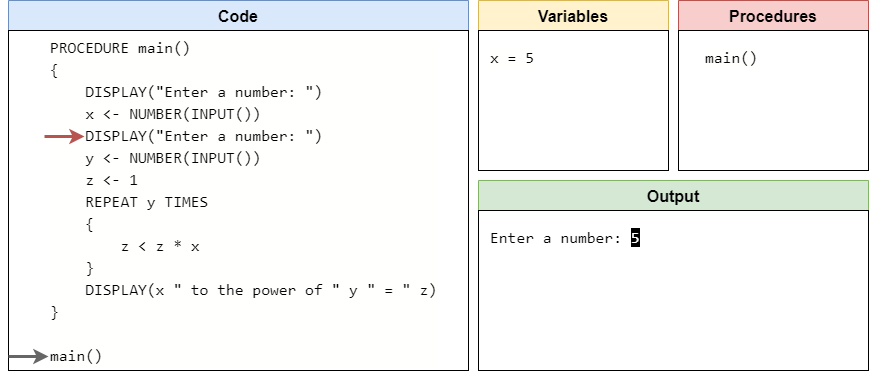
Likewise, we’ll do the same for the variable y. So, let’s assume the user inputs "3", which will store the number $3$ in the variable y.

The program will also initialize the variable z by storing the number $1$ in it.

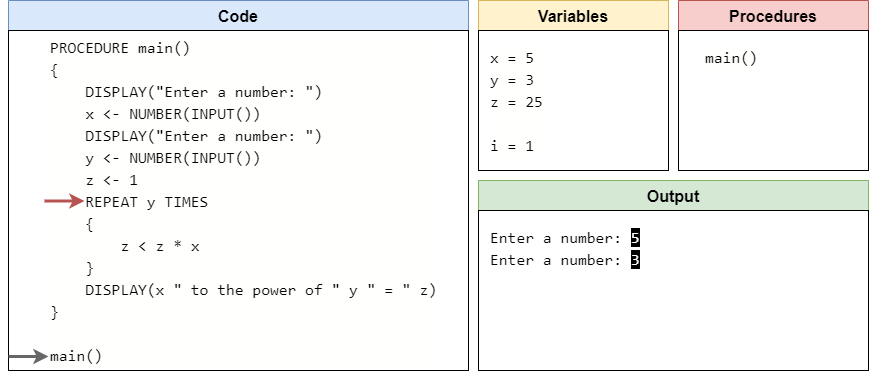
At this point, we’ve reached the for loop in our code. When we evaluate a for loop, we need to keep track of how many iterations are left. So, the easiest way to do that is to create a new hidden variable that is initially set to the value given for how many times to repeat the loop, and then we can count down using that variable. So, in our list of variables, we’ll create a new variable i to keep track of the loop. It should initially store the same value that is stored in y, so we’ll store $3$ in i.
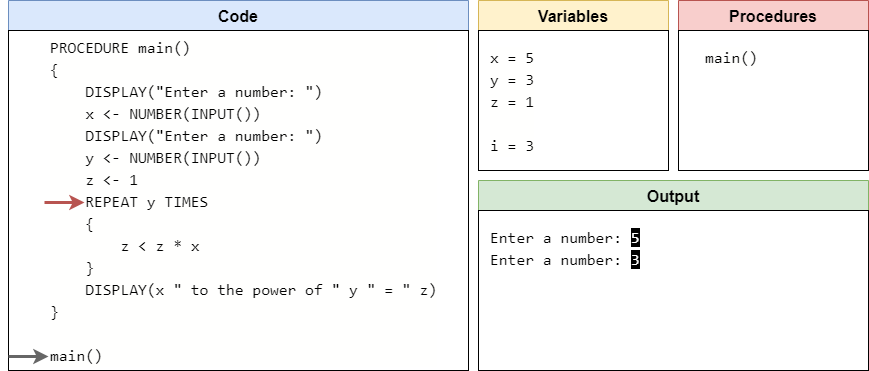
Now we are ready to see if we should enter the loop. Since i is greater than $0$, we know that we have at least one loop iteration to go. Therefore, we’ll enter the loop.

Inside the loop, we’ll update the value stored in z by multiplying it by x. So, z will now store the value $5$.

Now we’ve reached the end of the loop. At this point, we’ve completed a full iteration of the loop, so we can subtract $1$ from the hidden loop counter variable i. This is called decrementing a variable. Once we’ve done that, we can loop back up to the beginning of the loop itself.

Here, we once again must check to see if we should enter the loop. Since our loop counter variable i is greater than $0$, we know that we can enter the loop again.

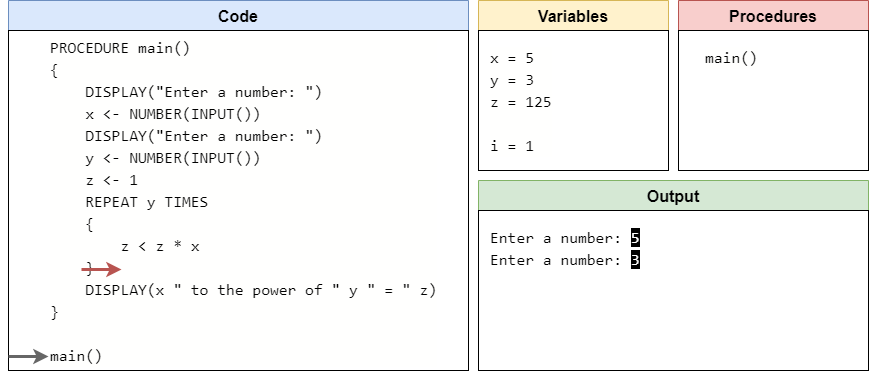
Inside the loop, we’ll once again update the value in z by multiplying it by x. So, z now stores $25$.

Then, we’ll reach the end of the loop, so we must decrement the value in i and jump back to the top of the loop.
Since i is still greater than $0$, we’ll enter the loop once again.

We’ll multiply the value in z by x, which means z will now be storing $125$.
At the end of the loop, we’ll decrement i again and return back to the top of the loop.

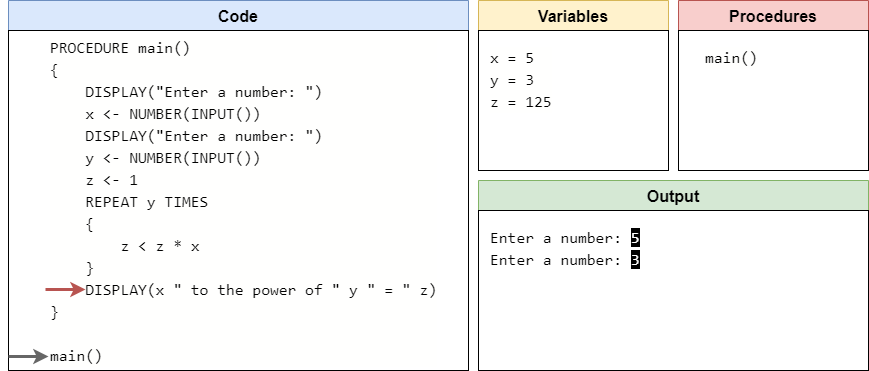
At this point, we see that i is now equal to $0$. This means that we’ve executed the loop the correct number of times, we can now jump to the code after the loop.
Finally, at the end of the program, we’ll print the result of our calculation.
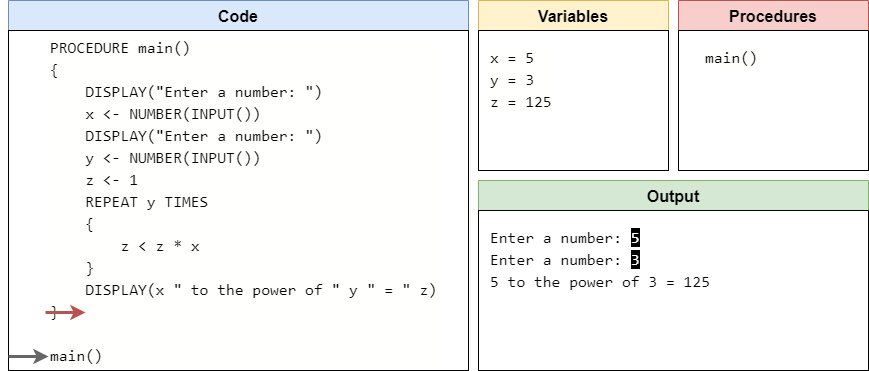
Now that we’ve reached the end of the main() procedure, we’ll return back to where it was called from. Since that is the end of the code, the program stops executing. A full animation of this program can be seen here.
As we were able to show through code tracing, this program will compute the result of taking the first input to the power of the second input. Since the power operation is simply repeatedly performing multiplication a set number of times, it is easily done through the use of a for loop.
Subsections of For Loops
Input with Loops
YouTube VideoResources
One of the most powerful features of loops is to deal with invalid user input. For example, if we want a user to input a positive number, but they accidentally input a negative number instead, what should our program do? Previously, all we could do was print an error and ask the user to run the program again, but that isn’t very user friendly or efficient. Instead, we can use a loop to repeatedly prompt the user for input until we receive a valid input.
Let’s look at an example to see how this works. Consider the following pseudocode procedure:
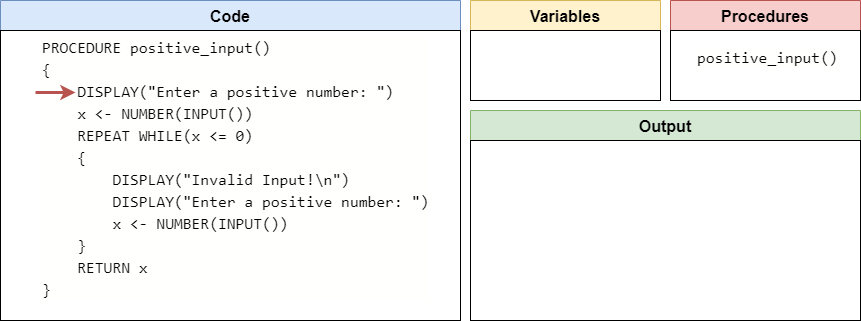
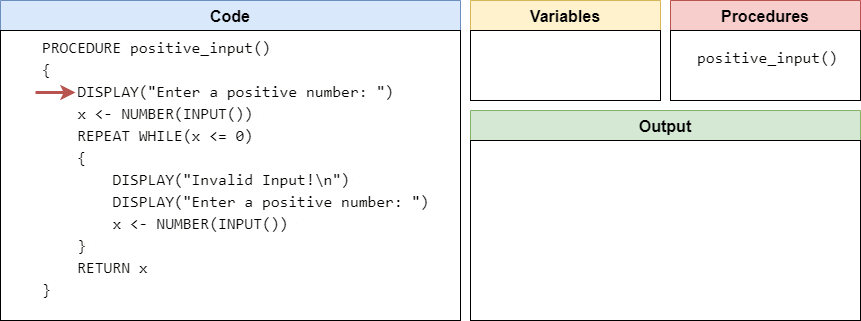
PROCEDURE positive_input()
{
    DISPLAY("Enter a positive number: ")
    x <- NUMBER(INPUT())
    REPEAT WHILE(x <= 0)
    {
        DISPLAY("Invalid Input!\n")
        DISPLAY("Enter a positive number: ")
        x <- NUMBER(INPUT())
    }
    RETURN x
}
This procedure will prompt the user for input, and then store whatever is received in the variable x. However, if the user inputs a number that is less than or equal to $0$, it will print an error message and prompt the user for input once again. Let’s quickly code trace through this procedure to see how it works.
Code Trace
When code tracing a procedure, we simply start as if we are calling the procedure from somewhere else. So, our setup will look like this:
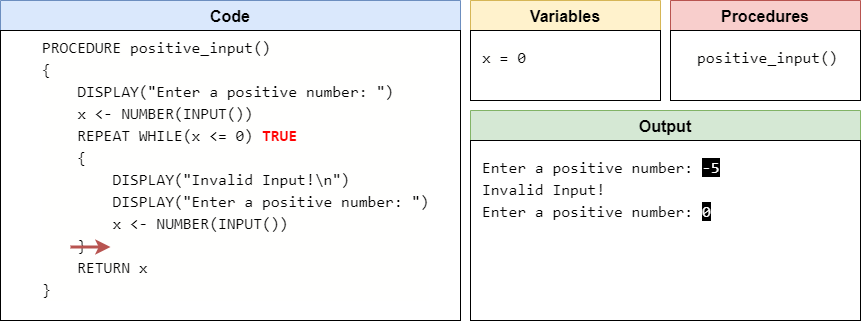
This program begins by prompting the user for input, and then storing the input as a number in the variable x. So, let’s assume that the user input the string "-5" when prompted. So, that will store the value $-5$ in the variable x.
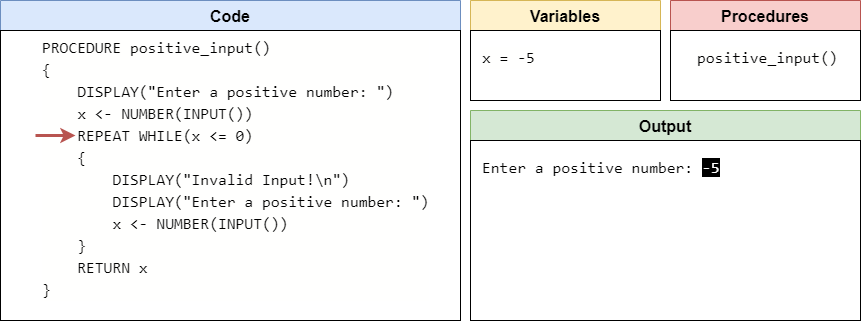
At this point, we’ve reached the beginning of our loop, so we need to determine if the Boolean expression evaluates to true or false. Since the value stored in x is less than or equal to $0$, the Boolean expression is true and we should enter the loop.
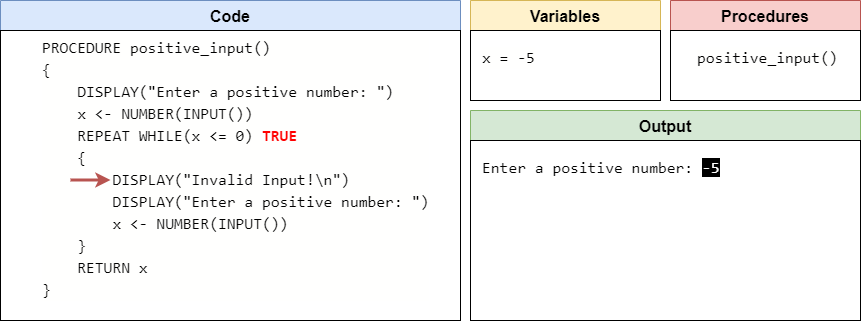
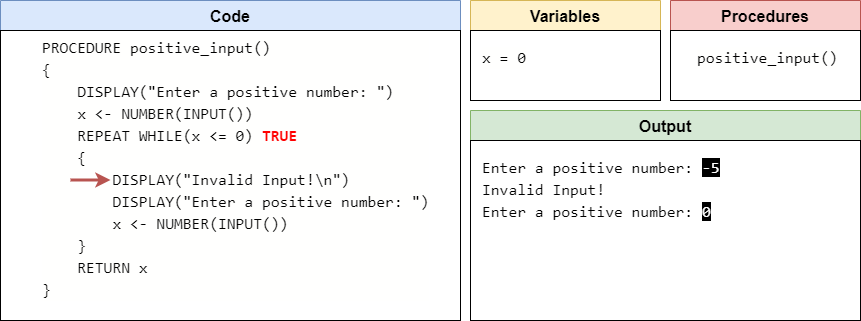
Inside the loop, we know that the most recent input from the user was invalid. So, we’ll print an error message, followed by a new prompt for input, and then we can read a new value from the user. This time, let’s assume the user has input the string "0", so we’ll store the value $0$ in the variable x.
Now we’ve reached the end of the loop, so we must go back to the beginning of the loop and start over.

Here, we can check the Boolean expression once again. Since x now stores the value $0$, it is still less than or equal to $0$, so we should enter the loop again.
Just like before, we’ll print an error and then prompt the user for new input. This time, let’s assume the user inputs the string "7", so we’ll store the value $7$ in the variable x.
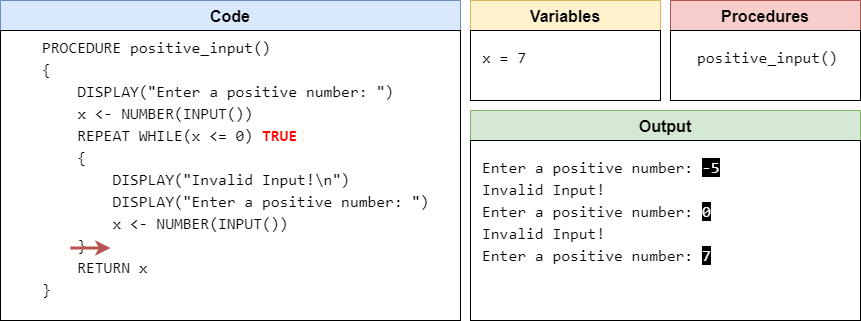
We’re at the end of the loop once again, so now we’ll jump back to the beginning of the loop.
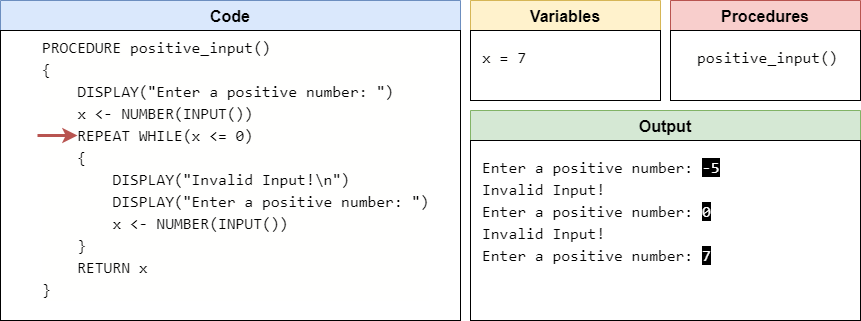
Here, we can test the Boolean expression yet again. This time, however, since x is not less than or equal to $0$, the Boolean expression is false and we can jump past the loop.
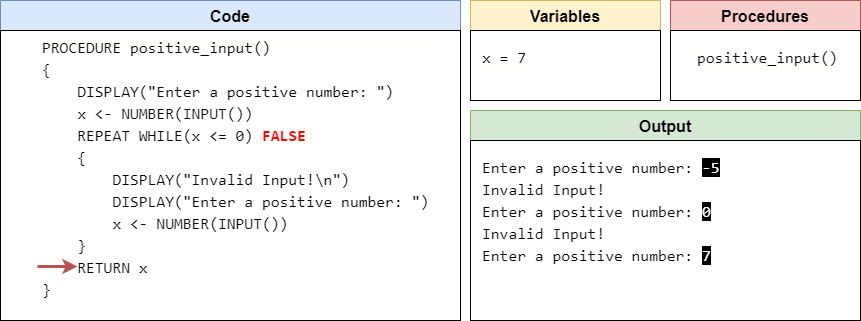
At the bottom of the procedure, we are returning the value we received as input from the user. So, the value returned by this procedure will be $7$, which is a valid input that we received from the user itself. A full animation of this procedure is shown here.
Reading Input
Once we’ve created a procedure such as this in our programs, we can easily use it to read input from the user and verify that it meets the requirements we need. For example, consider this main() procedure that uses the positive_input() procedure we created above:
PROCEDURE main()
{
    a <- positive_input()
    b <- positive_input()
    c <- (a + b) / 2
    DISPLAY("The midpoint is " + c)
}
This program will simply find the midpoint between two positive numbers. All of the code for handling user input is in the positive_input() procedure, and we can call it multiple times to get multiple different inputs from the user.
The positive_input() procedure is a great example of a simple design pattern that is commonly used in programs. A design pattern is simply a structure in code that is used to solve a particular problem, usually one that comes up often in many different programs. If we learn to solve these little problems by using these common programming structures, or patterns, it makes it much easier for others to read and understand our code. In addition, by learning these design patterns ourselves, it makes it much easier for us to solve common problems in our code - we can simply apply the relevant design pattern instead of trying to create a new solution from scratch. So, feel free to make use of the positive_input() procedure shown here, or adapt it as needed, anytime you need to read input from a user.
Subsections of Input with Loops
Testing Loops
YouTube VideoResources
Now that we’ve seen many examples of how to use loops in our code, let’s briefly discuss some techniques for testing programs that contain loops. Many of these techniques are similar to ones we’ve explored when testing conditional statements, but there are a few important nuances to think about.
Branch and Path Coverage
First, just like we explored with conditional statements, it is important to test our programs in a way that we execute every possible branch, and try to find every possible path through the program as well. When dealing with a loop, usually we just consider two paths - one where the loop is entered at least once, and one where the loop is skipped entirely, if possible.
Consider this example program in pseudocode:
PROCEDURE main()
{
    x <- NUMBER(INPUT())
    y <- NUMBER(INPUT())
    REPEAT WHILE(x < y)
    {
        x = x + x
    }
    DISPLAY(x)
}
This program will repeatedly double x until it larger than y. So, let’s come up with some inputs for this program that achieve branch and path coverage.
Branch Coverage
To achieve branch coverage, we must simply come up with a set of inputs that will execute every line of code in the procedure at least once. So, let’s try inputting $3$ and $5$ first. Since x is less than y, we enter the loop at least once. Eventually, x will become greater than y, so we’ll exit the loop as well at some point. Therefore, we can say that the inputs 3 and 5 are enough to achieve branch coverage.
Path Coverage
In this sample program, we’ve already executed all of the code, but we may want to try and come up with a set of inputs that will bypass the loop completely. This helps us check to make sure there aren’t any issues with the code if the loop isn’t executed at all. For this instance, consider the inputs 5 and 3. In this case, the value in x is already greater than y, so the program will never execute the code inside of the loop at all. Thankfully, this doesn’t break anything, so we know this program will work just fine without executing the loop.
Loop Termination
When testing code that contains a loop, there is one other test we must consider - is it possible to reach a situation where the loop will never terminate? That is, once we start executing code within the loop, is it possible to get stuck in the loop and then never actually complete the program?
Therefore, we must think carefully about our loops and situations that might cause problems. For example, what if we provide the inputs -5 and -3 to the pseudocode program above?
In that case, we’ll enter the loop since $-5$ is less than $-3$, but once we’ve executed the code in the loop, we’ll see that x is now storing $-10$! We’ve actually gotten further away from a situation where the loop will terminate, which is definitely not good. In fact, this loop will repeat infinitely, and our program will run forever.
So, we should either rethink our program a bit, or possibly add additional code to make sure the user does not input a negative value for y. By properly testing our program, we were able to discover a situation where the loop would not terminate!
note-1
Unfortunately, it can be difficult to definitively prove if a loop will terminate in all cases. In computer science, we typically use a special concept known as a loop variant in order to prove that a loop will eventually terminate. Loosely, a loop variant is a way of expressing a maximum number of possible iterations of a loop before it terminates based on the current state of the program.
In the example above, we could say that our loop variant is the difference between x and y. Then, as long as we can show that the difference between those two values is monotonically decreasing each time the loop iterates, we can show that eventually it will reach a $0$ or less than $0$ and the loop will terminate. If the loop variant does not decrease, then the loop will not terminate.
In this course, you won’t be expected to reach that level of detail, but hopefully you’ll be able to use some simple logic and common sense to figure out if a loop will terminate or if there are situations where it won’t work correctly.
Subsections of Testing Loops
Worked Example
YouTube VideoResources
Let’s go through a complete worked example program so we can see how to use loops to transform a problem statement into a working program. Once we’re done, we’ll also talk about how we can test the program to determine if it works correctly and won’t run into an error.
Problem Statement
For this example, we’re going to write a simple program to play a variant of the game Nim known as the 21 Game . Here are the rules:
The game begins with the first player choosing either $1$, $2$, or $3$. Then, the second player chooses either $1$, $2$ or $3$ and adds that number to the number chosen by the first player to establish a total. The game continues by alternating between players, each choosing to add either $1$, $2$ or $3$ to the total. The game is over when the total reaches $21$ or higher. The player who adds the number to the total that causes the game to end is the loser.
This is a very simple game, and a great example of how loops can be used in a program in a variety of different ways. So, let’s see what it takes to create this program.
Basic Structure
To begin, we need to start with a main() procedure and a call to the main() procedure, as shown here:
PROCEDURE main()
{

}

main()
Next, we know that the program will repeat until the total is greater than or equal to $21$. So, we can easily add a variable to keep track of the total, and a loop that will represent the actual game being played.
PROCEDURE main()
{
    total <- 0
    REPEAT WHILE(total <= 21)
    {
        # players take turns
    }
    # game over
}

main()
We also need some way to keep track of which player’s turn it is. So, we’ll need a variable to track that, as well as a simple conditional statement at the end of our loop to switch between the two players. In pseudocode, that would look like this:
PROCEDURE main()
{
    total <- 0
    player <- 1
    REPEAT WHILE(total <= 21)
    {
        # player's turn
        IF(player = 1)
        {
            player = 2
        }
        ELSE
        {
            player = 1
        }
    }
    # game over
}

main()
As we can see, we just use a variable that switches between the values $1$ and $2$ to keep track of the current player. At the end of the loop, we have a conditional statement that checks the current value of that variable, and then switches it to the other value. This allows our players to take turns within a single loop.
Handling Input
Next, we need a way for our players to provide input. Thankfully, earlier in this lab we saw a simple procedure for accepting input from a user and checking to make sure it is valid. So, we can simply borrow that procedure and tweak it a little bit to fit this scenario. Here is what that procedure would look like in pseudocode:
PROCEDURE read_input(player)
{
    DISPLAY("Enter 1, 2, or 3 for player " + player + ": ")
    x <- INPUT()
    REPEAT WHILE(x != "1" AND x != "2" AND x != "3")
    {
        DISPLAY("Invalid Input!\n")
        DISPLAY("Enter 1, 2, or 3 for player " + player + ": ")
        x <- INPUT()
    }
    RETURN NUMBER(x)
}
This procedure is a bit different than the previous one because it requires a parameter. The parameter is used to represent the current player, and we include that in the prompt for input to show which player’s turn it is. Without that, the game would be very confusing. We’ve also updated the Boolean expression inside of the while loop to make sure the value input is either "1", "2", or "3". If it isn’t, it will print an error message and prompt the same player for input again. Once a valid input has been received, it will return that value back to where this procedure was called from.
note-1
Unfortunately, in pseudocode, there isn’t a good way to require users to input whole numbers. For this example, the number of possible inputs is small enough that it makes the most sense to just check for the individual string values themselves, and then convert the input to a number once it has been verified. There are many other approaches in both pseudocode and Python that will achieve the same result.
Completing the Program
Now that we have a procedure for handling input, we must simply add that procedure call to our main() procedure, and use it to update the value stored in the total. We can also add a message at the end to determine which player is the winner. The final, complete program is shown here:
PROCEDURE read_input(player)
{
    DISPLAY("Enter 1, 2, or 3 for player " + player + ": ")
    x <- INPUT()
    REPEAT WHILE(x != "1" AND x != "2" AND x != "3")
    {
        DISPLAY("Invalid Input!\n")
        DISPLAY("Enter 1, 2, or 3 for player " + player + ": ")
        x <- INPUT()
    }
    RETURN NUMBER(x)
}

PROCEDURE main()
{
    total <- 0
    player <- 1
    REPEAT WHILE(total <= 21)
    {
        # player's turn
        total <- total + read_input(player)
        IF(player = 1)
        {
            player = 2
        }
        ELSE
        {
            player = 1
        }
    }
    # game over
    DISPLAY("Player " + player + " wins!")
}

main()
Notice at the end of the main() procedure that we are able to print the player that wins, instead of the losing player. This is because we are switching between players at the end of the while loop, so once the total reaches a value greater than or equal to $21$, we know that we’ve already switched the player variable to be the other player, instead of the one that just caused the game to end. It’s a subtle logic choice, but it works well in this case.
Take a moment to work through this program and make sure you understand how it works. We won’t do a full code trace, but you are welcome to do so to make sure you are comfortable with it before continuing.
Testing - Branch & Path Coverage
Now that we’ve written our program, let’s test it to see if it works correctly. Testing this program is a bit different than some of the other programs we’ve created, mainly because it heavily restricts the inputs that are valid. Each player can only input the strings "1", "2", or "3" as valid input. Any other string is invalid, and will result in the loop inside of the read_input() procedure repeating.
Therefore, when testing our program, we should make sure we try each of these inputs, but also try some invalid inputs as well. The order the inputs are provided also matters - for path coverage, we want to test the situation where a valid input is provided first and the loop in read_input() is skipped, and also the situation where a valid input is provided after an invalid input or two, so the loop in read_input() is executed.
Finally, since this program will read inputs many times while it is executing, we can’t simply use multiple sets of inputs. Instead, we have to look at entire lists of inputs, where the order that they are provided matters as much as the inputs themselves.
Consider the following list of inputs, which are marked with the player’s turn and the updated sum or error:
| Input | Player | Sum/Error |
|---|---|---|
"1" |
1 | 1 |
"2" |
2 | 3 |
"3" |
1 | 6 |
"0" |
2 | error |
"4" |
2 | error |
"1" |
2 | 7 |
"-1" |
1 | error |
"5" |
1 | error |
"2" |
1 | 9 |
"lizard" |
2 | error |
"(*&#$&*^@" |
2 | error |
"3" |
2 | 12 |
"invalid" |
1 | error |
"3" |
1 | 15 |
"broken" |
2 | error |
"2" |
2 | 17 |
" " |
1 | error |
"1" |
1 | 18 |
"3" |
2 | 21 |
| Player 1 Wins |
This list represents one complete game. The first input, "1", will be the first input provided by player 1, then the "2" will be player 2’s turn, and so on. However, as the inputs progress, we start to see some invalid inputs as well. When the game receives an invalid input, the read_input() procedure will enter the loop, and the same player will be prompted for input again until a valid input is received. So, looking through this list, we see that it includes both the situation where the input provided is valid the first time, bypassing the loop, as well as situations where the initial input provided by a player is invalid, entering the loop and prompting for additional input. So, this set of input achieves path coverage in just one game!
We may also want to test and make sure that it is possible for both players to win. To do that, we can simply come up with another set of inputs similar to the one given above, but use different values for the valid inputs to make sure that player 2 wins that game. By doing so, we’ve achieved every possible outcome of the game.
Testing - Loop Termination
The other part of testing this program is to show that the loops will terminate properly. You won’t be required to prove this yourself in this course, but you should still think about it when designing and testing them. So, let’s briefly take a look at that process as well.
First, we can look at the loop in read_input() procedure. This is a bit tricky, since the condition for repeating in the loop is entirely driven by user input. So, we really can’t say whether the loop will terminate or not, but we can easily show that if the user inputs a valid value, the loop will correctly terminate and the program can continue running. So, as far as our testing goes, that’s good enough.
The loop in the main() procedure is a bit different. This loop will repeat while the value stored in total is less than or equal to $21$. So, to prove this loop will terminate, we need to come up with a loop variant and show that it is reducing each time the loop is executed. Thankfully, we can just say that the loop variant is 21 - total. As the value in total increases, that value will decrease until it reaches $0$ or less.
To show that it is constantly decreasing, we can simply say that the read_input() procedure will always return a positive integer, and that value is added to the total each time the loop iterates. So, since total is always getting larger, the loop variant is getting smaller, and the loop will eventually terminate.
There we go! That’s a complete worked example for building and testing a program that contains multiple loops in different procedures. Hopefully this is helpful as you move ahead to the next part of the lab, where you are asked to create and test your own programs. Good luck!
Subsections of Worked Example
Summary
In this lab, we introduced several major important topics in pseudocode. Let’s quickly review them.
Pseudocode While Loops
While loops in pseudocode will execute while a Boolean expression evaluates to true.
REPEAT WHILE(<boolean expression>)
{
    <block of statements>
}
Pseudocode For Loops
For loops in pseudocode will execute a set number of times.
REPEAT <n> TIMES
{
    <block of statements>
}
Input with Loops
Loops can be used to request new input from the user if invalid input is received.
PROCEDURE positive_input()
{
    DISPLAY("Enter a positive number: ")
    x <- NUMBER(INPUT())
    REPEAT WHILE(x <= 0)
    {
        DISPLAY("Invalid Input!\n")
        DISPLAY("Enter a positive number: ")
        x <- NUMBER(INPUT())
    }
    RETURN x
}
Testing Loops
Loops can be tested for both branch and path coverage. In general, achieving path coverage involves writing code that will enter the loop, and also code that will bypass the loop entirely.
Loops should also be tested for termination and situations that may result in infinite loops. Using a loop variant and showing that it is monotonically decreasing is a helpful technique.