Chapter 12
Subsections of Nested Loops
Nested While Loops
YouTube VideoResources
To create a nested loop in Python, we can simply place a loop structure inside of the block of statements that is repeated by another loop structure. This is very similar to how we can nest conditional statements as well.
For example, consider this short Python program:
def main():
    i = 1
    while i < 10:
        j = i
        while j < 10:
            print("{} ".format(j), end="")
            j = j + 1
        print("")
        i = i + 1
    print("Complete!")


main()
In this example, we see a Python while loop that uses the variable i in its Boolean expression first, and then inside of that loop we see another loop that uses j in its Boolean expression. When we run this code, each time we execute the steps inside of the outer while loop, we’ll have to completely go through the inner while loop as well. It can be very complex to keep track of everything, but with a bit of practice we’ll learn some strategies for mentally working through loops.
Before continuing, take a look at that program’s code and see if you can determine what it will print!
Code Tracing Example
To really understand how a set of nested loops work, let’s go through a code tracing example using Python Tutor. To follow along, place this code in the tutor.py file in the python folder on Codio, or click this Python Tutor
link to load Python Tutor in a web browser.
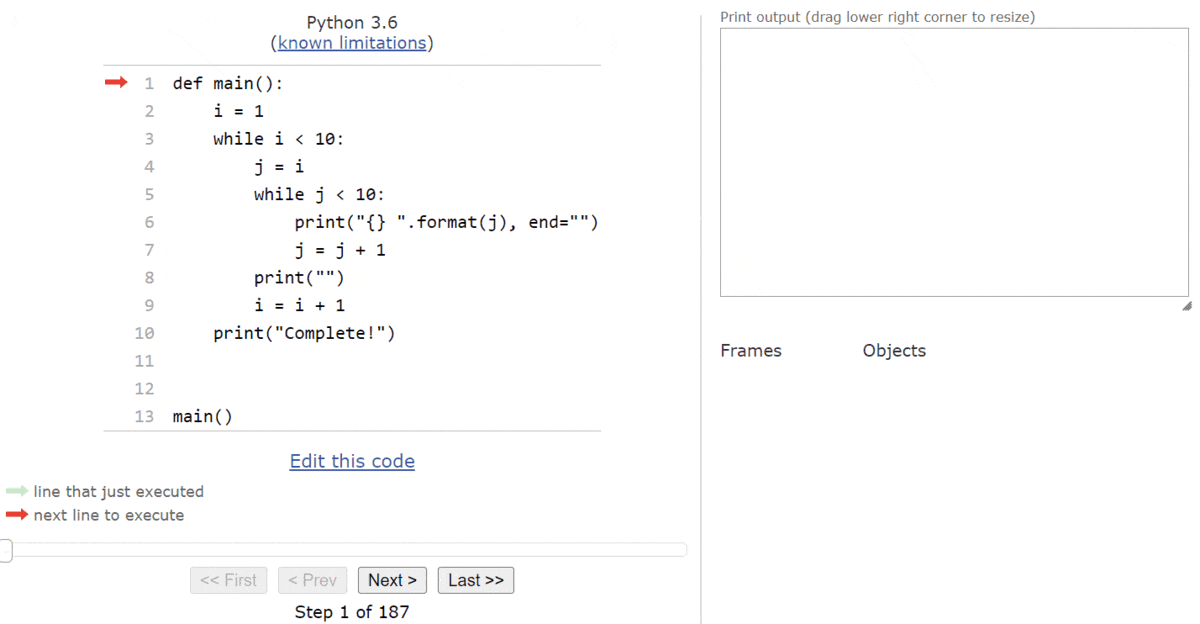
When we first load this code in Python Tutor, we should see the following state:
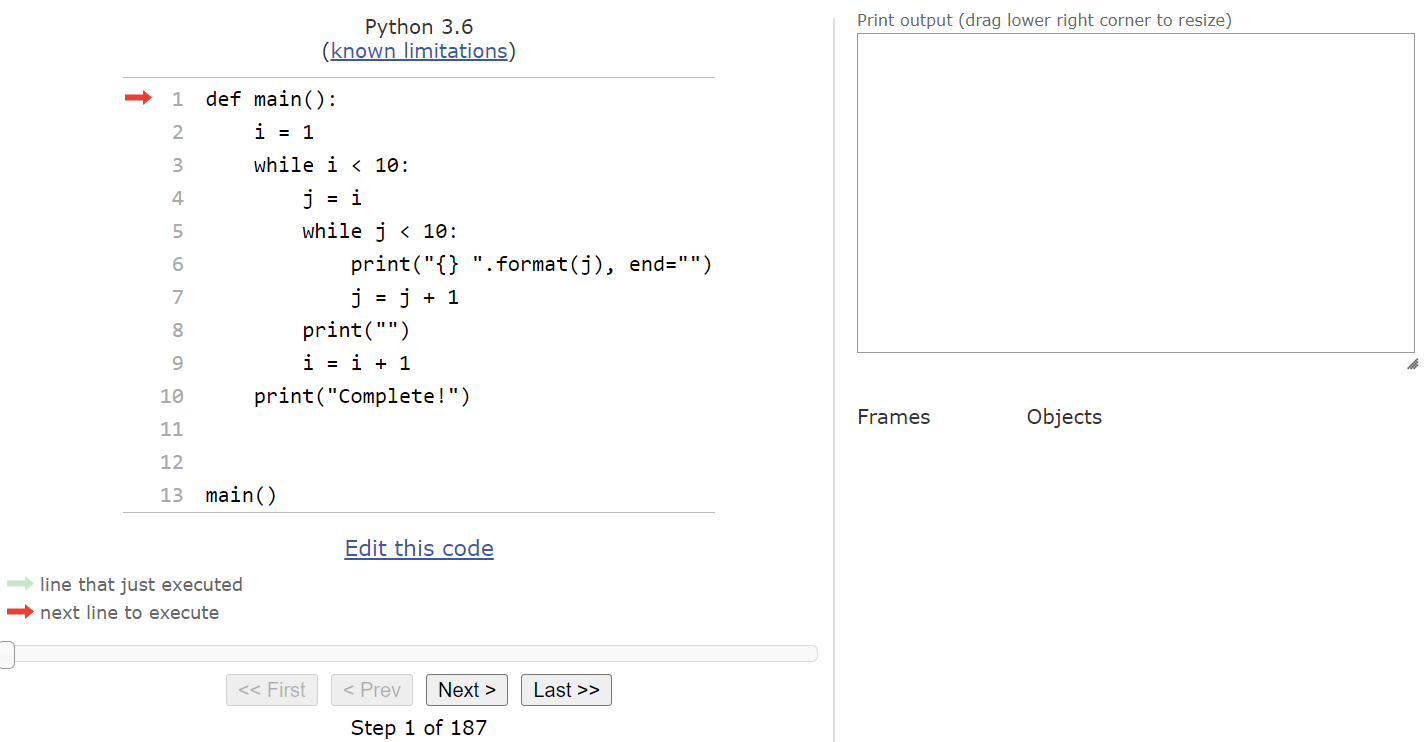
When we look at the bottom of the Python Tutor page, we’ll see that we are on step 1 of 187 steps! That’s a very large number of steps to deal with! Up to this point, most of our programs have been around 20 or 30 steps in total. So, already we’re seeing that nested loops can quickly create programs that execute many more steps.
If we click next a few times, we’ll see Python Tutor find the main() function definition, and then call that function from the bottom of the code. By the time we’ve entered the main() function, we should be at this state:
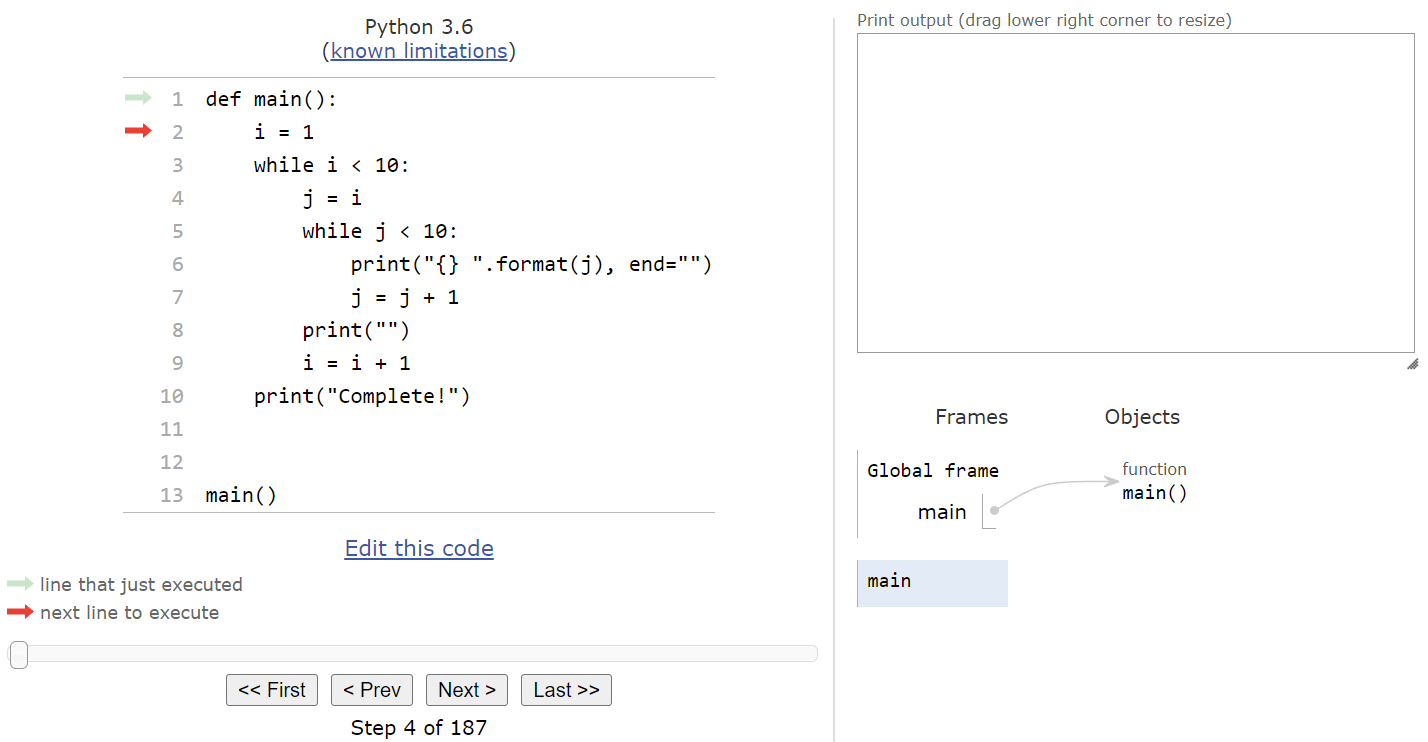
Here, we are setting up the iterator variable i that is used for the outermost loop. So, we’ll store the value $1$ in i and then move to the next line:
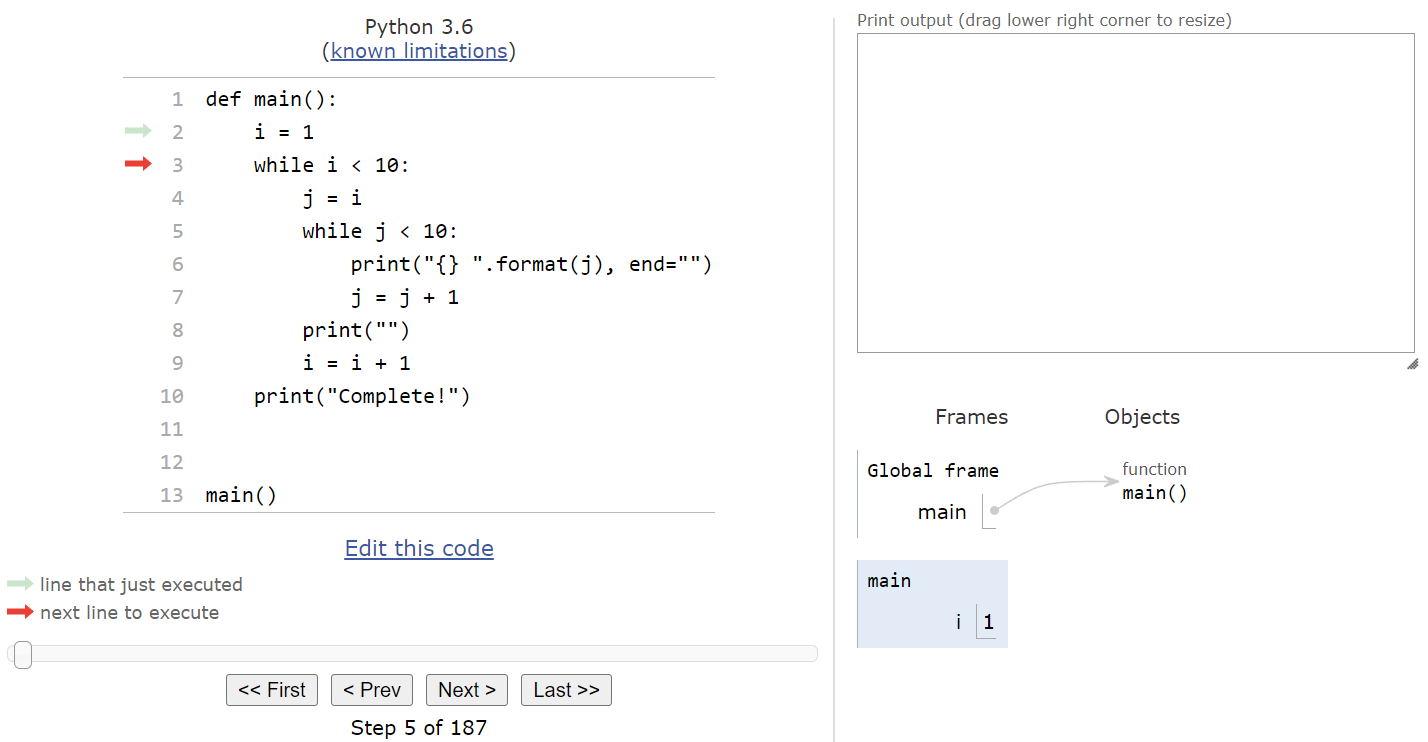
Now we’re at the start of our outer while loop. That means that we’ll need to evaluate the Boolean expression and determine if it is True or False. In this case, we can see that i < 10 will evaluate to True, so we should enter the loop.
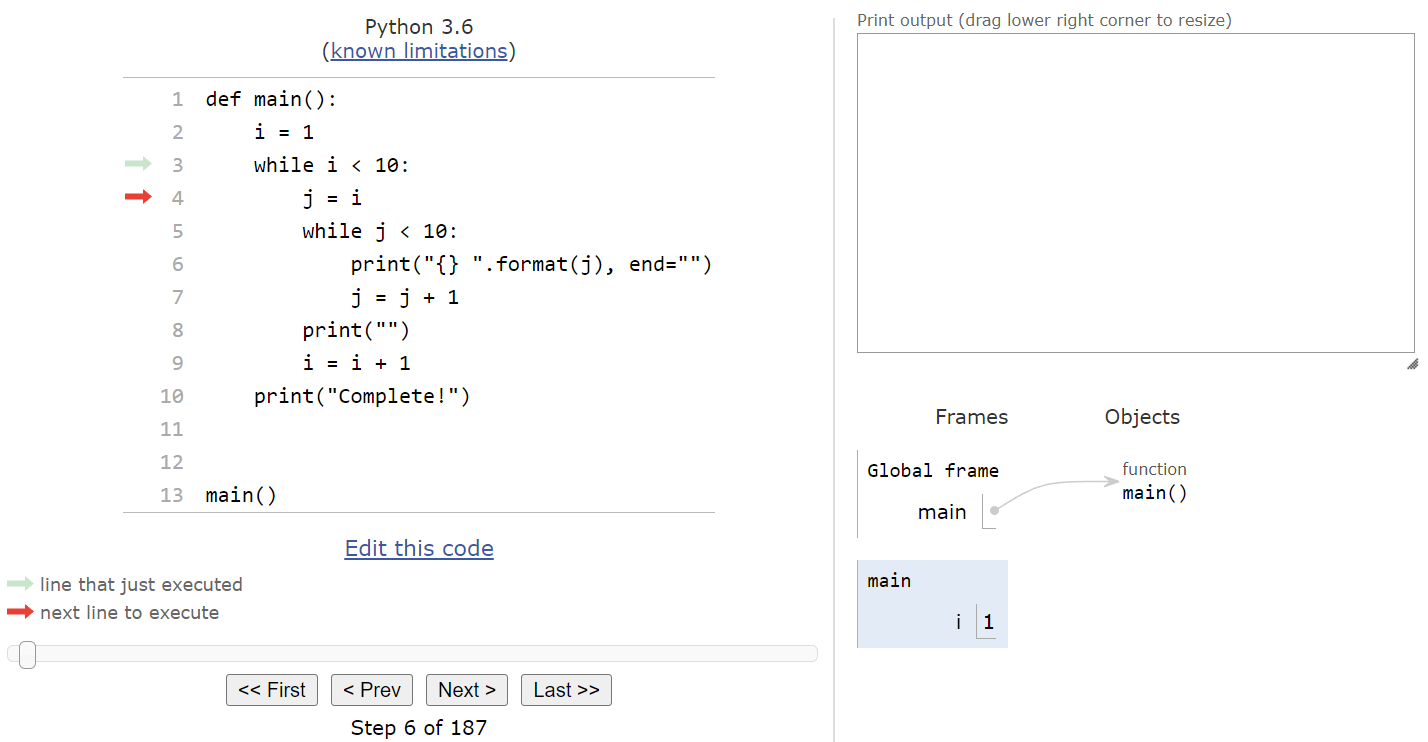
Once we are inside the loop, we’ll start setting up the iterator variable j for the inner loop. In this code, we are storing the current value of i in j, so at this point j will also contain $1$.

At this point, we need to decide if we should enter the inner while loop. So, once again we’ll look at the Boolean expression, j < 10, and see that it is also True and we should enter the loop.

Inside of the inner while loop, we’ll perform two actions. First, we’ll print the current value of j to the output, but we won’t move to the next line since the end parameter is set to an empty string in the print() function:
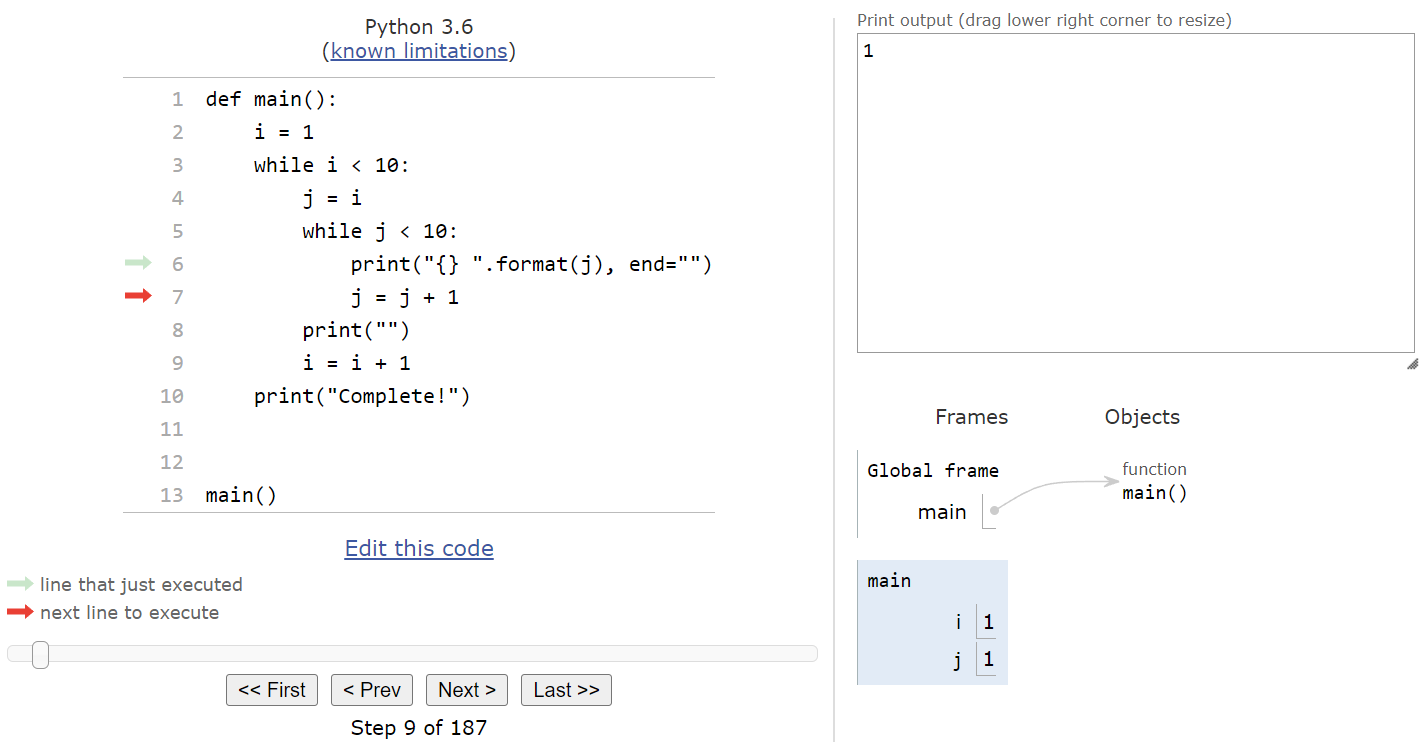
Then, we’ll increment the value of j by $1$ before looping back to the top of the innermost loop:

Notice that when we reach the end of the innermost loop, we jump back to the beginning of that loop, NOT to the beginning of the outermost loop. This is an important concept to learn - since we are only dealing with the inner loop at this point, we must continue to repeat its steps until the Boolean expression evaluates to False. So, since the Boolean expression j < 10 still evaluates to True, we should enter the loop once again.

Inside the loop, we’ll print the current value of j to the same line of output as before:

And once again we’ll increment the value of j by $1$ and jump back to the top of the innermost while loop:
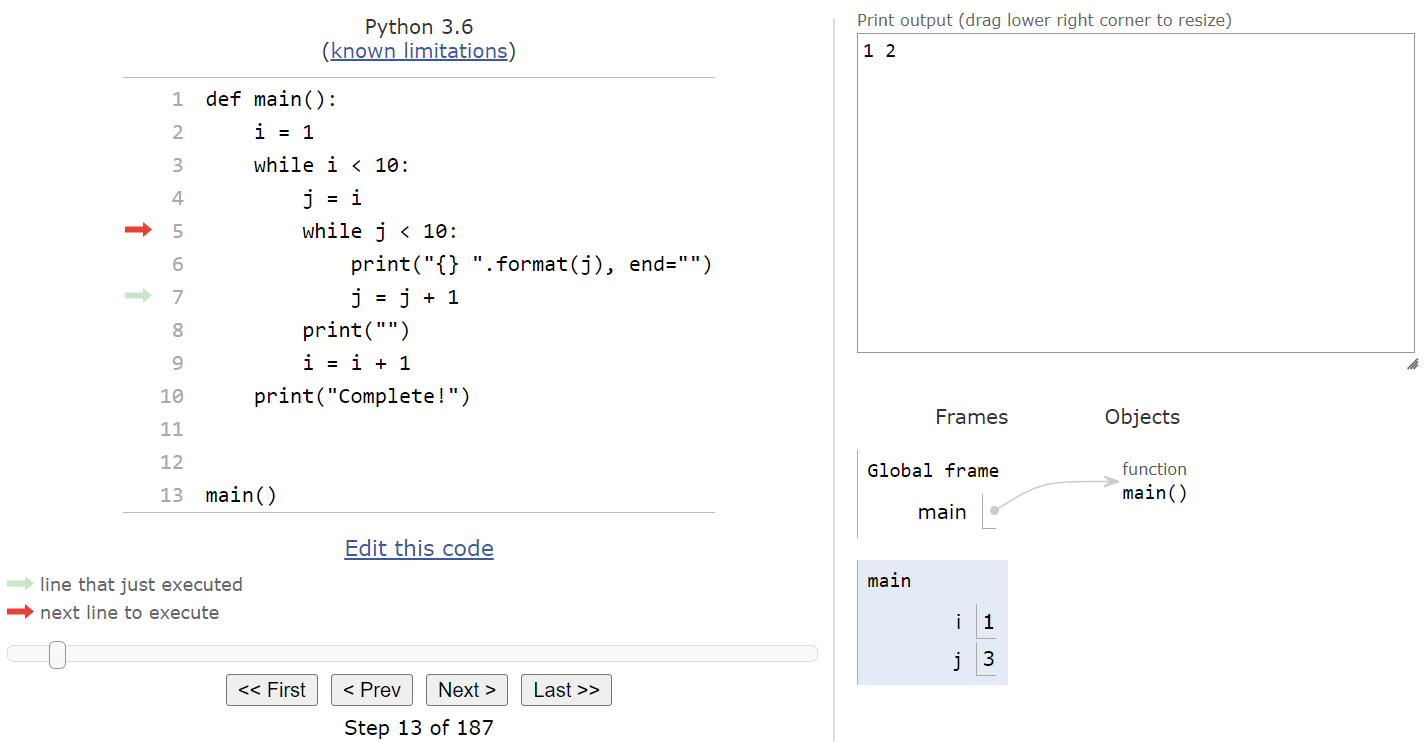
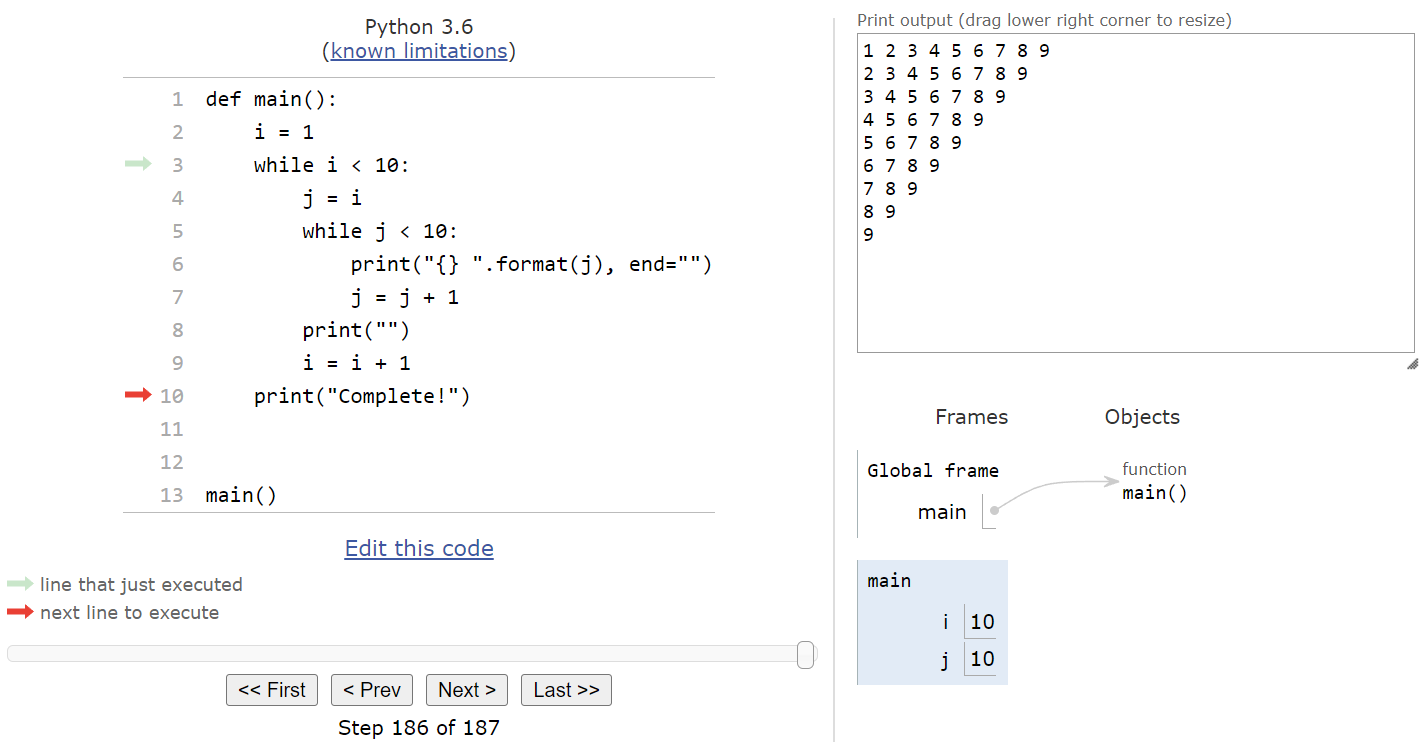
Hopefully at this point we have a pretty good idea of what each step of the innermost while loop does. It will simply print the value of j and increment it by $1$, repeating those steps until j is greater than or equal to $10$. So, once the inner while loop terminates, we’ll see this state:

We jumped from step 13 to step 35 just to complete the inner while loop. Finally, at this point we’ll print an empty string, which will move our output to the next line, and then we’ll increment the value in i by $1$ before looping to the top of the outer while loop:
Now we must check to see if we should enter the outer while loop again by checking the Boolean expression i < 10. Since that evaluates to True, we’ll enter the loop a second time.

Inside the loop, we’ll reset the value of j to be the current value stored in i, which is now $2$, and then we’ll reach the inner while loop:
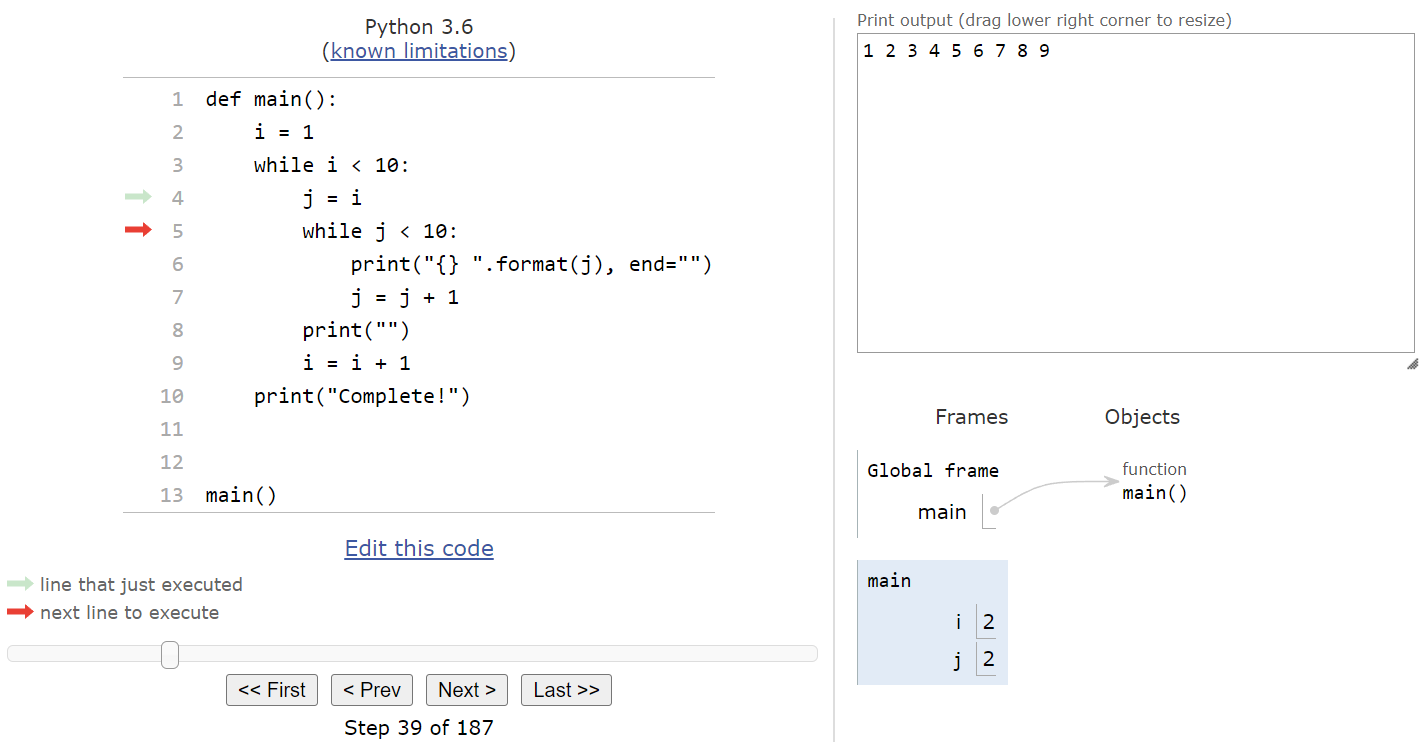
Here, we can evaluate the Boolean expression j < 10, which is currently True, and determine that we should enter the inner while loop.

Inside the loop, the code hasn’t changed, so we can use our understanding from before to quickly figure out what this loop does. It will print the current value in j and then increment j by $1$, so we’ll end up at this state:

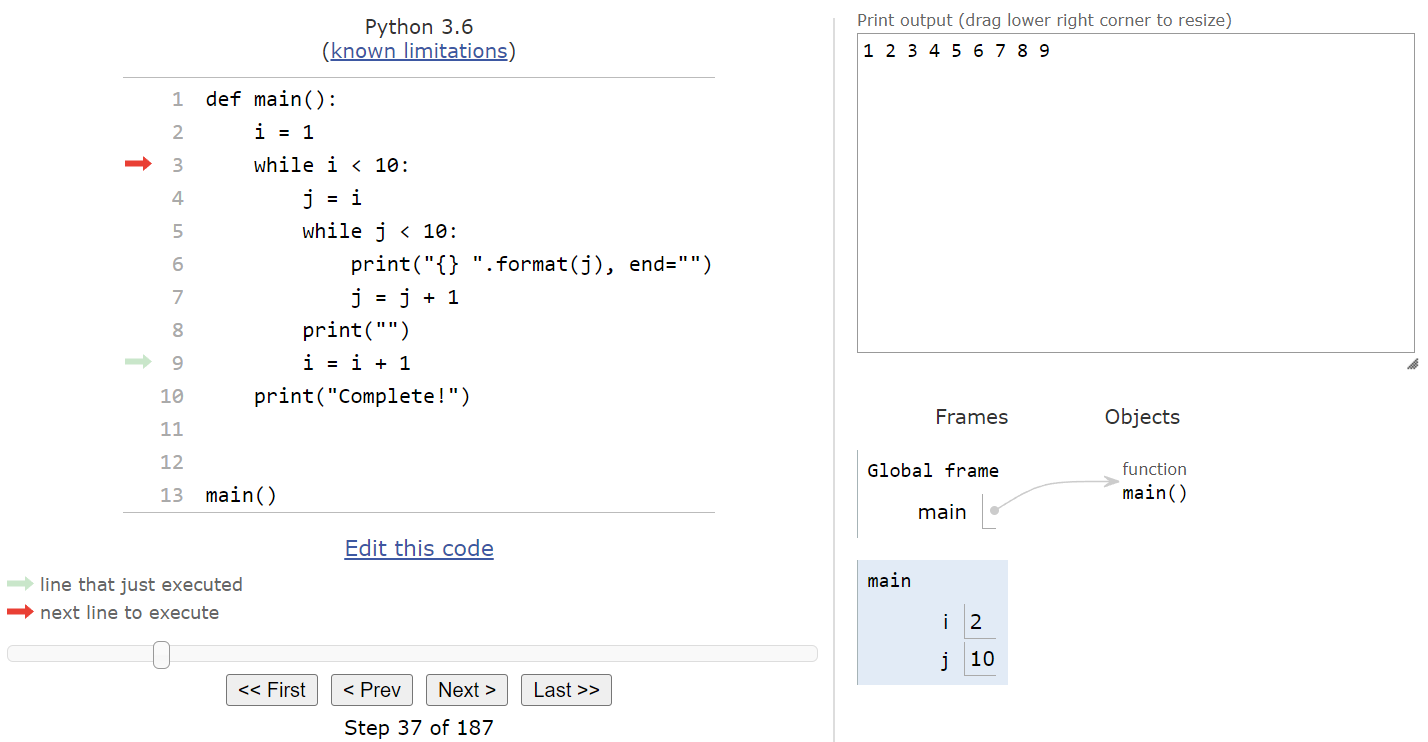
At this point, we can easily assume that the inner loop will do pretty much the same thing as before - it will print all of the values from i up through $9$ to the output, all on the same line. So, once the inner loop has completely finished, we’ll see the following state in Python Tutor:

We were able to quickly jump from step 42 all the way to step 64 just by understanding what the inner loop is doing and extrapolating from our previous experience. Now, we can finish up this iteration of the outer loop by printing a newline and then incrementing i by $1$, and then we’ll be back at the beginning of the outer while loop:

At this point, we’ve completely worked through two iterations of the outermost while loop, including two complete executions of the innermost while loop. So, we’re at a good point to make a prediction about the output of the program as a whole, without executing the next 120 steps. It looks like the inner loop will print the values from i through $9$ on a single line, and then each line will start with the value of i being incremented by $1$ each time. So, overall, we can expect the entire outer while loop to produce the following output:
1 2 3 4 5 6 7 8 9
2 3 4 5 6 7 8 9
3 4 5 6 7 8 9
4 5 6 7 8 9
5 6 7 8 9
6 7 8 9
7 8 9
8 9
9
And, indeed, if we jump ahead to the last line of the program we’ll see exactly that situation in Python Tutor:
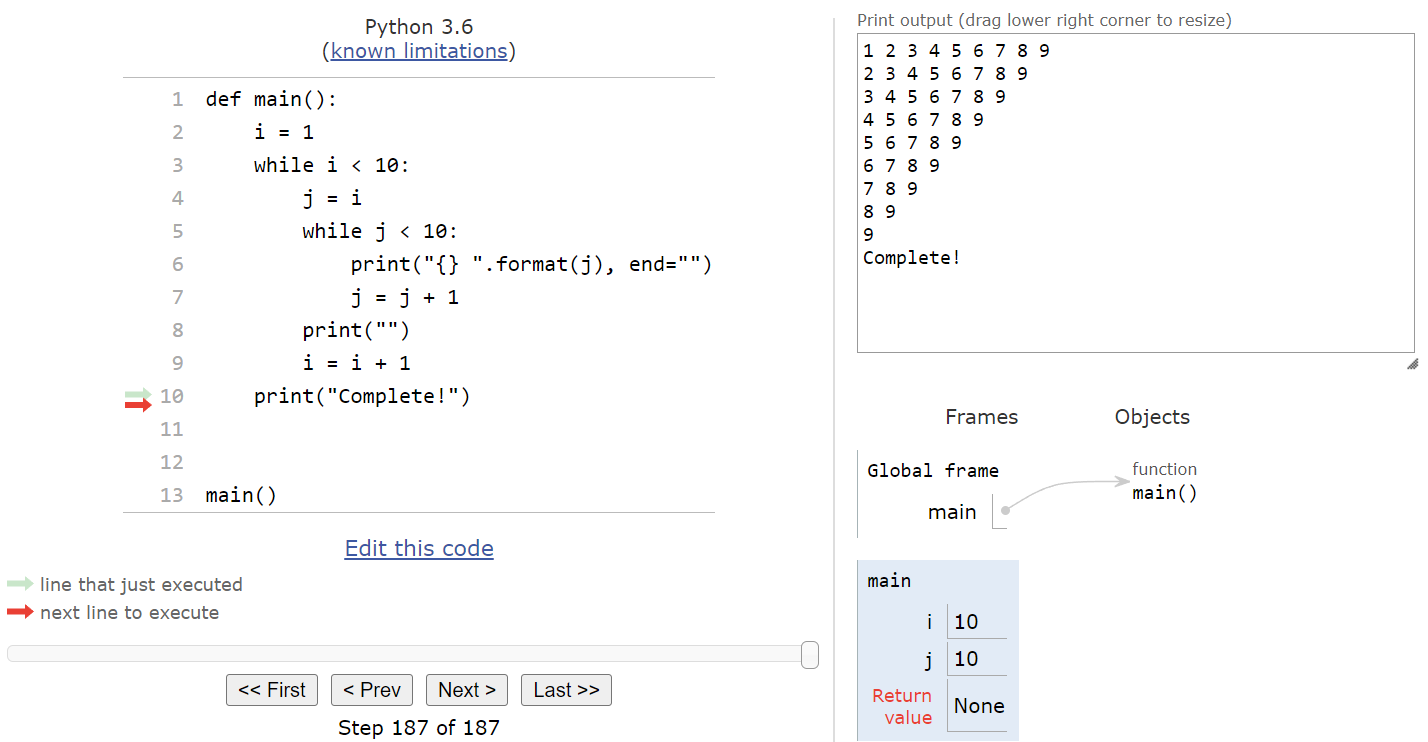
The program ends by printing the string "Complete!". At the end of the program, we’ll see the following state:
A full animation of this process is shown here. After the first full iteration of the outer while loop, the rest of the internal steps are omitted and only the end of each loop iteration is shown.
Working through an example program such as this one is a great way to explore how nested loops work in Python
Tips for Nested Loops
Writing code that has nested while loops can be quite tricky, as there are several pitfalls that we might encounter. Here are a few tips to keep in mind when designing code that uses nested while loops:
- Try to understand the relationship between each loop’s Boolean expression. If possible, use different variables in each one. It is easy to write code where the Boolean expressions are closely related, causing an infinite loop to occur.
- Consider moving the internal loop to a separate function. That way it can be tested independently by calling the function directly elsewhere in your code.
- Look for ways to combine the nested loops into a single loop if possible. While this may not always be an option, it can make reasoning about the code much simpler.
- Try to make the loops as simple as possible. It is much easier to debug loops that use a simple iterator that increments regularly instead of a complex Boolean expression. Likewise, try to build loops that either both increment or both decrement the iterator variable to maintain consistency.
Nested loops present a very difficult challenge for programmers, because they are short snippets of code that may end up resulting in hundreds or even thousands of individual steps to be executed. So, anything we can do to make the loops simpler and easier to understand will greatly improve our ability to write programs with fewer bugs.
Subsections of Nested While Loops
Nested For Loops
YouTube VideoResources
For loops can also be nested, just like while loops. In fact, nesting for loops is often much simpler than nesting while loops, since it is very easy to predict exactly how many times a for loop will iterate, and also because it is generally easier to determine if a for loop will properly terminate instead of a while loop.
A great way to explore using nested for loops is by printing ASCII Art shapes. For example, consider the following Python program that contains nested for loops:
def main():
    for i in range(3):
        for j in range(5):
            print("* ", end="")
        print("")


main()
Just by looking at the code, can you predict what shape it will print? We can check the result by running the program on the terminal directly. If we do so, we should receive this output:
* * * * *
* * * * *
* * * * *
It printed a rectangle that is $3$ rows tall (the outer for loop) and $5$ columns wide (the inner for loop). If we look back at our code, this hopefully becomes very clear. This is a very typical structure for nested for loops - the innermost loop will handle printing one line of data, and then the outer for loop is used to determine the number of lines that will be printed.
The process for dealing with nested for loops is nearly identical to nested while loops. So, we won’t go through a full example using Python Tutor. However, feel free to run any of the examples in this lab in Python Tutor yourself and make sure you clearly understand how it works and can easily predict the output based on a few changes.
Example 1
Let’s look at a few more examples of nested for loops and see if we can predict the shape that is created when we run the code.
def main():
    for i in range(5):
        for j in range(i + 1):
            print("* ", end="")
        print("")


main()
This time, we’ve updated the inner for loop to use range(i + 1), so each time that inner loop is reached, the range will be different based on the current value of i from the outer loop. So, we can assume that each line of text will be a different size. See if you can figure out what shape this will print!
When we run the code, we’ll get this output:
*
* *
* * *
* * * *
* * * * *
We see a triangle that is $5$ lines tall and $5$ columns wide. If we look at the code, we know that we’ll have 5 rows of output based on the range(5) used in the outer loop. Then, in the inner loop, we can see that the first time through we’ll only have a single item, since i is $0$ and the range used is range(i + 1).
The next iteration of the outer loop will have $1$ stored in i, so we’ll end up repeating the inner loop $2$, or i + 1, times. We’ll repeat that process until the final line, which will have $5$ characters in it to complete the triangle.
From here, we can quickly modify the program to change the structure of the triangle. For example, to flip the triangle and make it point downward, we can change the range in the inner loop to range(i, 5) instead!
Example 2
What if we want to flip the triangle along the vertical axis, so that the long side runs from the top-right to the bottom-left? How can we change our nested loops to achieve that outcome?
In that case, we’ll not only have to print the correct number of asterisks, but we’ll also need to print the correct number of spaces on each line, before the asterisks. One possible way to achieve this is shown in this code:
def main():
    for i in range(5):
        for j in range(4 - i):
            print("  ", end="")
        for j in range(i + 1):
            print("* ", end="")
        print("")


main()
Here, we have two for loops nested inside of our outer loop. The first loop creates a range using the expression 4 - i, and the second loop uses the expression i + i. So, when i is equal to $0$ during the first iteration of the outer loop, the first inner loop will be executed $4$ times, and the second loop only $1$ time. Then, on the next iteration of the outer loop, the first inner loop will only run $3$ times, while the second loop now runs $2$ times. Each time, the sum of the iterations will be $5$, so our lines will always be the same length.
When we run the code, we’ll get this output:
        *
      * *
    * * *
  * * * *
* * * * *
Example 3
Up to this point, we’ve just been writing loops to print shapes using ASCII art. While that may seem trivial, understanding the “shape” that will be produced by a given set of nested loops can really help us understand how the code itself will function with other data.
Consider this example code:
def main():
    sum = 0
    count = 0
    for i in range(10):
        for j in range(i + 1):
            sum = sum + (i * j)
            count += 1
    print("sum: {}, count: {}".format(sum, count))


main()
Before we even try to run this code, can we guess what the final value of the count variable will be? Put another way, can we determine how many times we’ll execute the code in the innermost loop, which will help us understand how long it will take for this program to run?
Let’s compare this code to the first example shown above:
def main():
    for i in range(5):
        for j in range(i + 1):
            print("* ", end="")
        print("")


main()
Notice how the code structure is very similar? The outermost loop runs a given number of times, and then the inner loop’s iterations are determined by the value of the outer loop’s iterator variable. Since we know that the first example produces a triangle, we can guess that the program above runs in a similar way. So, the first iteration of the outer loop will run the inner loop once, then twice on the second iteration, and so on, all the way up to $10$ iterations. If we sum up all the numbers from $1$ to $10$, we get $55$.
Now let’s run that code and see if we are correct:

As this example shows, we can use our basic understanding of various looping structures to help us understand more complex programs, and even predict their output without running or tracing the program. This is a very useful skill to learn when working with nested loops.
Subsections of Nested For Loops
Testing Nested Loops
YouTube VideoResources
Testing nested loops can also be very tricky, especially because they can make our program’s control flow even more complex. So, let’s briefly go through an example to see how to determine what inputs we can use to test nested loops.
Consider the following example program:
def positive_input():
    x = int(input("Enter a positive integer: "))
    while x <= 0:
        print("Invalid input!")
        x = int(input("Enter a positive integer: "))
    return x


def main():
    x = positive_input()
    y = positive_input()
    while y <= x:
        for i in range(x - y):
            print("*", end="")
            y = y + 2
        print("")
    print("Complete!")


main()
Let’s work through the process of generating some test cases for this program to see if it runs without any errors. As always, our biggest concern is to make sure that we don’t reach a situation where the program enters an infinite loop, and that we also try to provide inputs that will enter each loop at least once, and also bypass each loop if possible.
Input Loop
First, we see that the positive_input() function uses a loop to make sure the user inputs only positive values. So, some of our first test cases could involve trying values such as $-1$, $0$ and $1$ to check the edge cases of that while loop’s Boolean expression. When we run the program and provide those inputs, we should see it enter the loop in that function at least once.
We can also bypass that loop by simply making sure we enter a positive integer each time. So, we know we have a few test cases available that will achieve branch coverage for that loop.
Outer While Loop
Next, let’s consider the outermost while loop in the main() function. That loop uses the Boolean expression y <= x to determine if the loop should be entered or not. So, we want to come up with a few tests that check the edge cases of that Boolean expression. We can start by choosing a value to use for x, such as $5$. Then, the edge cases of that Boolean expression would be when y is either $4$, $5$, or $6$.
If y is $6$, the Boolean expression would be False and it should bypass the loop. We can easily test this to make sure that is the case:

Likewise, if y is $4$, we know that it should enter the outermost loop. Inside, we see a for loop that will iterate based on the expression x - y. Effectively, it will compute the difference between x and y and then iterate that many times. So, if x is $4$ and y is $5$, the difference between those values will be $1$. So, we’ll enter the innermost for loop at least once. When we run the program with these inputs, we’ll see the following output:

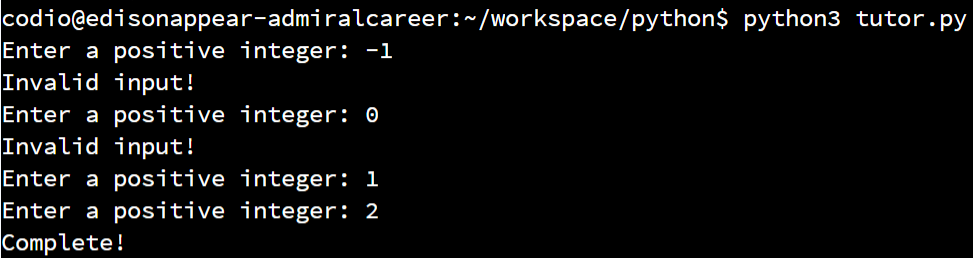
What if we set both x and y to be the same value? We know that the inner for loop will run x - y times, so if both x and y are the same value, this would be a way to bypass that loop, while still entering the outermost while loop since y <= x will be True. However, when we try to run the program with these inputs, we’ll see something interesting happen:
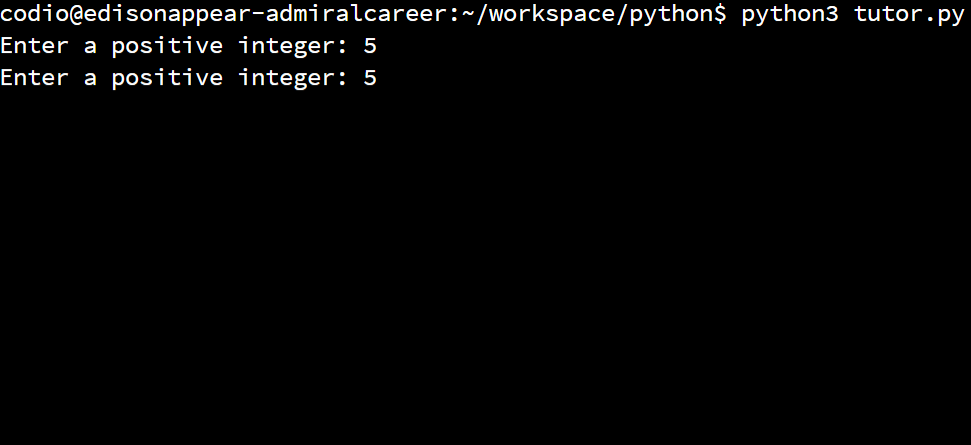
Our program will quickly start printing blank lines of output to the terminal. So quickly, in fact, that it is hard to even see what happens. As it turns out, we accidentally caused our program to enter an infinite loop! When this happens, the only way to stop the program is to close the terminal window it is running in, or use the CTRL+C keyboard command to interrupt it. So, let’s see why this infinite loop is occurring, and figure out how we can fix it.
Infinite Loop
Did you spot the infinite loop when you first read the program’s code? It can be really tricky to find, which is why we have to be very good about choosing test cases that will explore many different ways to run the program.
In this case, the infinite loop is caused by the interaction between the two loops. In the outermost while loop, we have the Boolean expression y <= x to enter the loop. However, inside that loop, the for loop will only execute x - y times, which also happens to be the loop variant for the outer while loop. The key to the infinite loop lies in the fact that the only line inside of the outer while loop that will change the value of either x or y is also inside of the inner for loop. So, if we don’t execute the for loop’s code at all, then the value of x and y won’t change either, and we’ll continually repeat the steps of the outermost while loop.
There are many ways to fix this problem, but the simplest would be to change the Boolean expression of the outermost while loop to be y < x. That will ensure that there is at least one iteration of the innermost for loop, and the infinite loop condition will be avoided.
So, as this example shows, testing nested loops is just like testing regular loops - we want to try and find inputs that will enter the loop at least once, as well as inputs that will bypass the loops if possible, just to make sure there aren’t any strange situations that may arise. While this won’t find all errors that are present in code containing nested loops, it is a great way to start testing your programs.
Subsections of Testing Nested Loops
Worked Example
YouTube VideoResources
Now that we’ve explored how to create programs that contain nested loops, let’s work through a complete example problem to see how we can convert a problem statement into working code.
Consider the following problem statement:
Write a program to print the sum of the first
nprime numbers, wherenis provided as input from the user.
This is a very simple problem statement, but it can be very complex to build a program that satisfies it. So, let’s go through the steps and see if we can get it to work.
Handling User Input
As always, we can start building our programs by adding a main() function and a call to the main() function to our code, as shown here:
def main():


main()
Inside of the main() function, the first thing we’ll need to do is get input from the user, since we really can’t do anything else until we know what our goal is. While the problem statement doesn’t include any information about what inputs are acceptable, we can infer that only positive integers should be used as input. So, we can borrow the positive_input() function from earlier in this module to handle all of our input:
def positive_input():
    x = int(input("Enter a positive integer: "))
    while x <= 0:
        print("Invalid input!")
        x = int(input("Enter a positive integer: "))
    return x


def main():
    n = positive_input()


main()
Reusing existing code, such as the positive_input() function we just included here, is a great way to build our programs. We can always think of previous code that we’ve already written and tested as possible building blocks for future programs, and reusing existing code is a great way to speed up our development process.
Prime Numbers
Next, we need some way to determine if a number is a prime number. Recall from mathematics that a prime number is a number that is only equally divisible by $1$ and itself. For example, $7$ is prime, but $8$ is not since it can be evenly divided by $4$.
Thankfully, we know that we can use the modulo operator % to determine if a number if evenly divisible by another number. So, all we need to do is check if each number less than our chosen number can equally divide it. If none of them can, then our chosen number is prime.
So, let’s write a function that performs this operation. We’ll start by creating a function that accepts our chosen number as a parameter:
def is_prime(n):Next, we know that we need to check all of the numbers from $2$ up to but not including n. We can do this using a for loop and the range() function:
def is_prime(n):
    for i in range(2, n):
Inside of the for loop, we want to check and see if the iterator variable i can evenly divide the chosen number n using the modulo operator:
def is_prime(n):
    for i in range(2, n):
        if n % i == 0:
            # i equally divides n
Here’s where things get a bit tricky - if i can equally divide n, we know that n is not prime and we don’t have to check any other values. So, in our function, we can just use the return False statement to return the value False from this function. As soon as the function reaches a return statement, even if it is inside of a loop, it will immediately stop the function and go back to where it was called from. In effect, we can use this to shortcut the rest of the loop.
def is_prime(n):
    for i in range(2, n):
        if n % i == 0:
            return False
    # what if we don't return false?
However, what happens if we check all of the values from $2$ up to n and don’t find a single one that will equally divide our chosen number n? In that case, we’ll reach the end of our for loop, but our function hasn’t returned anything. So, we’ll need to add one extra line to the end of the function to return True if we get to that point.
def is_prime(n):
    for i in range(2, n):
        if n % i == 0:
            return False
    return True
There we go! That’s a quick and easy function to determine if a given number is prime. This function is a great example of a pattern that we’ll see many times as we write complex programs whenever we must determine if a particular situation is true for a given list of numbers. Inside of the loop, we’ll check each case and return False if it isn’t true. If it is true, then we’ll complete the entire loop without returning False, so we’ll need to return True at the end of the function. We’ll see this pattern again in a later lab.
note-1
The is_prime() function above is very simple, but not very efficient. With a bit of thought, it is easy to determine that we only have to actually check numbers up to n /2, since it is impossible for any number larger than that to evenly divide n. Likewise, we can do some quick math to eliminate numbers that end in an even digit or $5$, since those numbers will never be prime.
Finally, we could use a more advanced mathematical technique such as the Sieve of Eratosthenes to generate all prime numbers more quickly. However, for this example, we’ll stick to the simplest approach.
Complete Program
Finally, now that we have the is_prime() function, we can complete our main() function by simply iterating through all possible numbers until we’ve found n prime numbers, and then print the sum:
def main():
    n = positive_input()
    count = 0
    i = 2
    sum = 0
    while count < n:
        if is_prime(i):
            sum = sum + i
            count = count + 1
        i = i + 1
    print("The sum of the first {} prime numbers is {}".format(n, sum))
This program requires three additional variables. The variable count is used to keep track of the number of prime numbers found, so we’ll increment it inside of the if statement each time we find a prime number. Likewise, the sum variable keeps track of the sum of the prime numbers, which we’ll print at the end. Finally, we use i as our iterator variable, so we must make sure that we increment i each time the while loop iterates, outside of the if statement. We’ll start i at $2$, since $1$ is not a prime number mathematically. A very common programming mistake is to forget to increment i outside the if statement, resulting in an infinite loop. Also, we chose to use a while loop instead of a for loop since our program’s goal is to sum up the first n prime numbers, which is better expressed as a while loop instead of a for loop.
The full program is shown below:
def positive_input():
    x = int(input("Enter a positive integer: "))
    while x <= 0:
        print("Invalid input!")
        x = int(input("Enter a positive integer: "))
    return x


def is_prime(n):
    for i in range(2, n):
        if n % i == 0:
            return False
    return True


def main():
    n = positive_input()
    count = 0
    i = 2
    sum = 0
    while count < n:
        if is_prime(i):
            sum = sum + i
            count = count + 1
        i = i + 1
    print("The sum of the first {} prime numbers is {}".format(n, sum))


main()
Finally, notice that this program doesn’t contain a loop nested within another loop in the same function, but because we are calling the is_prime() function, which contains a loop, from within a loop inside of the main() function, it actually has a nested loop structure inside of it! Feel free to run this program in Python or using Python Tutor to confirm that it works as expected before continuing.
Testing
Testing this program is a bit complex, since we can only provide a single input. We can easily provide a negative value or $0$ to confirm that the loop in the positive_input() function is working correctly, but beyond that we have little control over the rest of the program just by changing inputs.
Instead, we have to rely on our ability to read and analyze the code to determine if it is working properly. For example, we can look at the loop inside of the main() function. It is a while loop, which relies on the count variable increasing until it is greater than or equal to n before it will terminate. We can see that count will be incremented each time the is_prime() function returns True, so as long as we are able to find enough prime numbers, and assuming our is_prime() function works correctly, this loop should eventually terminate.
In the is_prime() function, we have a simple for loop, which will always terminate eventually. There is no way to bypass it, so we don’t really have to worry about that function not eventually returning a value.
However, proving that this program creates the correct answer is a bit trickier. One of the best ways to do this is to simply check a few answers manually. For example, with a bit of searching online, we can find a list of prime numbers. According to Wikipedia , the first 9 prime numbers are:
2
3
5
7
11
13
17
19
23
The sum of those numbers is easy to calculate using a calculator or other device, and eventually we can be fairly certain that the correct answer is $100$. When we run our program, we should hopefully get the same result:

We can test a few other numbers until we are sure that our program is working correctly.
Hopefully this example is a good look at how to build a program using loops that meets a given problem description. We were able to put together various types of loops and conditional statements in our program, and then test it to be sure it works. As you continue to work on projects in this class, feel free to refer back to these examples for ideas and blocks of code that you may want to use in your own programs. Good luck!
Subsections of Worked Example
Summary
In this lab, we introduced several major important topics in Python. Let’s quickly review them.
Nested Loops
Loops in Python can be nested, just like any other statement. While loops and for loops can be nested in any combination.
Testing Nested Loops
When testing nested loops, it is important to consider situations where a loop will be executed and where it will be bypassed. It is also important to consider the loop variants for while loops to ensure that there aren’t situations where a loop will accidentally run infinitely.
Efficiency
Nested loops can result in programs that execute many individual steps, even using just a few lines of code. It is always helpful to think about the number of times a loop will execute and make sure that it isn’t executing more times than necessary.