Chapter 13
Subsections of Lists
Python Lists
YouTube VideoResources
The first collection we’ll review in Python is the list. A list in Python allows us to store many individual values, or elements, in a single variable. To keep track of the elements, each one is assigned an index, which is an integer that uniquely identifies the element’s position in the list. In Python, just like in many other programming languages, the indexes begin at $0$ and count up from there.
Creating a List
There are many ways to create a list in Python. The simplest is to simply use an empty set of square brackets [] to represent an empty list, and then store that in a variable using an assignment statement:
list_1 = []If we know what values we want to store in the list, we can include them inside of the square brackets. For multiple items, we can separate them by commas:
list_2 = [1, 2, 3]We can store any value in a list, including strings, numbers, Boolean values, and even other lists. We won’t cover lists inside of lists in this course, but it is important to know that it can be done.
Adding New Items to a List
Once we’ve created a list, there are two ways to add items to a list. First, if we want to add a new item to the list and expand it’s size by one, we can use the append() method. For example, we can start with a list containing three items and then add a fourth item:
list_2 = [1, 2, 3]
list_2.append(4)
Accessing List Items
To access existing items in a list, we can use the index of the item inside of square brackets after the name of the list. Consider this example:
list_2 = [1, 2, 3]
print(list_2[0])    # 1
print(list_2[1])    # 2
print(list_2[2])    # 3
The list stored in list_2 initially contains the items 1, 2, and 3. To access the first item, we can use index $0$, as in list_2[0]. We can similarly use index $1$ and $2$ to access the other items.
Updating List Items
We can also use the index to update a value stored in a particular location of the list. In effect, each location in the list can be treated just like a variable in an assignment statement.
list_2 = [1, 2, 3]
list_2[1] = 5
print(list_2)       # [1, 5, 3]
In this example, we are replacing the value 2, at index $1$ in the list, with the new value 5. As we can also see in that example, we can even print an entire list at once in a print statement!
Lists in Python Tutor
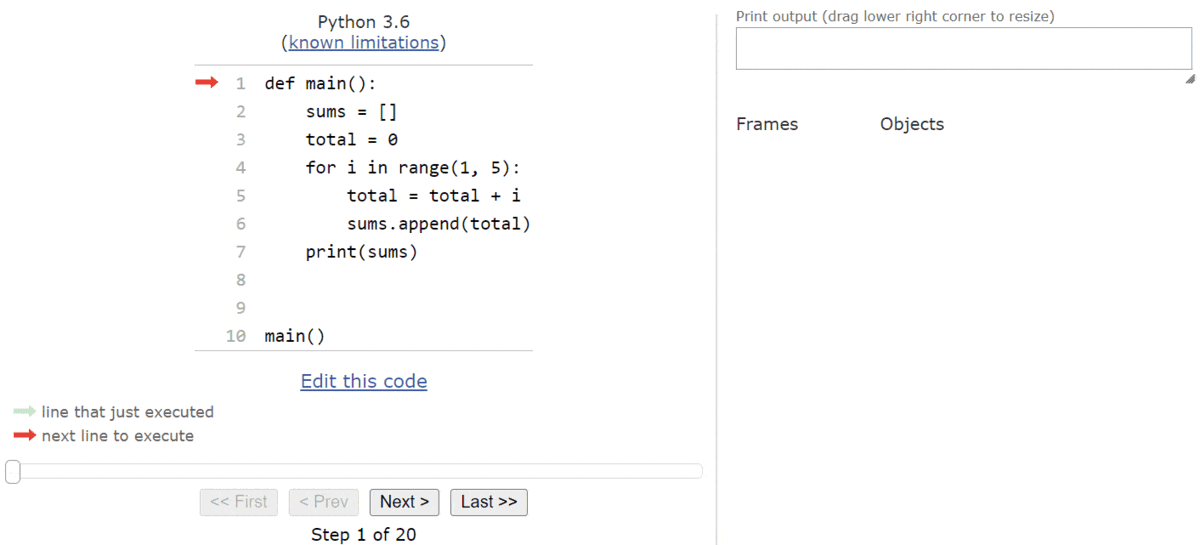
Thankfully, tools like Python Tutor make it very easy to work with lists in Python and understand what is happening in memory on the computer itself. Let’s walk through a brief example program that includes lists in Python Tutor:
def main():
    sums = []
    total = 0
    for i in range(1, 5):
        total = total + i
        sums.append(total)
    print(sums)


main()
As always, we can copy this code to the tutor.py file in Codio, or click this Python Tutor
link to open it in a web browser. We can skip ahead a few steps to the point where the execution pointer enters the main() function and we see this state:
The very first line of code in the main() function will create a new list and store it in the sums variable. So, when we execute that line of code, we’ll see some new information appear in the frames and objects area in Python Tutor:
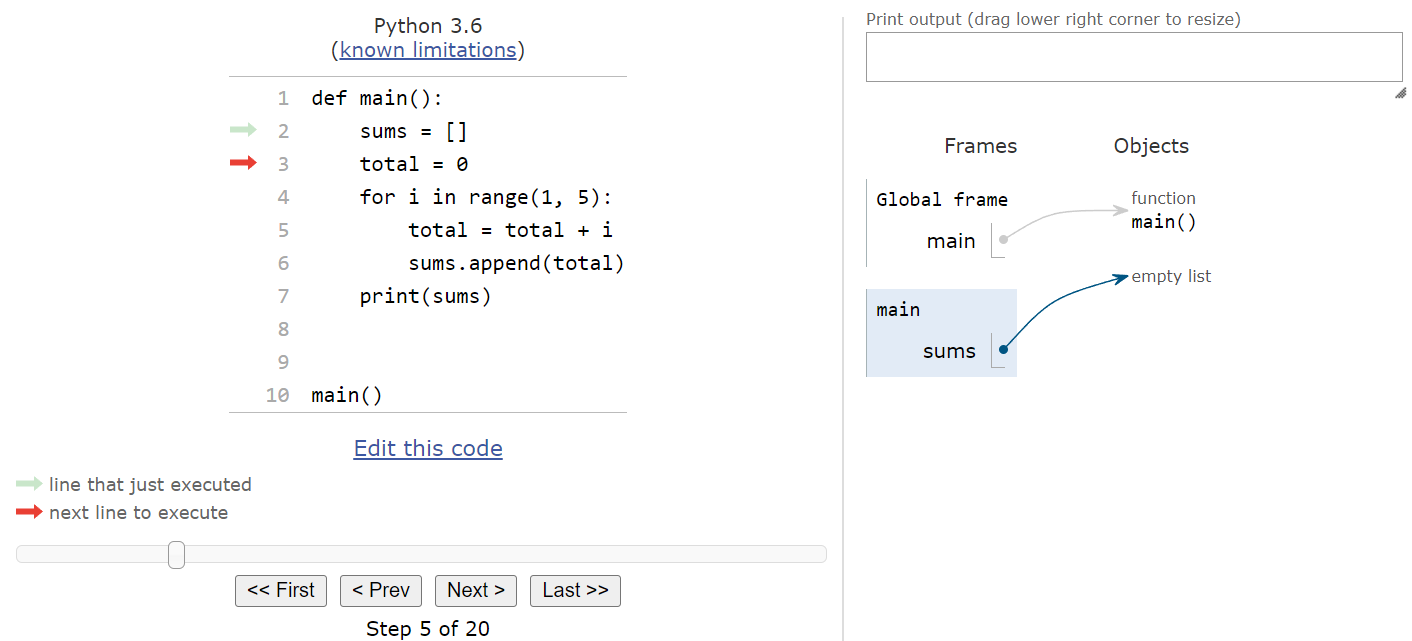
As we can see, in Python lists are treated like objects, so the sums variable in the main() function’s frame points to an empty list object in the objects list. As we add elements to the list, they’ll show up in the object itself. We’ll come back to this concept later in this lab to show why it is important to know that Python treats lists like objects instead of other variables.
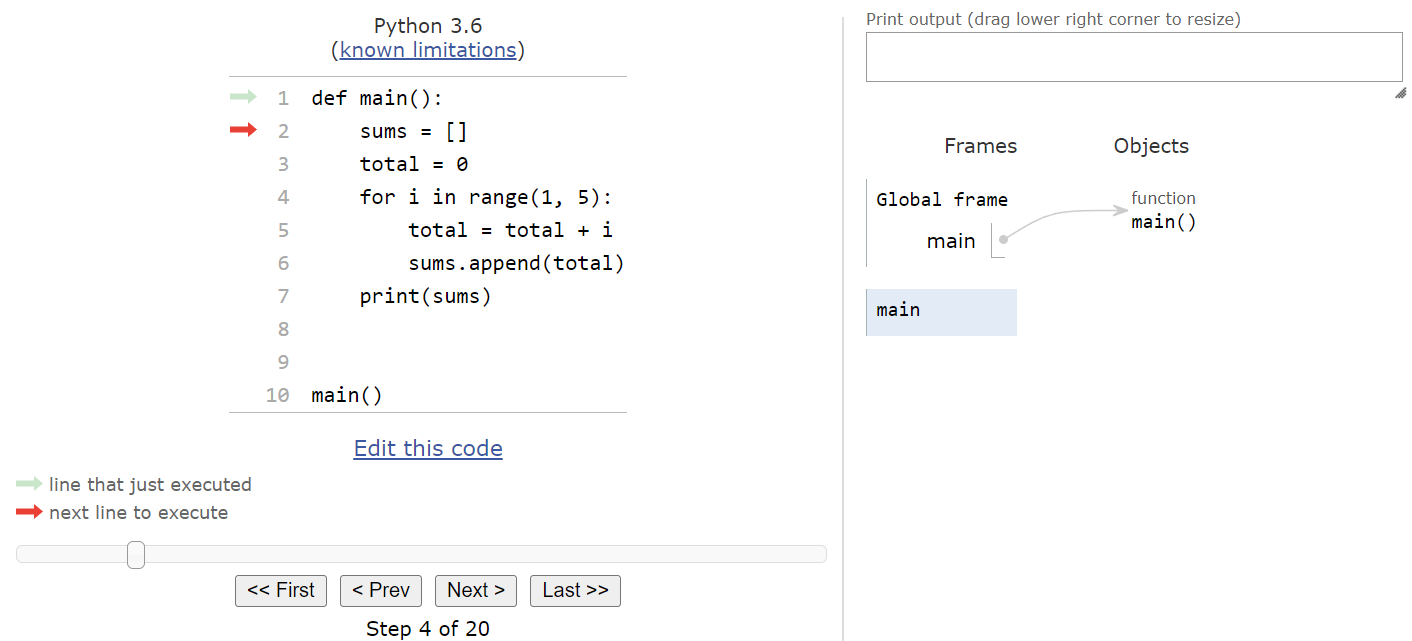
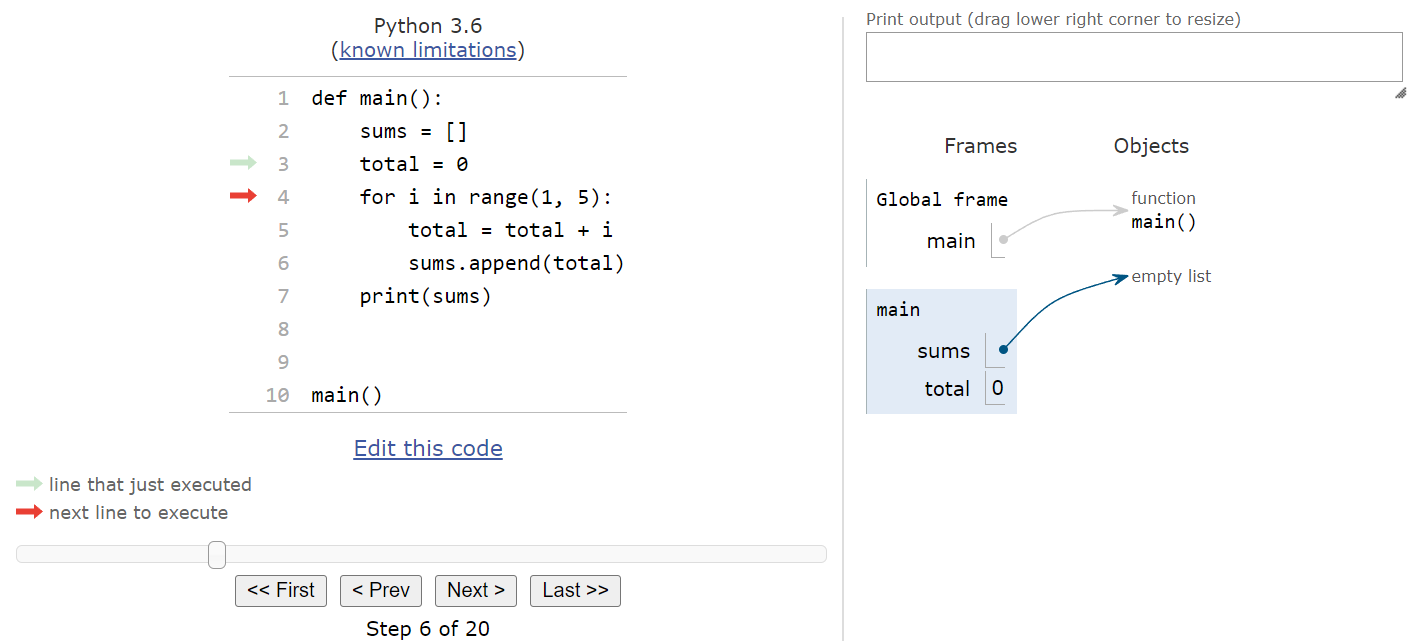
The next line creates the total variable, setting it equal to $0$, and then we’ll reach the for loop:
This for loop iterates four times, from $1$ up to but not including $5$. So, we’ll enter the loop with i storing the value $1$.
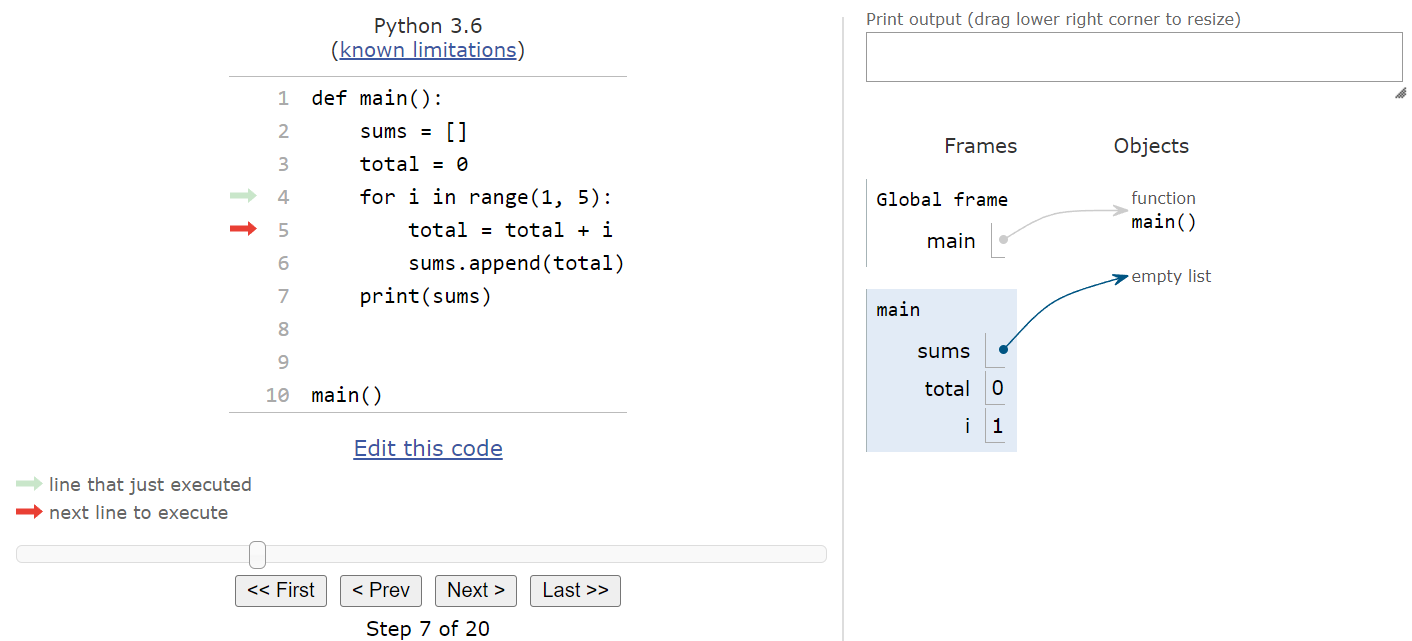
Inside of the loop, we’ll add the value of i to the total:

Then, we’ll append that new value in total to the end of the sums list. Since that list is empty, it will become the first item in the list, as we can see here:
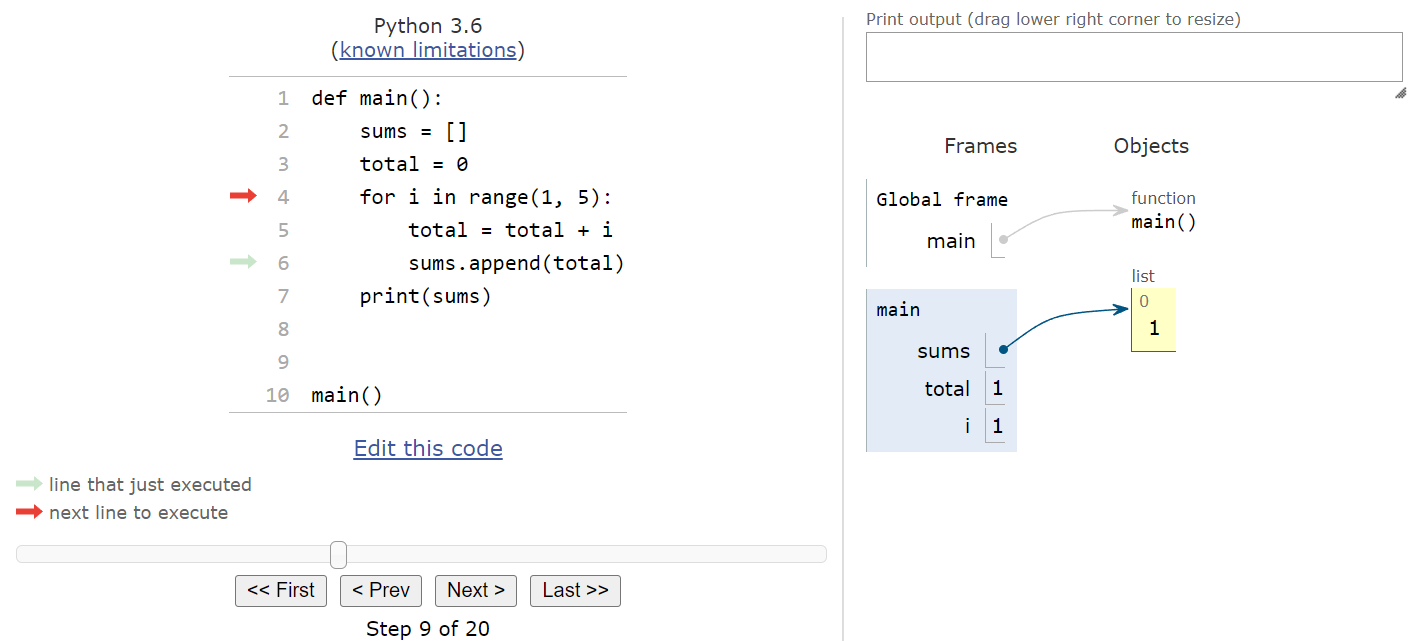
Notice that the list in the object area now includes a single element. On that element, we can see a small $0$ at the top of the box, which is the index of that element. Then, at the bottom and in a larger font, we see the value stored in that element, $1$. Just like with other variables, even though the assignment statement references the total variable, we are actually storing the value in the list, not a reference to the variable.
At this point, we’ve looped back to the top of the for loop, so we’ll increment i by one and enter the loop again:

Inside of the loop, we’ll add the new value of i to total, and then append that value to the sums list. After both of those steps, we should see the following state in Python Tutor:
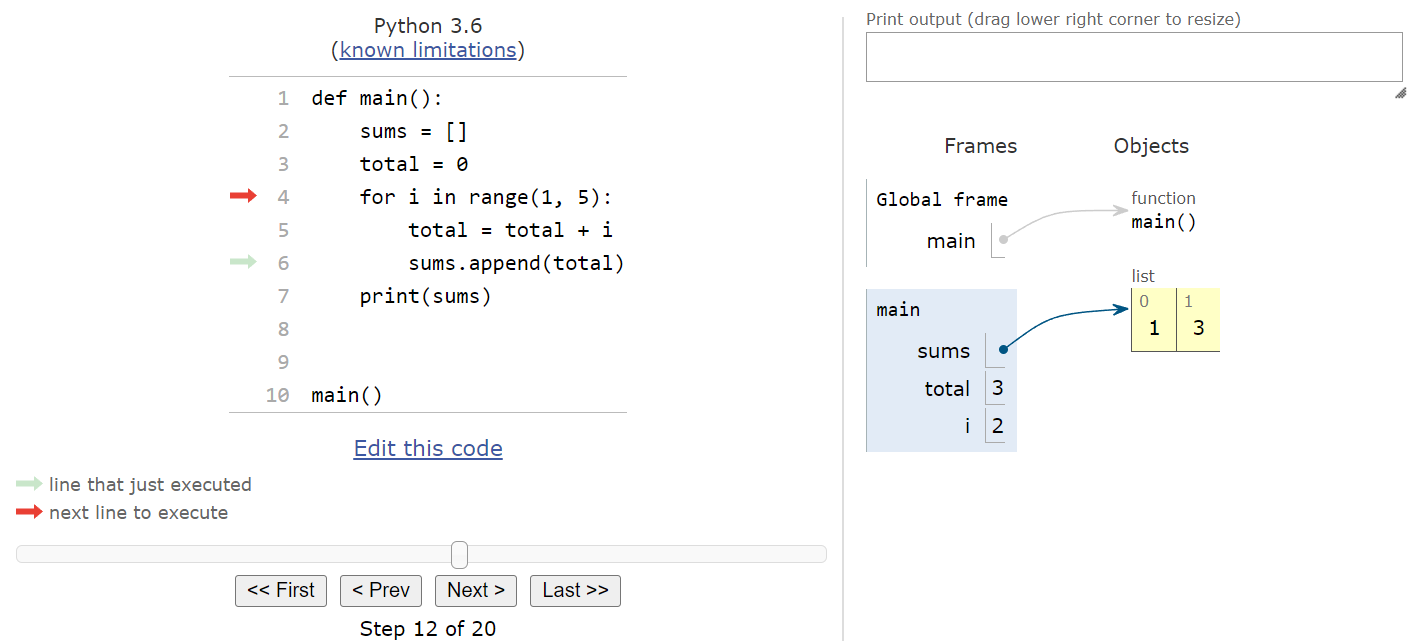
Notice that we now have two elements in the list. The first item, at index $0$, is still $1$, but now we’ve appended a second element at index $1$ that stores the value $3$. We’ve reached the top of the loop, so we’ll increment i and repeat those steps again. After the next loop iteration, we’ll see this state:
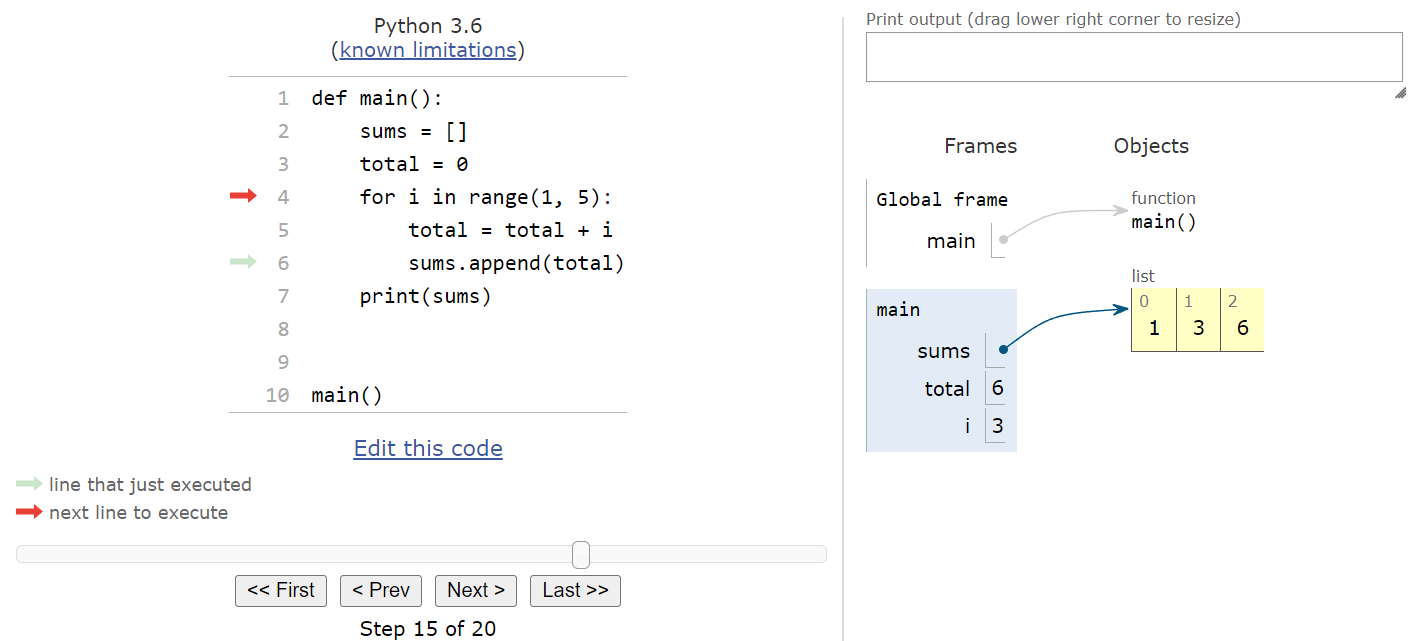
The process repeats one more time, leading to this state at the end of the for loop:
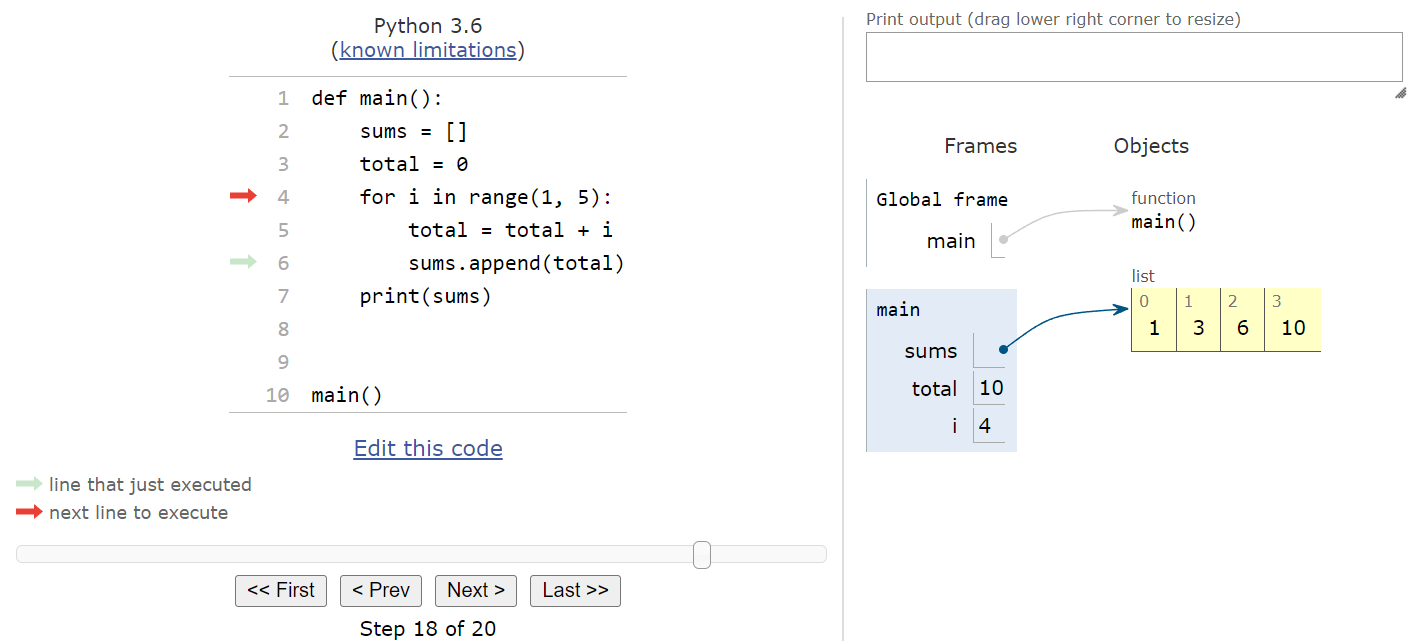
Notice that each time the loop iterates, we get a new value added to the sums list. Finally, we’re out of items to iterate over in the range, so we’ll jump to the bottom of the for loop and continue executing code from there:
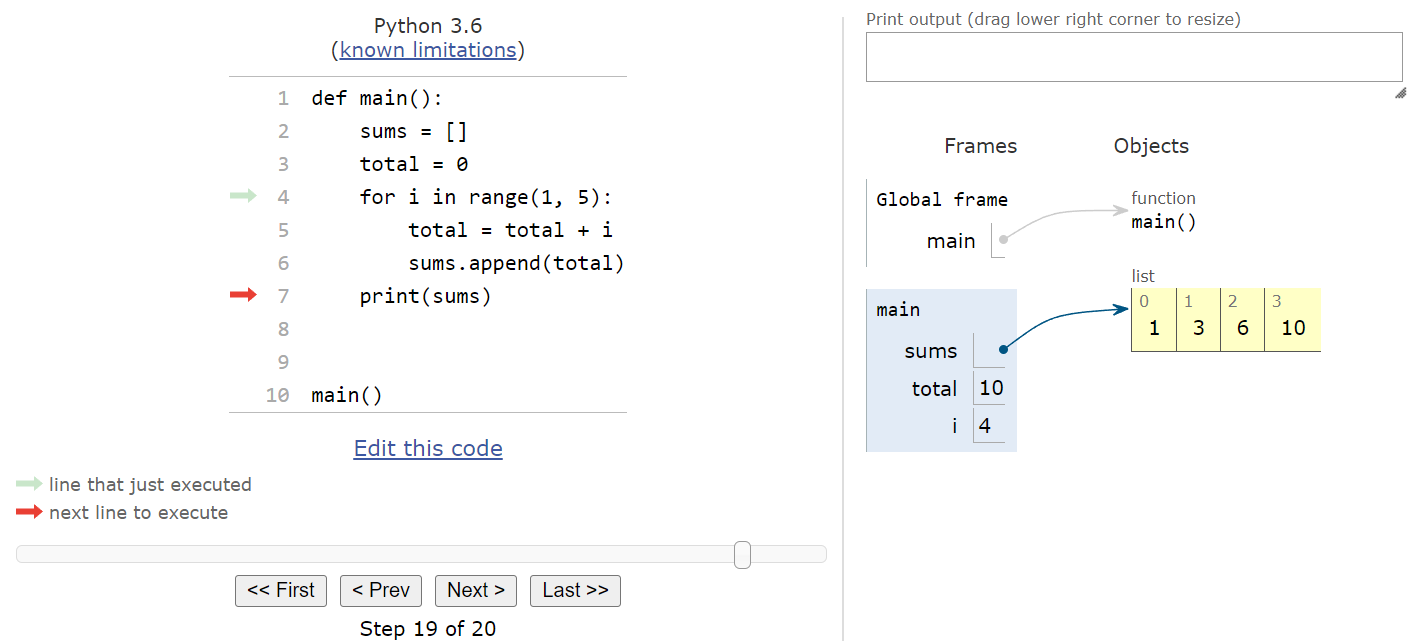
This last line of code will print the current contents of the sums list to the terminal. Python does a great job of formatting lists on the terminal so they are easy to read and understand. So, when we execute this line, we should see the following state, with output added in the print output section at the upper-right of the screen:
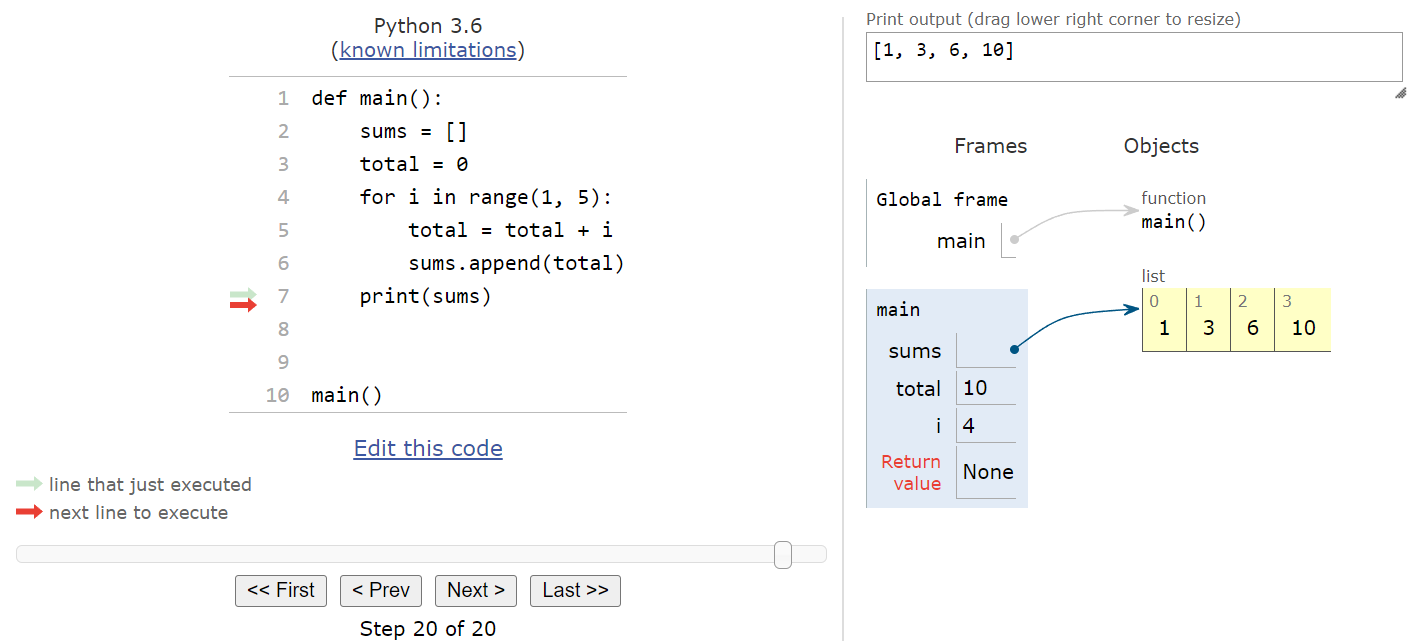
As we can see, adding elements to a list using a for loop works very easily, and Python Tutor does a great job showing us how Python will store that data in memory. The image below shows a full animation of this entire program.
Later in this lab, we’ll see why this particular structure is used and why it is important.
Subsections of Python Lists
Loops with Lists
YouTube VideoResources
One great way to work with lists in Python is using a loop. Recall from an earlier lab that a for loop actually iterates over a list itself, and that the range() function is simply used to generate a list that the for loop can use. Likewise, while loops can also be used in a similar way.
Let’s look at a quick example of how we can iterate through the items in a list using a loop in Python.
For loop
Consider the following example program in Python:
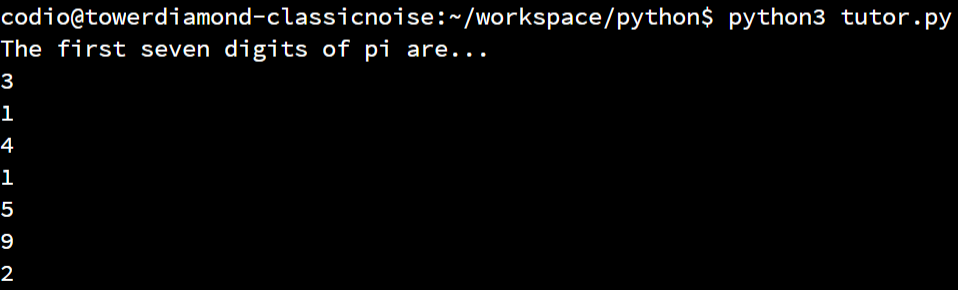
def main():
    nums = [3, 1, 4, 1, 5, 9, 2]
    print("The first seven digits of pi are...")
    for i in nums:
        print(i)


main()
In this example, the for loop will iterate through the values in the nums list instead of a given range. So, during the first iteration, i will store the value $3$, then $1$, then $4$, and so on until it reaches the end of the list. When the program is executed, we should receive this output:
Using a list in a for loop is an excellent way to go through each element quickly, and it allows us to build for loops that don’t require the use of the range() function to generate a list that is in some sort of sequential order. We’ll see this pattern used very often in our programs using lists.
Finally, it is not recommended to edit the contents of the list while inside of the for loop using this method. Since we are only getting the individual values from each list element, we cannot easily make changes to the list itself without causing issues in the loop itself. Instead, if we want to make changes to the list while we are iterating through it, it is highly recommended to use a while loop structure as shown below.
While Loop
It is also possible to iterate through a list in Python using a while loop. However, instead of iterating through the items themselves, we can use an iterator variable that references the indexes of the elements in the list. Consider this example program:
def main():
    nums = [3, 1, 4, 1, 5, 9, 2]
    print("The first seven digits of pi are...")
    i = 0
    while i < len(nums):
        print(nums[i])
        i = i + 1


main()
This program is effectively the same as the one above, except that it uses a while loop to iterate through the items in the nums list. We start by setting the iterator variable i to be $0$, the first index in the list. Then, in the while loop, we use the special len() function, which is used to find the size of the list. Since the list contains seven items, the length of the list is $7$. Another way to think about the length of the list is that it is always one more than the highest index - if the last item in the list is at index $6$, then the length of the list overall must be $7$.
Then, inside of the loop, we’ll use the iterator variable i inside of square brackets to access each individual element in the nums list and print it to the terminal. We’ll also need to remember to increment i by one each time.
This method is very useful if we want to do more with the list inside of our loop, such as edit individual elements or make changes to the overall structure of the list. This works because we can directly manipulate the value in the iterator variable i, and then use it to access individual elements in the list and update them. Also, if the size of the list changes, it will be checked using the len() function after each iteration of the while loop.
So, as a general rule, we should use a for loop when we just want to iterate through the list and not make any changes to the list while inside of the loop. If we do need to make changes, it is better to use a while loop and an iterator variable to access the list elements directly.
Subsections of Loops with Lists
Lists and Functions
YouTube VideoResources
Earlier in this lab, we saw Python Tutor create a list variable within the frame of a function, but that variable actually pointed to a list object that was stored in the global objects list. As it turns out, this seemingly minor distinction is a very important concept to understand how lists and functions interact with each other.
To demonstrate what is going on, let’s explore a program that contains multiple functions that operate on lists using Python Tutor once again. For this example, consider the following Python program:
def increment_list(nums):
    i = 0
    while i < len(nums):
        nums[i] = nums[i] + 1
        i = i + 1


def append_sum(nums):
    sum = 0
    for i in nums:
        sum = sum + i
    nums.append(sum)


def main():
    nums = [1]
    for i in range(4):
        increment_list(nums)
        append_sum(nums)
        print(nums)


main()
Before we go through the full example, take a minute to read through the code and try to piece together how it works. For example, notice that the increment_list() and append_sum() functions do not return a value! Since they don’t return a value, will they really have any impact on the program itself?
To find out, let’s run through this program in Python Tutor. As always, you can copy the code to the tutor.py file in Codio, or click this Python Tutor
link to open it in a web browser.
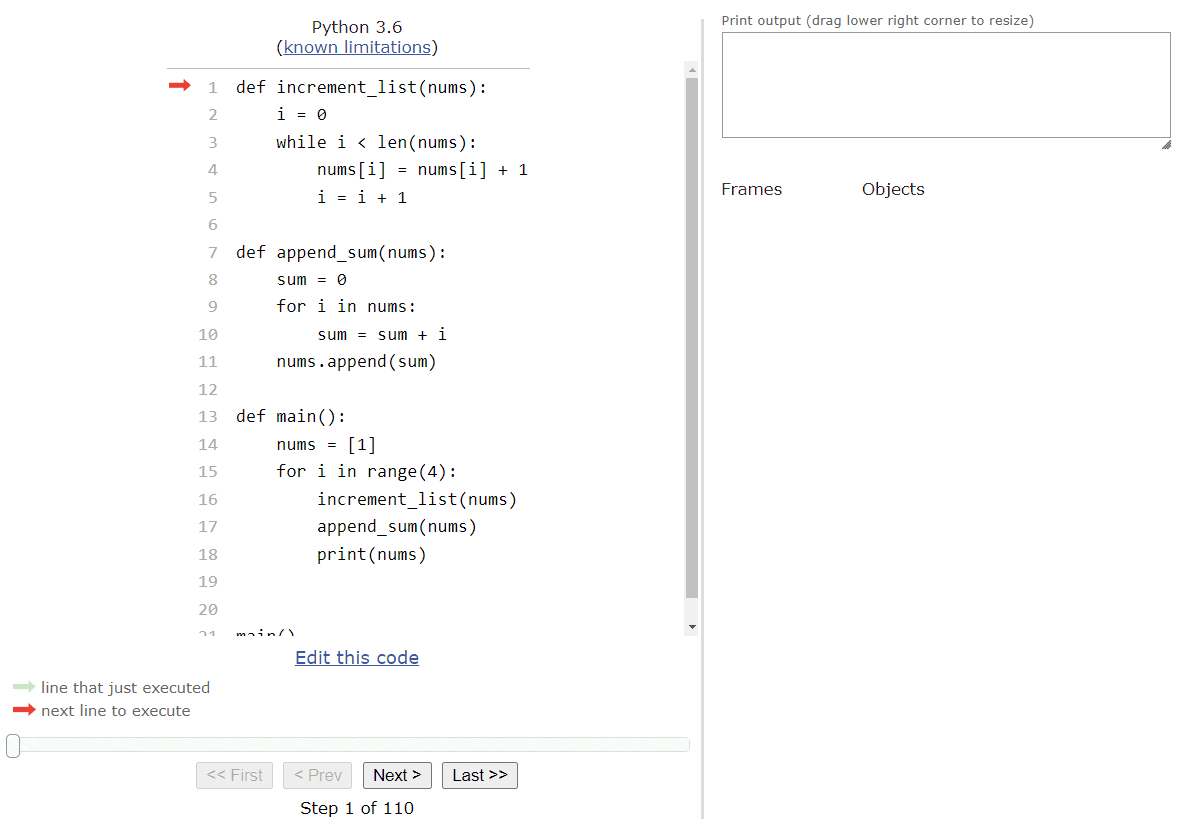
Python Tutor begins by adding all of the functions to the global frame, and then entering the main() function when it is called at the bottom of the code. Once the program enters the main() function, we should see this state:
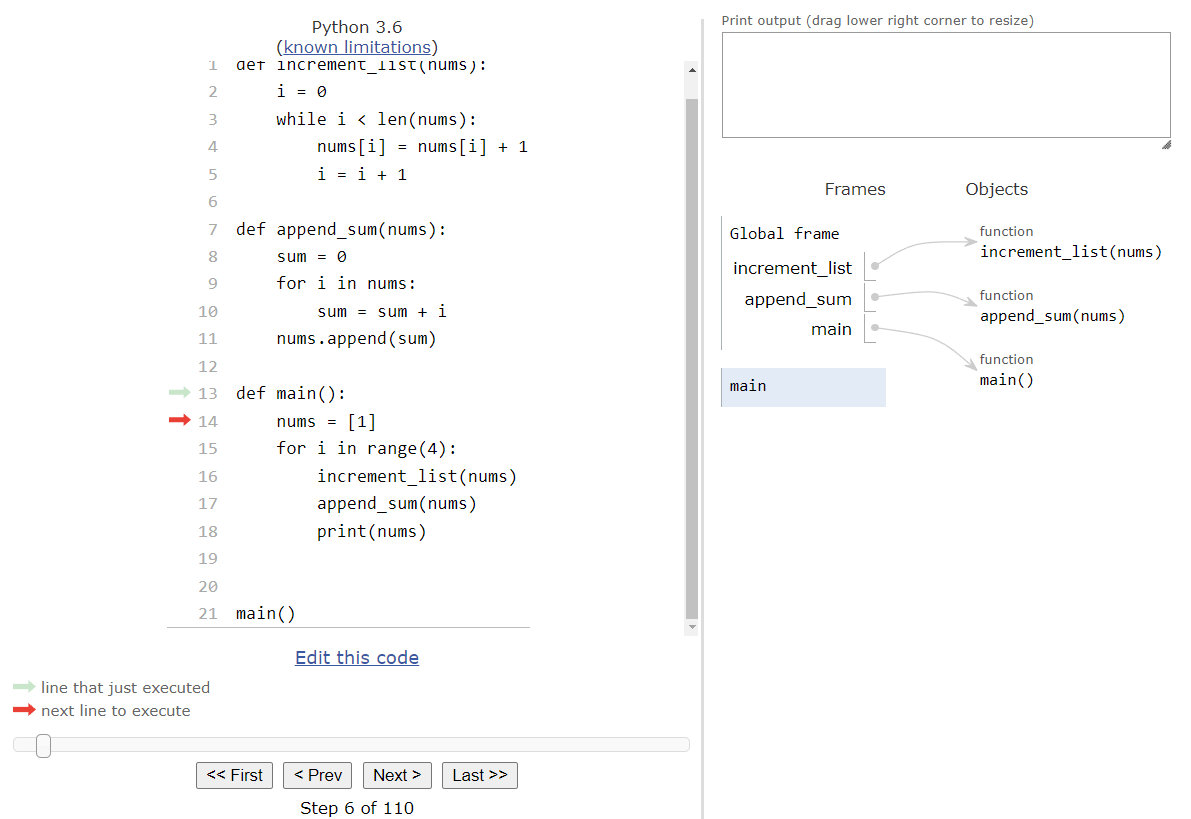
The main() function begins by creating a single list in the nums variable, which initially stores a single element, the number $1$. So, we’ll see the nums variable added to the main() function’s frame, with a pointer arrow to the list itself in the list of objects to the right:
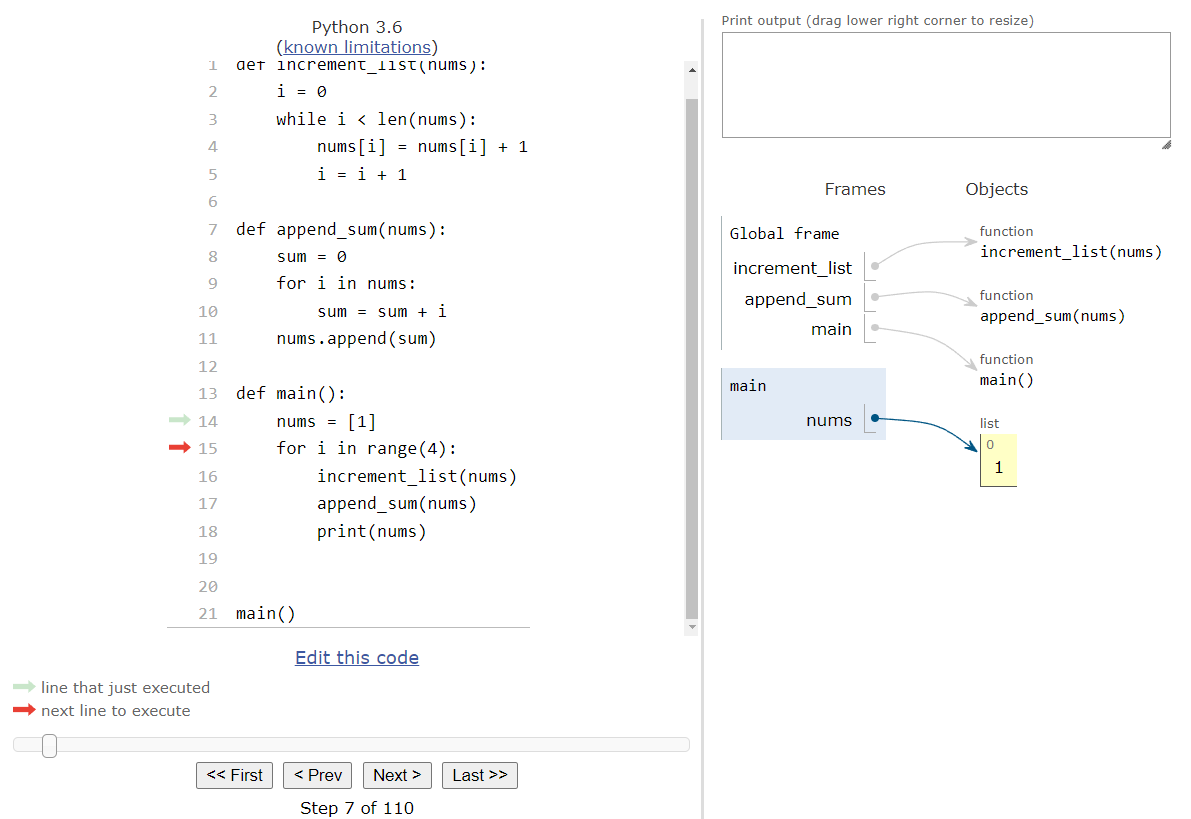
Next, we’ll reach a for loop that will iterate $4$ times. So, we’ll store the first iterator value, $0$, in the iterator variable i and enter the for loop:
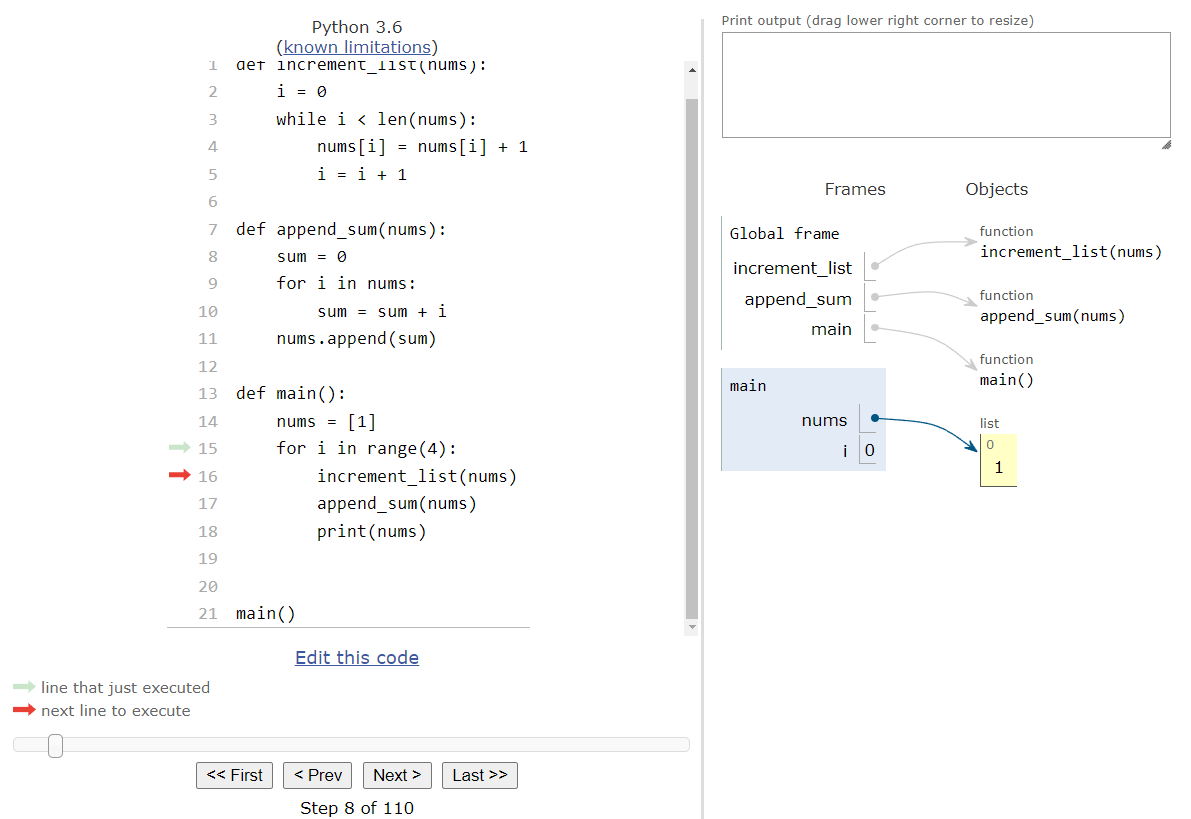
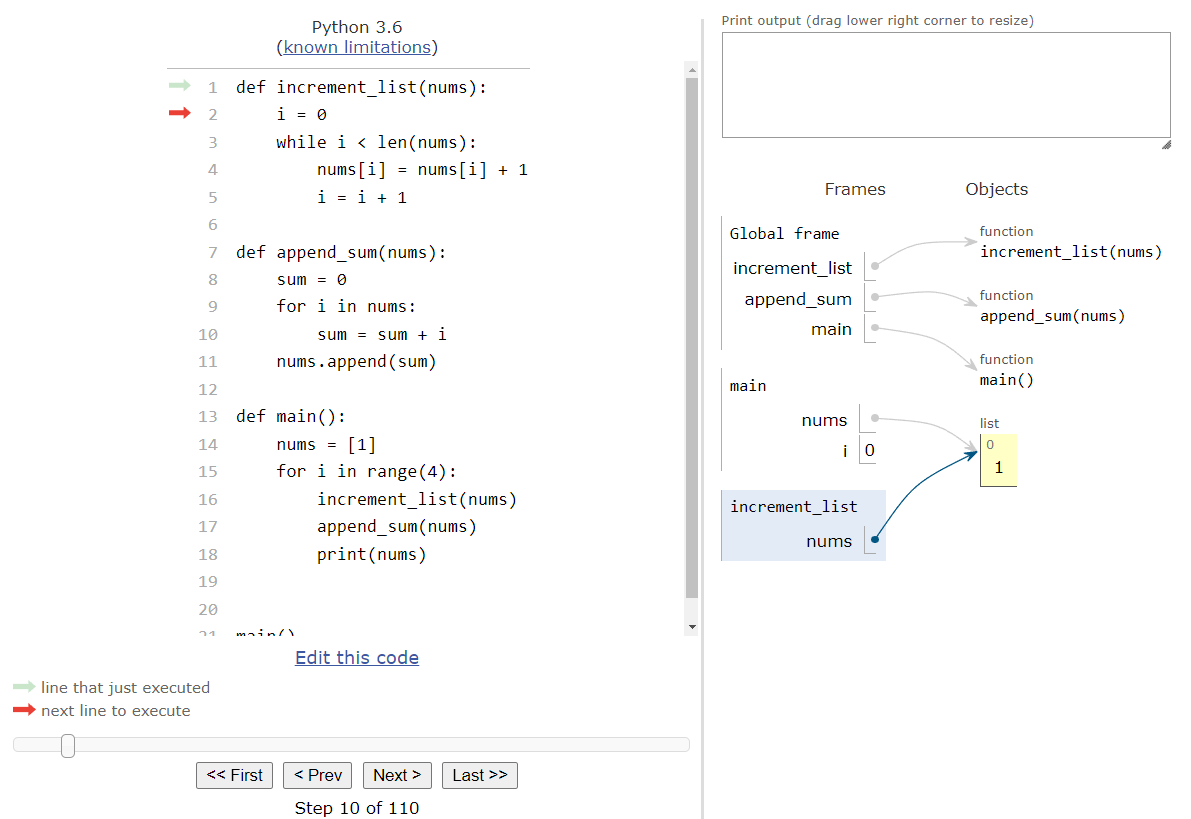
Inside of the for loop, the first step is to call the increment_list() function, which accepts a single parameter. So, we’ll provide the nums list as an argument to that function call. Just like always, Python Tutor will create a new frame for the increment_list() function when we call it, and it will populate all of the parameters for that function with the arguments that are provided, as shown here:
In this state, we see something interesting. In the increment_list() frame, we see the parameter nums is also a pointer to a list, but notice that it points to the exact same list object that the main() frame points to. This is because we are only sending the pointer to the increment_list() function so it knows where to find the list in the objects in memory, but it doesn’t actually duplicate the list.
In programming, we call this method of dealing with parameters call by reference, since we are simply passing references, or pointers, to the various objects but not the objects themselves. In technical terms, we’d say that the list is a mutable, or changeable, object, so we’ll use call by reference instead of the usual call by value process.
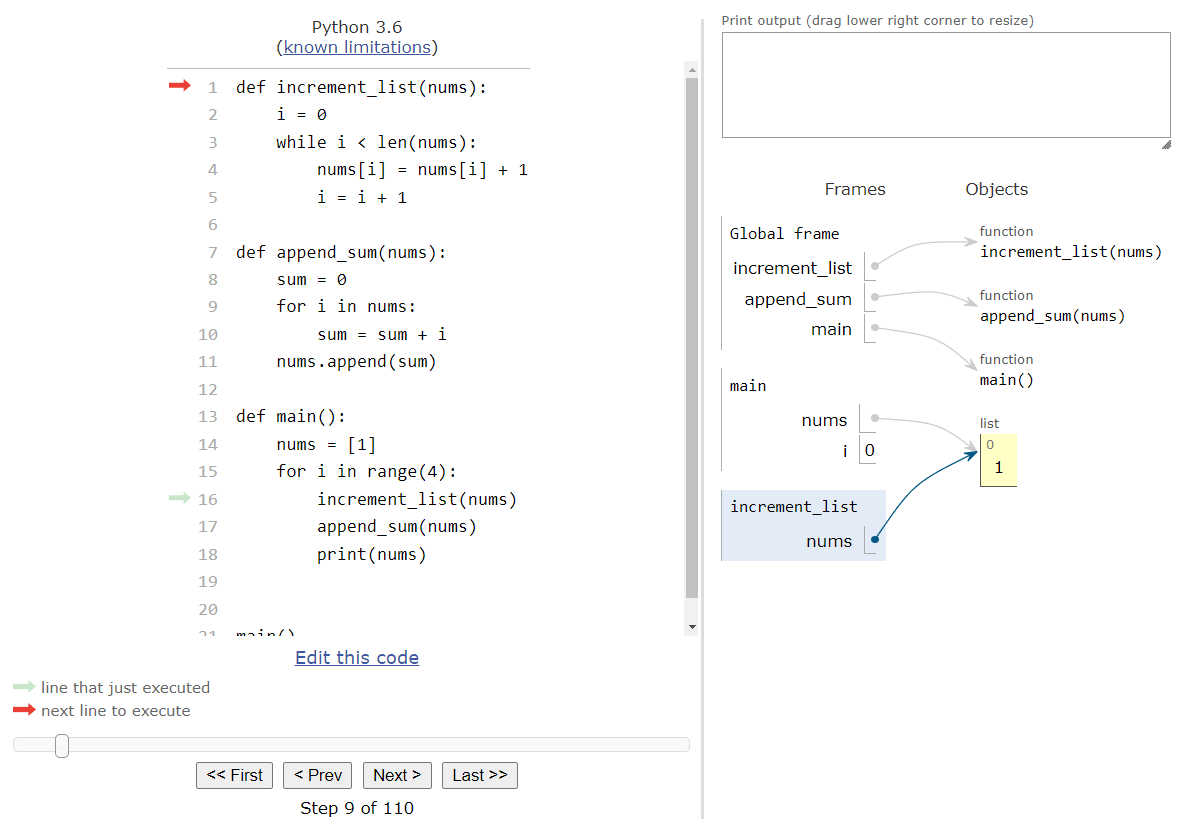
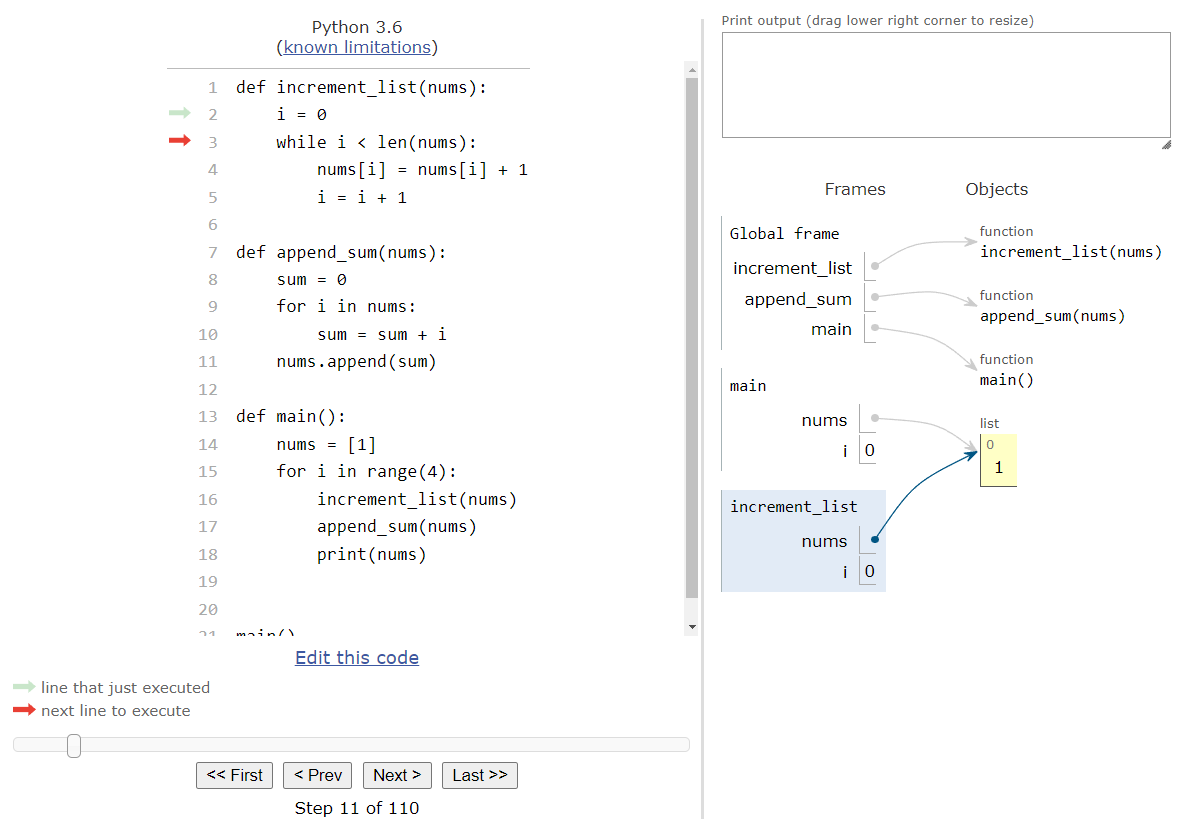
The next step will be to enter the increment_list() function itself:
In this function, we are getting ready to use a while loop to iterate through the nums list. Since we’re going to be editing the values stored in the list, we should use a while loop instead of a for loop. So, we’ll start by setting the initial value of our iterator variable i to $0$, and then we’ll reach the while loop in code:
When we’ve reached the while loop, we’ll need to make sure that our iterator variable is less than the size of the list. Since i is currently storing $0$, and our list contains at least one item, this Boolean expression is True and we’ll enter the loop:
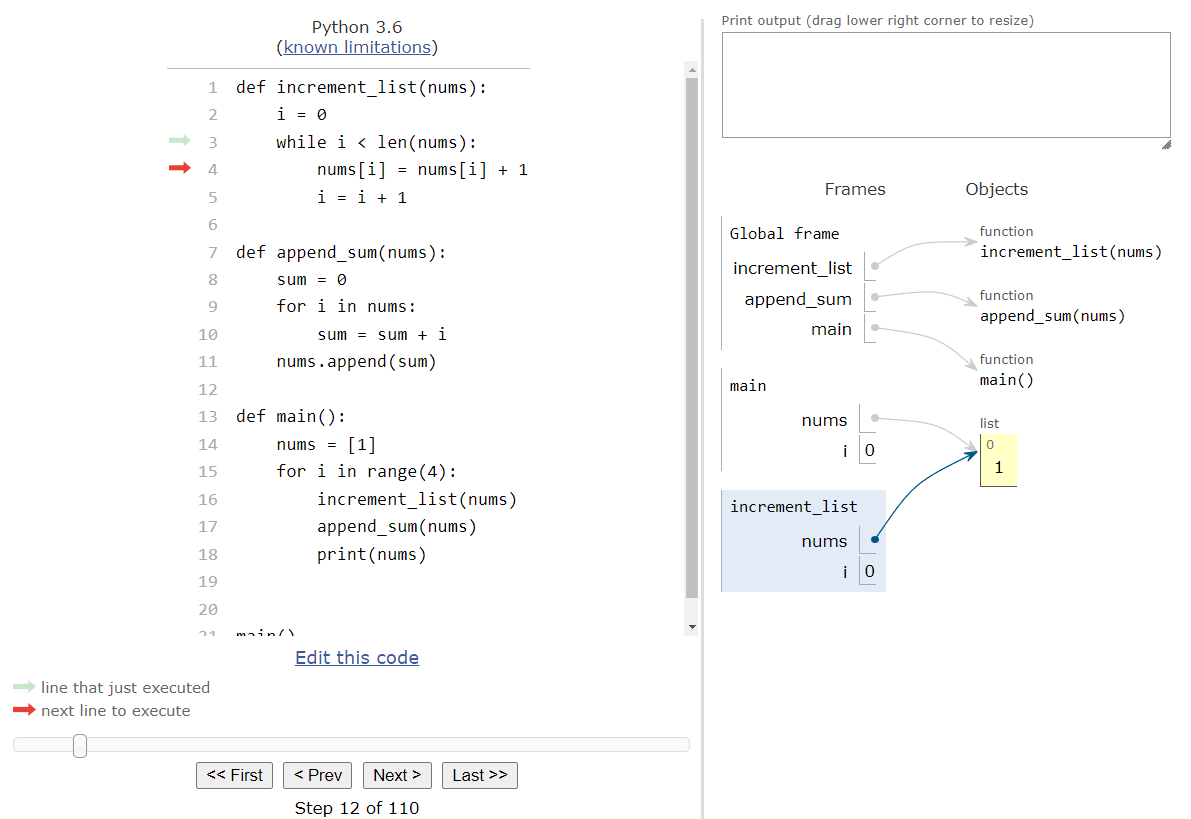
Inside of the loop, our goal is to increment each item in the list by $1$. So, we’ll use the iterator variable i inside of square brackets to both access the item in the list currently on the right-hand side of the assignment statement, and then we can also use it as the location we want to store the computed value, which is on the left-hand side of the assignment statement.

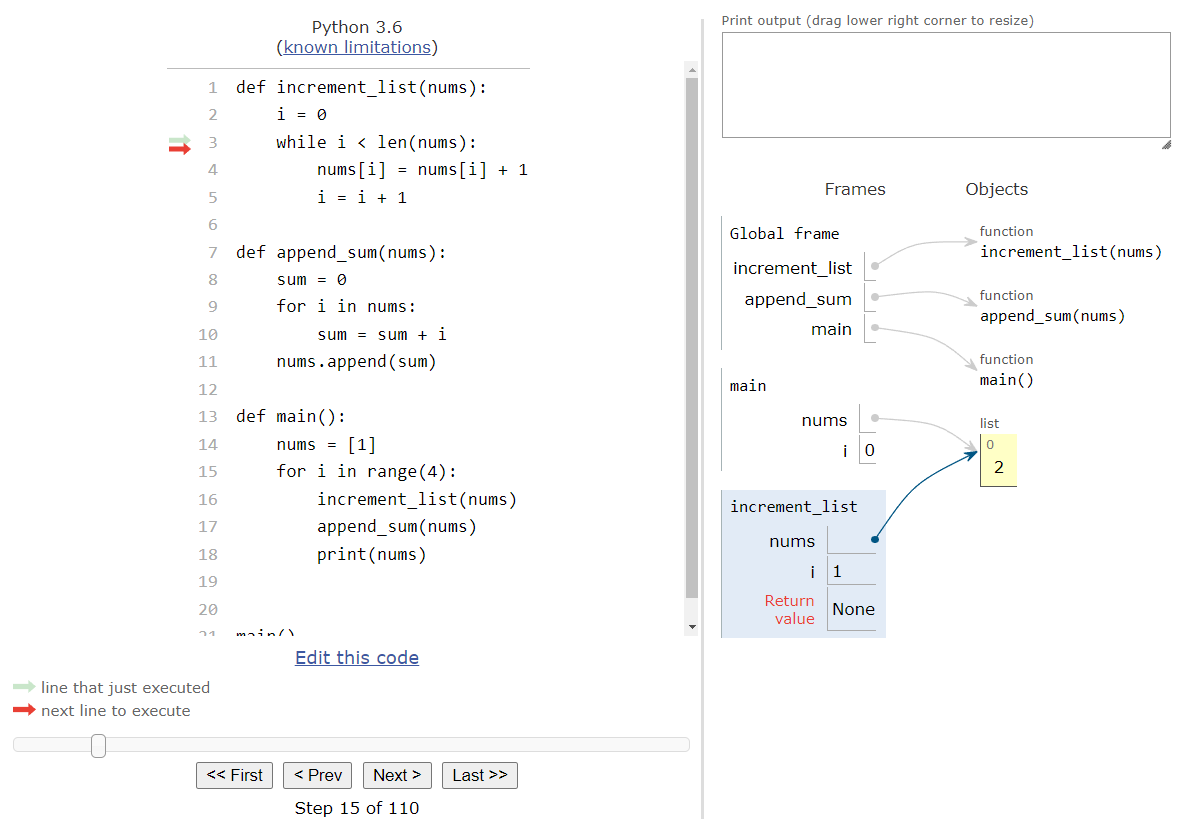
Then, we’ll increment our iterator variable i by $1$, and then jump back to the top of the loop:

At this point, we must check our Boolean expression again. This time, our iterator variable i is storing $1$, but the length of the list is also $1$, so the Boolean expression is False and we should skip past the loop. Since there is no additional code in the increment_list() function after the loop, the function will simply return here.
Notice that the function itself is not returning a value. Since Python uses call by reference, we don’t have to return the nums list back to the main() function even though we updated it, because the main() function still has a pointer to that exact same list object in memory. So, once the function returns, we’ll end up back in the main() function as shown here:

Notice that the frame for the increment_list() function is now gone, but the changes it made to the list are still shown in the list object to the right. This is why working with lists and functions can be a bit counter-intuitive, since it works completely differently than single variables such as numbers and Boolean values. A bit later in this lab, we’ll discuss how string values can be treated as lists, even though they are technically stored as single variable values.
The next step in this program is to call the append_sum() method, using the same nums list as before. So, we’ll create a new frame for that function and populate it once again with a pointer to the nums list in memory - the very same nums list that the main() function is using:
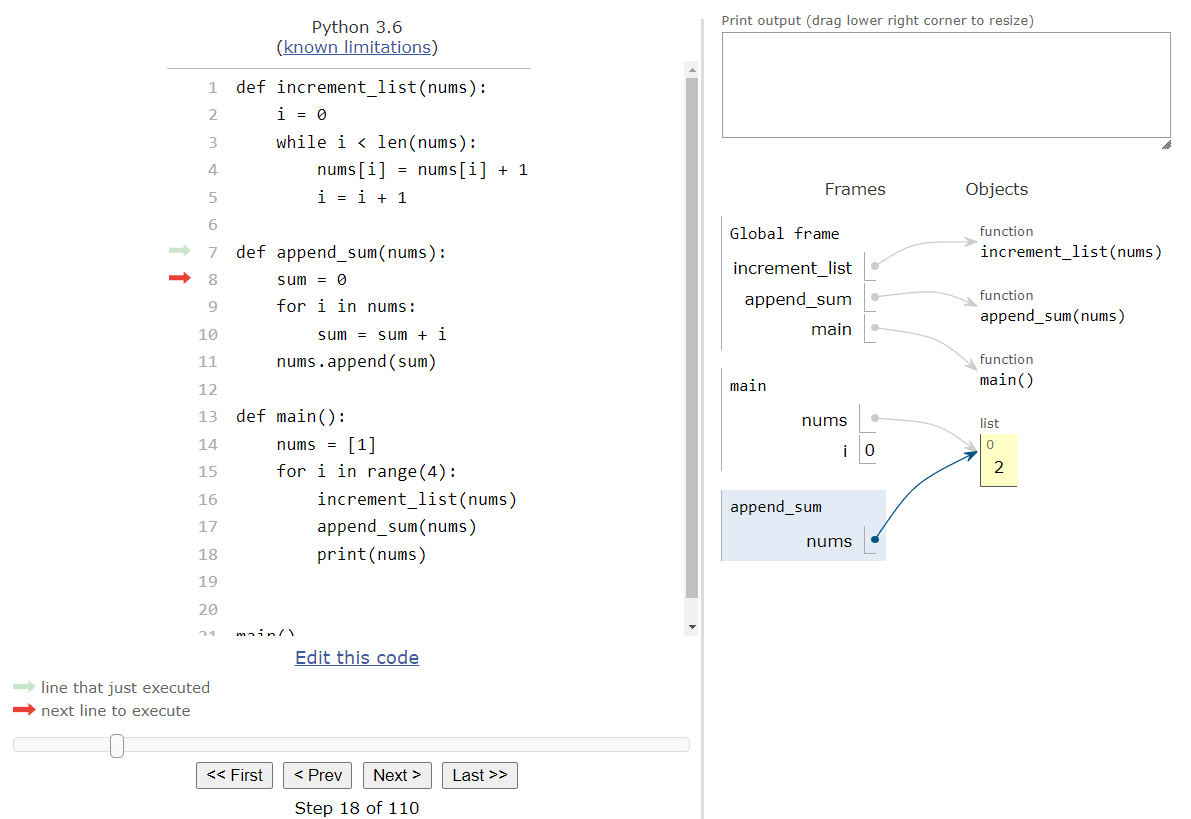
In the append_sum() function, our goal is to sum up all of the values currently in the list, and then append that value to the end of the list. So, we’ll need to create a sum variable to keep track of the total, which will initially store $0$:
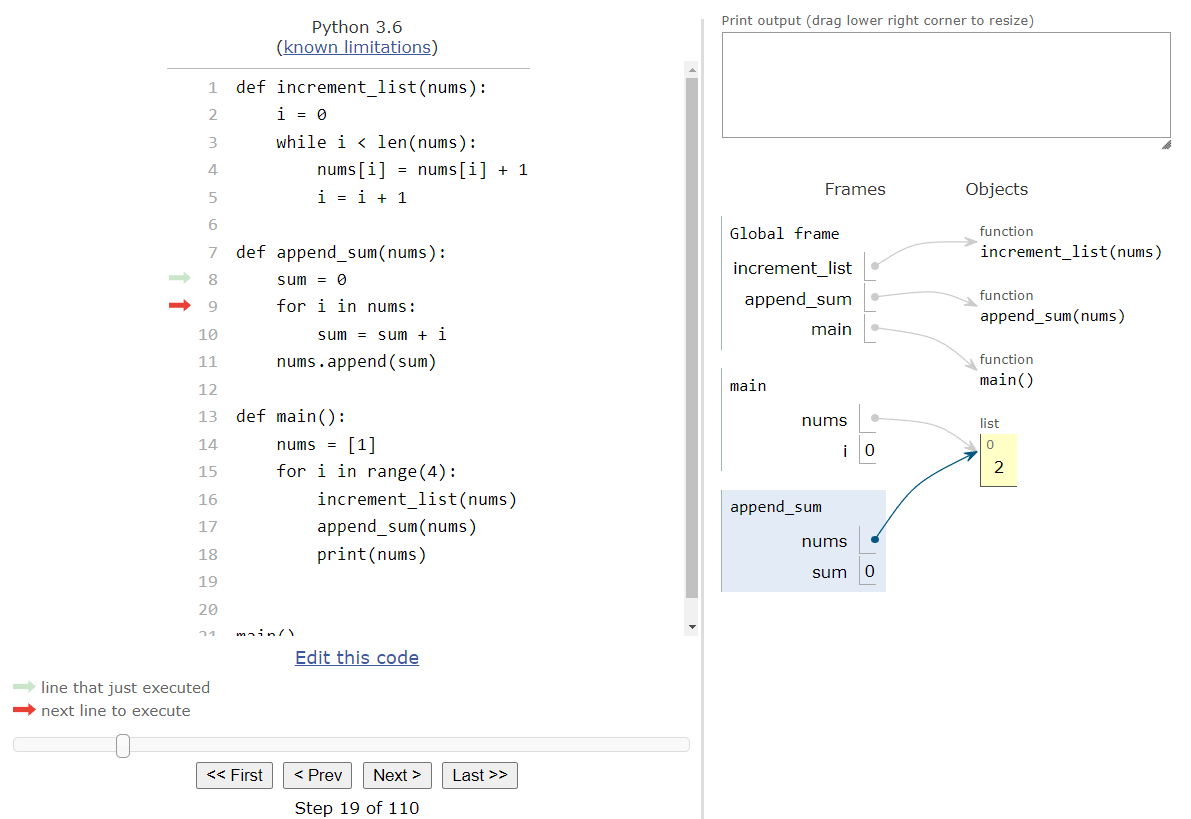
Thankfully, since we are not going to update the list from within our loop, we can use a simple for loop to iterate through the list. So, we’ll start by storing the first value in the list, $2$, into our iterator variable i, and then we’ll enter the loop.

Inside of the loop, all we are doing is adding the value currently stored in i to the sum variable. So, we’ll store $2$ in sum and jump back to the top of the loop.

At this point, we’ve used every element in the list in our loop, so the loop will terminate and we’ll jump down to the code directly below the loop as shown here:
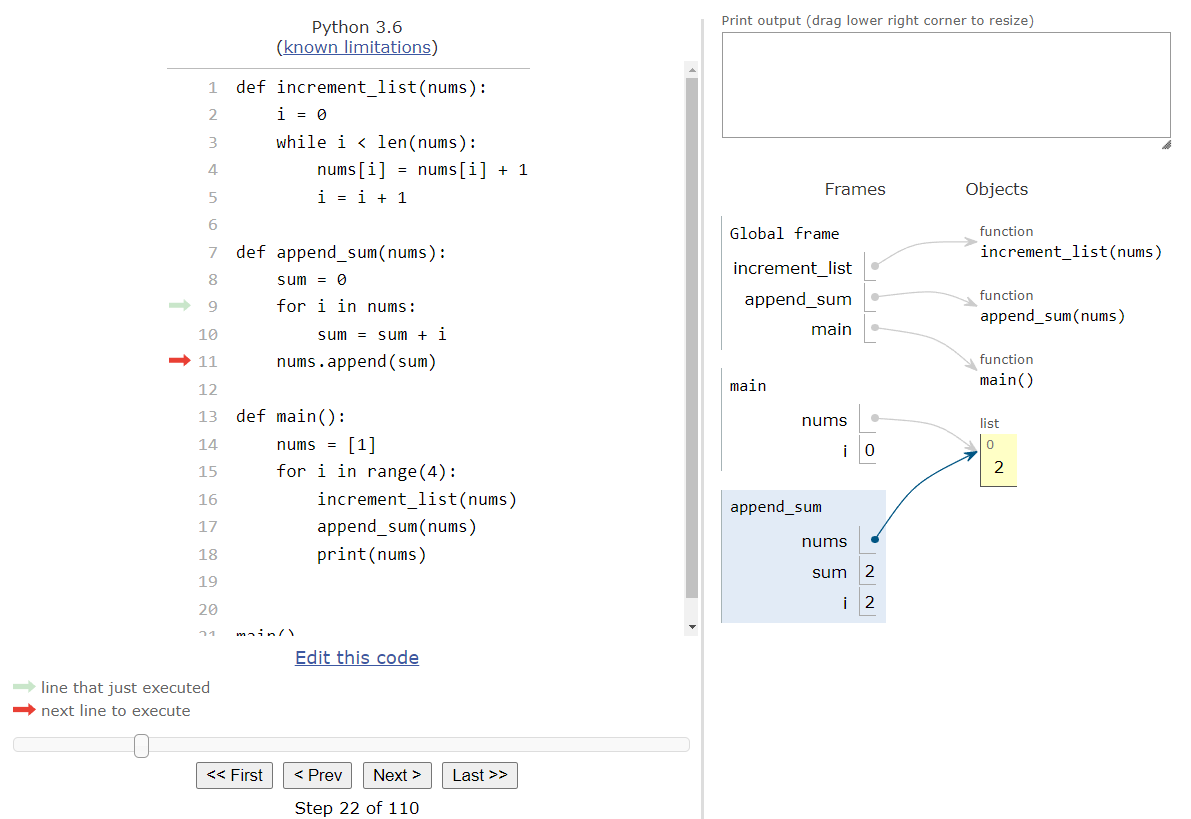
Finally, the last line of code in this function will append the value of sum to the end of the list.
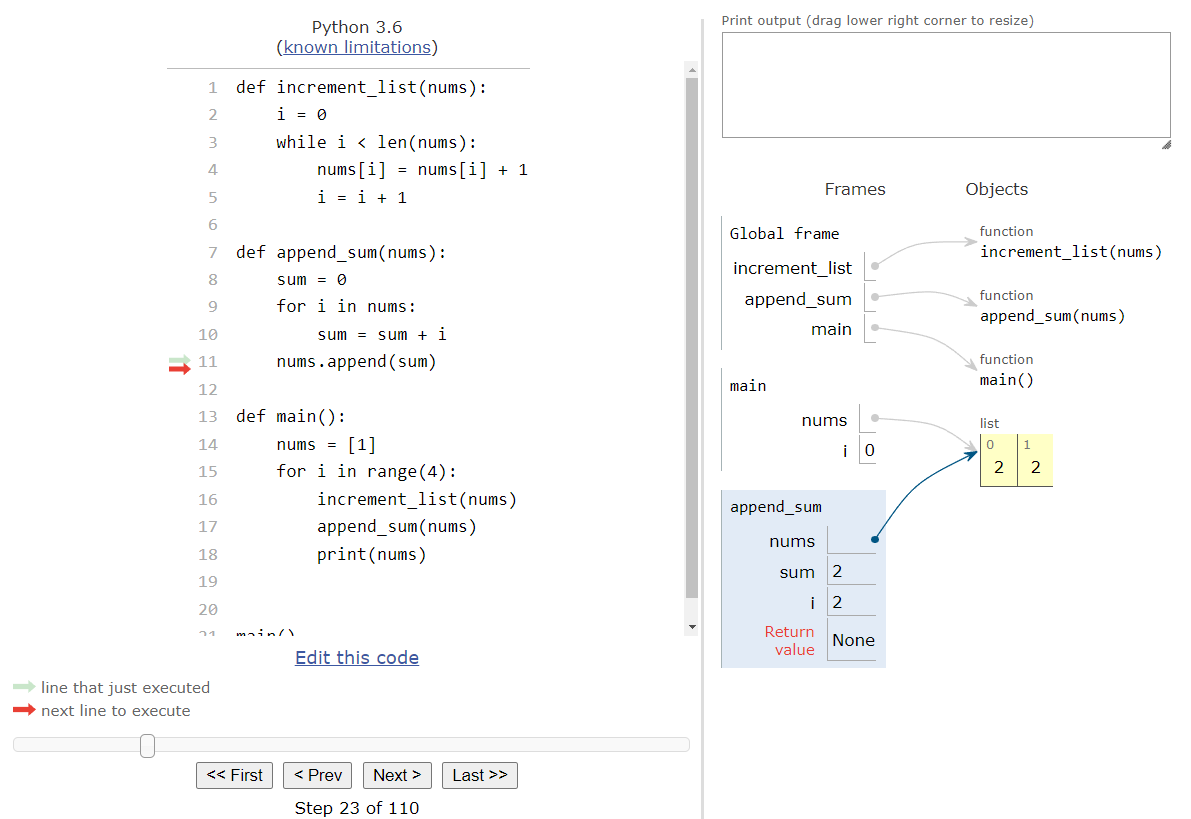
At this point, we’ve modified the list to contain a new element. However, in Python Tutor we can clearly see that this item was just added to the existing list object in memory. So, when we get back to the main() function, we’ll be able to access the existing list, which will now include this new element as well.
Back in the main() function, the last step in the loop is to print the current contents of the list to the terminal. So, after we execute that line, we should see some output in our print output box at the top right of the screen:

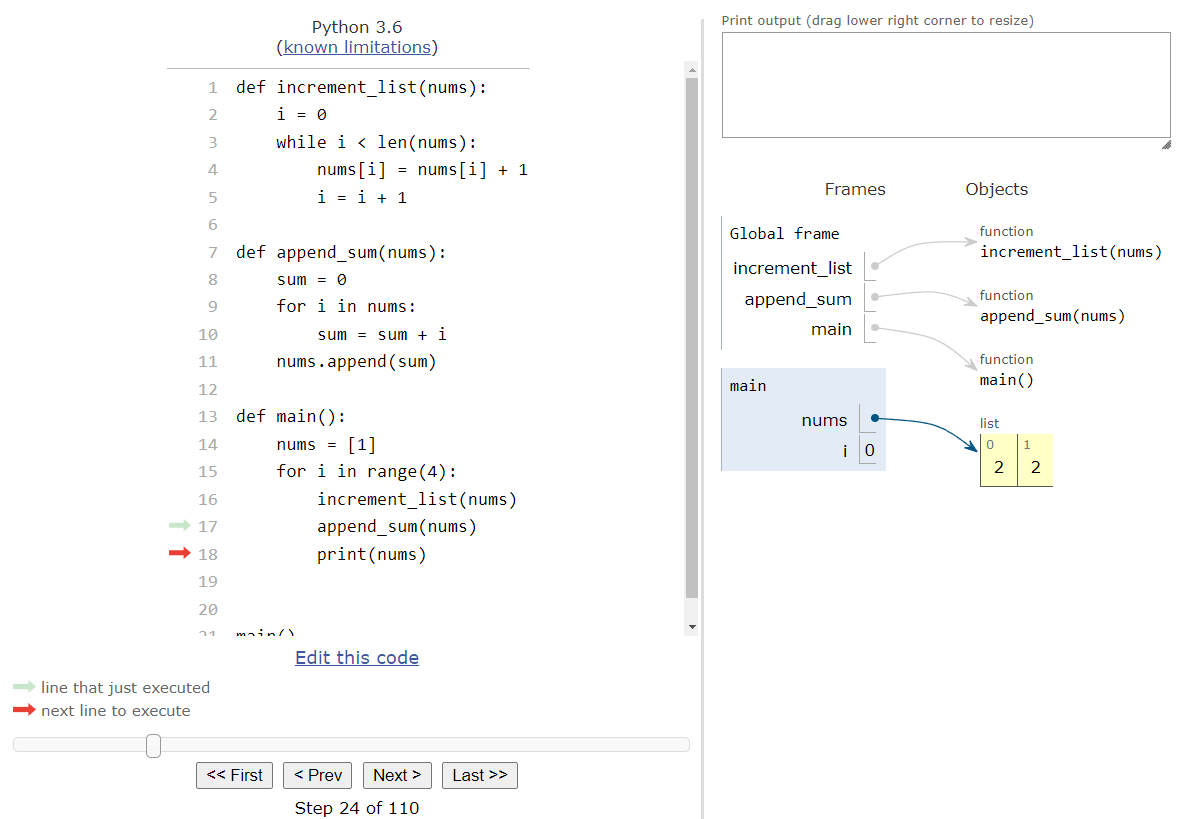
There we go! That’s one whole iteration through the loop in the main() function. This process will repeat $3$ more times. Each time, we’ll first increment the elements in the list using the increment_list() function, as shown here:
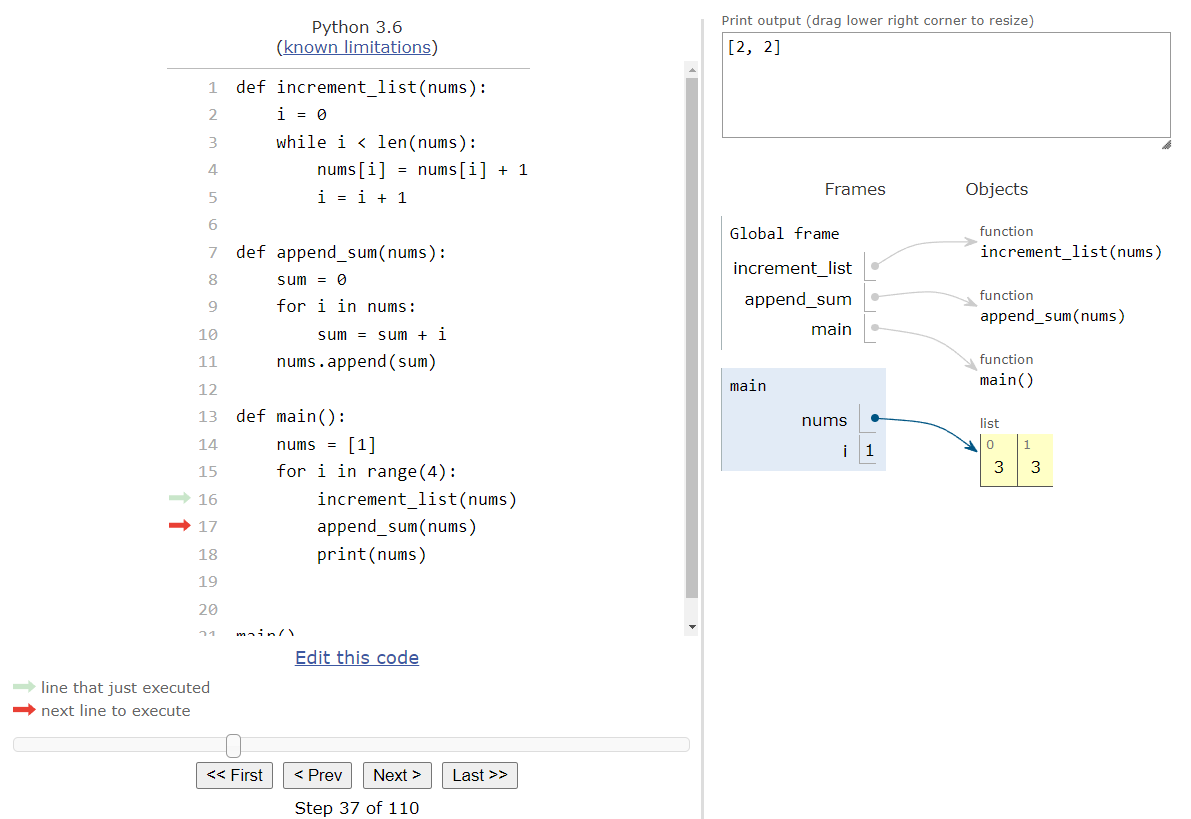
Then, we’ll sum up the existing elements in the list and append that value to the end of the list, which will result in this state:
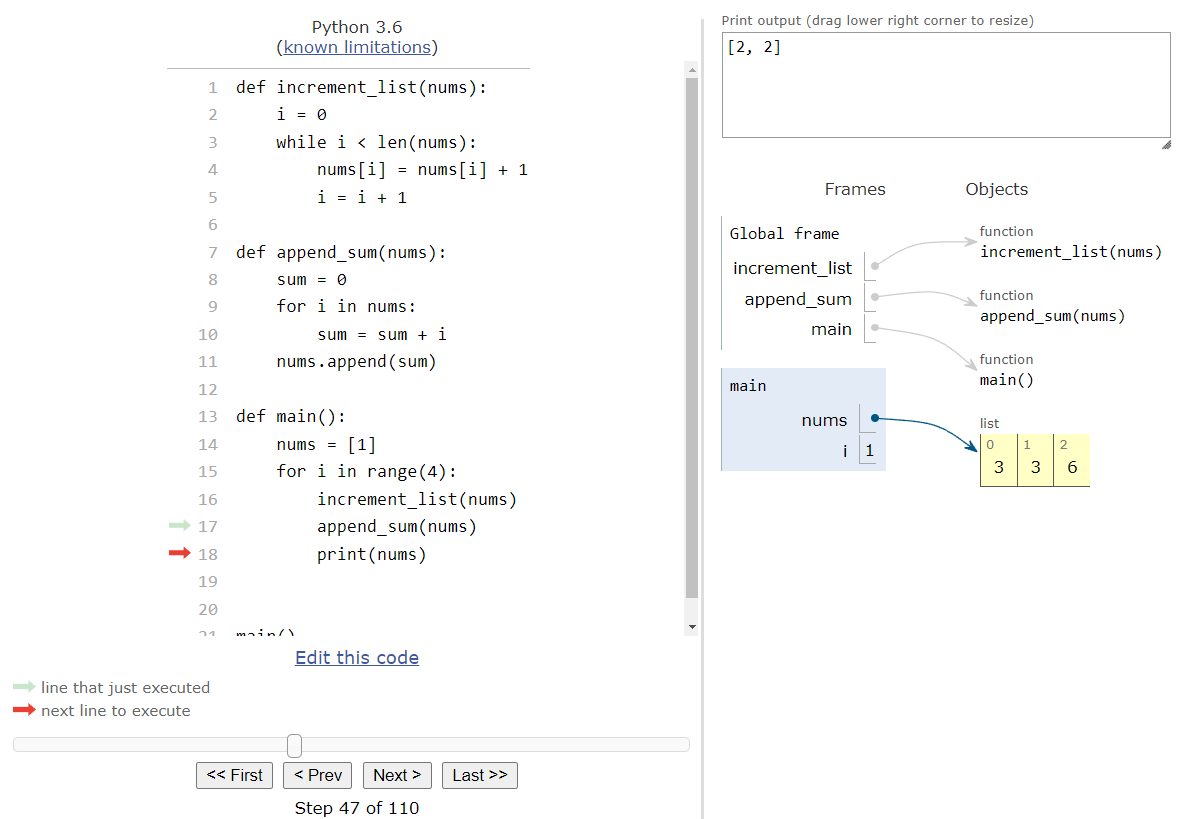
Finally, we’ll print the contents of the list at that point, and jump back to the top of the loop:
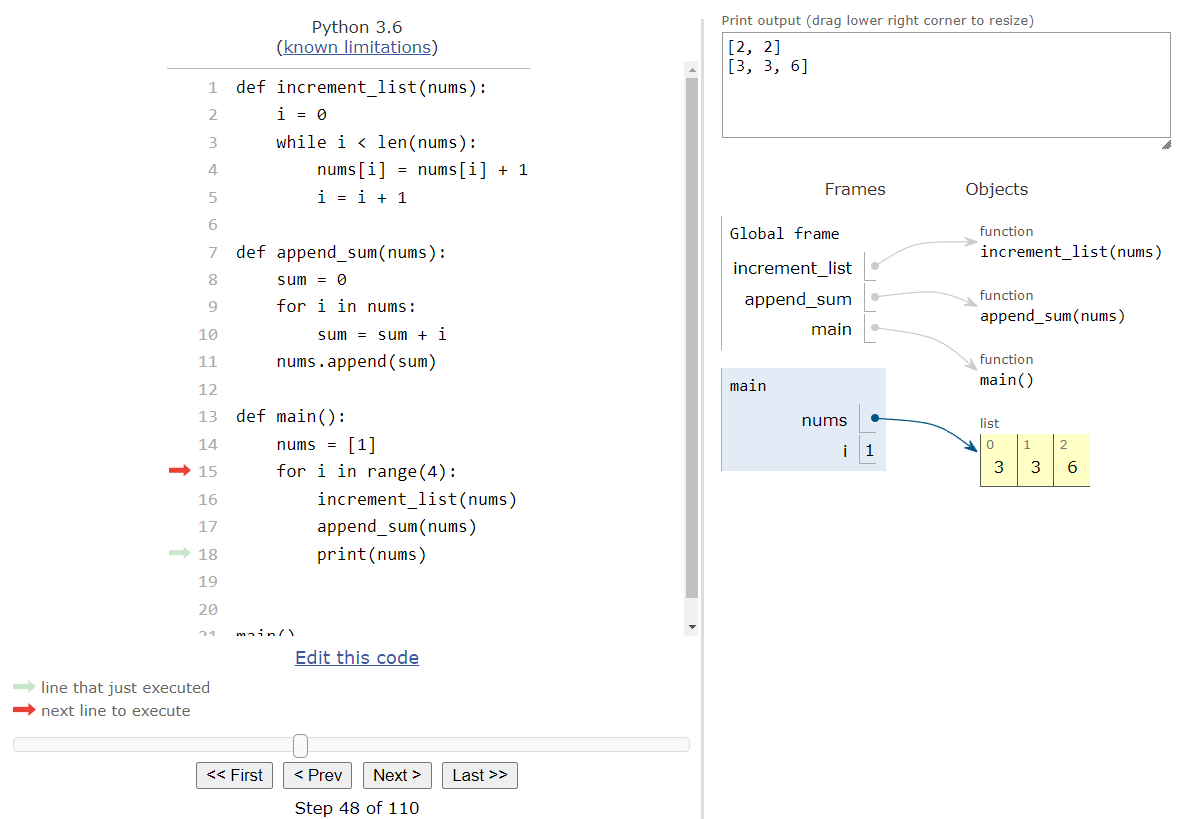
Each time, the list will be updated by the various functions that the main() function calls. Thankfully, since Python uses call by reference, each function is able to update the same list object in memory, making it quick and easy to work with lists and functions in Python. At the end of the entire program, we’ll see this state:
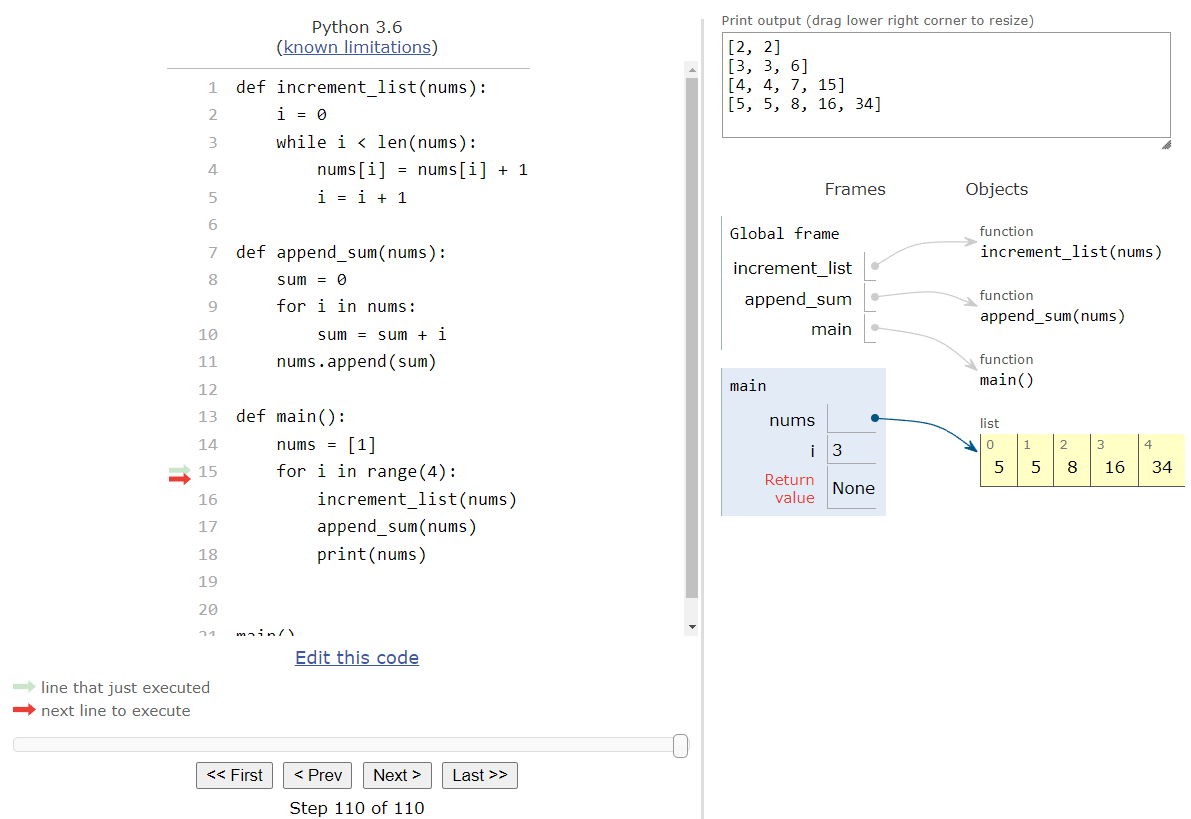
A full animation of this program, with some steps omitted, is shown here:
Functions that use lists as parameters are a very common technique in programming, and it is very important to understand how they work. If we aren’t careful, it is very easy to make a change to a list inside of a function call, and then later assume that the original list is unchanged. Likewise, if we pass a list as an argument to a function that works differently than we think it should, it could end up changing our data without us even noticing it. Hopefully this example makes it very clear how Python functions handle lists as parameters.
Subsections of Lists and Functions
Slicing Lists
YouTube VideoResources
One of the coolest features in Python is the ability to easily create slices of lists. A slice is simply a portion of a list that can be stored and used as a separate list, allowing us as programmers to quickly create and manipulate new lists based on existing lists.
There are two basic ways to create a list slice in Python.
nums[start:end]- this will create a slice of the list stored innumsthat begins as the indexstartand ends before the indexend. For example, ifnumsis storing the list[2, 4, 6, 8, 10], thennums[1:3]would create the list slice[4, 6].nums[start:end:step]- this will create a slice of the list stored innumsthat begins as the indexstart, movesstepindexes between each successive items, and ends before the indexend. For example, ifnumsis storing the list[2, 4, 6, 8, 10], thennums[0:5:2]would create the list slice[2, 6, 10].
The method for creating list slices is very similar to how the range() function is used in Python. In effect, if the same values are provided as arguments to the range() function, then it will produce the list of indexes that will be used to generate the list slice.
Beyond the simple syntax, there are a few other rules to understand about list slices:
- Any of the numbers may be omitted, as long as there is at least one colon placed inside of the square brackets. By default,
startwill be $0$ at the start of the list,endwill be the size of the list, andstepwill be $1$. So, each of these are valid ways to slice a list, and there are many more possible combinations:nums[:]- this will effectively copy the list and include every item in the slice.nums[start:]- this will include all items in the list starting atstart.nums[:end]- this will include all items in the list beforeend.nums[::step]- this will include all items in the list starting at index $0$ and moving forwardstepindexes each
- List slices may include negative indexes! In fact, we can use negative indexes to access elements in any list in Python. Some examples:
nums[-1]- this will access the last item in the listnums[-3:]- this will create a slice containing the last three items in the list.nums[:-2]- this creates a slice of the entire list except for the last two items.
For example, we can start with a simple list, and then try the various list slicing methods to see what elements would be included in the new list. Here’s an example program that shows some of the various ways to manipulate lists in Python:
def main():
nums = [0, 1, 2, 3, 4, 5, 6, 7, 8, 9]
print(nums)
# simple slices
print(nums[3:7])
print(nums[5:])
print(nums[:5])
print(nums[::2])
print(nums[1::2])
# negative numbers
print(nums[-1])
print(nums[-7:-3])
print(nums[-3:])
print(nums[:-3])
print(nums[::-1])
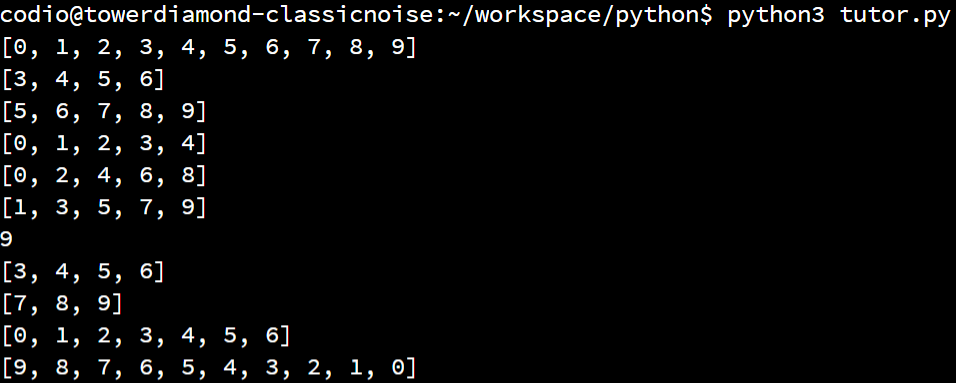
main()When we execute the program above, we should see the following output:
List slicing is a great way to use and manipulate lists in Python, but it takes a bit of practice to learn all the various ways that it can be used. Feel free to play around with all of the various examples above using some sample data to see how they work.
note-1
The range() function in Python is used to generate a list, but unfortunately we can’t directly use that list in our code without a bit of manipulation. For example, we can try to store the result of the range() function in a variable as shown here:
nums = range(10)
print(nums[3:7])
However, when we try to run that code, we’ll see this output:
range(3, 7)This is because the range() function doesn’t actually create a list - it is it’s own data structure type! Since a range can be constructed from just three numbers, it is much simpler to store just those numbers in memory instead of the entire list of numbers that it represents. When we create a slice of a range object, it just generates a new range instead of a list. So, to actually convert a range to a list, we must use the list() function in Python:
nums = list(range(10))
print(nums[3:7])
This will produce the expected output:
[3, 4, 5, 6]You can learn more about this by reading Python’s Range documentation.
Subsections of Slicing Lists
Strings are Lists
YouTube VideoResources
Throughout this course, we’ve seen several different ways to work with strings. In Python, just like in many other programming languages, it is possible to treat strings as a list of individual characters. Because of this, we can write many useful programs that use and manipulate strings in a variety of ways.
Let’s look at one quick example program that can manipulate strings just like a list! Consider the following Python program:
import random
import string


def encode(secret, step):
    output = ""
    for i in secret:
        output = output + i
        for j in step:
            output = output + random.choice(string.ascii_lowercase)
    return output


def decode(code, step):
    return code[::step]


def main():
    secret = input("Enter a secret word")
    step = int(input("Enter a positive integer"))
    code = encode(secret, step)
    print("Your code is:")
    print(code)
    print()
    decoded = decode(code, step)
    print("I can decode it back to:")
    print(decoded)


main()
This is a very simple encoding program that will allow the user to enter a secret phrase, encode it by inserting many random characters between the characters of the word itself, and then show that it can be decoded once again. This is very similar to how a Scytale encodes messages.
Let’s briefly walk through this example using Python Tutor to see how it works. As always, we can copy and paste this code in the tutor.py file in Codio, or click this Python Tutor
link to open it in a browser window.
We can skip ahead to the point where the code enters the main function, as shown in this state:
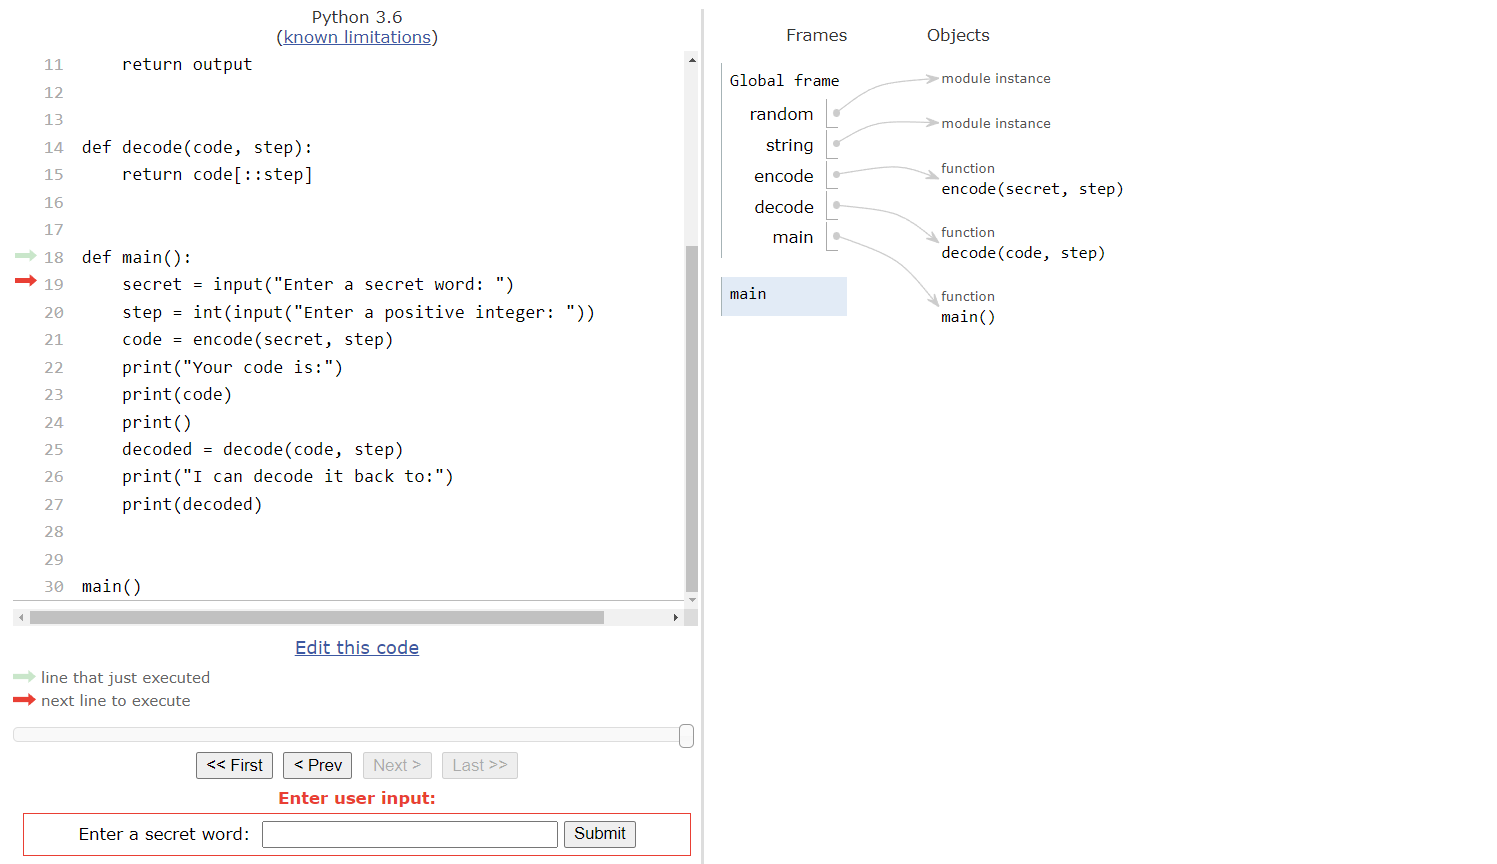
Let’s assume that the user inputs the string "password" for the secret word. That will be stored in the secret variable. On the next line, we’ll ask the user to input a positive integer:
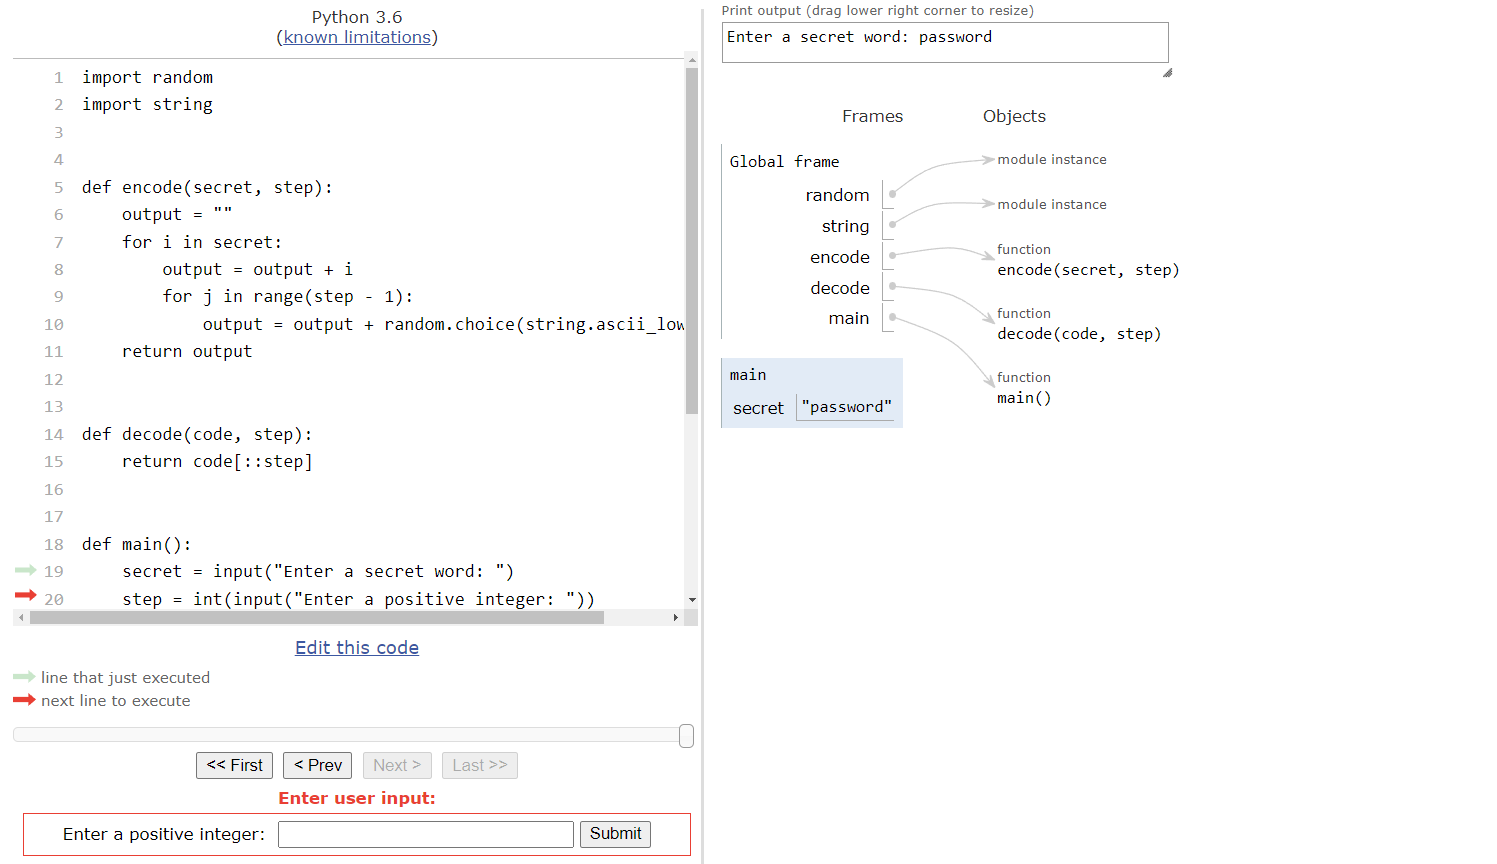
For this input, we’ll assume the user chooses to input the number $5$. So, we’ll store that in the step variable in our main() function, as shown here:
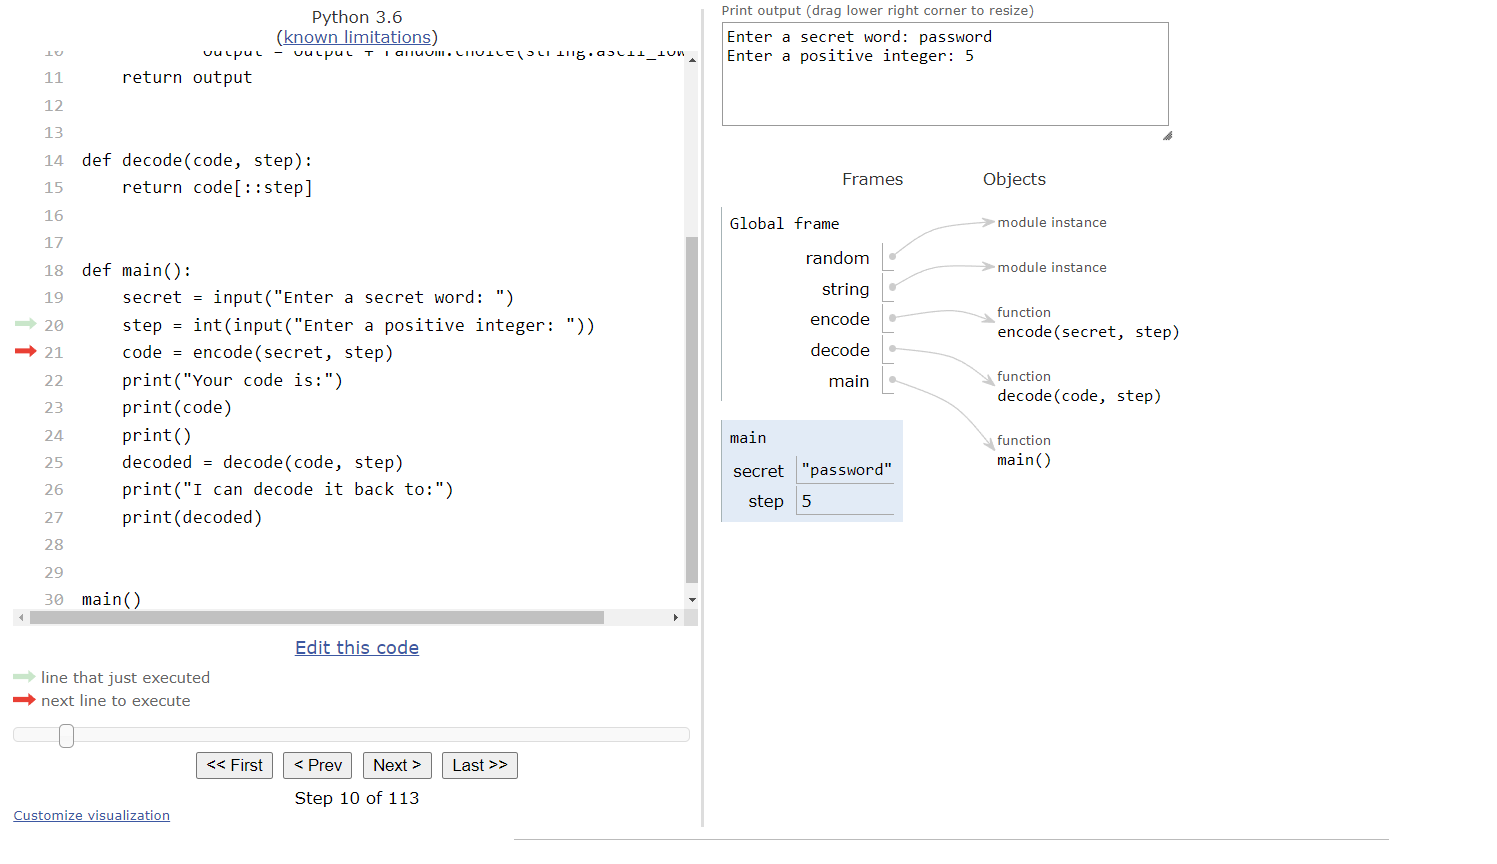
At this point, we’re ready to call the encode() function, which requires two parameters. We’ll use the variables secret and step as the arguments to those parameters, so Python Tutor will create a new frame for the encode() function and store those values within it:

At this point, we can notice one very important difference between strings and lists. Even though a string can be treated like a list, as we’ll see in this example program, it is still stored as a single variable item in the frame. So, the encode() function’s frame now contains a copy of the string secret, not a pointer to the original variable in the main() function’s frame. Technically, we would say that strings are an immutable data type, so we cannot change them from within a function like we can do with lists.
Inside of the encode() function, we’ll start by creating a new variable output, which is initially set to store an empty string.
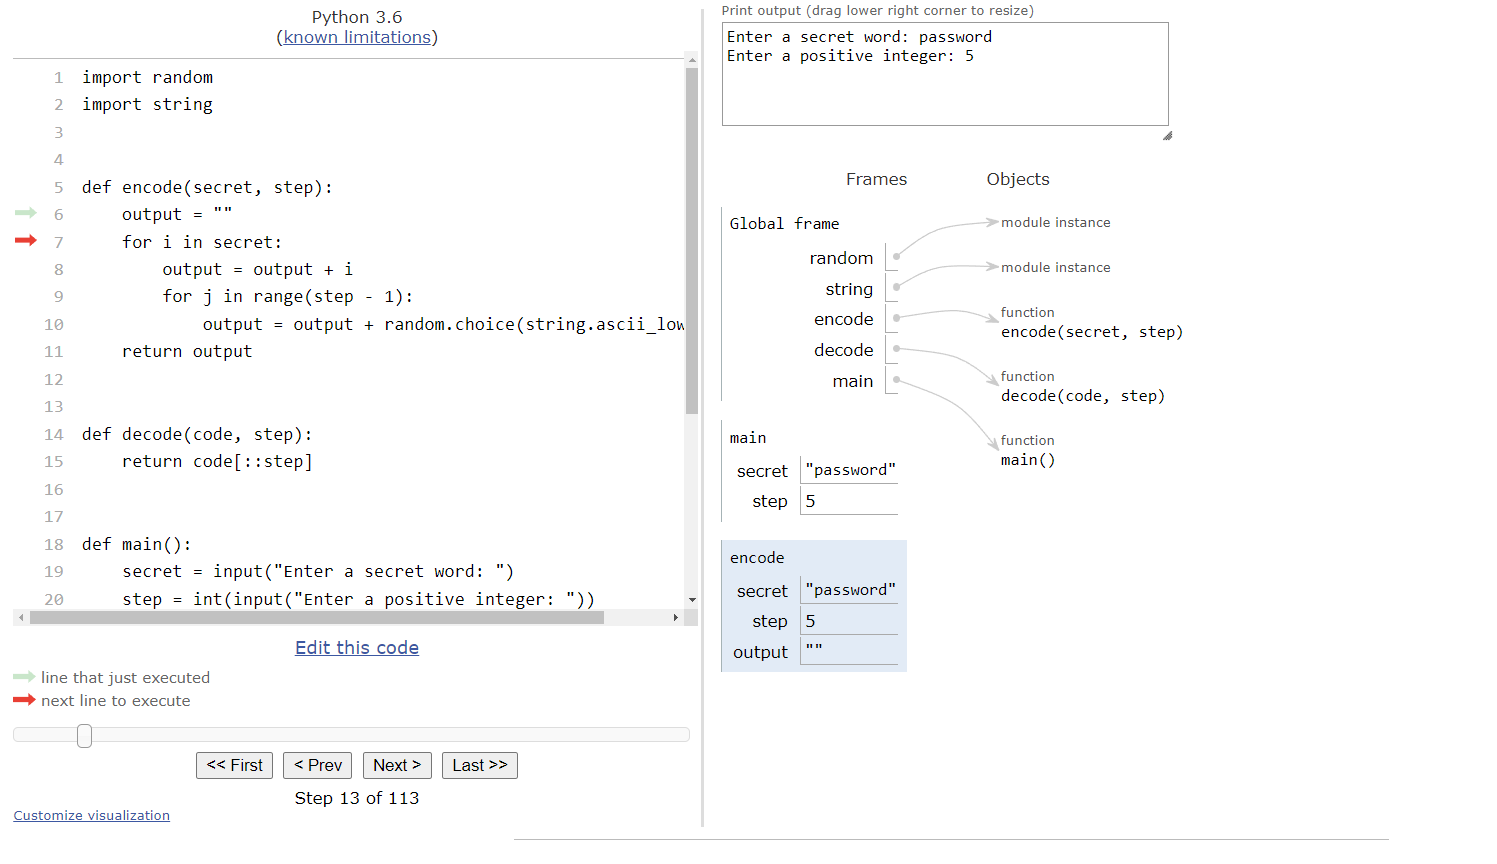
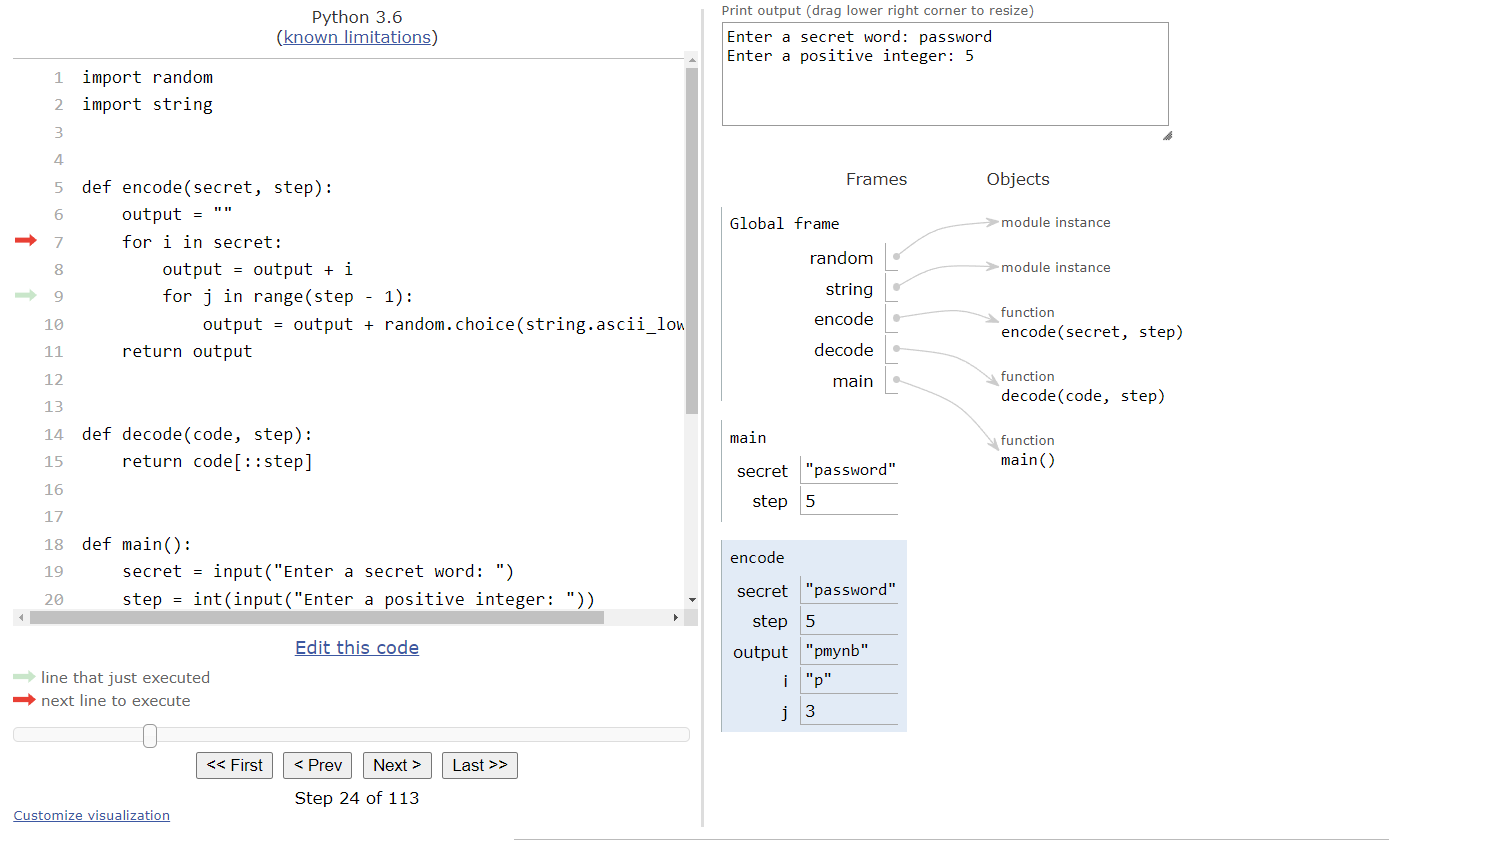
Then, we’ll reach a for loop. This for loop will iterate through each character in the secret string, one at a time. So, just like with a list, each character will be stored in the iterator variable i so we can use it inside of our for loop. For the first iteration, we’ll store the character 'p' in the iterator variable i, then we’ll enter the loop:

Inside of the loop, the first step is to append the current iterator variable i to the output string. So, we’ll place the character 'p' at the end of that string:
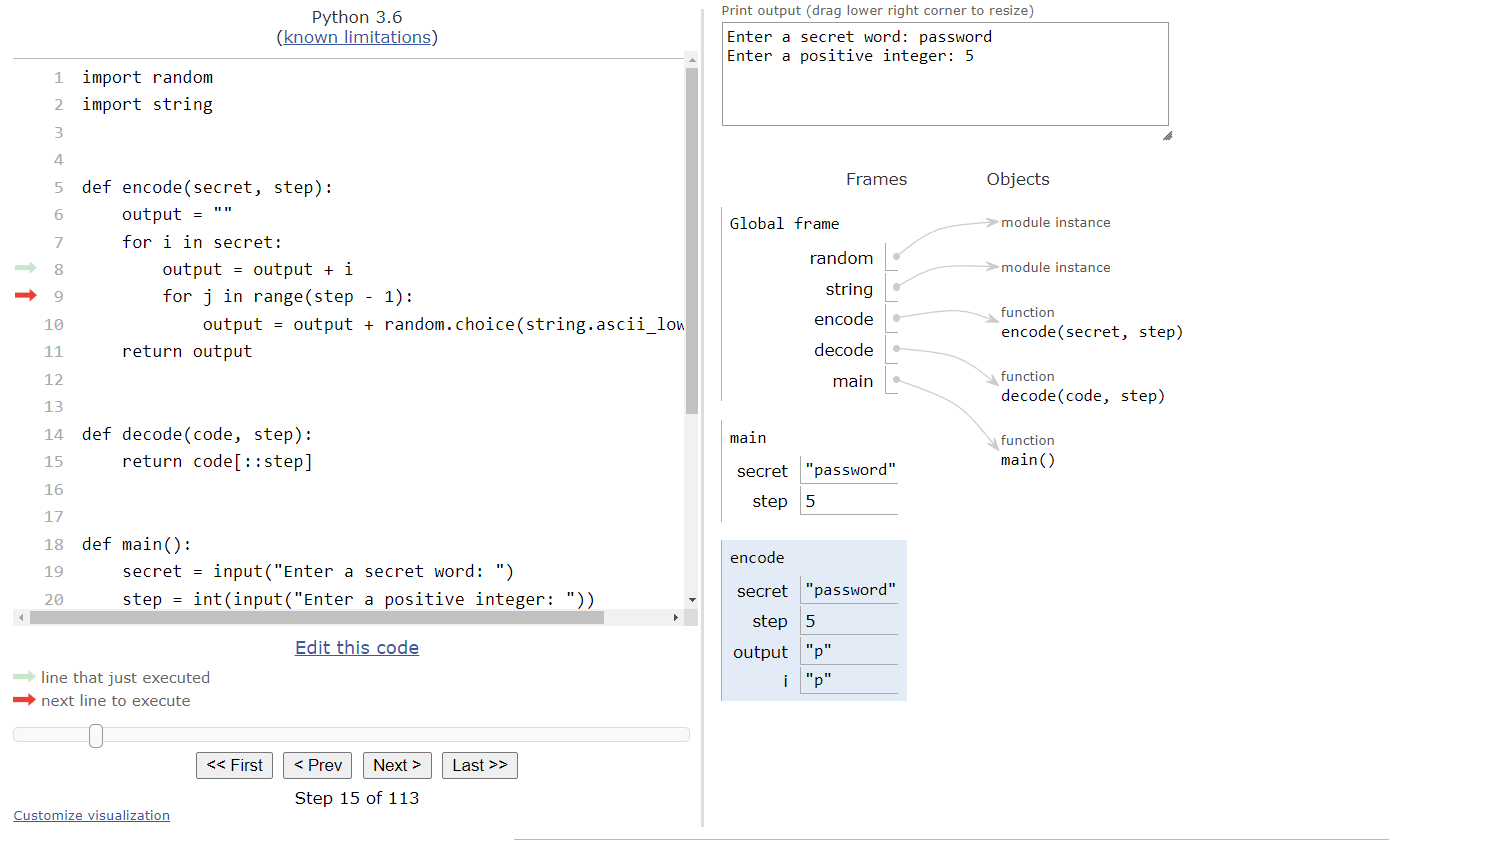
Then, we’ll reach a second for loop. This loop will repeat step - 1 times, so we’ll enter the loop and set the iterator variable j to be $0$ initially.

Inside of this loop, we have one complex line of code that we haven’t seen before. First, we have the string.ascii_lowercase list, which is a built-in list that is part of the string library which contains all $26$ lowercase letters of the English alphabet. To use this list, we have to include the import string line at the top of our file. Then, we use a special function named random.choice(), which is used to choose a random element from a list. So, we’ll also have to include the import random line at the top of our file to use that library as well. Finally, we’ll add that character to the end of the output string.

We’ll repeat this process a few more times. Once we exit the innermost for loop, we should be at this state:
In the output variable, we now see the first character of our secret word, 'p', followed by four random characters. These random characters make it more difficult for someone to decode our message. We’ll repeat this process for each of the other letters in our secret word. So, at the end of the encode() function, we should be at this state:
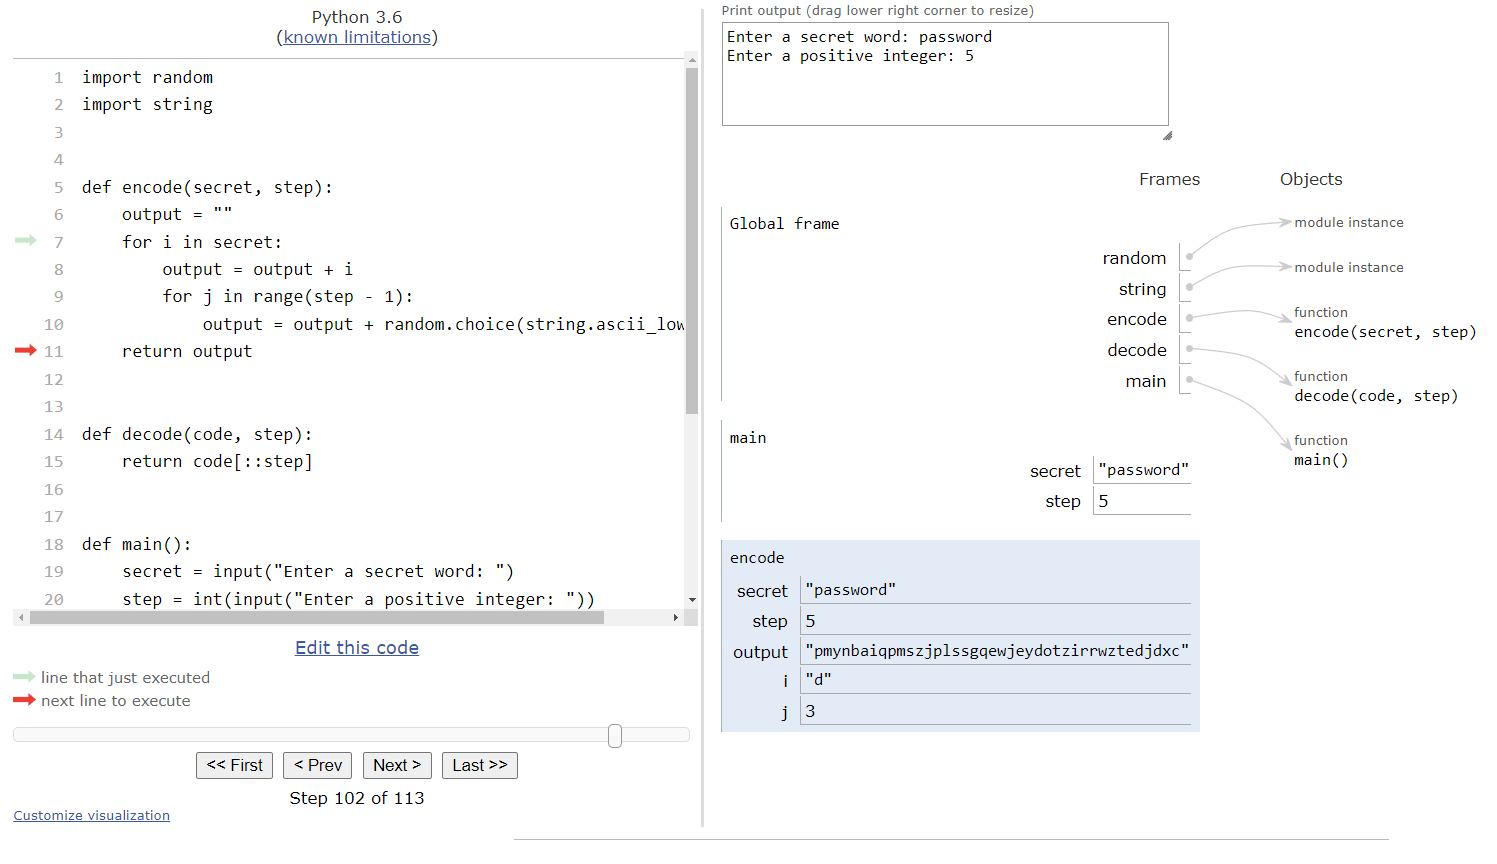
As we can see, the output variable appears to be completely random at first glance, which is exactly what we want. At this point, the encode() function will return that string back to the main() function, and it will be stored in the code variable there.
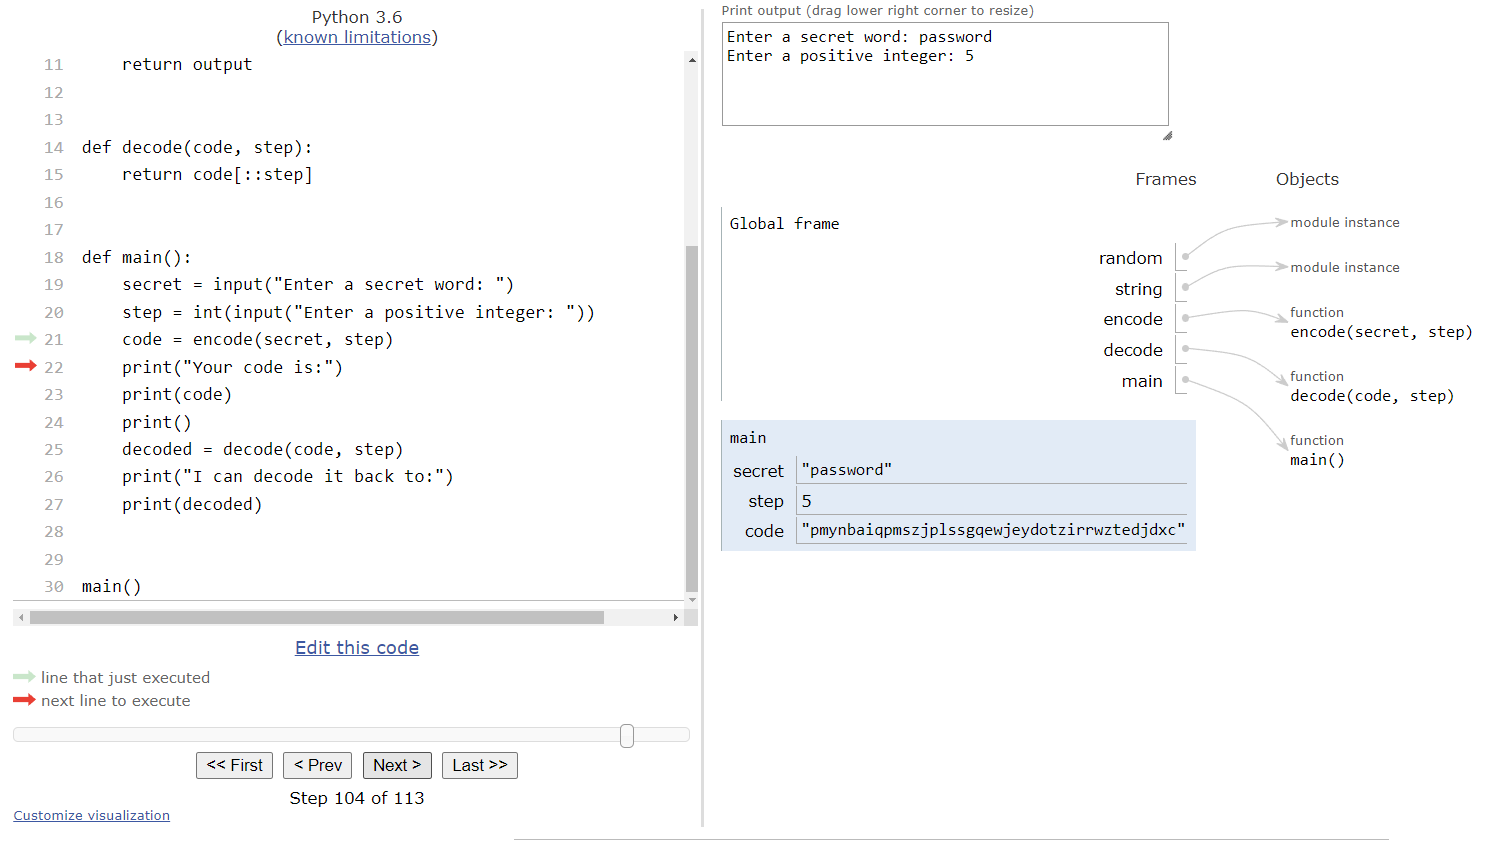
Next, the main() function will print out some helpful output, and then eventually it will reach the line that calls the decode() function.
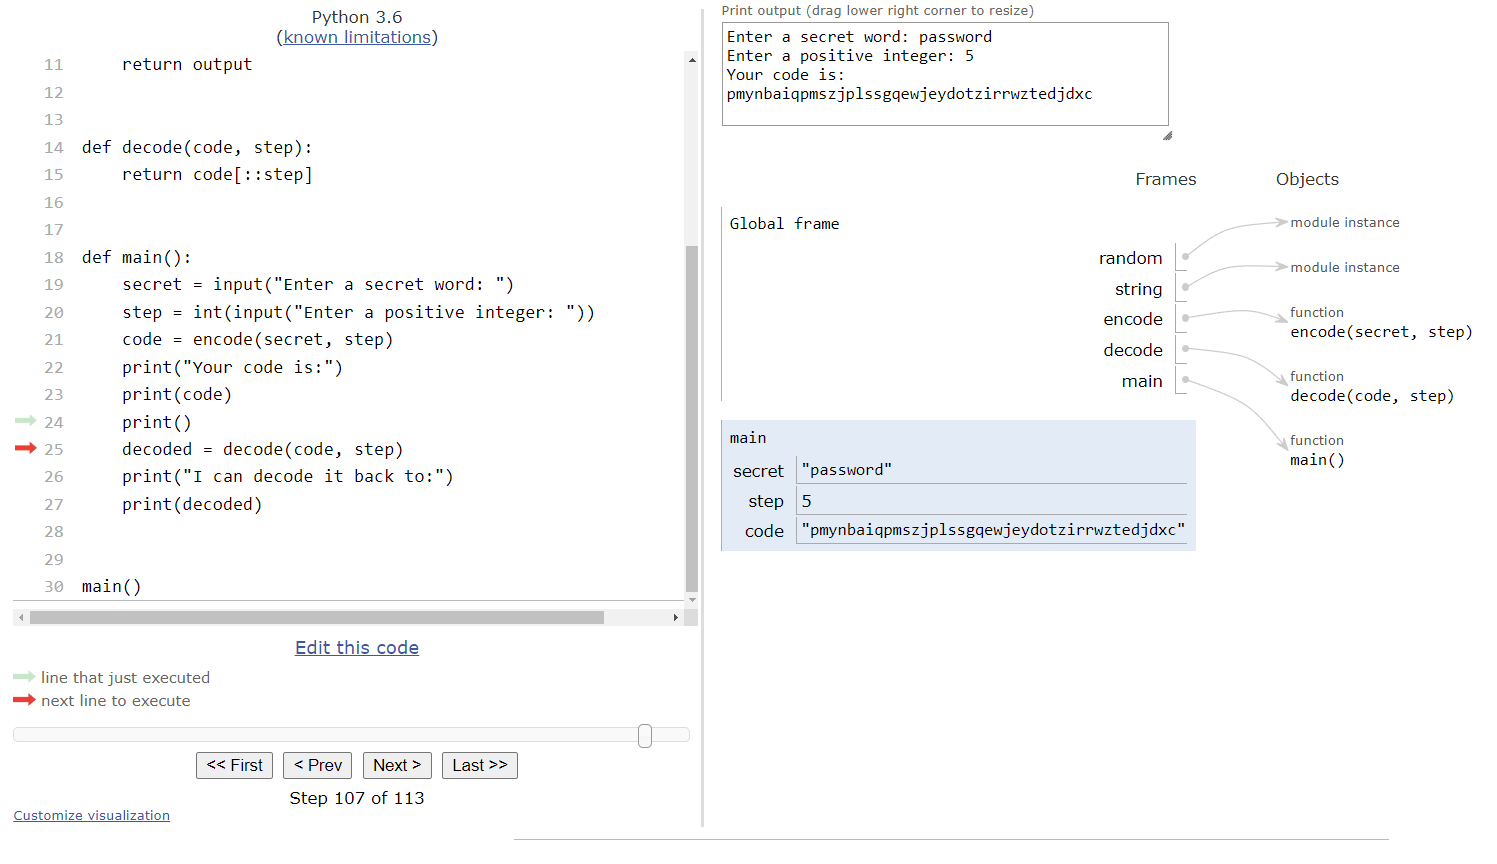
Once again, we’ll copy the values in the code and step variables to the decode() function’s frame since they are provided as arguments, and then we’ll enter the decode() function:
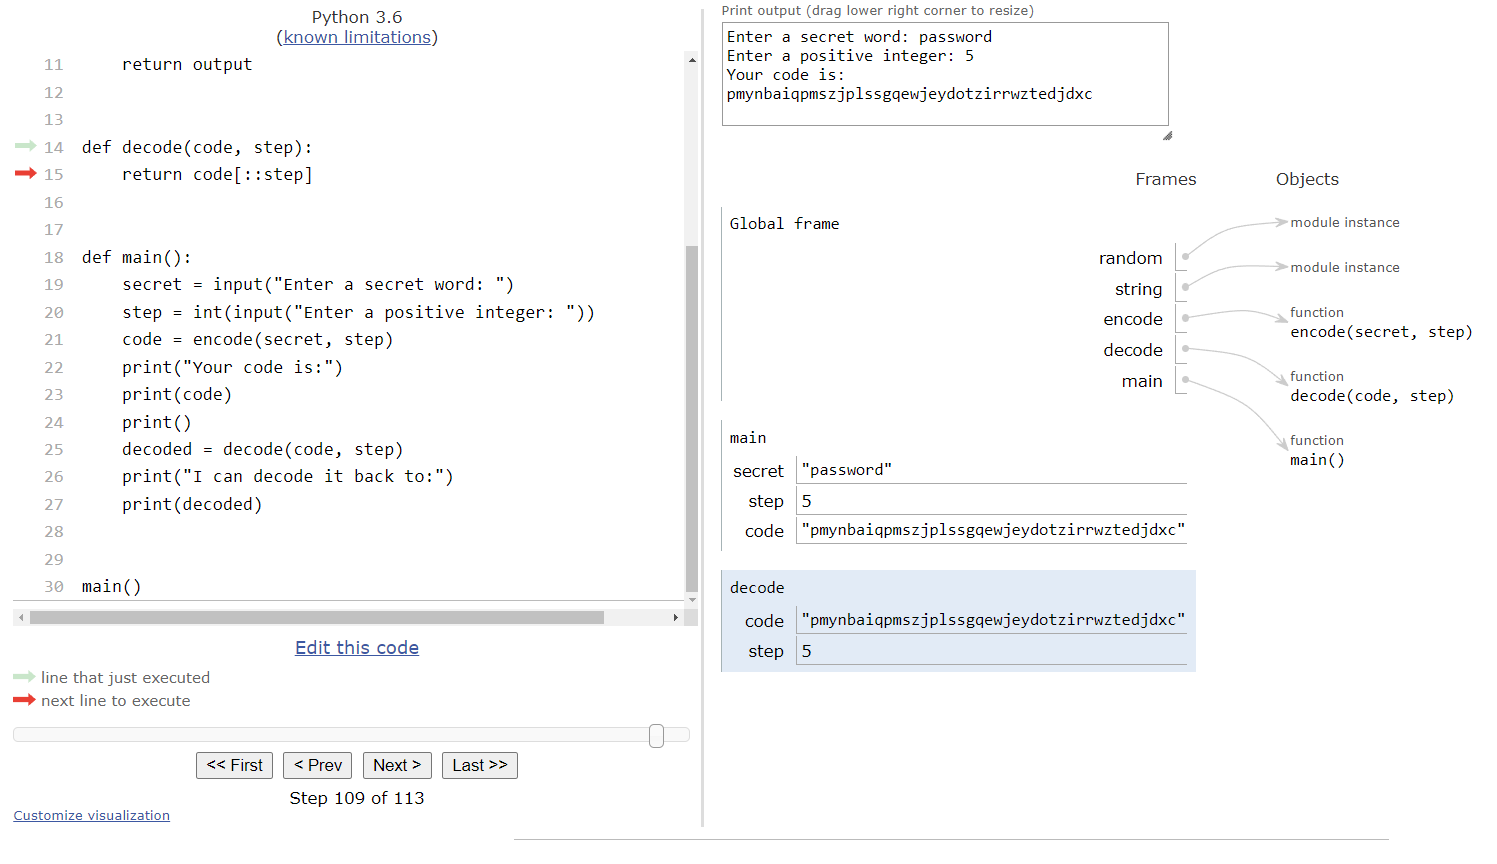
In this function, we see that we can decode our encoded phrase using a simple slicing operation, with the step variable providing the key we need to get our secret word out of the encoded string. We’ll return that back to the main() function:
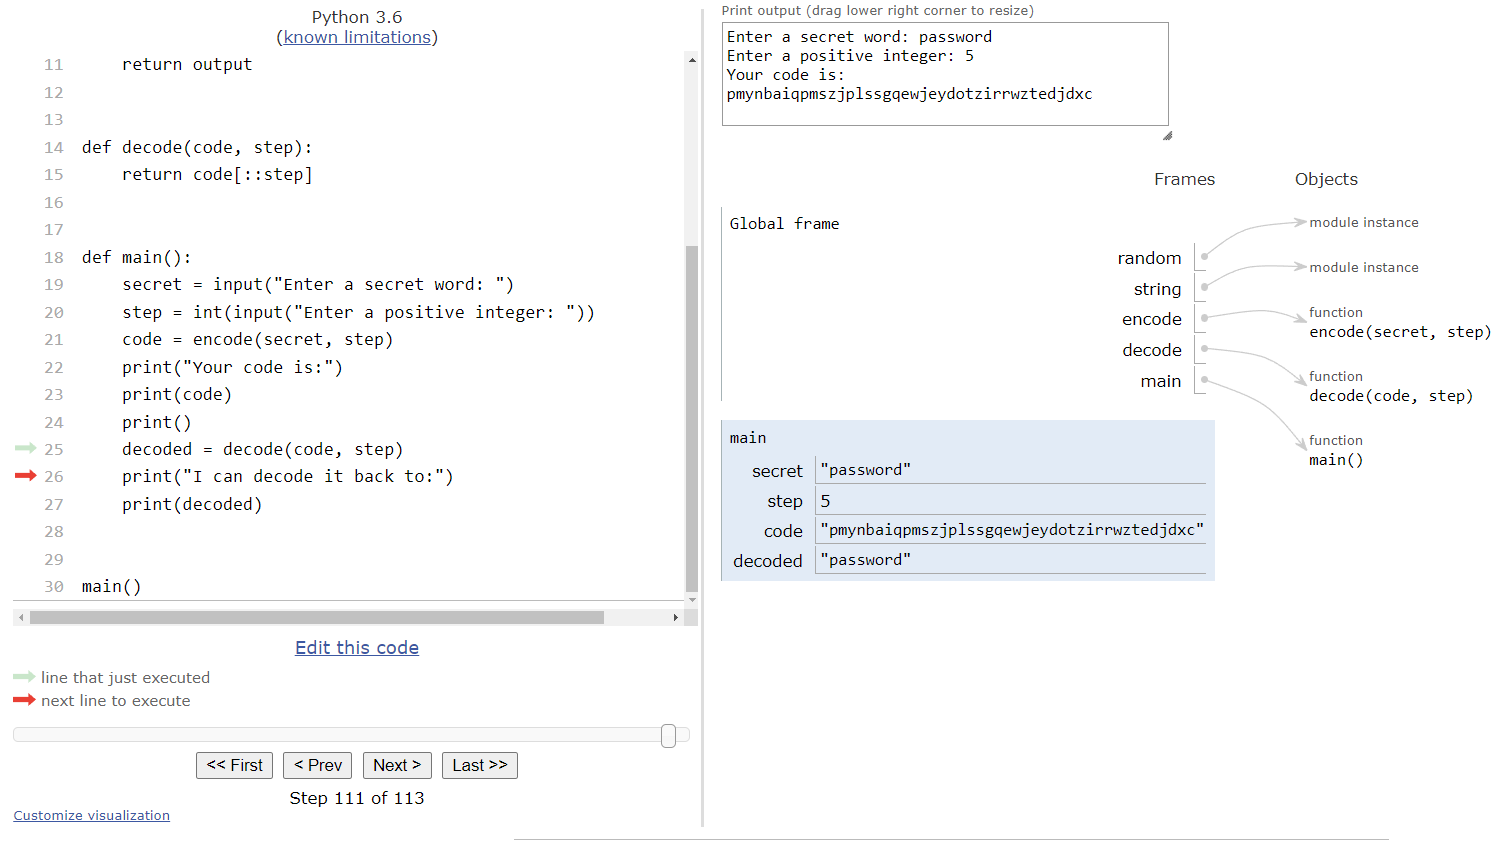
There we go! We’ve shown that we can easily construct an encoded phrase in a string using a secret word and a step variable, and then we can decode that phrase using a simple string slice. At the same time, we were able to explore how strings can be used like lists by iterating through a string and creating slices of a string, but also that strings are immutable and aren’t passed using call by reference like lists are. Instead, strings use call by value in Python, so we have to remember to return our updated strings at the end of any functions that manipulate them.
Thankfully, being able to work with strings in Python using the same methods as lists makes it very easy to write a wide variety of programs that create and manipulate strings!
Subsections of Strings are Lists
Worked Example
YouTube VideoResources
Finally, let’s work through another full example program in Python that uses lists and strings, just to gain some more experience with the various ways we can use the techniques we’ve learned in this lab.
For this example, consider the following problem statement:
Write a program to construct and print Pascal’s Triangle for a given number of rows. The user should be prompted to enter a positive integer indicating the number of rows, and if the user provides an invalid input the program should prompt for additional input until valid input is received.
Pascal’s Triangle is a simple mathematical construct that begins with the value $1$, and then each value below on the triangle is the sum of the two values immediately above it. The first few rows of Pascal’s Triangle are shown below:
    1
   1 1
  1 2 1
 1 3 3 1
1 4 6 4 1
We can easily do this with loops and lists. So, let’s go through the process of building that program from scratch.
Handling Input
To begin, we can start with our usual program structure consisting of a main() function and a call to the main() function at the bottom of the file:
def main():


main()
Next, we’ll include the positive_input() function that we’ve used in several previous labs, which handles prompting the user for a positive integer input and will prompt the user for additional input if an invalid value is provided. Once again, we’re doing our best to reuse pieces of code we’ve already written:
def positive_input():
    x = int(input("Enter a positive integer: "))
    while x <= 0:
        print("Invalid input!")
        x = int(input("Enter a positive integer: "))
    return x


def main():


main()
In our main() function, we can quickly call the positive_input() function to get the required piece of input from the user and store it in the variable n:
def positive_input():
    x = int(input("Enter a positive integer: "))
    while x <= 0:
        print("Invalid input!")
        x = int(input("Enter a positive integer: "))
    return x


def main():
    n = positive_input()


main()
That’s the basic structure of our program to handle input. It’s very simple and mostly reused code, so it should be quick and easy to get to this point of our development process.
Initial Setup
Next, we should add some of the initial steps to our program. For example, we know that the first row of Pascal’s Triangle is simply the number $1$, so we can create an initial list that contains just that single element, and then print that to the terminal:
def main():
    n = positive_input()
    row = [1]
    print(row)
Next, we know we need to create additional rows of Pascal’s Triangle, up to n rows in total. So, we can quickly build a for loop that will handle that in our main() function:
def main():
    n = positive_input()
    row = [1]
    print(row)
    for i in range(1, n):
        # update row
        print(row)
Notice that we are starting our range at $1$ instead of $0$. This is because we’ve already printed the first row, so we only want to print additional rows if the value of n is greater than $1$. That’s the basic structure we need in our main() function
Computing the Next Row
Finally, we need to deal with the process of updating our row list to include the next row’s information. While we could do that directly in the main() function, it makes the most sense to create a separate method for that. So, we’ll start by creating a new function update_row() that requires a single parameter:
def update_row(row):In this function, we need to use the previous row on Pascal’s Triangle to compute the next row. This is a bit tricky to figure out, but thankfully there are a few helpful rules that we can follow:
- Each successive row is $1$ element larger than the previous row
- The first item in the row is always $1$
- The item at index
i+1of the new row is the sum of the items at indexiandi+1on the previous row. - The last item in the row is always $1$
Using those rules, we can write a loop in code that will create a new list for the next row. First, since we’ll be using multiple items from the row list in our loop, we’ll need to start with the generic while loop structure to iterate through the list:
def update_row(row):
    i = 0
    while i < len(row):
        # use list elements
        i = i + 1
We can also initialize our new list to start with the value $1$ initially:
def update_row(row):
    i = 0
    new_row = [1]
    while i < len(row):
        # use list elements
        i = i + 1
Inside of the while loop, we can append new items to our new_row by simply summing the elements at index i and i + 1 of our previous list:
def update_row(row):
    i = 0
    new_row = [1]
    while i < len(row):
        new_row.append(row[i] + row[i + 1])
        i = i + 1
At the end, we’ll need to add the final $1$ to the new row. Finally, since we’re creating a new list instead of modifying the existing one, we’ll need to return that reference back to the main function:
def update_row(row):
    i = 0
    new_row = [1]
    while i < len(row):
        new_row.append(row[i] + row[i + 1])
        i = i + 1
    new_row.append(1)
    return new_row
note-1
It may seem like we can simply do row = new_row in the update_row() method instead of returning it, but that actually doesn’t work. This is because the row variable in the update_row() function’s frame is a reference to the previous list in memory. If we update that reference, it will point to the new list in the update_row() function’s frame, but not in the main() frame - that variable still points to the previous list. You can confirm this behavior by testing it in Python Tutor to see how it looks in memory.
Final Program
The last step is to simply update the for loop in our main() function to call the update_row() function and store the returned list reference back into the row variable. So, our final program looks like this.
def positive_input():
    x = int(input("Enter a positive integer: "))
    while x <= 0:
        print("Invalid input!")
        x = int(input("Enter a positive integer: "))
    return x


def update_row(row):
    i = 0
    new_row = [1]
    while i < len(row):
        new_row.append(row[i] + row[i + 1])
        i = i + 1
    new_row.append(1)
    return new_row


def main():
    n = positive_input()
    row = [1]
    print(row)
    for i in range(1, n):
        row = update_row(row)
        print(row)


main()
Now that we’ve completed this program, let’s test it once and make sure that it produces the correct output.
Logic Error
When we run this program, we should see the following appear in our terminal:
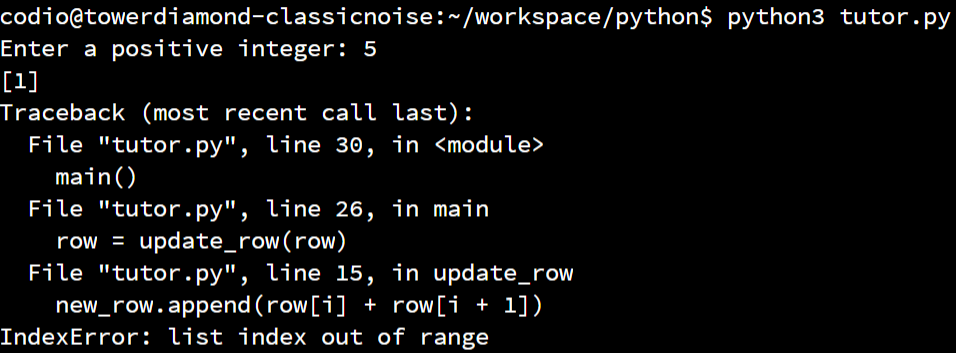
Uh oh! We’ve run into an error! This error is telling us that somewhere we are trying to access an index inside of a list that doesn’t exist. Helpfully, it tells us that we are doing this in the update_row() function, right inside of the for loop:
def update_row(row):
    i = 0
    new_row = [1]
    while i < len(row):
        new_row.append(row[i] + row[i + 1])
        i = i + 1
    new_row.append(1)
    return new_row
So, let’s see if we can figure out what is going on here. Let’s assume that it is failing when we are passing in the first row, which is simply the list [1]. On that line of code, we are appending a new item to the end of our new_list that is the sum of row[i] and row[i+1].
Ah ha! At this point, our row only contains a single item, so even if i is initially set to $0$, we cannot access an element that has index $1$ in that list. That’s where our logic error is coming from!
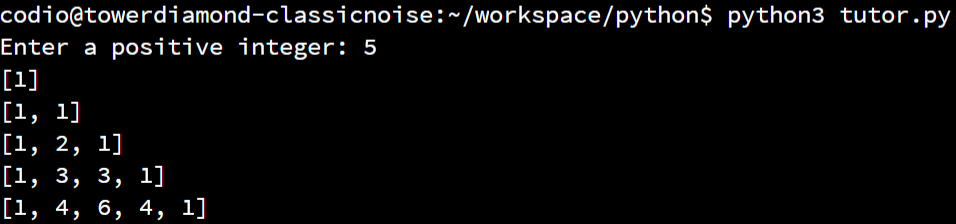
Since we need to access elements that are at one index higher than i, we must adjust our while loop so that it stops at the element before the last one. We can easily do that by modifying our while loop’s Boolean expression to i < len(row) - 1. If we make that change and try our program again, we should see the correct output:
The full, working example code is shown here:
def positive_input():
    x = int(input("Enter a positive integer: "))
    while x <= 0:
        print("Invalid input!")
        x = int(input("Enter a positive integer: "))
    return x


def update_row(row):
    i = 0
    new_row = [1]
    while i < len(row) - 1:
        new_row.append(row[i] + row[i + 1])
        i = i + 1
    new_row.append(1)
    return new_row


def main():
    n = positive_input()
    row = [1]
    print(row)
    for i in range(1, n):
        row = update_row(row)
        print(row)


main()
There we go! We’ve written a complete program that will generate Pascal’s Triangle for any given number of rows. It uses both while and for loops and lists to accomplish that goal. Try to work through this entire example and run the program many times along the way to make sure you have a good understanding of why it works before continuing in this lab.
info-1
You might be wondering why we’ve chosen to keep the logic error in this example program instead of simply fixing it in our explanation. As it turns out, that logic error was actually made by the author while writing this example, and we felt that it was best to demonstrate how to quickly identify and resolve such an error instead of simply explaining it away. Hopefully seeing how easy it is to make simple logic errors like this will help you understand that it can happen to anyone, and it is not a big deal to have to fix small bugs along the way.
Subsections of Worked Example
Summary
In this lab, we introduced several major important topics in Python. Let’s quickly review them.
Python Lists
Lists in Python allow us to store multiple elements in a single variable, with each element identified by a unique index within the list.
Lists can be created using square brackets []:
list_a = []
list_b = [5, 3, 7]
Adding and Accessing List Items
New elements can be added to a list using the append() method:
list_a = []
list_a.append(4)
Items in a list can be accessed and updated using square brackets:
list_b = [5, 3, 7]
list_b[2] = list_b[0] + list_b[1]
Loops with Lists
Lists can be iterated using both for loops and while loops:
list_b = [5, 3, 7]

for i in list_b:
    print(i)

j = 0
while j < len(list_b)
    print(list_b[j])
    j = j + 1
Lists should not be changed while iterating using a for loop.
Functions with Lists
When calling a function that accepts a list as a parameter, the argument is passed using call by reference instead of call by value. The original list can be modified by the function, but it cannot be replaced with a new list unless the reference to that new list is returned from the function.
Strings as Lists
Strings can be iterated just like a list, and we can use square brackets to access individual characters in a string. However, lists are still passed as call by value when provided as an argument to a function.
Slicing
We can create a slice of a list by specifying a start, end and step value separated by colons. The values may be omitted, and may also be negative.
list_b = [5, 3, 7]
print(list_b[-1])
print(list_b[0:1])
print(list_b[0:2:2])
print(list_b[::-1])