Chapter 3
Subsections of Functions
Pseudocode Procedures
YouTube VideoResources
As our programs get larger and larger, we’ll probably find that we keep repeating pieces of code over and over again in our programs. In fact, we’ve probably already done that a few times just working through this lab. What if we had some way to build a small block of code once, and then reuse it over and over again in our programs?
Thankfully, this is a core feature of most programming languages! In our pseudocode, we call these procedures, though many other programming languages refer to them as functions, methods, or subroutines. For now, we’ll use procedure in pseudocode, and later on we’ll introduce the same concept in Python using a different term.
Creating a Procedure
Creating a procedure requires a more complex structure in our code than we’ve seen previously. The best way to learn it is to just see it in action, so here is the basic structure of a procedure in pseudocode:
PROCEDURE procedure_name()
{
    <block of statements>
}
Let’s look at each part of this structure in detail to see how it works:
- Every procedure starts with the special keyword
PROCEDURE. Just likeDISPLAY, thePROCEDUREkeyword is a built-in part of our language that we use to create a new procedure. - Following the keyword
PROCEDUREwe see the name of the procedure. In this case, we are usingprocedure_nameas the name of the procedure. Procedure names follow the same rules and conventions as variable names that we discussed earlier. The two most important rules are:- A procedure name must begin with a letter.
- Procedure names must only include letters, numbers, and underscores. No other symbols, including spaces, are allowed.
- Next, we have a set of parentheses
(). These are used for the parameters of a procedure, which we’ll learn about on the next page. - Following the parentheses, we see an opening curly brace
{on the next line, and a closing curly brace}a few lines later. The curly braces are used to define the block of statements that make up the procedure. - Inside of the curly braces, we see a
<block of statements>section. This is where we can place the code that will be run each time we run this procedure. Each procedure will include at least one statement here, but many times there are several.
It may seem a bit complex at first, but creating a procedure is really simple. For example, let’s see if we can create a procedure that performs the “Hello World” action we learned about earlier. We’ll start by writing the keyword PROCEDURE followed by the name hello_world, some parentheses, and a set of curly braces:
PROCEDURE hello_world()
{

}
That’s the basic structure for our procedure! Now, inside of the curly braces, we can place any code that we want to run when we use this procedure. To make it easier to read, we will indent the code inside of the curly braces. That makes it clear that these statements are part of the procedure, and not something else. So, let’s just have this procedure display "Hello World" to the user:
PROCEDURE hello_world()
{
    DISPLAY("Hello World")
}
There we go! That’s what a basic procedure looks like.
Calling a Procedure
Of course, learning how to write a procedure is only part of the process. Simply creating a procedure doesn’t actually cause it to run. So, once we have a procedure created, we have to learn how to use it in our code as well.
When we want to run a procedure, we call it from our code using its name. It may seem strange at first, but the term call is what we use to describe the process of running a procedure in our code.
Thankfully, a procedure call is very simple - all we have to do is state the name of the procedure, followed by a set of parentheses:
hello_world()So, our complete program would include both the definition of our procedure, and then a procedure call that executes it. Typically, we include the procedure calls at the bottom of the program, so it would look like this:
PROCEDURE hello_world()
{
    DISPLAY("Hello World")
}

hello_world()
Pretty simple, right? To make our code easy to read, we usually leave a blank line after the creation of a procedure, as shown in this example.
When our “mental model” of a computer runs this code, it will start at the top. Here, it sees that we are creating a procedure called hello_world, so it will make a note of that. It won’t run the code inside the procedure just yet, but it will remember where that procedure is in our code so it can find it later. It will then jump ahead to the end of the procedure, marked by the closing curly brace }. As it moves on from there, it will see the line that is a procedure call. Since it knows about the hello_world procedure, it can then jump to that place in the code and run that procedure before jumping back down here to run the next line of code. However, it can be a bit tricky to follow exactly what is going on, so let’s go through a code tracing exercise to make sure our “mental model” of a computer can properly follow procedure calls in our programs.
Code Tracing a Procedure Call
Let’s consider the following program, which contains two procedures, and a bit of code to call those procedures:
PROCEDURE foo()
{
DISPLAY("Run ")
}
PROCEDURE bar()
{
DISPLAY("Forrest, ")
}
foo()
bar()
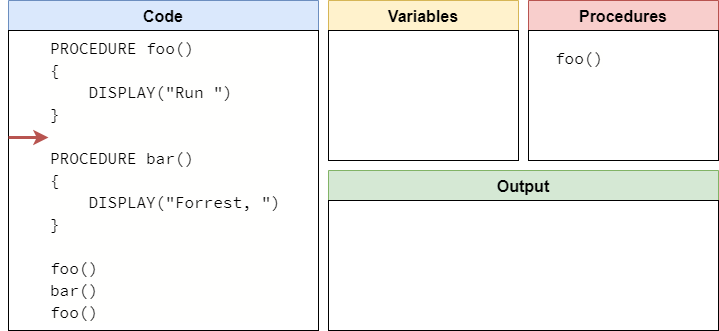
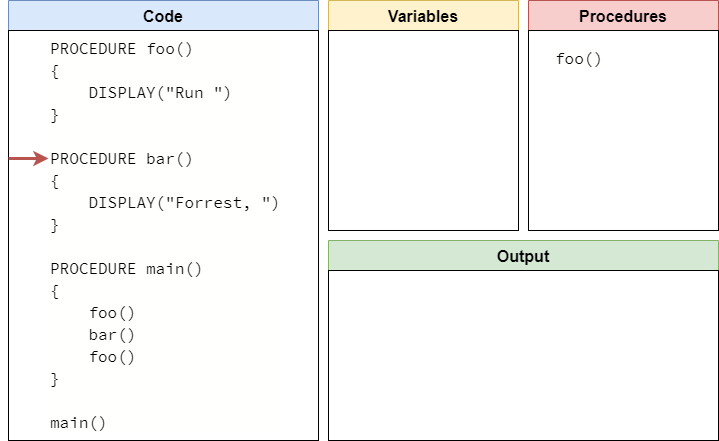
foo()As before, we can set up our code tracing structure that includes our code, variables, and output. However, this time we’re also going to add a new box to keep track of the procedures in our program. So, our code tracing structure might look something like this:

Once again, we can work through this program line by line, starting at the top. In this program, the very first thing we find is the creation of a new procedure. At this point, we aren’t running the code inside the procedure, we are simply creating it. So, our program will record that it now knows about the procedure named foo in its list of procedures, and it will skip down to the next line of code after the procedure is created.
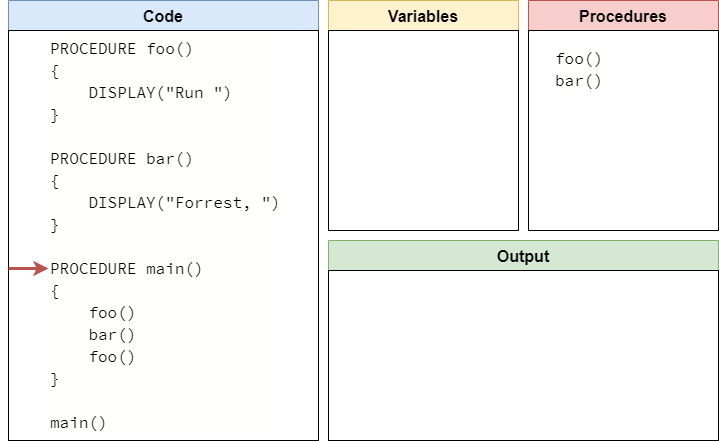
This line is just a blank line, so our “mental model” of a computer will just skip it and move to the next line. Blank lines are simply ignored by the computer, but it makes it easier for us to write code that is readable. So, on the next line, we see the creation of another procedure:
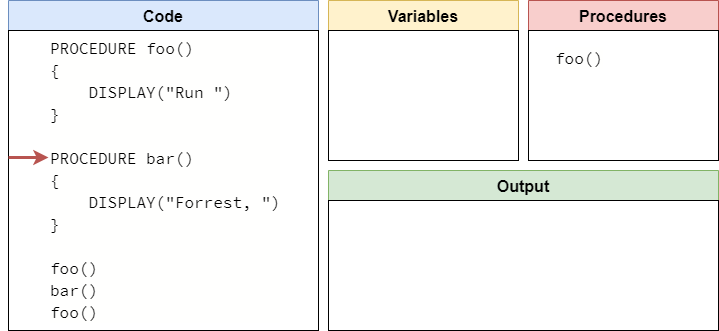
Once again, we see that a new procedure is being created, so our computer will simply make a note of it and move on. It will skip the blank line below the procedure, and eventually it will reach the first procedure call, as shown below:
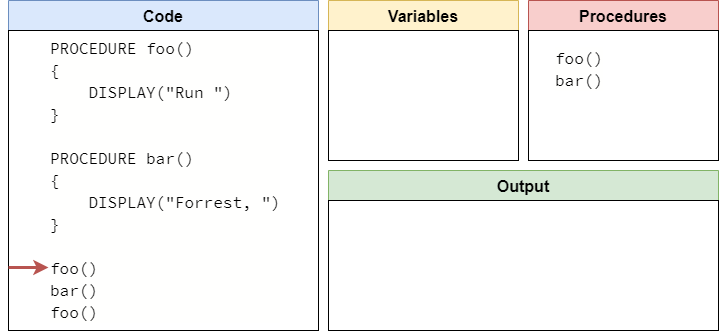
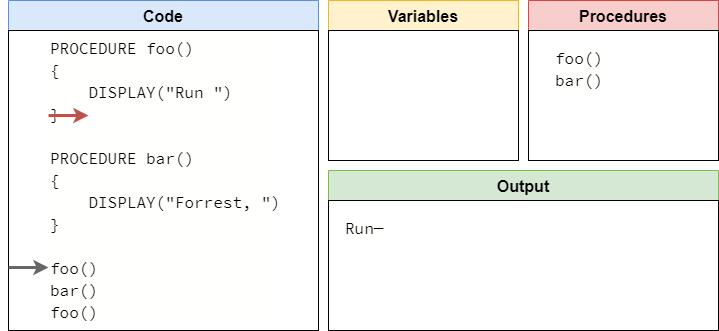
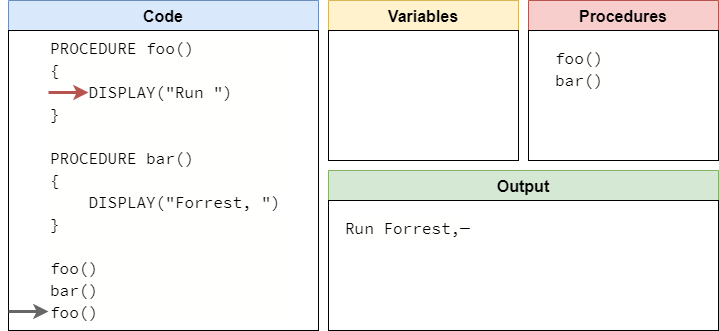
Ok, here’s where things get a bit tricky! At this point, we are calling the procedure named foo. So, our computer will check the list of procedures it knows about, and it will see that it knows where foo() is located. So, our “mental model” of a computer knows that it can execute that procedure. To do that, it will jump up to the first statement inside of the procedure and start there. At the same time, it will also keep track of where it was in the program, so it can jump back there once the procedure is done. We’ll represent that with a shaded arrow for now:
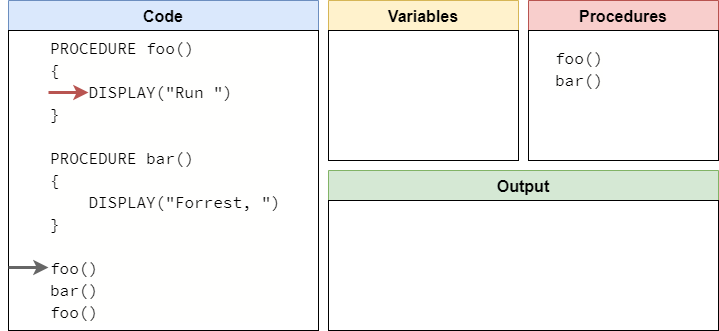
Now we are looking at the first line of the foo procedure, which simply displays the text "Run " on the output. So, we’ll update our output, and move to the next line of the procedure.
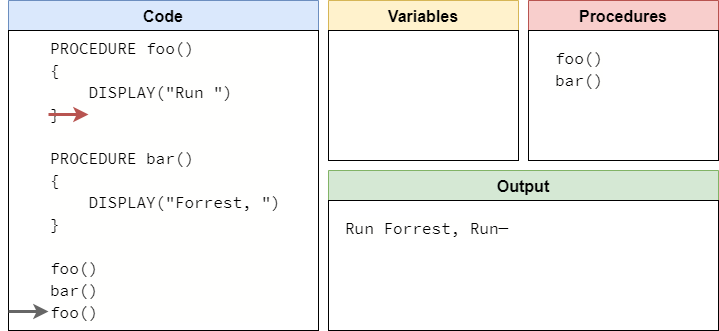
At this point, we’ve reached the end of our procedure. So, our computer will then jump back to the previous location, indicated by the shaded arrow.

Since there is nothing else to execute on this line, it will simply move to the next line.
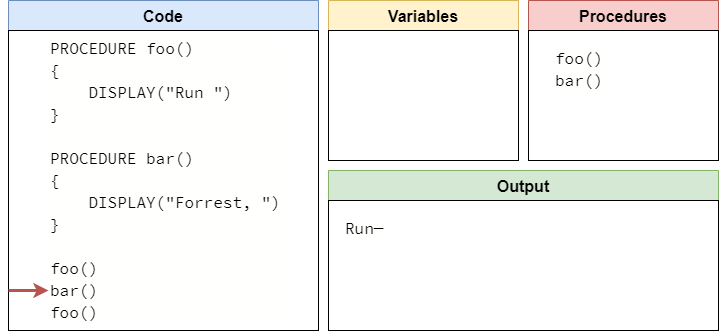
Once again, we see that this is another procedure call. So, the computer will make sure it knows where the bar() procedure is, and then it will jump to the first line of that procedure. When it does, it will remember what line of code it was currently running, so it can jump back at the end of the procedure.
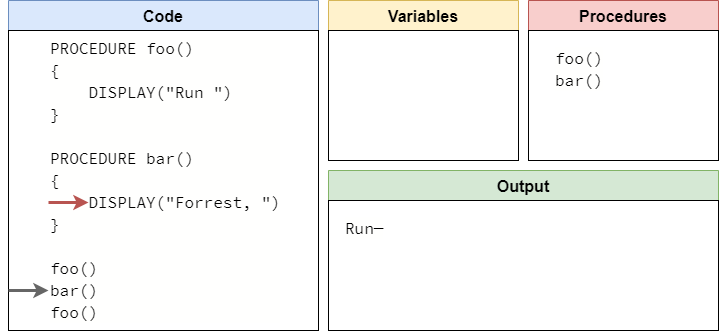
Like before, it will then run the first line of the bar() procedure, which will display "Forrest, " to the user. So, we’ll update our output section, and move the arrow to the next line.
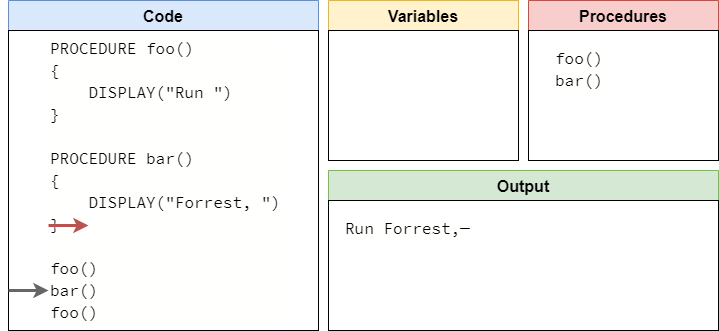
We’re back at the end of a procedure, so we will jump back to the previous location and see if there is anything else to do on that line:

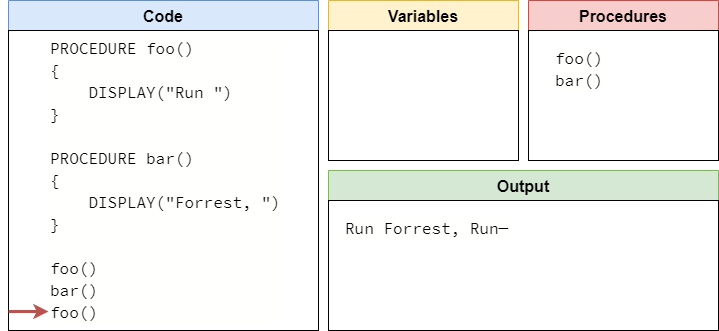
Since there’s nothing else there, our “mental model” will just move to the next line of code:

By now, we should have a good idea of what is happening when we call a procedure. We simply jump to where it starts, making sure we remember where we came from:
Then, we execute the lines of code in the procedure:
Finally, when we reach the end of the procedure, we go back to where we came from and see if there is anything else to do on that line:
There’s nothing left to do, so we’ve reached the end of our program! The full process is shown in the animation below:
It is very important for us to make sure our “mental model” of a computer knows how to properly call and execute procedures, since that is a core part of developing larger and more complex programs. Thankfully, we’ll get lots of practice at this as we learn to program!
tip-1
One of the tricky parts of learning how to program is knowing when to take a piece of code and make it into a procedure. A great principle to keep in mind is the Don’t Repeat Yourself or “DRY” principle of software development. In this principle, if we find that our program contains the same lines of code in multiple places, we should make a procedure containing those lines of code and call that procedure each time we use those lines in our program. In that way, we are only writing that block of code once, and we can use it anywhere.
Another principle is that programs should only consist of procedures, and each procedure should only be a few lines of code. By following this method of development, each procedure only performs one or two actions, making it much easier to test and debug those procedures independently and make sure they are working properly before testing the entire program as a whole.
As we continue to learn more about programming, we’ll see both of these principles in action.
Subsections of Pseudocode Procedures
Main Procedure
YouTube VideoResources
Up to this point, we’ve simply written code and expected it to run easily in our “mental model” of a computer. However, many programming languages place one additional requirement on code that we should also follow: all code must be part of a procedure.
What does this mean? Put simply, we shouldn’t place any code in our programs that isn’t part of a procedure. Or, put another way, our programs should only consist of procedures and nothing else.
But wait! Didn’t we just learn that our “mental model” of a computer will just skip past procedures when it runs our programs, and it will only execute the code inside of a procedure when it is called? How can we call a procedure if all of our code must be within a procedure? It sounds a bit like a “chicken and egg” problem, doesn’t it?
Thankfully, there is a quick and easy way to solve this. Many programming languages define one specific procedure name, usually main, as the defined starting point of a program. In those languages, the computer often handles calling the main procedure directly when a program starts. Other languages don’t define this as a rule, but many developers choose to follow it as a convention. In our pseudocode, we will follow this convention, since this closely aligns with the Python language we’ll learn later in the course.
Creating a Main Procedure
Let’s see an example. We can update the example on the previous page to include a main procedure by simply placing all of the code at the bottom of the program into a procedure. We’ll also include a call to the main procedure at the bottom of the code, as shown below:
PROCEDURE foo()
{
    DISPLAY("Run ")
}

PROCEDURE bar()
{
    DISPLAY("Forrest, ")
}

PROCEDURE main()
{
    foo()
    bar()
    foo()
}

main()
That’s really all there is to it! From there, our “mental model” of a computer will know that it should start executing the program in the main procedure. Let’s quickly code trace the first part of that process, just to see how it works. As before, we’ll start running our program at the top of the code:

Just like we saw previously, this line is creating a new procedure named foo. So, we’ll make a note of that procedure, and move on to the next part of the code:
Here, we are creating the bar procedure, so we’ll record it and move on:
Likewise, we see the creation of the main procedure, so we’ll record it and continue working through the program:
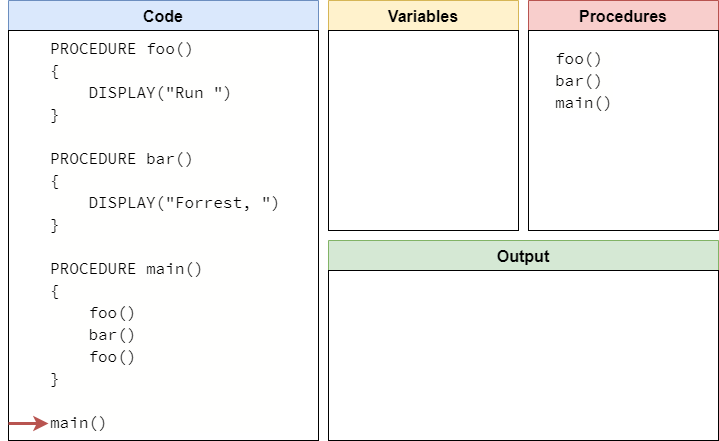
Finally, we’ve reached the end of the code, and here we see the call for the main procedure. So, just like we saw before, our “mental model” of a computer will determine that it has indeed seen the main procedure, and it will jump to the start of that procedure:
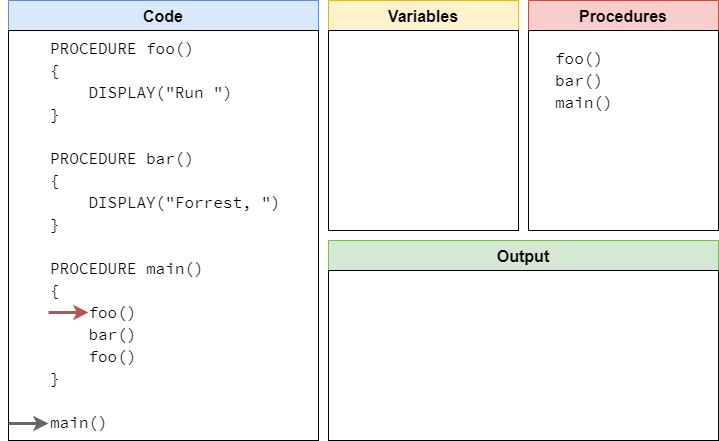
From here, the rest of the program trace is pretty much the same as what we saw before. It will work through the code in the main procedure one line at a time, jumping to each of the other procedures in turn. Once it reaches the end of the main procedure, it will jump back to the bottom of the program where main is called, and make sure that there is nothing else to execute before reaching the end of the program. The full process is shown in the animation below:
From here on out, we’ll follow this convention in our programs. Specifically:
- All programs must contain a procedure named
mainas the starting point of the program. - All code in a program must be contained within a procedure, with the exception of a single call to the
mainprocedure at the bottom of the program.
These conventions will help us write code that is easy to follow and understand. We’ll also be learning good habits now that help us write code in a real programming language, such as Python, in a later lab.
Subsections of Main Procedure
Parameters
YouTube VideoResources
The last new concept we’re going to introduce in this lab is the concept of parameters. We just learned how to create procedures in our code, but our current understanding of procedures has one very important flaw in it: a procedure will always do the same thing each time we call it! What if we want to write a procedure that performs the same operation, but uses different data each time? Wouldn’t that be useful?
Thankfully, we can do just that by introducing parameters into our procedures. A parameter is a special type of variable used in a procedure’s code. The value of the parameter is not given in the procedure itself - instead, it is provided when the procedure is called. When a value is given as part of a procedure call, we call it an argument. So, a procedure has parameters, and the value of those parameters is given by arguments that are part of the procedure call.
Creating Procedures with Parameters
To include parameters as part of a procedure, we simply list the names of the parameters in the parentheses after the procedure name. If we want to use more than one parameter, we can separate them using a comma ,. Here’s an example of a "Hello World" procedure that uses two parameters:
PROCEDURE hello_world(first_name, last_name)
{
    DISPLAY("Hello ")
    DISPLAY(first_name)
    DISPLAY(" ")
    DISPLAY(last_name)
}
Inside of the procedure, we can use first_name and last_name just like any other variable. We can read the value stored in the variable by using it in an expression, and we can even change the value stored in the variable within the procedure itself using an assignment statement.
Calling a Procedure with Arguments
Now that we have a procedure that requires parameters, we need to call that procedure by providing arguments as part of the procedure call. To do that, we provide expressions that result in a value inside of the parentheses of a procedure call. Once again, multiple arguments are separated by commas.
For example, we can call the hello_world procedure by providing two arguments like this:
hello_world("Willie", "Wildcat")So, when this code is run on our “mental model” of a computer, we should receive the following output on the user interface:
Hello Willie WildcatLet’s walk through a quick code trace to see exactly what happens when we call a procedure with arguments.
Code Tracing a Procedure with Arguments
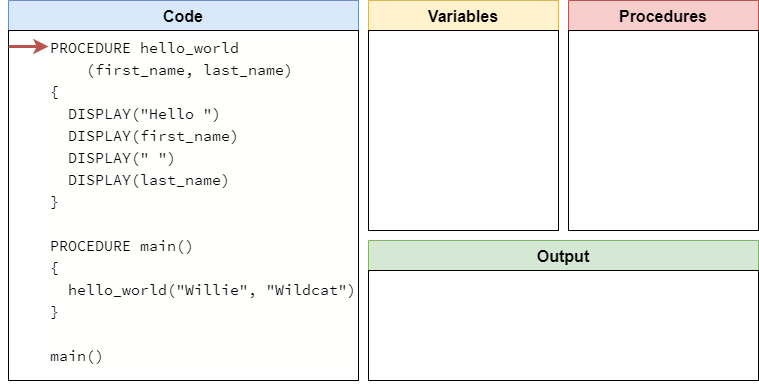
First, let’s formalize the example above into a complete program:
PROCEDURE hello_world(first_name, last_name)
{
DISPLAY("Hello ")
DISPLAY(first_name)
DISPLAY(" ")
DISPLAY(last_name)
}
PROCEDURE main()
{
hello_world("Willie", "Wildcat")
}
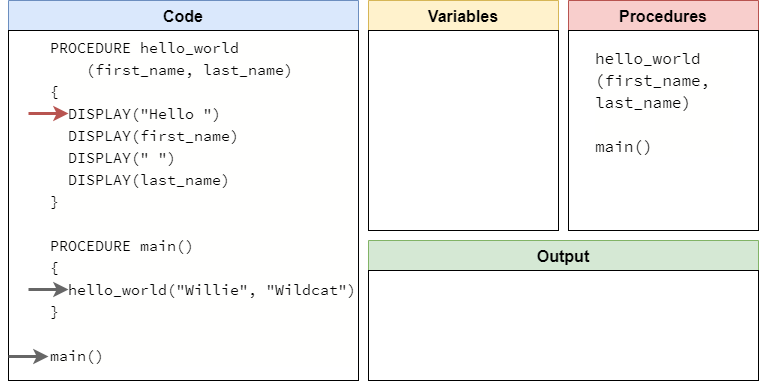
main()To do that, we’ve placed our procedure call in a main procedure, and we’ve added a call to the main procedure at the end of our program. So, once again, we can set up our code trace structure to include our code and the various boxes we’ll use to keep track of everything:
We are already pretty familiar with how our “mental model” of a computer will scan through the whole program to find the procedures, so let’s skip ahead to the last line with the procedure call to main:
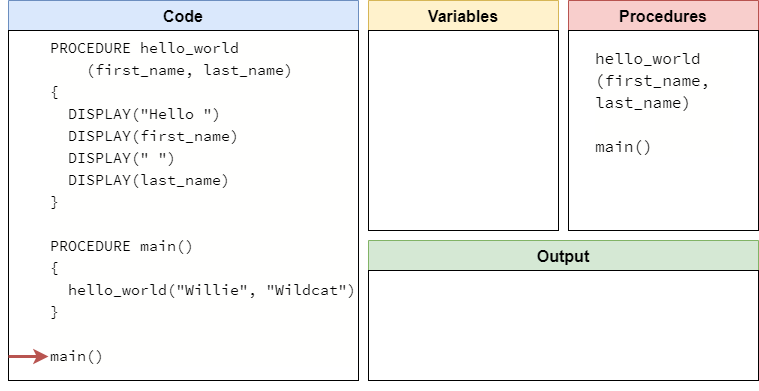
Once again, our computer will see that it is calling the main procedure, which it knows about. So, it will jump to the beginning of the main procedure and start from there:
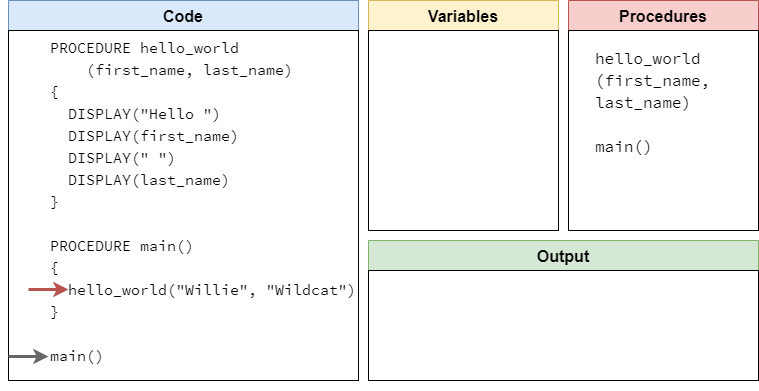
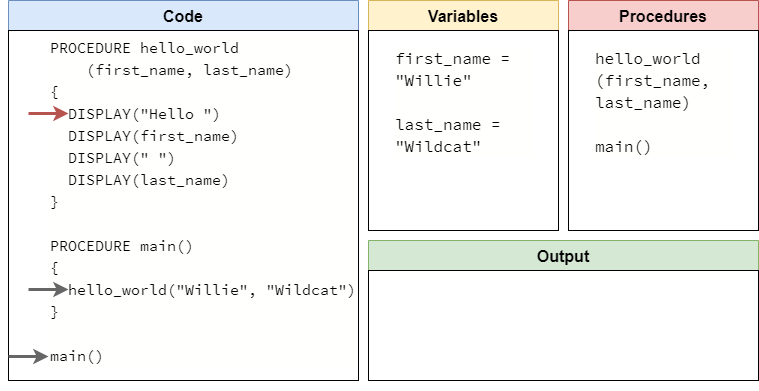
This line contains another procedure call, this time to the hello_world procedure. However, when our “mental” computer looks up that procedure in its list of procedures, it notices that it requires a couple of parameters. So, our computer will also need to check that the procedure call includes a matching argument for each parameter. In our pseudocode language, each parameter must have a matching argument provided in the procedure call, or else the computer will not be able to run the program.
Thankfully, we see that there are two arguments provided, the values "Willie" and "Wildcat", which match the two parameters first_name and last_name. So, the procedure call is valid and we can jump to the beginning of the procedure.
This time, however, we’ll need to perform one extra step. When we call a procedure that includes parameters, we must also list the parameters as variables when we start the procedure. The value of those variables will be the matching argument that was provided as part of the procedure call. So, the parameter variable first_name will store the value "Willie", and the parameter variable last_name will store the value "Wildcat". Therefore, our code trace should really look like this when we start running the hello_world procedure:
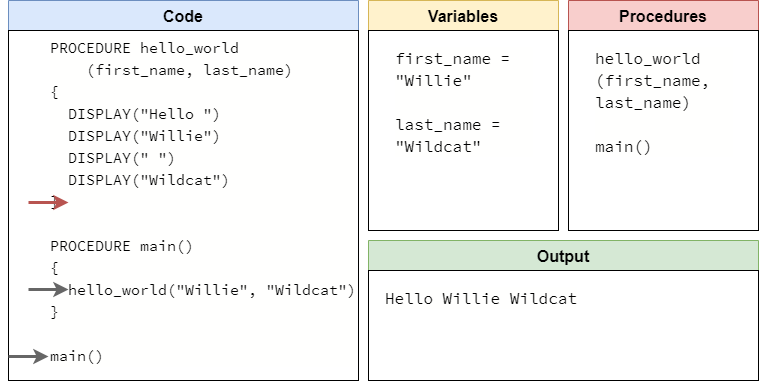
In the future, we’ll show that as just one step in our code trace. Once we are in the hello_world procedure, we can simply walk through the code line by line and see what it does. At the end of the procedure, we’ll see that it has produced the expected output:
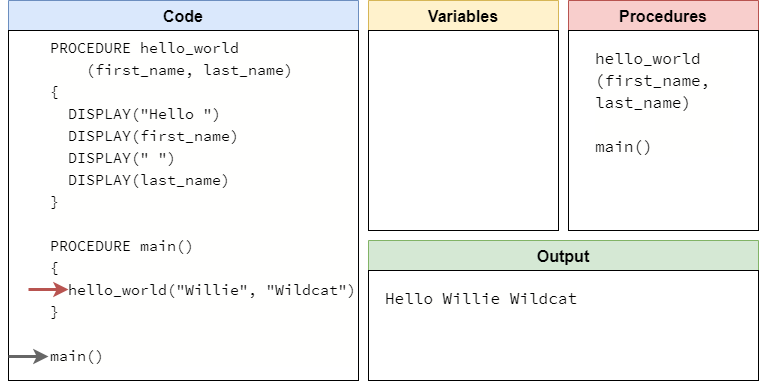
At this point, we will jump back to the main procedure. When we do this, there are a couple of other things that happen in our “mental model” of a computer:
- Any variables created in the
hello_worldprocedure are removed. This includes any parameter variables. - We’ll reset the code back to the original, removing any computed values and replacing them with the original expressions.
So, after that step, our code trace should look like this:
Now we are back in the main procedure, and the program will simply reach the end of that procedure, then jump back to the main procedure call and reach the end of the program. The full code trace is shown in the animation below:
That’s all there is to calling a procedure that uses parameters! We can easily work through it using the code tracing technique we learned earlier in this lab.
note-3
The definitions for parameter and argument given above are the correct ones. However, many programmers are not very precise about how they use these terms, so in practice you may see the terms parameter and argument used somewhat interchangeably.
We’ll do our best to use them correctly throughout this course, and we encourage you to be careful about how you use the terms and make sure you understand the difference.
Subsections of Parameters
Expressions as Arguments
YouTube VideoResources
Let’s briefly consider one more important situation that may arise when calling procedures. What if the arguments provided in a procedure call are variables themselves? What does that look like?
Let’s work through an example:
PROCEDURE swap(one, two)
{
    temp <- one
    one <- two
    two <- temp
    DISPLAY(one)
    DISPLAY(two)
}

PROCEDURE main()
{
    first <-  "Willie"
    last <- "Wildcat"
    swap(first, last)
    DISPLAY(first)
    DISPLAY(last)
}

main()
Before reading the code trace below, take a moment to read this code and see if you can predict what the output will be.
Code Tracing Expressions as Arguments
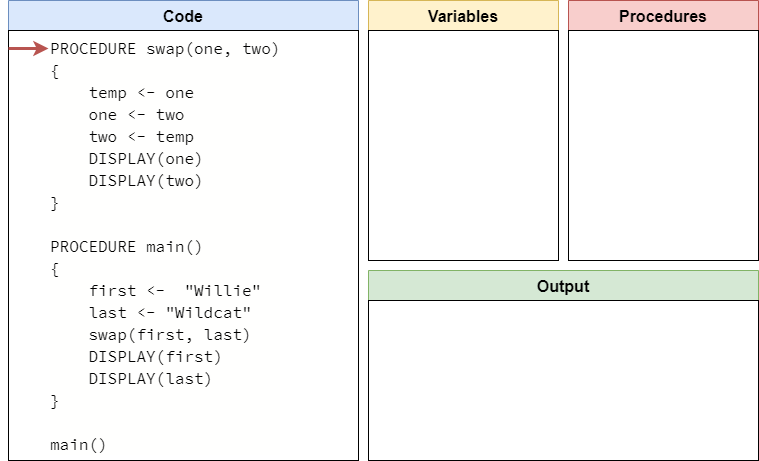
Like before, let’s set up our code trace to include our code and the various boxes we need to keep track of everything:
Let’s go ahead and skip to the bottom where the main procedure call is. When we reach that line, we’ll start at the top of the main procedure, like this:
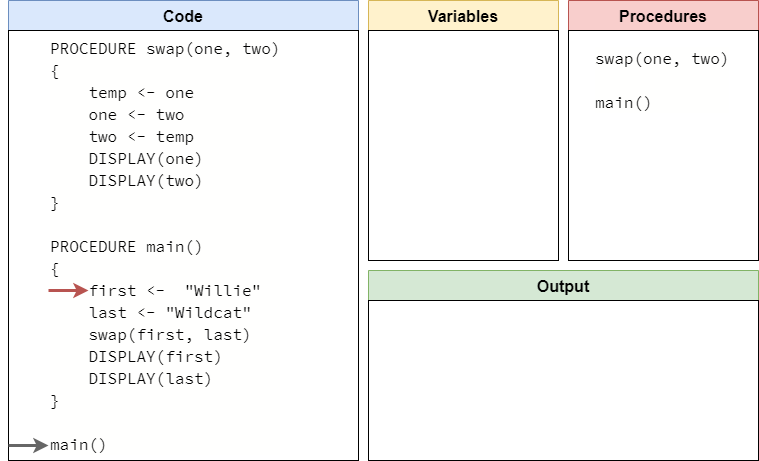
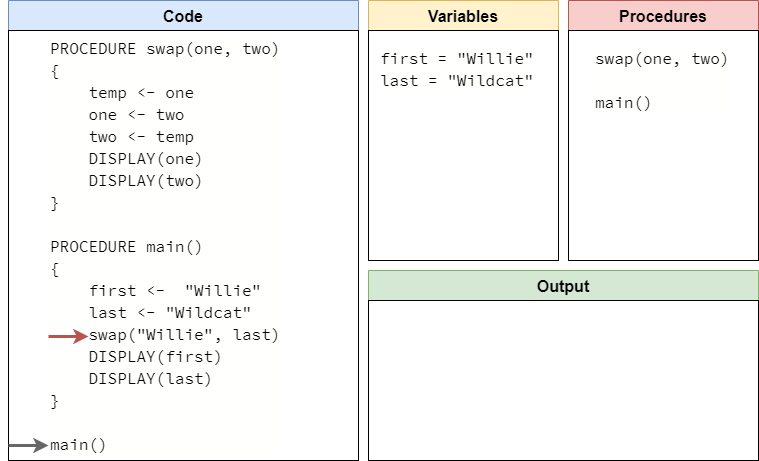
Next, we can move through the following two lines of code, which create the variables first and last, storing the values "Willie" and "Wildcat", respectively. At this point, we’re ready to call the swap procedure:

To make a procedure call, we must first make sure the computer knows about the procedure. Since it is in our procedures box, we know we’ve seen it. The next step is to check and make sure that there is a matching argument for each parameter. The swap procedure requires two parameters, and we’ve provided two arguments, so that checks out. The next step is to actually evaluate each of the expressions used as arguments to a single value. If we look at our code, we see that the first argument expression is the variable first, which stores the value "Willie". So, we can place that value where the variable goes in our procedure call:
Then, we can do the same for the last variable, which stores the value "Wildcat":

Now that we’ve evaluated all of our argument expressions, we can finally perform the procedure call and enter the swap procedure. When we do this, we’ll create two new variables, one and two, and populate them with the values that we evaluated for each expression. Just like when we store the value of one variable into another, these are copies of the values that were stored in the original variables. So, just because they have the same value, they otherwise aren’t connected, as we’ll see later. So, our current code trace should look like this:
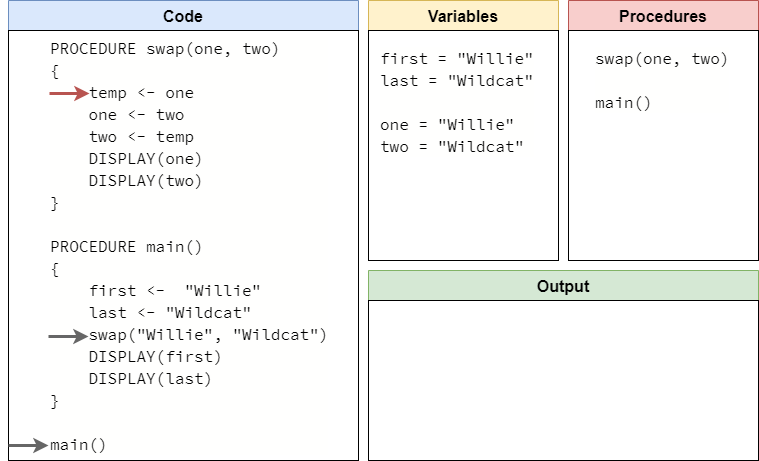
Inside of the swap procedure, we actually perform a three step “swap” process, which will swap the contents of the parameter variables one and two. First, we place the value of one in a new variable we call temp:

Next, we place the original value in two into one. At this point, they both have the same value, but we’ve stored the original value from one into temp, so it hasn’t been lost:
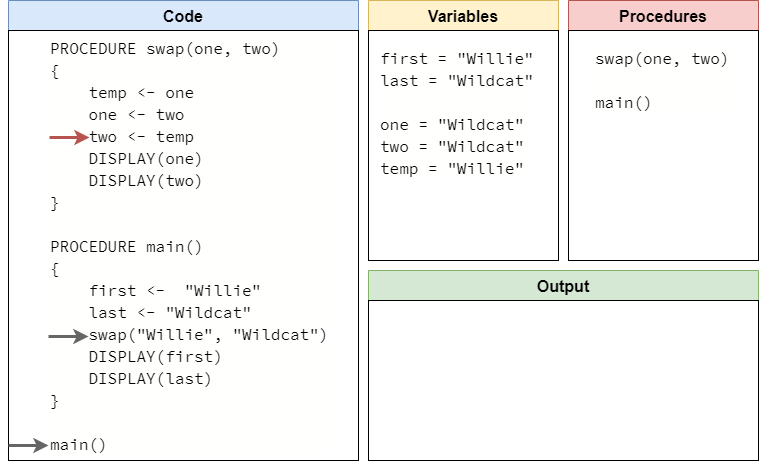
Finally, we can place the value from temp into two, completing the swap:

The next two lines will simply display the current values in one and two to the user:
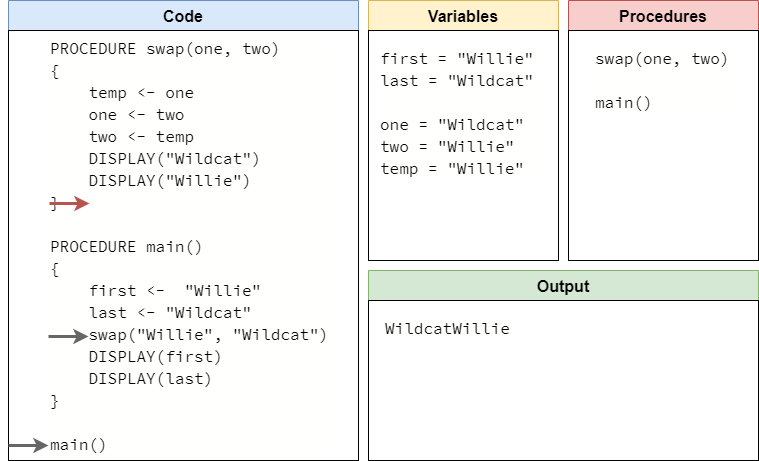
Notice that the values of first and last have not changed throughout this entire process. They are still the same values that were originally set in the main procedure. At this point, we’ve reached the end of the swap procedure. So, we can jump back to the location we left off in the main procedure. When we do so, we’ll remove all of the variables we created in the swap procedure. We’ll also reset all of the evaluated expressions in the swap procedure back to the original code. So, our code trace should now look like this:

Since there’s nothing else to evaluate on this line, we can move to the next line in the program:
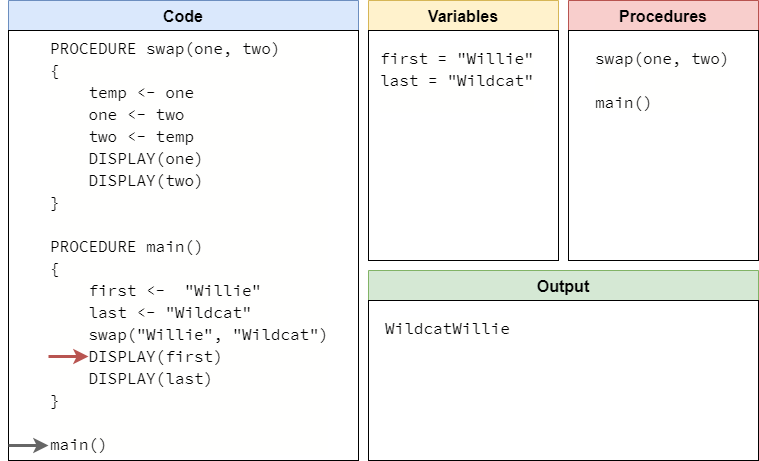
The next two lines are going to print the values of the first and last variables in the interface. Notice that, even though we swapped the values of one and two in the swap procedure, the values of first and last are unchanged here. This is an important concept to remember - when we use a variable as an argument in a procedure call, the procedure receives a copy of the value stored in that variable. So, any chagnes to the parameter variable in the procedure will not affect the variable that was used as an argument in the procedure call. In technical terms, we say this is a call by value procedure, since it uses the values in the arguments.
So, after running those two lines of code, we should reach the end of the main procedure, and our code trace should look like this:

At this point, we’re at the end of the main procedure, so the computer will just jump back to the main procedure call, and reach the end of the program! The whole process is shown in the animation below:
As we can see, calling procedures is a pretty easy process. By using parameters, we can build procedures that repeat the same steps in our program, just with different data each time.
Subsections of Expressions as Arguments
Functions
YouTube VideoResources
Python also supports the use of procedures, which allows us to write small pieces of code that can be repeatedly used throughout our programs. In Python, we call these procedures functions. We’ve already seen one example of a function in Python - the print statement is actually a function! Let’s look at how we can create and use functions in Python.
Creating a Function
The process of creating a function in Python is very similar to the way we created a procedure in pseudocode. A simple function in Python uses the following structure:
def function_name():
    <block of statements>
Let’s break this structure down to see how it works:
- First, a function definition in Python begins with the word
def, which is short for define. In effect, we are stating that we are defining a new function using the specialdefkeyword. - Next, we include the name of the function. Function names in Python follow the same rules as variable names:
- A function name must begin with a letter or underscore
_. Function names beginning with an underscore_have special meaning, so we won’t use those right now. - A function name may only include letters, numbers, and underscores
_. - After the function name, we see a set of parentheses
(). This is where we can add the parameters for the function, just like we did with procedures in pseudocode. We’ll see how to add function parameters later in this lab. - Then, we end the first line of a function definition in Python with a colon
:. This tells us that the block of statements below the function definition is what should be executed when we run the function. In pseudocode, we used curly braces{}here. - Finally, we have the block of statements that are part of the function itself. This block of statements must be indented one level to indicate that it is part of the function and not something else. When we reach the end of the function, we cease to indent the code, which tells Python that we’ve ended the function and are starting something else. So, notice that there is no closing curly brace
}or any other marker to indicate the end of the function - only the indentation tells us where the function’s code ends.
Indentation in Python
So, let’s discuss indentation in Python, since it is very important and is usually something that trips up new Python developers. Most programming languages use symbols such as curly braces {} to surround blocks of statements in code, making it easy to tell where one block ends and another begins. Similarly, those languages also use symbols such as semicolons ; at the end of each line of code, indicating the end of a particular statement.
These programming languages use those symbols to make it clear to both the developer and the computer where a particular line or block of code begins and ends, and it makes it very easy for tools to understand and run the code. As an interesting side effect, it also means that the code doesn’t need to follow any particular structure beyond the use of those symbols - many of the languages allow developers to place multiple statements, or even entire programs, on a single line of code. Likewise, indentation is completely optional, and only done to help make the code more readable.
Python takes a different approach. Instead of using symbols like semicolons ; and curly braces {} to show the structure of the code, Python uses newlines and indentation for this purpose. By doing so, Python is simultaneously simpler (since it has fewer symbols to learn) and more complex (the indentation has meaning) than other languages. It’s really a tradeoff, though most Python programmers will admit that not having to deal with special symbols in Python is well worth the effort of making sure that the indentation is correct, especially since most other languages follow the same conventions anyway, even if it isn’t strictly required.
So, how can we indent code in Python? Typically, we use four consecutive spaces for each level of indentation. So, below the function definition def function_name(): shown above, we would place four spaces before the first line of the <block of statements>, and then continue to do so for each line below that should be included in the function.
Thankfully, most text editors used for programming, such as Codio, Atom, Visual Studio Code, and more, are all configured to convert tabs to spaces. So, we can simply press the Tab key on the keyboard to insert the correct amount of spaces for one level of indentation. Likewise, we can usually use Shift+Tab to remove four spaces.
Finally, it is worth noting that there is a special symbol that actually is a tab in text, which is represented as \t in a string. Like the newline symbol, we can’t see it in our UI in most cases, but it is there. Some non-programming text editors, such as Notepad in Windows, will insert that symbol instead of four spaces when we press the Tab key. If we try to run a program that contains those symbols, the Python interpreter may not be able to read our program and will give us an error about inconsistent use of tabs and spaces. If that happens, we’ll need to make sure our program is consistently using only tabs or spaces for indentation. Most editors used for programming have a special function for converting tabs to spaces, and there are lots of online tools available for this as well.
Function Example
Let’s look at an actual function in Python. In this case, we’ll create the simple hello_world function again in Python:
def hello_world():
    print("Hello World")
Really, this structure is exactly like we’d expect it to be, based on the pseudocode we learned about earlier. We start with the def keyword, then the name of the function. After that, we have parentheses () where the parameters would go, and then a colon : to show the start of the block of statements. Inside of the function, we indent the block of statements that make up the code to be run when this function is run - in this case we just print the string "Hello World" to the terminal. That’s really all there is to it!
Calling a Function
Likewise, calling a function in Python is exactly the same as what we saw in pseudocode - we simply state the name of the function, followed by a set of parentheses where we would place the arguments if the function required any parameters:
hello_world()So, a complete Python program that includes the hello_world function and calls that function would look like this:
def hello_world():
    print("Hello World")


hello_world()
Try placing this code in a Python file and see if you can run it. It should work!
Notice that the function call for hello_world is not indented, and we included a couple of blank lines after the end of the definition of that function before the next piece of code. We do this for two reasons:
- We do not indent code that is not part of the block of statements within a function. Since the function call for
hello_worldshould not be part of the definition for the function, we don’t want to indent it. - In Python, the convention is to include two blank lines at the end of a function definition. So, that is why we included two blank lines in the code. These blank lines are not required, but it is good practice to include them.
Code Tracing a Function Call
Finally, let’s briefly go through an example of tracing a program that includes a couple of functions and function calls. Here’s a quick example we can use:
def foo():
    print("eye")


def bar():
    print("to")


foo()
bar()
foo()
To trace this example, copy-paste the code into the tutor.py file in the python folder in Codio, or by clicking this Python Tutor
link.
When the program first loads, we should see this setup:
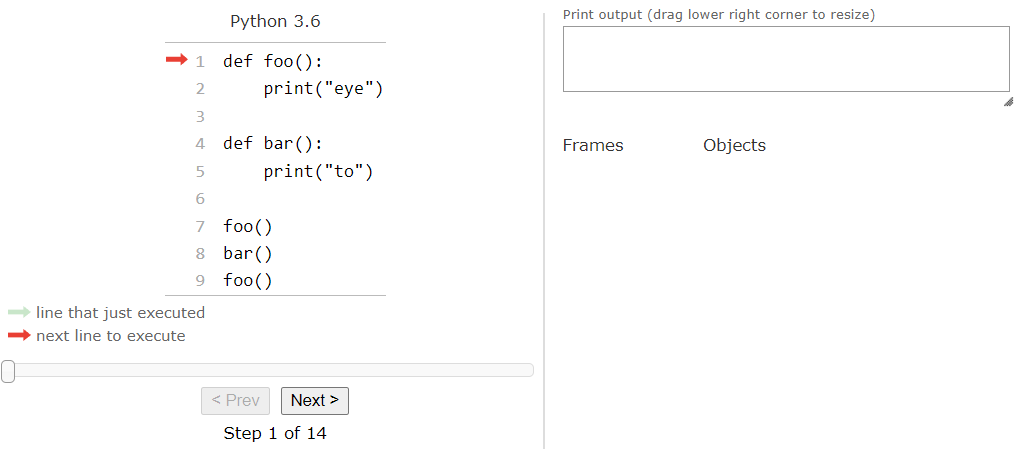
Again, this is very familiar to us based on what we’ve seen so far. So, let’s click the Next > button to step through the first part of the code:
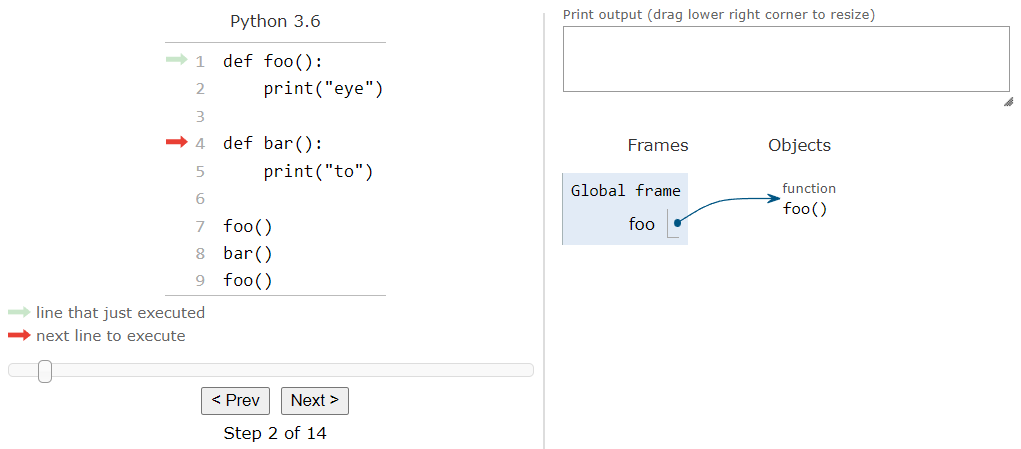
As we can see, the first thing that Python sees is the definition for the foo function. Instead of keeping a separate list of functions, Python Tutor simply adds that function to the global frame just like any variable. The function itself is added to the Objects list, and then there is an arrow, connecting the variable in the global frame to the function in the objects list. In fact, this is exactly how Python handles functions - they are just treated like variables that are pointers to the function objects themselves! So, when we click Next > again, we’ll see it do the same to the bar function as well:
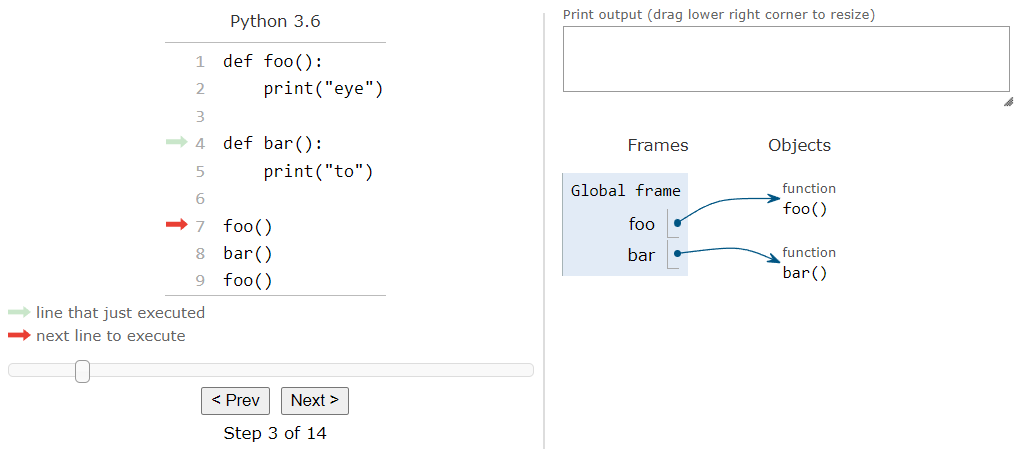
At this point, we are ready to execute the first function call, which will run the foo function. So, when we click the Next > button, we’ll see the arrow jump to the start of that function:

Here, we see Python tutor do something a bit different than in our own code traces - instead of keeping all of the variables in a single box, it creates a new frame to keep track of the variables that are created in the foo function. When we look an example of a function with parameters, we’ll see where this becomes very useful. For now, we can just ignore it and move on by clicking Next > once again:

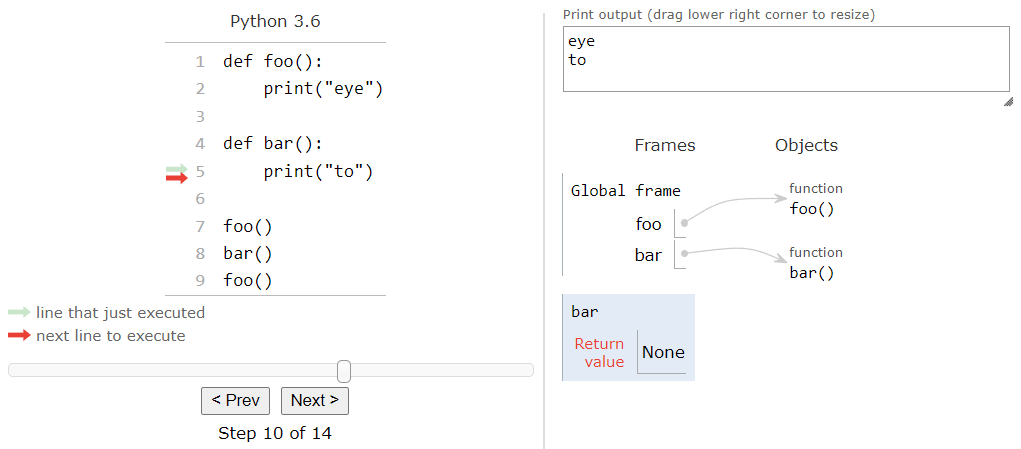
At this point, the function is ready to print the string value "eye" to the terminal. So, if we click Next > once again, we should see that reflected in the output of Python Tutor:
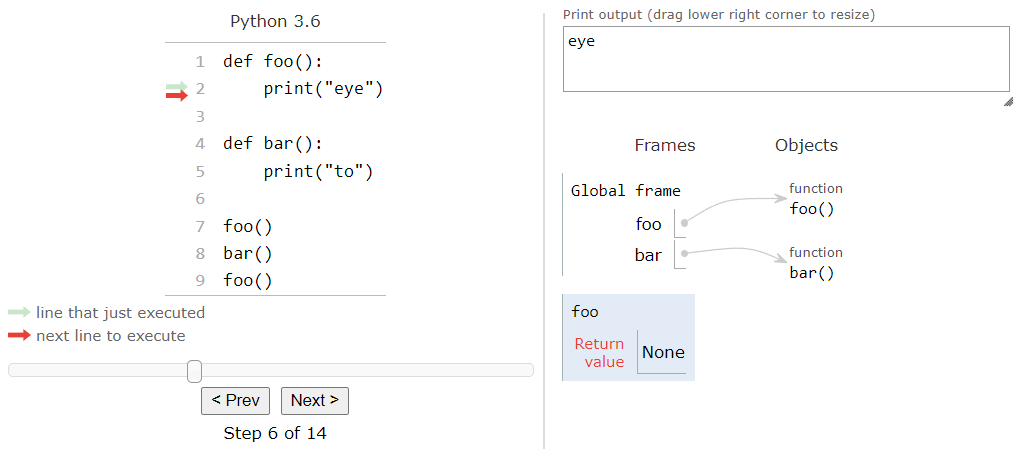
At this point, we’ve reached the end of the foo function. So, Python Tutor will remove the foo frame from the list of frames and it will jump back down to where the function was called from when we click Next >:
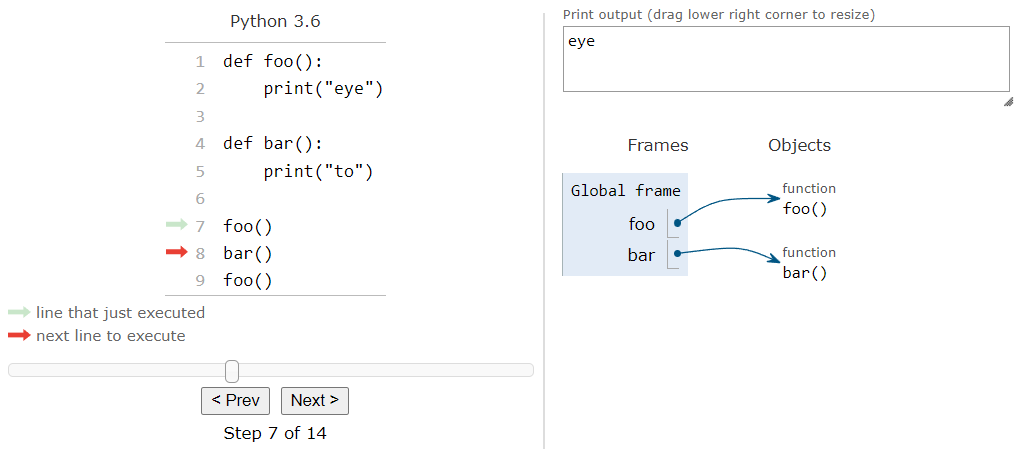
Here, we are back to the main piece of our code, and we’re ready to call the bar function. So, we can click Next > once again:
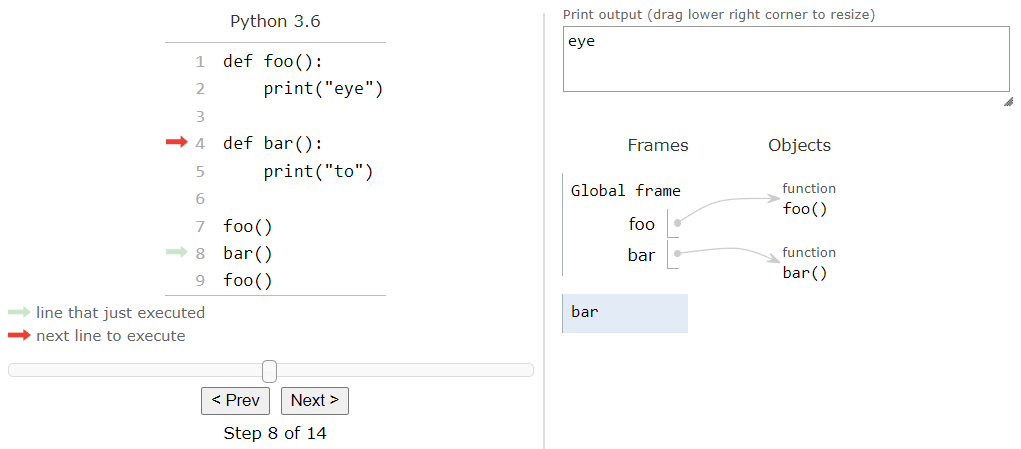
This will jump up to the start of the bar function and create a new frame for storing any variables created by bar. We can click Next > again to enter the function:
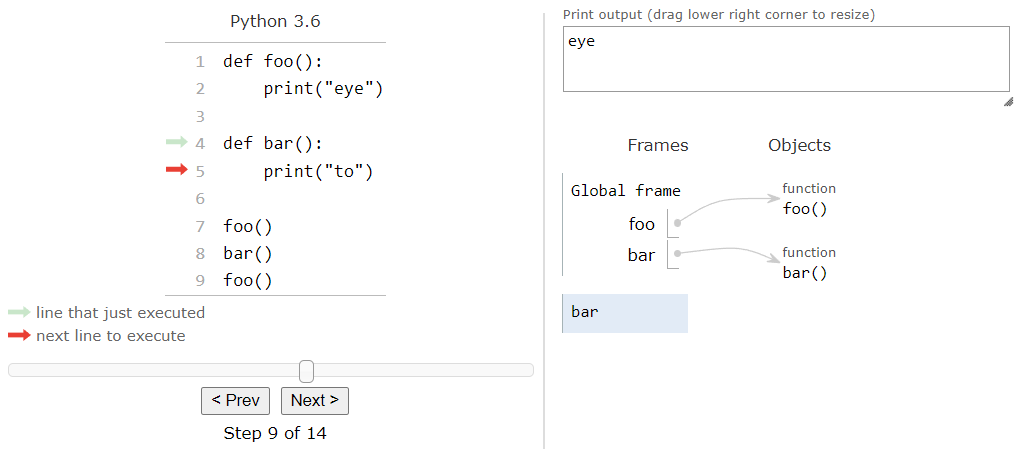
And then click Next > again to print the string value "to" to the output:
Once again, we are at the end of a function, so when we click Next > once more:
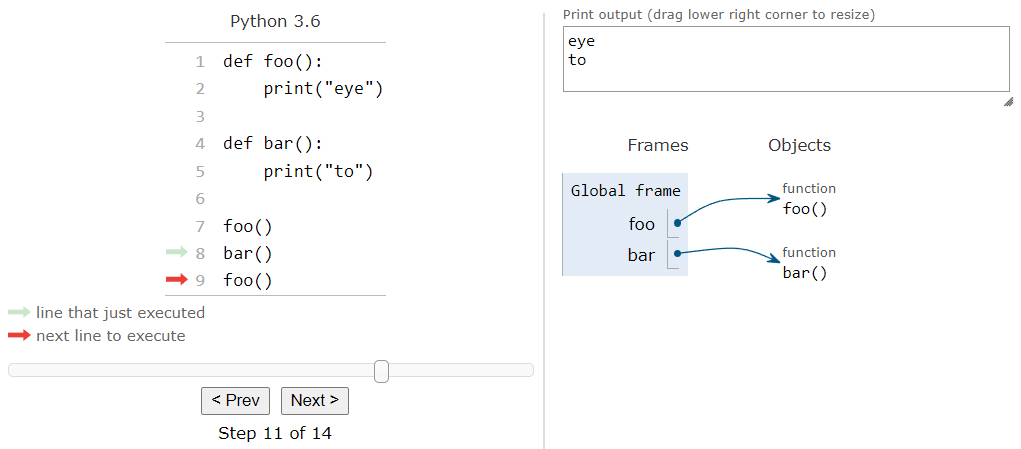
We’ll move back to the main piece of the code, removing the frame for bar. On this line, we see yet another function call, this time to the foo function. Hopefully by this point we can predict what is going to happen, so we can click Next > a few more times to jump to the foo function and execute it. When it is done, we’ll see this output:

There we go! We’ve successfully traced the execution of a Python program that contains multiple function calls. The full process is shown in this animation:

Using tools like Python Tutor to trace through code is a great way to make sure we understand exactly what our computer is doing when it is running our code.
Subsections of Functions
Main Function, Parameters, & Arguments
YouTube VideoResources
Let’s review a couple other concepts related to functions in Python. These will closely mirror what we’ve already learned in pseudocode, so we’ll cover them pretty quickly here.
Main Function
Just like in pseudocode, we can also create a main function in Python. The use of a main function in Python is not required at all - Python is designed as a scripting language, meaning we can write code directly in a Python file without using any functions at all. However, it is generally considered good practice to make sure all code is part of a function, and then we can include a main function as the starting point for any program.
So, we can update the example we saw previously to include a main function by simply placing the three function calls in a new function called main, and then including a call to the main function at the bottom of the program:
def foo():
    print("eye")


def bar():
    print("to")


def main():
    foo()
    bar()
    foo()


main()
From here on out in this course, we’ll follow this convention in our complete Python programs. Specifically:
- All programs must contain a function named
mainas the starting point of the program. - All code in a program must be contained within a function, with the exception of a single call to the
mainfunction at the bottom of the program.
This will make our Python programs easy to follow, and it will help us later on down the road if we choose to learn another language such as Java or C# that requires a main function.
Function Parameters
Functions in Python can also require parameters. To include a parameter in a function, we simply have to include the name of the parameter in the parentheses () at the end of the function definition. Multiple parameters should be separated by commas ,. For example, we can update our hello_world function to include a couple of parameters:
def hello_world(first_name, last_name):
    print("Hello ", end="")
    print(first_name, end=" ")
    print(last_name)
Here, we are defining two parameters, named first_name and last_name, that are used as part of the function. Those parameters can be treated just like any other variable within the function.
Calling a Function with Arguments
Once we have a function that requires parameters, we can call it by including arguments in the parentheses () that are part of the function call. For example, we can call the hello_world procedure above and provide two arguments like this:
hello_world("Willie", "Wildcat")When we run this code, it will place the string value "Willie" in the parameter variable first_name, and the string value "Wildcat" will be placed in the parameter value last_name within the frame for the hello_world function. When the code in hello_world is executed, we should see the following output:
Hello Willie WildcatCode Tracing a Procedure with Arguments
To see how this works, let’s work through a full example. Here’s a more complex Python program that includes parameters, arguments, and some other variable expressions:
def flip(first, last):
    temp = first
    first = last
    last = temp
    print(first)
    print(last)


def main():
    first = "Willie"
    last = "Wildcat"
    flip(first, last)
    print(first)
    print(last)


main()
Once again, before reading the full analysis below, take a minute to read through this code and see if you can guess what it does. It can be a bit tricky if you don’t read it carefully and think about what we’ve learned so far.
To trace this example, copy the code into the tutor.py file in the python folder on Codio, or click this Python Tutor
link.
When we begin, our code trace will look like this example:
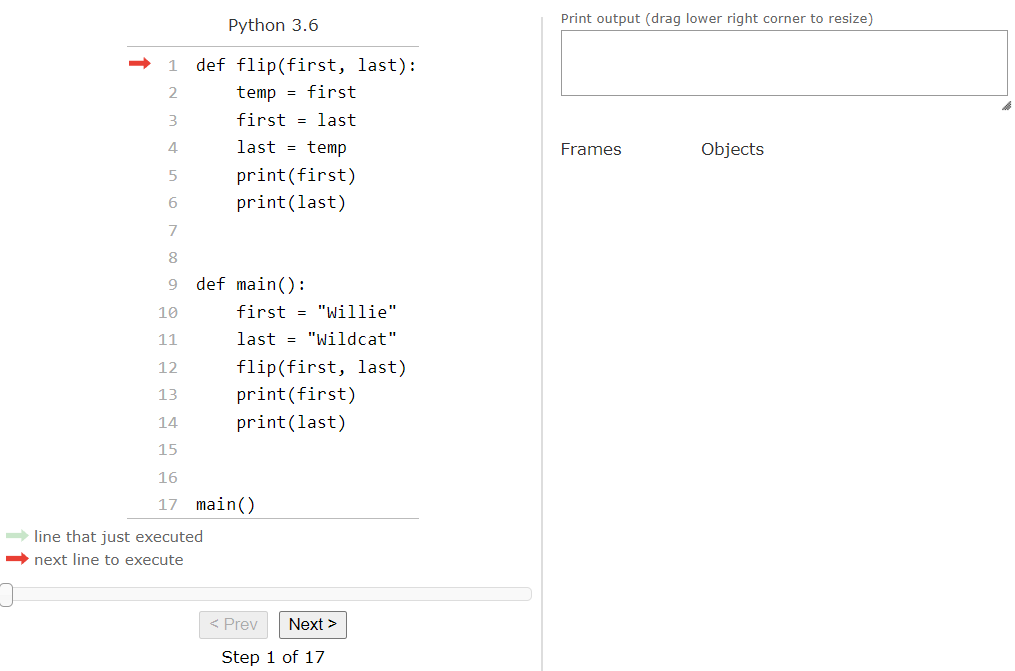
As we expect, the first thing that Python will do is scan through the code and record any functions it finds in the global frame. So, after pressing the Next > button a couple of times, we should reach this point:
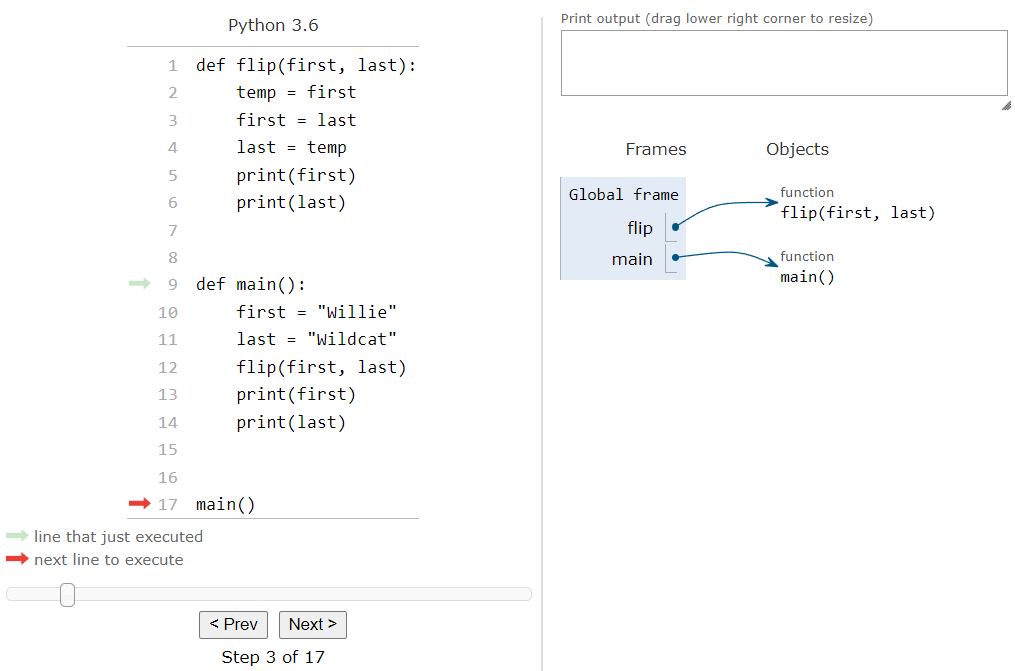
Now we are at a function call for the main function. So, when we click the Next > button:
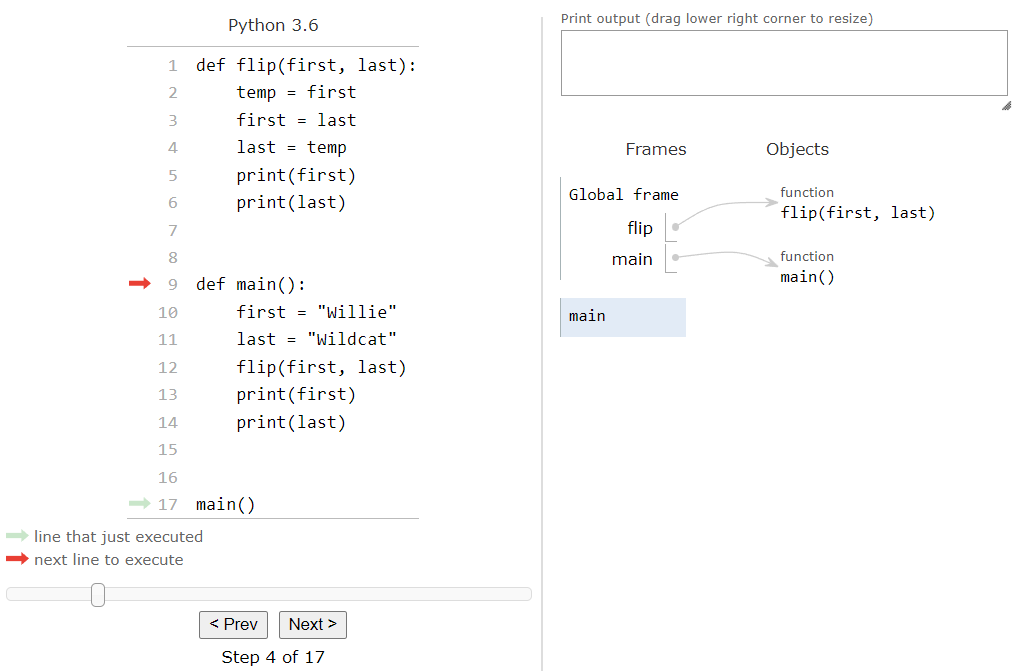
Python tutor will jump to that function’s code, and it will also create a new frame for variables that are created in the main function. The next two lines deal with creating a couple of variables, so we can click the Next > button a couple of times to execute those lines and stop when we reach the next function call:
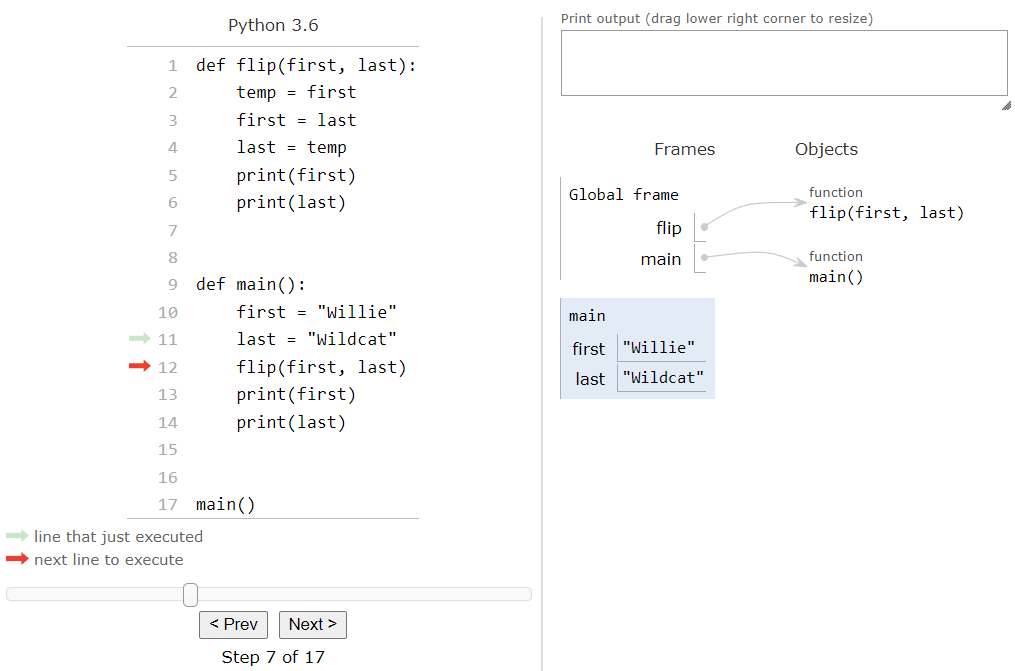
Now we are ready to call the flip function. This function requires two parameters, named first and last. Notice that those parameter names are the same names as the variables that we created in the main function? This is a common practice in programming - sometimes it is simplest to use the same variable names in multiple functions, especially if they are storing the same data. However, it is important to understand that those variables are not related in any way except for the name, as we’ll see in this example. When we click the Next > button to jump to the start of the flip function, we should see the following in our Python tutor trace:
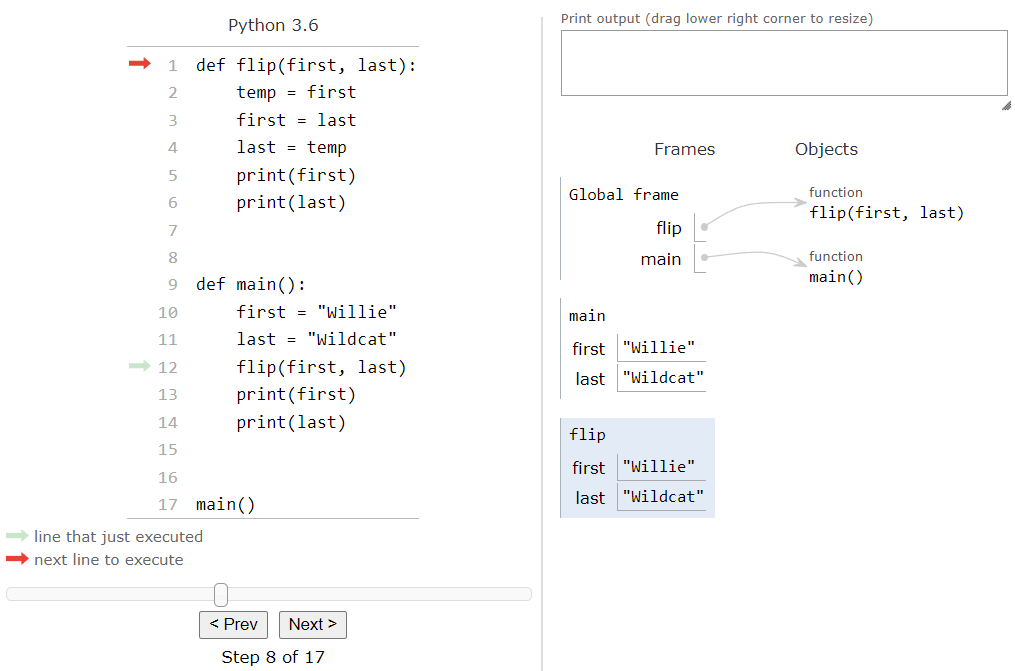
It has now created a frame for the flip function, and copied the values of the two arguments into the appropriate parameter variables. Since we listed the arguments first and last in that order in the function call to flip, a copy of the values from those two variables in main will be stored in the same two variable names in flip. It’s an easy way to make sure the arguments are in the correct order!
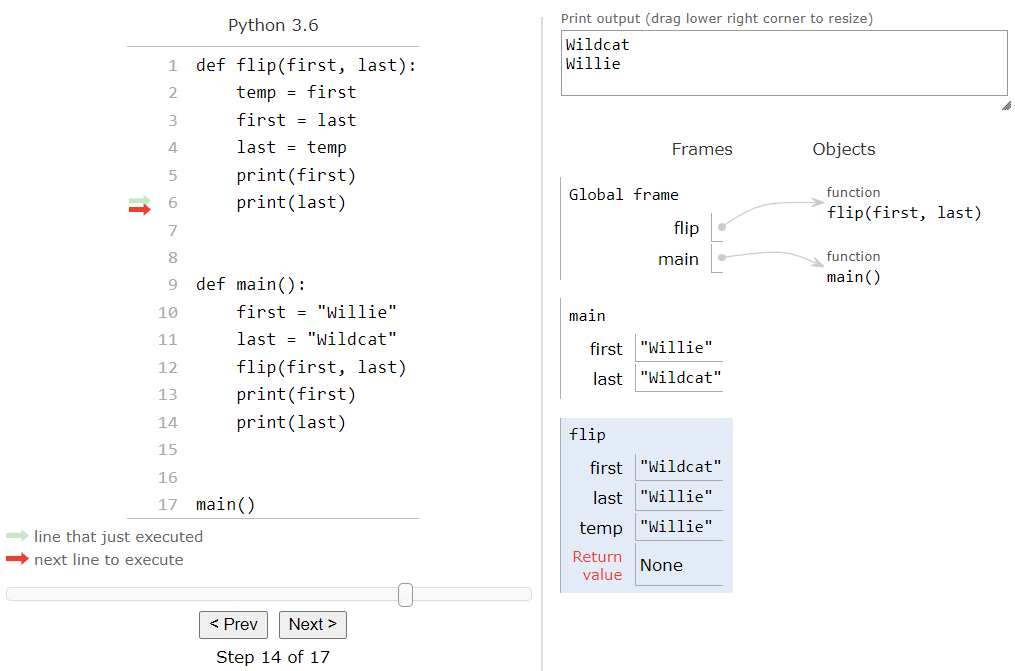
The first three lines in the flip function will swap the values in the first and last parameter variables. So, after we’ve executed those three lines, we should now see this setup in our trace:
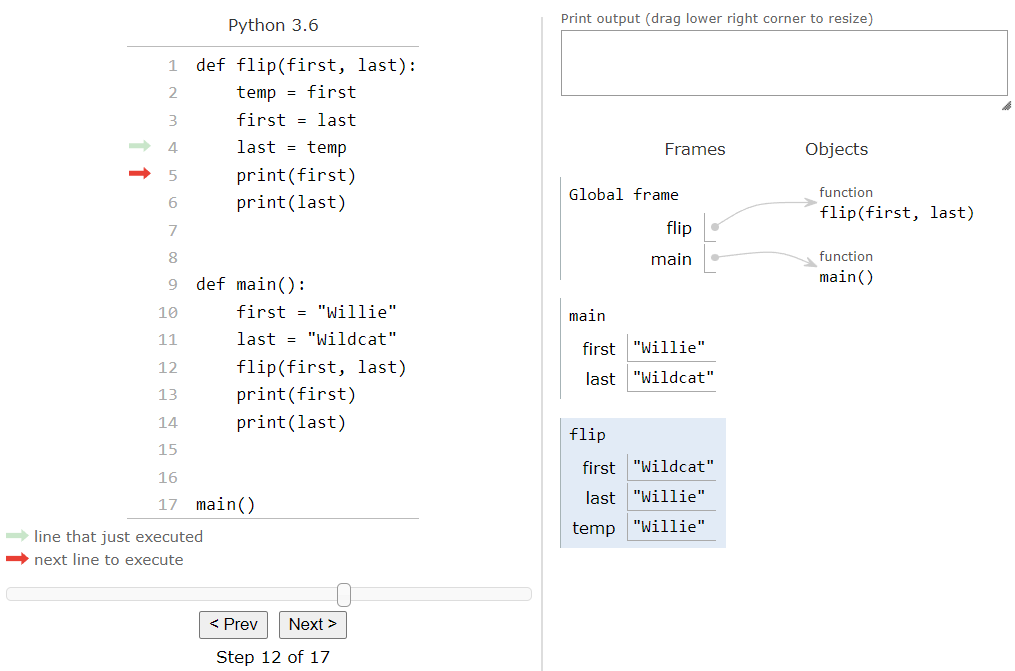
Notice that the values in first and last inside of the flip frame have changed, but the values in the same variables in the main frame have not changed! This is why it is very useful to keep track of variables in frames within a code trace - we can easily tell which variables go with which function, even if they have the same names. So, the next two lines of code in the flip function will simply print out the contents of the first and last parameter variables:
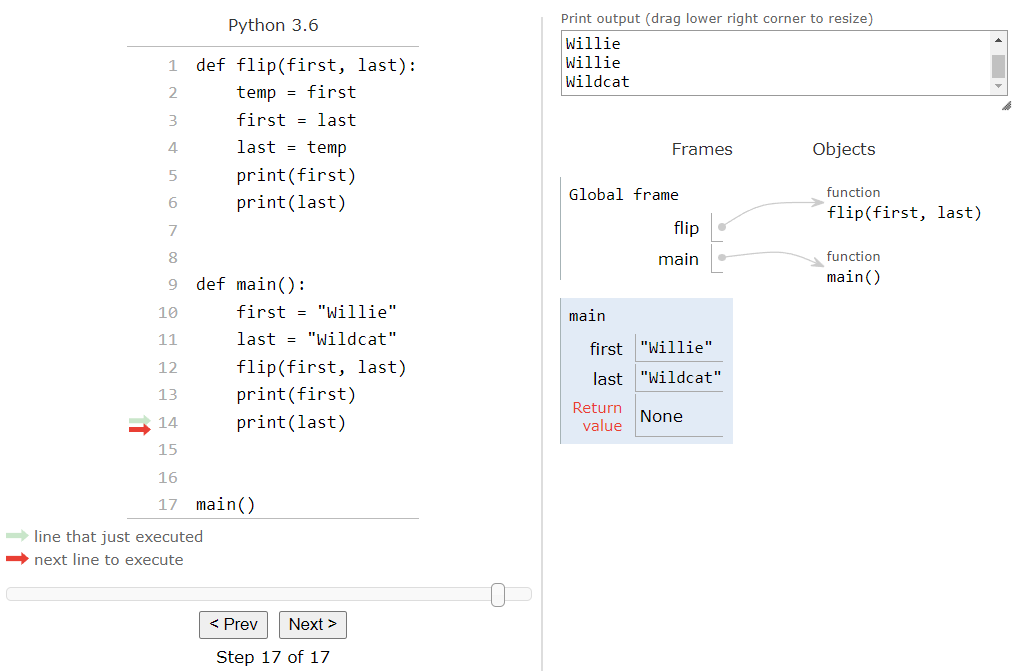
At this point, we’ve reached the end of the flip function, so when we click the Next > button again, we’ll jump back down to where we left off in the main function. At the same time, we’ll remove the flip frame from the list of frames, completely removing the first and last parameter variables used in that function:

Now that we are back in the main function, we can see that the values stored in the first and last variable are unchanged, just like we’d expect. This is important to understand - just because one function uses the same variable names as another function, or that a function’s parameter names match the variable names provided as arguments, they are not related and any changes in the function won’t impact the values outside of the function. So, we can finish the main function by running the last two lines, which will print the current values of first and last to the screen:
Finally, once the program reaches the end of the main function, it will jump back to the main function call at the bottom of the program. This will remove the main frame from the list of frames. Since there is nothing more to do, the program will end at this point:
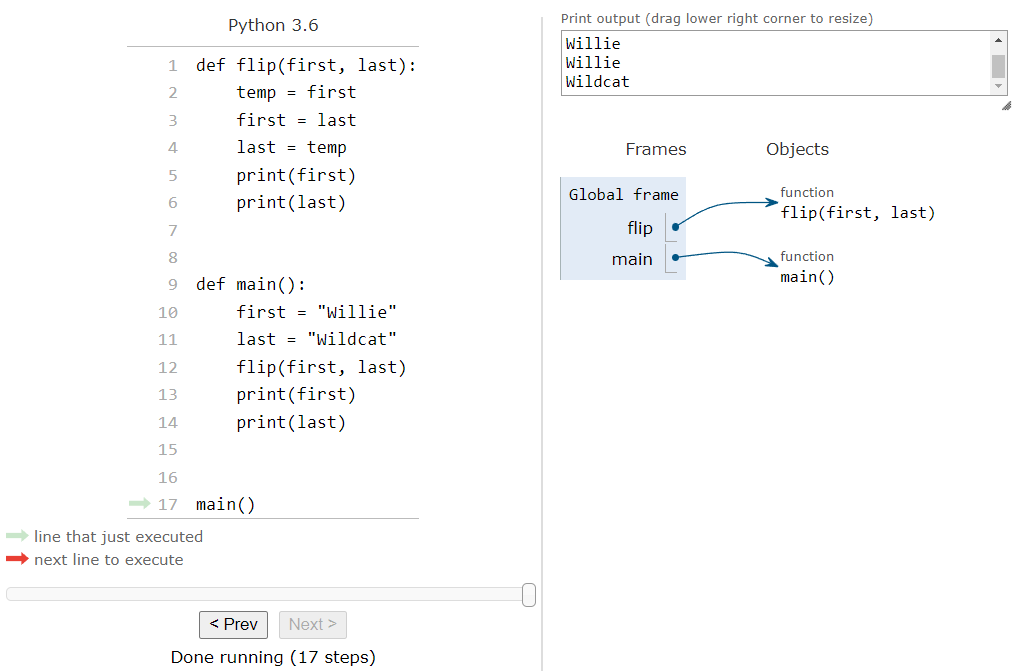
The whole process can be seen in this animation:

There we go! We’ve explored how functions, parameters, and arguments all work in Python. Understanding this process now will make it much easier to write complex programs later on.
Subsections of Main Function, Parameters, & Arguments
Summary
Pseudocode Procedures
A procedure in pseudocode is a piece of code that is given a name, which can then be run by calling it elsewhere in the program.
To create a procedure, we use the following structure:
PROCEDURE procedure_name(parameter1, parameter2)
{
    <block of statements>
}- Procedure names follow the same rules as variable names.
- Procedures may require 0 or more parameters, placed in parentheses after the procedure name. Multiple parameters are separated by commas.
- When called, a procedure will run the lines of code placed between the curly braces
{}. These lines of code are indented to make it clear that they are part of the procedure.
To call a procedure, we use the following structure:
procedure_name(argument1, argument2)- A procedure call is the procedure name, followed by parentheses
(). - Inside of the parentheses, a matching argument must be included for each parameter required by the procedure. Multiple arguments are separated by commas.
- Each argument may be an expression that evaluates to a value.
- The values of each argument are copied into the procedure. When the procedure ends, the original arguments are unchanged.
Python Functions
A function in Python is a piece of code that is given a name, which can then be run by calling it elsewhere in the program.
To create a function, we use the following structure:
def function_name(parameter1, parameter2):
<block of statements>- Function names follow the same rules as variable names.
- Functions may require 0 or more parameters, placed in parentheses after the function name. Multiple parameters are separated by commas.
- When called, a function will run the lines of code indented beneath the function definition.
To call a function, we use the following structure:
function_name(argument1, argument2)- A function call is the function name, followed by parentheses
(). - Inside of the parentheses, a matching argument must be included for each parameter required by the function. Multiple arguments are separated by commas.
- Each argument may be an expression that evaluates to a value.
- The values of each argument are copied into the function. When the function ends, the original arguments are unchanged.
Summary
As we’ve seen, procedures in pseudocode and functions in Python are very similar. They allow us to write pieces of code that we can use repeatedly throughout our programs. This makes our programs more organized and modular, and will make it much easier to write more complex programs as we continue to develop our skills.s