Chapter 5
Subsections of Input & Strings
Pseudocode Input
YouTube VideoResources
So far, we’ve mainly focused on writing programs that can store and manipulate data, but the data itself has always been included in the code itself. While that approach is great for learning the basics, real programs often need to receive data as input from the user. This allows programs to truly be interactive and perform work based on what the user needs. So, let’s introduce a new expression in pseudocode that allows our programs to receive input from the user.
Input Expression
We can use the INPUT() expression in pseudocode to get input from the user. It works just like a procedure, similar to DISPLAY(), but it doesn’t require any parameters. Instead, when evaluated the INPUT() expression will simply result in whatever input value is provided from the user. So, we can use this in an assignment statement to store that value in a variable.
The INPUT() expression can be a bit confusing to work with in pseudocode, since we can only run these programs on our “mental model” of a computer. There isn’t any user interface, and we are acting both as the computer and as the user in most cases. However, this allows us to build and reason about programs that require input from the user, which is a useful skill to develop. As we continue to learn more about a real programming language, we’ll see that this same skill applies there as well.
Let’s look at a quick example of using the INPUT() expression in pseudocode:
DISPLAY("Enter your name: ")
name <- INPUT()
DISPLAY("Hello ")
DISPLAY(name)
As we work through this program, we see the second line requires input from the user. So, it is not longer enough to simply read the code and process what it does - we must also consider what the user inputs as well. For this example, let’s assume the user inputs Willie Wildcat when prompted. In that case, the output should look like this:
Enter your name: Willie Wildcat
Hello Willie Wildcat
In this example, we store the user’s input in a variable named name, and then we print the value of the name variable using a DISPLAY() statement. By default, the INPUT() expression will result in a string value, so it can accept just about any text that the user could provide.
Numerical Input
What if we want the user to input a number instead? Traditionally, the AP CSP Pseudocode
would just handle this automatically by converting the data to whatever type is needed or makes the most sense. In this course, however, we’re going to explicitly convert data between types. So, we can use the NUMBER() procedure to make that conversion.
Let’s look at an example:
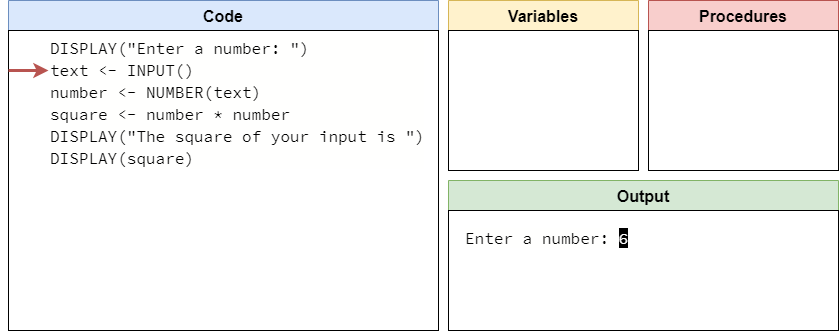
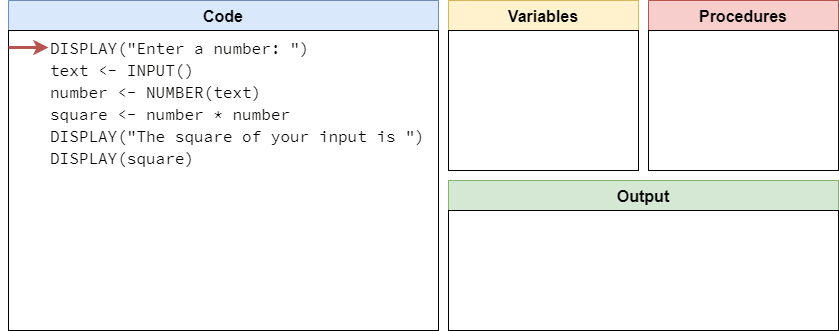
DISPLAY("Enter a number: ")
text <- INPUT()
number <- NUMBER(text)
square <- number * number
DISPLAY("The square of your input is ")
DISPLAY(square)
Let’s quickly trace this program to understand how it works! We’ll set up our code trace like always, as shown below:

The first line will simply print a prompt to the user for input, so we’ll add that to the output section and move to the next line:

Here, we are asking the user for input. On a real computer, the program would pause with a blinking cursor, allowing the user to enter input. In our code trace, we’ll show the user’s input as white text against a black background. So, if the user enters the text 6, it would look like this in our code trace:
The INPUT() expression will give us that value, which we can store in the text variable as shown in this step:
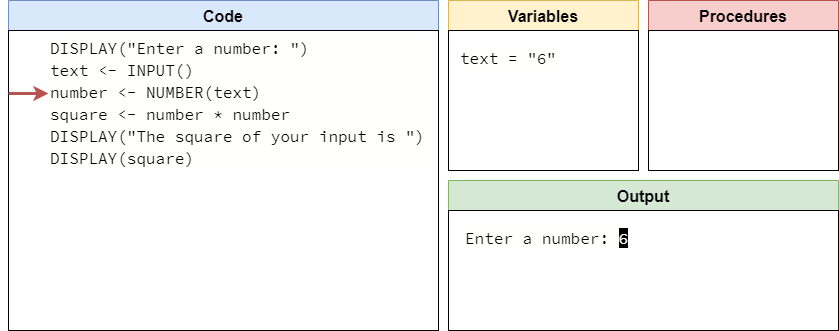
The next line will use the NUMBER() procedure to convert the text value "6" to the numerical value $6$ and store that in the new number variable:
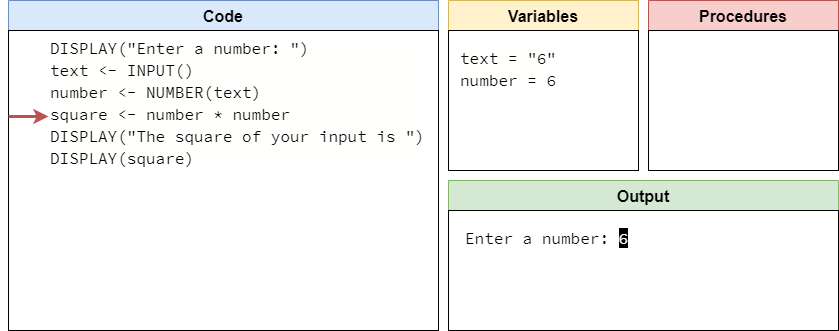
Notice that the value $6$ in the number variable does not have quotes around it. In our code traces, just like anywhere else, we’ll be careful to make sure that string values are surrounded by quotation marks, and numerical values are not.
On the next line, we’ll compute the square of the input by multiplying it by itself, and storing that result in the square variable:

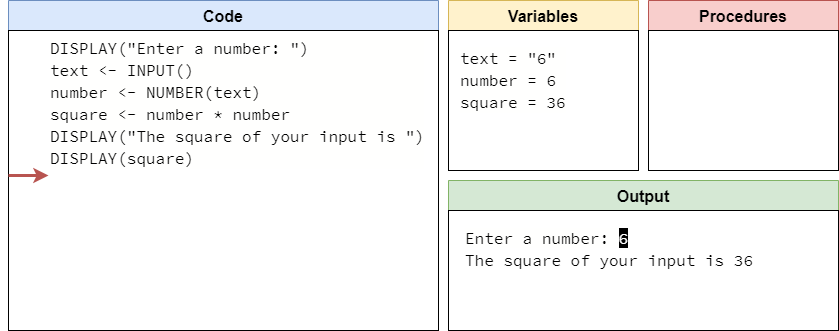
Finally, the last two lines of the program will display output to the user, including the new square value. We’ll start this output on the next line, since user input usually ends with the user pressing the ENTER key to denote the end of the input, which results in a newline character that is part of what is shown on the screen:
The full process can be seen in this animation:
This example shows us quite a bit about how we can use the INPUT() expression in our pseudocode to build programs that are interactive and allow the user to input data for our programs to store and manipulate.
Subsections of Pseudocode Input
String Concatenation
YouTube VideoResources
So far we’ve only looked at operators that can be used on two numeric values, but there are also a few operations we can perform on strings as well. Let’s look at one important operator that is commonly used with strings - the concatenation operator. In pseudocode, like most other programming languages, we’ll use the plus symbol + to represent the concatenation operator.
The term concatenate may be a new term, since it isn’t used very often outside of programming. To concatenate two items, we are simply linking two items together, one after the other. When applied to strings, we can use the concatenate operator to combine two strings into a single string.
Let’s look at an example:
one <- "Hello"
two <- "World"
message <- one + " " + two
DISPLAY(message)
In this code, we begin with the strings "Hello" and "World" stored in two separate variables, one and two. Then, we create a new variable message, which contains the values of one and two concatenated together, with a space in between. Since one and two are strings instead of numbers, we know the + symbol represents the concatenate operation, instead of addition.
When we run this program on our “mental model” of a computer, we should see this output:
Hello WorldAs we can see, the concatenate operator is a way we can build complex strings from various parts.
Concatenating Numbers
Because the concatenate operator works with strings, we have to add a couple of rules to how our pseudocode language handles data types to deal with this. Here are the most important rules to follow:
- If both sides of the
+operator are strings, then the+operator is treated like a concatenation. If both sides are numbers, then it is treated like addition. The+operator cannot be applied to a string and a number. - The concatenation operation always returns a string.
This may seem a bit confusing to anyone who has experience with programming, since many programming languages allow us to use the + operator between strings and numbers without any issues. However, in this case we’re going to stick closely with what is allowed in Python, so these are the rules we’ll follow in pseudocode.
Subsections of String Concatenation
Return in Procedures
YouTube VideoResources
Getting data from the user is one way we can store data in our programs. What if we want to create a procedure that produces a new data value? We can do that using a special statement called the return statement.
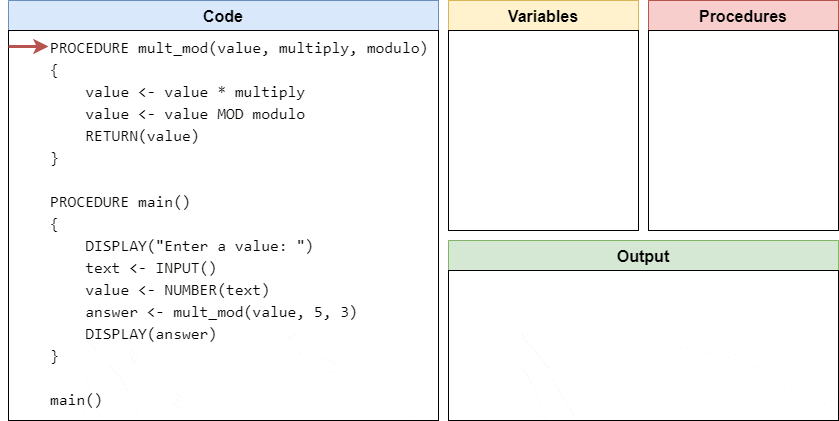
In a procedure, we can choose any expression to be the result of calling the procedure, which will allow us to use the procedure as part of an expression instead of a statement. To really understand how this works, let’s see it in action! Here’s an example of a complete pseudocode program with a procedure that returns a value:
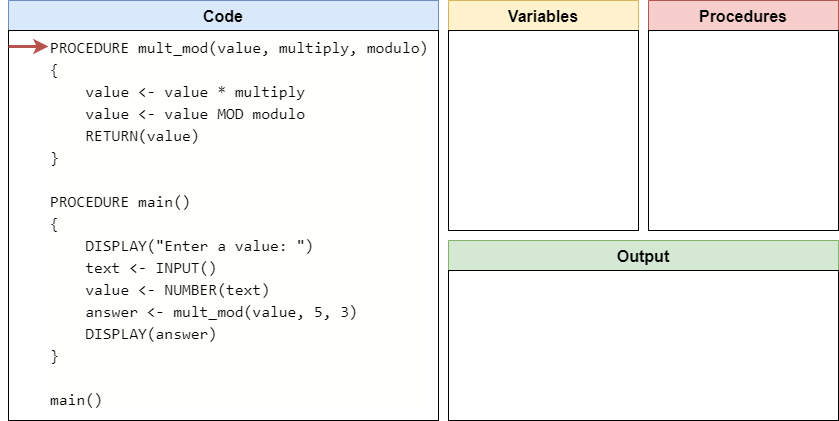
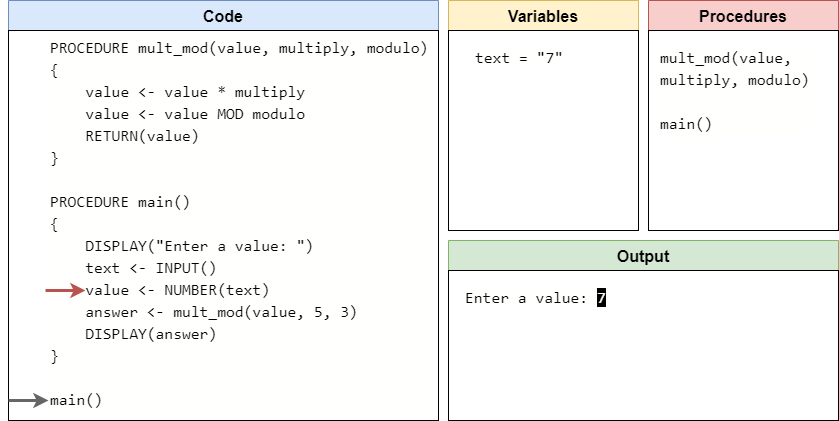
PROCEDURE mult_mod(value, multiply, modulo)
{
value <- value * multiply
value <- value MOD modulo
RETURN(value)
}
PROCEDURE main()
{
DISPLAY("Enter a value: ")
text <- INPUT()
value <- NUMBER(text)
answer <- mult_mod(value, 5, 3)
DISPLAY(answer)
}
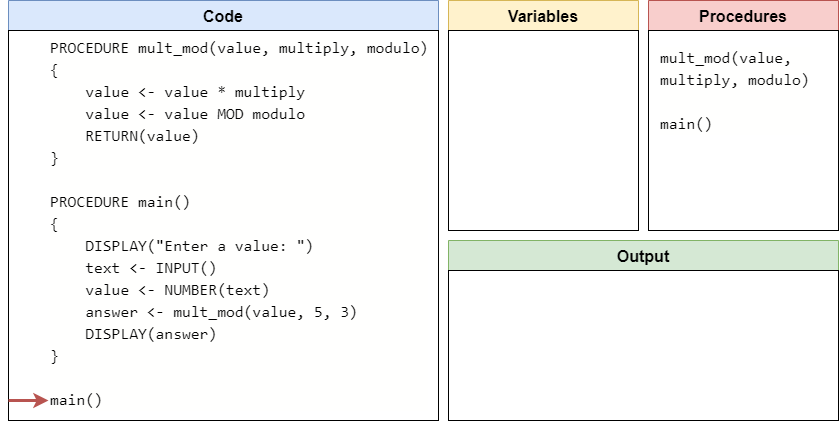
main()In the mult_mod() procedure, we see that the last line of code is RETURN(value). This line will end the procedure, and it will use the current value stored in the value variable as the return value from the procedure. Then, in the main() procedure, we see that the procedure call for mult_mod() is actually part of an assignment statement answer <- mult_mod(value, 5, 3). So, when the mult_mod() procedure is called, it will perform its work and then produce a return value, which can then be stored in the answer variable in the main() procedure. In effect, we can now use a procedure call to compute a value, which is a very useful thing in our programs. Let’s work through a code trace using this code to see how it works.
Code Trace
Like always, we’ll start with the usual setup for our code trace as shown below.
The first few steps will simply find the procedures declared in the code. Once we reach the call to the main() procedure at the bottom, we should be at this state:
So, we’ll enter the main() procedure. Here, we print a prompt to the user, and then accept input using the INPUT() expression:
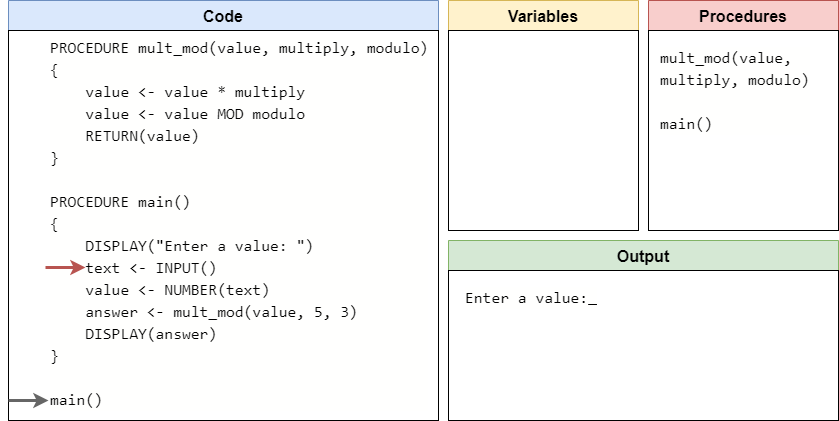
In this example, let’s assume the user inputs the number $7$ as input. So, we’ll update our code trace to show that string value being stored in the text variable:
Next, we’ll need to convert that string value to a numerical value using the NUMBER() procedure, storing that result in the value variable:
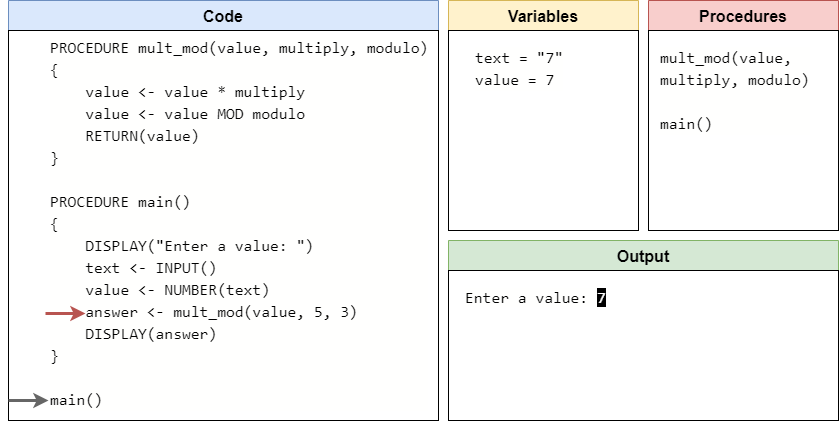
At this point, we are ready to call the mult_mod() procedure. So, we’ll jump up to the first line of that procedure, and create a new set of variables that represent all of the parameters of the mult_mod() procedure, with values matching the arguments provided in the procedure call:
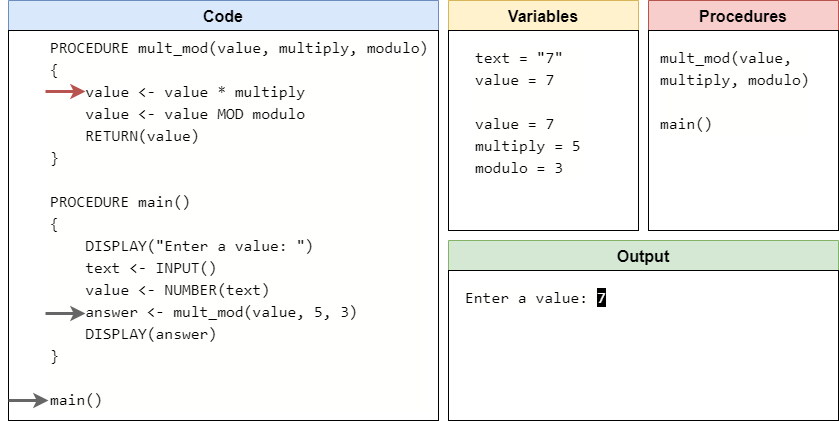
The first two steps of the mult_mod() procedure will multiply the value parameter by the multiply parameter, then find the modulo of that result and the modulo parameter. As it does so, it updates the value stored in the value variable. Once it is done, value should store the value $2$:

Now we’ve reached the RETURN() statement. This statement will end the mult_mod() procedure, so for this example it is the last line of code. Inside of the RETURN() statement, we are choosing to return the value stored in the value variable. So, in our variables list, we’ll remove all of the variables from the mult_mod() procedure, but we’ll place a special variable there showing the value that is being returned from the procedure. In our code trace, we’ll just call that the RETURN variable:
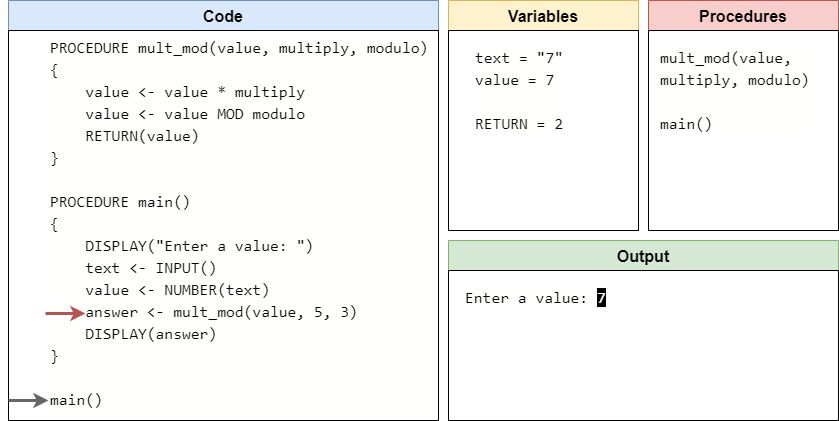
Now, back in the main() procedure, we can deal with the assignment statement on the current line. Here, we will take the value returned from the mult_mod() procedure, which we see as the RETURN variable, and store that value in the answer variable in main. Once we’ve done that, our code trace will look like this:

Notice that the RETURN variable disappears once we’ve passed that line. The RETURN value is only used immediately after the procedure is called, to help evaluate the expression that it is a part of. Once that is done, the value is no longer needed.
Finally, we can complete the program by printing the answer to the output:

We’ll reach the end of the main() procedure, and once we’ve moved back to the outer level of the code, we’ll see that there is no more work to be done. The full trace is shown in this animation:
Returning values from a procedure is a really useful tool in programming. It allows us to create procedures that can perform a complex calculation for us, and then we can use those procedures in other expressions to perform even more complex calculations. It is all about finding ways to simplify our programs by creating small, repeatable pieces of code for each task.
Subsections of Return in Procedures
Complex Pseudocode
YouTube VideoResources
Previously, we worked through this simple example pseudocode program:
DISPLAY("Enter a number: ")
text <- INPUT()
number <- NUMBER(text)
square <- number * number
DISPLAY("The square of your input is ")
DISPLAY(square)
However, we can greatly shorten this program’s code using a couple of programming features that we have not covered yet. Let’s look at how we can do that.
Expressions of Expressions
The single biggest thing to understand about expressions in programming is that we can usually combine them in a variety of different ways.
For example, this program receives input from the user using the INPUT() expression, and then on a separate line of code it uses the NUMBER() procedure to convert it to a number and store it in a variable. However, since the NUMBER() procedure allows us to use any expression as an argument, we can combine those two lines:
DISPLAY("Enter a number: ")
number <- NUMBER(INPUT())
square <- number * number
DISPLAY("The square of your input is ")
DISPLAY(square)
Yup, that’s right! Because INPUT() is essentially a procedure that returns a value, we can directly use that returned value as an argument to the NUMBER() procedure, without ever storing it in a variable. Our “mental model” of a computer will call the procedure inside the parentheses first, just like we’d expect, and then once it returns a value it will use that value to call the other procedure.
We can combine the last two lines of code in a similar way. We’ve already seen how to combine strings using the concatenation operator, so as long as we convert the value in square to a string it will work:
DISPLAY("Enter a number: ")
number <- NUMBER(INPUT())
square <- number * number
DISPLAY("The square of your input is " + STRING(square))
So, we’ll just place the square variable in the STRING() procedure to convert it to a string value, and then we can concatenate that value onto the end of the other string and display it in a single line.
Finally, we can even perform operations directly inside of procedure calls. So, we can combine the last two lines in this new example, preventing us from even needing the square variable at all:
DISPLAY("Enter a number: ")
number <- NUMBER(INPUT())
DISPLAY("The square of your input is " + STRING(number * number))
Our computer knows to resolve any expressions used as an argument in a procedure before calling the procedure, so this will work exactly like we’d expect it to. So, we’ve taken a program with 6 lines of code and reduced it to just 3 lines of code, and removed 2 of the 3 variables it uses in the process.
Concise and Readable
The real question is: which of these two examples is best? That is, which one is the preferred coding style to learn? The answer is that it really depends - both have their merits, and functionally they will work nearly identically on most modern computers and programming languages.
It really is a question of style - is it better to have more lines of code and variables, clearly spelling out what each step of the process is, or is it better to have shorter programs with more complex lines of code but maybe fewer variables? For beginning programmers, it is usually recommended to follow the first style, using as many variables as needed and focusing on short, concise lines of code over large, complex statements.
However, as we become more accustomed to programming, we’ll find that many times it is easier to read and understand complex statements, and our code can be written in a way that better reflects what it is actually doing.
This is very similar to learning how to read, write, and speak in a new language. We must start with short, concise sentences, and slowly build up our knowledge of more complex statements and grammar rules until we become a fluent speaker.
Overall, the best advice to follow is to make your code readable to both yourself and anyone else who may have to read and maintain the code. As long as it is clear what the code is doing based on what it says, it is probably a good style to follow. As we continue to learn more, we’ll slowly refine our coding style to be one that is easy to follow and understand for everyone.
Subsections of Complex Pseudocode
Python Input
YouTube VideoResources
The Python programs we’ve written up to this point are very static - each time we run the program, it will perform the same exact operations. Since we’re running these programs on a real computer, it might be helpful to build programs that can read and respond to input from the user, making them much more useful overall. Python includes many different ways to handle user input, but in this lab we’ll just focus on the simple input() function.
Input in Python
The input() function is used to display a prompt the user and then record input. It works very similarly to the INPUT() expression we’ve already seen in pseudocode, but in Python we can display the prompt to the user directly in the input() function itself.
Let’s look at a quick example:
name = input("Enter your name: ")
print("Hello ", end="")
print(name)
Here, we see that the input() function actually accepts a message as an argument, which will be displayed to the user. After the message is printed, the user will be given a cursor to enter text immediately after it. Once the user presses the ENTER key, the input() function will read the input that was entered and store it as a string value or str data type in the name variable.
For example, if the user inputs Willie Wildcat at the prompt, this program’s output will look like this:
Enter your name: Willie Wildcat
Hello Willie Wildcat
We can see this even more clearly in the terminal. When we first run the program, we’ll see the prompt "Enter your name:" printed, followed by a cursor prompting the user to enter something:

Once the user types the input and presses ENTER, the rest of the program will run:

Now we see the cursor is at the next command prompt, ready to run another program.
Numerical Input
Of course, we can also read numerical input in Python using the input() function. To do this, we must simply use either the int() or float() function to convert the input received as a string to the correct data type.
Here’s a quick example program that requires two inputs for the price and quantity of an item being purchased:
text_one = input("Enter the price of one item: ")
price = float(text_one)
text_two = input("Enter the quantity of items: ")
quantity = int(text_two)
cost = price * quantity
print("The total cost is $", end="")
print(cost)
If the user wishes to purchase $3$ items at the price of $2.75$ per item, then the program’s output would look like this:
Enter the price of one item: 2.75
Enter the quantity of items: 3
The total cost is $8.25
In the program, we simply read each input from the user as a string value, then use the appropriate conversion function to convert it to the correct data type. For numbers including a decimal point, we use float(), but for whole numbers we use the int() function.
This works well if the user enters values that make sense. But, what if the user wishes to purchase a fraction of an item? Will this program work? Unfortunately, if the user enters a value with a decimal point for the second input, it can no longer be converted to an integer and we’ll get an error:
Enter the price of one item: 2.75
Enter the quantity of items: 3.5
Traceback (most recent call last):
  File "tutor.py", line 4, in <module>
    quantity = int(text_two)
ValueError: invalid literal for int() with base 10: '3.5'
For right now, there’s not much we can do about that error other than write programs that clearly tell the user what type of data is expected, but later we’ll learn how to handle errors like this and prompt the user for input again.
Subsections of Python Input
Python Strings
YouTube VideoResources
Python also includes an operator that can be used to concatenate two strings together. Just like in pseudocode, we can use the plus symbol + between two strings to concatenate them together into a single string, making it much simpler to build more complex strings and outputs.
A simple example is shown below:
first = "Hello"
second = "World"
print(first + second)
When executed, this code will display this output:
Hello WorldAs we can see, using the + operator in Python to concatenate two strings together is a quick and easy way to simplify our print statements.
Concatenating Numbers
Just like in pseudocode, Python also requires both sides of the + operator to be strings in order for concatenation to work. So, if we want to concatenate a string with a numeric value, we’ll have to convert it to a string using the special str() function. Here’s an example:
text = "Your total is $"
value = 2.75
print(text + str(value))
When we run this program, we’ll receive the following output:
Your total is $2.75However, if we forget to convert the value variable to a string, as in this example:
text = "Your total is $"
value = 2.75
print(text + value)
we’ll receive an error instead:
Traceback (most recent call last):
  File "tutor.py", line 3, in <module>
    print(text + value)
TypeError: must be str, not float
So, we’ll have to be careful and make sure that we convert all of our numbers to strings before trying to concatenate them together. Of course, if both sides of the + operator are numbers, then it will perform addition instead of concatenation!
String Formatting
Python also includes another method of building strings, and that is the format() method. The format() method allows us to put placeholders in strings that are later replaced with values from variables, effectively creating a way to build “templates” that can be used throughout our program.
The easiest way to see how this works is looking at a few examples. Let’s start with a simple one:
name = input("Enter your name: ")
print("Hello {}".format(name))
If the user inputs "Willie Wildcat" when prompted, then this code will produce this output:
Enter your name: Willie Wildcat
Hello Willie Wildcat
There are many important parts to this example, so let’s look at each one individually. First, in the print() statement, we see the string "Hello {}". This is an example of a template string, which includes a set of curly braces {} as placeholders for data to be inserted. Each template string can have unlimited sets of curly braces, and each one will be given a different piece of data from the format() method.
Then, we see a period ., followed by the format() method. Notice that the format method is directly attached to the template string by a period - this is because it is actually a method that operates on the template string object itself. This is a key concept in object-oriented programming, which we won’t cover in detail right now, but we’ll definitely see it come up later as we learn more about programming. This is also why we are referring to format() as a method instead of a function, since it is directly attached to another object.
When executed, the format method will replace the placeholders in the string with the values provided as arguments, working from left to right. The first argument will replace the first placeholder, and so on, until all placeholders are replaced and the arguments are all used.
The format() method itself can have unlimited arguments. Each argument corresponds with one of the placeholders in the template string. So, if there are two placeholders, there should also be two arguments.
note-1
The Python format() method can do many powerful things, such as place the same argument in multiple placeholders, and each placeholder can define how a value should be presented to the user, among many other features. For right now, we’ll just use simple, empty placeholders in our template strings. Likewise, we’ll just deal with the situation where each placeholder matches to exactly one argument to the format() method.
The most powerful use of the string format() method is to insert numerical values directly into strings without having to convert each value directly to the str data type - the format() method handles that conversion for us.
For example, we can update our previous program to use the string format() method to display the output in a single print() statement, and we can also add additional information with ease:
text_one = input("Enter the price of one item: ")
price = float(text_one)
text_two = input("Enter the quantity of items: ")
quantity = int(text_two)
cost = price * quantity
print("{} items at ${} each is ${} total".format(quantity, price, cost))
When we execute this program, we’ll see output that looks like this:
Enter the price of one item: 2.75
Enter the quantity of items: 3
3 items at $2.75 each is $8.25 total
This example shows how easy it is to build complex output strings using a simple template string and the string .format() method.
Subsections of Python Strings
Return in Functions
YouTube VideoResources
Python functions are also capable of returning a value, just like we’ve seen in pseudocode. In Python, we use the return keyword, instead of a RETURN() statement, but the concept is the same.
Let’s look at a quick example of a full Python program that includes a function that returns a value:
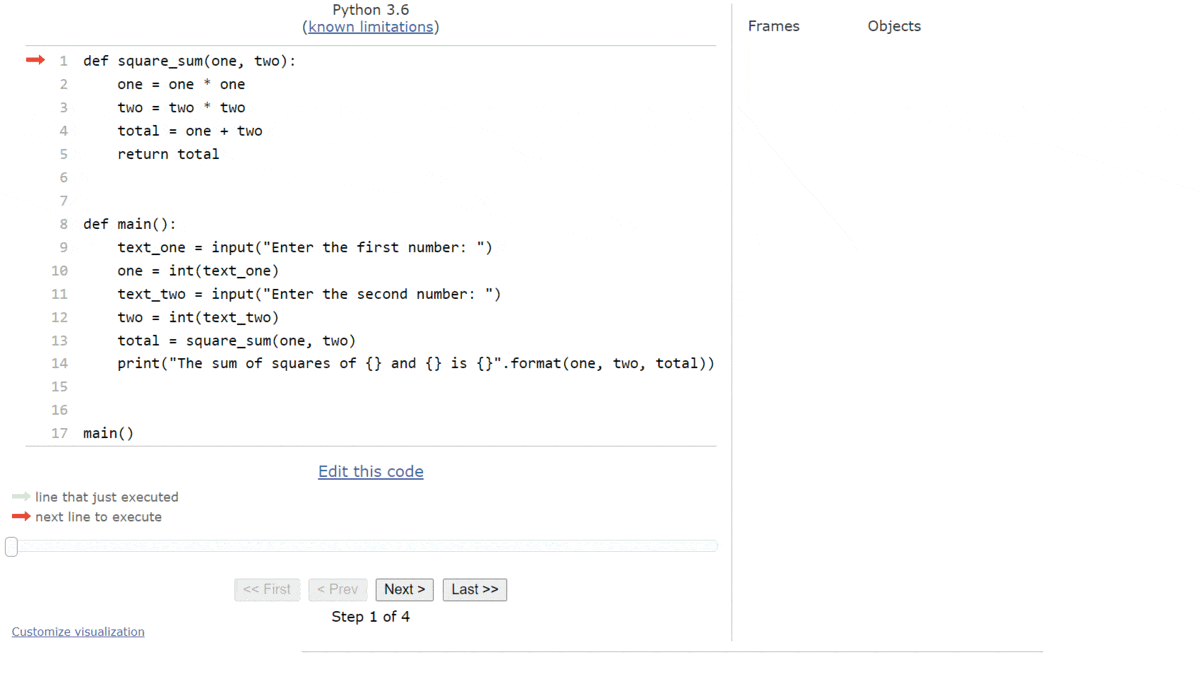
def square_sum(one, two):
    one = one * one
    two = two * two
    total = one + two
    return total


def main():
    text_one = input("Enter the first number: ")
    one = int(text_one)
    text_two = input("Enter the second number: ")
    two = int(text_two)
    total = square_sum(one, two)
    print("The sum of squares of {} and {} is {}".format(one, two, total))


main()
To truly understand how this program works, let’s use Python Tutor to explore it step by step. Like before, copy the code into the tutor.py file in the python folder on Codio, or click this Python Tutor
link.
At the start, our Python Tutor trace will look like this:
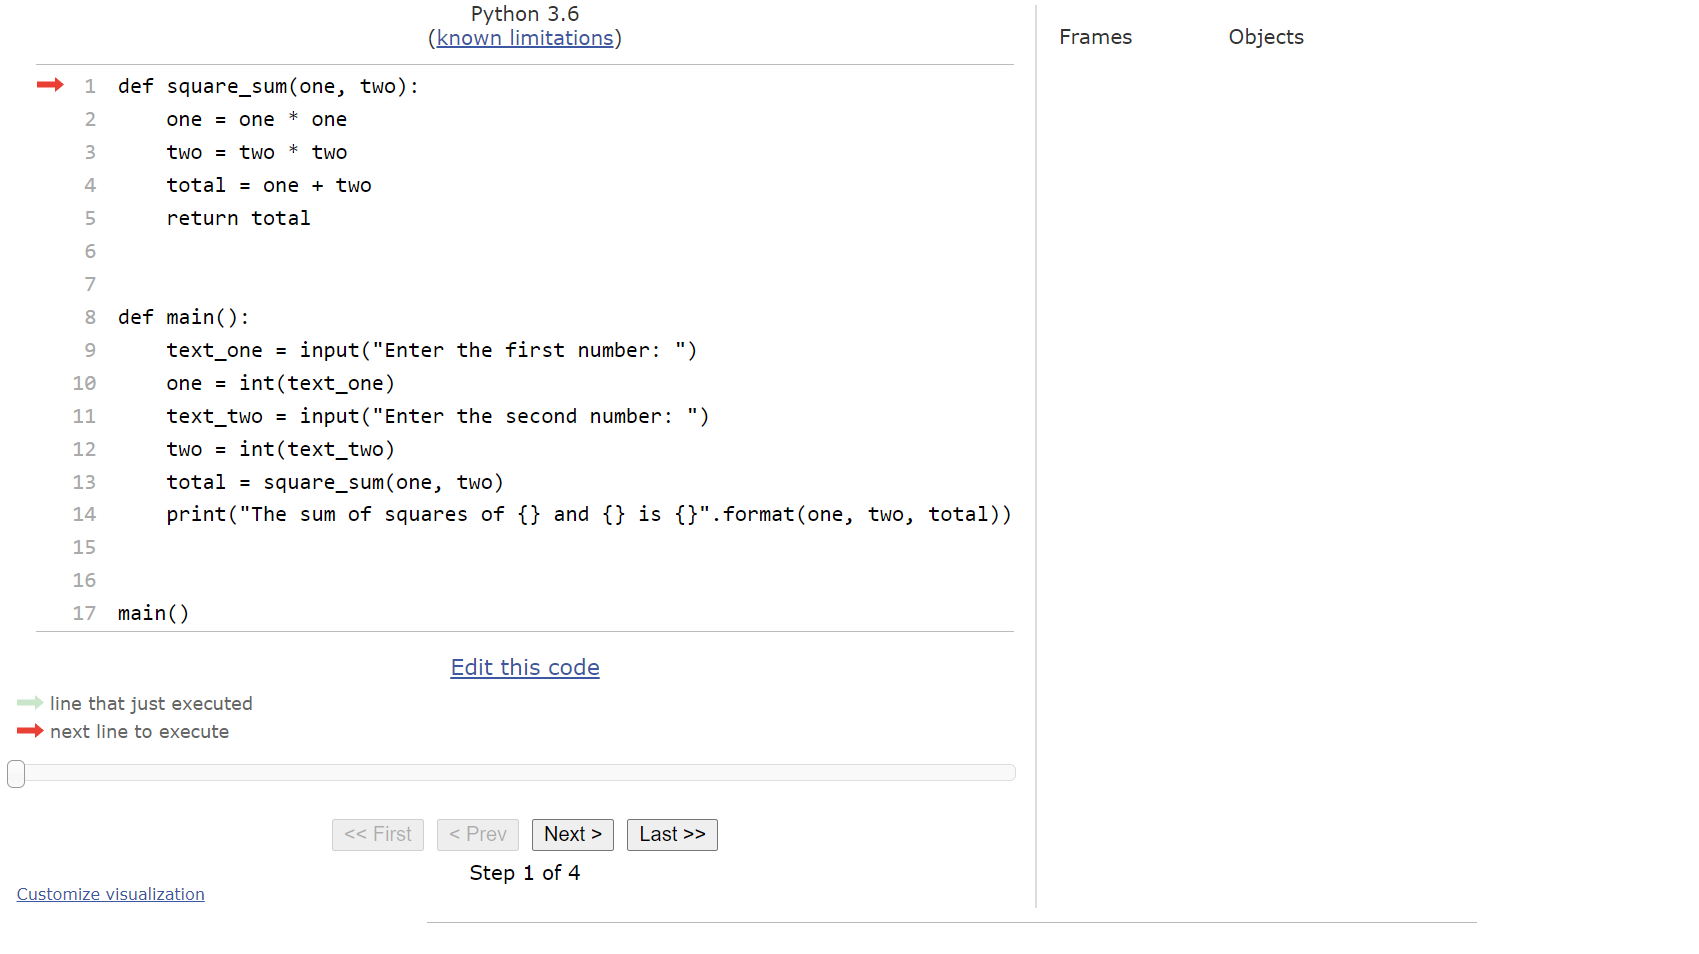
The first few steps are pretty straightforward, since Python will simply move through the code and record all of the functions it finds. Once we reach the call to the main() function at the bottom, we’ll be at this state:
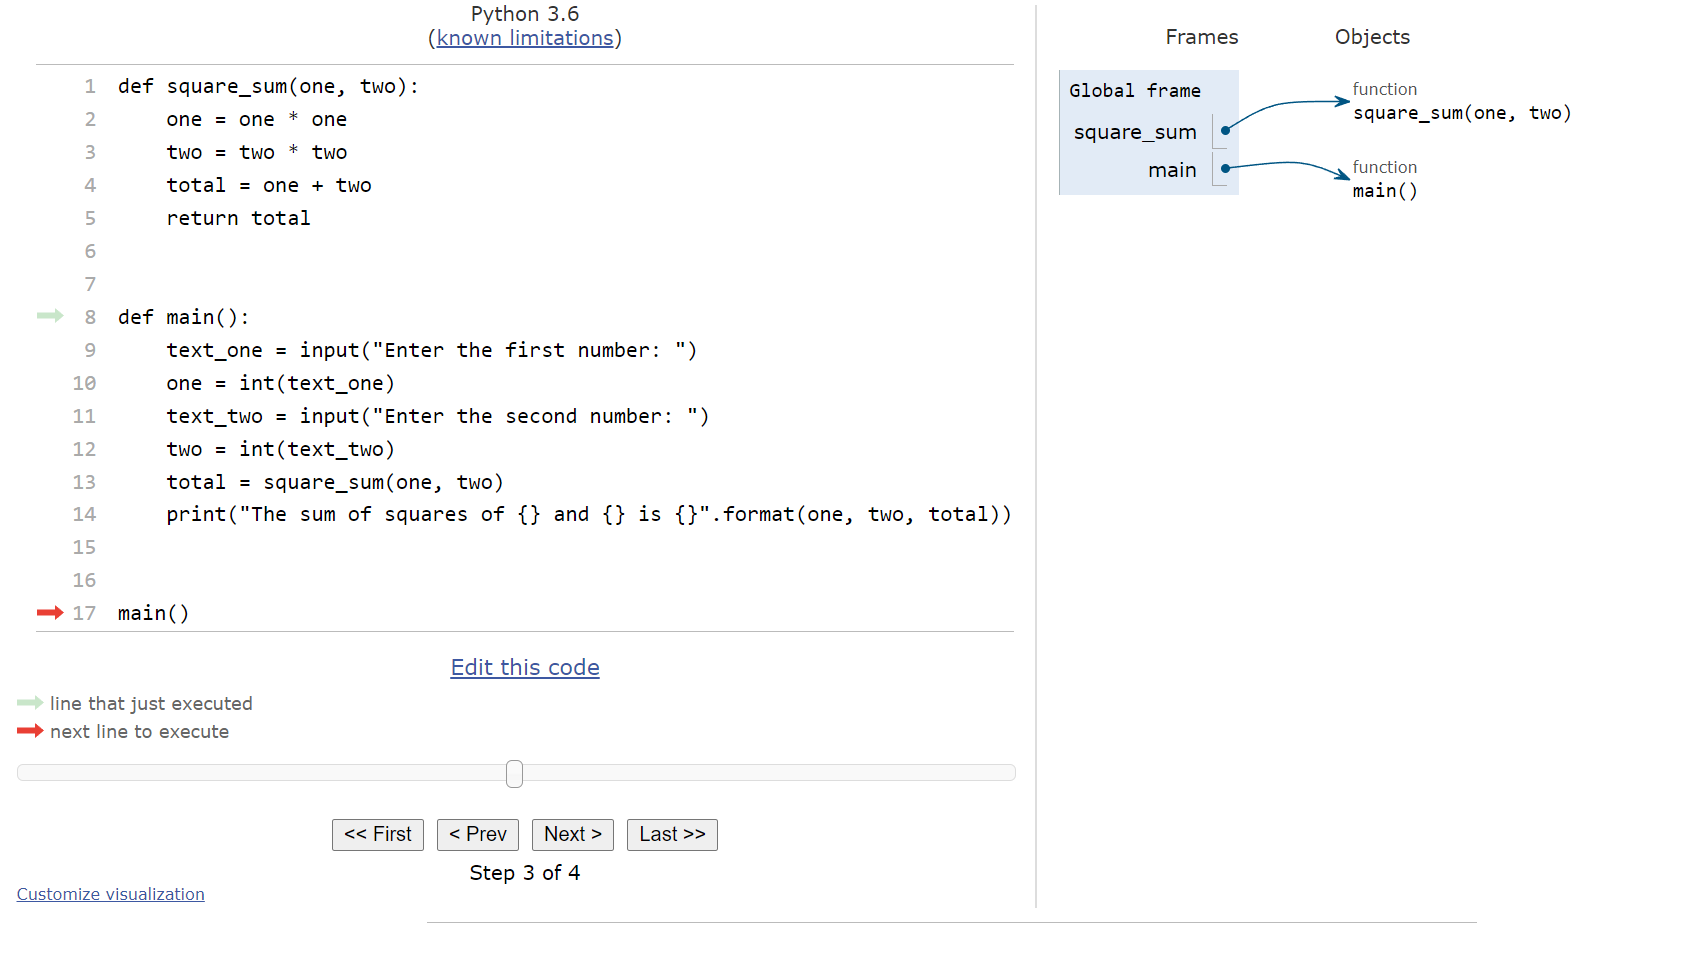
So, we’ll enter the main() function and start executing the code it contains. The first line is an input() expression, so Python will prompt the user for input. In Python Tutor, this will open a box at the bottom where we can enter the input, as shown below:
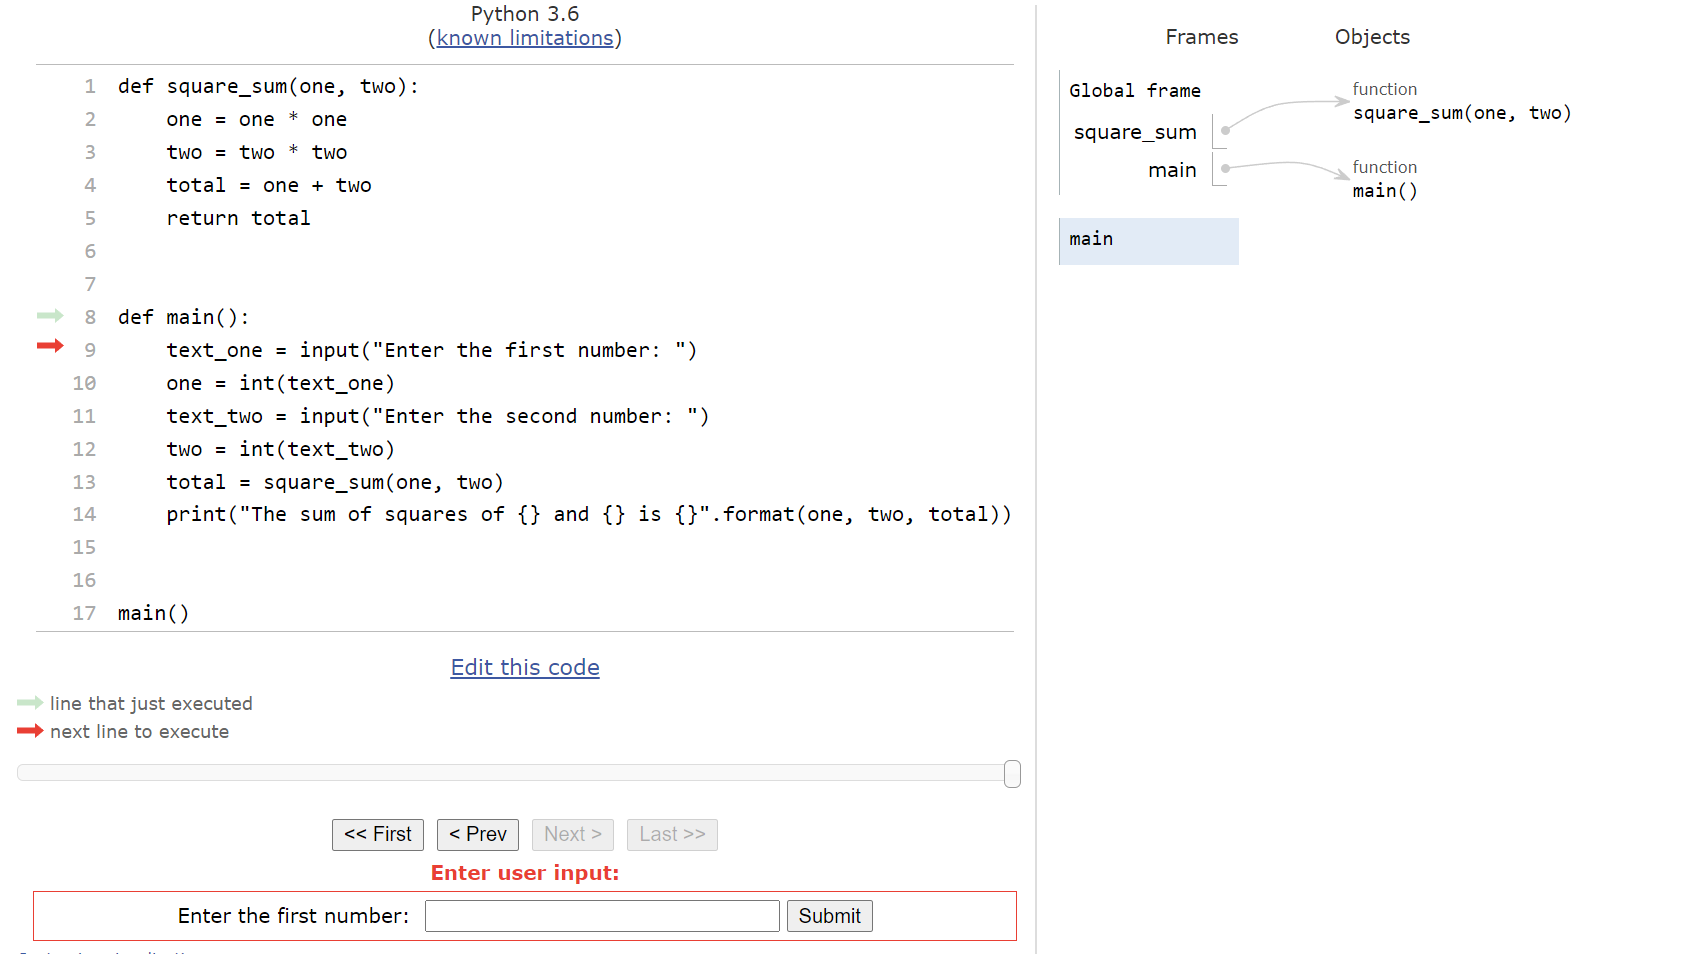
Let’s assume that the user would enter 2 for this input. So, we can type that into the box and press ENTER or click submit. Python tutor will refresh the page to accept the input, and then we’ll be at this setup:
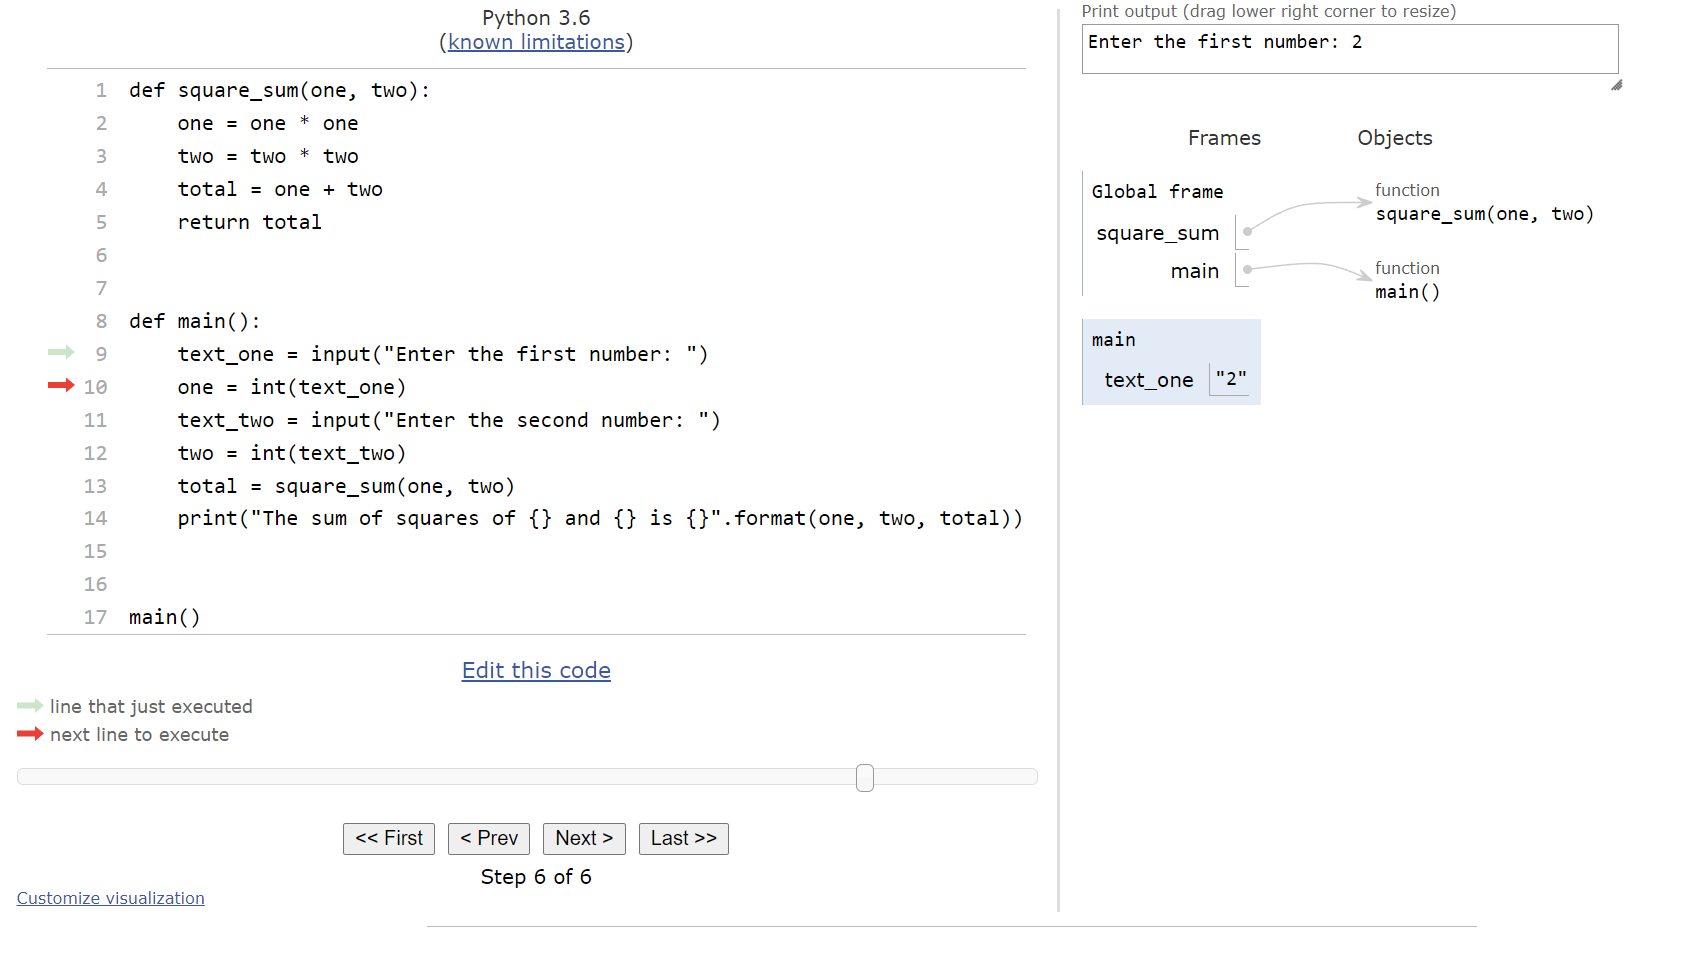
Next, we’ll convert the string value "2" that is currently stored in the text_one variable to an integer using the int() function and store it in the variable one. On the next line, it will ask for input once again:
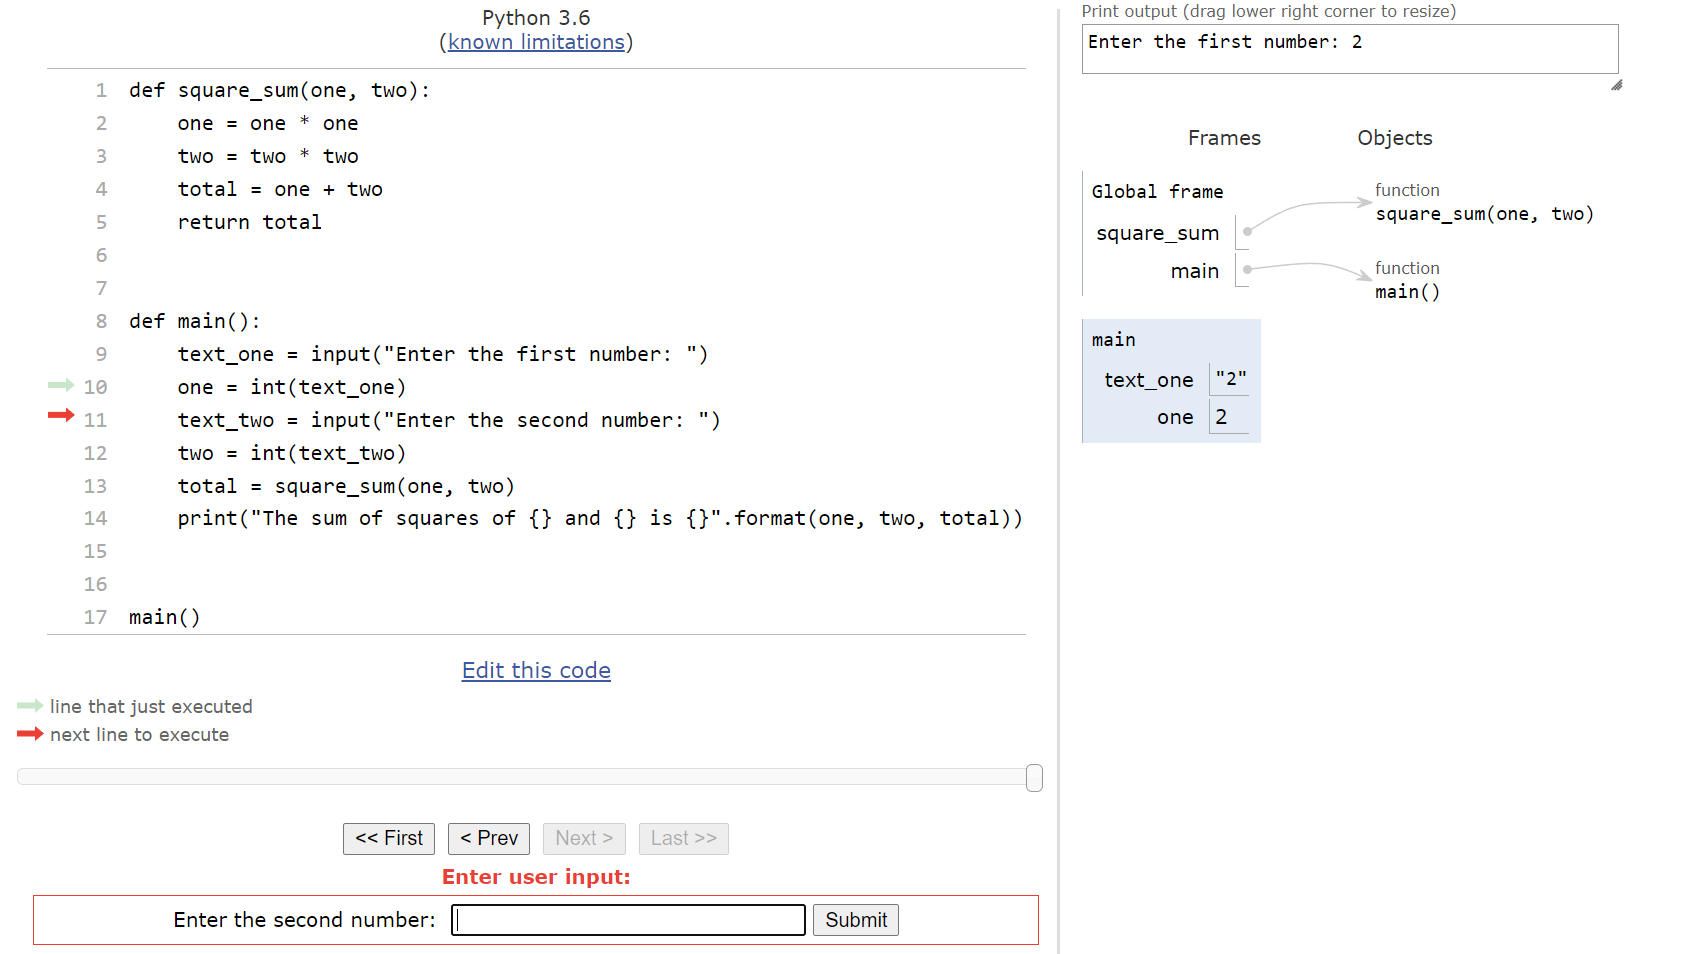
In this case, we’ll assume the user is inputting 3, and then we’ll store it and convert it to an integer stored in the variable two:
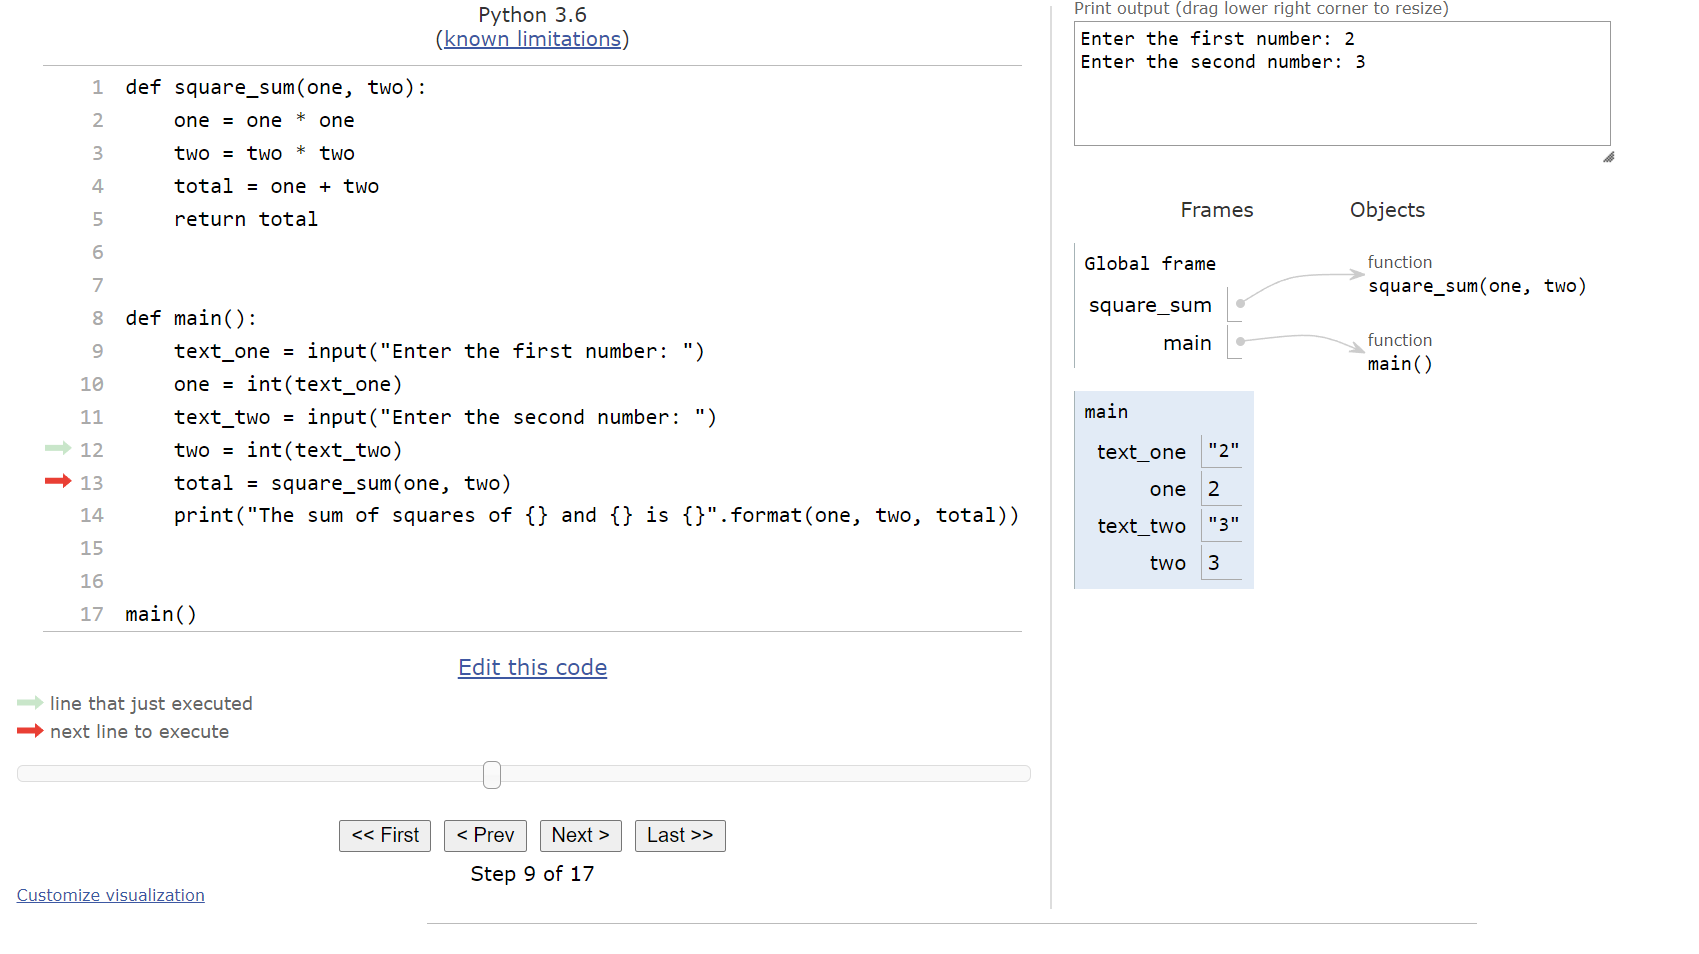
At this point, we’re ready to call the square_sum() function. So, Python Tutor will find the arguments for the function call and prepare to store them in the parameter variables of the function. When we click next, we’ll see this setup in our window:
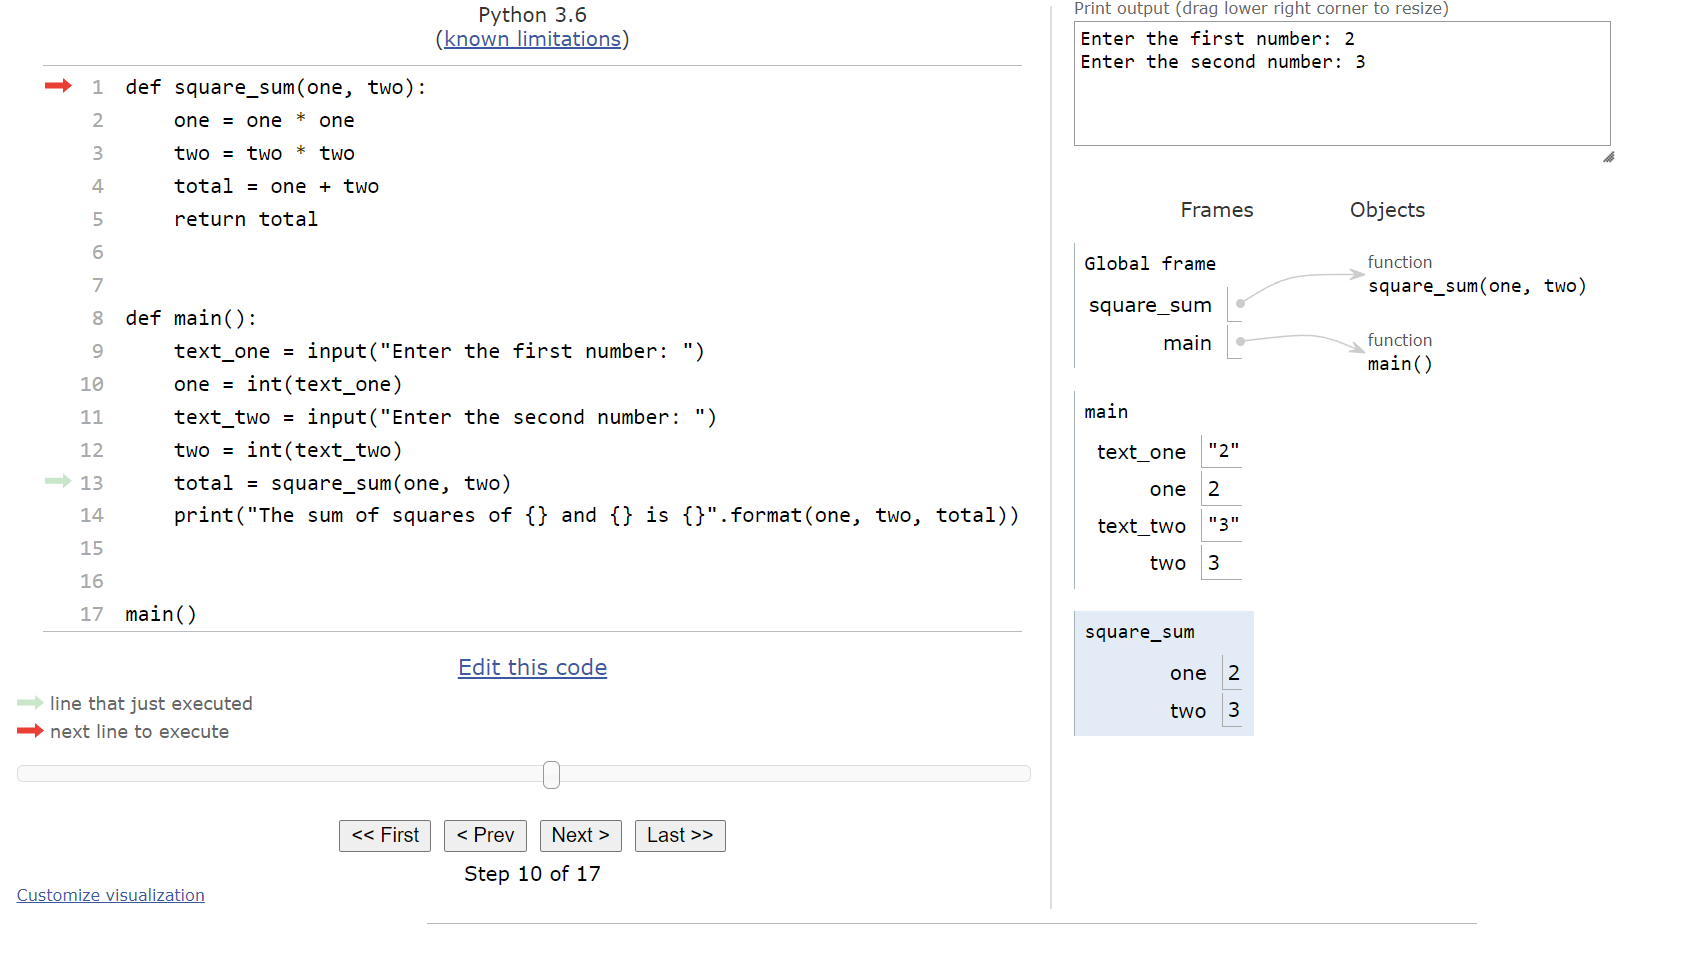
Recall that Python Tutor will create a new frame for the square_sum() function in the frames area and store the variables from that function there. This will become important later when we reach the end of the function. Inside of the square_sum() function, we just perform a few mathematical operations, culminating with the total variable storing the sum of the squares of the two arguments, as shown here:
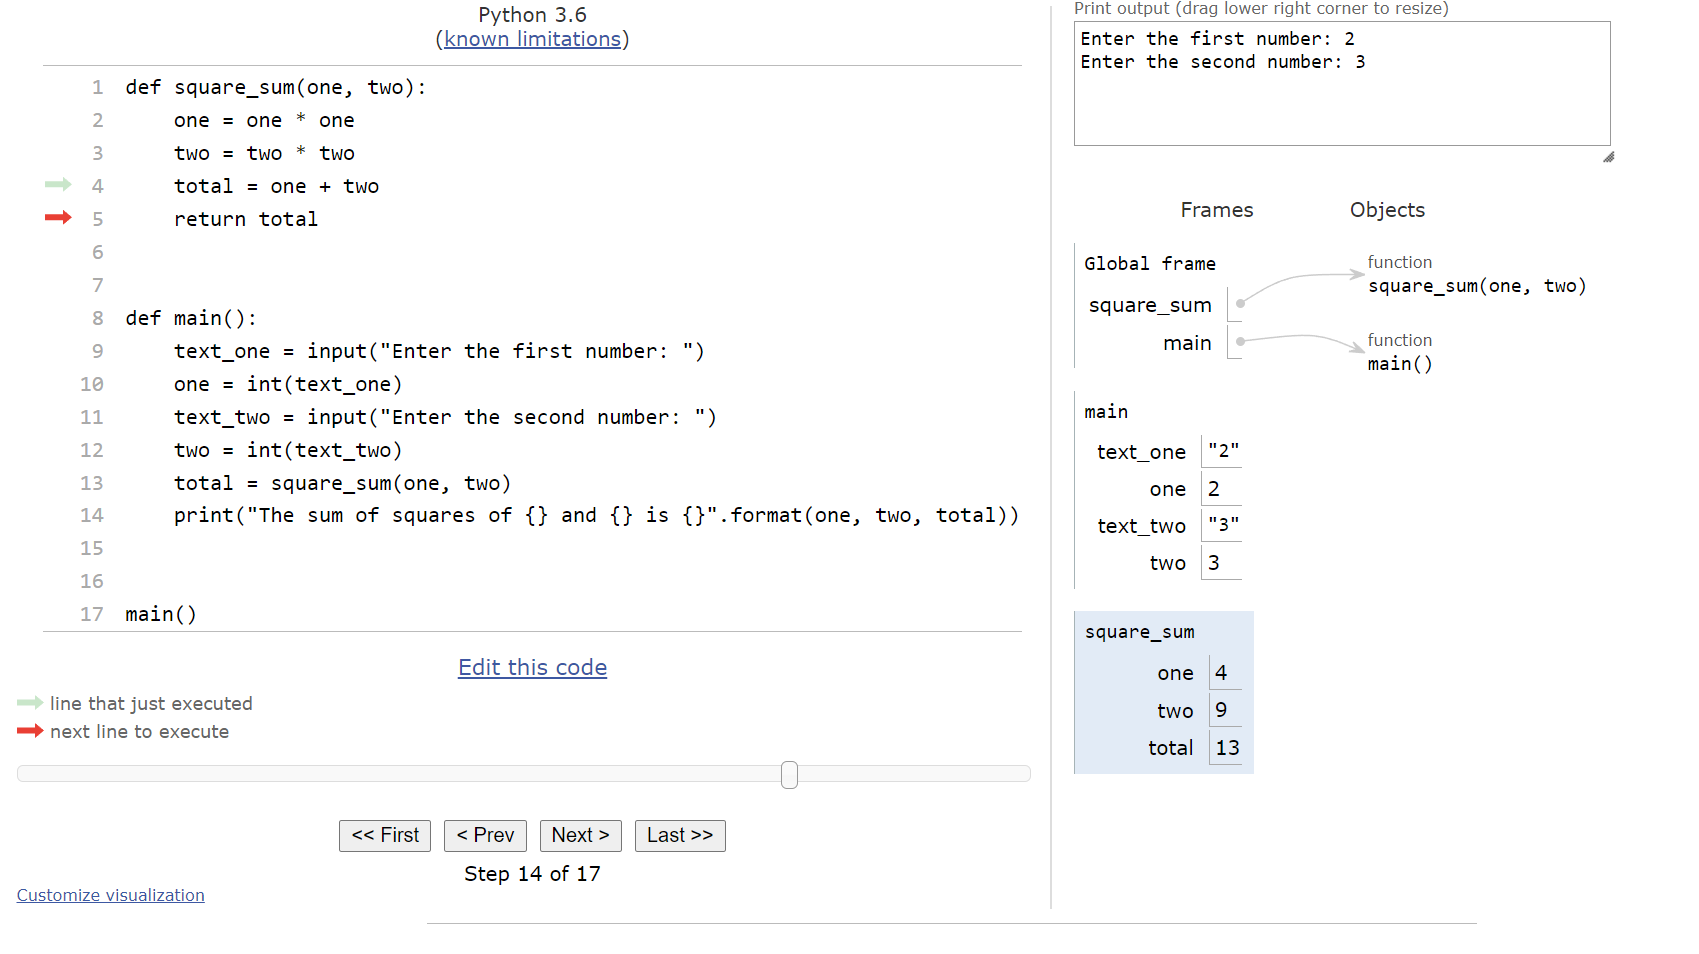
At this point, we’ve reached the return statement at the end of the square_sum() function. When we click next on Python Tutor, we’ll see something new appear:
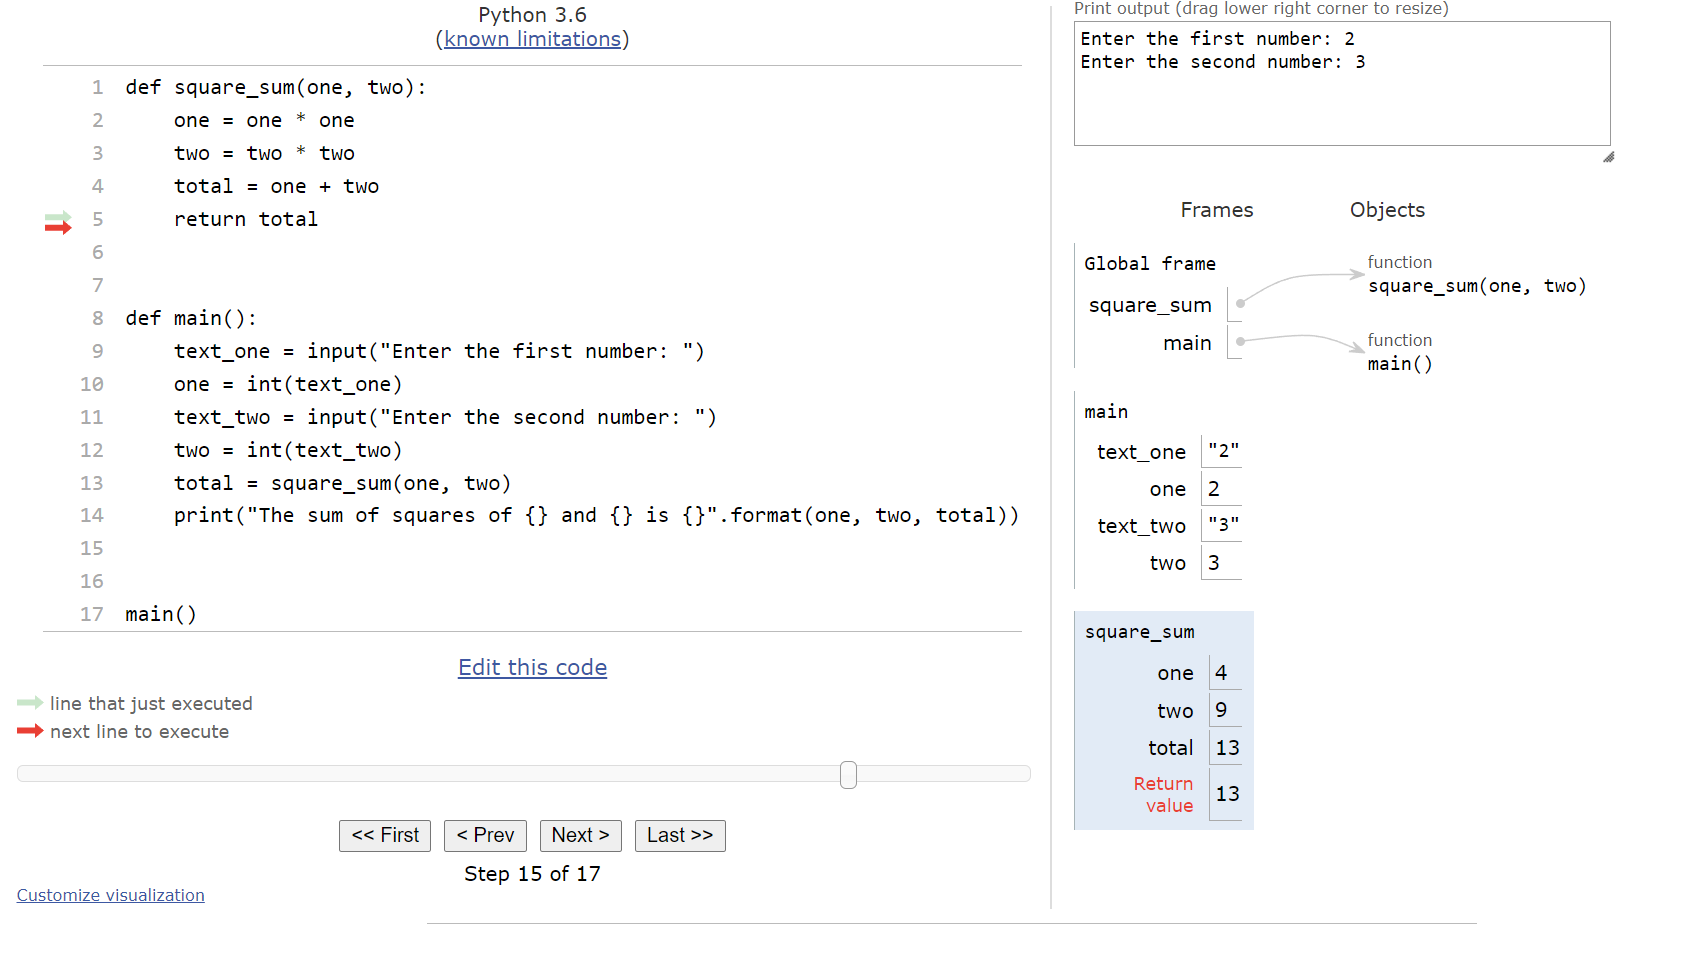
When Python reaches the end of a function, it will record the return value in the function’s frame before leaving the function. This value is what is given back to the main() function. So, when we click next again, we’ll see this state:
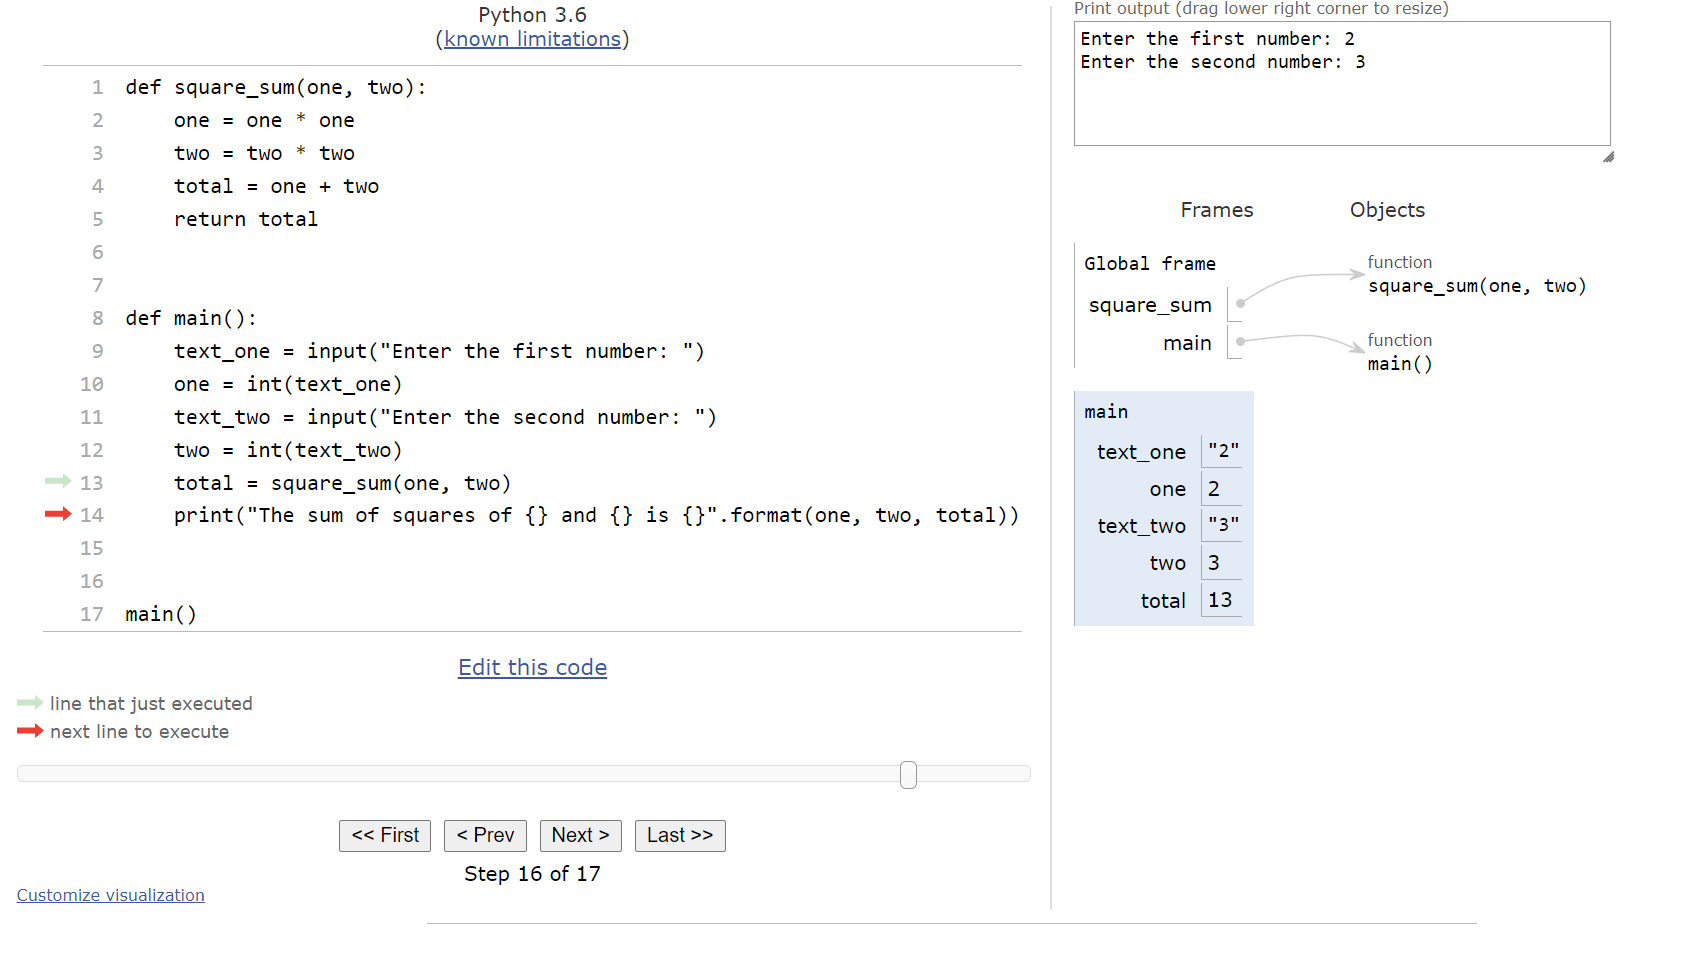
We’re back in the main() function, and now we can see that the new total variable stores the value $13$, which was the returned value from the square_sum() function. So, on this last line, we’ll see that the program will create an output statement using a template string and the string format() method, and it will display output to the user:
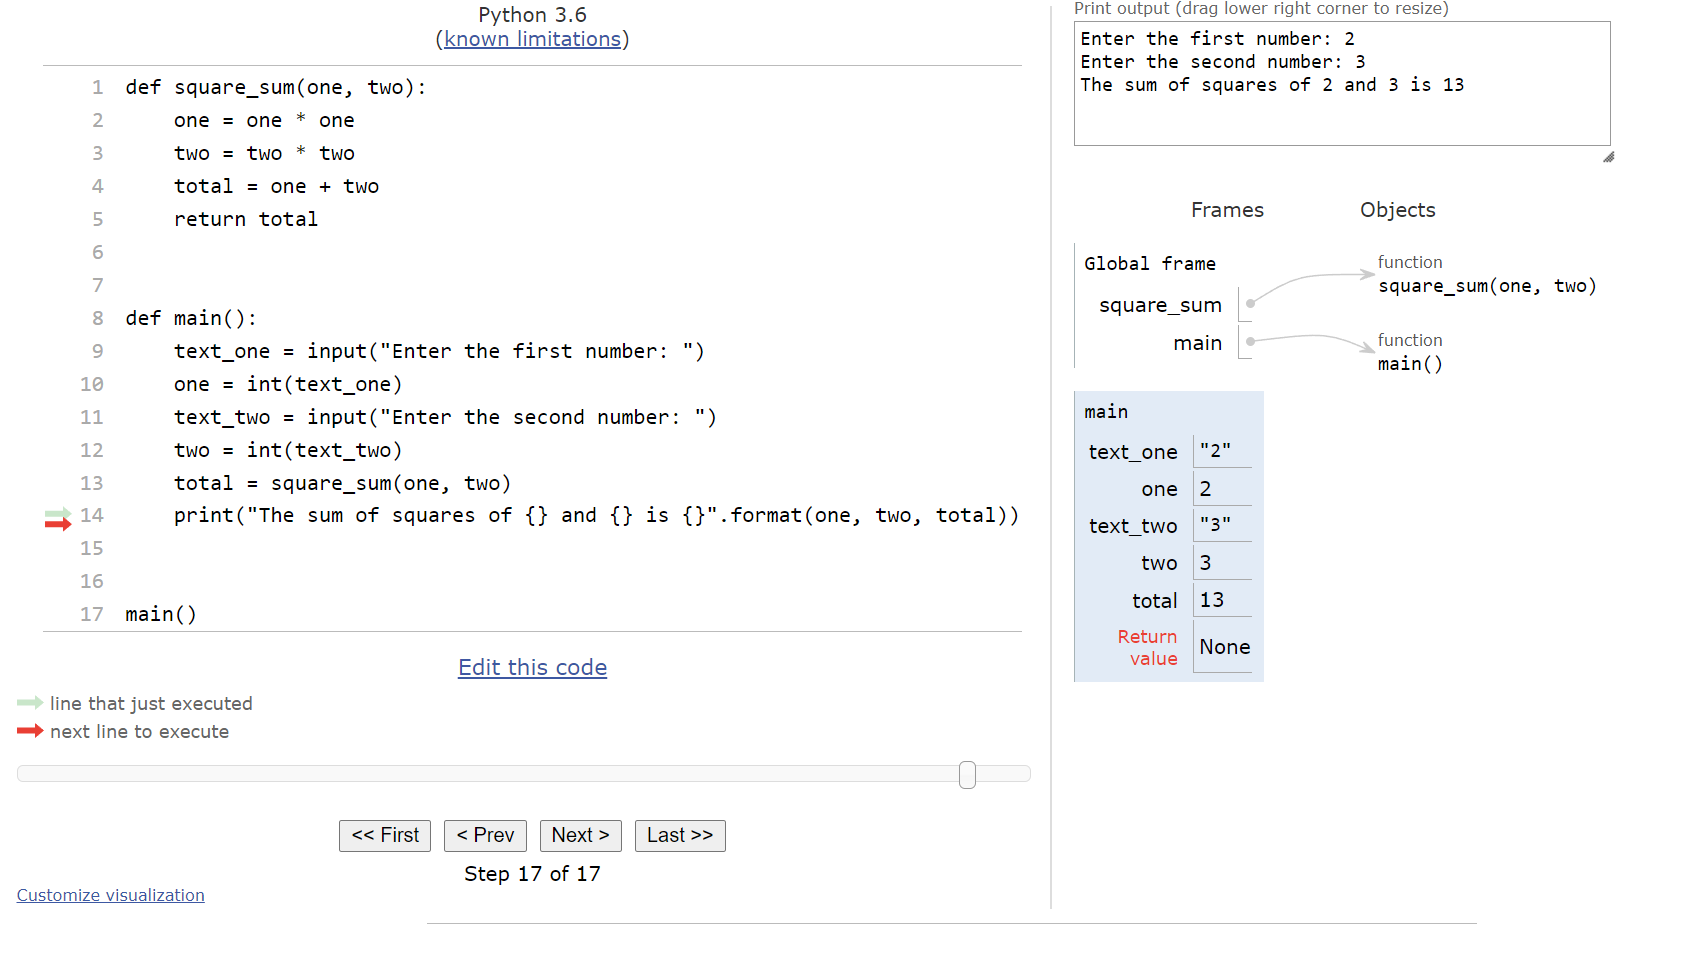
What’s also interesting to note here is the return value of the main() function. Since we didn’t include a return statement at the end of the function, the return value is set to a special value called None in Python. We’ll learn about what that value actually represents in a future course.
The entire process is shown in the animation below:
This review of how a function returns data should be very helpful as we continue to build more complex programs. Remember - we can always paste any Python code into a tool like Python Tutor to run through it step-by-step and see what it really does.
Subsections of Return in Functions
Complex Python
YouTube VideoResources
Finally, let’s look at how we can rewrite some of our previous Python programs by combining expressions into more complex statements. Just like we saw in pseudocode, Python also allows us to perform multiple actions on a single line of code, provided they can all be combined in some way to create a single statement.
Let’s consider the example on the previous page, shown here:
def square_sum(one, two):
    one = one * one
    two = two * two
    total = one + two
    return total


def main():
    text_one = input("Enter the first number: ")
    one = int(text_one)
    text_two = input("Enter the second number: ")
    two = int(text_two)
    total = square_sum(one, two)
    print("The sum of squares of {} and {} is {}".format(one, two, total))


main()
There are many ways we can write this program to perform the same work. For example, the square_sum() function can actually be reduced to a single line of code as seen below:
def square_sum(one, two):
    return (one * one) + (two * two)
We can perform multiple mathematical operations in a single expression, and as long as we either use parentheses or pay attention to the order of operations, we’ll get the expected answer. We don’t have to store the intermediate values in variables, since Python will do that for us when it evaluates the expression.
Likewise, in the main() function, we can put the input() expression inside of the int() function, allowing us to read input as a string and convert it to an integer in a single line:
def main():
    one = int(input("Enter the first number: "))
    two = int(input("Enter the second number: "))
    total = square_sum(one, two)
    print("The sum of squares of {} and {} is {}".format(one, two, total))
Finally, we can also move the function call to square_sum() directly into the format() method in the print() statement. When that line is executed, Python will know it has to call the square_sum() method first and get the returned value before it can print the output.
def main():
    one = int(input("Enter the first number: "))
    two = int(input("Enter the second number: "))
    print("The sum of squares of {} and {} is {}".format(one, two, square_sum(one, two)))
Of course, if we really wanted to, we could remove the square_sum() function entirely, and just compute the value directly in main(). However, for this example, we will leave it as a separate function. So, our new program contains this code:
def square_sum(one, two):
    return (one * one) + (two * two)


def main():
    one = int(input("Enter the first number: "))
    two = int(input("Enter the second number: "))
    total = square_sum(one, two)
    print("The sum of squares of {} and {} is {}".format(one, two, total))


main()
Functionally, this code will create the exact same output as the previous code, but it will do so using fewer variables and statements. Each statement is simply more complex, consisting of multiple expressions.
As we discussed in pseudocode, each of these approaches to writing code is valid. They simply follow different coding styles, each one with particular benefits and disadvantages to consider. Sometimes it is better to have more variables and shorter expressions, especially if the overall operation involves many steps and is difficult to follow. Other times it is better to combine a few lines of code together as a single statement to make it very clear what the overall operation is trying to accomplish.
Once again, the best advice is to simply write code in a way that it is readable to you and to anyone else who has to read it. As long as it is clear and performs correctly, it is a good style to follow. As we further develop our skills and gain experience, our style will continue to change over time.
Subsections of Complex Python
Summary
In this lab, we covered several major important topics. Let’s quickly review them.
Pseudocode Input
INPUT()will read input from the user and return what was typed as a string value.INPUT()is terminated by the user pressing ENTER, so next output starts on a new line.
Pseudocode String Operators
+Concatenation (join strings together). May only be applied to two strings.
Returning Data from Procedures
RETURN(expression)will return the value ofexpressionto where the procedure was called from.- Procedure calls can be used in assignment statements to store return values, or as part of other expressions.
Python input
input(expression)will display theexpressionto the user as a prompt, then return what was typed by the user as a string value.input(expression)is terminated by the user pressing ENTER, so next output starts on a new line.
Python String Operators
+Concatenation (join strings together). May only be applied to two strings.string.format(value1, value2)performs string formatting. Thestringportion is any valid template string, which contains curly braces{}as placeholders. Each placeholder will be replaced by the matching argumentvalue1,value2, etc. from theformat()method.
Returning Data from Functions
return expressionwill return the value ofexpressionto where the function was called from.- Function calls can be used in assignment statements to store return values, or as part of other expressions.
Complex statements
Expressions can be combined in many ways within a statement. Expressions can be used as arguments to procedures, and more!