Chapter 7
Subsections of Conditionals
Pseudocode If
YouTube VideoResources
Now that we understand how to use Boolean values in our pseudocode programs, it’s time to put those values to use. One way to think of the result of a Boolean expression is that it helps us make a decision in our programs. For example, if we want to do something special in our program when the user inputs the value $42$ into the variable x, then we can write the Boolean expression x = 42 to help us decide if the user input the correct value.
Once we have that decision made, we need some way to tell our program to run a different piece of code based on the outcome of that decision. In pseudocode, as well as most other programming languages, we can use a special construct called an if statement to do this. If statements are one example of a conditional statement in programming.
In an if statement, we start with a Boolean expression. Then, if that Boolean expression evaluates to the value true, we run the code inside of the if statement. Otherwise, we just skip that code and continue executing the rest of the program.
The general structure of an if statement in pseudocode is shown here:
IF(<boolean expression>)
{
    <block of statements>
}
In this structure, the <boolean expression> is any expression that results in a Boolean value. Typically, we use Boolean comparators and operators to construct the statement, along with any variables that are needed. Likewise, the <block of statements> is just like a block of statements inside of a procedure - it consists of one or more statements or lines of code, which can be executed.
To see how an if statement works, let’s go through a couple of code traces in an example program.
Code Tracing Example - False
For this example, consider the following program in pseudocode:
PROCEDURE main()
{
DISPLAY("Enter a number: ")
x <- NUMBER(INPUT())
IF(x = 42)
{
DISPLAY("You found the secret!\n")
}
DISPLAY("Thanks for playing!\n")
}
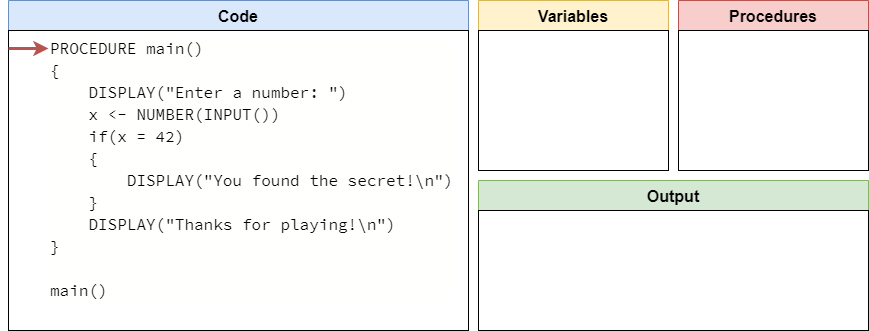
main()Let’s run trace through this program a couple of times to see how an if statement works in pseudocode. As always, we’ll start our code trace as shown below:
Next, we’ll process through the code, finding our main() procedure. At the end, we’ll reach the call for the main() procedure:
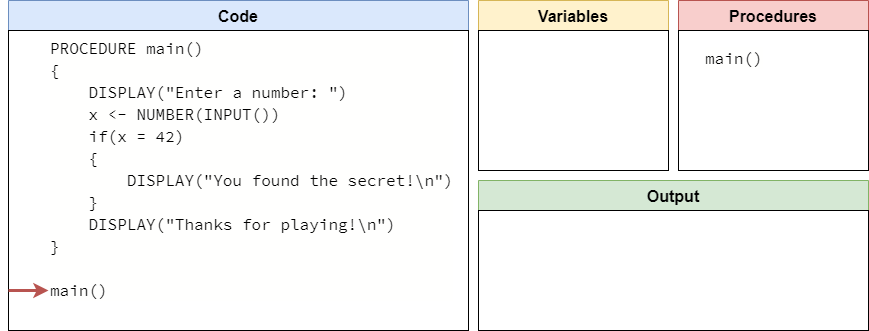
So, we’ll enter the main() procedure here.

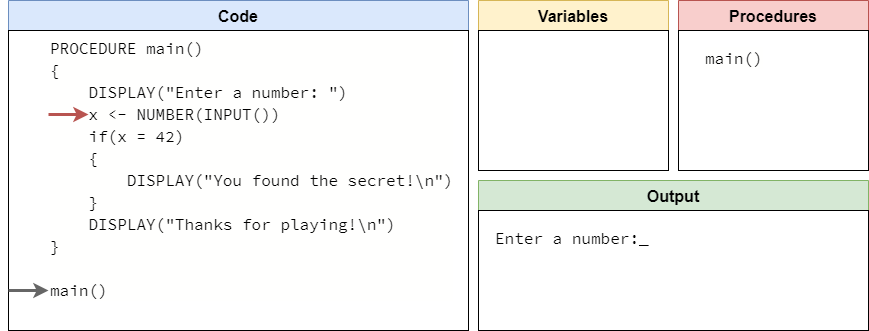
The first line of code will display a prompt to the user:
Then, we’ll read the input from the user and convert it to a number. In this example, let’s assume the user inputs the value "16" at the prompt. So, we’ll store the number value $16$ in the variable x.
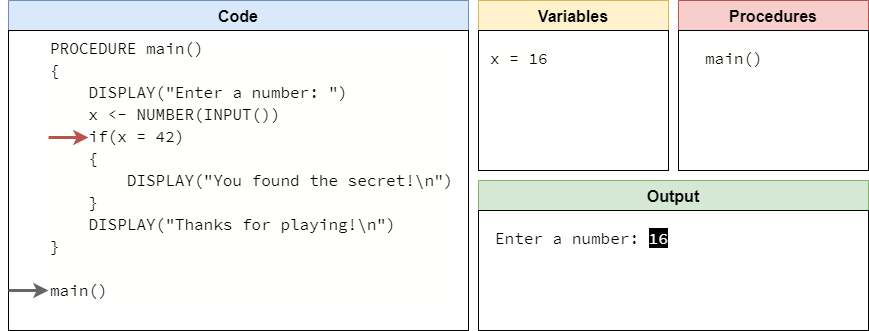
Now we have reached the beginning of the if statement in our code. When we evaluate an if statement, the first thing we need to do is evaluate the Boolean expression inside the parentheses. In this example, we are evaluating the expression x = 42. Since x is $16$, this evaluates to false:
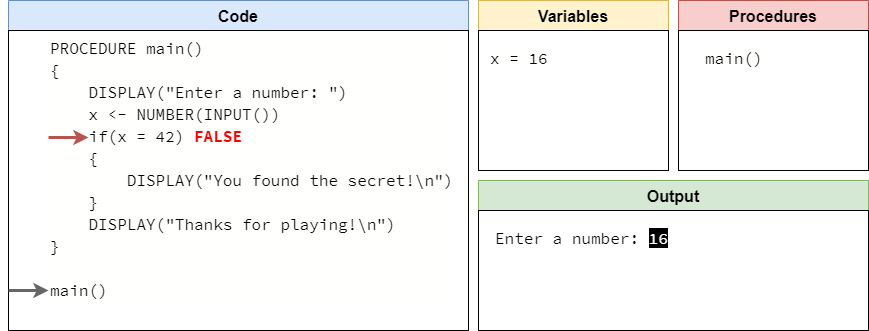
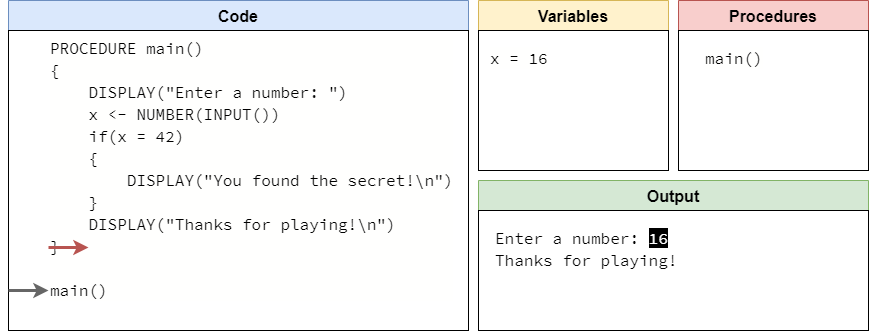
When the Boolean expression is false, we don’t execute the code inside of the if statement’s curly braces {}. So, we’ll just skip to the bottom of the statement, and execute the next line:

This line simply displays a message to the user, and then the program ends:
This entire process is shown in the animation below:

Code Tracing Example - True
Now let’s go back a few steps in the program to the point where it is expecting user input:
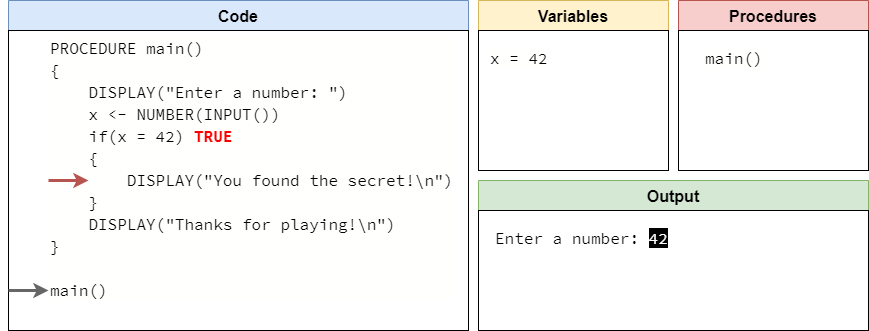
This time, let’s assume the user inputs the value "42" at the prompt. So, that means that the variable x will now store the value $42$ as shown here:

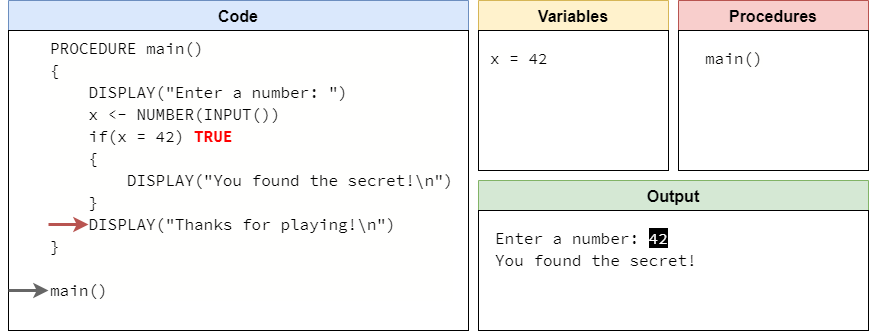
Now, when we reach the beginning of the if statement, we’ll evaluate the expression x = 42 again, but this time the result will be true since x is indeed storing the value $42$:

When the Boolean expression is true in an if statement, we should execute the code inside its curly braces {}. So, we’ll move the arrow down to that line:
This line will print out special output for the user, as shown here:
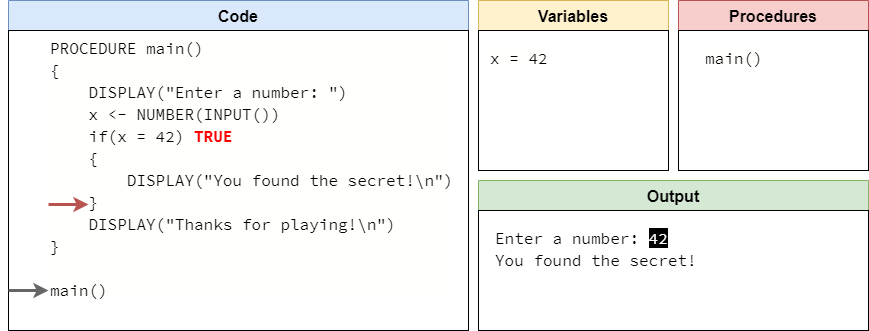
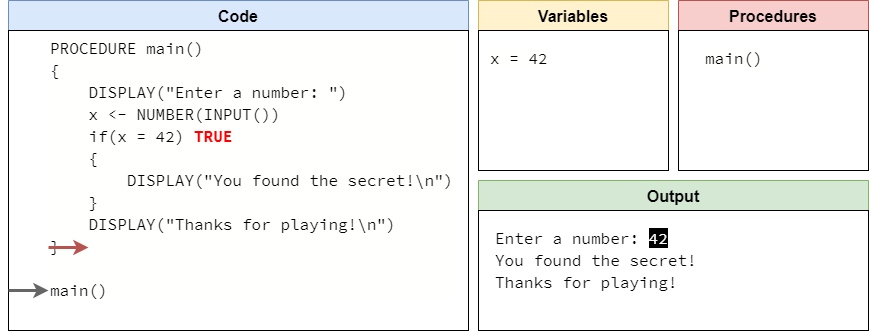
Once we’ve reached the end of the block of statements inside of the if statement, we’ll just continue through the program starting with the next line of code after the if statement:
This line will print a message as well, and then the program will end:
This entire process is shown in the animation below:

As we can see, an if statement is a powerful construct in our program. We can use any variables to create a Boolean expression using comparators and operators, and then we can use that result to make a decision about whether to run a special piece of code or not.
If Statement Flowchart
Another way to visualize an if statement is using a flowchart. Consider the following pseudocode:
x <- NUMBER(INPUT())
IF(x > 0)
{
    DISPLAY(x)
}
DISPLAY("Goodbye")
This pseudocode can also be represented as the flowchart shown below:
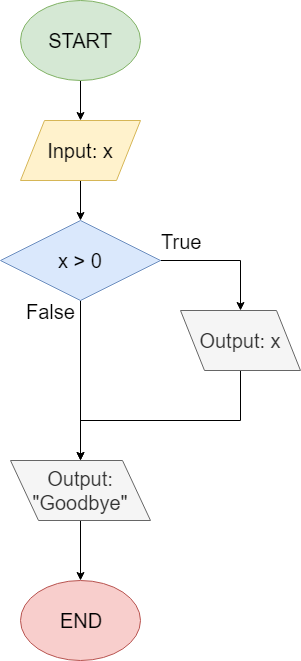
When we read flowcharts like this, we typically go from top to bottom, starting with the circle labeled “START”. The first step is to read input from the user, and store that value in the variable x.
Then, we reach a decision node, which uses a diamond shape. This node asks if the value in the variable x is greater than 0. Notice that there are two lines coming from the decision node: one labeled “True” and another labeled “False”. They correspond to the possible values that can result from evaluating the Boolean expression x > 0. So, if the result of that expression is true, then we’ll follow the path that exits the diamond from the side labeled “True”, and we’ll output the value x to the terminal. Once that is done, we can follow that path around to the next box that will output the string "Goodbye".
If that result is false, then we’ll follow the downward path labeled “False” and skip the path to the side. Instead, we’ll just reach the line that prints "Goodbye" and then end the program.
As we learn how to use if statements in our code, we might find it easier to use flowcharts or other tools to help understand exactly what our program will do. The path that a program takes through a flowchart like this is called the control flow of the program. We’ll discuss that topic a bit more toward the end of this lab.
Subsections of Pseudocode If
Pseudocode If-Else
YouTube VideoResources
Another important type of conditional statement is the if-else statement. In an if-else statement, we can run either one piece of code if the Boolean expression evaluates to true, or another piece of code if it evaluates to false. It will always choose one option or the other, based on the value in the Boolean expression.
The general structure of an if-else statement in pseudocode is shown here:
IF(<boolean expression>)
{
    <block of statements 1>
}
ELSE
{
    <block of statements 2>
}
In this structure, the <boolean expression> is any expression that results in a Boolean value. Typically, we use Boolean comparators and operators to construct the statement, along with any variables that are needed. In an if-else statement, unlike an if statement, we see two blocks of statements. The first block of statements, labeled <block of statements 1>, will only be executed if the <boolean expression> evaluates to true. Similarly, the second block of statements, labeled <block of statements 2>, will only be executed if the <boolean expression> evaluates to false. So, our program is effectively choosing between one block of statements or the other, based on the value in the Boolean expression.
To see how an if-else statement works, let’s go through a couple of code traces in an example program.
Code Tracing Example - True
For this example, consider the following program in pseudocode:
PROCEDURE main()
{
DISPLAY("Enter a number: ")
x <- NUMBER(INPUT())
IF(x MOD 2 = 0)
{
DISPLAY("Your number is even!\n")
}
ELSE
{
DISPLAY("Your number is odd!\n")
}
DISPLAY("Thanks for playing!\n")
}
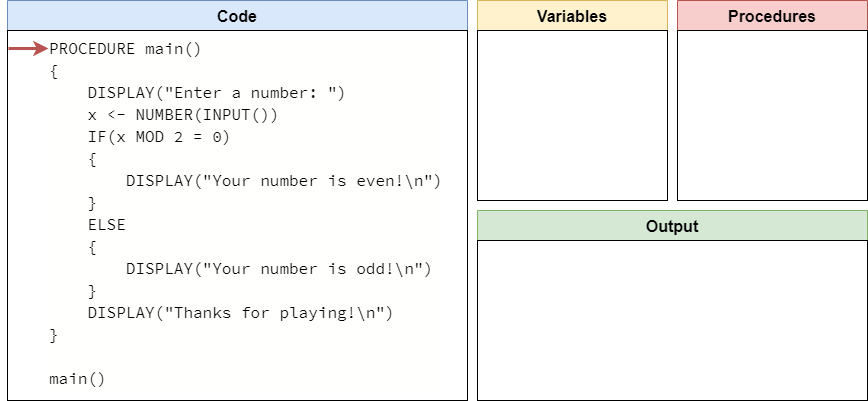
main()This program will accept input from the user, and then determine if the user has input an even or odd number using the modulo operator. Let’s run trace through this program a couple of times to see how an if-else statement works in pseudocode. As always, we’ll start our code trace as shown below:
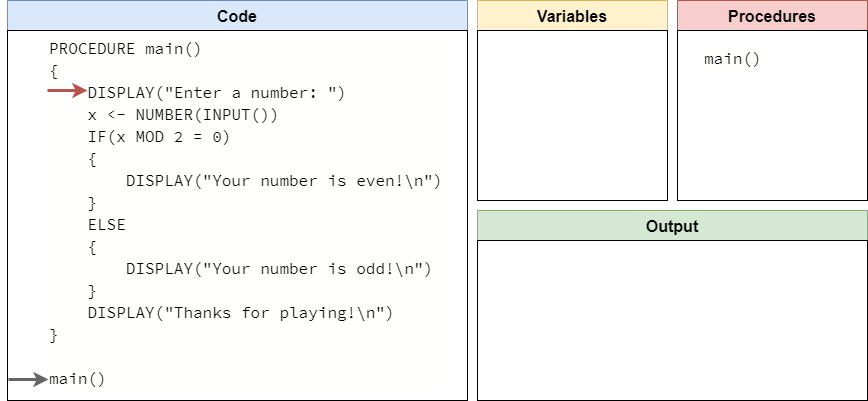
Just like always, our “mental model” of a computer will first skim through the code to find all of the procedures, and then it will reach the call to the main() procedure at the bottom of the code as shown here:

So, we’ll jump inside the main() procedure, and start running the code that is present there:
This first line will simply print a prompt for input to the user, so we’ll add that to the output and move to the next line as shown below:
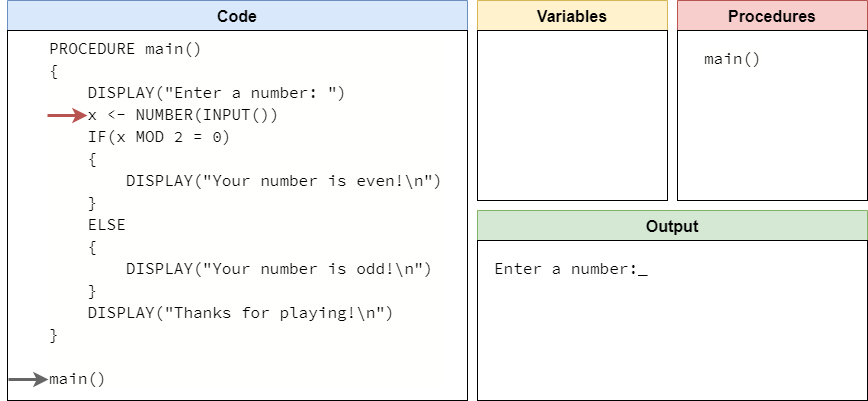
On this line, we’ll read input from the user, convert it to a number, and store it in the variable named x. In this example, let’s assume the user inputs the string "16". In that case, we’ll store the number value $16$ in the variable x as shown in this code trace:

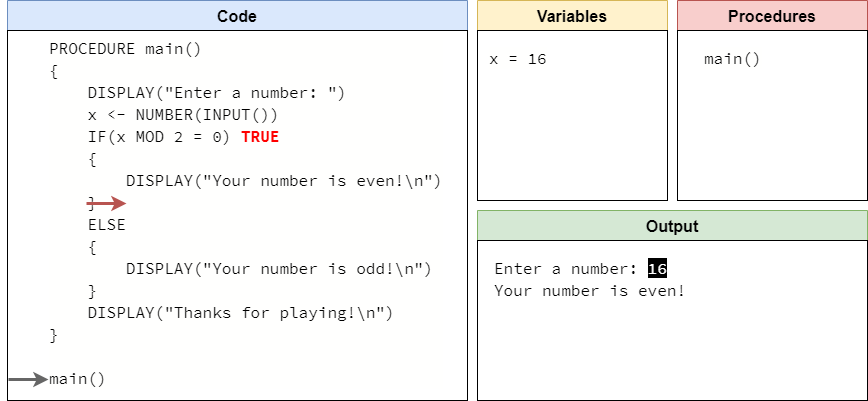
At this point, we’ve reached the first part of our if-else statement. So, the first step is to evaluate the Boolean expression in parentheses and determine if it is either true or false. In this case, our expression is x MOD 2 = 0, so we need to start by evaluating x MOD 2. Recall that the modulo operation will find the remainder of dividing the first number by the second number. Since $2$ goes evenly into $16$ exactly $8$ times, with no remainder, we’ll get the value $0$. So, this expression is really the Boolean expression 0 = 0, which is true:
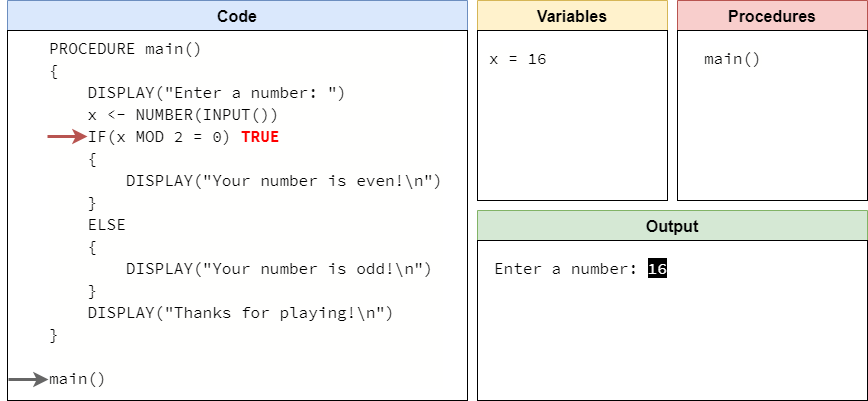
Since the Boolean expression is true, then our program will move to the first block of statements inside the if-else statement, and start executing that code:
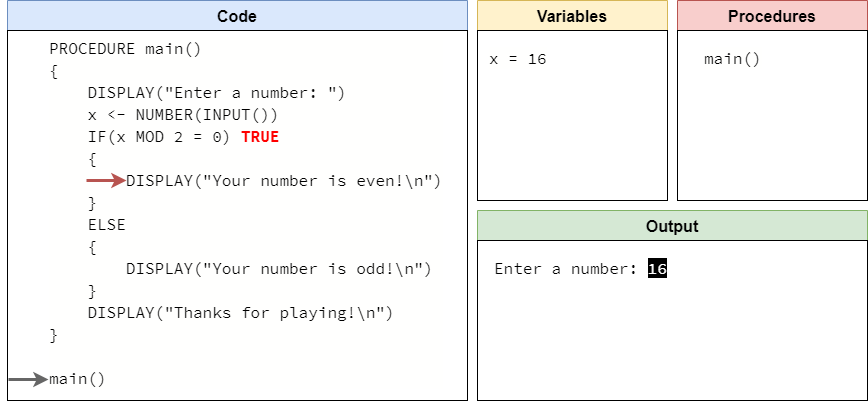
This line will print a message to the user that the number provided as input was even, so we’ll display that in our output:
At this point, we’ve reached the end of that block of statements, so we need to figure out where to go next. Since this is an if-else statement, and the Boolean expression was true, that means we can just skip the second block of statements and go straight down to the first line of code after the if-else statement, as shown here:

This line will print our goodbye message to the user, so we’ll show that in our output and move to the end of the main() procedure:
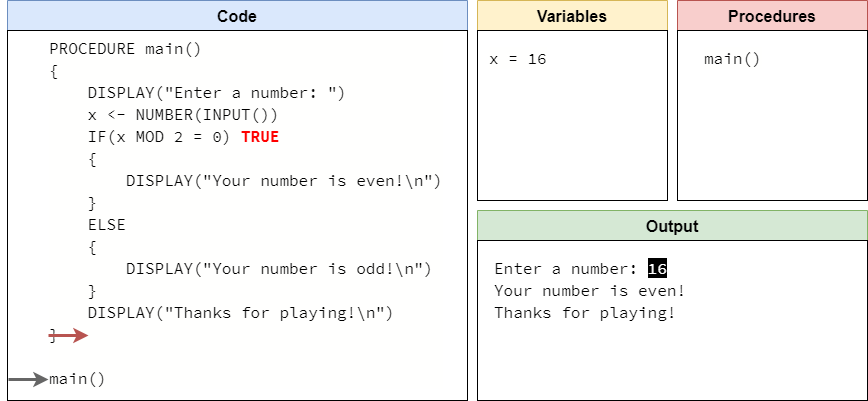
This is the end of that execution of our program. The entire process is shown in the animation below:
Code Tracing Example - False
Once again, let’s go back a few steps in the program to the point where it is expecting user input:
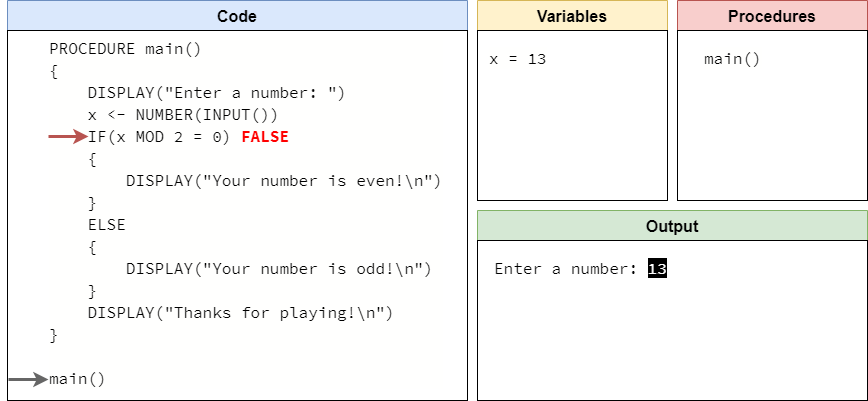
This time, let’s say the user chooses to input the string "13" instead. So, we’ll store the number value $13$ in the variable x as shown in this code trace:
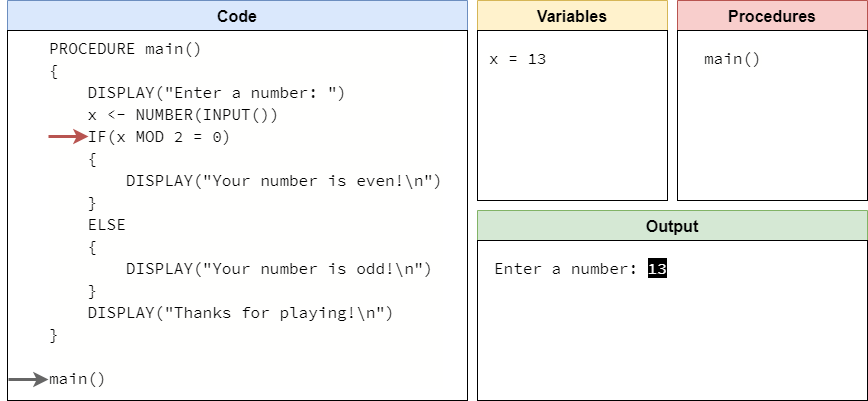
Now we’re back at the start of our if-else statement, but this time when we evaluate the Boolean expression x MOD 2 = 0, we’ll find out that the remainder of dividing $13$ by $2$ is $1$, since $2$ will only go into $13$ a total of $6$ times, for a value of $12$ with $1$ lefover as the remainder. So, since 1 = 0 is is not true, our Boolean expression will evaluate to false:
In this case, our if-else statement will jump down to the second block of statements as shown here:
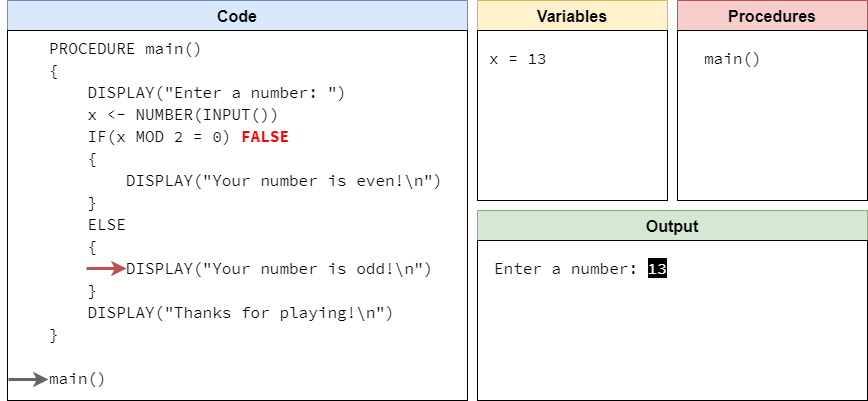
This statement will display output to the user showing that the provided value was odd, as we can see here:
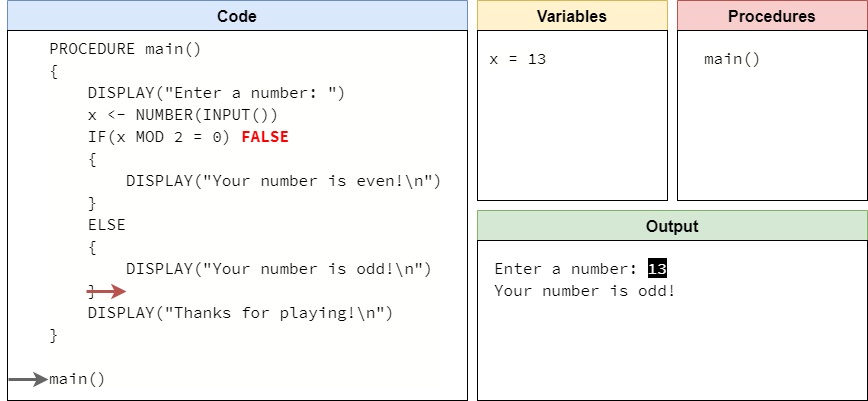
At this point, we’ve reached the end of that block of statements. So, just like when we reached the end of the first block of statements, we can now jump down to the first line of code after the if-else statement:

Once again, this will print our goodbye message to the user:
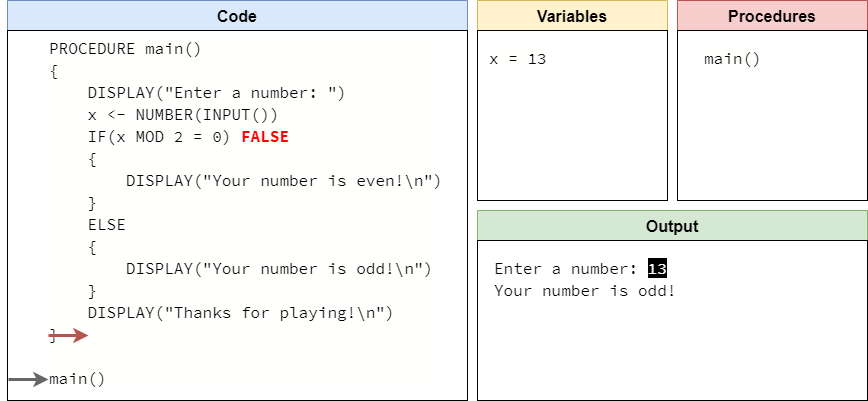
We’ll reach the end of our program here. A full run of this program is shown in the animation below:

If-Else Statement Flowchart
Another way to visualize an if-else statement is using a flowchart. Consider the following pseudocode:
x <- NUMBER(INPUT())
IF(x >= 0)
{
    DISPLAY(x)
}
ELSE
{
    DISPLAY(-1 * x)
}
DISPLAY("Goodbye")
This pseudocode can also be represented as the flowchart shown below:
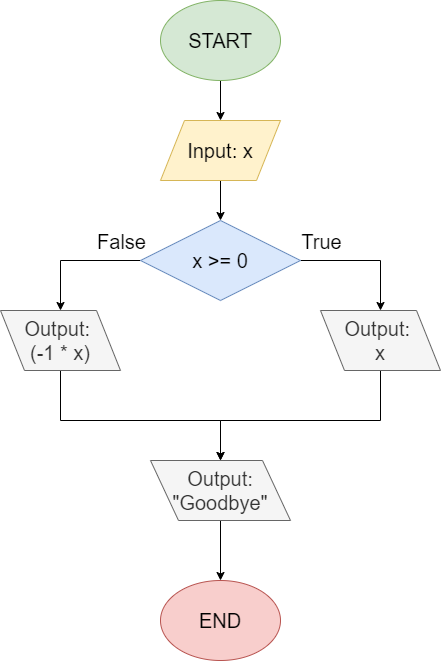
Once again, we start at the top of the flowchart at the circle labeled “START”. From there, we read an input from the user and store it in the variable x. At this point, we reach our if-else statement’s decision node, represented by the diamond. Here, we are using the Boolean expression x >= 0 to determine which branch to follow. So, if the user inputs a positive value, then we’ll follow the path to the right that is labeled “True”, which will simply print the value of x to the screen.
However, if the user inputs a negative value for x, then the Boolean expression will be false and we’ll follow the path to the left labeled “False”. In this branch, we’ll print the value of (-1 * x) to the screen, which simply removes the negative sign from the value in x.
Finally, after each path, we’ll merge back together to run the last piece of code, which prints the "Goodbye" message to the screen.
Notice that there is no way to print both x and -1 * x in the same execution of this program. If we follow the arrows through the flowchart, we see that we can only follow one branch or the other, and not both. This is an important concept to remember when working with if-else statements! The control flow of the program can only pass through one of the two blocks of statements, but not both.
Subsections of Pseudocode If-Else
Pseudocode Testing
YouTube VideoResources
One important concept to understand when writing if statements and if-else statements is the control flow of the program. Before we learned about conditional statements, our programs had a linear control flow - there was exactly one pathway through the program, no matter what. Each time we ran the program, the same code would be executed each time in the same order. However, with the introduction of conditional statements, this is no longer the case.
Because of this, testing our programs becomes much more complicated. We cannot simply test it once or twice, but instead we should plan on testing our programs multiple times to make sure they work exactly the way we want. So, let’s go through some of the various ways we can test our programs that include conditional statements.
Example Program
First, let’s consider this example pseudocode program:
PROCEDURE main()
{
DISPLAY("Enter a number: ")
x <- NUMBER(INPUT())
DISPLAY("Enter another number: ")
y <- NUMBER(INPUT())
IF (x + y > 10)
{
DISPLAY("Branch 1")
}
ELSE
{
DISPLAY("Branch 2")
}
IF (x - y > 10)
{
DISPLAY("Branch 3")
}
ELSE
{
DISPLAY("Branch 4")
}
}
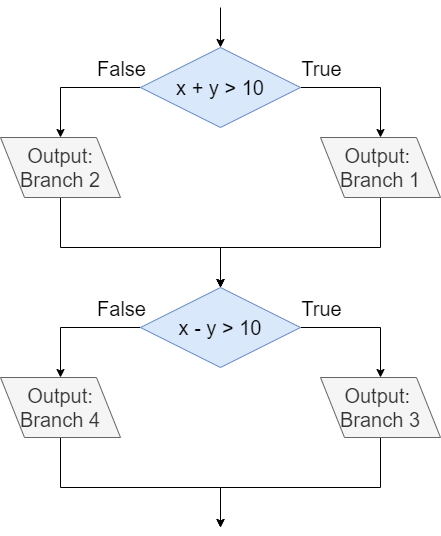
main()We can represent the two if-else statements in this pseudocode in the following flowchart as well:
Branch Coverage
First, let’s consider how we can achieve branch coverage by executing all of the branches in this program. This means that we should test the program using different sets of inputs that will run different branches in the code. Our goal is to execute the code in each branch at least once. In this example, we see that there are four branches, helpfully labeled with the numbers one through four in the DISPLAY() statements included in each branch.
So, let’s start with a simple set of inputs, which will store $6$ in both x and y. Which branches will be executed in this case? Before reading ahead, see if you can work through the code above and determine which branches are executed?
In the first if-else statement, we’ll see the x + y is equal to $12$, which is greater than $10$, making that Boolean statement true. So, we’ll execute the code in branch 1 this time through. When we reach the second if-else statement, we’ll compute the value of x - y to be $0$, which is less than $10$. In this case, that makes the Boolean statement false, so we’ll execute branch 4. Therefore, by providing the inputs 6 and 6, we’ve executed the code in branches 1 and 4.
So, can we think of a second set of inputs that will execute the code in branches 2 and 3? That can be a bit tricky - we want to come up with a set of numbers that add to a value less than $10$, but with a difference that is greater than $10$. However, we can easily do this using negative numbers! So, let’s assume that the user inputs $6$ for x and $-6$ for y. When we reach the first if-else statement, we can compute the result of x + y, which is $0$. That is less than $10$, so the Boolean statement is false and we’ll execute the code in branch 2. So far, so good!
Next, we’ll reach the second if-else statement. Here, we’ll compute the result of x - y. This time, we know that $6 - -6$ is actually $12$, which is greater than $10$. So, since that Boolean expression is true, we’ll run the code in branch 3. That’s exactly what we wanted!
Therefore, if we want to test this program and try to execute all the branches, we only have to provide two pairs of inputs:
- $6$ and $6$
- $6$ and $-6$
However, that’s only one way we can test our program. There are many other methods we can follow!
Path Coverage
A more thorough way to test our programs is to achieve path coverage. In this method, our goal is to execute all possible paths through the program. This means that we want to execute every possible ordering of branches! So, since our program has 4 branches in two different if-else statements, the possible orderings of branches are listed below:
- Branch 1 -> Branch 3
- Branch 1 -> Branch 4
- Branch 2 -> Branch 3
- Branch 2 -> Branch 4
As we can see, there are twice as many paths as there are branches in this case! We’ve already covered ordering 2 and 3 from this list, so let’s see if we can find inputs that will cover the other two orderings.
First, we want to find a set of inputs that will execute branch 1 followed by branch 3. So, we’ll need two numbers that add to a value greater than 10, but their difference is also greater than 10. So, let’s try the value $12$ for x and $0$ for y. In that case, their sum is greater than $10$, so we’ll execute branch 1 in the first if-else statement. When we reach the second if-else statement, we can evaluate x - y and find that it is also $12$, which is greater than $10$ and we’ll execute branch 3. So, we’ve covered the first ordering!
The last ordering can be done in a similar way - we need a pair of inputs with a sum less than $10$ and also a difference less than $10$. A simple anwer would be to input $4$ for both x and y. In this case, their sum is $8$ and their difference is $0$, so we’ll end up executing branch 2 of the first if-else statement, and branch 4 of the second if-else statement. So, that covers the last ordering.
As we can see, path coverage will also include branch coverage, but it is a bit more difficult to achieve. If we want to cover all possible paths, we should test our program with these 4 sets of inputs now:
- $6$ and $6$
- $6$ and $-6$
- $12$ and $0$
- $4$ and $4$
There’s still one more way we can test our program, so let’s try that out as well.
Edge Cases
Finally, we should also use a set of inputs that test the “edges” of the Boolean expressions used in each if-else statement. An edge is a value that is usually the smallest or largest value before the Boolean expression’s output would change. So, an edge case is simply a set of input values that are specifically created to be edges for the Boolean expressions in our code.
For example, let’s look at the first Boolean logic statement, x + y > 10. If we are simply considering whole numbers, then the possible edge cases for this Boolean expression are when the sum of x + y is exactly $10$ and $11$. When it is $10$ or below, the result of the Boolean expression is false, but when the result is $11$ or higher, then the Boolean expression is true. So, $10$ and $11$ represent the edge between true values and false values. The same applies to the Boolean expression in the second if-else statement.
So, to truly test the edge cases in this example, we should come up with a set of values with the sum and difference of exactly $10$ and exactly $11$. For the first one, a very easy solution would be to set x to $10$ and y to $0$. In this case, both the sum and the difference is $10$, so we’re on the false side of the edge. Our program will correctly execute branches 2 and 4.
For the other edge, we can use a similar set of inputs where x is $11$ and y is still $0$. In this case, both the sum and difference is $11$, so each Boolean expression will evaluate to true and we’ll execute branches 1 and 3.
Why is this important? To understand that, we must think a bit about what was intended by this program. What if the program should execute branches 1 and 3 if the value is greater than or equal to $10$? In that case, both of our chosen edge cases should execute branches 1 and 3, but instead we saw that the edge case $10$ executed branches 2 and 4 instead. This is a simple logic error that happens all the time in programming - we simply forgot to use the greater than or equal to symbol >= instead of the simple greater than symbol > in our code. So, a minor typo like that can change the entire execution of our program, and we wouldn’t have noticed it in any of our previous tests. This is why it is important to test the edge cases along with other inputs.
In fact, it would probably be a good idea to add a third edge case, where the sum and difference equal $9$, just to be safe. That way, we can clearly see the difference between true and false values in this program.
So, the final set of values we may want to test this program with are listed below:
- $6$ and $6$ (branch coverage 1 and 4)
- $6$ and $-6$ (branch coverage 2 and 3)
- $12$ and $0$ (path coverage 1 and 3)
- $4$ and $4$ (path coverage 2 and 4)
- $9$ and $0$ (edge case 2 and 4)
- $10$ and $0$ (edge case 2 and 4)
- $11$ and $0$ (edge case 1 and 3)
As we can see, even a simple program with just a few lines of code can require substantial testing to really be sure it works correctly! This doesn’t even include other types of testing, where we make sure it works properly with invalid input values, decimal numbers, and other situations. That type of testing is really outside of the scope of this lab, but we’ll learn more about some of those topics later in this course.
Subsections of Pseudocode Testing
Python If
YouTube VideoResources
Boolean expressions in Python can be used in a variety of ways. One of the most important things we can do with a Boolean expression is affect the control flow of our program using a conditional statement.
Recall that a conditional statement is a type of statement that allows us to choose to run different pieces of code based on the value given in a Boolean expression. The simplest conditional statement is the if statement.
In an if statement, we include a Boolean expression and a block of statements. If the Boolean expression evaluates to True, then we execute the code in the block of statements. If it is False, then we skip the block and continue with the rest of the program.
The structure of an if statement in Python is shown below:
if <boolean expression>:
    <block of statements>
In this structure, we still have a <boolean expression> that is evaluated. However, instead of it being in parentheses like in pseudocode, in Python those parentheses are not required. After the Boolean expression is a colon :, just like at the end of a function definition.
Then, the <block of statements> is included below the if statement’s first line, and it must be indented one level. Again, this is very similar to the structure of a function definition in Python. In Python, the <block of statements> must include at least one line of code, otherwise Python won’t be able to understand it.
Let’s go through a couple of code tracing examples in Python Tutor to see how an if statement works in code.
Code Tracing Example - False
Consider this program in Python:
def main():
    x = int(input("Enter a number: "))
    if x == 7:
        print("That's a lucky number!")
    print("Thanks for playing!")


main()
We can run that code in Python Tutor by clicking this Python Tutor link. At first, our window should look something like this:
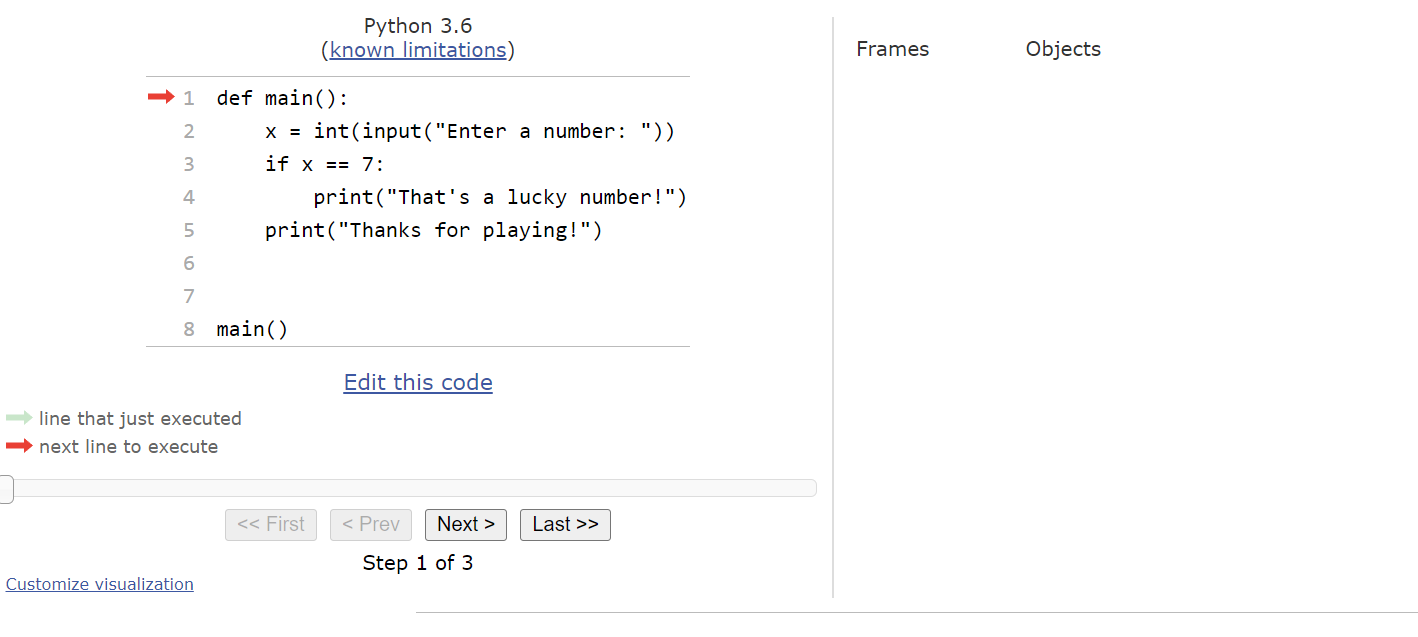
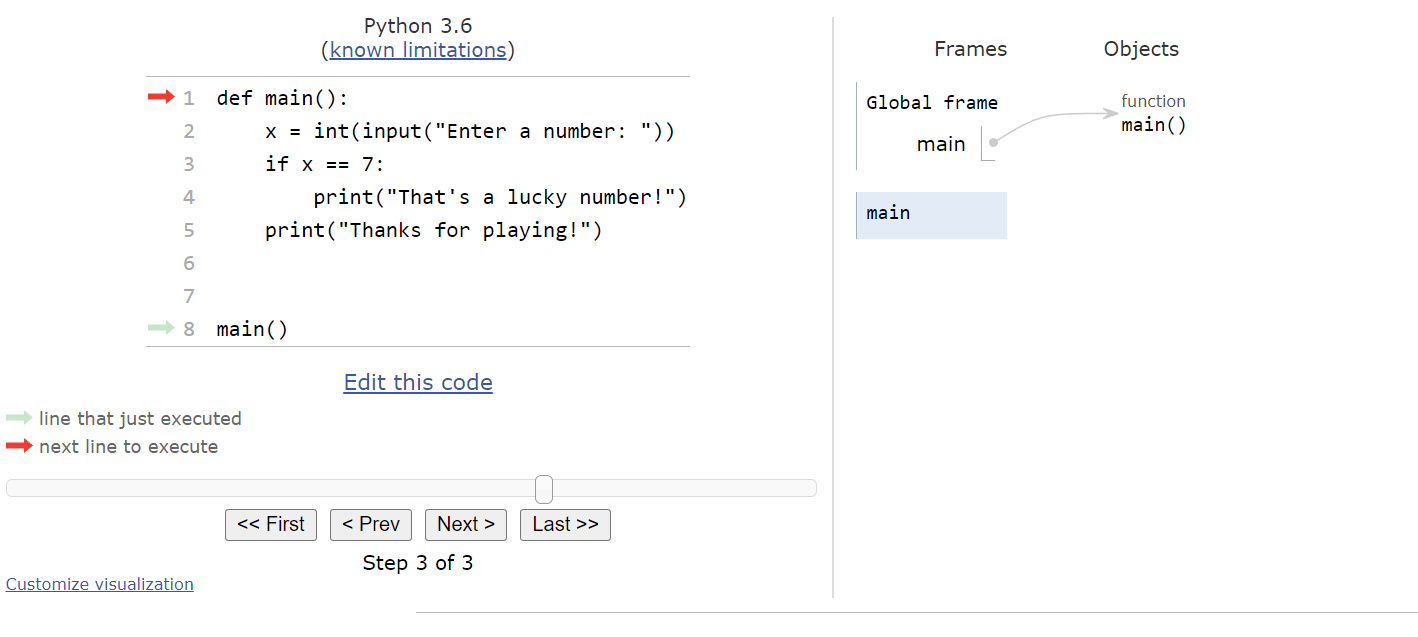
When we step through the program, the first thing it will do is record the main() function in the objects list, as shown here:
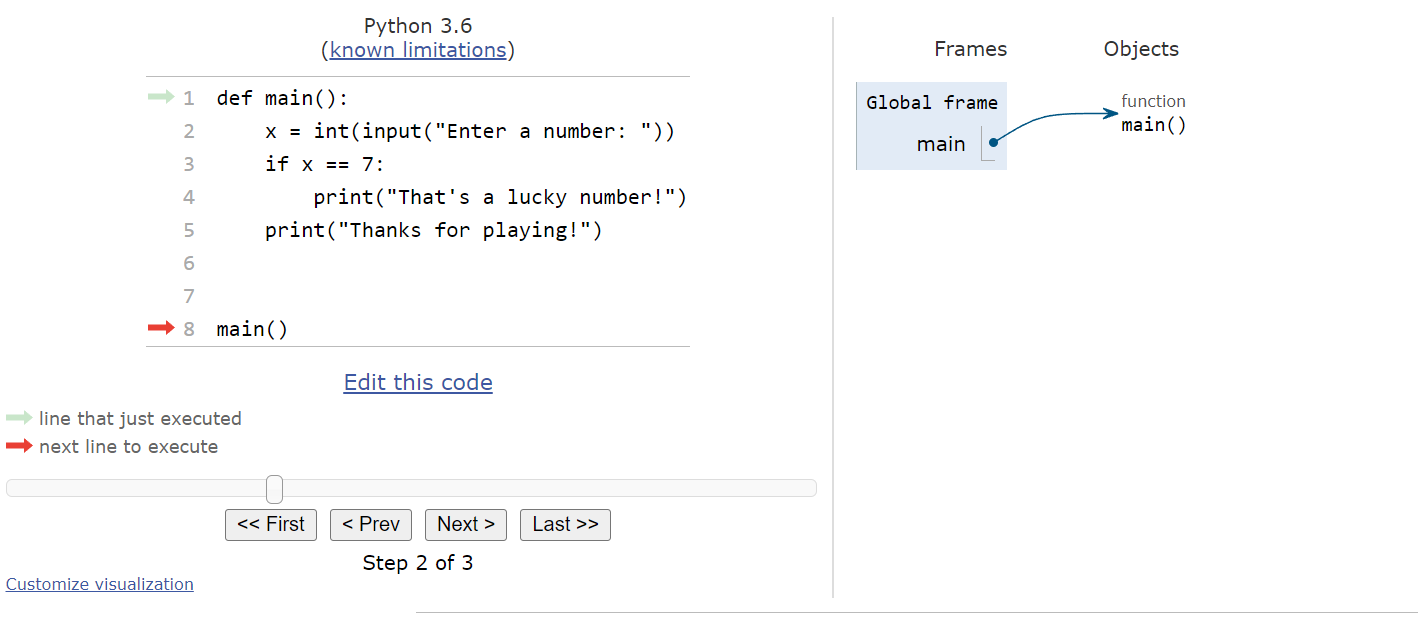
Then, we’ll reach the call to the main() function, so Python Tutor will jump to that function and create a frame for all the variables needed:
The next line of code will ask the user to input a number, so Python Tutor will show an input box at the bottom of the window:
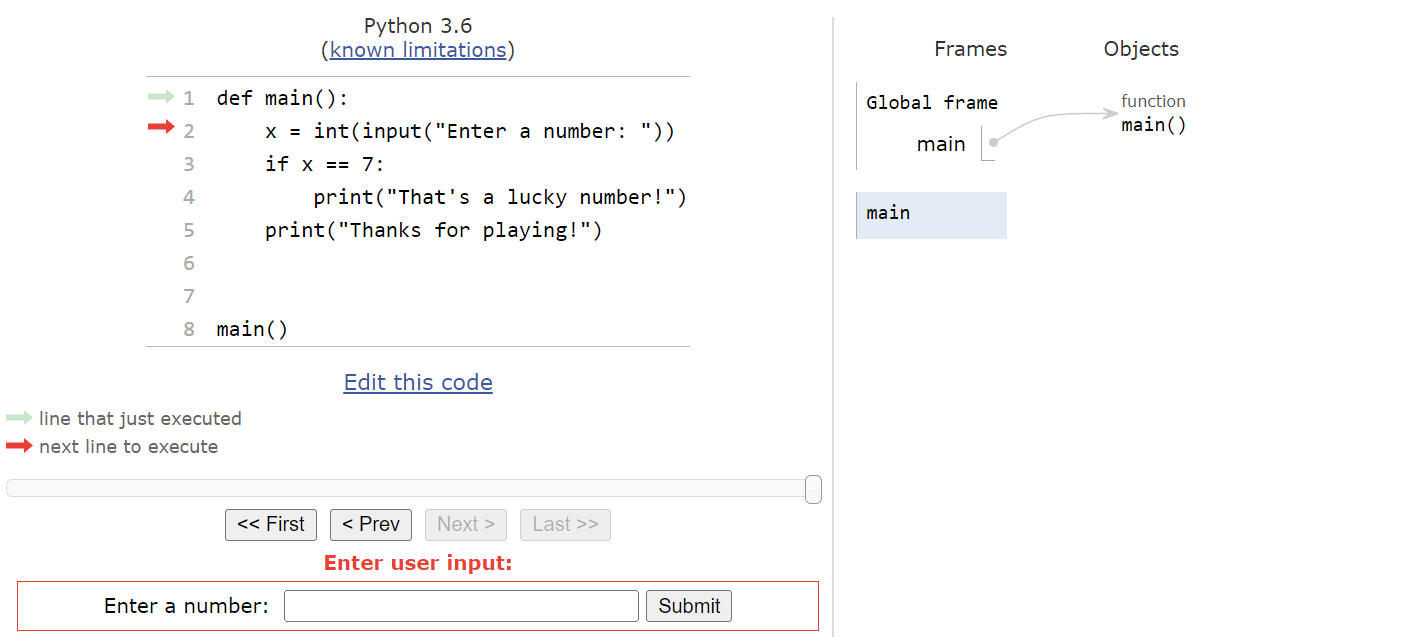
For this first time through the program, let’s assume the user inputs the string "42" as input. So, when we click Submit, we’ll see the integer value $42$ stored in the variable x in the main frame:

At this point, we’ve reached the if statement. The first step is to evaluate the Boolean expression x == 7. Since x is actually storing the value $42$, this statement will evaluate to False. So, when we click the Next button on the state below:

We’ll see that the program arrow jumps past the block of statements in the if statement. So, the next line will simply print the goodbye message:
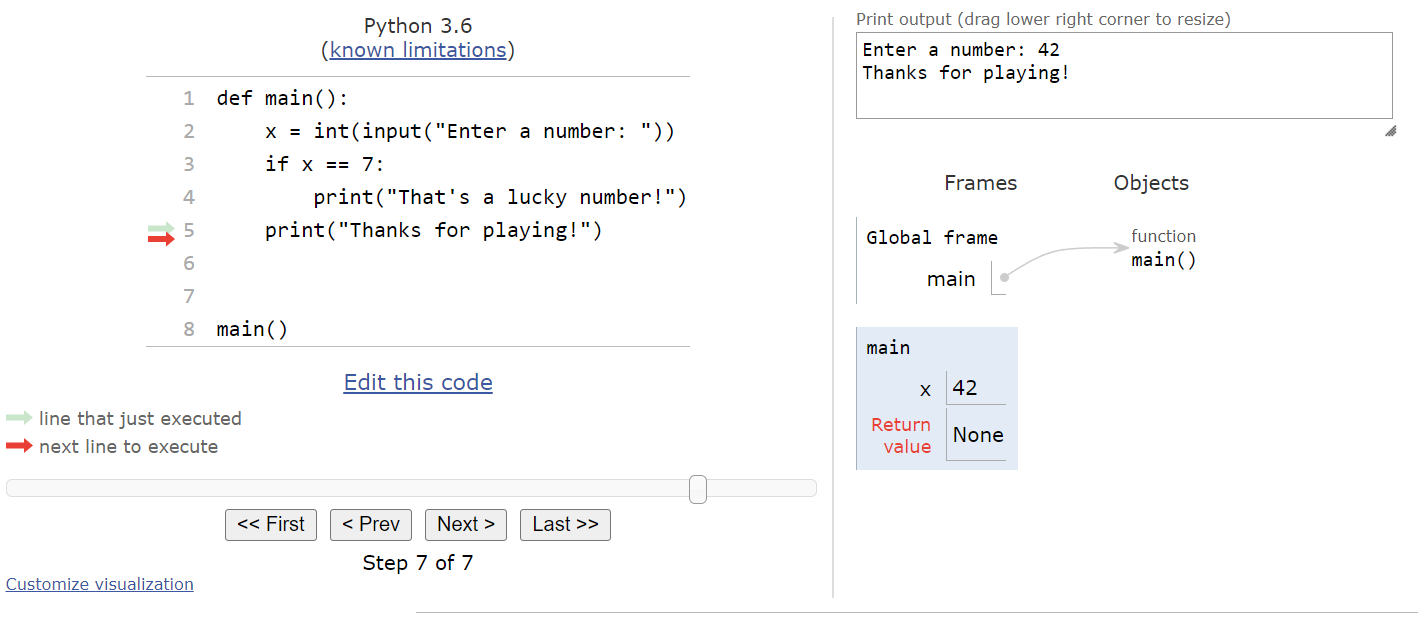
Finally, the main() function will return, and we’ll end the program:
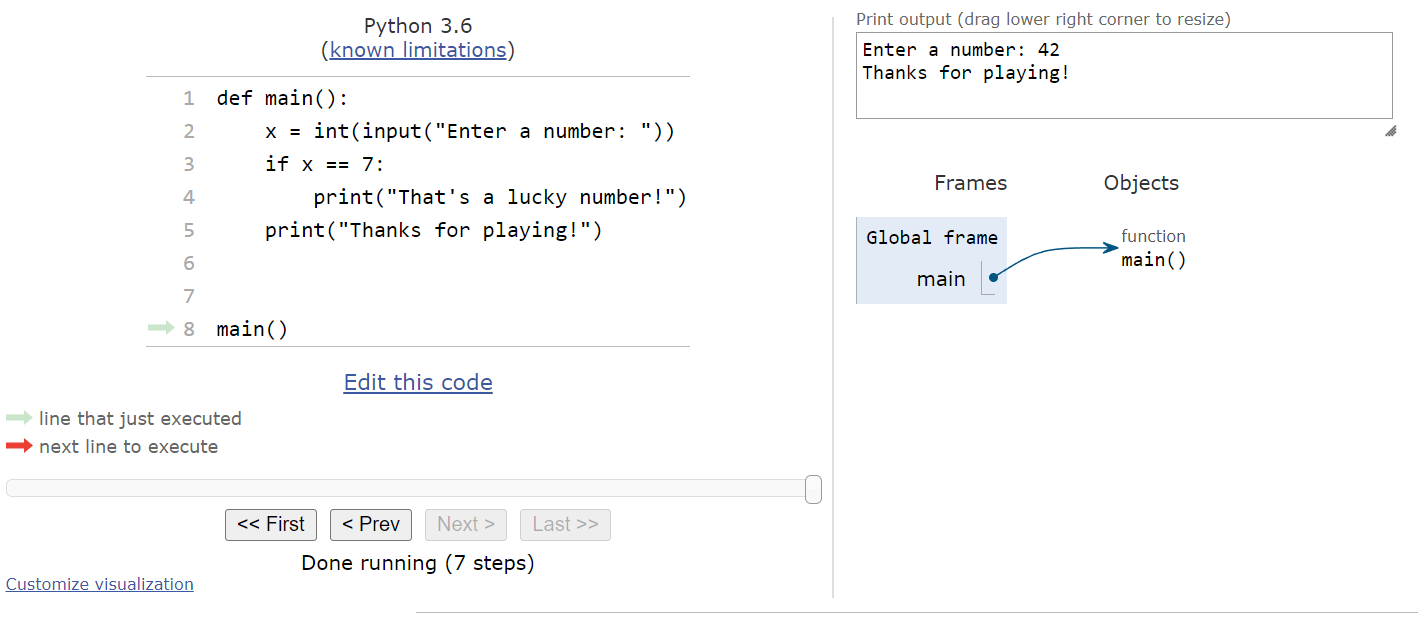
The entire process is shown in the animation below:

As we can see, when the Boolean expression evaluates to False, we’ll just skip the block of statements inside of the if statement. This is the same result that we observed when we were working in pseudocode.
Code Tracing Example - True
Now let’s see what happens when the Boolean expression evaluates to True instead. To see that, we can go back to the point where our program is asking for input, as shown below:
This time, we’ll assume the user inputs the string "7" as input. So, when we click Submit, we’ll see the integer value $7$ stored in the variable x in the main frame:

This time, when we reach the if statement, we’ll see that the Boolean expression x == 7 will evaluate to True. So, when we click the Next button, we’ll be taken to the block of statements inside of the if statement:
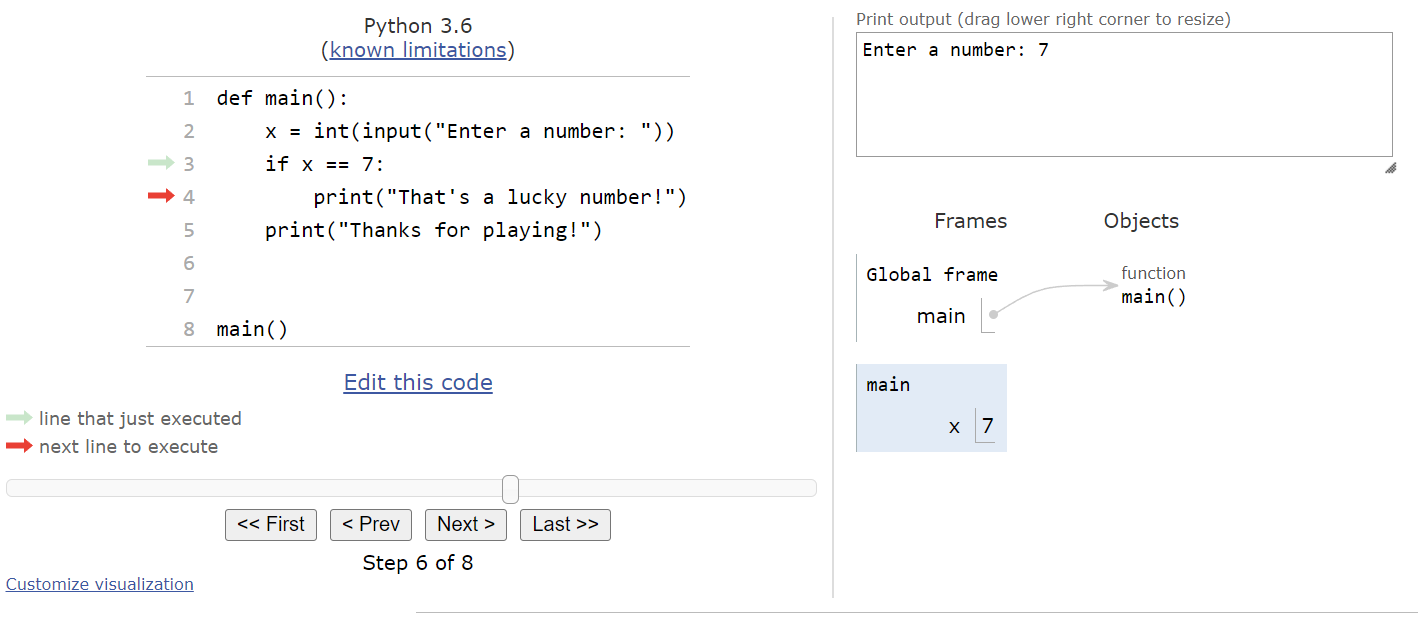
Here, we’ll print the special message for finding a lucky number:

Then, we’ll print the program’s goodbye message:
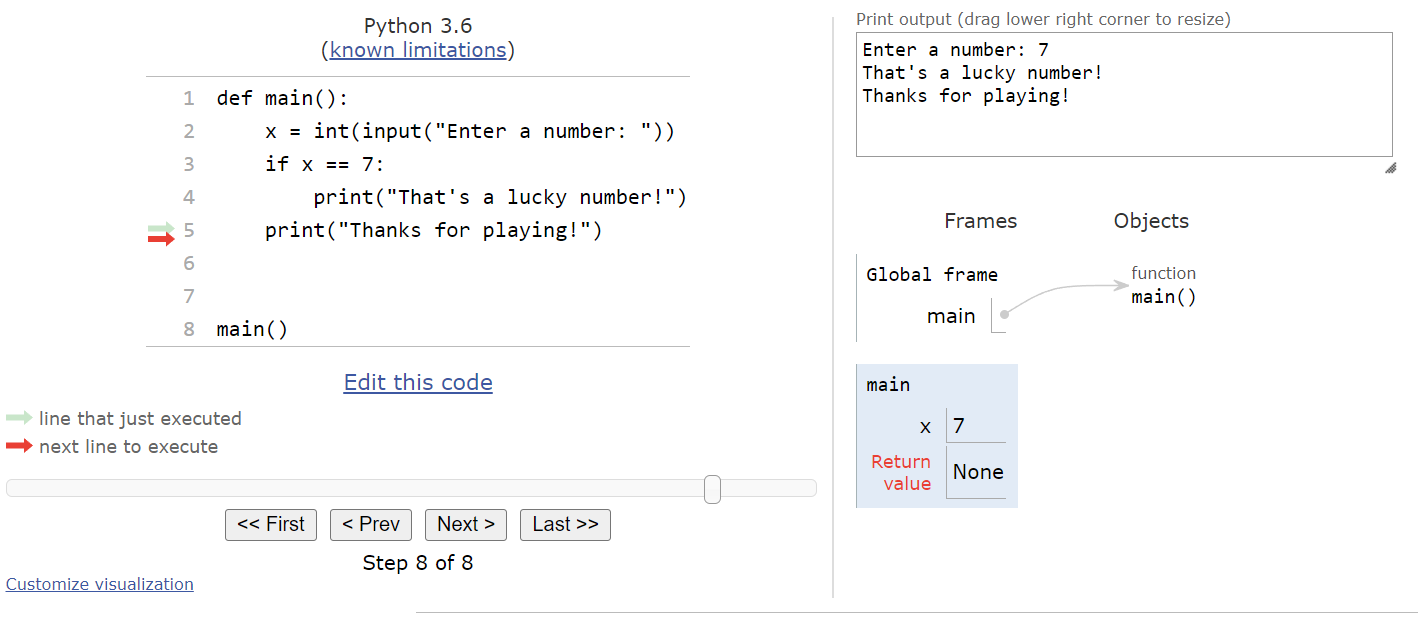
And finally we’ll reach the end of the main() function, so it will return and we’ll be at the end of the program:
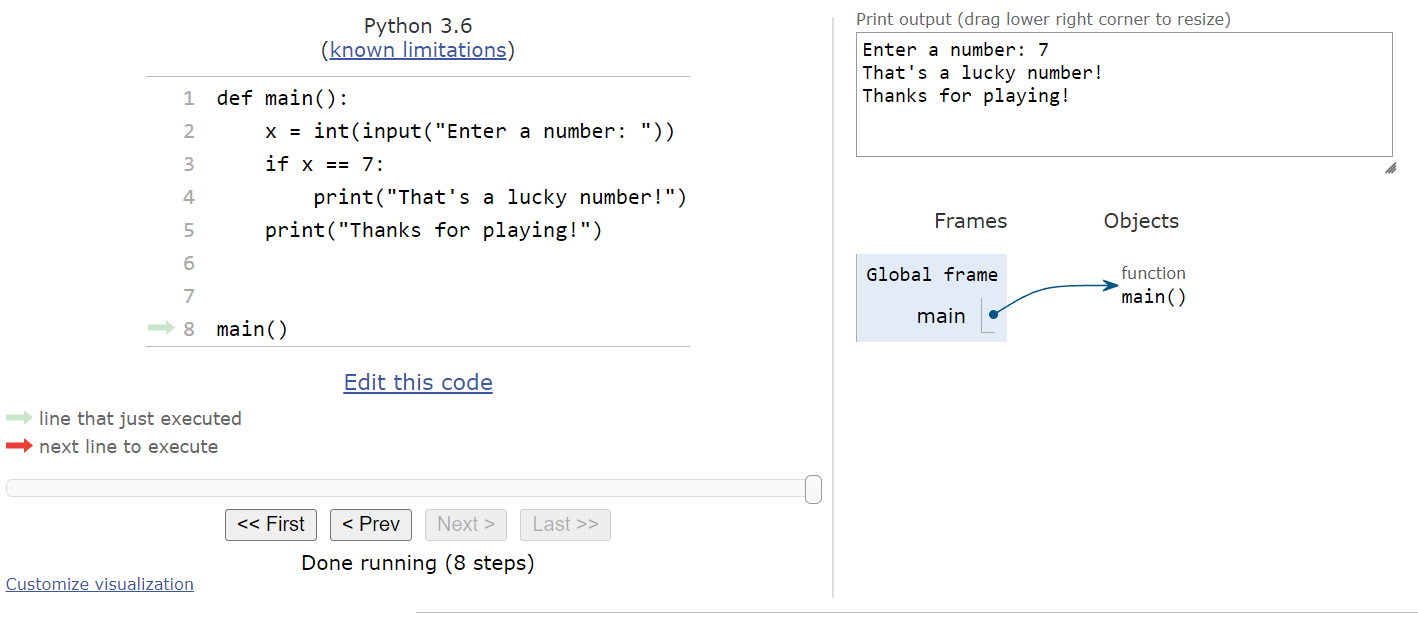
The entire process can be seen in this animation:
So, when the Boolean expression evaluates to True, we’ll run the code inside the if statement. If it is False, then we’ll just skip past the if statement and continue with the rest of our program.
Subsections of Python If
Python If-Else
YouTube VideoResources
Python also supports another kind of conditional statement, the if-else statement. Just like in pseudocode, an if-else statement contains a single Boolean expression, but two blocks of code. If the Boolean expression evaluates to True, then one block of statements is executed. If it is False, then the other block will be executed.
The general structure of an if-else statement in Python is shown below:
if <boolean expression>:
    <block of statements 1>
else:
    <block of statements 2>
Notice that the else keyword is followed by a colon, just like the first line of the if-else statement. As we’d expect, the first block of statements is executed if the <boolean expression> portion is True and the second block is executed if it is False.
Once again, let’s go through a couple of code traces using Python Tutor to explore how an if-else statement works in Python.
Code Tracing Example - True
Here’s a simple Python program that contains an if-else statement:
def main():
    x = int(input("Enter a number: "))
    if x >= 0:
        print("Your number is positive!")
    else:
        print("Your number is negative")
    print("Thanks for playing!")


main()
This program accepts an input from the user, converts it to an integer, and then determines if the integer is a positive or negative number. Let’s go through this program a couple of times in Python tutor to see how it works. As always, you can click this Python Tutor link:
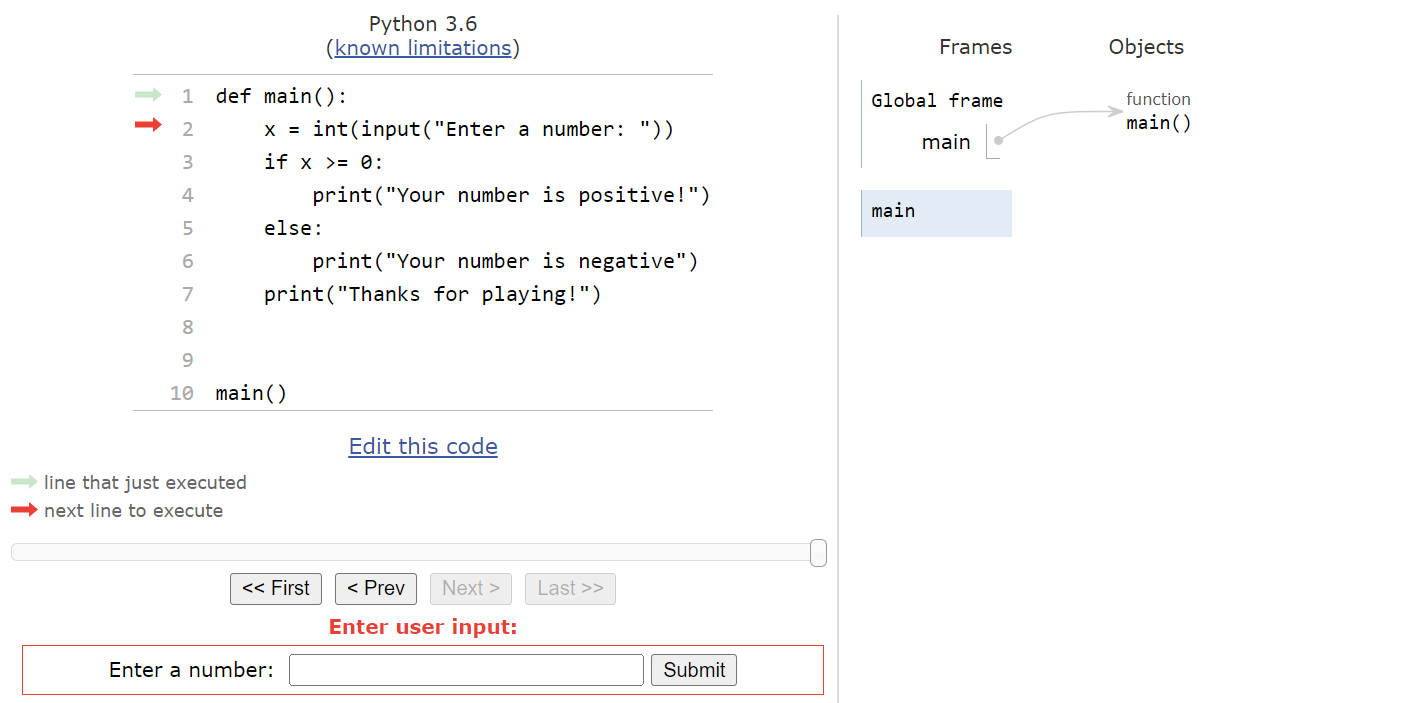
We’ll start with the usual default state:

Like always, Python will find the main() function and add it to the objects list. Then, it will call the main() function, and we’ll be presented with an input prompt as shown here:
Let’s assume that the user inputs the string "5" here. That means that the integer value $5$ will be stored in the variable named x:
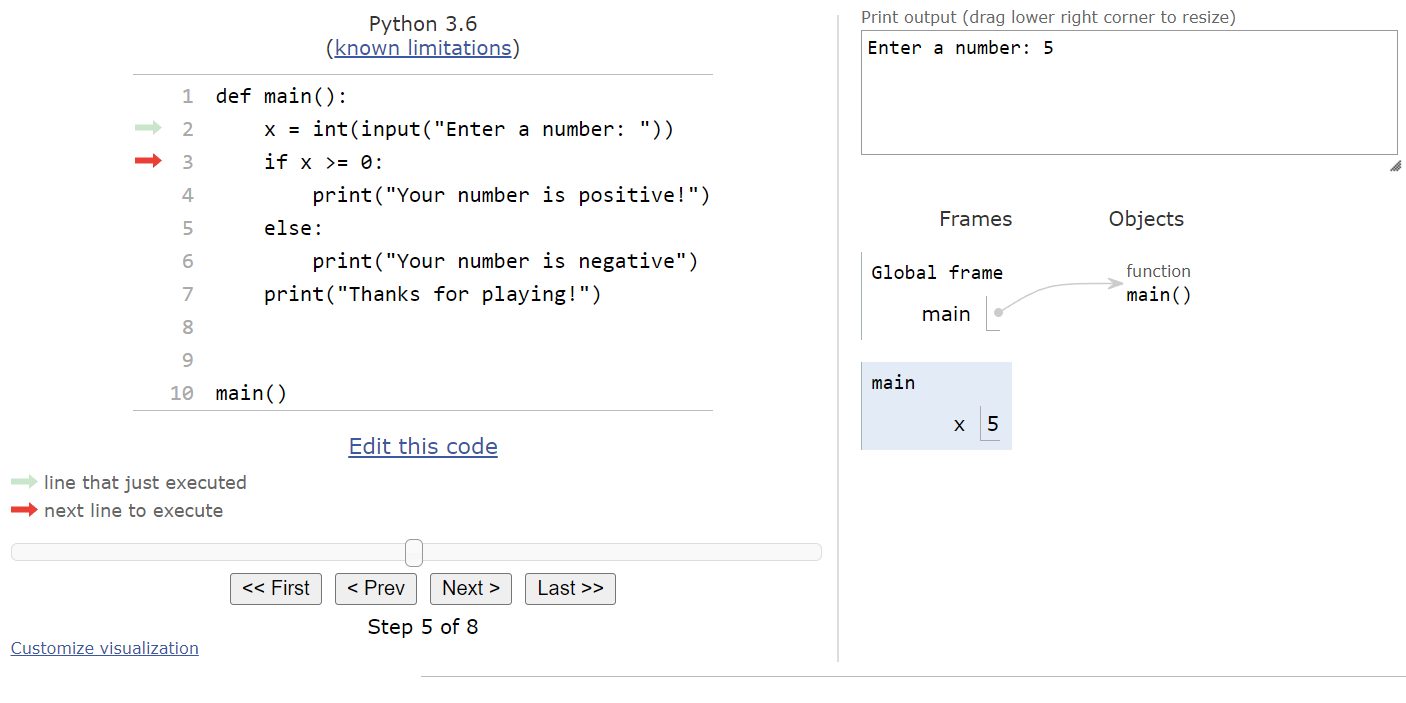
Now we’ve reached the if-else statement. So, we’ll need to evaluate the Boolean expression x >= 0. Since x is currently storing the value $5$, this expression will evaluate to True. Therefore, we’ll move into the first block of statements in the if-else statement:

From here, we’ll print the message that the user’s input was a positive number, as well as the goodbye message at the end of the program. It will entirely skip the second block of statements in the if-else statement, as we can see here:
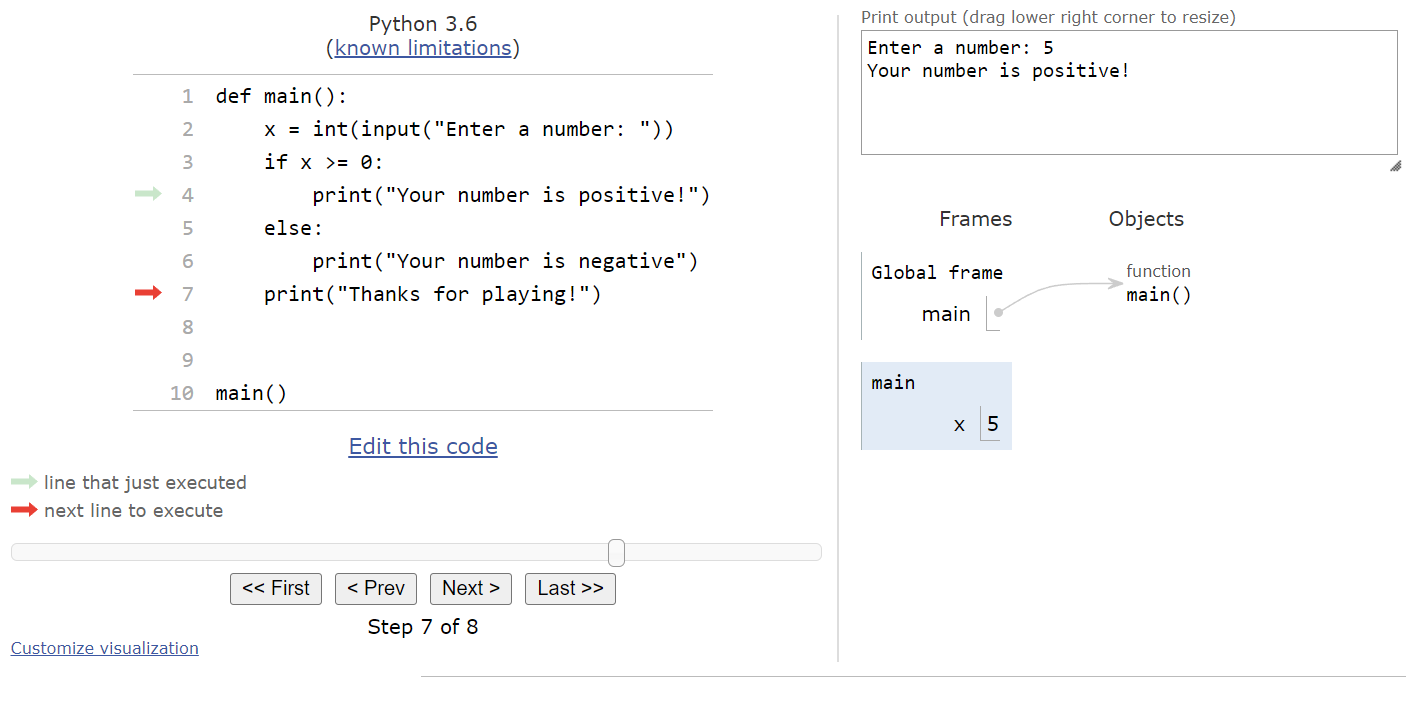
A full execution of this program is shown in the animation below:

Code Tracing Example - False
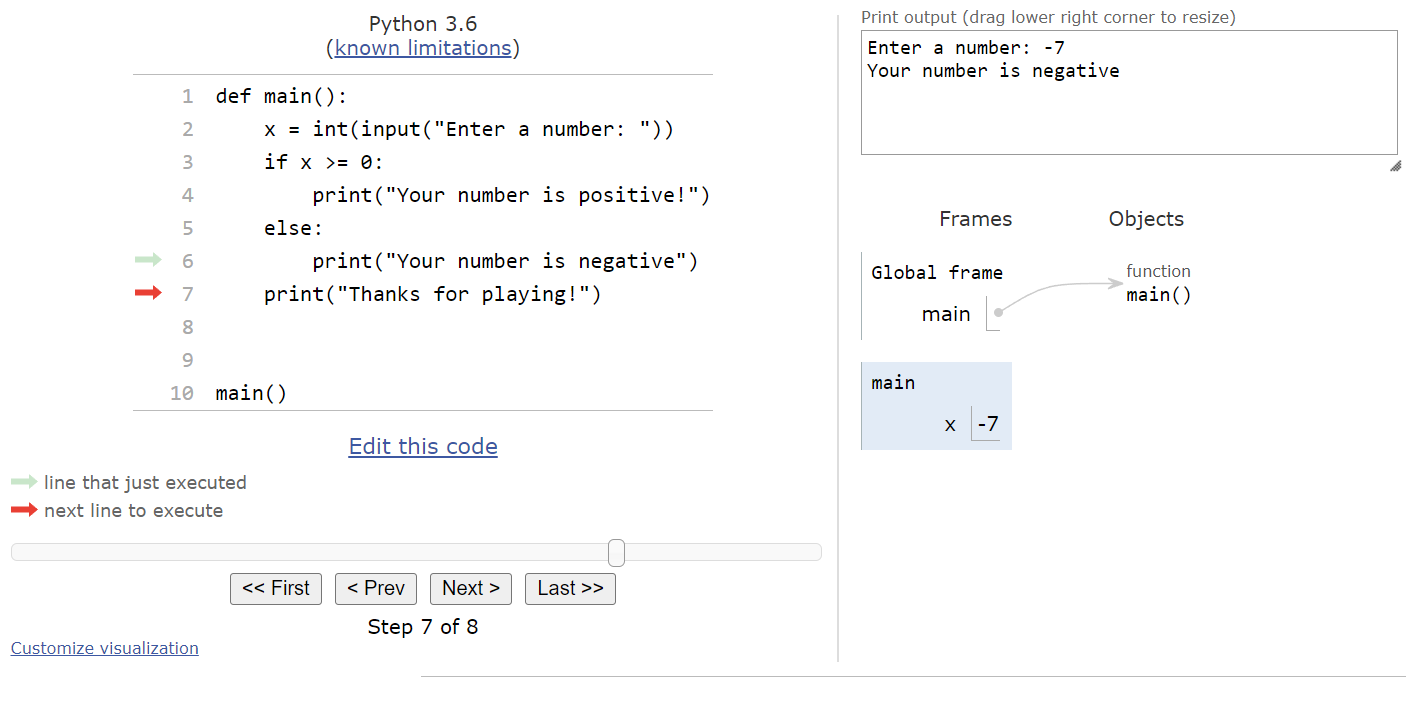
What if the user inputs a negative value, such as $-7$? In that case, we’ll be at this state in our program:

From here, we’ll evaluate the Boolean expression x >= 0 again. This time, however, we’ll see that it evaluates to False, so we’ll jump down to the second block of statements inside the if-else statement:

This will print a message to the user that the input was a negative number, and then it will print the goodbye message. We completely skipped the first block of statements:
A complete run through this program is shown in this animation:
So, as we expect, an if-else statement allows us to run one block of statements or the other, based on the value of the Boolean expression. It is a very powerful piece of code, and it allows us to write programs that perform different actions based on the input provided by the user or the values of other variables.
note-1
Python also includes another keyword elif that is used to chain together multiple if-else statements. We’ll cover that topic in a future lab. For now, we won’t need it to complete any of this lab’s activities.
Subsections of Python If-Else
Python Testing
YouTube VideoResources
Previously, we saw how important it was to consider many possible test inputs when testing a program that contains a conditional statement. Let’s go through one more example, this time in Python, to get some more practice with creating test inputs for conditional statements.
Example Program
For this example, let’s consider the following program in Python:
def main():
    a = int(input("Enter a number: "))
    b = int(input("Enter a number: "))
    if a // b >= 5:
        # Branch 1
        print("{} goes into {} at least 5 times".format(b, a))
    else:
        # Branch 2
        print("{} is less than 5 times {}".format(a, b))
    if a % b == 0:
        # Branch 3
        print("{} evenly divides {}".format(b, a))
    else:
        # Branch 4
        print("{} / {} has a remainder".format(a, b))


main()
This program is a bit trickier to evaluate. First, it accepts two numbers as input. Then, it will check to see if the first number is at least 5 times the second number. It will print an appropriate message in either case. Then, it will check to see if the first number is evenly divided by the second number, and once again it will print a message in either case.
Branch Coverage
To achieve branch coverage, we need to come up with a set of inputs that will cause each print statement to be executed. Thankfully, the branches are numbered using comments in the Python code, so it is easy to keep track of them.
Let’s start with an easy input - we’ll set a to $25$ and b to $5$. This means that a // b is equal to $5$, so we’ll go into branch 1 in the first if statement. The second if statement will go into branch 3, since a % b is exactly $0$ because $5$ stored in b will evenly divide the $25$ stored in a without any remainder. So, we’ve covered branches 1 and 3 with this input.
For another input, we can choose $21$ for a and $5$ for b. In the first if statement, we’ll see that a // b is now $4$, so we’ll go into branch 2 instead. Likewise, in the second if statement we’ll execute branch 4, since a % b is equal to $1$ with these inputs. That means we’ve covered branches 2 and 4 with these inputs.
Therefore, we can achieve branch coverage with just two inputs:
- $25$ and $5$
- $21$ and $5$
Path Coverage
Recall that there are four paths through a program that consists of two if statements in a row:
- Branch 1 -> Branch 3
- Branch 1 -> Branch 4
- Branch 2 -> Branch 3
- Branch 2 -> Branch 4
We’ve already covered the first and last of these paths, so we must simply find inputs for the other two.
One input we can try is $31$ and $5$. In the first if statement, we’ll go to branch 1 since a // b will be $6$ this time. However, when we get to the second if statement, we’ll find that there is a remainder of $1$ after computing a % b, so we’ll go to branch 4 instead. This covers the second path.
The third path can be covered by inputs $20$ and $5$. In the first if statement, we’ll go to branch 2 because a // b is now $4$, but we’ll end up in branch 3 in the second if statement since a % b is exactly 0.
Therefore, we can achieve path coverage with these four inputs:
- $25$ and $5$
- $21$ and $5$
- $31$ and $5$
- $20$ and $5$
Edge Cases
What about edge cases? For the first if statement, we see the statement a // b >= 5, so that clues us into the fact that we’ll probably want to try values that result in the numbers $4$, $5$, and $6$ for this statement. Thankfully, if we look at the inputs we’ve already tried, we can see that this is already covered! By being a bit deliberate with the inputs we’ve been choosing, we can not only achieve branch and path coverage, but we can also choose values that test the edge cases for various Boolean expressions as well.
Likewise, the Boolean statement in the second if statement is a % b == 0, so we’ll want to try situations where a % b is exactly $0$, and when it is some other value. Once again, we’ve already covered both of these instances in our sample inputs!
So, with a bit of thinking ahead, we can come up with a set of just 4 inputs that not only achieve full path and branch coverage, but also properly test the various edge cases that are present in the program!
Subsections of Python Testing
Summary
In this lab, we covered several major important topics. Let’s quickly review them.
Pseudocode Conditional Statements
- if statement
IF(<boolean expression>)
{
    <block of statements>
}- if-else statement
IF(<boolean expression>)
{
    <block of statements 1>
}
ELSE
{
    <block of statements 2>
}
Python Conditional Statements
- if statement
if <boolean expression>:
<block of statements>- if-else statement
if <boolean expression>:
    <block of statements 1>
else:
    <block of statements 2>
Testing
- Branch Coverage - all possible branches are executed at least once
- Path Coverage - all possible paths through branches are executed at least once
- Edge Cases - values that are near the point where Boolean expressions go from
falsetotrue