Subsections of Full Stack Web Application
Introduction
This is a brief guide to building a framework for a full-stack web application from scratch.
Features
- Express.js Backend
- React Frontend
- Can easily substitute Vue or other frontends
- Postgres Database
- Can easily substitue MySQL or other databases
- Full Docker Setup for Development
- You don’t have to install Node or a database locally - it all runs in Docker!
- Docker Deployment
- GitHub Actions
What this is: this guide will give you the steps to build the framework, including links to associated resources and tutorials. Basically, it will show you what to do.
What this is not: this guide is not an exhaustive explanation of why or how to do these steps. It also doesn’t cover how to build a web application once you have this framework set up. So, you may have to do some extra reading to really understand what is going on and match this framework to your needs.
Conventions
Some brief conventions in this guide:
- Code blocks will include a comment at the top giving the filename where the code is placed or the terminal where the commands should be executed.
- Be careful copy/pasting code - you may have to modify code or commands to match your environment!
FAQ
- Can I download this framework somewhere? Yes, it is on GitHub. However, the value in this framework is really going through the work of building it yourself so you understand what it contains and how it works. Then, once you’ve built it yourself once, you can reuse your own version and tweak it as needed.
Setup
Prerequisites
The basic environment required for this setup:
- A Linux/Unix system
- Ubuntu/Debian is preferred. Mac OS X (Darwin) should also work.
- Docker Desktop
- Visual Studio Code
- Git and GitHub
This guide will use the following environment:
Optional
To match the environment seen in the screenshots/videos, you can install these optional items:
Other Systems
This guide should generally work for developing on both Ubuntu/Debian Linux systems as well as Mac OS X systems. Some modifications will need to be made, but in general you want to have Visual Studio Code, Docker Desktop, and Git installed.
Likewise, deployment will mostly use GitHub actions but I will also include information for using GitLab runners.
Helpful Resources
Initialize
Create Repository
Start by creating a new GitHub repository. We’ll let it initialize the repository using a README file, and also select the .gitignore file for a Node project.
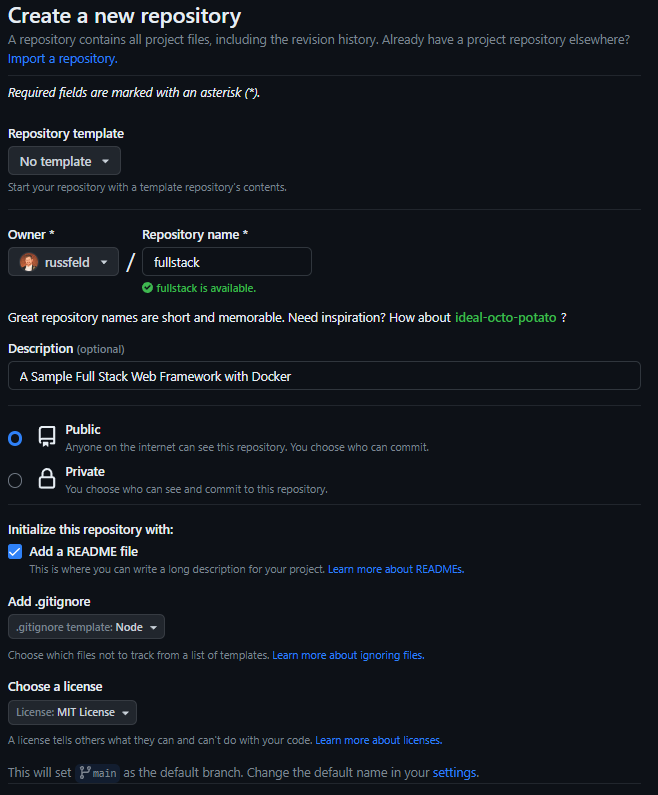
If you’ve already created the repository, you can get the .gitignore file for Node projects from GitHub’s gitignore repository
Check out Repository
Next, check out the repository:
# Terminal
git clone git@github.com:russfeld/fullstack.git
cd fullstack
code .
Tip
Change the repository URL to match your repository!
This should open the repository in Visual Studio Code.
Create the File Structure
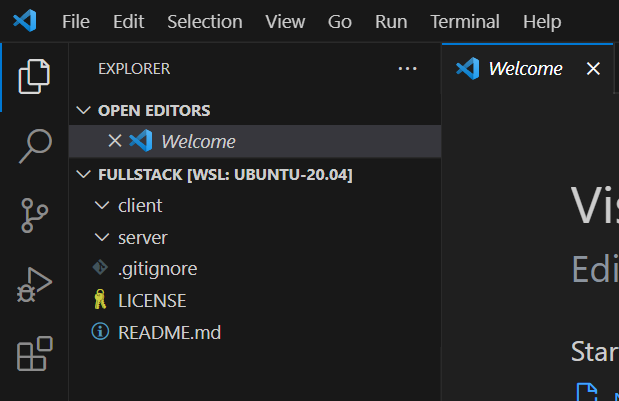
Create the following folders within your project:
These folders will store the frontend and backend applications, respectively.
At this point, you should have the following structure:
Note
If you aren’t using GitHub, you can simply create the directory structure shown above manually or modify your existing project to match.
Docker
Note
If you have already created projects locally, skip down to the Remove Node Modules section below. You can Dockerize existing projects as well!
Get Effective IDs
First, we need to make a note of our effective user ID and group ID in the terminal:
You should get output that begins with something similar to this:
uid=1000(youboon2) gid=1000(youboon2)
Remember those two numbers for later!
Create Projects
To create the projects themselves, we’re going to use a one-off Docker command to run a container.
# Terminal
docker run --rm -it --user=1000:1000 -v `pwd`/:/app node:18 bash
Tip
Modify the command above to match your IDs found earlier. See below for details. Make sure you run this command in the root directory of your project!
In this command:
docker run will start a container to run a command. The container is removed when the command is finished.--rm will remove the container when it is finished-it will provide an interactive terminal--user=1000:1000 will set the user and group IDs to 1000, respectively - match these to the output you received above.-v `pwd`/:/app</code> will create a volume mount between the current directory and the /app directory in the container.
- Backticks around a command in the terminal will use the result of that command in the outer command. You could instead enter the full path to the current directory as part of the command, as in
-v /home/user/projects/fullstack:/app/code.
- See Docker Volumes for more details.
node:18 is the name of the Docker image to run.
- Refer to Node on DockerHub for other image versions. At the time of writing, Node 18 is the current LTS version.
bash will load the Bash terminal inside of the container
Refer to the Docker run documentation for more details.
Once we have run that command, we should get a terminal inside of the container:

To create the projects, we are going to use Express Application Generator and Create React App. You can refer to those pages for additional options that you can use when creating these projects.
# Docker Container Terminal
npx express-generator -v ejs /app/server
npx create-react-app /app/client
Note
This guide uses React, but you could easily use Vue or another frontend framework here. Just make sure it is placed in the /app/client directory inside of the container.
Once we are done, we can exit the container:
# Docker Container Terminal
exit
This will stop the container and remove it.
Remove Node Modules
Finally, we want to remove the node_modules folders from both the client and server folders. These are created when the project is first initialized, but we don’t want them outside of our actual containers. So, DELETE both node_modules folders!
Now let’s configure Docker to allow us to load both projects in separate Docker containers.
Create a docker-compose.yml file in the root directory of the project with the following content:
# docker-compose.yml
services:

  # server
  project-server:
    build:
      # location of Dockerfile
      context: ./server
    container_name: project-server
    # set the user ID to match our user
    user: "1000"
    networks:
      - project-network
      # allow external connections (remove this in production)
      - default
    volumes:
      # mount code into container
      - ./server:/app/server
      # maintain existing node_modules in container
      - /app/server/node_modules

  # client
  project-client:
    build:
      # location of Dockerfile
      context: ./client
    container_name: project-client
    # set the user ID to match our user
    user: "1000"
    depends_on:
      # requires server to start
      - project-server
    networks:
      - project-network
      # allow external connections
      - default
    volumes:
      # mount code into container
      - ./client:/app/client
      # maintain existing node_modules in container
      - /app/client/node_modules

networks:
  # internal Docker network for project
  project-network:
    name: project-network
    internal: true
Refer to Docker Compose File Reference for what this does.
Tip
Update user: "1000" in each of these files to match the user ID found earlier.
We’ll also need to add a Dockerfile to each project:
# client/Dockerfile
# For running in development mode only
FROM node:18
USER 1000
WORKDIR /app/client
COPY --chown=1000:1000 package*.json ./
RUN npm install
EXPOSE 3000
CMD ["npm", "start"]
# server/Dockerfile
# For running in development mode only
FROM node:18
USER 1000
WORKDIR /app/server
COPY --chown=1000:1000 package*.json ./
RUN npm install
EXPOSE 3000
CMD ["npm", "run", "dev"]
Refer to Dockerfile Reference for the structure of these files.
Tip
Update user: "1000" and --chown=1000:1000 in each of these files to match the user ID and group ID found earlier.
Finally, we can start and run the Docker containers using Docker Compose:
# Terminal
docker compose up -d
Refer to the Docker Compose CLI Reference for how to use Docker Compose commands.
It will take a bit to build and configure both containers, but eventually the command should finish. This will be faster in the future. You can confirm they are running using the docker ps command.

To stop the containers when you are done, use
# Terminal
docker compose down
Commit
This is a great place to stop and commit your work to GitHub.
Working with Docker
Now that the project is running in Docker, let’s review some helpful commands we can use to interact with the Docker containers.
Docker Status
Query running container status
Sample output:
CONTAINER ID   IMAGE                      COMMAND                  CREATED         STATUS         PORTS      NAMES
119d2cc1ae20   fullstack-project-client   "docker-entrypoint.s…"   2 minutes ago   Up 2 minutes   3000/tcp   project-client
b5c0853fa8b2   fullstack-project-server   "docker-entrypoint.s…"   2 minutes ago   Up 2 minutes              project-server
Software Output
You can view the output of programs running in a container using this command:
# Terminal
docker logs project-client
Replace project-client with the name of the container to query.
If you want to monitor the logs for new output, add the -f flag:
# Terminal
docker logs -f project-client
When following the logs, use CTRL + C to exit.
Terminal
To get an interactive terminal inside of the container, use this command:
# Terminal
docker exec -it project-client bash
Replace project-client with the name of the container to run the command in.
The command bash will get you an interactive terminal running Bash. You can replace bash with another command to run that command inside of the container itself. This allows you to run comands inside of the contaniner while it is running. However, your app will also be running, so you will be limited in what you can do.
Run Commands
Alternatively, you can run some commands inside of a container using Docker compose:
#Terminal
docker compose run --rm project-client npm run test
This will create a new temporary container to run the command, so be aware that there may be some side effects of doing so.
Cleanup
Finally, Docker provides a handy command to cleanup any unused Docker resources on your system to conserve space:
# Terminal
docker system prune
This removes all unused containers, images, networks, and more. However, it will not remove any data volumes by default, but you can add the --volumes option to do just that.
Reference
Docker Command Line Reference
Nodemon
At this point we probably want to install the Nodemon tool in our backend.
Install Nodemon
First, we’ll get a terminal inside of the container
# Terminal
docker exec -it project-server bash
Then we can use the usual process to install Nodemon using npm. Make sure this is done inside of the /app/server directory:
# Docker project-server Terminal
npm install nodemon
Once Nodemon is installed, we can close the terminal connected to the container using the exit command.
Tip
This same basic process can be used to install any library using npm inside of the container.
Update Dockerfile
To use Nodemon inside of our container, we need to update the scripts section of the package.json file for the server:
/* server/package.json */
{
  /* other contents */
  "scripts": {
    "dev": "nodemon ./bin/www",
    "start": "NODE_ENV=production node ./bin/www"
  },
  /* other contents */
}
This adds a new dev command that uses Nodemon to run the server in development mode, and also changes the start command to run the server in production mode.
We also need to update the CMD entry in the server’s Dockerfile to use the new dev command:
# server/Dockerfile
# For running in development mode only
FROM node:18
WORKDIR /app/server
COPY package*.json ./
RUN npm install
EXPOSE 3000
CMD ["npm", "run", "dev"]
With those changes, we need to rebuild and restart our containers:
# Terminal
docker compose up -d --build
The --build will build any changed containers.
Database
Now let’s add a database to our project.
Postgres Container
First, we can add an entry to our Docker Compose file to create a Postgres database, and also an entry for the volume to store the data:
# docker-compose.yml
services:

  # database
  project-db:
    # Use an existing image from DockerHub
    image: postgres:15
    container_name: project-db
    # Automatically restart the container as needed
    restart: unless-stopped
    networks:
      - project-network
    volumes:
      # Persist database data in a Docker volume
      - project_db_data:/var/lib/postgresql/data:rw
    environment:
      # Configure environment using .env file
      POSTGRES_USER:
      POSTGRES_PASSWORD:
      POSTGRES_DB:
    healthcheck:
      # check if database is running and healthy
      test: ["CMD-SHELL", "pg_isready -d $${POSTGRES_DB} -U $${POSTGRES_USER}"]
      interval: 30s
      timeout: 5s
      retries: 5
      start_period: 10s

  # server
  project-server:
    build:
      # location of Dockerfile
      context: ./server
    container_name: project-server
    # set the user ID to match our user
    user: "1000"
    depends_on:
      # requires database to start
      - project-db
    networks:
      - project-network
      # allow external connections (remove this in production)
      - default
    volumes:
      # mount code into container
      - ./server:/app/server
      # maintain existing node_modules in container
      - /app/server/node_modules

  # client
  project-client:
    build:
      # location of Dockerfile
      context: ./client
    container_name: project-client
    # set the user ID to match our user
    user: "1000"
    depends_on:
      # requires server to start
      - project-server
    networks:
      - project-network
      # allow external connections
      - default
    volumes:
      # mount code into container
      - ./client:/app/client
      # maintain existing node_modules in container
      - /app/client/node_modules

volumes:
  project_db_data:

networks:
  # internal Docker network for project
  project-network:
    name: project-network
    internal: true
Refer to the Postgres Docker Image documentation for more details.
Environment File
For this project, we are going to use a single global environment file that is shared across all containers. For this, create a file named .env in the root of the project and add the following contents:
# .env
POSTGRES_HOST="project-db"
POSTGRES_PORT="5432"
POSTGRES_USER="projectuser"
POSTGRES_PASSWORD="projectpass"
POSTGRES_DB="projectdb"
Tip
Customize the user, password, and database variables as desired. The host should match the name of the database container, and the port should be the default port for the chosen database engine.
You should also create a file named .env.example that has the same contents.
Warning
You should never commit the .env file to GitHub, since it contains all of the secret information for your project. Instead, it is recommended to create a sample file such as .env.example that contains the same variables but with default values, and also some explanation of what each variable does.
In the Docker Compose file above, we defined several variables in the project-db service that match variables in the .env file:
    environment:
      # Configure environment using .env file
      POSTGRES_USER:
      POSTGRES_PASSWORD:
      POSTGRES_DB:
By including blank variables here, the values from the .env file for those variables will be shared with the container. Other variables will not be shared.
Start Container
Once we are ready, we can use Docker Compose to update our running containers and start the database container:
# Terminal
docker compose up -d
You can confirm that the database is up and running using docker ps or checking the logs using docker logs project-db.
Commit
This is a great place to stop and commit your work to GitHub.
Knex
We’re going to use the Knex library to connect to our database from the server. We’ll also use it to handle database migrations and seeding.
Install Knex
We can install Knex using npm inside the server container:
# Terminal
docker exec -it project-server bash
Then we can use npm to install the knex library, along with the pg library for connecting to Postgres databases. This should be done in the /app/server directory inside the container:
# Docker project-server Terminal
npm install knex pg
Tip
You can replace pg with the database engine of your choice. Modifications must be made below to match that engine; refer to the Knex documentation.
Once Knex is installed, we’ll run a few additional commands inside of the container to configure it.
Create Knexfile
The Knex library uses a special file called a knexfile to store some configuration information. We can create it using this command:
# Docker project-server Terminal
npx knex init
Tip
In the documentation for Knex it will reference these commands as just knex. However, since they are installed by an npm package, they are not directly accessible in the system path inside the container. So, to get around that, we can prefix the command with npx to run commands from within an npm package. npx documentation
This should create a file server/knexfile.js.
Once that is done, we can close the terminal connected to the container using the exit command.
We’ll replace the default contents of the server/knexfile.js with the following:
// server/knexfile.js

/**
 * @type { Object.<string, import("knex").Knex.Config> }
 */
module.exports = {
  development: {
    client: 'pg',
    connection: {
      host: process.env.POSTGRES_HOST,
      port: process.env.POSTGRES_PORT,
      user: process.env.POSTGRES_USER,
      password: process.env.POSTGRES_PASSWORD,
      database: process.env.POSTGRES_DB,
    },
    migrations: {
      tableName: 'migrations',
    },
  },

  production: {
    client: 'pg',
    connection: {
      host: process.env.POSTGRES_HOST,
      port: process.env.POSTGRES_PORT,
      user: process.env.POSTGRES_USER,
      password: process.env.POSTGRES_PASSWORD,
      database: process.env.POSTGRES_DB,
    },
    migrations: {
      tableName: 'migrations',
    },
  },
}
This will use environment variables to configure the database in both development and production modes.
Pass Environment to Containers
Next we’ll need to reconfigure our containers to pass the environment from the .env file. To do this, we’ll edit the server service in the Docker Compose file:
  # server
  project-server:
    build:
      # location of Dockerfile
      context: ./server
    container_name: project-server
    # set the user ID to match our user
    user: "1000"
    depends_on:
      # requires database to start
      - project-db
    networks:
      - project-network
      # allow external connections (remove this in production)
      - default
    volumes:
      # mount code into container
      - ./server:/app/server
      # maintain existing node_modules in container
      - /app/server/node_modules
    env_file:
      # load environment file into container environment
      - .env
This will load the entire contents of the .env file into the container’s environment. This is a bit different than how we handled the database container, since we only passed it a few variables. Refer to Docker Compose Environment Documentation for details.
Recreate Container
Once we’ve made that change, we need to recreate our container with the new environment.
# Terminal
docker compose up -d
This will give us access to the information needed to connect to the database.
Create Migration
We can use Knex to create a migration for our database. First, we must connect to it:
# Terminal
docker exec -it project-server bash
Then we can create a migration:
# Docker project-server Terminal
npx knex migrate:make users
Tip
Use the same user ID and group ID found earlier when setting up the projects.
This will create a file in the migrations directory that includes a timestamp and the name of the migration. The timestamp is included to ensure the migrations are applied in the correct order.
Add Users Table
Now, open the file created in the migrations directory and add the following content:
/**
 * @param { import("knex").Knex } knex
 * @returns { Promise<void> }
 */
exports.up = function(knex) {
  return knex.schema
    .createTable('users', function (table) {
      table.increments('id')
      table.string('username', 20).unique().notNullable()
      table.string('passhash', 60).notNullable()
      table.string('name', 255).notNullable()
      table.string('email', 255).notNullable()
      table.timestamps()
    })
};

/**
 * @param { import("knex").Knex } knex
 * @returns { Promise<void> }
 */
exports.down = function(knex) {
  return knex.schema
    .dropTable('users')
};
This will create a users table with a few columns. You can find more information about creating migrations with Knex in the Schema Builder Documentation.
Once we’ve created that file, we can apply the migration using the knex command line tool:
# Docker project-server Terminal
npx knex migrate:up
If everything works correctly, you’ll get a success message. You can check that the table exists in the database using various tools to query a Postgres database.
Create Seed
You can also use Knex to seed some initial data into the database. First, create a seed file from inside the project-server Docker container:
# Docker project-server Terminal
npx knex seed:make users_seed
This will create a file users_seed.js in the seeds directory. Add the following content to that file:
/**
 * @param { import("knex").Knex } knex
 * @returns { Promise<void> }
 */
exports.seed = async function(knex) {
  // Get current date
  const now = new Date().toISOString().slice(0, 19).replace('T', ' ')

  // Deletes ALL existing entries
  await knex('users').del()
  await knex('users').insert([
    {
      id: 1,
      username: 'admin',
      passhash: '$2y$10$41NXCocgYzuOGgOB4aL1M.wg7mZT.P6NY9D9EbfdKu8xbHU8x0b3O',
      name: "Administrator",
      email: "admin@local.local",
      created_at: now,
      updated_at: now,
    },
    {
      id: 2,
      username: 'user',
      passhash: '$2y$10$41NXCocgYzuOGgOB4aL1M.wg7mZT.P6NY9D9EbfdKu8xbHU8x0b3O',
      name: "User",
      email: "user@local.local",
      created_at: now,
      updated_at: now,
    }
  ]);
};
We can now apply that seed file using the knex command line tool:
# Docker project-server Terminal
npx knex seed:run
You should now be able to see a couple of entries in the users table of the database. You can check that these exist in the database using various tools to query a Postgres database.
Helpful Scripts
It is very helpful to have a script that will allow you to reset your database while working on it. I recommend adding the following reset to your package.json file for the server:
  "scripts": {
    "dev": "nodemon ./bin/www",
    "start": "NODE_ENV=production node ./bin/www",
    "reset": "knex migrate:rollback --all && knex migrate:latest && knex seed:run"
  }
With that script in the package.json file, you can use the following command to fully reset the database back to the default state:
# Docker project-server Terminal
npm run reset
This will undo all database migrations, redo them, and seed the database with your initial seed data.
Note
You may also wish to look into Objection.js, which is a great ORM that works well with Knex.