Chapter 6
Subsections of Functions
Introduction
YouTube VideoResources
As our Python programs continue to get larger and more complex, we may notice that we are reusing certain pieces of code over and over again. A great example is the loop structure to repeatedly get input from the user until a valid input is received.
x = float(input("Enter a percentage as a decimal number from 0 to 1: "))
while(x < 0 or x > 1):
    print("Invalid Input!")
    x = float(input("Enter a percentage as a decimal number from 0 to 1: "))
This is a very useful piece of code, and we can easily copy and paste it wherever we need it in our programs. Unfortunately, this means that anytime we want to update or change that code, we have to manually change every location where it is used in our programs. In a large program, this can be very tricky to do correctly without causing other errors in the code.
Thankfully, Python allows us to create small, repeatable blocks of code called functions that we can write once, and then use anywhere we’d like within our programs. We’ve already used many different functions in our programs, from the print() function used to display output to the user and the input() function used to get input from the user, all the way to the random.randint() function we’ve used to generate random numbers in our code.
Functions also allow us to break our larger programs up into smaller, easier to understand steps. This makes our code much easier to read, test, and debug. Learning how to build programs in terms of individual functions instead of just simple steps is a big part of becoming a more experienced programmer. So, in this lab, we’re going to learn all about how to build, use, and test our own functions in Python.
Subsections of Introduction
Function Basics
YouTube VideoResources
Creating a Function
A simple function in Python uses the following structure:
def function_name():
    <block of statements>
Let’s break this structure down to see how it works:
- First, a function definition in Python begins with the word
def, which is short for define. In effect, we are stating that we are defining a new function using the specialdefkeyword. - Next, we include the name of the function. Function names in Python follow the same rules as variable names:
- A function name must begin with a letter or underscore
_. Function names beginning with an underscore_have special meaning, so we won’t use those right now. - A function name may only include letters, numbers, and underscores
_. - After the function name, we see a set of parentheses
(). This is where we can add the parameters for the function. We’ll see how to add function parameters later in this lab. - Then, we end the first line of a function definition in Python with a colon
:. This tells us that the block of statements below the function definition is what should be executed when we run the function. We’ve already seen colons in both conditional statements and loops, and here it is used in a similar way. - Finally, we have the block of statements that are part of the function itself. This block of statements must be indented one level to indicate that it is part of the function and not something else. When we reach the end of the function, we cease to indent the code, which tells Python that we’ve ended the function and are starting something else. So, notice that there is no closing curly brace
}or any other marker to indicate the end of the function - only the indentation tells us where the function’s code ends. Again, this is very similar to how conditional statements and loops are structured in Python.
Function Example
Let’s look at an actual function in Python. In this case, we’ll create a simple hello_world function in Python:
def hello_world():
    print("Hello World")
Really, this structure is exactly like we’d expect it to be, based on the structures we’ve learned so far in Python. We start with the def keyword, then the name of the function. After that, we have parentheses () where the parameters would go, and then a colon : to show the start of the block of statements. Inside of the function, we indent the block of statements that make up the code to be run when this function is run - in this case we just print the string "Hello World" to the terminal. That’s really all there is to it!
Calling a Function
Likewise, calling a function in Python is exactly the same as what we’ve seen with the print() function - we simply state the name of the function, followed by a set of parentheses where we would place the arguments if the function required any parameters:
hello_world()So, a complete Python program that includes the hello_world function and calls that function would look like this:
def hello_world():
    print("Hello World")


hello_world()
Try placing this code in a Python file and see if you can run it. It should work!
Notice that the function call for hello_world is not indented, and we included a couple of blank lines after the end of the definition of that function before the next piece of code. We do this for two reasons:
- We do not indent code that is not part of the block of statements within a function. Since the function call for
hello_worldshould not be part of the definition for the function, we don’t want to indent it. - In Python, the convention is to include two blank lines at the end of a function definition. So, that is why we included two blank lines in the code. These blank lines are not required, but it is good practice to include them.
Code Tracing a Function Call
Finally, let’s briefly go through an example of tracing a program that includes a couple of functions and function calls. Here’s a quick example we can use:
def foo():
    print("eye")


def bar():
    print("to")


foo()
bar()
foo()
To trace this example, copy-paste the code into Python Tutor, or click this Python Tutor link.
When the program first loads, we should see this setup:
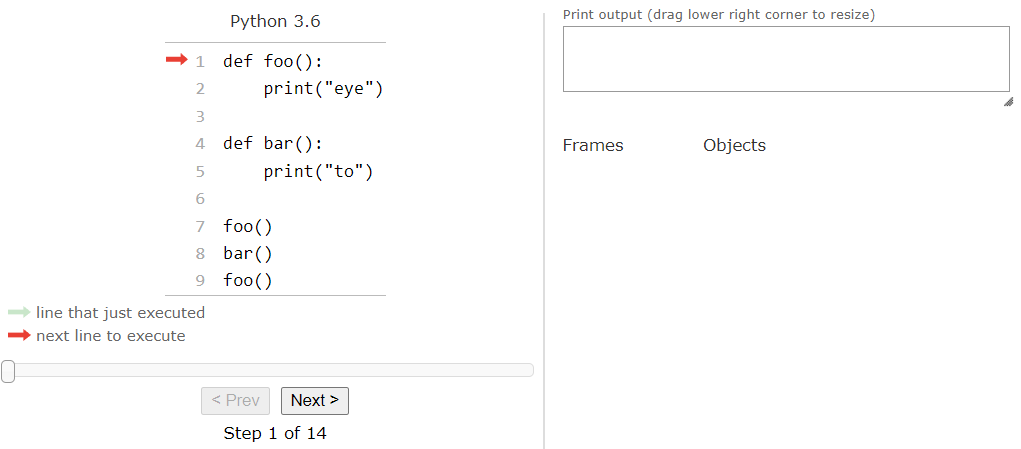
Again, this is very familiar to us based on what we’ve seen so far. So, let’s click the Next > button to step through the first part of the code:
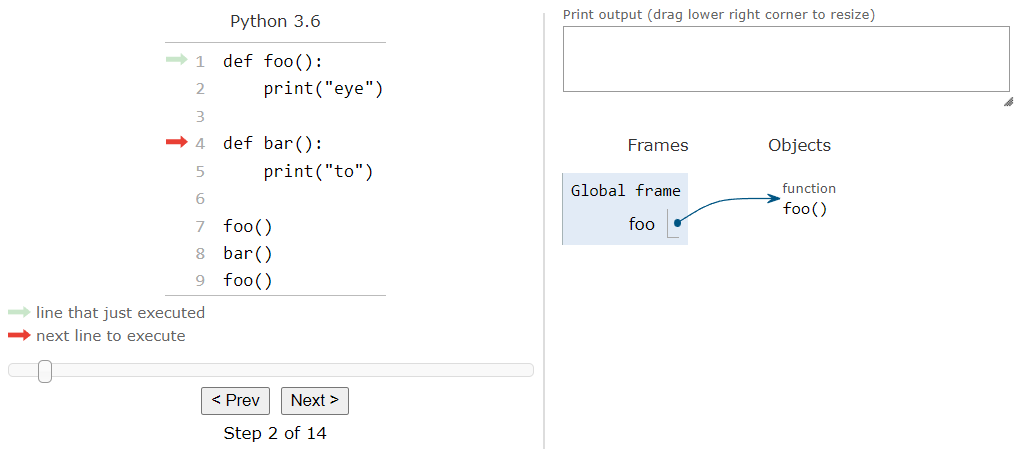
As we can see, the first thing that Python sees is the definition for the foo function. Instead of keeping a separate list of functions, Python Tutor simply adds that function to the global frame just like any variable. The function itself is added to the Objects list, and then there is an arrow, connecting the variable in the global frame to the function in the objects list. In fact, this is exactly how Python handles functions - they are just treated like variables that are pointers to the function objects themselves! So, when we click Next > again, we’ll see it do the same to the bar function as well:
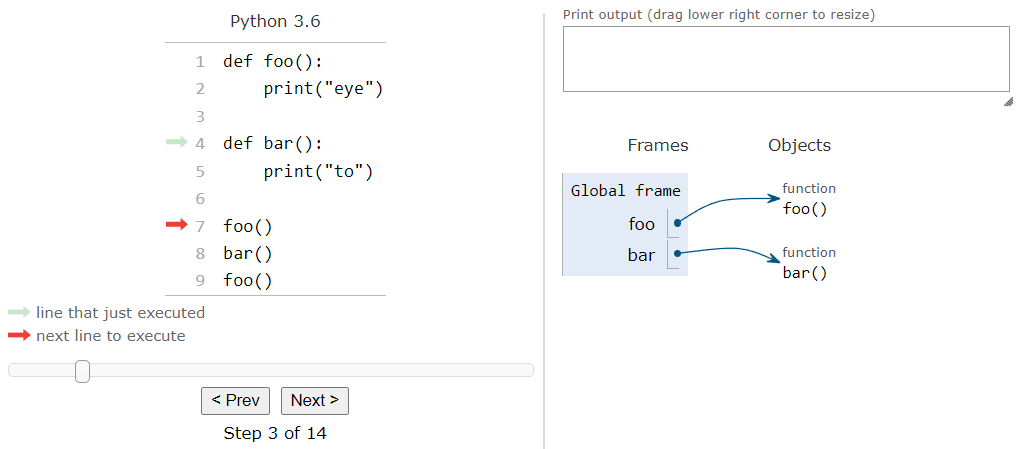
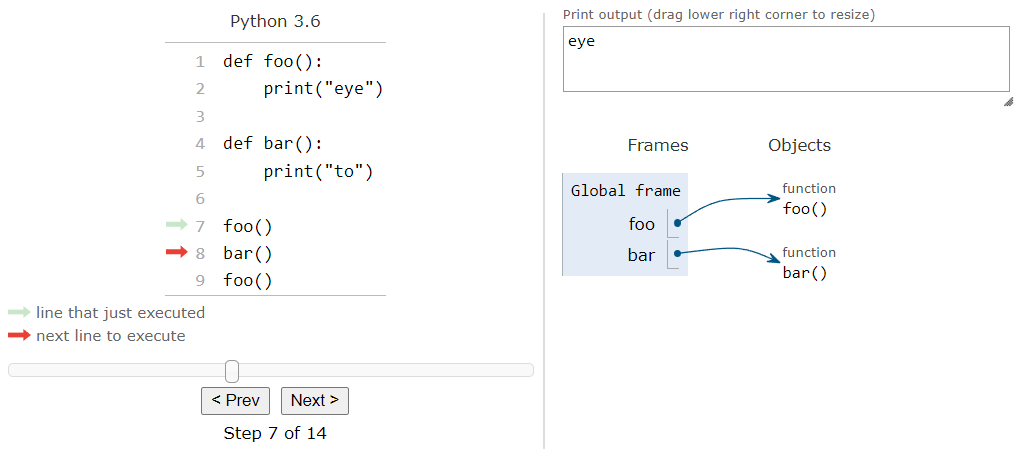
At this point, we are ready to execute the first function call, which will run the foo function. So, when we click the Next > button, we’ll see the arrow jump to the start of that function:
Here, we see Python tutor do something a bit different than in our own code traces - instead of keeping all of the variables in a single box, it creates a new frame to keep track of the variables that are created in the foo function. When we look an example of a function with parameters, we’ll see where this becomes very useful. For now, we can just ignore it and move on by clicking Next > once again:

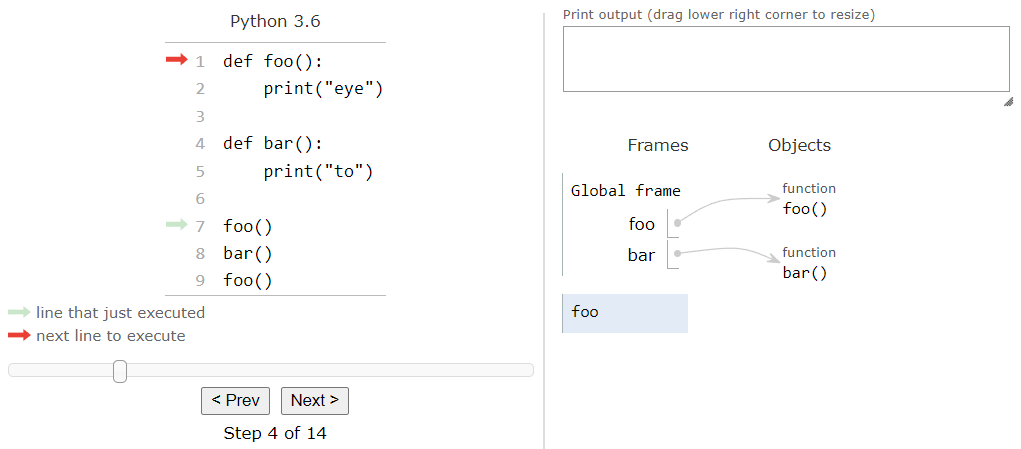
At this point, the function is ready to print the string value "eye" to the terminal. So, if we click Next > once again, we should see that reflected in the output of Python Tutor:

At this point, we’ve reached the end of the foo function. So, Python Tutor will remove the foo frame from the list of frames and it will jump back down to where the function was called from when we click Next >:
Here, we are back to the main piece of our code, and we’re ready to call the bar function. So, we can click Next > once again:
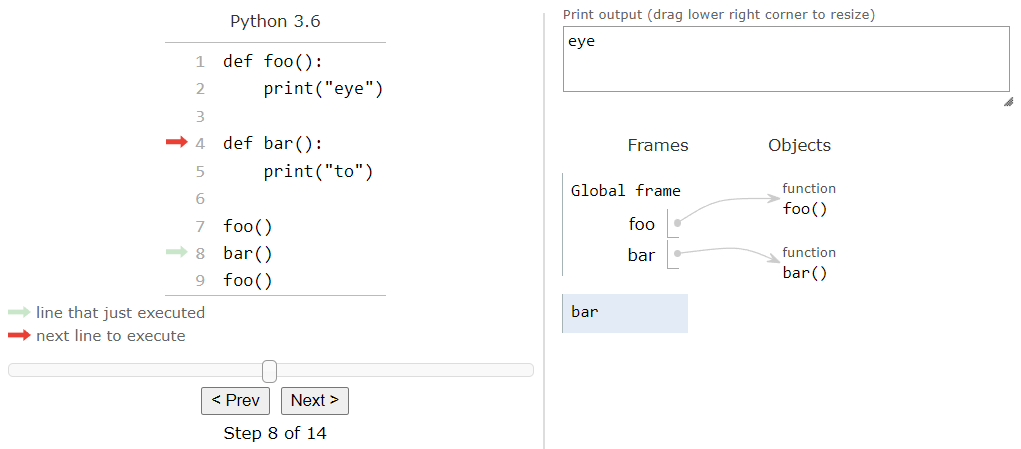
This will jump up to the start of the bar function and create a new frame for storing any variables created by bar. We can click Next > again to enter the function:
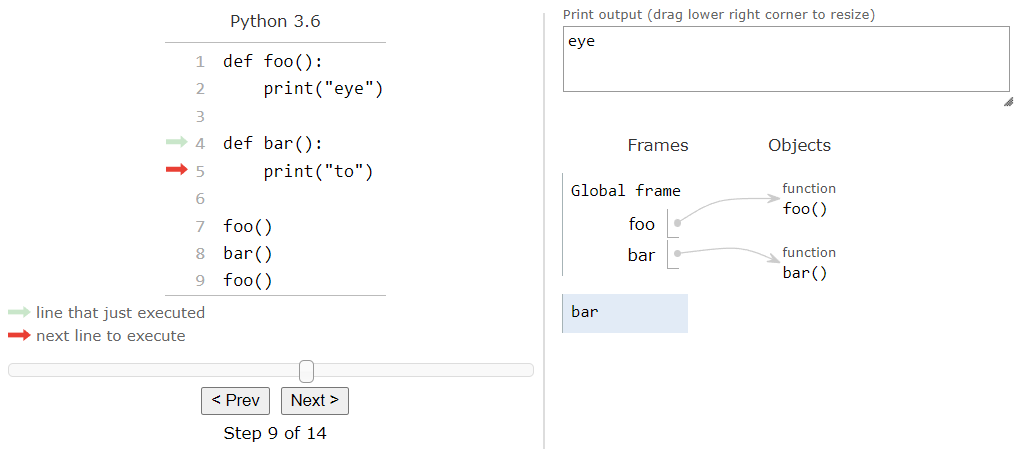
And then click Next > again to print the string value "to" to the output:
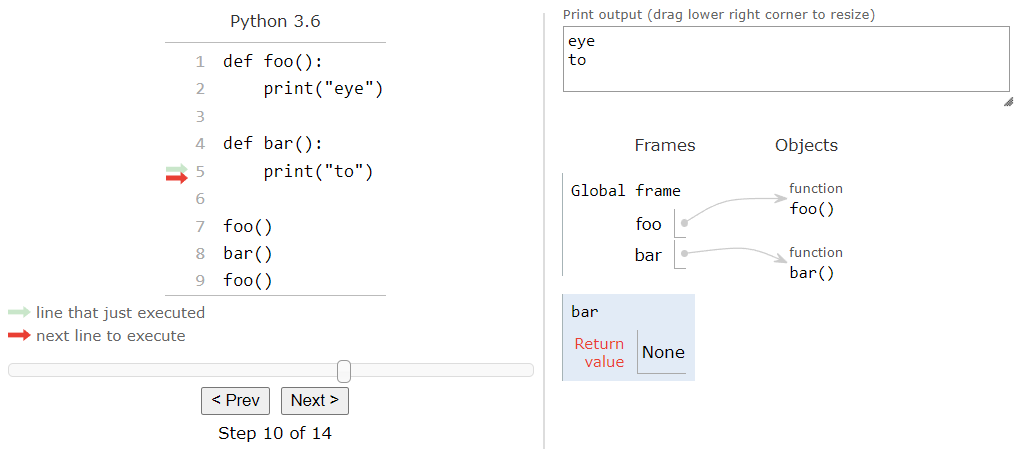
Once again, we are at the end of a function, so when we click Next > once more:
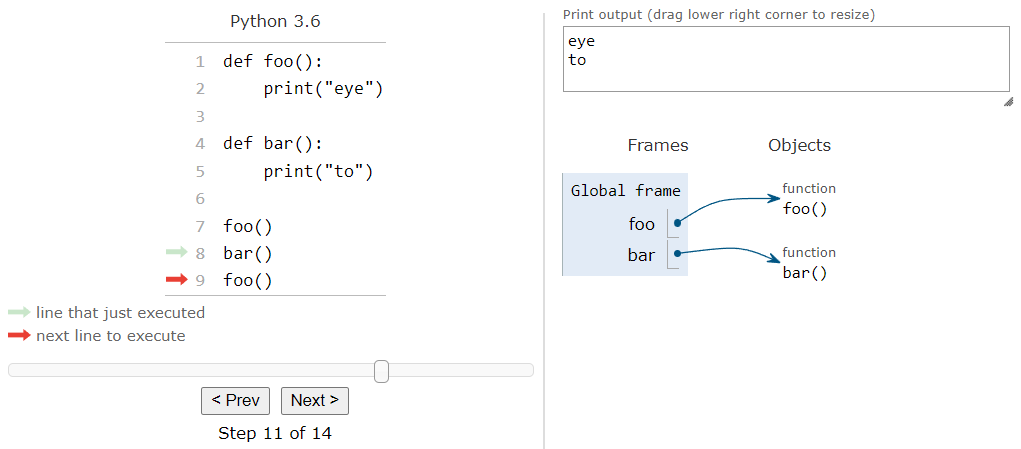
We’ll move back to the main piece of the code, removing the frame for bar. On this line, we see yet another function call, this time to the foo function. Hopefully by this point we can predict what is going to happen, so we can click Next > a few more times to jump to the foo function and execute it. When it is done, we’ll see this output:
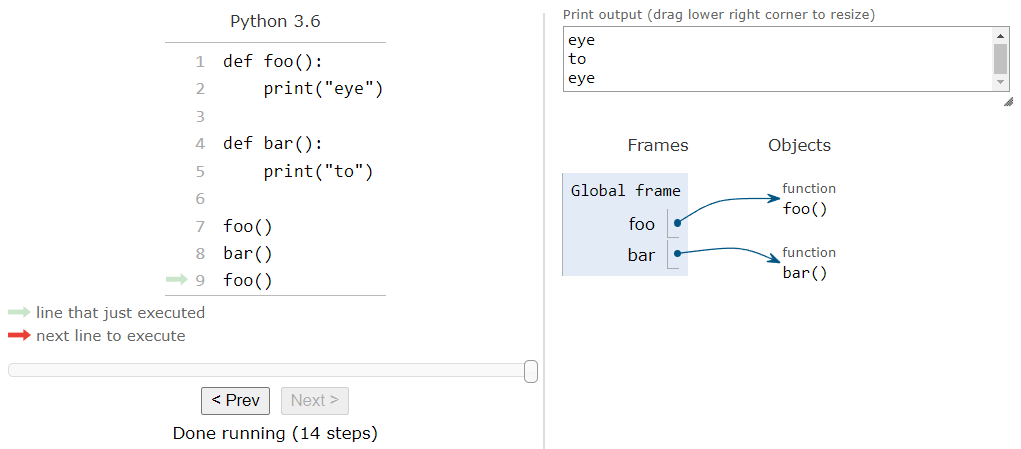
There we go! We’ve successfully traced the execution of a Python program that contains multiple function calls. The full process is shown in this animation:

Using tools like Python Tutor to trace through code is a great way to make sure we understand exactly what our computer is doing when it is running our code.
Subsections of Function Basics
Main Function
YouTube VideoResources
Let’s review a couple other concepts related to functions in Python.
Main Function
We can also create a main function in Python. The use of a main function in Python is not required at all - Python is designed as a scripting language, meaning we can write code directly in a Python file without using any functions at all. However, it is generally considered good practice to make sure all code is part of a function, and then we can include a main function as the starting point for any program.
So, we can update the example we saw previously to include a main function by simply placing the three function calls in a new function called main, and then including a call to the main function at the bottom of the program:
def foo():
    print("eye")


def bar():
    print("to")


def main():
    foo()
    bar()
    foo()


main()
From here on out in this course, we’ll follow this convention in our complete Python programs. Specifically:
- All programs must contain a function named
mainas the starting point of the program. - All code in a program must be contained within a function, with the exception of a single call to the
mainfunction at the bottom of the program.
This will make our Python programs easy to follow, and it will help us later on down the road if we choose to learn another language such as Java or C# that requires a main function.
Subsections of Main Function
Parameters & Arguments
YouTube VideoResources
Function Parameters
Functions in Python can also require parameters. To include a parameter in a function, we simply have to include the name of the parameter in the parentheses () at the end of the function definition. Multiple parameters should be separated by commas ,. For example, we can update our hello_world function to include a couple of parameters:
def hello_world(first_name, last_name):
    print("Hello ", end="")
    print(first_name, end=" ")
    print(last_name)
Here, we are defining two parameters, named first_name and last_name, that are used as part of the function. Those parameters can be treated just like any other variable within the function.
Calling a Function with Arguments
Once we have a function that requires parameters, we can call it by including arguments in the parentheses () that are part of the function call. For example, we can call the hello_world function above and provide two arguments like this:
hello_world("Willie", "Wildcat")When we run this code, it will place the string value "Willie" in the parameter variable first_name, and the string value "Wildcat" will be placed in the parameter value last_name within the frame for the hello_world function. When the code in hello_world is executed, we should see the following output:
Hello Willie WildcatCode Tracing a Function with Arguments
To see how this works, let’s work through a full example. Here’s a more complex Python program that includes parameters, arguments, and some other variable expressions:
def flip(first, last):
    temp = first
    first = last
    last = temp
    print(first)
    print(last)


def main():
    first = "Willie"
    last = "Wildcat"
    flip(first, last)
    print(first)
    print(last)


main()
Once again, before reading the full analysis below, take a minute to read through this code and see if you can guess what it does. It can be a bit tricky if you don’t read it carefully and think about what we’ve learned so far.
To trace this example, copy this code to Python Tutor, or click this Python Tutor link.
When we begin, our code trace will look like this example:

As we expect, the first thing that Python will do is scan through the code and record any functions it finds in the global frame. So, after pressing the Next > button a couple of times, we should reach this point:

Now we are at a function call for the main function. So, when we click the Next > button:

Python tutor will jump to that function’s code, and it will also create a new frame for variables that are created in the main function. The next two lines deal with creating a couple of variables, so we can click the Next > button a couple of times to execute those lines and stop when we reach the next function call:

Now we are ready to call the flip function. This function requires two parameters, named first and last. Notice that those parameter names are the same names as the variables that we created in the main function? This is a common practice in programming - sometimes it is simplest to use the same variable names in multiple functions, especially if they are storing the same data. However, it is important to understand that those variables are not related in any way except for the name, as we’ll see in this example. When we click the Next > button to jump to the start of the flip function, we should see the following in our Python tutor trace:

It has now created a frame for the flip function, and copied the values of the two arguments into the appropriate parameter variables. Since we listed the arguments first and last in that order in the function call to flip, a copy of the values from those two variables in main will be stored in the same two variable names in flip. It’s an easy way to make sure the arguments are in the correct order!
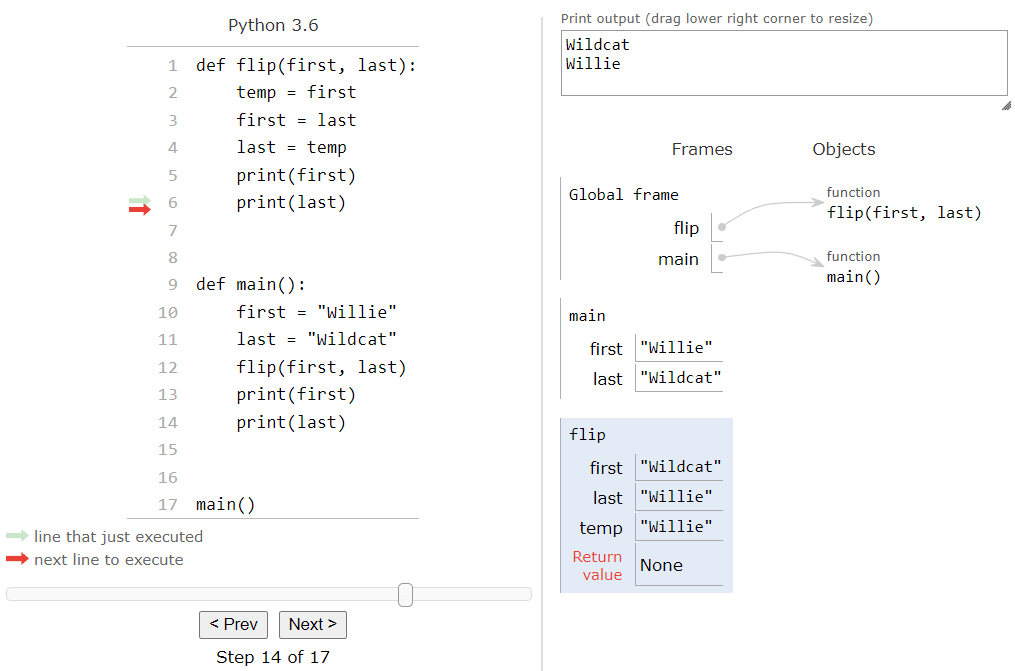
The first three lines in the flip function will swap the values in the first and last parameter variables. So, after we’ve executed those three lines, we should now see this setup in our trace:

Notice that the values in first and last inside of the flip frame have changed, but the values in the same variables in the main frame have not changed! This is why it is very useful to keep track of variables in frames within a code trace - we can easily tell which variables go with which function, even if they have the same names. So, the next two lines of code in the flip function will simply print out the contents of the first and last parameter variables:
At this point, we’ve reached the end of the flip function, so when we click the Next > button again, we’ll jump back down to where we left off in the main function. At the same time, we’ll remove the flip frame from the list of frames, completely removing the first and last parameter variables used in that function:
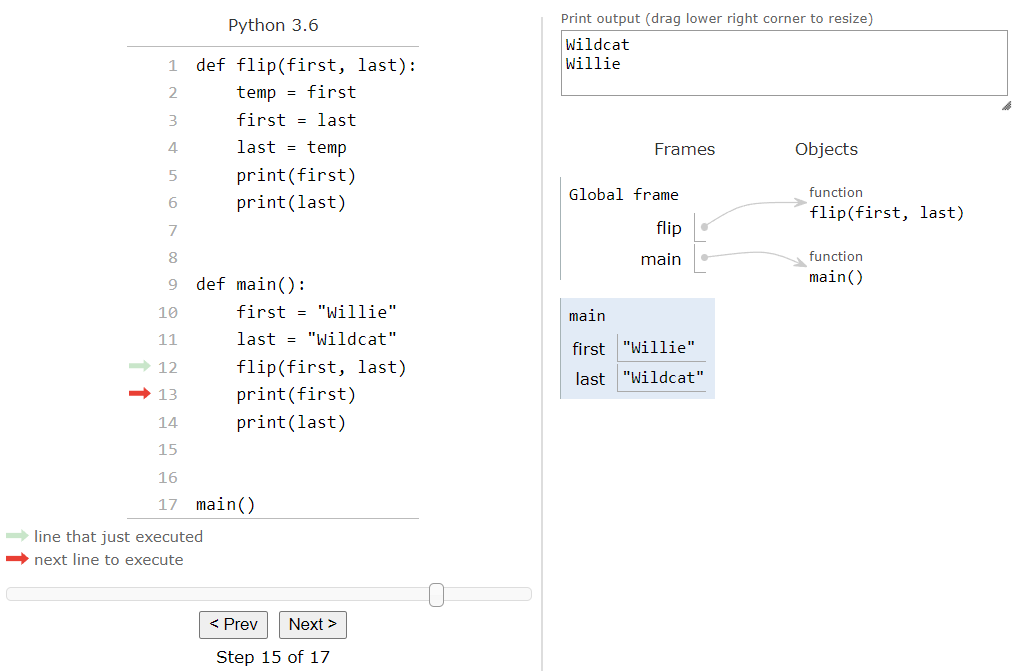
Now that we are back in the main function, we can see that the values stored in the first and last variable are unchanged, just like we’d expect. This is important to understand - just because one function uses the same variable names as another function, or that a function’s parameter names match the variable names provided as arguments, they are not related and any changes in the function won’t impact the values outside of the function. So, we can finish the main function by running the last two lines, which will print the current values of first and last to the screen:
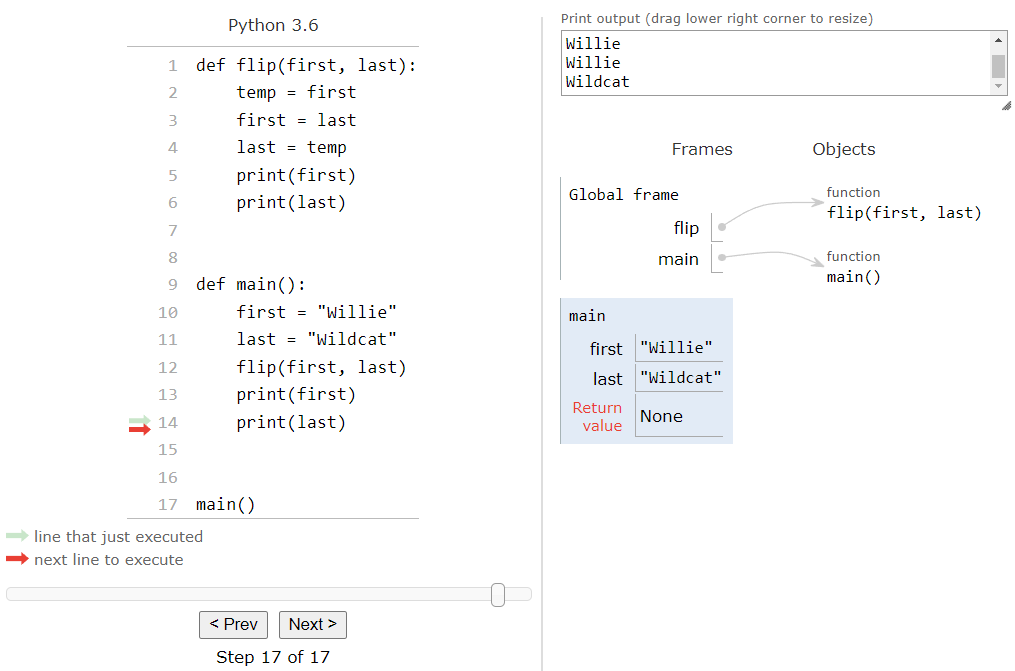
Finally, once the program reaches the end of the main function, it will jump back to the main function call at the bottom of the program. This will remove the main frame from the list of frames. Since there is nothing more to do, the program will end at this point:
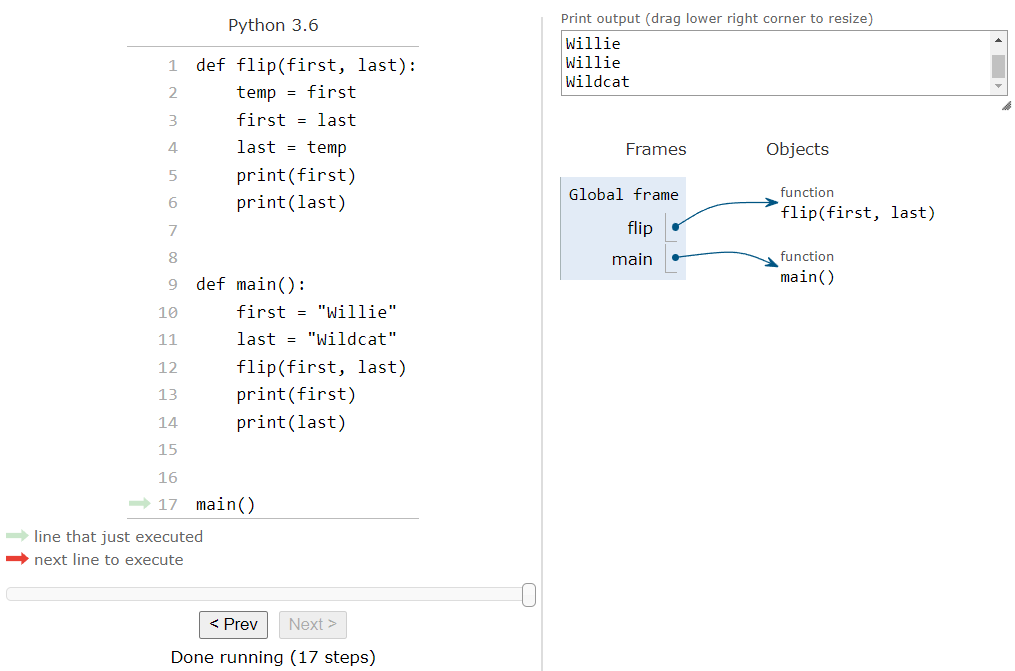
The whole process can be seen in this animation:

There we go! We’ve explored how functions, parameters, and arguments all work in Python. Understanding this process now will make it much easier to write complex programs later on.
Subsections of Parameters & Arguments
Return
YouTube VideoResources
Python functions are also capable of returning a value, In Python, we use the return keyword.
Let’s look at a quick example of a full Python program that includes a function that returns a value:
def square_sum(one, two):
one = one * one
two = two * two
total = one + two
return total
def main():
text_one = input("Enter the first number: ")
one = int(text_one)
text_two = input("Enter the second number: ")
two = int(text_two)
total = square_sum(one, two)
print(f"The sum of squares of {one} and {two} is {total}")
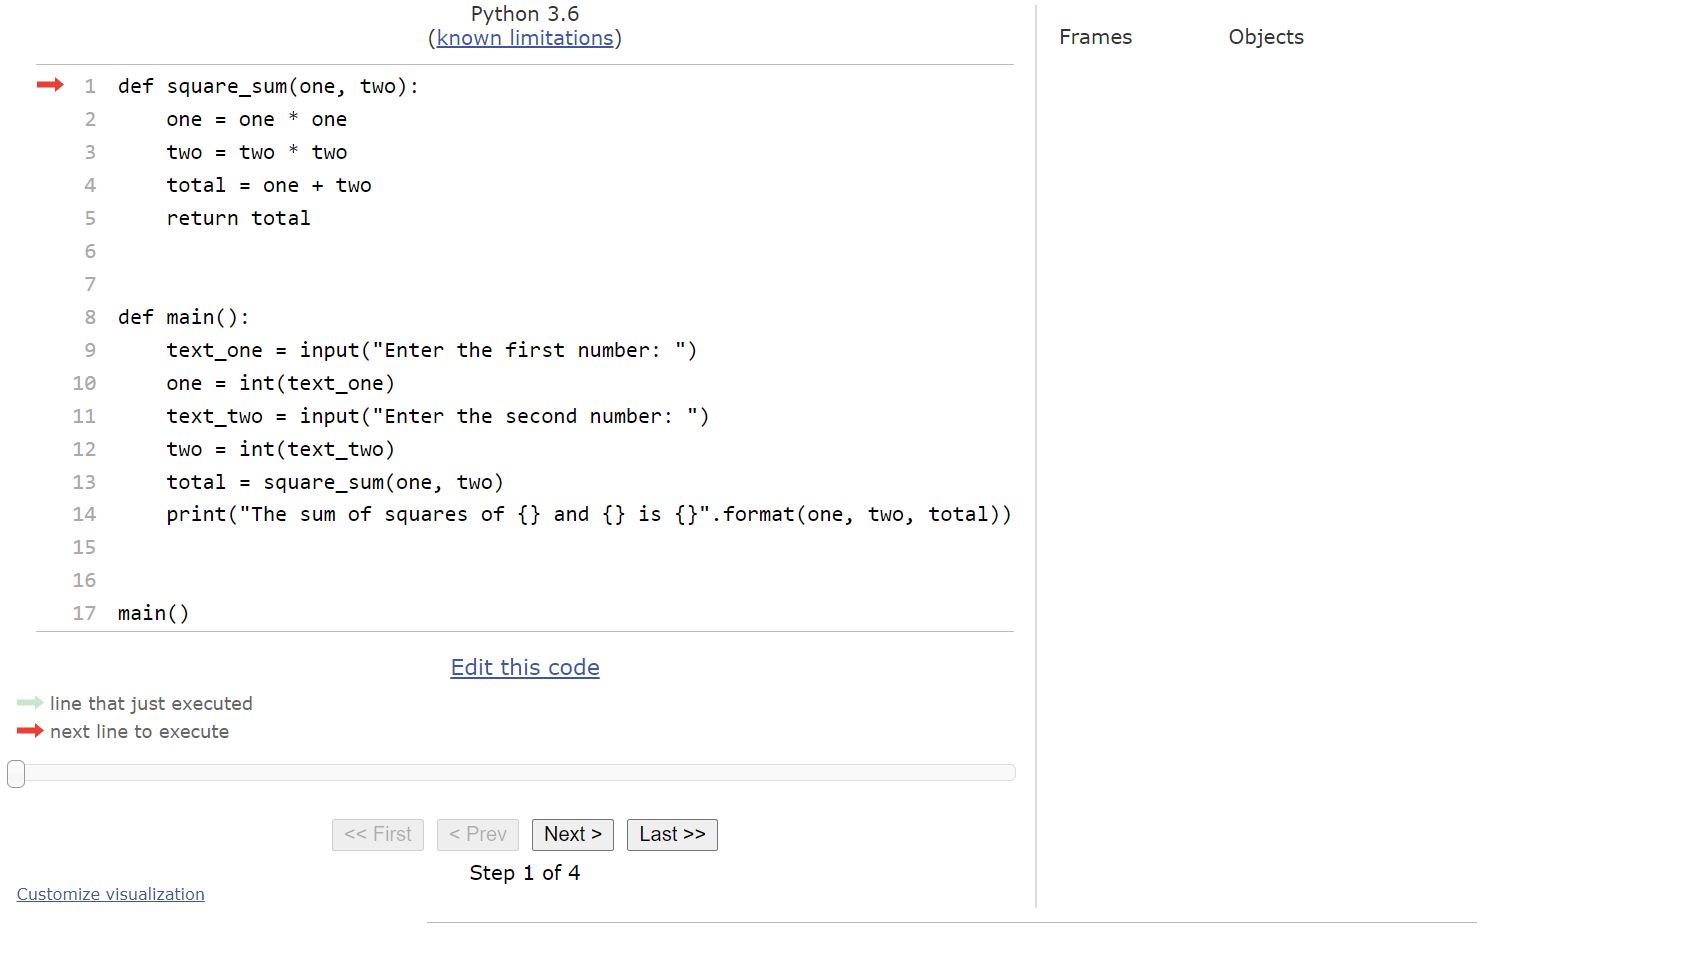
main()To truly understand how this program works, let’s use Python Tutor to explore it step by step. Like before, copy the code into Python Tutor, or click this Python Tutor link.
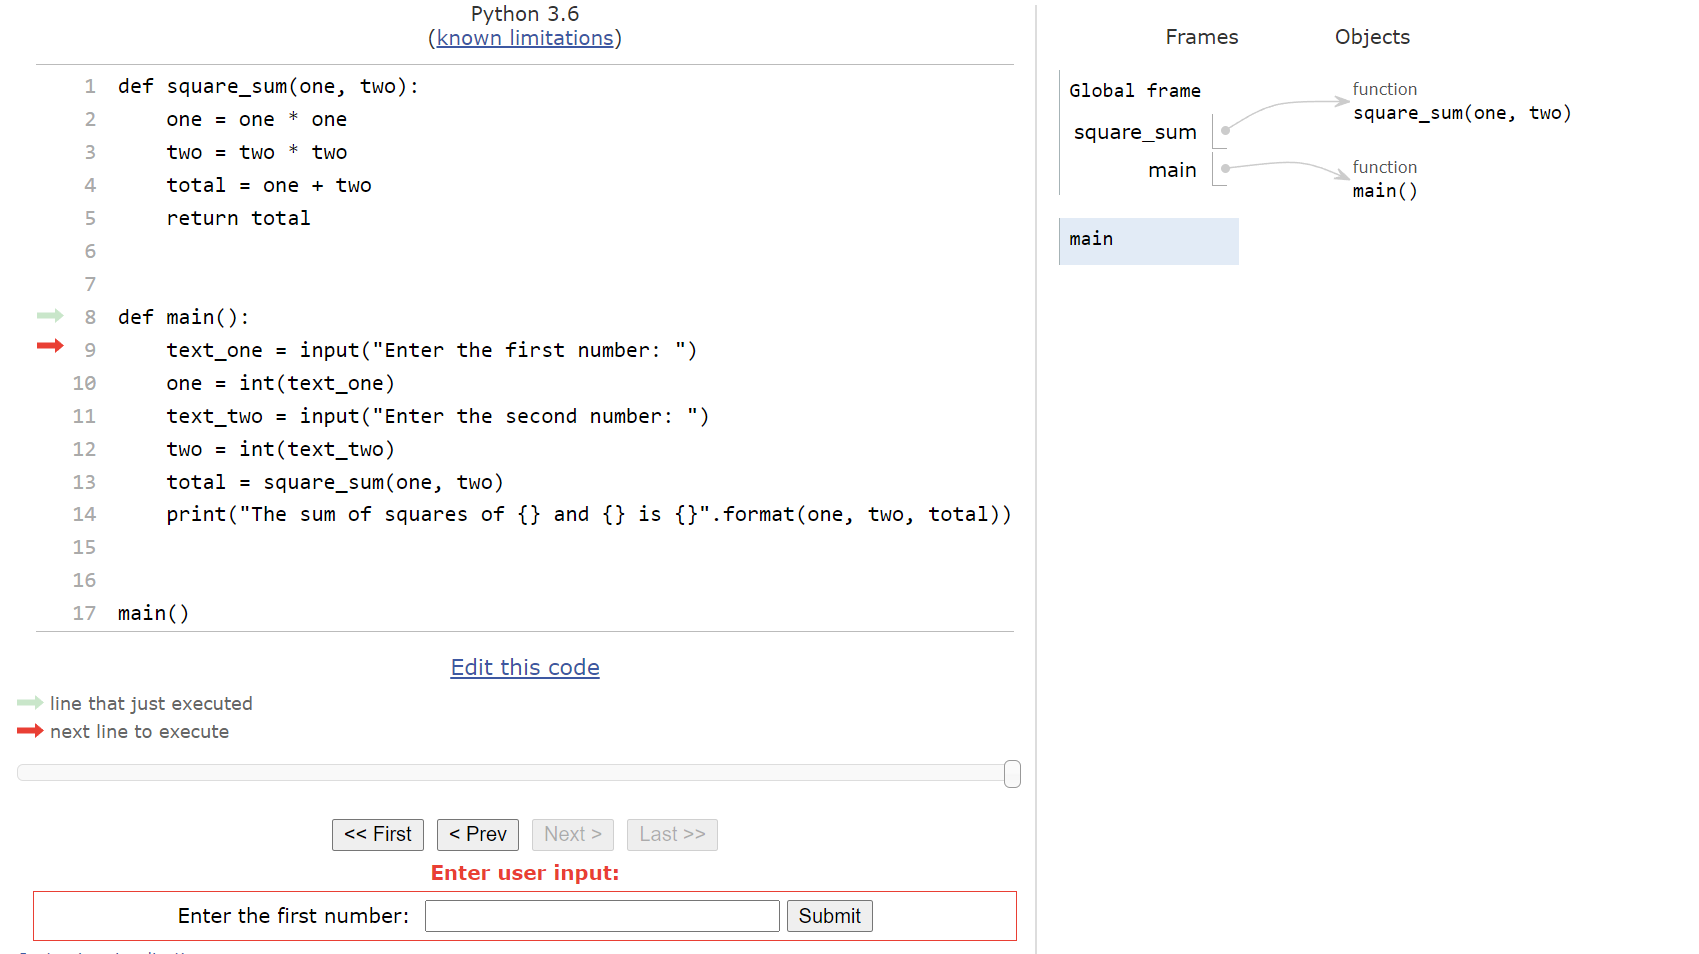
At the start, our Python Tutor trace will look like this:
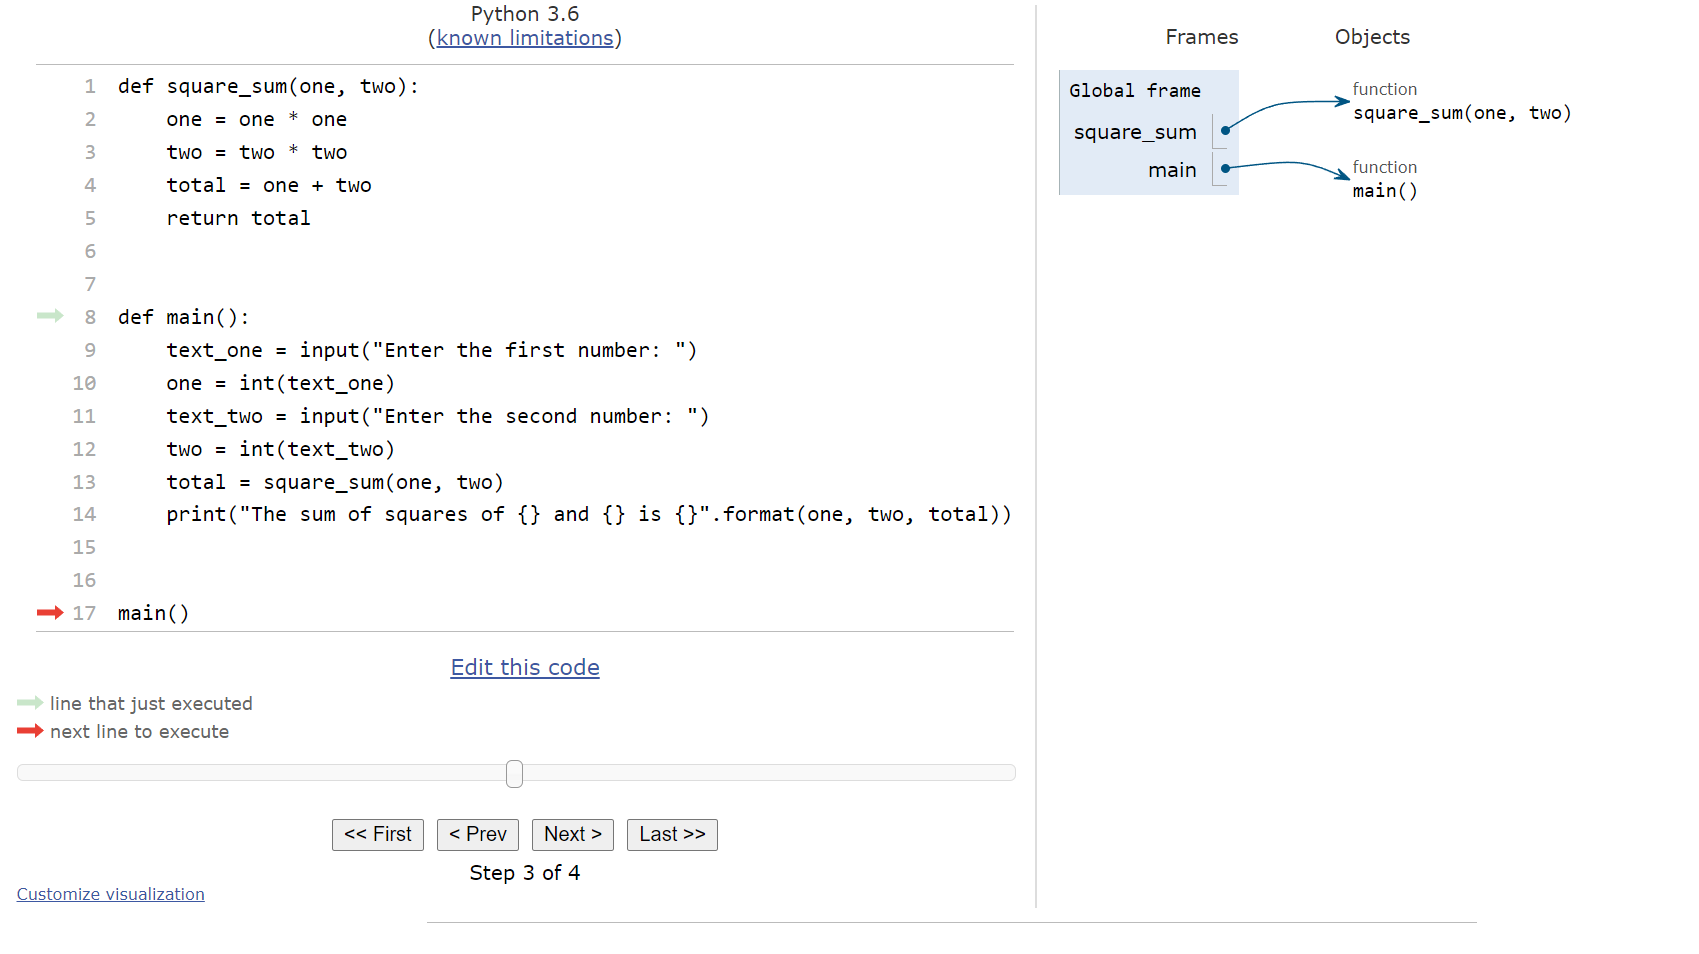
The first few steps are pretty straightforward, since Python will simply move through the code and record all of the functions it finds. Once we reach the call to the main() function at the bottom, we’ll be at this state:
So, we’ll enter the main() function and start executing the code it contains. The first line is an input() expression, so Python will prompt the user for input. In Python Tutor, this will open a box at the bottom where we can enter the input, as shown below:
Let’s assume that the user would enter 2 for this input. So, we can type that into the box and press ENTER or click submit. Python tutor will refresh the page to accept the input, and then we’ll be at this setup:
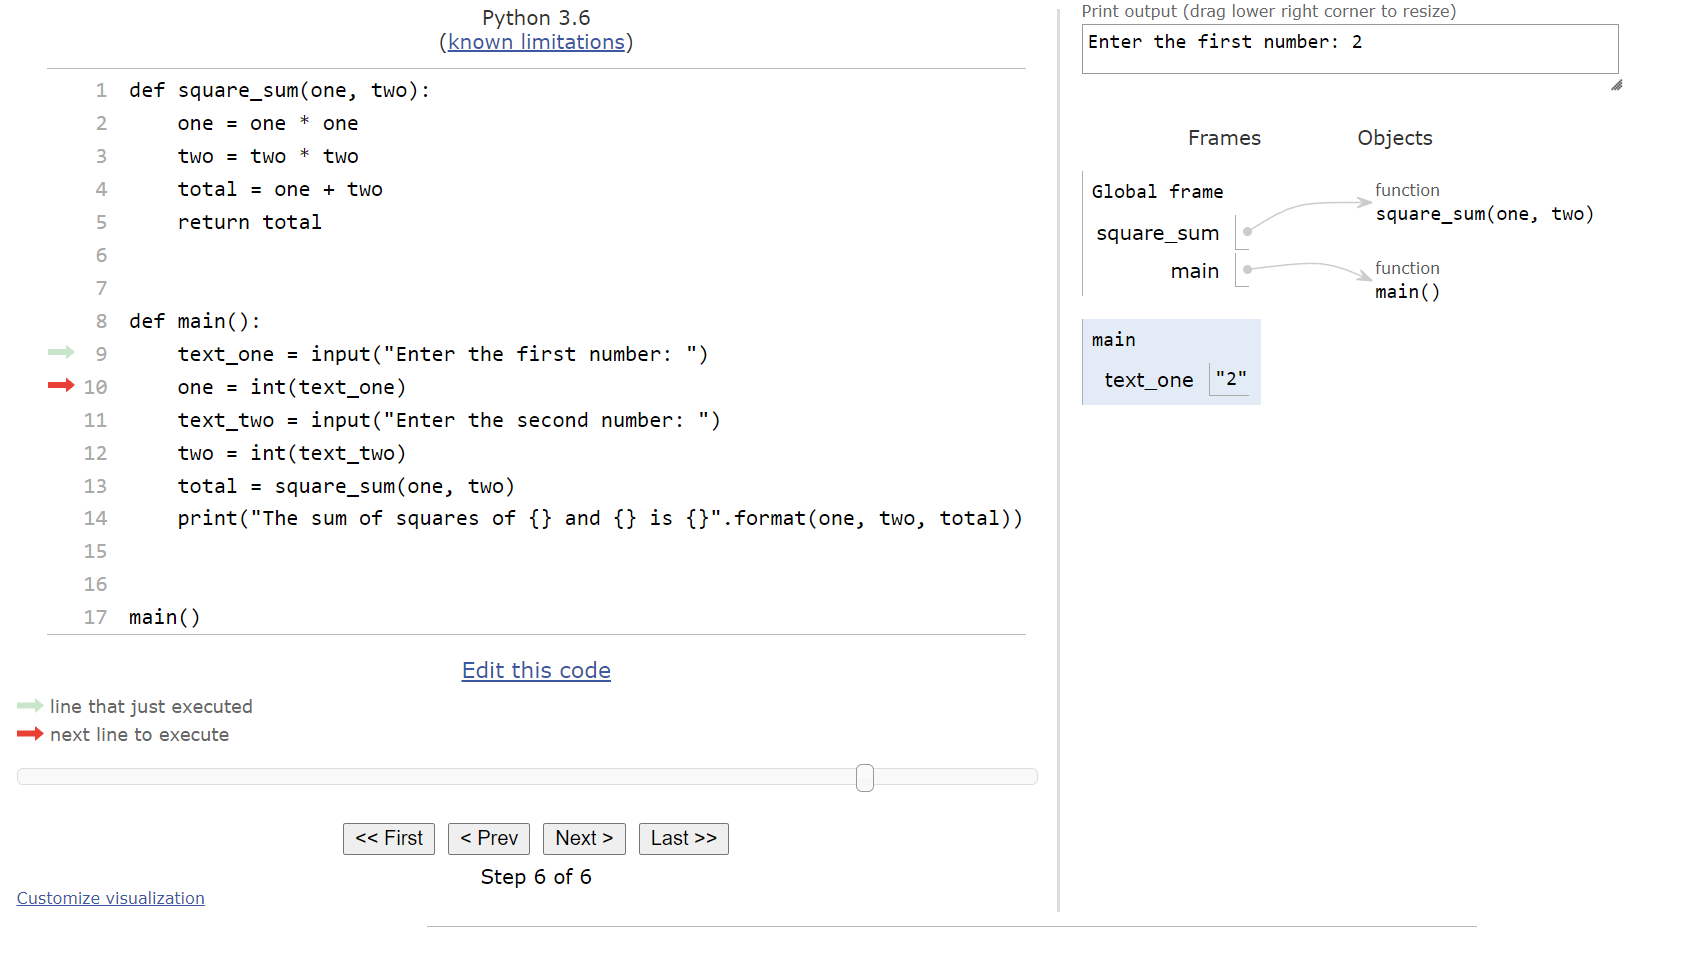
Next, we’ll convert the string value "2" that is currently stored in the text_one variable to an integer using the int() function and store it in the variable one. On the next line, it will ask for input once again:
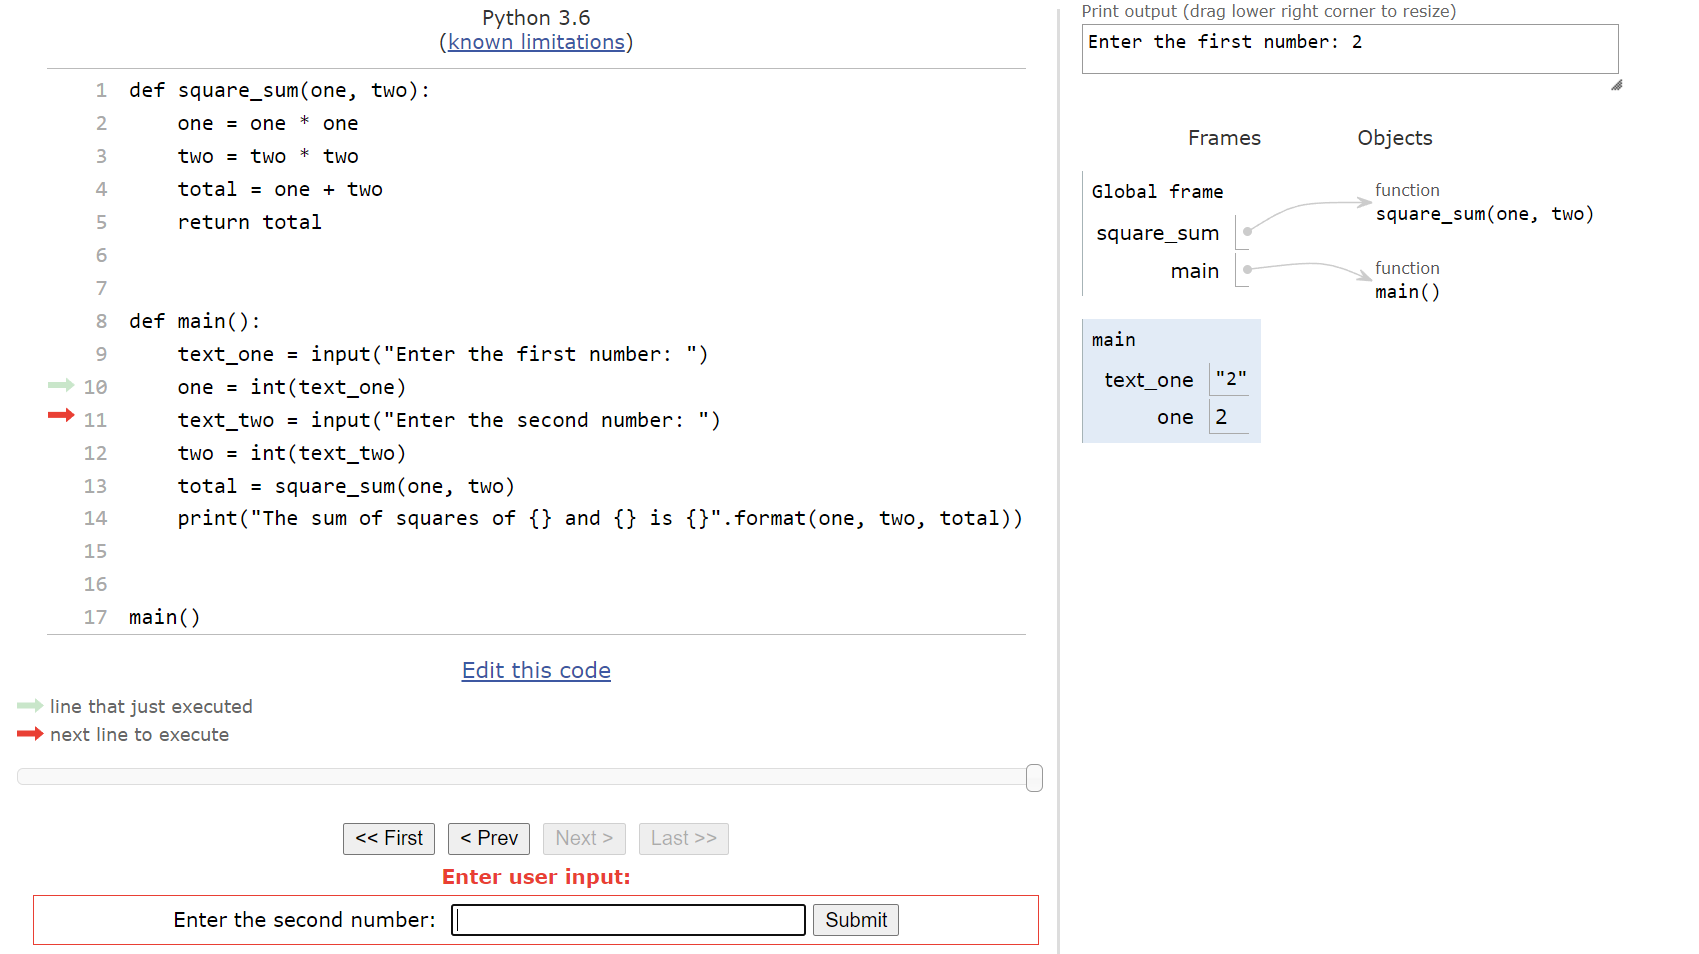
In this case, we’ll assume the user is inputting 3, and then we’ll store it and convert it to an integer stored in the variable two:
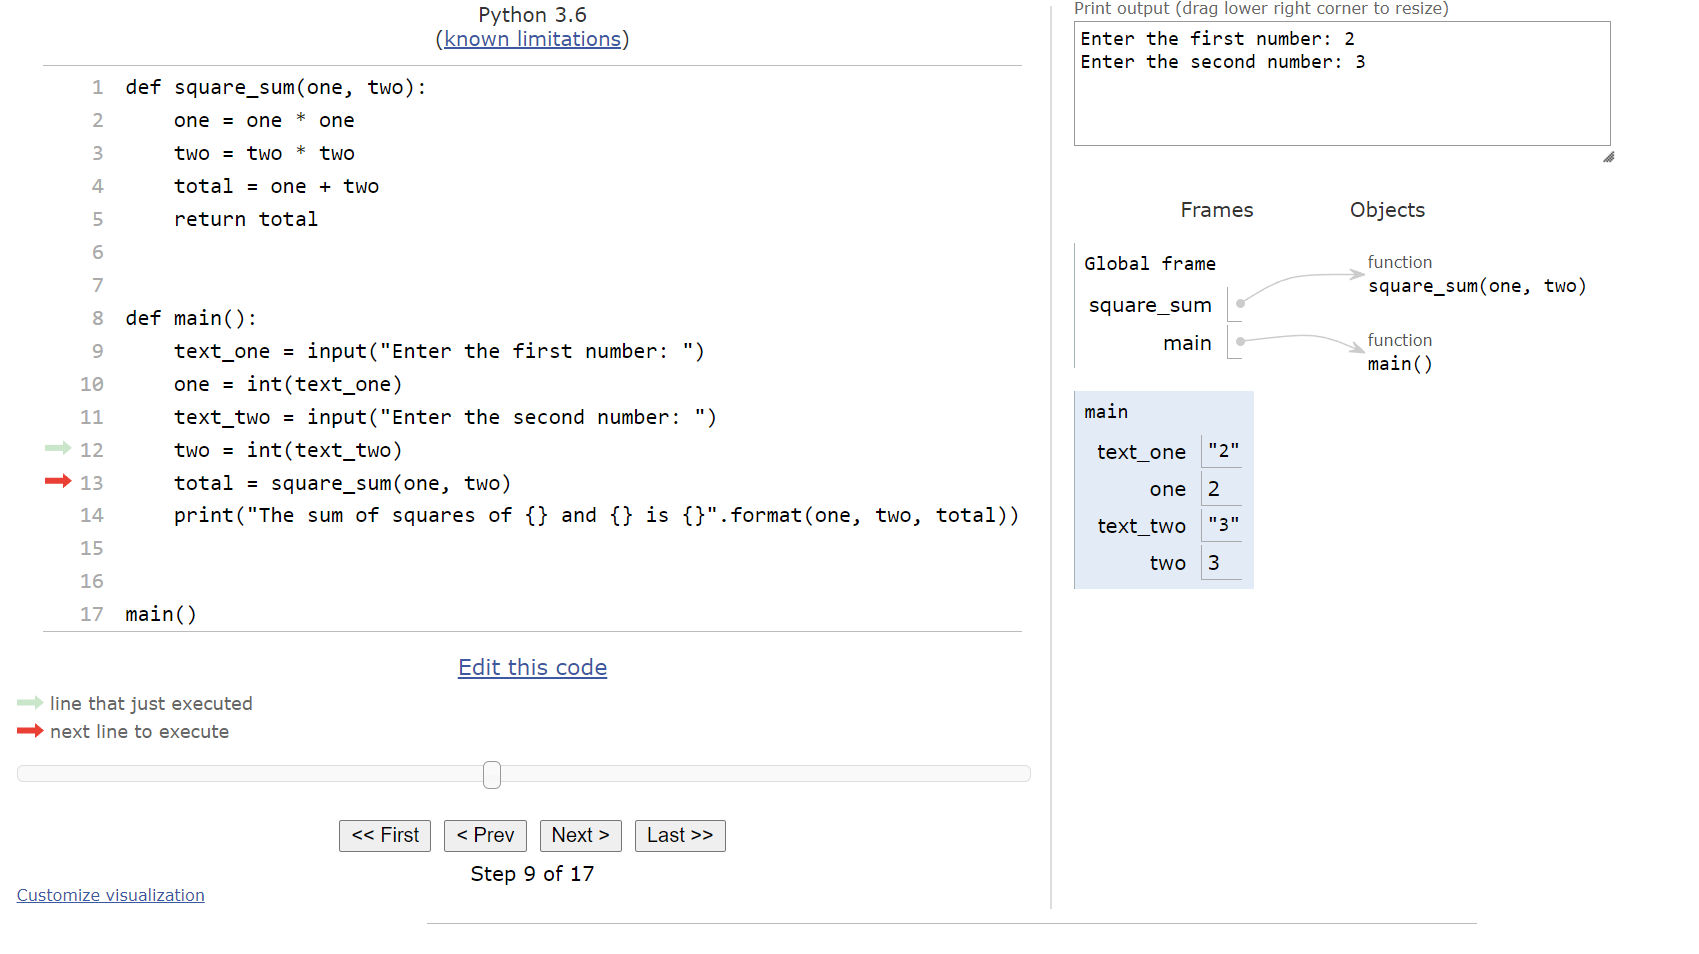
At this point, we’re ready to call the square_sum() function. So, Python Tutor will find the arguments for the function call and prepare to store them in the parameter variables of the function. When we click next, we’ll see this setup in our window:
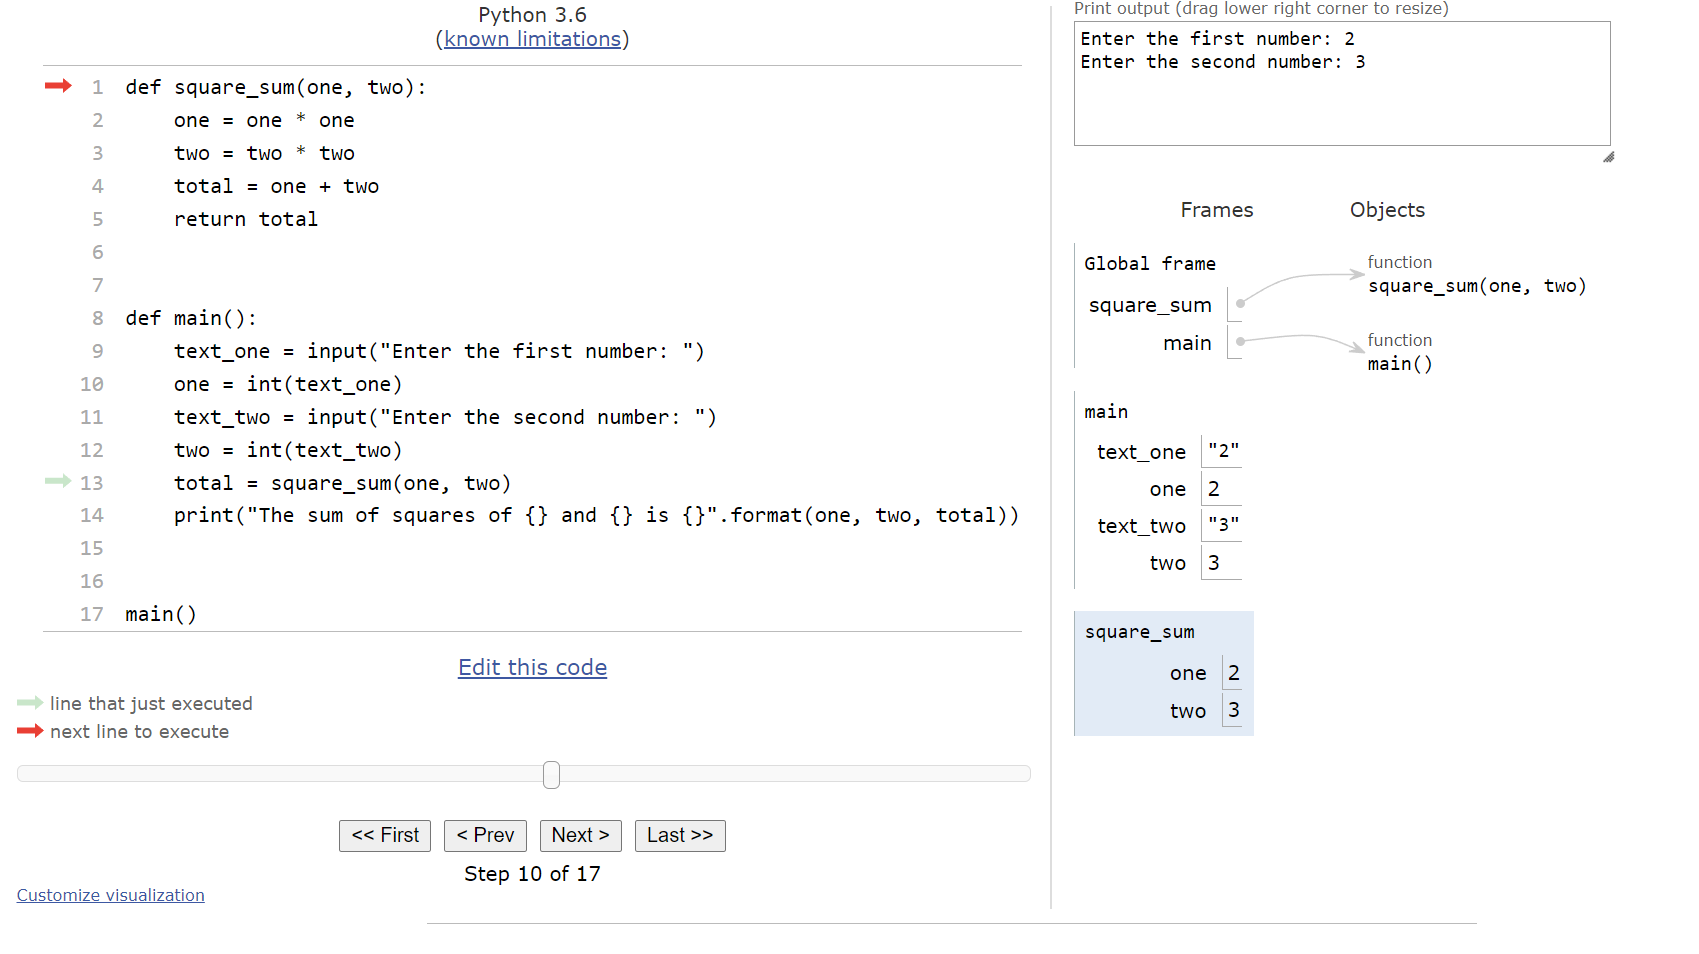
Recall that Python Tutor will create a new frame for the square_sum() function in the frames area and store the variables from that function there. This will become important later when we reach the end of the function. Inside of the square_sum() function, we just perform a few mathematical operations, culminating with the total variable storing the sum of the squares of the two arguments, as shown here:
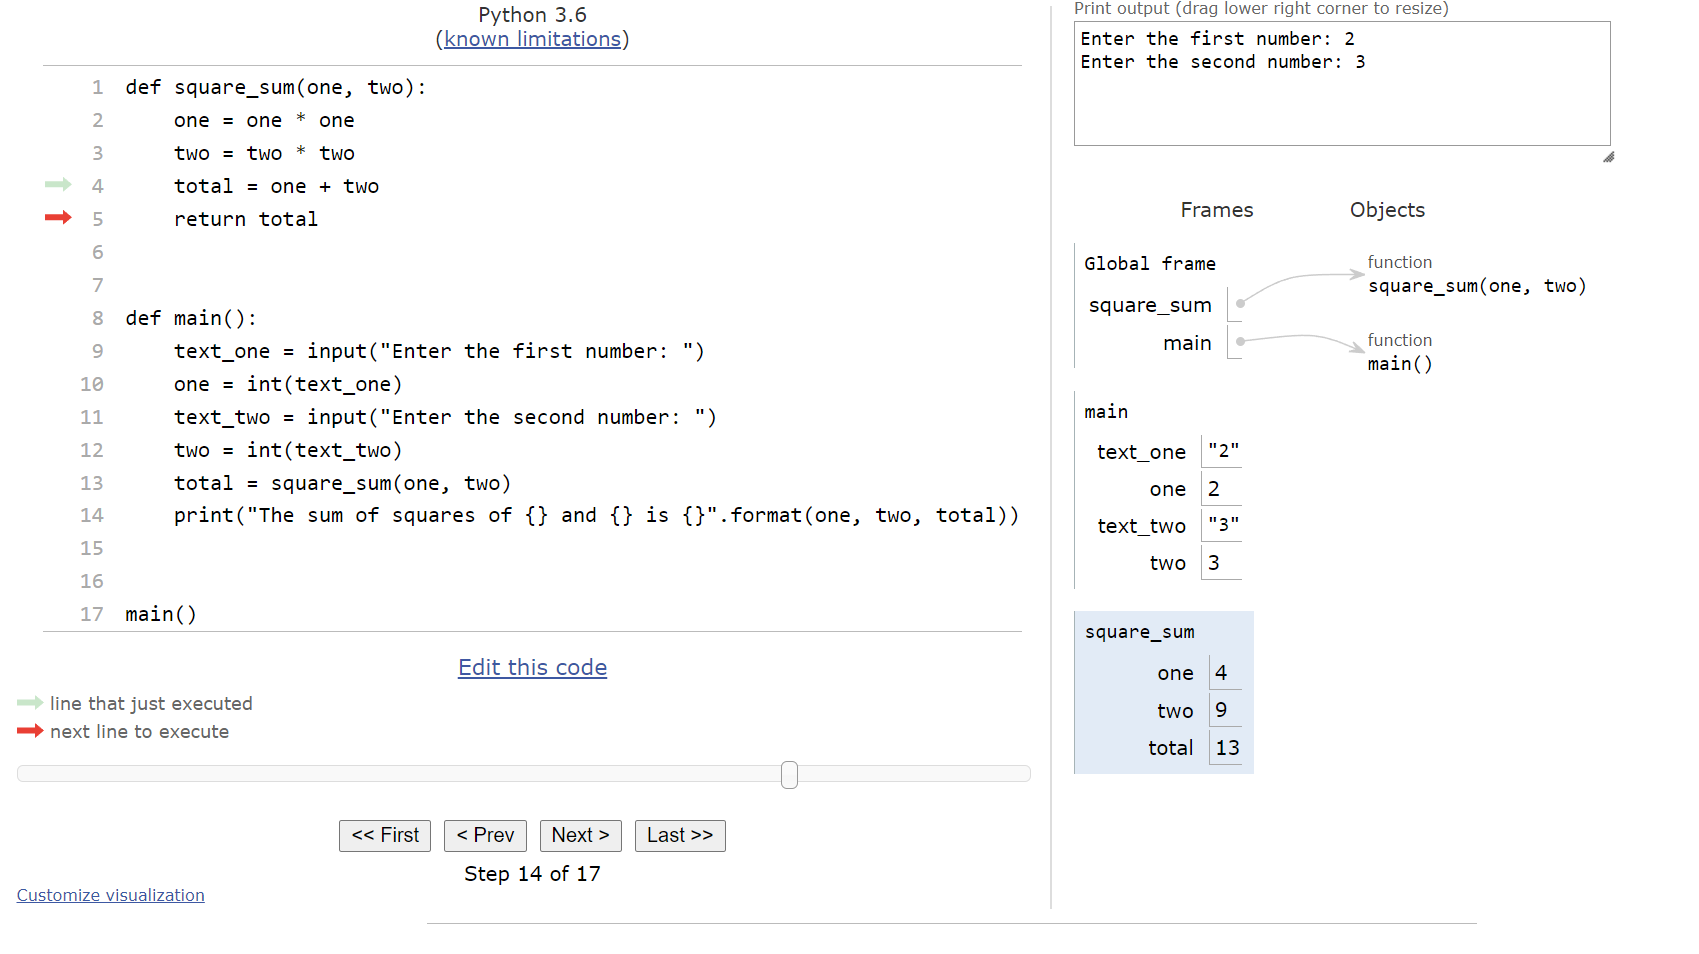
At this point, we’ve reached the return statement at the end of the square_sum() function. When we click next on Python Tutor, we’ll see something new appear:
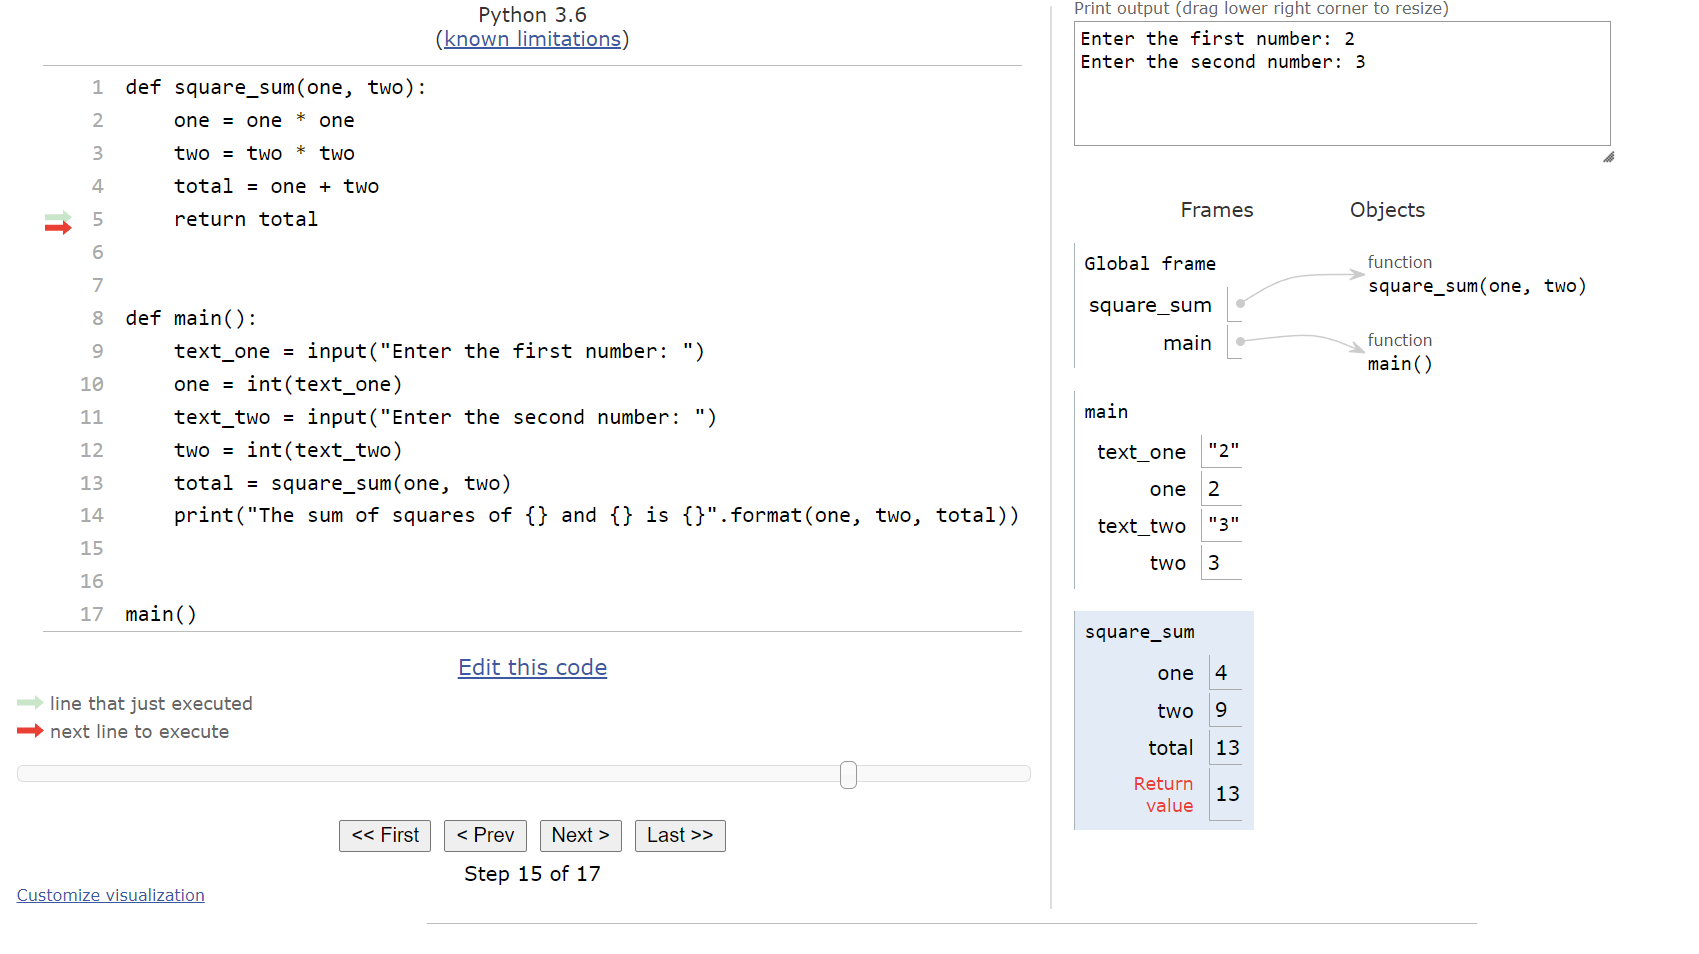
When Python reaches the end of a function, it will record the return value in the function’s frame before leaving the function. This value is what is given back to the main() function. So, when we click next again, we’ll see this state:
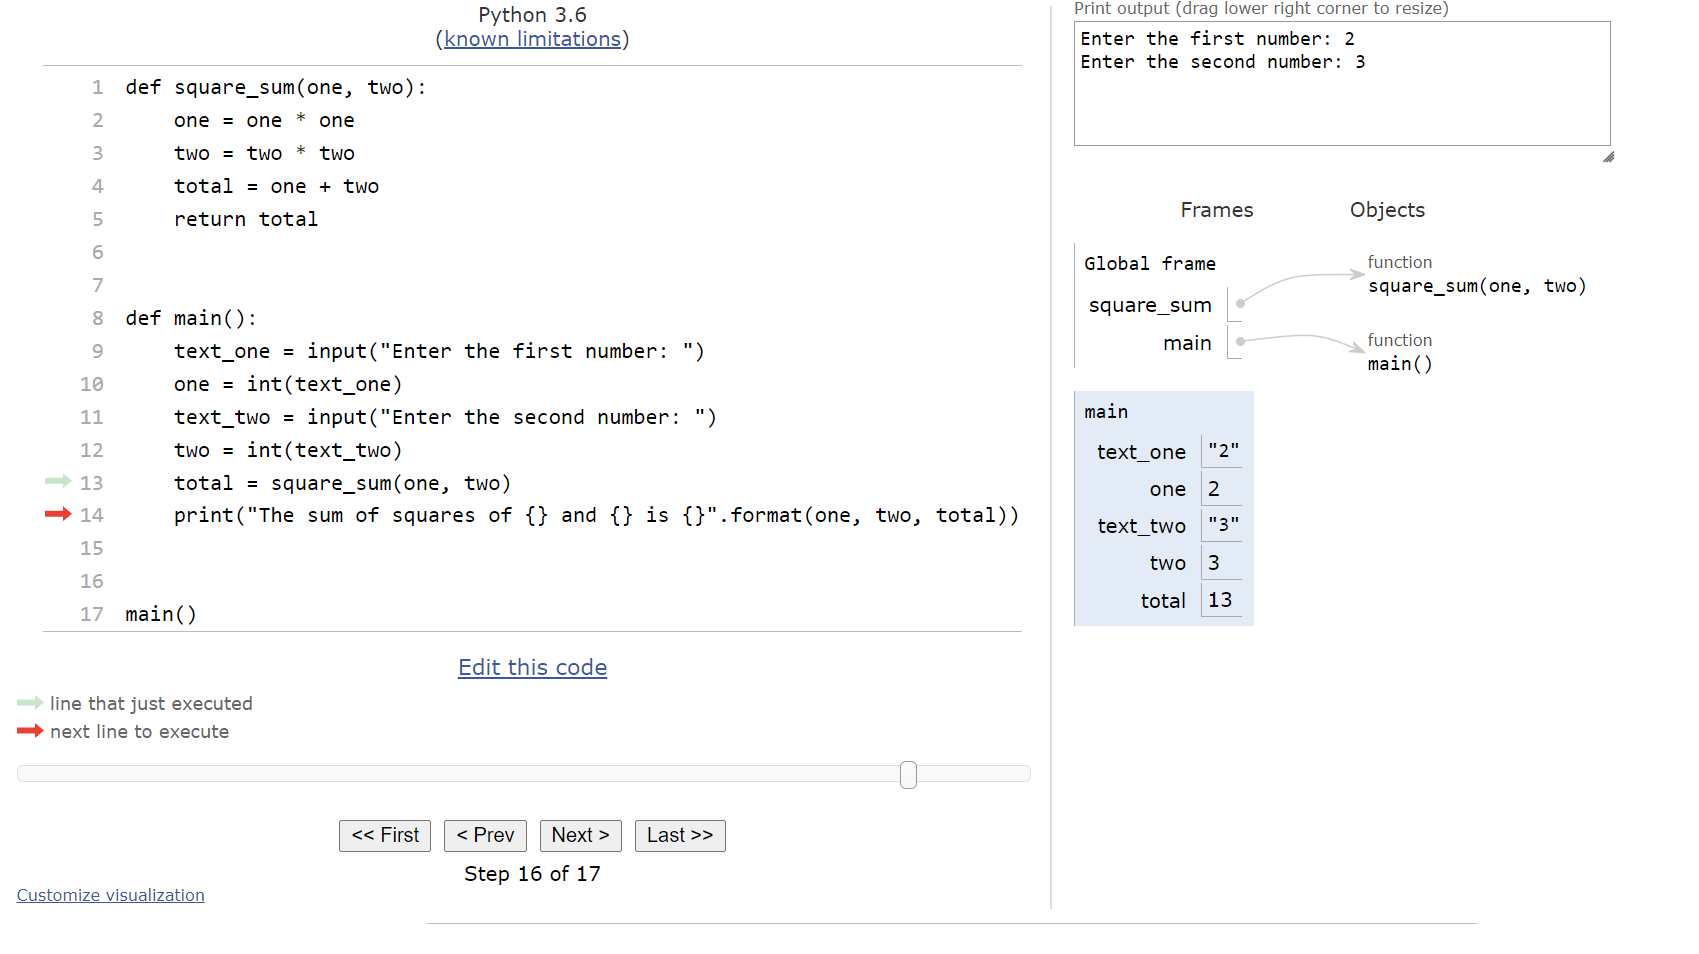
We’re back in the main() function, and now we can see that the new total variable stores the value $13$, which was the returned value from the square_sum() function. So, on this last line, we’ll see that the program will create an output statement using a template string and the string format() method, and it will display output to the user:
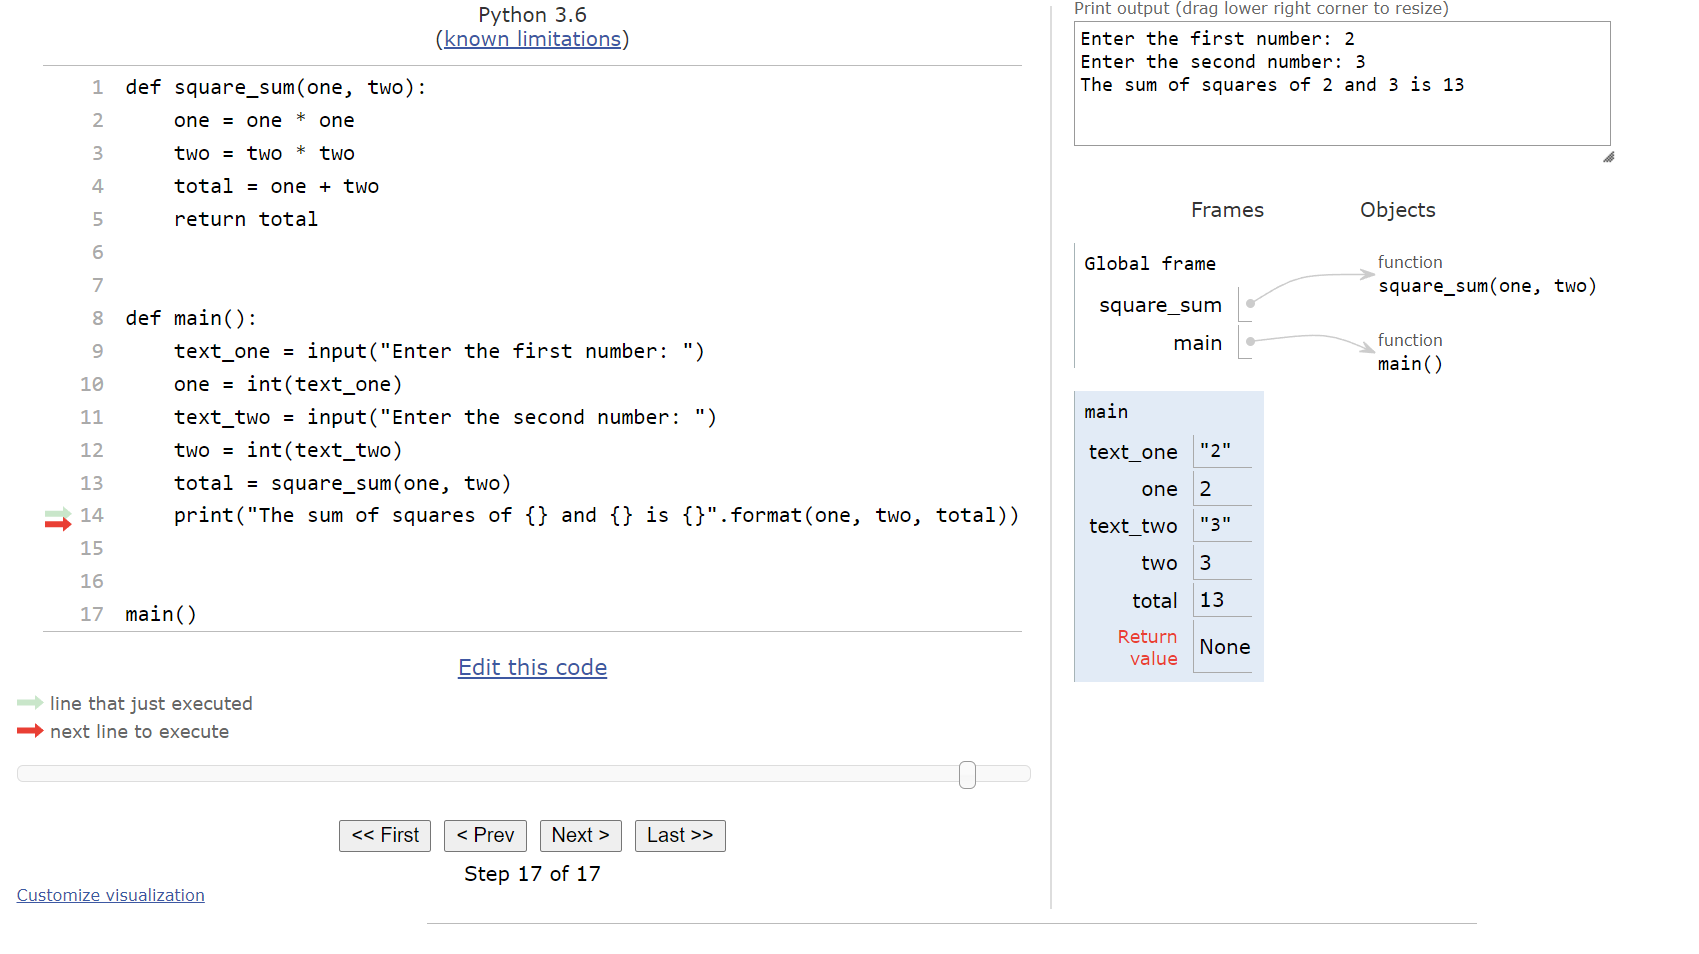
What’s also interesting to note here is the return value of the main() function. Since we didn’t include a return statement at the end of the function, the return value is set to a special value called None in Python. We’ll learn about what that value actually represents in a future course.
The entire process is shown in the animation below:
This review of how a function returns data should be very helpful as we continue to build more complex programs. Remember - we can always paste any Python code into a tool like Python Tutor to run through it step-by-step and see what it really does.
Subsections of Return
Worked Example
YouTube VideoResources
Now that we’ve explored how to create functions, let’s work through a one of our previous worked examples to see how we could approach building that same program, but this time using some functions to simplify our code a bit.
Consider the following problem statement:
Write a program to print the sum of the first
nprime numbers, wherenis provided as input from the user.
This is a very simple problem statement, but it can be very complex to build a program that satisfies it. So, let’s go through the steps and see if we can get it to work.
Handling User Input
Now that we’ve learned about functions and the main() function, we can start with that structure. It is always good practice to include a main() function and a call to the main() function to our code, as shown here:
def main():


main()
Inside of the main() function, the first thing we’ll need to do is get input from the user, since we really can’t do anything else until we know what our goal is. While the problem statement doesn’t include any information about what inputs are acceptable, we can infer that only positive integers should be used as input. So, we can borrow the loop for reading a positive input from earlier to handle all of our input. This time, we’ll put it in a function called positive_input(), and this function will return the value input by the user once it is accepted:
def positive_input():
    x = int(input("Enter a positive integer: "))
    while x <= 0:
        print("Invalid input!")
        x = int(input("Enter a positive integer: "))
    return x


def main():
    n = positive_input()


main()
We’ll also add a call to that function in our main() function, and store the input provided by the user in the variable n inside of our main() function. Notice that the variable x in the positive_input() function is the value that is returned, but we are storing it in a different variable inside of the main() function. We’ll have to keep track of the location of that value as we think about our program. Thankfully, Python Tutor can help us learn how to do this, so feel free to follow along and build this program in Python Tutor and run it there to see how it works.
Building reusable functions, such as the positive_input() function we just created here, is a great way to build our programs. We can always think of previous code that we’ve already written and tested as possible building blocks for future programs, and reusing existing code is a great way to speed up our development process.
Prime Numbers
Next, we need some way to determine if a number is a prime number. Recall from mathematics that a prime number is a number that is only equally divisible by $ 1 $ and itself. For example, $ 7 $ is prime, but $ 8 $ is not since it can be evenly divided by $ 4 $.
Thankfully, we know that we can use the modulo operator % to determine if a number if evenly divisible by another number. So, all we need to do is check if each number less than our chosen number can equally divide it. If none of them can, then our chosen number is prime.
So, let’s write another function that performs this operation. We’ll start by creating a function that accepts our chosen number as a parameter:
def is_prime(n):Next, we know that we need to check all of the numbers from
$ 2 $ up to but not including n. We can do this using a for loop and the range() function:
def is_prime(n):
    for i in range(2, n):
Inside of the for loop, we want to check and see if the iterator variable i can evenly divide the chosen number n using the modulo operator:
def is_prime(n):
    for i in range(2, n):
        if n % i == 0:
            # i equally divides n
Here’s where things get a bit tricky - if i can equally divide n, we know that n is not prime and we don’t have to check any other values. So, in our function, we can just use the return False statement to return the value False from this function. As soon as the function reaches a return statement, even if it is inside of a loop, it will immediately stop the function and go back to where it was called from. In effect, we can use this to shortcut the rest of the loop.
def is_prime(n):
    for i in range(2, n):
        if n % i == 0:
            return False
    # what if we don't return false?
However, what happens if we check all of the values from
$ 2 $ up to n and don’t find a single one that will equally divide our chosen number n? In that case, we’ll reach the end of our for loop, but our function hasn’t returned anything. So, we’ll need to add one extra line to the end of the function to return True if we get to that point.
def is_prime(n):
    for i in range(2, n):
        if n % i == 0:
            return False
    return True
There we go! That’s a quick and easy function to determine if a given number is prime. This function is a great example of a pattern that we’ll see many times as we write complex programs whenever we must determine if a particular situation is true for a given list of numbers. Inside of the loop, we’ll check each case and return False if it isn’t true. If it is true, then we’ll complete the entire loop without returning False, so we’ll need to return True at the end of the function. We’ll see this pattern again in a later lab.
Complete Program
Finally, now that we have the is_prime() function, we can complete our main() function by simply iterating through all possible numbers until we’ve found n prime numbers, and then print the sum:
def main():
    n = positive_input()
    count = 0
    i = 2
    sum = 0
    while count < n:
        if is_prime(i):
            sum = sum + i
            count = count + 1
        i = i + 1
    print(f"The sum of the first {n} prime numbers is {sum}")
This program requires three additional variables. The variable count is used to keep track of the number of prime numbers found, so we’ll increment it inside of the if statement each time we find a prime number. Likewise, the sum variable keeps track of the sum of the prime numbers, which we’ll print at the end. Finally, we use i as our iterator variable, so we must make sure that we increment i each time the while loop iterates, outside of the if statement. We’ll start i at
$ 2 $, since
$ 1 $ is not a prime number mathematically. A very common programming mistake is to forget to increment i outside the if statement, resulting in an infinite loop. Also, we chose to use a while loop instead of a for loop since our program’s goal is to sum up the first n prime numbers, which is better expressed as a while loop instead of a for loop.
The full program is shown below:
def positive_input():
    x = int(input("Enter a positive integer: "))
    while x <= 0:
        print("Invalid input!")
        x = int(input("Enter a positive integer: "))
    return x


def is_prime(n):
    for i in range(2, n):
        if n % i == 0:
            return False
    return True


def main():
    n = positive_input()
    count = 0
    i = 2
    sum = 0
    while count < n:
        if is_prime(i):
            sum = sum + i
            count = count + 1
        i = i + 1
    print(f"The sum of the first {n} prime numbers is {sum}")


main()
Finally, notice that this program doesn’t contain a loop nested within another loop in the same function, but because we are calling the is_prime() function, which contains a loop, from within a loop inside of the main() function, it actually has a nested loop structure inside of it! Feel free to run this program in Python or using Python Tutor to confirm that it works as expected.
Subsections of Worked Example
Functions Practice
Let’s try some simple practice problems. These problems are not graded - they are just for you to practice before doing the real exercises in the lab itself. You can find the answers below each question by clicking the button below each question.
6.1 Reading Code
Write the output that is displayed to the user after running the following Python program:
def foo(word):
    print(word, end=" ")


def bar(word1, word2, word3):
    foo(word1)
    foo(word2)
    print("don't make a", end=" ")
    print(word3)


def main():
    bar("two", "wrongs", "right")


main()6.2 Writing Code
Construct a function (not an entire program) that meets the following specification. When the function is called using this line of code:
fun("s", "e", "l", "r")it should produce the following output:
sellerWhen the same function is called using this line of code:
fun("p", "i", "p", "n")it should produce the following output:
pippin6.3 Writing Code
Write a complete program in Python that meets the following specification:
- It should include a function named
displaythat requires a single parameter. When run, that function should print the value of the parameter to the terminal, but without a newline character at the end. - It should include a function named
squarethat will call thedisplayfunction multiple times to create an ASCII art square as shown in the output example below. Thesquareprocedure may not use theprint(expression)statement directly - it must call thedisplayfunction to produce output. - It should include a
mainfunction that only calls thesquarefunction. - It should call the
mainfunction at the end of the code to start the program.
When the program is run, it should produce the following output:
* * * *
* * * *
* * * *
* * * *Summary
In this lab, we introduced several major important topics in Python. Let’s quickly review them.
Python Functions
A function in Python is a piece of code that is given a name, which can then be run by calling it elsewhere in the program.
To create a function, we use the following structure:
def function_name(parameter1, parameter2):
<block of statements>- Function names follow the same rules as variable names.
- Functions may require 0 or more parameters, placed in parentheses after the function name. Multiple parameters are separated by commas.
- When called, a function will run the lines of code indented beneath the function definition.
To call a function, we use the following structure:
function_name(argument1, argument2)- A function call is the function name, followed by parentheses
(). - Inside of the parentheses, a matching argument must be included for each parameter required by the function. Multiple arguments are separated by commas.
- Each argument may be an expression that evaluates to a value.
- The values of each argument are copied into the function. When the function ends, the original arguments are unchanged.
Returning Data from Functions
return expressionwill return the value ofexpressionto where the function was called from.- Function calls can be used in assignment statements to store return values, or as part of other expressions.