The Scratch editor consists of several parts, pictured below:
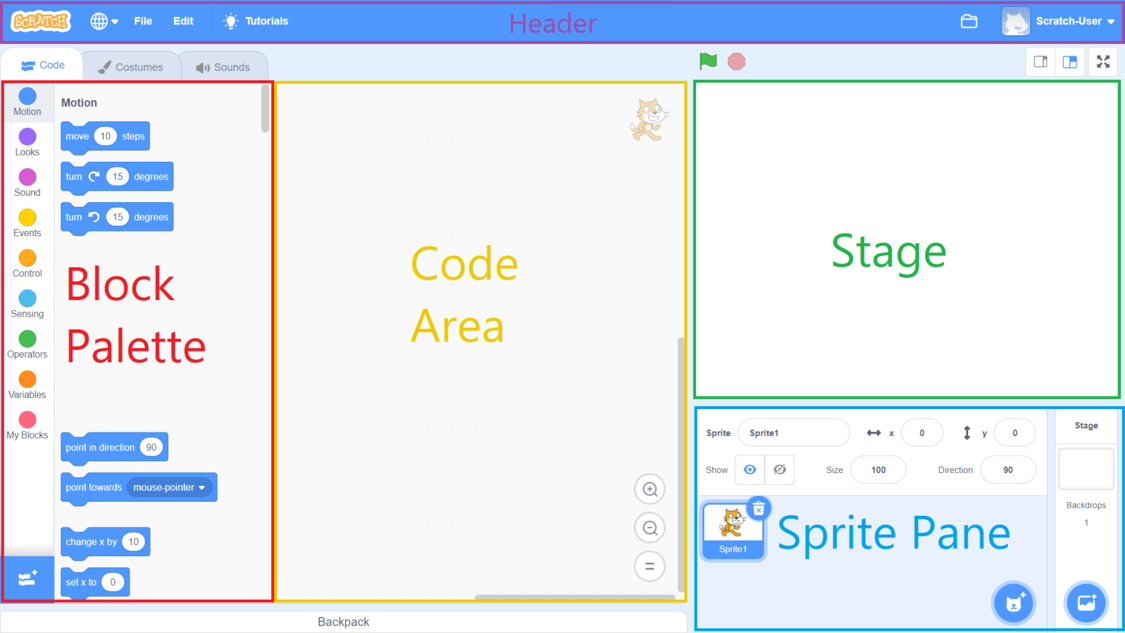
Stage
Scratch is a multimedia programming environment, which means unlike most programming languages that write output to a text console, it displays its output graphically, as well as being able to play sounds through the computer’s speakers. The stage is where the program’s graphical output is displayed. This includes a background which can be changed (called the “Backdrop”), much like set dressing of a theatrical stage.
The “actors” on the stage are Sprites - a term that was borrowed from 2d computer games. A sprite is simply an image controlled by the program’s code. Sprites can be moved around the stage, and animated by switching the image they display (their “Costume”). Sprites can also display text in speech or thought bubbles, be scaled, have different graphical effects applied to them, and even be cloned. We’ll explore each of these concepts and how they correspond to ideas in Computer Science in future lessons.
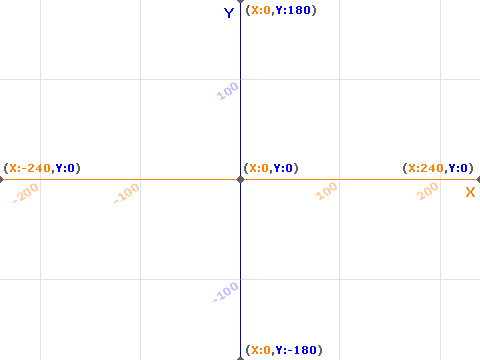
The stage has a coordinate system which is based on Cartesian coordinates. It has an x- and y-axis, with origin in the center of the stage. The x-axis increases to the right, and decreases to the left, with the right edge of the stage at 240 and the left edge at -240. The y-axis increases in an upward direction and decreases in the downward, with the top of the stage at 180, and the bottom at -240. An angle of 0 points along the positive x-axis, and rotates counter-clockwise to 360 degrees.
The green flag at the top of the Stage acts like a play button on a DVD player - it runs the program. And the red stop sign stops the program. The other buttons switch between a small stage, large stage, or full-screen stage view.
A Scratch program can be shared by embedding it in a website - when this is done, it often is displayed in a player-only mode, where all that is shown is the stage.
Sprite Pane
The Sprite Pane allows you to select and display details about the sprites and the stage. The currently selected sprite (or stage) will have a thick blue outline around it. The details displayed at the top of the Sprite Pane include the name of the sprite, it’s x and y position on the stage, buttons to toggle its visibility, and its current size (as a percentage), and its rotation (an angle measured in degrees). Each of these is editable - you can change them by directly typing into the corresponding text bubble or clicking the show/hide button.
Code Area
The Code Area is where the code to control the currently selected sprite or the stage is displayed. A small semi-translucent image of the sprite/stage appears in the upper-right corner to help inform you which sprite (or the stage) you are currently editing. The bottom-left corner includes buttons for zooming in and out, while the button displaying the equal sign (=) will center the code in the Code Area, changing the zoom level as need to ensure that all code is visible.
Block Palette
The Block Palette displays all of the blocks that are available to write your programs with. You write programs by dragging blocks from the Block Palette into the Coding Area and snapping them together. The available blocks are organized thematically (Motion, Looks, Sound, Events, Control, Sensing, Operators, Variables, and My Blocks), and clicking one of the categories on the far right will scroll to that block’s category in the Block Palette. Note too that all blocks from a category are the same color. We will discuss the specific blocks in much more detail in future lessons.
In the the lower-right corner of the Block Palette is a button that allows you to load Scratch Extensions, which provide additional functionality in Scratch. We’ll discuss some of them soon.
Header
The header provides menu options for saving and loading projects, changing the language used by Scratch on its blocks and editor, and to display tutorials.
On the right side of the header are links for interacting with your account on the Scratch website, scratch.mit.edu. These will not appear in the desktop version or Codio.
Underneath this header are three tabs, Code, Costumes, and Sounds. We’ll explore these in future lessons as well - for now, we’ll focus on the Code tab.