Introduction to Scratch
This textbook is used by CC 111, CC 711, and the Cyber Pipeline outreach program to teach basic Scratch programming to first-time programmers.
This textbook is used by CC 111, CC 711, and the Cyber Pipeline outreach program to teach basic Scratch programming to first-time programmers.
An overview of the Scratch programming language and environment
This book is intended for educators wanting to learn Scratch, a pedagogical programming language and multimedia programming environment developed at MIT to help anyone learn the basic concepts and skills of computer science. Scratch is currently in its third version, and can be used both online or as a desktop application. The online version can be reached at https://scratch.mit.edu, and can be accessed through your browser on any internet-connected computer. If you set up an account, your work will be stored in the cloud, and you can return to it at any time, from any machine you log in with. The desktop version can be downloaded from https://scratch.mit.edu/download and is available for Windows, MacOS, ChromeOS, and Andriod. You do not need a Scratch account to use the desktop version, and projects created with it are stored on your local computer, not the cloud. Finally, if you are using this book for a K-State class, you will complete your assignments using a version of Scratch embedded in Codio. All three versions of Scratch are nearly identical, and we’ll call out what differences exist as we cover Scratch’s features.
Scratch builds upon a long history of teaching programming and computational thinking in schools, including the LOGO programming language and the work of Seymor Papert and the Squeak/eToys programming system. It incorporates many best practices and ideas derived from this proud history.
In 2006, Jeanette Wing published a number of papers arguing Computational Thinking - problem-solving approaches utilizing the power of compututers - were increasingly a fundamental skill needed by all students. She built her case on the recognition of the transformative effect computing technology and computational approaches were having on all disciplines in the late 20th and early 21st century (and not just the STEM fields)1. This helped inspire a national push to incorporate computational thinking into K-12 education as a new fundamental skill.
But what exactly is computational thinking? Essentially, it is solving problems like a computer scientist would. Typically this would mean studying a problem, then developing a program that can be run on a computer to solve it. Thus, computational thinking and programming are intractably linked, as one of the primary tools a computer scientist uses to solve problems is a programming language. But programming itself is not equivalent to computational thinking, no more than addition and subtraction are equivalent to mathematics, rather, programming is a tool utilized in computational thinking to express a problem-solving approach, much like addition and subtraction are used in mathematical equations. The ISTE and CSTA have developed an “Operational Definition of Computational Thinking for K-12 Education”2 that can be useful for an aspiring teacher:
Computational thinking (CT) is a problem-solving process that includes (but is not limited to) the following characteristics:
- Formulating problems in a way that enables us to use a computer and other tools to help solve them.
- Logically organizing and analyzing data
- Representing data through abstractions such as models and simulations
- Automating solutions through algorithmic thinking (a series of ordered steps)
- Identifying, analyzing, and implementing possible solutions with the goal of achieving the most efficient and effective combination of steps and resources
- Generalizing and transferring this problem solving process to a wide variety of problems
These skills are supported and enhanced by a number of dispositions or attitudes that are essential dimensions of CT. These dispositions or attitudes include:
- Confidence in dealing with complexity
- Persistence in working with difficult problems
- Tolerance for ambiguity
- The ability to deal with open ended problems
- The ability to communicate and work with others to achieve a common goal or solution
Note that much of computational thinking is not specific to computer science - many are skills and dispositions used across multiple discipines. But an overreaching aspect of computational thinking is that how problems are formulated, data is organized, and models and simulations are represented are explicitly tied to the computer we are using to solve them.
Wing, Jeanette, “Computational Thinking”, Communications of the ACM, March 2006/Vol. 49, No. 3 ↩︎
ISTE and CSTA, 2011. “Operational Definition of Computational Thinking for K-12 Education” ↩︎
It is important to understand that different programming languages use different approaches to modeling computational processes carried out on a computer, much like different human languages use different ways of expressing ideas about the world. Thus, the expression of computational solutions you might build are heavily influcenced by the programming language you express them in. This also feeds into the problem-solving process (computational thinking), which will look different if you are using Scratch or if you are using Python, or any other language. That is okay, but you need to be aware of it because your approach to teaching computational thinking will necessarily depend on the language you are using as part of your instruction.
With this in mind, we turn to Brennan and Resnick’s Computational Thinking Framework1, which was developed specifically for the Scratch programming language consisting of seven concepts, four practices, and three perspectives, reprinted below:
Concepts
- sequence: identifying a series of steps for a task
- loops: running the same sequence multiple times
- parallelism: making things happen at the same time
- events: one thing causing another thing to happen
- conditionals: making decisions based on conditions
- operators: support for mathematical and logical expressions
- data: storing, retrieving, and updating values
Practices
- experimenting and iterating: developing a little bit, then trying it out, then developing more
- testing and debugging: making sure things work — and finding and solving problems when they arise
- reusing and remixing: making something by building on existing projects or ideas
- abstracting and modularizing: exploring connections between the whole and the parts
Perspectives
- expressing: realizing that computation is a medium of creation, “I can create.”
- connecting: recognizing the power of creating with and for others, “I can do different things when I have access to others.”
- questioning: feeling empowered to ask questions about the world, “I can (use computation to) ask questions to make sense of (computational things in) the world.”
The framework is also available as a handy one-page handout and website
We will refer to aspects of this framework throughout this book, so it’s a good idea to familiarize yourself with it..
Brennan, Karen, and Mitchel Resnick. “New frameworks for studying and assessing the development of computational thinking.” Proceedings of the 2012 annual meeting of the American educational research association, Vancouver, Canada. Vol. 1. 2012. ↩︎
Programming is essentially writing a set of instructions for the computer to carry out. These instructions are part of a programming language that has a well-defined syntax and grammar, and is in many ways similar to a human langauge (albeit with a much more limited vocabulary). For example, here is a program written in LOGO that moves a robot in a rectangle:
forward 100
right 90
forward 100
right 90
forward 100
right 90
forward 100
However, a computer can only interpret instructions that conform exactly to the syntax and the grammar of the language. Thus, the following program would fail to work:
Forward 100
Right 90
Forward 100
Right 90
Forward 100
Right 90
Forward 100
Can you spot the problem?
Learning to program therefore involves several challenges - we must learn the syntax and grammar of a language, and a new way of thinking. This challenge is compounded by the need to get syntax and grammar exactly correct. Unlike a language arts teacher, who can see past typos and mispellings to understand our intent, a computer simply cannot.
Scratch and other block-based programming languages seek to make this learning process easier by reducing the cognitive load involved. In a block-based language, instead of typing code, blocks representing the code are dragged around the screen and “snap” together. This snapping only occurs when the block is in a location that is appropriate for the language, effectively making it impossible for the programmer to make syntax errors or mistype commands. This allows the learner to focus more on the logic of the program and how the computer actually interprets the code that we write.
That last bit, understanding how the computer processes our code, is an important part of developing our computer science skills. We sometimes call this having a “mental model” of the computer. If we have a good mental model, we can understand what a program does even without running it. So in this course, we’ll introduce not only the blocks that make up the Scratch language, but also aspects of how the Scratch Virtual Machine (its computer) makes sense of those blocks.
The Scratch editor consists of several parts, pictured below:
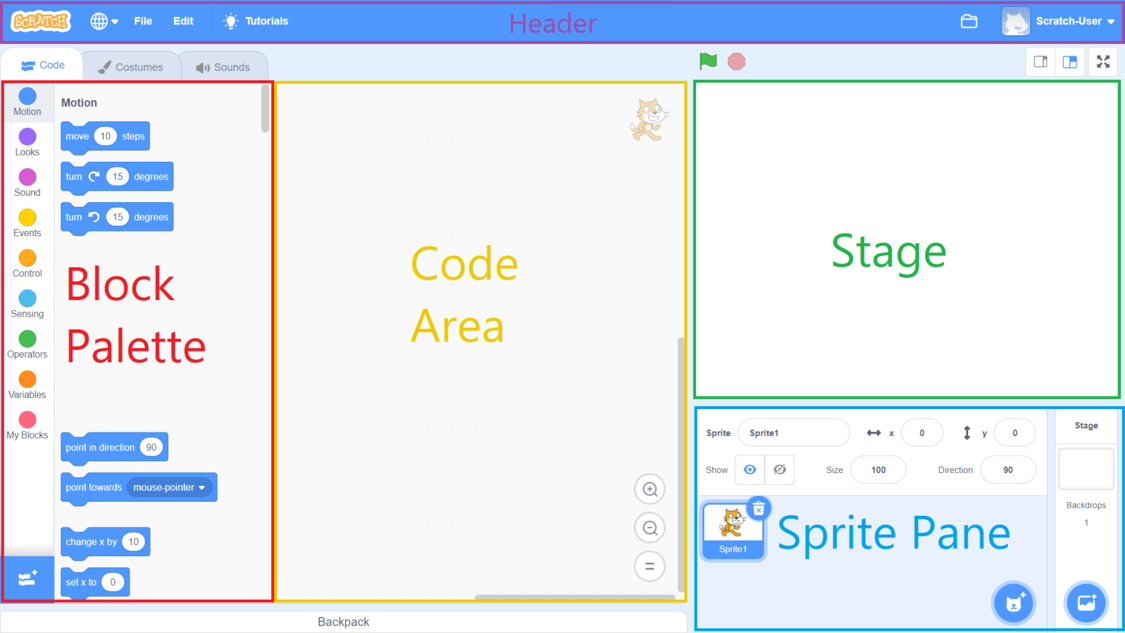
Scratch is a multimedia programming environment, which means unlike most programming languages that write output to a text console, it displays its output graphically, as well as being able to play sounds through the computer’s speakers. The stage is where the program’s graphical output is displayed. This includes a background which can be changed (called the “Backdrop”), much like set dressing of a theatrical stage.
The “actors” on the stage are Sprites - a term that was borrowed from 2d computer games. A sprite is simply an image controlled by the program’s code. Sprites can be moved around the stage, and animated by switching the image they display (their “Costume”). Sprites can also display text in speech or thought bubbles, be scaled, have different graphical effects applied to them, and even be cloned. We’ll explore each of these concepts and how they correspond to ideas in Computer Science in future lessons.
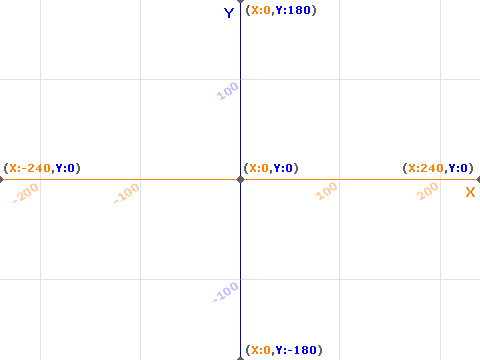
The stage has a coordinate system which is based on Cartesian coordinates. It has an x- and y-axis, with origin in the center of the stage. The x-axis increases to the right, and decreases to the left, with the right edge of the stage at 240 and the left edge at -240. The y-axis increases in an upward direction and decreases in the downward, with the top of the stage at 180, and the bottom at -240. An angle of 0 points along the positive x-axis, and rotates counter-clockwise to 360 degrees.
The green flag at the top of the Stage acts like a play button on a DVD player - it runs the program. And the red stop sign stops the program. The other buttons switch between a small stage, large stage, or full-screen stage view.
A Scratch program can be shared by embedding it in a website - when this is done, it often is displayed in a player-only mode, where all that is shown is the stage.
The Sprite Pane allows you to select and display details about the sprites and the stage. The currently selected sprite (or stage) will have a thick blue outline around it. The details displayed at the top of the Sprite Pane include the name of the sprite, it’s x and y position on the stage, buttons to toggle its visibility, and its current size (as a percentage), and its rotation (an angle measured in degrees). Each of these is editable - you can change them by directly typing into the corresponding text bubble or clicking the show/hide button.
The Code Area is where the code to control the currently selected sprite or the stage is displayed. A small semi-translucent image of the sprite/stage appears in the upper-right corner to help inform you which sprite (or the stage) you are currently editing. The bottom-left corner includes buttons for zooming in and out, while the button displaying the equal sign (=) will center the code in the Code Area, changing the zoom level as need to ensure that all code is visible.
The Block Palette displays all of the blocks that are available to write your programs with. You write programs by dragging blocks from the Block Palette into the Coding Area and snapping them together. The available blocks are organized thematically (Motion, Looks, Sound, Events, Control, Sensing, Operators, Variables, and My Blocks), and clicking one of the categories on the far right will scroll to that block’s category in the Block Palette. Note too that all blocks from a category are the same color. We will discuss the specific blocks in much more detail in future lessons.
In the the lower-right corner of the Block Palette is a button that allows you to load Scratch Extensions, which provide additional functionality in Scratch. We’ll discuss some of them soon.
The header provides menu options for saving and loading projects, changing the language used by Scratch on its blocks and editor, and to display tutorials.
On the right side of the header are links for interacting with your account on the Scratch website, scratch.mit.edu. These will not appear in the desktop version or Codio.
Underneath this header are three tabs, Code, Costumes, and Sounds. We’ll explore these in future lessons as well - for now, we’ll focus on the Code tab.
The Scratch Computational Thinking Concepts Explained
At the core, a program is simply a step-by-step set of instructions the computer will carry out. In Scratch, these instructions take the form of blocks, which snap together in a sequence, which we typically refer to as a block stack (or stack).
For a sequence to be executed (carried out), it must start with a “hat” block, so called because its shape resembles a baseball cap:

This block indicates the conditions that will trigger the execution of blocks that are snapped into place beneath it. The commands of these other blocks will be carried out in order - a sequence. For example, the following script will play the first two measures of the tune “Hot Cross Buns”:

Clicking the green flag will play each note in the order they appear in the sequence. You can see the full program here or run it below:
If we leave off the hat block, then the sequence of blocks will never be executed. We call a stack without a hat block an orphan stack.
Often, programmers will leave a sequence of blocks that they may come back to work on later orphaned intentionally, as they might comment out sections of code in another programming langauge. However, best practice is to remove orphaned code once you are sure it is no longer needed, as having many orphan stacks makes the script harder to read and understand.
You can have multiple stacks in a Scratch program, and each will execute when its starting condition is met. For example, if two stacks both start with a when flag clicked block, both will run when the green flag is clicked. This is covered in more detail in the paralleism section.
Strings
Numbers
Booleans
Variables
Lists
String Operators
Mathematical Operators
Boolean Operators
In programming, an event triggers the execution of code. You’ve already worked extensively with one event in Scratch, the when flag clicked block:

Clicking the green flag button on the stage triggers the hat block to execute.
A related event is triggered when you click the red stop sign button. That button stops all running scripts, effectively stopping the program. You can also trigger this event with the stop () block:

In addition to stopping all scripts in the program, the stop () block can be used to stop the other scripts of this sprite, or the specific script it appears in.
There are many other events and blocks that interact with them in Scratch. Let’s examine each.
User events are events triggered in some way by the user. The green flag is the most common example - clicking it will execute any stack of blocks starting with a when flag clicked block:
Likewise, the when () key pressed block will execute its block stack when the specified key is pressed. You can set it to the arrow keys, letter keys, space, or ‘any’ key:

You can also use the when this sprite clicked block to trigger a stack of blocks when the user clicks on its sprite.
![]()
![]()
Finally, a unique event in Scratch is represented by the when [loudness] > () which will trigger when a microphone attached to the computer detects sound louder than the specified threshold:
![when [loudness] > () block](/intro-scratch/images/when-loudness-greater-than.svg)
Scratch includes a timer that starts when the green flag is clicked, and counts up in seconds. Its value can be accessed with the timer reporter block, and it can be restarted with the reset timer block. Both are found in the Sensing palette.


In addition to these two blocks, the when [timer v] > () block can be used to trigger a block stack when the timer reaches a certain value, i.e. 10 seconds:

The when backdrop switches to () block triggers when the backdrop is changed to the selected value:

This can be especially helpful when a program is organized as a state machine with each backdrop representing a different state. One example of this approach would be an animated storybook with each backdrop serving as a new “page” of the story.
When a new clone is created it executes any block stacks starting with the when I start as a clone hat block:

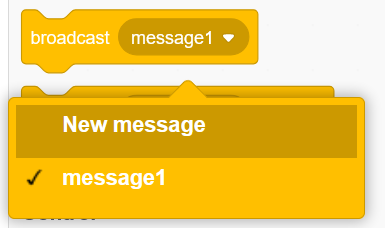
Finally (and perhaps most powerfully), the programmer can create custom events in Scratch using the broadcast () or broadcast () and wait blocks. These blocks send a message that executes any corresponding when I receive () hat blocks:

A new message can be created by selecting the “New message” option in any of these block’s selection menus:
The broadcast () block sends the corresponding message and immediately continues executing blocks in its own stack:

In contrast, the broadcast () and wait sends the message and then pauses its stack’s execution until all when I recieve () stacks have finished executing:

Note this does not necessarily mean the entire stacks are executed before the pause ends, as the other stacks will pause at wait () seconds and at each loop iteration. See the parallelism section for more details.
Parallelism refers to doing more than one thing in parallel (at the same time). When we have two stacks of blocks both starting with a when flag is clicked, these both trigger thier execution when the green flag button is clicked, and appear to execute at the same time. Likewise, two stacks starting with when I recieve () blocks listening for the same message will be triggered at the same time.
Parallism exists between stacks of blocks in the same Sprite, and also between all Sprites (and the Stage) - essentially any time an event occurs, each corresponding hat block will execute.
However, there is some order to parallel actions in Scratch. Consider these scripts:

The sprite containing them can only display one of the speech/thought baloons at a time, so one of these will take precidence over the other. Generally, they will execute in the order the stacks were created, but there is no guarantee of this.
Establishing an order to script execution is called synchronization, and there are several techiques we can employ.
One of the easiest is to add a wait (0) seconds block in the stack we want to go last. A wait block pauses the execution of the current stack, and allows other stacks to finish their execution. Setting the seconds to 0 means that the pause is infantesmally small, but it does allow the other block stacks to run first (we call this a yield in computer science). In Scratch, loops also yield after each iteration.
While this approach works, it is not exactly intuitive, and it only ensures ordering between two stacks. However, it is important to know, as it can help understand the behavior of parallel stacks.
A far more powerful approach is using broadcast () and when I recieve () blocks to trigger stacks in sequence. For example, the following script first executes the say () for () seconds block, then triggers the think () for () seconds block:
While the example is trivial, this appraoch to synchronizing parallel stacks is extremely powerful. You can have multiple stacks in multiple sprites triggered by each message, and you can define as many messages as you need.
One common design pattern using this approach is the Get Ready and Go Design Pattern, which helps ensure all sprites start in the expected state when a Scratch program is run.
An exploration of the blocks from which Scratch programs are built
As a block-based programming langauge, Scratch programs are built from snippets of code represented by blocks. These blocks have a quasi-puzzle piece shapes that helps indicate how they can fit together. Consider this example program that counts to ten:

Here we see a number of different blocks snapped tightly together to form a complete, simple program. This chapter will introduce the various blocks available in Scratch, as well as explain thier basic functionality and use.
Scratch blocks come in several shapes, which help identify how they can snap together and are intended to be used:
| Name | Shape | Use |
|---|---|---|
| Hat Block |
|
First block in a stack of blocks, and identifies what event will start execution of the block stack |
| Stack block | 
|
The primary shape of block in a block stack, typically executes some kind of instruction |
| Cap block | 
|
Can only be used as the last block in a block stack as it ends the execution of the stack |
| C block | 
|
Also used in stacks, but allows for one or more stacks of blocks to be snapped inside that will be conditionally or repeatedly executed |
| Reporter block | 
|
Snaps into the input field of another block, providing a value for that block to use |
| Boolean block | 
|
Snaps into a boolean input field of another block, and provides a value of true or false |
Scratch blocks are further organized into color-coded categories based on what the block does. These categories appear at the left of the block palette, and are:
| Category | Color | Purpose |
|---|---|---|
| Motion | Rotate the sprite and move it around the stage | |
| Looks | Alter the appearance of the sprite | |
| Sound | Play and apply affects to pre-recorded sounds | |
| Events | Trigger execution of block stacks | |
| Control | Control program flow in block stacks | |
| Sensing | Blocks that determine details from the user and the program state | |
| Operators | Perform operations on data | |
| Variables | Get and set variable and list values | |
| My Blocks | Custom, user-created blocks |
Additional block categories can be supplied by Scratch Extensions. These are marked by a custom icon.
Motion blocks are used to rotate the sprite and to move it around the stage.
The motion blocks control the motion of the sprite across the stage. In working with these blocks, it is important to remember the coordinate system Scratch uses, which is based on Cartesian coordinates. These consist of two coordinates, the first is along the x-axis (horizontal), and the second along the y-axis (vertical). The boundary of the stage is from -240 to 240 on the x-axis, and -180 to 180 on the y-axis. This can be seen in the image below:
Sprites are allowed to move anywhere on the stage, but cannot move off it (if you want your sprite to disappear off-stage, use the hide block from the Looks palette). Attempting to change a coordinate to a value off-stage will instead set it to the maximum/minimum value.
In addition to specifying movement using coordinates, sprites can also be moved forward. Each sprite has a direction it is facing, measured as an angle between 0 and 360 degrees. The angle 0 is straight up, and positive rotations are clockwise. Rather than specifying positive and negative rotations on blocks, Scratch uses a clockwise and counterclockwise arrow to indicate a change in direction.
While Scratch adopts the familiar Cartesian coordinate system from mathematics, it does not adopt the unit circle (with the angle 0 aligning with the postive x-axis and positive rotations in a counter-clockwise direction). Instead it adopts clockface-based angles, with 0 degrees corresponding to 12-o’clock position, and positive rotation matching in the direction of clock hand movement.

The move () steps blocks moves a sprite in the direction it is currently facing. Each step corresponds to one unit on the stage.

The turn clockwise () degrees rotates the sprite in a clockwise direction by the specified number of degrees.

The turn counterclockwise () rotates the sprite in a counterclockwise direction by the specified number of degrees.

The go to () block moves the sprite to the specified location. Possible locations include:

The go to x: () y: () block moves a sprite to the coordinates (x, y) provided they are on the stage.

The glide () secs to () block moves the sprite to the specified location over the specified number of seconds. Possible locations include:

The glide to x: () y: () block moves a sprite to the coordinates (x, y) over the specified number of seconds, provided the coordinates are on the stage.

The change x by () block changes the sprites x-coordinate by the supplied value. For example, if the sprite was currently at x: 110, and the value of 10 was supplied to this block, the new value would be x: 120.

The set x to block changes the sprite’s x position to the provided value.

The change y by () block changes the sprites y-coordinate by the supplied value. For example, if the sprite was currently at y: 130, and the value of -10 was supplied to this block, the new value would be x: 120.
The set y to block changes the sprite’s y position to the provided value.

The x position block reports a sprite’s current x coordinate on the stage.

The y position block reports a sprite’s current y coordinate on the stage.
The direction block reports a sprite’s current direction, an angle between -180 and +180 degrees.
Looks blocks change the appearance of the sprite
Sound blocks play and apply effects to recorded sounds
Event blocks trigger the execution of block stacks
Control blocks determine when blocks are executed
Sensing blocks report aspects of sprite and program state, and provide for user interaction
Operator blocks transform and report data.
My blocks are custom, user-created blocks
Variables blocks allow data to be stored while the program is running
Design Patterns are commonly-used combinations of blocks
For many Scratch programs we find ourselves needing to ask the user questions and use thier answers later. If we need to ask more than one question, only the last answer is available in the answer block. The ask and set design pattern meets this need by prompting the user for an answer, then storing it in a variable:

For example, we might prompt the user for thier first and last names, and then greet them by both:

The move () steps immediately moves a sprite the specified number of steps. But what if we want that movement to be slower, animated over time? The various glide blocks provide smooth movement, but not in the direction the sprite is facing. Instead, we can emulate this movement with a combination of repeat (), move () steps, and wait () seconds blocks:

The total number of units moved is the product of the number of repeats and the movement in the block (i.e. repeating a movement of 2 units five times is $$2 * 5 = 10$$ total units moved). The value of the wait () block determines how fast the sprite moves. A small value (i.e. 0.06, roughly 1/16 a second) will give good results.
A slighly more sophisticated version adds sprite animaiton, swapping frames each step forward:

Sprites in Scratch maintain thier state - which means that if the program was stopped with a sprite in a certain position, the next time the program is run, it will begin in that position. But for many Scratch projects, we want every sprite to start in a known position, regardless of where it last was.
One common pattern to accomplish this using messages is the Get Ready and Go design pattern. This pattern helps ensure that all sprites start at the intended position on stage, with the desired visibility, size, and effects before the program continues.
In this design pattern, a broadcast () and wait block triggers the initialization sequence by broadcasting a Get Ready message, and waits until all when I receive () stacks finish their work before using a broadcast () block to send a Go message (note, the names of the messages can be anything, “Get Ready” and “Go” were chosen for the ease of understanding thier meaning). The script looks like:

This script is often placed in the Stage (as it is more central to the program than sprites). Then, individual sprites (and the stage) can listen for the two messages with when I recieve () to trigger thier corresponding Get Ready and Go routines, i.e.:
![]()
![]()