Chapter 1
Object-Oriented Programming
Representing Real-World Objects in Code
Representing Real-World Objects in Code
As with any learning adventure, we must begin somewhere. When learning how to write computer programs, one of the best questions to tackle first is “what is programming?” As it turns out, the answer to that question is key to understanding exactly what it is we are trying to learn.
At its core, a computer is simply an electronic device that is capable of following instructions to perform calculations. In computer science theory, there is a special kind of theoretical computer called a Turing Machine that represents the simplest version of a modern computer. It might look something like this, as imagined by an artist:
A Turing Machine consists of an infinitely long tape that can be used to store data, and a small control box that manipulates the tape. The control box knows how to perform a few simple instructions, such as “Move Left” or “Write 0.” So, to program a Turing Machine, we must simply tell the control box which instructions to follow, and it can do it. For example, if we want the Turing Machine to write “101” on the tape, we could write the following program:
Seems simple enough. We won’t go into the details here, but computer scientists have been able to prove that any computer program that can run on a real computer could also be performed on a Turing Machine, as long as the Turing Machine has infinite time and an infinitely long tape.
This video shows an example of what a Turing Machine might look like in real life.
YouTube VideoSo, all we really need to learn is how to write programs for a Turing Machine, right?
Well, it’s unfortunately not that simple. There are two major differences between a Turing Machine and a modern computer that we must deal with. First, a modern computer knows many more instructions than a Turing Machine. To learn how to write programs that a modern computer can understand, we’d have to learn an entirely different vocabulary of commands. At the same time, modern computers are very complex systems, so any program we write might not be very efficient at doing what we want.
So, to learn how to write computer programs quickly and easily, we really want to be able to do two things:
Developing computer programs was very difficult work in the 1950s, and many of those early programmers were looking for a better way to solve that exact problem. One of these was Rear Admiral Grace Hopper, shown above. Her team was one of the first to develop the idea of writing computer programs using English words, and then using a second program, which they called a compiler, to convert those English words into instructions a computer could understand.
Their compiler made developing computer programs much simpler, since programmers didn’t have to learn an entirely new vocabulary to tell the computer what to do. Instead programmers simply had to learn the rules of what a computer could and couldn’t understand, and the syntax, or grammar rules, of how the compiler expected the program to be written. These new programming languages that use English words are referred to as high-level languages.
Programmers would now write the source code for the program in a high-level language, and then use a compiler to generate the machine code that the computer would actually run. In addition, since the compiler was a program itself, it could make sure the machine code it generated was as fast and efficient as possible, eliminating lots of hard work programmers would have to perform to tailor each program to fit the hardware it was going to run on.
Today, programming languages such as C, C++, and Java use compilers to convert source code into machine code.
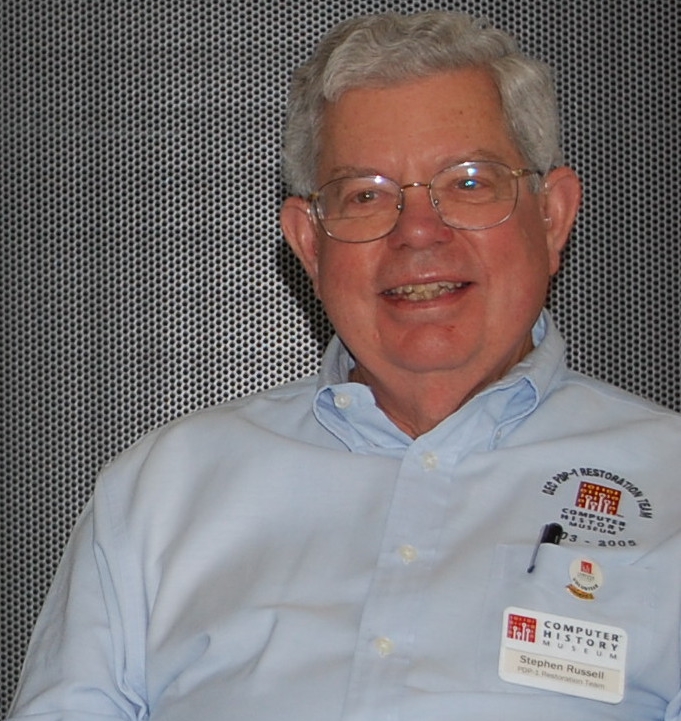
At the same time, other developers such as Steve Russell, shown above, were working on another type of program, called an interpreter, to solve the same problem. An interpreter can read source code and immediately tell the computer what steps to perform, without needing to generate the whole machine code first. This makes it much easier to write and edit programs on the fly, as the interpreter reads the source code directly each time the program runs. Today, programming languages such as PHP, JavaScript, and Python use interpreters to run the source code on a computer.
So, programming is simply the act of writing computer code in a way that a computer can run it. In most cases today, that means developing the source code for a program in a high-level language, then using either a compiler to generate the machine code for that program, or an interpreter to run the program directly on the computer from the source code. Of course, we can always write machine code by hand, but that is quite a bit more difficult.
In this class, we’ll learn how to write source code in one of two common languages, Java and Python. They both have their own unique features, especially since Java is a compiled language and Python is an interpreted language. However, as we saw above with the Turing Machine example, each language can be used to write any computer program. So, the choice of language is really more about personal preference and the unique features of each language than anything else.
This makes sense, because in general we can use both English and Spanish, as well as most other languages today, to express the same thoughts and ideas, even if we may not always have a word with the same meaning in both languages.
File:Maquina.png. (2014, March 4). Wikimedia Commons, the free media repository. Retrieved 15:31, December 10, 2018 from https://commons.wikimedia.org/w/index.php?title=File:Maquina.png&oldid=118120539 ↩︎
File:Desktop computer clipart - Yellow theme.svg. (2018, July 11). Wikimedia Commons, the free media repository. Retrieved 15:44, December 10, 2018 from https://commons.wikimedia.org/w/index.php?title=File:Desktop_computer_clipart_-_Yellow_theme.svg&oldid=310624404 ↩︎
File:Commodore Grace M. Hopper, USN (covered).jpg. (2018, July 21). Wikimedia Commons, the free media repository. Retrieved 15:51, December 10, 2018 from https://commons.wikimedia.org/w/index.php?title=File:Commodore_Grace_M._Hopper,_USN_(covered).jpg&oldid=311956355 ↩︎
File:Steve Russell.jpg. (2017, December 28). Wikimedia Commons, the free media repository. Retrieved 16:05, December 10, 2018 from https://commons.wikimedia.org/w/index.php?title=File:Steve_Russell.jpg&oldid=274743269 ↩︎
Modern computers share many theoretical similarities with the Turing Machine, but in practice they are much more advanced. In this section, we’ll discuss how a modern computer is able to run programs we’ve written in a high-level programming language like Java or Python.
A programming language, along with the associated compiler or interpreter, is a complete set of tools to write and translate instructions written in that language into the binary code that a computer’s central processing unit (CPU) can natively execute.
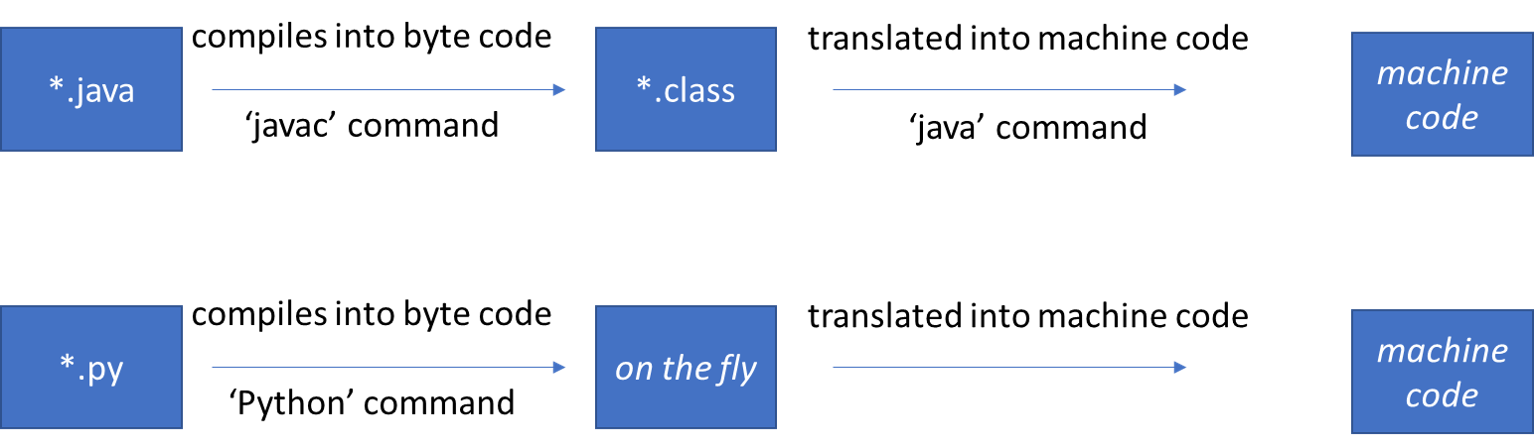
Both Java and Python do this by producing an intermediate representation (byte code) then translating that to machine code. In Java’s case this byte code is saved as a class file, but usually the Python interpreter does not store the byte code.
Computer central processing units (CPU) exclusively run machine code.
Learning to program requires some basic understanding of how a computer works. In the most basic sense, a computer has a large amount of memory connected to a central processing unit (CPU). The memory consists of many bytes of data, each containing eight binary values (e.g. 01001101).
The memory itself is split into various regions, with different regions storing the machine code instructions that make up a program and the data that the program is operating on.
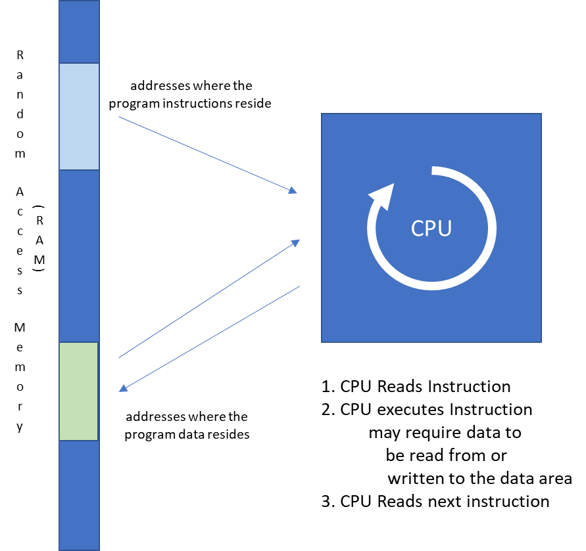
The CPU contains enough circuitry to interpret the instructions it is given and perform the requested mathematical and logical operations on the data provided.
Consider a single line of code in a program:
z = 5 + 7In most languages, a line similar to this will instruct the computer add the values of 5 and 7 and save the value into a variable named z, which will be stored in some location in memory. In a machine language, this single line of code may be actually require different instructions to complete. The table below shows one possible interpretation of that line of code into machine language.
| Instruction | Meaning |
|---|---|
LVal eax, 0x01A0 |
Load the value found at memory loc 0x01A0 into CPU register eax This is where 5 is stored |
LVal ebx, 0x01A8 |
Load the value found at memory loc 0x01A8 into CPU register ebx This is where 7 is stored |
Add eax, ebx |
Add the values in CPU registers eax and ebx together and store the result back into eax |
Mov eax, 0x01B0 |
Move the value in CPU register eax to memory location 0x01B0 This is where the variable z is stored |
Machine language is pretty ugly, but this is really how a CPU functions. Thankfully, we have many higher-level programming languages available, such as Java and Python, so we usually don’t have to write code directly in machine language.
From this, we can come up with a pretty powerful abstraction that represents how a computer works. In programming, an abstraction is a simplified model of a complex system, keeping only the most important details to make using the model easy.

In our abstract model of a computer, we see that a program consists of an ordered list of instructions to be executed, and memory is a set of labelled boxes that can store any data our program requires. We also have a pointer that keeps track of which instruction the computer is currently executing. The list of instructions, the instruction pointer, and the memory combined all make up a program’s state when it is running on a computer. Tools such as Python Tutor or Java Tutor use a model very similar to this to help us understand how our programs actually work.
Another big idea in computer programming is the software development lifecycle. There are many different ways to approach developing a large computer program, but most of them can be divided into a few clear steps, as shown in this diagram.
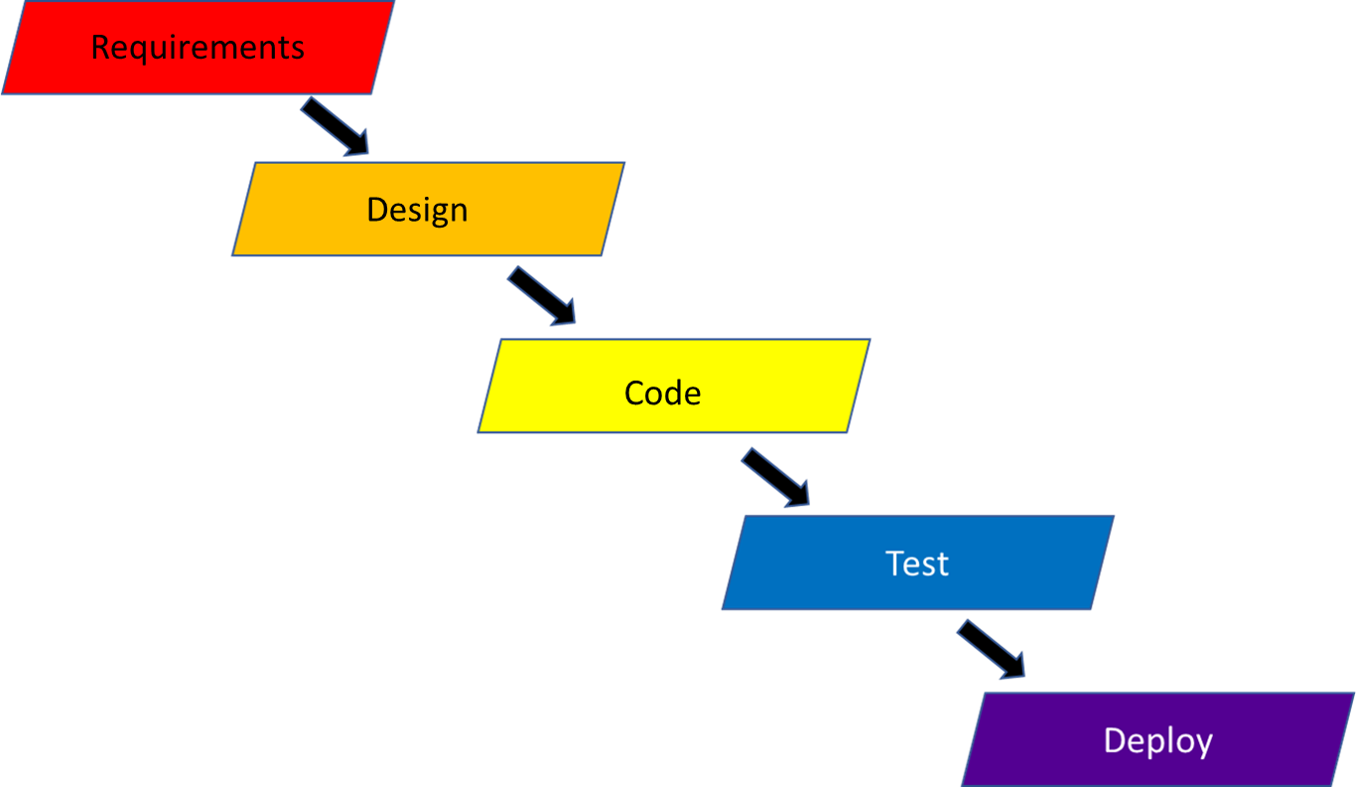
The first step is the requirements analysis phase. In this phase, a software developer works to clearly describe and understand the problem to solve and the features that the solution should have. Throughout this course, the problem statement or programming project description will form the requirements for the program to be written.
Next comes the design phase. In this phase, we describe the solution in terms of the actual structure of the code. In Object-oriented programming, this generally consist of designing the classes and the interactions between them which meet the requirements.
A class is a collection of data and the methods (procedures) by which data is accessed and manipulated. Classes are generally organized around things (the shopping cart from any online store is a classic example) or functions (communication with your computer’s network card is probably handled by a class). Similar to the requirements, the design of most of the projects in this course will be provided, but it is important to pay attention to those designs since later courses may leave the design up to the developer.
Following the design phase is the development, or coding, phase. In this phase, actual code is written to match the requirements and design from the previous phases.
This course primarily focuses on this phase of the software development lifecycle. In this course, we’ll cover how to write code in classes and methods to perform various operations on data. We’ll also learn how to store and manipulate data in variables and data structures.
Testing while coding is an important part of the coding process. Good programmers constantly test small parts of their code, both by running the code and by continually thinking about the code, any time they complete a task. When a program fails to run correctly, we say that it contains a “bug” and the process of finding and fixing those bugs is known as “debugging.”
There are many advantages to testing while coding:
We recommend a “code a little, test a little” approach in this class. This helps us narrow down which parts of the code are working properly and which ones contain bugs to be removed. If we write too much code without testing any of it, it can be very difficult to isolate and fix the bugs.
When the development phase is complete, we move on to the formal testing phase of development. In this phase, the software is formally tested to ensure that is matches the specifications and design, usually by specially trained test engineers who can report any bugs that are found back to the developers.
In this class, the autograder that we use serves as a formal test process. It isn’t perfect and won’t catch every bug, but it does a good job of helping you determine if your program meets the specifications for the project.
Finally, there is the deployment phase. This is where the code is packaged and released to the users. In this course, this is analogous to turning in our project and marking it complete. At this point, it is very difficult to fix any bugs without making a new release of the software.
In this course, we will be teaching programming from the object-oriented perspective. Both Java and Python support this programming paradigm, and it is commonly used in industry today. However, it is easier to understand some of these concepts (such as classes and objects), after first covering some of the fundamental concepts.
Thus, the first few modules of this course will contains some pieces of starter code that we’ll use without really explaining much about how they work, but rest assured that we’ll cover those concepts at the correct time in the course. Likewise, many of the early programming assignments will include some frozen starter code that provides the structure, and the point of the assignment will be simply to fill in the middle portion of the program that contains the actual code.
Before we begin programming, let’s go over some basic terminology and rules for high-level programming languages.
First, all high programming languages have a syntax, which is a pattern of words and symbols that all correct instructions in the language much follow. So, when we receive a syntax error from the compiler or interpreter, we should know that one or more lines of code in our program doesn’t follow the rules of the language. In a very real sense, this is the grammar that all correct programming lines will follow.
Natural languages also have a grammar, but most natural language listeners can understand improper grammar. The question “Which room is the dog in?” which contains the dreaded dangling preposition, will almost certainly be correctly interpreted as “in which room is the dog?” by most listeners.
Programming languages are not like this – the slightest violation of a grammar rule will result in code that most likely will not run. So, as developers we must learn to be very precise and exact in our code. This is a difficult skill to learn, but we’ll develop it over time with practice.
Second, all programming instructions have a specific meaning, known as the semantics of the language. When one of our programs compiles and executes but produces an incorrect result, this is due to a semantic error (sometimes known as a logic error) in our code.
Unfortunately, the compiler or interpreter isn’t able to help us find any semantic errors, but we can find them through careful testing of our code.
Finally, all programming languages have various defined structures, which we can think of as the “parts of speech” in the programming language. This is similar to the concept of nouns, verbs, and adjectives in the English language.
This is a list of some of the most common parts in a programming language:
class is a keyword. We cannot use a keyword for any purpose other than the one(s) intended by the programming language.6.626) are meant to represent themselves. Similarly, text literals are most often enclosed in double quotation marks (such as "wildcat"). Text literals are most commonly referred to as strings.+ - / * =), brackets of all forms (() [] {}), and then some not so obvious ones ( . , ; " !).Properly, a subroutine is a generic term for a named code fragment that does something. Your programming language may have a subroutine named math.sqrt(x) that calculates the square root of x or one called print (something) that prints what ever the value of ‘something’ is to the screen. The print() subroutine may be many lines long, but you gain access to it by calling (using) its name.
The issue is different programming languages use different words to refer to different kinds of subroutines. Functions in C may mean a different thing than functions in Fortran, Java, Python, or mathematics.
We are not going to worry about the details, and will use method or occasionally function to refer to callable subroutines.
When writing code in an object-oriented language, many times we must use some additional syntax and structures in our programs that are required by the language, even though they aren’t strictly required for the program we are trying to develop.
In this section, we’ll briefly discuss some of those limitations. Later on in this course, we’ll come back to these concepts and explain them more fully, but for now we’ll provide some of this structure as starter code for the first few modules.
Classes are the blueprints of objects. In an object-oriented program, everything is inside a class definition. In this class, every file will contain exactly class definition or class-body.
// Java
public class ClassName {
    class-body
}
# Python
class ClassName:
class-bodyThe class-definition is a “code-block.” Code-blocks signal a boundary to the compiler. This helps the compiler manage identifier names, memory and other things.
Code-blocks are delimited, or set apart, by various symbols. In Java, this is done with brackets { code block }. Spacing is often also used to make the code more readable, so that everything in a block lines up.
In Python, each code block is indented to the right. In this class we will use 4 spaces. When a line ends with a colon, Python expects the next line to be the start of a new code block (and therefore indented).
public class Foo{
    statement one
    statement two
}

public class Bar{
    statement_three
}
class Foo:
statement_one
statement_two
class Bar:
statement_threeIn the preceding examples, statement_one and statement_two are the code block for the class named Foo, and statement_three is part of the code block for the class named Bar.
By tradition (and by rule in many languages), object-oriented programs start in a method called main().
// Java
public class ClassName {
    public static void main(String[] args){
        // method-body
    }
}
# Python
class ClassName:
@classmethod
def main(args):
# method-bodyFor the first several modules, all of the code we need to write will be in the method body for the main() method. This area will be clearly marked in the starter code using a comment similar to WRITE YOUR CODE HERE.
Tradition dictates that the first program in any introduction course is Hello World. Hello World simply prints the text “Hello World” to the screen.
Below is an example of an object-oriented version of this program in both Java and Python:
// Java
public class HelloWorld{
    public static void main(String[] args){
        System.out.println("Hello World");
    }
}
# Python
class HelloWorld:
@classmethod
def main():
print("Hello World")
HelloWorld.main()In each program, the actual work is done by the line containing the word print. In the rest of this module, we’ll explain the details behind the structure of this program.
Hello World in Java
The Java programming language was originally developed by Sun Microsystems starting in the early 1990s as Oak, a new programming language designed to build upon the ideas of C++. Oak would be object-oriented and include a garbage collector, both things that were seen as weak points of the C++ language at that time. In addition, it would be designed to be portable across many different types of devices.
Eventually, the language was renamed to Java, and was originally used develop applications that could run on a website. These Java applets for the web were very popular in the late 1990s and early 2000s, but most of them have since been replaced by JavaScript code that can run directly in the web browser.
While Java and JavaScript may share a common-sounding name, they are in fact completely unrelated languages. JavaScript was originally named Mocha and then LiveScript, but was rebranded to JavaScript in 1995. That move was widely regarded as a marketing ploy to take advantage of the fact that Java was the most popular new language at the time.
In fact, today JavaScript is just one of many implementations of a language standard known as ECMAScript. However, the name confusion still exists.
Since that time, Java has grown into its own fully-fledged programming language, and has indeed met its goal of being highly portable. Java today can run on most major computer operating systems through the use of the Java Runtime Environment (JRE) and Java Virtual Machine (JVM). In addition, the Android mobile operating system uses the Java programming language, and it has been used on many web servers and in consumer electronics.
For software developers, the Java Development Kit (JDK) provides easy access to all of the tools needed to develop programs using the Java language. Once a program is developed, the Java compiler converts the program to Java bytecode, which is similar to machine-code. That Java bytecode can then be run on any compatible platform using the JVM. This allows Java to achieve true portability. The only part of the system that must be specific to the computer’s hardware and operating system is the JVM, while Java bytecode can be used on any system with a compatible JVM installed.
Today, the OpenJDK project handles all development of the Java platform, and the language and all supporting code is free and open source.
If none of these features in the history of Java make any sense at this point, that’s OK! It’s difficult to describe the differences between programming languages without getting technical. However, that is a good thing for us, since nearly every programming language can be used to create the programs we’ll be writing in this course. The differences aren’t really important at this point!
Now that we’ve covered the basics, let’s get right down to it and create our first program in Java!
File:Java_programming_language_logo.svg. (2018, May 26). Wikipedia. Retrieved 13:46, December 10, 2018 from https://en.wikipedia.org/w/index.php?title=File:Java_programming_language_logo.svg&oldid=872323259. ↩︎
According to tradition, the first computer program that we cover in any language is a simple program called “Hello World!” The entire goal of the program is to demonstrate what it takes to create our first program from scratch in the language and get to the point where we can print the message of our choice to the screen. While that sounds very simple, it is actually a pretty big first step toward learning how to write our own programs. Let’s get started!
If this is your first-time programming, it can be quite daunting to know where to get started. This guide will walk you through all the steps to create your first program. However, if you have any questions at all, don’t be afraid to seek help. It’s much easier to answer questions up front when they come up, instead of dealing with them down the road when you are truly lost.
In any programming language, there is a bit of terminology that we should discuss before diving in. Here are a few terms we’ll want to be familiar with at this point:
{ and }, to enclose blocks of code. We’ll use these to enclose both the class body and method body.Formally, a Declaration associates an identifier with a program language element.
public class Pet;
// a declaration give the name only and
// tells the compiler that there will be a class called Pet
// Java will not support a class declaration this way
A Definition includes the complete information about the program element. So for a class, a definition includes its body.
public class Pet {
     String name = "rover";
     // a definition gives the content of the item; it is
     // like a declaration with all the info about the class
}
Some older languages (notably C) allowed things to be declared and used before they were defined. However, Java does not support this style of coding. As a result, Java documentation and developers tend to use “declaration” for both declaration and definition.
To begin, we’ll write our code in a file name HelloWorld.java. If this lesson is being done in Codio or another learning environment, that file may already be open. If not, click on that file in the file tree to the far left to open it. Make sure that file is open for this example, since the file name must match in order for this process to work properly.
Also, we should make sure that the file is completely empty before moving on. If there is any text currently in that file, take the time to delete it now.
We can also do these same steps on a computer with the Java Development Kit installed. Simply create a new, blank text file named HelloWorld.java.
Java is an object-oriented programming language. We’ll discuss this more in detail in a later module, but for now we’ll just need to know that Java requires all of our code to be placed in a class. So, at the very top of our file, we’ll enter the following line:
public class HelloWorldThat line called a class declaration in Java. Let’s break that line down and discuss what each part means:
public - this keyword is used to identify that the item after it should be publicly accessible to all other parts of the program. In a later module, we’ll talk about these keywords, called access modifiers, and the impact they have on our programs. For now, we’ll just use public whenever we need an access modifier, such as in a class declaration.class - this keyword says that we are declaring a new class.HelloWorld - this is an identifier that gives us the name of the class we are declaring. Java requires that the class name matches the filename that it is stored in, so we must store the HelloWorld class in a file named HelloWorld.java.Every Java program must contain at least one class declaration. In fact, each Java file we create will contain at least on class declaration, so we’ll see this structure repeated very often.
Unfortunately, when learning to program in Java, there are a few things that we’ll just have to take for granted for now until we learn a bit more about how they actually work. Class declarations are a great example of this. For the next several modules, we’ll just have to include a class declaration at the top of each file without understanding everything about them. As long as we make sure the identifier matches the name of the file, it should work just fine. In fact, in most of the later examples in this book, we’ll have some sample code in each file that includes the class declaration.
We’re covering it in detail here just to make sure it is clear what is going on at first. It’s always better to have too much information than not enough.
Once we’ve completed our class declaration, we need to move on to the class body. The class body is where all of the information about the class is stored. In Java, we use braces to enclose a block of code, such as a body. So, let’s modify our file to look like the following example by adding an opening brace { and a closing brace } with a few empty lines in between. Instead of copy-pasting it, try to type it in yourself and see what happens!
public class HelloWorld {


}
Did you notice that the text editor automatically added a closing brace right after you typed the opening brace? That’s the power of using a text editor that is tailored for programming. It should have also indented all of the lines between the two braces a bit, making it easier to read your code as we continue to fill it in. It may seem a bit jarring a first, but you’ll quickly get used to it. We’ll see it happen again later in this example.
To make your code easier to read, many textbooks and companies use a style guide that defines some of the formatting rules that you should follow in your source code. However, this is a point of contention, and many folks disagree over what is the best format. These formatting rules do not affect the actual code itself, only how easy it is to read.
For this book, most of the examples will be presented in a variant of the K&R Style used by most Java developers, which places the opening brace on the same line as the declaration, but the closing brace is placed on a line by itself and indented at the same level as the declaration. The code inside will be indented by four spaces.
Google provides a comprehensive style guide that is recommended reading if you’d like to learn more about how to format your source code.
Inside of our class body, we must create a main method. A method is a piece of code that performs an action in our program. Methods are sometimes referred to as functions or subroutines as well, but we’ll use the term method. Each Java program have one class that contains at least one special method, called the main method, that tells the program where to start. So, let’s modify our file to the left to look like this example:
public class HelloWorld {

    public static void main(String[] args){


    }

}
We just added a method declaration and method body to our program! Let’s look at some of the keywords we used here:
public - just like before, we are using the public access modifier to allow any part of our program to access this method.static - the static keyword is one of the more difficult to understand, and even some experienced programmers struggle with it. In this example, we must use static since this is the main method, which must always be a static method. This is because we aren’t using this method inside of an object, which we’ll cover in a much later module. For now, every method we create will use a static keyword.void - this describes what kind of data this method should output. Since this is the main method, it cannot output anything to another part of the program, so we use the special void keyword to denote the fact that it doesn’t output anything. (At least, it doesn’t output anything to the rest of the program, but it may display things on the screen!)main - this is another identifier that gives the name of the method. Since our program needs to have at least one main method, we need to use main as the name of this method.(String[] args) - following the method name is a section in parentheses that defines the inputs, or parameters, for the method. The main method must take in one parameter, an array of Strings. By convention, we use the identifier args as the name of that parameter. We’ll learn more about parameters, Strings, and arrays, in a later module. For now, we’ll just have to remember that the main method must have this exact set of parameters.Lastly, we included a second set of braces to enclose the method body. Notice how everything in the class body is indented slightly, making it easy to see the structure of the code.
For now, we’ll just have to memorize the fact that the main method in Java is declared using public static void main(String[] args). As we move through this book, we’ll slowly learn more about each part of that line and what it does, and it will make much more sense.
Finally, we can write our code. The actual code of our program goes inside the main method’s body, between the two braces. In the classic “Hello World!” example, we simply want to print the words “Hello World!” to the screen. So, let’s modify our program one last time to look like this example:
public class HelloWorld{

    public static void main(String[] args){
        System.out.println("Hello World");

    }

}
As you typed in that information, you might have noticed that the editor also added a second set of quotation marks ", just like it did with the braces earlier. This is another example of a programmer-friendly text editor at work!
Let’s review what we just added to our program:
System.out.println - this line tells us that we’d like to use a method called println in the System.out PrintStream object. Again, that means very little to us right now, but for now we’ll need to know to use this method to print a line of text to the screen. Following the name of the method is a set of parentheses that accepts input to the method, which is what we’d like to have printed to the screen."Hello World" - by putting this in the parentheses after System.out.println, we are telling the println method in System.out to print Hello World to the screen. We have to enclose it in quotation marks " so that our program will treat it as a line of text and not more Java code. The values, or variables passed to a method are referred to as the method’s parameters.; - each line of code in Java must end with a semicolon ;. This helps the compiler determine where one line of code ends and another begins. They really serve the same purpose as the period . in written English. However, periods are already used for other purposes in Java, so the semicolon became the standard symbol for the end of each line of code.That’s it! That’s all it takes to write our first program in Java. On the next page, we’ll learn how to actually compile and run this program.
Note: the video's "Run" menu reference is obsolete.
Now that we’ve written our first Java program, we must compile and run the program to see the fruits of our labors. There are many different ways to do so. We’ll discuss each of them in detail here.
This textbook was written for the Codio learning environment, so many of the steps below will reference features in Codio. However, most integrated development environments (IDEs) also include features to compile and run your code, and you can always do so manually using commands in the terminal for your operating system. If you aren’t sure how to get it to work, ask for help!
Codio includes a built-in Linux terminal, which allows us to perform actions directly on a command-line interface just like we would on an actual computer running Linux. We can access the Terminal in many ways:
Additionally, some pages may already open a terminal window for us in the left-hand pane, as this page so helpfully does. As we can see, we’re never very far away from a terminal.
No worries! We’ll give you everything you need to know to compile and run your Java programs in this course.
If you’d like to learn a bit more about the Linux terminal and some of the basic commands, feel free to check out this great video on YouTube:
Let’s go to the terminal window and navigate to our program. When we first open the Terminal window, it should show us a prompt that looks somewhat like this one:
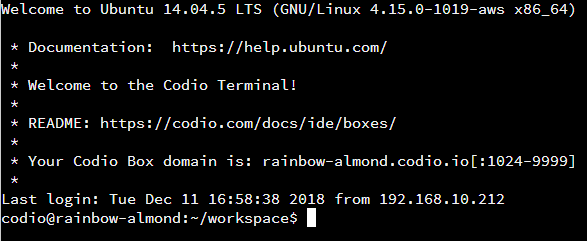
There is quite a bit of information there, but we’re interested in the last little bit of the last line, where it says ~/workspace. That is the current directory, or folder, our terminal is looking at, also known as our working directory. We can always find the full location of our working directory by typing the pwd command, short for “Print Working Directory,” in the terminal. Let’s try it now!
Enter this command in the terminal:
pwdand we should see output similar to this:

In that output, we’ll see that the full path to our working directory is /home/codio/workspace. This is the default location for all of our content in Codio, and its where everything shown in the file tree to the far left is stored. When working in Codio, we’ll always want to store our work in this directory.
Next, let’s use the ls command, short for “LiSt,” to see a list of all of the items in that directory:
~/workspace$ lsjava README.mdWe should see a short list of items appear in the terminal.
We can use the cd command, short for “Change Directory,” to change the working directory. To change to the java directory, type cd into the terminal window, followed by the name of that directory:
~/workspace$ cd java~/workspace/java$We are now in the java directory, as we can see by observing the ~/workspace/java on the current line in the terminal. Finally, we can do the ls command again to see the files in that directory:
~/workspace/java$ lsHelloWorld.javaWe should see our HelloWorld.java file! If it doesn’t appear, try using this command to get to the correct directory: cd /home/codio/workspace/java.
Once we’re at the point where we can see the HelloWorld.java file, we can move on to actually compiling and running the program.
To compile a Java program in the terminal, we’ll use the javac command, short for Java Compiler, followed by the name of the Java file we’d like to compile. So, in our case, we’ll do the following:
javac HelloWorld.javaIf it works correctly, we shouldn’t get any additional output. The compiler will look through our Java file and create a new file containing the Java bytecode for our program, called HelloWorld.class. We can use the ls command to see it:
ls
If the javac command gives you any output, or doesn’t create a HelloWorld.class file, that most likely means that your code has an error in it. Go back to the previous page and double-check that the contents of HelloWorld.java exactly match what is shown at the bottom of the page. You can also read the error message output by javac to determine what might be going wrong in your file.
We’ll cover information about simple debugging steps on the next page as well. If you get stuck, now is a great time request help via your course’s help system. You aren’t in this alone!
Finally, we can now run our program! Once it is compiled, just type the following in the terminal to run it:
java HelloWorld
That’s all there is to it! We’ve now successfully compiled and run our first Java program. Of course, we can run the program as many times as we want by repeating the previous java command. If we make changes to the HelloWorld.java file, we’ll need to recompile it using the previous javac command first. Then, if those changes instruct the computer to do something different, we should see those changes when we run the program after compiling it.
See if you can change the HelloWorld.java file to print out a different message. Once you’ve changed it, use the javac and java commands to compile and run the updated program. Make sure you see the correct output!
Last, but not least, many of the Codio tutorials and projects in this program will include assessments that we must solve by writing code. Codio can then automatically run the program and check for specific things, such as the correct output, in order to give us a grade. For most of these questions, we’ll be able to make changes to our code as many times as we’d like to get the correct answer.
Of course, when developing a computer program, there are always times when things don’t quite work the way we’d like them to. Let’s review a few of the common errors and how to solve them.
The Java Compiler is usually the source of most of our woes when first learning how to write programs in Java. The compiler expects the source code to be correctly formatted, or else it won’t be able to generate the Java bytecode for our program. Let’s modify our HelloWorld.java file to include some errors, just to see exactly what the error messages from the compiler are like.
First, let’s replace everything in HelloWorld.java with the following code:
public class HelloWorld{

  public static void main(String[] args){
    System.out.println("Hello World");


}Before compiling that program, can you spot the error? Being able to find errors in code without using a compiler will definitely help you develop programs much faster. It is just like being able to spell words correctly without using a spell-checker. It makes everything go just a bit more smoothly.
In each of the examples in this section, take a minute and see if you can spot the error before running it through the compiler. The quiz in this module includes a few questions that require you to spot the error in a piece of code, so this is great practice for later!
Once we’ve updated that file, we can compile it using the using the terminal. When we do, we should see output similar to this:

That error message gives us quite a bit of information. The first part, java/HelloWorld.java tells us which file the error is in, which is handy later on when we start working in programs that include multiple source code files. Following that, we see a 7 after the file name, which tells us that the error is on or around line 7. However, that doesn’t always mean that we’ll need to edit something at line 7 to fix the error; it just means that the Java Compiler realized there was an error when it reached line 7. Sometimes, we must make a change elsewhere in the file to resolve the issue.
After that, we’ll see the actual error message, which in this case is error: reached end of file while parsing. That may not seem very helpful at first, but it actually gives us an important clue.
If we look at the code above, we’ll notice that it is missing the second closing brace } at the end of the file. So, the compiler was expecting to see one more closing brace, but didn’t find it. So, to fix that, we’ll just need to add one more closing brace at the end of the file, and it should work just fine.
Here’s another example we can try:
public class HelloWorld{

  public static void main(String[] args){
    System.out.println("Hello World")

  }
}
When we try to compile this file, we should get output similar to the following:
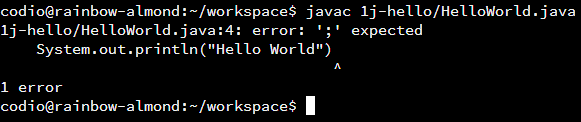
In this example, the output is really helpful. It clearly shows us exactly where in our code we forgot to include a semicolon. By adding that symbol where indicated, we can solve the problem.
Of course, there are some problems that the compiler may not catch. These are known as runtime errors, since they happen at the time we run our programs. They can be especially tricky to deal with, but thankfully they are usually quite rare.
Let’s look at one more example:
public class HelloWorld{

  public static void main(String args){
    System.out.println("Hello World");

  }
}
This time, the program actually compiles! However, when we try to actually run the file, we’ll get an error similar to this one:

This is because we accidentally forgot the square brackets [] in the main method declaration. It should be public static void main(String[] args), as the error message so helpfully tells us. So, it is important to remember that our programs may still have errors, even if the compiler doesn’t find any.
Now that you’ve learned a bit about how to debug compiler errors, let’s see if you can figure out how to cause one! Modify HelloWorld.java in a way that causes the compiler to output the following error message:
error: class WrongClass is public, should be declared in a file named WrongClass.java
We’ve now written our first program in a real, high-level programming language. While the program may only consist of a few lines of code at most, it is still a very big step toward writing bigger and more advanced programs.
Computer technology has some quite a long way since the 1950s, but the same needs that drove the development of compilers and interpreters continue today to drive the development of more advanced programming languages and related tools. It’s a very exciting field to experience firsthand, and once we understand a bit of code, we’ll be able to see it for ourselves.
In the next chapter, we’ll dive in head first to learn all about how to store and manipulate various types of data in our programs.