Testing
Making sure everything works correctly!
Making sure everything works correctly!
Much of the content in this chapter was adapted from Nathan Bean’s CIS 400 course at K-State, with the author’s permission. That content is licensed under a Creative Commons BY-NC-SA license.
A critical part of the software development process is ensuring the software works! We mentioned earlier that it is possible to logically prove that software works by constructing a state transition table for the program, but once a program reaches a certain size, this strategy becomes less feasible. Similarly, it is possible to model a program mathematically and construct a theorem that proves it will perform as intended. But in practice, most software is validated through some form of testing. This chapter will discuss the process of testing object-oriented systems.
Some key terms to learn in this chapter are:
The key skill to learn in this chapter is how to write unit tests in our chosen language. For Java, we’ll be using JUnit 5 to write our tests, and in Python we’ll use pytest as our test framework. We will also explore using the Hamcrest assertion library for both Java and Python.
As you’ve developed programs, you’ve probably run them, supplied input, and observed if what happened was what you wanted. This process is known as informal testing. It’s informal, because you don’t have a set procedure you follow, i.e. what specific inputs to use, and what results to expect. Formal testing adds that structure. In a formal test, you would have a written procedure to follow, which specifies exactly what inputs to supply, and what results should be expected. This written procedure is known as a test plan.
Historically, the test plan was often developed at the same time as the design for the software (but before the actual programming). The programmers would then build the software to match the design, and the completed software and the test plan would be passed onto a testing team that would follow the step-by-step testing procedures laid out in the testing plan. When a test failed, they would make a detailed record of the failure, and the software would be sent back to the programmers to fix.
This model of software development has often been referred to as the “waterfall model” as each task depends on the one before it:
Unfortunately, as this model is often implemented, the programmers responsible for writing the software are reassigned to other projects as the software moves into the testing phase. Rather than employ valuable programmers as testers, most companies will hire less expensive workers to carry out the testing. So either a skeleton crew of programmers is left to fix any errors that are found during the tests, or these are passed back to programmers already deeply involved in a new project.
The costs involved in fixing software errors also grow larger the longer the error exists in the software. The table below comes from a NASA report of software error costs throughout the project life cycle:
It is clear from the graph and the paper that the cost to fix a software error grows exponentially if the fix is delayed. You probably have instances in your own experience that also speak to this - have you ever had a bug in a program you didn’t realize was there until your project was nearly complete? How hard was it to fix, compared to a error you found and fixed right away?
It was realizations like these, along with growing computing power, that led to the development of automated testing, which we’ll discuss next.
File:Waterfall model.svg. (2020, September 9). Wikimedia Commons, the free media repository. Retrieved 16:48, October 21, 2021 from https://commons.wikimedia.org/w/index.php?title=File:Waterfall_model.svg&oldid=453496509. ↩︎
Jonette M. Stecklein, Jim Dabney, Brandon Dick, Bill Haskins, Randy Lovell, and Gregory Maroney. “Error Cost Escalation Through the Project Life Cycle”, NASA, June 19, 2014. ↩︎
Automated testing is the practice of using a program to test another program. Much as a compiler is a program that translates a program from a higher-order language into a lower-level form, a test program executes a test plan against the program being tested. And much like you must supply the program to be compiled, for automated testing you must supply the tests that need to be executed. In many ways, the process of writing automated tests is like writing a manual test plan - you are writing instructions of what to try, and what the results should be. The difference is with a manual test plan, you are writing these instructions for a human. With an automated test plan, you are writing them for a program.
Automated tests are typically categorized as unit, integration, and system tests:
The complexity of writing tests scales with each of these categories. Emphasis is usually put on writing unit tests, especially as the classes they test are written. By testing these classes early, errors can be located and fixed quickly.
In this course, we’ll focus on the creation of unit tests to effectively test the software we create. At a minimum, our goal is to write enough tests to achieve a high level of code coverage of our program being tested. Recall that code coverage is a measure of the amount of code in a program that is executed by a set of unit tests.
In theory, a good set of unit tests should, at a minimum, execute every line of code in the program at least once. Of course, that doesn’t nearly guarantee that the unit tests are sufficient to find all bugs, or even a majority of bugs, but it is a great place to start and make sure that the unit tests are properly testing the entirety of the program.
On the next few pages, we’ll discuss how to write unit tests for programs written in both Java and Python. Feel free to only read about the language you are learning, but it might be interesting to see how other languages handle the same idea in different ways.
Writing tests is in many ways just as challenging and creative an endeavor as writing programs. Tests usually consist of invoking some portion of program code, and then using assertions to determine that the actual results match the expected results. The result of these assertions are typically reported on a per-test basis, which makes it easy to see where your program is not behaving as expected.
Consider a class that is a software control system for a kitchen stove. We won’t write the code for the class itself, because it is important for us to be able to write tests that effectively test the code without even seeing it. It might have properties for four burners, which correspond to what heat output they are currently set to. Let’s assume this is as an integer between 0 (off) and 5 (high). When we first construct this class, we’d probably expect them all to be off! A test to verify that expectation would be:
import static org.junit.jupiter.api.Assertions.assertEquals;
import org.junit.jupiter.api.Test;

public class StoveTest{

    @Test
    public void testBurnersShouldBeOffAtInitialization(){
        Stove stove = new Stove();
        assertEquals(0, stove.getBurnerOne(), "Burner is not off after initialization");
        assertEquals(0, stove.getBurnerTwo(), "Burner is not off after initialization");
        assertEquals(0, stove.getBurnerThree(), "Burner is not off after initialization");
        assertEquals(0, stove.getBurnerFour(), "Burner is not off after initialization");
    }
}
Here we’ve written the test using the JUnit 5 test framework, which is one of the most commonly used Java unit testing frameworks today.
Notice that the test is simply a method, defined in a class. This is very common for test frameworks, which tend to be written using the same programming language the programs they test are written in (which makes it easier for one programmer to write both the code unit and the code to test it). Above the test method is a method annotation @Test that tells JUnit to use this method as a unit test. Omitting the @Test annotation allows us to build other helper methods within our test classes as needed. Annotations are a way of supplying metadata within Java code. This metadata can be used by the compiler and other programs to determine how it works with your code. In this case, it indicates to the JUnit test runner that this method is a test.
Inside the method, we create an instance of stove, and then use the assertEquals(actual, expected, message) method to determine that the actual and expected values match. If they do, the assertion is marked as passing, and the test runner will display this pass. If it fails, the test runner will report the failure, along with details to help find and fix the problem (what value was expected, what it actually was, and which test contained the assertion).
To use the portions listed below, we’ll need to modify our build.gradle file to include the following dependencies:
dependencies {
    // Use JUnit Jupiter API for testing.
    testImplementation 'org.junit.jupiter:junit-jupiter-api:5.6.2', 'org.hamcrest:hamcrest:2.2', 'org.junit.jupiter:junit-jupiter-params'

    // Use JUnit Jupiter Engine for testing.
    testRuntimeOnly 'org.junit.jupiter:junit-jupiter-engine'

    // This dependency is used by the application.
    implementation 'com.google.guava:guava:29.0-jre'
}
Notice that we added a junit-jupiter-params library.
The JUnit framework provides for two kinds of tests, Test, which are written as functions that have no parameters, and ParameterizedTest, which do have parameters. The values for these parameters are supplied with another annotation, typically @ValueSource. For example, we might test that when we set a burner to a setting within the valid 0-5 range, it is set to that value:
import static org.junit.jupiter.api.Assertions.assertEquals;
import org.junit.jupiter.api.Test;
import org.junit.jupiter.params.ParameterizedTest;
import org.junit.jupiter.params.provider.ValueSource;

public class StoveTest{

    @ParameterizedTest
    @ValueSource(ints = {0, 1, 2, 3, 4, 5})
    public void ShouldBeAbleToSetBurnerOneToValidRange(int setting){
        Stove stove = new Stove();
        stove.setBurnerOne(setting);
        assertEquals(setting, stove.getBurnerOne(), "Burner does not have expected value");
    }
}
The values in the parentheses of the @ValueSource annotation are the values supplied to the parameter list of the parameterized test method. Thus, this test is actually six tests; each test makes sure that one of the settings is working. We could have done all six as separate assignments and assertions within a single test method, but using a parameterized test means that if only one of these settings doesn’t work, we will see that one test fail while the others pass. This level of specificity can be very helpful in finding errors.
So far our tests cover the expected behavior of our stove. But where tests really prove their worth is with the edge cases - those things we as programmers don’t anticipate. For example, what happens if we try setting our range to a setting above 5? Should it simply clamp at 5? Should it not change from its current setting? Or should it shut itself off entirely because its user is clearly a pyromaniac bent on burning down their house? If the specification for our program doesn’t say, it is up to us to decide. Let’s say we expect it to be clamped at 5:
@ParameterizedTest
@ValueSource(ints = {6, 18, 1000000})
public void BurnerOneShouldNotExceedFive(int setting){
    Stove stove = new Stove();
    stove.setBurnerOne(setting);
    assertEquals(5, stove.getBurnerOne(), "Burner does not have expected value");
}
Note that we don’t need to exhaustively test all numbers above 5 - it is sufficient to provide a representative sample, ideally the first value past 5 (6), and a few others. Also, now that we have defined our expected behavior, we should make sure the documentation of our BurnerOne property matches it:
/**
 * Sets the value of Burner One.
 *
 * Should be an integer between 0 (off) and 5 (high)
 * If a value higher than 5 is provided, the burner will be
 * set to 5 instead.
 *
 * @param value        the value of the burner
 */
public void setBurnerOne(int value){
This way, other programmers (and ourselves, if we visit this code years later) will know what the expected behavior is. We’d also want to test the other edge cases: i.e. when the burner is set to a negative number.
For a complete guide to parameterized tests in JUnit, including how to use enumerations as a value source, refer to the Guide to JUnit 5 Parameterized Tests from Baeldung.
Recognizing and testing for edge cases is a critical aspect of test writing. But it is also a difficult skill to develop, as we have a tendency to focus on expected values and expected use-cases for our software. But most serious errors occur when values outside these expectations are introduced. Also, remember special values, like Double.POSITIVE_INFINITY, Double.NEGATIVE_INFINITY, and Double.NaN.
Like most testing frameworks, the JUnit framework provides a host of specialized assertions. They are all created as static methods within the Assertions class, and many of them are described in the JUnit 5 User Guide.
For example, JUnit provides two boolean assertions:
assertTrue(condition) - asserts that the value supplied is trueassertFalse(condition) - asserts that the value supplied is falseAs with any assertion statements in JUnit, we can also optionally supply a message string as an additional parameter to these assertion statements. That message will be present in the error message when this assertion fails.
The workhorse of the JUnit assertion library are the assertEquals() and assertNotEquals() methods. That method is overloaded, with implementations that accept many different data types. These are all listed in the Assertions documentation, but they all follow the same basic form:
assertEquals(expected, actual)assertNotEquals(expected, actual)For floating-point values such as the double data type, you can also specify a delta value, such that the values are considered equal as long as their positive difference is less than delta
assertEquals(expected, actual, delta)assertNotEquals(expected, actual, delta)Why do we need to include a delta value? This is because floating-point values are by their nature imprecise, and can sometimes lead to strange errors. Consider this example from GeeksforGeeks:
public static void main(String[] args)
{
    double a = 0.7;
    double b = 0.9;
    double x = a + 0.1;
    double y = b - 0.1;

    System.out.println("x = " + x);
    System.out.println("y = " + y );
    System.out.println(x == y);
}
While we would expect both x and y to store the same value, they are actually slightly different.
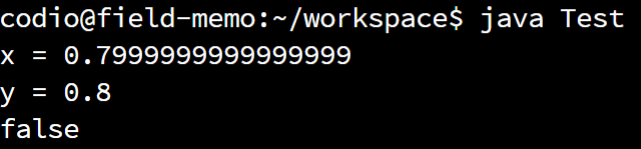
So, we may need to account for this imprecision in our unit tests. We could also rewrite our code to avoid the use of floating point values. For example, many programs that deal with monetary values actually store them as integers based on cents instead of dollars, and simply add the decimal point only when the value is printed.
JUnit also includes assertions for arrays. These methods are also overloaded to handle many different data types:
assertArrayEquals(expected, actual)This method is really handy when we need to check that the contents of an entire array match the values we expect it to contain.
For lists of strings (List<String> data type), JUnit also includes a special method to confirm that each line matches what is expected.
assertLinesMatch(expectedLines, actualLines)This is very handy for checking that multiple lines of output produced by a program match the expected output.
JUnit also includes several helpful assertion methods that allow us to determine if two objects are the same actual object in memory (the same reference), as well as if an object is null:
assertNull(actual)assertNotNull(actual)assertSame(expected, actual)assertNotSame(expected, actual)JUnit also includes a special type of assertion that can be used to catch exceptions. This allows us to assert that a particular piece of code being tested should, or should not, throw an exception.
To do this, JUnit uses a lambda expression, which we haven’t covered yet in this course. We’ll discuss lambdas more in a later chapter. Thankfully, the syntax is very simple. Here’s an example, taken from the JUnit 5 User Guide:
@Test
void exceptionTesting() {
    Exception exception = assertThrows(ArithmeticException.class, () ->
        calculator.divide(1, 0));
    assertEquals("/ by zero", exception.getMessage());
}
The assertThrows(expectedType, executable) method is used to assert that the calculator.divide() method will throw an exception, specifically an ArithmeticException. If that method call does not throw an exception, then the assertion will fail.
The second argument to the assertThrows() method is a lambda expression. In Java, a lambda expression can be thought of as an anonymous function - we are defining a block of code that acts like a function, but we’re not giving it a name. That allows us to pass that block of code as a parameter to another method, where it can be executed. See Anonymous Function on Wikipedia for a deeper explanation. As we mentioned before, we’ll learn more about lambda expressions later in this course.
We can also write code to assert that a method does not throw an exception using the assertDoesNotThrow() assertion:
@Test
void noExceptionTesting() {
    assertDoesNotThrow(() ->
        calculator.multiply(1, 0));
}JUnit includes one other assertion that is used to simply fail a test:
fail(message)By including the fail() method in our unit test, we can cause a test to fail immediately. This allows us to build conditional statements to test complex values that are difficult to express in the provided assertion methods, and then fail a test if the conditional expression reaches the wrong branch. Here’s a quick example:
@Test
void testFail() {
    if(calculator.multiply(1, 0) > calculator.multiply(0, 1)){
        fail("Commutative property violated!");
    }
}One task we may want to be able to perform in our unit tests is capturing output printed by the program. By default, any output that is printed using System.out is immediately sent to the terminal, but we can actually redirect that output without our tests in order to capture it and examine its contents.
We already saw how to do this in the “Hello Real World” project. Here’s that code once again:
@Test
public void testHelloWorldMain() {
    HelloWorld hw = new HelloWorld();
    final PrintStream systemOut = System.out;
    ByteArrayOutputStream testOut = new ByteArrayOutputStream();
    System.setOut(new PrintStream(testOut));
    hw.main(new String[]{});
    System.setOut(systemOut);
    assertEquals(testOut.toString(), "Hello World\n", "Unexpected Output");
}
In that code, we start by storing a reference to the existing System.out as a java.io.PrintStream named systemOut. This will allow us to undo our changes at the end of the test.
Then, we create a new java.io.ByteArrayOutputStream called testOut to store the output printed to the terminal, and use the System.setOut method to redirect System.out to a new PrintStream based on our testOut stream. So, anything printed using System.out will be sent to that PrintStream and captured in our testOut variable.
Once we’ve done those changes, we can then execute our code, calling any functions and including any assertions that we’d like to check. When we are finished, we can then reset System.out back to the original reference using the System.setOut(systemOut) line.
Then, to check the output we received, we can use testOut.toString() to get the output it captured as a single string. If multiple lines of output were printed, they would be separated by \n character, so we could use String.split() to split that single string into individual lines if needed.
We can also choose to use the Hamcrest assertion library in our code, either instead of the JUnit assertions or in addition to them. Hamcrest includes some very helpful assertions that are not part of JUnit, and also includes version for many languages, including both Java and Python. Most of the autograders in previous Computational Core courses are written with the Hamcrest assertion library!
Hamcrest uses a single basic assertion method called assertThat() to perform all assertions. It comes in two basic forms:
assertThat(actual, matcher) - asserts that actual passes the matcher.assertThat(message, actual, matcher) - asserts that actual passes the matcher. If not, it will print message as part of the failure.The real power of Hamcrest lies in the use of Matchers, which are used to determine if the actual value passes a test. If not, then the assertThat method will fail, just like a JUnit assertion.
For example, to test if an actual value returned by a fictional calculator object is equal to an expected value, we could use this statement:
assertThat(calculator.add(1, 3), is(4));As we can see, reading this statement out loud tells us everything we need to know: “Assert that calculator.add(1, 3) is 4!”
Here are a few of the most commonly used Hamcrest matchers, as listed in the Hamcrest Tutorial. The full list of matchers can be found in the Matchers class in the Hamcrest documentation:
is(expected) - a shortcut for equality - an example of syntactic sugar as discussed below.equalTo(expected) - will call the actual.equals(expected) method to test equalityisCompatibleType(type) - can be used to check if an object is the correct type, helpful for testing inheritancenullValue() - check if the value is nullnotNullValue() - check if the value is not nullsameInstance(expected) - checks if two objects are the same instancehasEntry(entry), hasKey(key), hasValue(value) - matchers for working with Maps such as HashMapshasItem(item) - matcher for Collections such as LinkedListhasItemInArray(item) - matcher for arrayscloseTo(expected, delta) - matcher for testing floating-point values within a rangegreaterThan(expected), greaterThanOrEqualTo(expected), lessThan(expected), lessThanOrEqualTo(expected) - numerical matchersequalToIgnoringCase(expected), equalToIgnoringWhiteSpace(expected), containsString(string), endsWith(string), startsWith(string) - string matchersallOf(matcher1, matcher2, ...), anyOf(matcher1, matcher2, ...), not(matcher) - boolean logic operators used to combine multiple matchersHamcrest includes a helpful matcher called is that makes some assertions more easily readable. For example, each of these assertion statements from the Hamcrest Tutorial all test the same thing:
assertThat(theBiscuit, equalTo(myBiscuit));
assertThat(theBiscuit, is(equalTo(myBiscuit)));
assertThat(theBiscuit, is(myBiscuit));
By including the is matcher, we can make our assertions more readable. We call this syntactic sugar since it doesn’t add anything new to our language structure, but it can help make it more readable.
There are lots of great examples of how to use Hamcrest available on the web. Here are a couple that are worth checking out:
Writing tests is in many ways just as challenging and creative an endeavor as writing programs. Tests usually consist of invoking some portion of program code, and then using assertions to determine that the actual results match the expected results. The result of these assertions are typically reported on a per-test basis, which makes it easy to see where your program is not behaving as expected.
Consider a class that is a software control system for a kitchen stove. We won’t write the code for the class itself, because it is important for us to be able to write tests that effectively test the code without even seeing it. It might have properties for four burners, which correspond to what heat output they are currently set to. Let’s assume this is as an integer between 0 (off) and 5 (high). When we first construct this class, we’d probably expect them all to be off! A test to verify that expectation would be:
from src.hello.Stove import Stove

class TestStove:

    def test_burners_should_be_off_at_initialization(self):
        stove = Stove()
        assert stove.burner_one == 0, "Burner is not off after initialization"
        assert stove.burner_two == 0, "Burner is not off after initialization"
        assert stove.burner_three == 0, "Burner is not off after initialization"
        assert stove.burner_four == 0, "Burner is not off after initialization"
Here we’ve written the test using the pytest test framework, which is one of the most commonly used Python unit testing frameworks today.
Notice that the test is simply a method, defined in a class. This is very common for test frameworks, which tend to be written using the same programming language the programs they test are written in (which makes it easier for one programmer to write both the code unit and the code to test it). The test method itself is prefixed with test, as well as the file where the test is stored. In addition, the class name also includes the word Test. These naming conventions help pytest find test methods in the code, as described in the pytest Guide. Omitting the test prefix in the method name allows us to build other helper methods within our test classes as needed.
Inside the method, we create an instance of stove, and then use the assert statement to determine that the actual and expected values match. If they do, the assertion is marked as passing, and the test runner will display this pass. If it fails, the test runner will report the failure, along with details to help find and fix the problem (what value was expected, what it actually was, and which test contained the assertion).
The pytest framework provides for two kinds of tests, standard tests, which are written as functions that have no parameters, and parameterized tests, which do have parameters. The values for these parameters are supplied with a special method annotation, typically @pytest.mark.parametrize. For example, we might test that when we set a burner to a setting within the valid 0-5 range, it is set to that value:
from src.hello.Stove import Stove
import pytest

class TestStove:

    @pytest.mark.parametrize("value", [0, 1, 2, 3, 4, 5])
    def test_should_be_able_to_set_burner_one_to_valid_range(self, value):
        stove = Stove()
        stove.burner_one = value
assert stove.burner_one == value, "Burner does not have expected value"Note the creative spelling of the @parametrize annotation! Be careful to not misspell it (by spelling it correctly) in your code.
The values in the parentheses of the @parametrize annotation are the values supplied to the parameter list of the parameterized test method. Thus, this test is actually six tests; each test makes sure that one of the settings is working. We could have done all six as separate assignments and assertions within a single test method, but using a parameterized test means that if only one of these settings doesn’t work, we will see that one test fail while the others pass. This level of specificity can be very helpful in finding errors.
So far our tests cover the expected behavior of our stove. But where tests really prove their worth is with the edge cases - those things we as programmers don’t anticipate. For example, what happens if we try setting our range to a setting above 5? Should it simply clamp at 5? Should it not change from its current setting? Or should it shut itself off entirely because its user is clearly a pyromaniac bent on burning down their house? If the specification for our program doesn’t say, it is up to us to decide. Let’s say we expect it to be clamped at 5:
@pytest.mark.parametrize("value", [6, 18, 1000000])
def test_burner_one_should_not_exceed_five(self, value):
    stove = Stove()
    stove.burner_one = value
    assert stove.burner_one == 5, "Burner does not have expected value"
Note that we don’t need to exhaustively test all numbers above 5 - it is sufficient to provide a representative sample, ideally the first value past 5 (6), and a few others. Also, now that we have defined our expected behavior, we should make sure the documentation of our burner one property matches it:
@property
def burner_one(self) -> int:
   """Sets the value of Burner One.

   Should be an integer between 0 (off) and 5 (high)
   If a value higher than 5 is provided, the burner will be
   set to 5 instead.

   Args:
       value: the value of the burner
   """
This way, other programmers (and ourselves, if we visit this code years later) will know what the expected behavior is. We’d also want to test the other edge cases: i.e. when the burner is set to a negative number.
For a complete guide to parameterized tests in pyunit, refer to the pyunit Guide.
Recognizing and testing for edge cases is a critical aspect of test writing. But it is also a difficult skill to develop, as we have a tendency to focus on expected values and expected use-cases for our software. But most serious errors occur when values outside these expectations are introduced. Also, remember special values, like float("inf"),, float("-inf"), and float("nan").
Unlike many testing frameworks, the pytest framework by default only uses the built-in assert statement in Python. It doesn’t include a large number of specialized assertions, and instead relies on the developer to write Boolean logic statements to perform the desired testing. More information can be found in the pytest documentation
The pytest framework can leverage the assertions already present in other Python unit testing libraries such as the built-in unittest library. So, for developers familiar with that approach, those assertions can be used.
For this course, we’ll discuss how to use the built-in assert statement, as well as the Hamcrest assertion library.
In general, an assert statement for pytest includes the following structure:
assert <boolean expression>For example, to test if the variable actual is equal to the variable expected, we would write the following assertion:
assert actual == expectedWe can optionally add an error message describing the assertion, as in this example:
assert actual == expected, "The value returned is incorrect"This allows us to provide additional information along with the failure. However, by including a message in this way, it may reduce the amount of information that pytest gives us when the test fails. So, we may find it easier to omit these messages, or include them as comments in the code near the assertion, instead of as part of the assertion itself.
Let’s look at some examples to see how we can use the assert statement in various ways.
assert actual == Trueassert actual == Falseassert acutal == expectedassert actual != expectedassert actual == pytest.approx(expected)assert actual is expected - true if both actual and expected are the same object in memoryassert actual is None - true if actual is the value NoneWhy do we need to deal with approximate floating-point values? This is because floating-point values are by their nature imprecise, and can sometimes lead to strange errors. Consider this example from GeeksforGeeks:
a = 0.7
b = 0.9
x = a + 0.1
y = b - 0.1
print(x)
print(y)
print(x == y)
While we would expect both x and y to store the same value, they are actually slightly different.
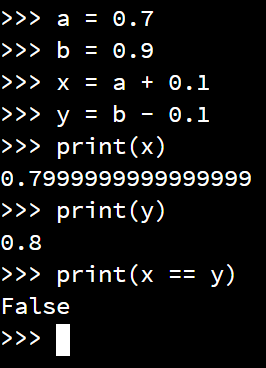
So, we may need to account for this imprecision in our unit tests. We could also rewrite our code to avoid the use of floating point values. For example, many programs that deal with monetary values actually store them as integers based on cents instead of dollars, and simply add the decimal point only when the value is printed.
The pytest framework also includes a special method that can be used to catch exceptions. This allows us to assert that a particular piece of code being tested should, or should not, throw an exception.
Here’s an example, taken from the pytest documentation:
def test_zero_division():
    with pytest.raises(ZeroDivisionError):
        calculator.divide(1, 0)
The with pytest.raises(ZeroDivisionError) statement is used to assert that the calculator.divide() method will throw an exception, specifically a ZeroDivisionError. If that method call does not throw an exception, then the assertion will fail. We can include multiple lines of code within the with block as well.
pytest includes one other assertion that is used to simply fail a test:
fail(message)By including the fail() method in our unit test, we can cause a test to fail immediately, such as when we reach a state that should be unreachable.
One task we may want to be able to perform in our unit tests is capturing output printed by the program. By default, any output that is printed using print() is immediately sent to the terminal, but we can actually redirect that output without our tests in order to capture it and examine its contents.
We already saw how to do this in the “Hello Real World” project. Here’s that code once again (with full type annotations):
from pytest import CaptureFixture
from _pytest.capture import CaptureResult
from typing import Any
from src.hello.HelloWorld import HelloWorld

def test_hello_world(self, capsys: CaptureFixture[Any]) -> None:
    HelloWorld.main(["HelloWorld"])
    captured: CaptureResult[Any] = capsys.readouterr()
    assert captured.out == "Hello World\n", "Unexpected Output"
In that code, we start by adding a parameter named capsys to the test method declaration. capsys is an example of a fixture in pytest. Fixtures allow us to do build more advanced test functions. The capsys fixture is described in the pytest documentation.
So, by including that parameter in our test function, we’ll gain access to all of the features of the capsys fixture. When we execute our code, we can then use capsys.readouterr() to get a CaptureResult object that contains the text that was output by our program. Then, using captured.out, we can check that text and make sure it matches our expectation in an assertion.
We can also choose to use the Hamcrest assertion library in our code, either instead of the pyunit assertions or in addition to them. Hamcrest includes some very helpful assertions that are not part of pyunit, and also includes version for many languages, including both Python and Java. Most of the autograders in previous Computational Core courses are written with the Hamcrest assertion library!
Hamcrest uses a single basic assertion method called assert_that() to perform all assertions. It comes in two basic forms:
assert_that(actual, matcher) - asserts that actual passes the matcher.assert_that(actual, matcher, message) - asserts that actual passes the matcher. If not, it will print message as part of the failure.The real power of Hamcrest lies in the use of Matchers, which are used to determine if the actual value passes a test. If not, then the assert_that method will fail, just like a pyunit assertion.
For example, to test if an actual value returned by a fictional calculator object is equal to an expected value, we could use this statement:
assert_that(calculator.add(1, 3), is_(4))As we can see, reading this statement out loud tells us everything we need to know: “Assert that calculator.add(1, 3) is 4!”
Here are a few of the most commonly used Hamcrest matchers, as listed in the Hamcrest Tutorial. The full list of matchers can be found in the Matcher Library in the Hamcrest documentation:
is_(expected) - a shortcut for equality - an example of syntactic sugar as discussed below. Notice the underscore to differentiate it from the Python keyword isequal_to(expected) - will call the actual.equals(expected) method to test equalityinstance_of(type) - can be used to check if an object is the correct type, helpful for testing inheritancenone() - check if the value is Nonenot_none() - check if the value is not Nonesame_instance(expected) - checks if two objects are the same instancehas_entry(key, value), has_key(key), has_value(value) - matchers for working with mapping types like dictionarieshas_item(item) - matcher for sequence types like listsclose_to(expected, delta) - matcher for testing floating-point values within a rangegreater_than(expected), greater_than_or_equal_to(expected), less_than(expected), less_than_or_equal_to(expected) - numerical matchersequal_to_ignoring_case(expected), equal_to_ignoring_whitespace(expected), contains_string(string), ends_with(string), starts_with(string) - string matchersall_of(matcher1, matcher2, ...), any_of(matcher1, matcher2, ...), is_not(matcher) - boolean logic operators used to combine multiple matchersHamcrest includes a helpful matcher called is_() that makes some assertions more easily readable. For example, each of these assertion statements from the Hamcrest Tutorial all test the same thing:
assert_that(theBiscuit, equal_to(myBiscuit))
assert_that(theBiscuit, is_(equal_to(myBiscuit)))
assert_that(theBiscuit, is_(myBiscuit))
By including the is_() matcher, we can make our assertions more readable. We call this syntactic sugar since it doesn’t add anything new to our language structure, but it can help make it more readable.
Once we’ve written our unit tests, we can execute them against our code to see how well it works. Tests are usually run with a test runner, a program that will execute the test code against the code to be tested. The exact mechanism involved depends on the testing framework.
As we discovered in the “Hello Real World” project, both JUnit and pytest have a way to automatically discover all of the tests we’ve created, provided we place them in the correct location and possibly give them the correct name.
Outside of Codio, many integrated development environments, or IDEs, support running unit tests directly through their interface. We won’t cover much of that in this class, but it is handy to know that it can be done graphically as well.
Once the test runner is done executing our tests, we’ll be given information about the tests which failed. We’ve also learned how to create an HTML report that gives us helpful information about our tests and why they failed. So, we can look through that information to determine if our code needs to be updated, or if the test is not testing our code correctly.
Occasionally, you may end up with problems executing your tests. So, as with any development process, it is helpful to work incrementally, and run your tests each time you add or change code. This allows you to catch errors as they happen when the code is fresh in your mind, and it will be that much easier to fix the problem.
It’s also a good idea to run all of your previously passed tests anytime you make a change to your code. This practice is known as regression testing, and can help you identify errors your changes introduce that break what had previously been working code. This is also one of the strongest arguments for writing test code rather than performing ad-hoc testing; automated tests are easy to repeat.
The term test code coverage refers to how much of your program’s code is executed as your tests run. It is a useful metric for evaluating the depth of your test, if not necessarily the quality. Basically, if your code is not executed in the test framework, it is not tested in any way. If it is executed, then at least some tests are looking at it. So aiming for a high code coverage is a good starting point for writing tests.
While test code coverage is a good starting point for evaluating your tests, it is simply a measure of quantity, not quality. It is easily possible for you to have all of your code covered by tests, but still miss errors. You need to carefully consider the edge cases - those unexpected and unanticipated ways your code might end up being used.
Unit testing is a small part of a much larger world of software testing strategies that we can employ in our workflow. On this page, we’ll review some of the more common testing strategies that we may come across.
First, it is important to differentiate between two different approaches to testing. The white box testing approach means that the developer writing the test has full access to the source code, and it is used to verify not just the functionality of a program as it might appear externally, but also that the internal workings of the program are correct.
By having access to the source code, you can take advantage of tools that determine code coverage, and develop tests that are specifically designed to test edge cases or paths found in the code itself.
On the other hand, black box testing means that the tester cannot see the source code of the application itself, and can only test it by calling the publicly available methods, sometimes referred to as the application programming interface or API of the software.
For example, consider testing the code in a library that we didn’t develop. We can access the documentation to see what functions it provides and how they should operate, and we can then write tests that verify those functions. This can be helpful to avoid some of the biases that may be introduced by reading the code itself. We could easily look at a line of code and convince ourselves that it is correct, such that we may not adequately test it’s functionality.
However, because we won’t be able to see the code itself, it can be much harder to test edge cases or unique functionality in the code since we cannot inspect it ourselves. So, we’ll have to be a bit more creative and deliberate in developing our test cases.
Beyond unit testing, many software programs also undergo integration testing, where each individual software component is tested to make sure its interface matches the design specifications, and also that multiple parts of the system work together properly. As programs become larger and larger, it is important to not only test the individual units but the links between those units as well. By creating a well defined interface and performing integration testing, we can ensure that all parts of our program work well together.
We’ve already discussed this a bit. Regression testing involves running our set of tests after a major change in the software, trying to ensure that we didn’t introduce any new bugs or break any working features, causing the software to regress in quality.
This can be really important if we plan on developing a new version of our program that remains compatible with previous versions. In that case, we may end up developing an entirely new suite of tests for our new version, while still using the previous version’s tests as a form of regression testing to ensure compatibility. As the software matures and new versions are released, maintaining backwards compatibility can be a major challenge.
Once the software is complete, a final phase of testing is the acceptance testing, where the software is tested by the eventual end user to confirm that it meets their needs. Acceptance testing could include phases such as alpha testing and beta testing, where incomplete versions of the software are tested by potential users to identify bugs. This is very common today in video game development.
Finally, one important concept in the world of software development is the test-driven development methodology. In contrast to more traditional software development methodologies where the software is developed and then tested, test-driven development requires that software tests be written first, and then the software itself is written to pass the tests. Through this method, if we adequately write our tests to match the requirements of the software, we can be sure that our software actually does what it should if it passes the tests.
This can be quite tricky, since writing tests can be much more complex than writing the actual software, and in some cases it is important to understand how the software itself will be structured before the tests can be effectively written.
For more information about the world of software testing, check out the Software Testing article on Wikipedia, as well as the many articles linked from that page.
In this chapter we learned about testing, both manually using test plans and automatically using a testing framework. We saw how the cost of fixing errors rises exponentially with how long they go undiscovered. We discussed how writing automated tests during the programming phase can help uncover these errors earlier, and how regression testing can help us find new errors introduced while adding to our programs.
We learned a bit more about the testing frameworks we have available to us in our chosen programming language and how to use them. And finally, we discussed some more advanced topics related to software testing.
Check your understanding of the new content introduced in this chapter below - this quiz is not graded and you can retake it as many times as you want.