Web
Applications for the World Wide Web!
Applications for the World Wide Web!
From desktop GUIs to the World Wide Web!
Up to this point, we’ve mainly focused on developing an application that can be executed locally on a computer. To use an application like this, users would have to download it and possibly install it on their system. Likewise, as developers, we’ll have to create a release that they can install, and we may have to make sure that the release is compatible with various different operating systems and computer architectures.
For decades, this was really the state of the art of computer programming. However, starting in the 2000s, things began to drastically change with the rise of Web 2.0 and interactive website. Soon, a whole new type of application, the web application, became commonplace.
Today, outside of video games and a few specialized applications, many computer users primarily interact with web applications instead of applications installed locally on their computer. Some great examples are the various social media sites such as Facebook and YouTube, productivity tools such as Microsoft Office 365 or Google Drive, and even communication platforms such as Slack and Discord.
To make things even more complicated, many of those web applications include versions that you can install and run locally on your computer or smartphone, but in many cases they are simply a lightweight wrapper around the web application. In that way, it appears to be running as a local application, but it is really just a version of the same web application that is stored locally.
In this chapter, we’re going to pivot our focus to building a web application. To do that, we’ll have to introduce many new concepts to lay the foundation for working in the web, so there will be lots of new content and ideas in this chapter.
Some key terms that we’ll cover:
At the end of this chapter, you’ll be able to generate your own data driven web pages using a web framework and its built-in templating engine!
Much of the content in this page was adapted from Nathan Bean’s CIS 400 course at K-State, with the author’s permission. That content is licensed under a Creative Commons BY-NC-SA license.
The World Wide Web was the brainchild of Sir Tim Berners-Lee. It was conceived as a way to share information across the Internet; in Sir Berners-Lee’s own words describing the idea as he first conceived it:
This project is experimental and of course comes without any warranty whatsoever. However, it could start a revolution in information access.
Clearly that revolution has come to pass. The web has become part of our daily lives.
There were three key technologies that Sir Tim Berners-Lee proposed and developed. These remain the foundations upon which the web runs even today. Two are client-side, and determine how web pages are interpreted by browsers. These are:
Hypertext Markup Language (HTML), is one of the three core technologies of the world wide web, along with Cascading Style Sheets (CSS) and Javascript (JS). Each of these technologies has a specific role to play in delivering a website. HTML defines the structure and contents of the web page. It is a markup language, similar to XML (indeed, HTML is based on the SGML, or Standardized General Markup Language, standard, which XML is also based on).
The structure of HTML consists of various tags. For example, a button in HTML looks like this:
<button onclick="doSomething">
    Do Something
</button>
HTML elements have and opening and closing tag, and can have additional HTML content nested inside these tags. HTML tags can also be self-closing, as is the case with the line break tag:
<br />Let’s explore the parts of an HTML element in more detail.
The start tag is enclosed in angle brackets (< and >). The angle brackets differentiate the text inside them as being HTML elements, rather than text. This guides the browser to interpret them correctly.
Because angle brackets are interpreted as defining HTML tags, you cannot use those characters to represent greater than and less than signs. Instead, HTML defines escape character sequences to represent these and other special characters. Greater than is >, less than is <. A full list can be found on mdn.
Immediately after the < is the tag name. In HTML, tag names like button should be expressed in lowercase letters. This is a convention (as most browsers will happily accept any mixture of uppercase and lowercase letters), but is very important when using popular modern web technologies like Razor and React, as these use Camel case tag names to differentiate between HTML and components they inject into the web page.
After the tag name come optional attributes, which are key-value pairs expressed as key="value". Attributes should be separated from each other and the tag name by whitespace characters (any whitespace will do, but traditionally spaces are used). Different elements have different attributes available - and you can read up on what these are by visiting the MDN article about the specific element.
However, several attributes bear special mention:
The id attribute is used to assign a unique id to an element, i.e. <button id="that-one-button">. The element can thereafter be referenced by that id in both CSS and JavaScript code. An element ID must be unique in an HTML page, or unexpected behavior may result!
The class attribute is also used to assign an identifier used by CSS and JavaScript. However, classes don’t need to be unique; many elements can have the same class. Further, each element can be assigned multiple classes, as a space-delimited string, i.e. <button class="large warning"> assigns both the classes “large” and “warning” to the button.
Also, some web technologies (like Angular) introduce new attributes specific to their framework, taking advantage of the fact that a browser will ignore any attributes it does not recognize.
The content nested inside the tag can be plain text, or another HTML element (or collection of elements). HTML elements can have multiple child elements. Indentation should be used to keep your code legible by indenting any nested content, i.e.:
<div>
    <h1>A Title</h1>
    <p>This is a paragraph of text that is nested inside the div</p>
    <p>And this is another paragraph of text</p>
</div>
The end tag is also enclosed in angle brackets (< and >). Immediately after the < is a forward slash /, and then the tag name. You do not include attributes in a end tag.
If the element has no content, the end tag can be combined with the start tag in a self-closing tag, i.e. the <input> tag is typically written as self-closing:
<input id="first-name" type="text" placeholder="Your first name" />
Text in HTML works a bit differently than you might expect. Most notably, all white space is converted into a single space. Thus, the lines:
<blockquote>
    If you can keep your head when all about you
        Are losing theirs and blaming it on you,
    If you can trust yourself when all men doubt you,
        But make allowance for their doubting too;
    If you can wait and not be tired by waiting,
        Or being lied about, don’t deal in lies,
    Or being hated, don’t give way to hating,
        And yet don’t look too good, nor talk too wise:
    <i>-Rudyard Kipling, exerpt from "If"</i>
</blockquote>
Would be rendered:
If you can keep your head when all about you Are losing theirs and blaming it on you, If you can trust yourself when all men doubt you, But make allowance for their doubting too; If you can wait and not be tired by waiting, Or being lied about, don’t deal in lies, Or being hated, don’t give way to hating, And yet don’t look too good, nor talk too wise: -Rudyard Kipling, exerpt from "If"
If, for some reason you need to maintain formatting of the included text, you can use the <pre> element (which indicates the text is preformatted):
<blockquote>
    <pre>
If you can keep your head when all about you
    Are losing theirs and blaming it on you,
If you can trust yourself when all men doubt you,
    But make allowance for their doubting too;
If you can wait and not be tired by waiting,
    Or being lied about, don’t deal in lies,
Or being hated, don’t give way to hating,
    And yet don’t look too good, nor talk too wise:
    </pre>
    <i>-Rudyard Kipling, exerpt from "If"</i>
</blockquote>
Which would be rendered:
If you can keep your head when all about you
    Are losing theirs and blaming it on you,
If you can trust yourself when all men doubt you,
    But make allowance for their doubting too;
If you can wait and not be tired by waiting,
    Or being lied about, don’t deal in lies,
Or being hated, don’t give way to hating,
    And yet don’t look too good, nor talk too wise:
-Rudyard Kipling, exerpt from "If"
Note that the <pre> preserves all formatting, so it is necessary not to indent its contents.
Alternatively, you can denote line breaks with <br/>, and non-breaking spaces with :
<blockquote>
If you can keep your head when all about you<br/>
Are losing theirs and blaming it on you,<br/>
If you can trust yourself when all men doubt you,<br/>
But make allowance for their doubting too;<br/>
If you can wait and not be tired by waiting,<br/>
Or being lied about, don’t deal in lies,<br/>
Or being hated, don’t give way to hating,<br/>
And yet don’t look too good, nor talk too wise:<br/>
<i>-Rudyard Kipling, exerpt from "If"</i>
</blockquote>Which renders:
If you can keep your head when all about you
Are losing theirs and blaming it on you,
If you can trust yourself when all men doubt you,
But make allowance for their doubting too;
If you can wait and not be tired by waiting,
Or being lied about, don’t deal in lies,
Or being hated, don’t give way to hating,
And yet don’t look too good, nor talk too wise:
-Rudyard Kipling, exerpt from "If"
Additionally, as a program you may want to use the the <code> element in conjunction with the <pre> element to display preformatted code snippets in your pages. There are even some JavaScript libraries available to automatically add syntax colors to your code.
HTML comments are identical to XML comments (as both inherited from SGML). Comments start with the sequence <!-- and end with the sequence -->, i.e.:
<!-- This is an example of a HTML comment -->HTML5 (the current HTML standard) pages have an expected structure that you should follow. This is:
<!DOCTYPE html>
<html>
    <head>
        <title><!-- The title of your page goes here --></title>
        <!-- other metadata about your page goes here -->
    </head>
    <body>
        <!-- The contents of your page go here -->
    </body>
</html>Rather than include an exhaustive list of HTML elements, I will direct you to the list provided by MDN. However, it is useful to recognize that elements can serve different purposes:
There are more tags than this, but these are the most commonly employed, and the ones you should be familiar with.
The MDN HTML Docs are recommended reading for learning more about HTML.
Much of the content in this page was adapted from Nathan Bean’s CIS 400 course at K-State, with the author’s permission. That content is licensed under a Creative Commons BY-NC-SA license.
Cascading Style Sheets (CSS) is the second core web technology of the web. It defines the appearance of web pages by applying stylistic rules to matching HTML elements. CSS is normally declared in a file with the .css extension, separate from the HTML files it is modifying, though it can also be declared within the page using the <style> element, or directly on an element using the style attribute.
A CSS rule consists of a selector and a definition block, i.e.:
h1
{
    color: red;
    font-weight: bold;
}A CSS selector determines which elements the associated definition block apply to. In the above example, the h1 selector indicates that the style definition supplied applies to all <h1> elements. The selectors can be:
p applies to all <p> elements.#. I.e. the selector #foo applies to the element <span id="foo">... I.e. the selector .bar applies to the elements <div class="bar">, <span class="bar none">, and <p class="alert bar warning">.CSS selectors can also be combined in a number of ways, and psuedo-selectors can be applied under certain circumstances, like the :hover psudo-selector which applies only when the mouse cursor is over the element.
You can read more on MDN’s CSS Selectors Page.
A CSS definition block is bracketed by curly braces and contains a series of key-value pairs in the format key=value;. Each key is a property that defines how an HTML Element should be displayed, and the value needs to be a valid value for that property.
Measurements can be expressed in a number of units, from pixels (px), points (pt), the font size of the parent (em), the font size of the root element (rem), a percentage of the available space (%), or a percentage of the viewport width (vw) or height (vh). See MDN’s CSS values and units for more details.
Other values are specific to the property. For example, the cursor property has possible values help, wait, crosshair, not-allowed, zoom-in, and grab. You should use the MDN documentation for a reference.
One common use for CSS is to change properties about how the text in an element is rendered. This can include changing attributes of the font (font-style, font-weight, font-size, font-family), the color, and the text (text-align, line-break, word-wrap, text-indent, text-justify). These are just a sampling of some of the most commonly used properties.
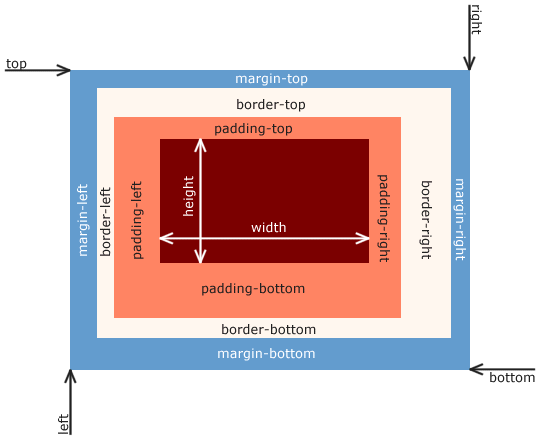
A second common use for CSS is to change properties of the element itself. This can include setting dimensions (width, height), adding margins, borders, and padding.
These values provide additional space around the content of the element, following the CSS Box Model:
The third common use for CSS is to change how elements are laid out on the page. By default HTML elements follow the flow model, where each element appears on the page after the one before it. Some elements are block level elements, which stretch across the entire page (so the next element appears below it), and others are inline and are only as wide as they need to be to hold their contents, so the next element can appear to the right, if there is room.
The float property can make an element float to the left or right of its container, allowing the rest of the page to flow around it.
Or you can swap out the layout model entirely by changing the display property to flex or grid. For learning about these two display models, the CSS-Tricks A Complete Guide to Flexbox and A Complete Guide to Grid are recommended reading. These can provide quite powerful layout tools to the developer.
This is just the tip of the iceberg of what is possible with CSS. Using CSS media queries can change the rules applied to elements based on the size of the device it is viewed on, allowing for responsive design. CSS Animation can allow properties to change over time, making stunning visual animations easy to implement. And CSS can also carry out calculations and store values, leading some computer scientists to argue that it is a Turing Complete language.
The MDN Cascading Stylesheets Docs and CSS Tricks are recommended reading to learn more about CSS and its uses.
Much of the content in this page was adapted from Nathan Bean’s CIS 400 course at K-State, with the author’s permission. That content is licensed under a Creative Commons BY-NC-SA license.
JavaScript (or ECMAScript, which is the standard JavaScript is derived from), was originally developed for Netscape Navigator by Brendan Eich. The original version was completed in just 10 days. The name “JavaScript” was a marketing move by Netscape as they had just secured the rights to use Java Applets in their browser, and wanted to tie the two languages together. Similarly, they pushed for a Java-like syntax, which Brendan accommodated. However, he also incorporated functional behaviors based on the Scheme language, and drew upon Self’s implementation of object-orientation. The result is a language that may look familiar to you, but often works in unexpected ways.
Unlike the statically-typed Java language, JavaScript has dynamic types like Python. This means that we always declare variables using the var keyword, i.e.:
var i = 0;
var story = "Jack and Jill went up a hill...";
var pi = 3.14;
The type of the variable is inferred when it is set, and the type can change with a new assignment, i.e.:
var i = 0; // i is an integer
i = "The sky is blue"; // now i is a string
i = true; // now i is a boolean
This would cause an error in C#, but is perfectly legal in JavaScript. Because JavaScript is dynamically typed, it is impossible to determine type errors until the program is run.
In addition to var, variables can be declared with the const keyword (for constants that cannot be re-assigned), or the let keyword (discussed below).
While the type of a variable is inferred, JavaScript still supports types. You can determine the type of a variable with the typeof() function. The available types in JavaScript are:
true or false)"I'm a string"), single quotes 'Me too!', or backticks `I'm a template string ${2 + 3}`) which indicate a template string and can execute and concatenate embedded JavaScript expressions.["I am", 2, "listy", 4, "u"]), which are a generic catch-all data structure, which can be treated as an array, list, queue, or stack.new keyword, discussed later)In JavaScript, there are two keywords that represent a null value, undefined and null. These have a different meaning: undefined refers to values that have not yet been initialized, while null must be explicitly set by the programmer (and thus intentionally meaning nothing).
As suggested in the description, JavaScript is a functional language incorporating many ideas from Scheme. In JavaScript we declare functions using the function keyword, i.e.:
function add(a, b) {
  return a + b;
}
We can also declare an anonymous function (one without a name):
function (a, b) {
  return a + b;
}
or with the lambda syntax:
(a,b) => {
  return a + b;
}
In JavaScript, functions are first-class objects, which means they can be stored as variables, i.e.:
var add = function(a,b) {
  return a + b;
}
Added to arrays:
var math = [
  add,
  (a,b) => {return a - b;},
  function(a,b) { a * b; },
]
Or passed as function arguments.
Variable scope in JavaScript is bound to functions. Blocks like the body of an if or for loop do not declare a new scope. Thus, this code:
for(var i = 0; i < 3; i++;)
{
  console.log("Counting i=" + i);
}
console.log("Final value of i is: " + i);
Will print:
Counting i=0
Counting i=1
Counting i=2
Final value of i is: 3
Because the i variable is not scoped to the block of the for loop, but rather, the function that contains it.
The keyword let was introduced in ECMAScript version 6 as an alternative for var that enforces block scope. Using let in the example above would result in a reference error being thrown, as i is not defined outside of the for loop block.
JavaScript was written to run within the browser, and was therefore event-driven from the start. It uses the event loop and queue pattern we saw in C#. For example, we can set an event to occur in the future with setTimeout():
setTimeout(function(){console.log("Hello, future!")}, 2000);This will cause “Hello, Future!” to be printed 2 seconds (2000 milliseconds) in the future (notice too that we can pass a function to a function).
As suggested above, JavaScript is object-oriented, but in a manner more similar to Self than to C#. For example, we can declare objects literally:
var student = {
  first: "Mark",
  last: "Delaney"
}
Or we can write a constructor, which in JavaScript is simply a function we capitalize by convention:
function Student(first, last){
  this.first = first;
  this.last = last;
}
And invoke with the new keyword:
var js = new Student("Jack", "Sprat");Objects constructed from classes have a prototype, which can be used to attach methods:
Student.prototype.greet = function(){
  console.log(`Hello, my name is ${this.first} ${this.last}`);
}
Thus, js.greet() would print Hello, my name is Jack Sprat;
ECMAScript 6 introduced a more familiar form of class definition:
class Student{
  constructor(first, last) {
    this.first = first;
    this.last = last;
    this.greet = this.greet.bind(this);
  }
  greet(){
    console.log(`Hello, my name is ${this.first} ${this.last}`);
  }
}
However, because JavaScript uses function scope, the this in the method greet would not refer to the student constructed in the constructor, but the greet() method itself. The constructor line this.greet = this.greet.bind(this); fixes that issue by binding the greet() method to the this of the constructor.
The Document Object Model (DOM) is a tree-like structure that the browser constructs from parsed HTML to determine size, placement, and appearance of the elements on-screen. In this, it is much like the elements tree we used with Windows Presentation Foundation (which was most likely inspired by the DOM). The DOM is also accessible to JavaScript - in fact, one of the most important uses of JavaScript is to manipulate the DOM.
You can learn more about the DOM from MDN’s Document Object Model documentation entry.
Much of the content in this page was adapted from Nathan Bean’s CIS 400 course at K-State, with the author’s permission. That content is licensed under a Creative Commons BY-NC-SA license.
At the heart of the world wide web is the Hypertext Transfer Protocol (HTTP). This is a protocol defining how HTTP servers (which host web pages) interact with HTTP clients (which display web pages).
It starts with a request initiated from the web browser (the client). This request is sent over the Internet using the TCP protocol to a web server. Once the web server receives the request, it must decide the appropriate response - ideally sending the requested resource back to the browser to be displayed. The following diagram displays this typical request-response pattern.
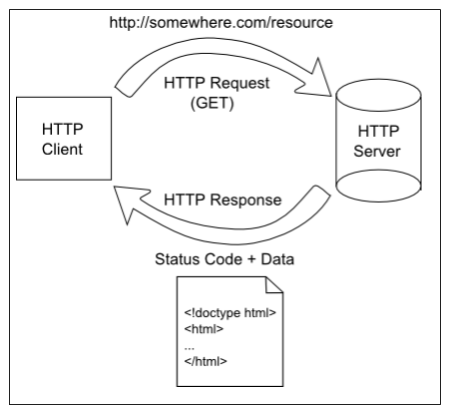
This HTTP request-response pattern is at the core of how all web applications communicate. Even those that use websockets begin with an HTTP request.
A HTTP Request is just text that follows a specific format and sent from a client to a server. It consists of one or more lines terminated by a CRLF (a carriage return and a line feed character, typically written \r\n in most programming languages).
Similar to an HTTP Request, an HTTP response consists of one or more lines of text, terminated by a CRLF (sequential carriage return and line feed characters):
With our new understanding of HTTP requests and responses as consisting of streams of text that match a well-defined format, we can try manually making our own requests, using a Linux command line tool netcat.
In Codio, we can open a terminal window and type the following command:
nc google.com 80The nc portion is the netcat executable - we’re asking Linux to run netcat for us, and providing two command-line arguments, google.com and 80, which are the webserver we want to talk to and the port we want to connect to (port 80 is the default port for HTTP requests).
Now that a connection is established, we can stream our request to Google’s server:
GET / HTTP/1.1The GET indicates we are making a GET request, i.e. requesting a resource from the server. The / indicates the resource on the server we are requesting (at this point, just the top-level page). Finally, the HTTP/1.1 indicates the version of HTTP we are using.
Note that you need to press the return key twice after the GET line, once to end the line, and the second time to end the HTTP request. Pressing the return key in the terminal enters the CRLF character sequence (Carriage Return & Line Feed) the HTTP protocol uses to separate lines
Once the second return is pressed, a whole bunch of text will appear in the terminal. This is the HTTP Response from Google’s server. We’ll take a look at that next.
Scroll up to the top of the request, and you should see something like:
HTTP/1.1 200 OK
Date: Wed, 16 Jan 2019 15:39:33 GMT
Expires: -1
Cache-Control: private, max-age=0
Content-Type: text/html; charset=ISO-8859-1
P3P: CP="This is not a P3P policy! See g.co/p3phelp for more info."
Server: gws
X-XSS-Protection: 1; mode=block
X-Frame-Options: SAMEORIGIN
Set-Cookie: 1P_JAR=2019-01-16-15; expires=Fri, 15-Feb-2019 15:39:33 GMT; path=/; domain=.google.com
Set-Cookie: NID=154=XyALfeRzT9rj_55NNa006-Mmszh7T4rIp9Pgr4AVk4zZuQMZIDAj2hWYoYkKU6Etbmjkft5YPW8Fens07MvfxRSw1D9mKZckUiQ--RZJWZyurfJUyRtoJyTfSOMSaniZTtffEBNK7hY2M23GAMyFIRpyQYQtMpCv2D6xHqpKjb4; expires=Thu, 18-Jul-2019 15:39:33 GMT; path=/; domain=.google.com; HttpOnly
Accept-Ranges: none
Vary: Accept-Encoding

<!doctype html>...
The first line indicates that the server responded using the HTTP 1.1 protocol, the status of the response is a 200 code, which corresponds to the human meaning “OK”. In other words, the request worked. The remaining lines are headers describing aspects of the request - the Date, for example, indicates when the request was made, and the path indicates what was requested. Most important of these headers, though is the Content-Type header, which indicates what the body of the response consists of. The content type text/html means the body consists of text, which is formatted as HTML – in other words, a webpage.
Everything after the blank line is the body of the response - in this case, the page content as HTML text. If you scroll far enough through it, you should be able to locate all of the HTML elements in Google’s search page.
That’s really all there is with a HTTP request and response. They’re just streams of data. A webserver just receives a request, processes it, and sends a response.
You can learn a bit more about HTTP and see a similar example in the HTTP lecture from the CIS 527 - Enterprise Systems Administration course.
Much of the content in this page was adapted from Nathan Bean’s CIS 400 course at K-State, with the author’s permission. That content is licensed under a Creative Commons BY-NC-SA license.
Now that we’ve learned about all of the core technologies used to create and deliver webpages, let’s take a deeper look at the software that runs on the servers that are responsible for receiving HTTP requests and responding to them. We typically call these programs web servers.
The earliest web servers simply served files held in a directory, and in fact many web servers today are still capable of doing exactly that. For example, K-State Computer Science provides a basic web server that can be used to host a personal web page for any faculty, staff, or students in the department. According to the instructions, all you have to do is place the files in a special folder named public_html on the central cslinux.cs.ksu.edu server, and then they can be accessed at the address http://people.cs.ksu.edu/~[eid]/ where [eid] is your K-State eID.
Apache is one of the oldest and most popular open-source web servers in the world. Microsoft introduced their own web server, Internet Information Services (IIS) around the same time. Unlike Apache, which can be installed on most operating systems, IIS only runs on the Windows Server operating system. More recently, the nginx server has become very popular due to its focus on high performance.
As the web grew in popularity, there was tremendous demand to supplement these static pages with pages created on the fly in response to requests - allowing pages to be customized for a particular user, or displaying the most up-to-date information from a database. In other words, dynamic pages. We’ll take a look at these next.
Much of the content in this page was adapted from Nathan Bean’s CIS 400 course at K-State, with the author’s permission. That content is licensed under a Creative Commons BY-NC-SA license.
Modern websites are more often full-fledged applications than collections of static files. These applications remain built upon the foundations of the core web technologies of HTML, CSS, and JavaScript. In fact, the client-side application is typically built of exactly these three kinds of files! So how can we create a dynamic web application?
One of the earliest approaches was to write a program to dynamically create the HTML file that was being served. Consider this method:
public String GeneratePage() {
    StringBuilder sb = new StringBuilder();
    sb.append("<!DOCTYPE html>\n");
    sb.append("<html>\n");
    sb.append("<head>\n");
    sb.append("<title>My Dynamic Page</title>\n");
    sb.append("</head>\n");
    sb.append("<body>\n");
    sb.append("<h1>Hello, world!</h1>\n");
    sb.append("<p>Time on the server is ");
    SimpleDateFormat formatter= new SimpleDateFormat("yyyy-MM-dd 'at' HH:mm:ss z");
    Date date = new Date(System.currentTimeMillis());
    sb.append(formatter.format(date) + "\n");
    sb.append("</p>\n");
    sb.append("</body>\n");
    sb.append("</html>\n");
    return sb.toString();
}
def generate_page(self) -> str:
sb: List[str] = list()
sb.append("<!DOCTYPE html>")
sb.append("<html>")
sb.append("<head>")
sb.append("<title>My Dynamic Page</title>")
sb.append("</head>")
sb.append("<body>")
sb.append("<h1>Hello, world!</h1>")
sb.append("<p>Time on the server is ")
now = datetime.now()
sb.append(now.strftime("%d/%m/%Y %H:%M:%S"))
sb.append("</p>")
sb.append("</body>")
sb.append("</html>")
return "\n".join(sb)It generates the HTML of a page showing the current date and time. Remember too that HTTP responses are simply text, so we can generate a response as a string as well:
public String generateResponse() {
    String page = generatePage();
    StringBuilder sb = new StringBuilder();
    sb.append("HTTP/1.1 200\n");
    sb.append("Content-Type: text/html; charset=utf-8\n");
    sb.append("ContentLength:" + page.length() + "\n");
    sb.append("\n");
    sb.append(page);
    return sb.toString();
}
def generate_response(self) -> str:
page: str = generate_page()
sb: List[str] = list()
sb.append("HTTP/1.1 200");
sb.append("Content-Type: text/html; charset=utf-8");
sb.append("ContentLength:" + page.length());
sb.append("");
sb.append(page);
return "\n".join(sb)The resulting string could then be streamed back to the requesting web browser. This is the basic technique used in all server-side web frameworks: they dynamically assemble the response to a request by assembling strings into an HTML page. Where they differ is what language they use to do so, and how much of the process they’ve abstracted.
For example, this approach was adopted by Microsoft and implemented as Active Server Pages (ASP). By placing files with the .asp extension among those served by an IIS server, C# or Visual Basic code written on that page would be executed, and the resulting string would be served as a file. This would happen on each request - so a request for http://somesite.com/somepage.asp would execute the code in the somepage.asp file, and the resulting text would be served.
You might have looked at the above examples and shuddered. After all, who wants to assemble text like that? And when you assemble HTML using raw string concatenation, you don’t have the benefit of syntax highlighting, code completion, or any of the other modern development tools we’ve grown to rely on. Thankfully, most web development frameworks provide some abstraction around this process, and by and large have adopted some form of template syntax to make the process of writing a page easier.
Much of the content in this page was adapted from Nathan Bean’s CIS 400 course at K-State, with the author’s permission. That content is licensed under a Creative Commons BY-NC-SA license.
It was not long before new technologies sprang up to replace the ad-hoc string concatenation approach to creating dynamic pages. These template approaches allow you to write a page using primarily HTML, but embed snippets of another language to execute and concatenate into the final page. This is very similar to the formatted strings we’ve used in Java and Python, i.e.:
String output = String.format("%s, %d", "Computer", 410)output: str = "{}, {}".format("Computer, 410)The example above concatenates the string "Computer" and the number 410 with a comma between them. While the template strings above use either format specifiers like %s or curly braces {} to call out the script snippets, most HTML template libraries initially used some variation of angle brackets + additional characters. As browsers interpret anything within angle brackets (<>) as HTML tags, these would not be rendered if the template was accidentally served as HTML without executing and concatenating scripts. Two early examples are:
<?php echo "This is a PHP example" ?><% Response.Write("This is a classic ASP example) %>And abbreviated versions:
<?= "This is the short form for PHP" ?><%= "This is the short form for classic ASP" %>Template rendering proved such a popular and powerful tool that rendering libraries were written for most programming languages, and could be used for more than just HTML files - really any kind of text file can be rendered with a template. Thus, you can find template rendering libraries for JavaScript, Python, Ruby, and pretty much any language you care to (and they aren’t that hard to write either).
Classic PHP, Classic ASP, and ASP.NET web pages all use a single-page model, where the client (the browser) requests a specific file, and as that file is interpreted, the dynamic page is generated. This approach worked well in the early days of the world-wide-web, where web sites were essentially a collection of pages. However, as the web grew increasingly interactive, many web sites grew into full-fledged web applications, or full-blown programs that didn’t lend themselves to a page-based structure. This new need resulted in new technologies to fill the void - web frameworks. We’ll talk about these next.
Much of the content in this page was adapted from Nathan Bean’s CIS 400 course at K-State, with the author’s permission. That content is licensed under a Creative Commons BY-NC-SA license.
As web sites became web applications, developers began looking to use ideas and techniques drawn from traditional software development. These included architectural patterns like Model-View-Controller (MVC) and Pipeline that simply were not possible with the server page model. The result was the development of a host of web frameworks across multiple programming languages, including:
In this course, we’re going to explore a lightweight web framework that was built for our chosen language:
Both of these frameworks are very powerful, but most importantly, they are extremely flexible and allow us to structure our web application in a way that makes sense for our needs.
On the next pages, we’ll dive a bit deeper into how these web frameworks handle web requests and generate appropriate responses for them.
Earlier in this chapter, we discussed how HTTP is a request-response protocol, as shown in this diagram:
We also discussed how we could write a simple dynamic program to generate a response by concatenating strings together. It was definitely not efficient, but it demonstrated that it is possible to dynamically generate a response to a web request.
Web frameworks simplify this process greatly by handling most of the work for us. As developers, all we really need to do is collect the data that should be contained in the response, and create the template used to generate the web page.
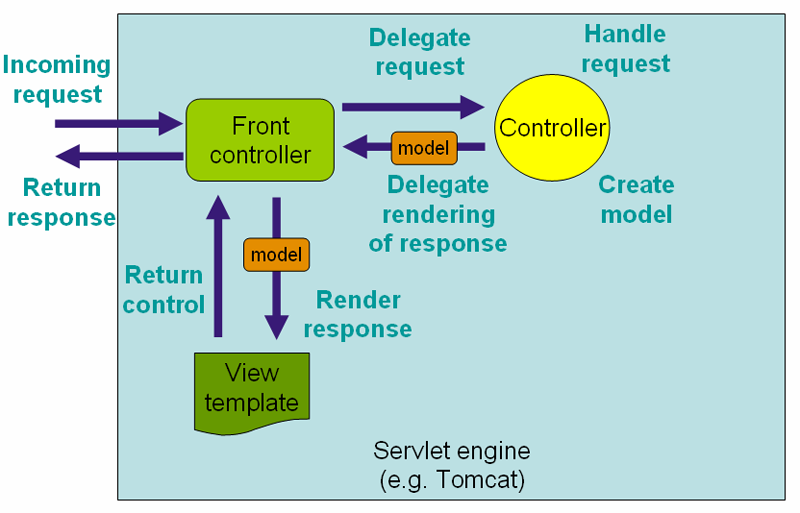
Let’s look at the diagram below, which shows the process that a MVC-based web framework, such as Spring, might follow:
First, the application will receive an incoming web request from a client, which will include a path and possibly some additional data. The framework will examine that request, and determine which part of the application should respond to it. This is a process known as routing, which we’ll cover on the next page.
At that point, the framework will delegate the request to a piece of code, usually called a controller, that can respond to it. In most web applications, the controllers are the main portion of the code written by the developer that isn’t part of the framework itself. So, in the controller, we can look at the request as well as the data that comes along with it, and we can collect the data needed to respond to it.
For example, the request might include information about the user that sent the request, as well as a search term used in a search box. So, our code might collect information about that user and the search term, and use it to populate a model that contains all of the data that is requested.
Once we have completed that task, we can return the model back to the framework, as well as specify a particular template that should be used to create the response. So, the next thing the framework will do is find the requested template and render it, substituting data from the model into the template based on the special markers included in the template. In most cases, the template is the other major part of the web application that is written by the developer.
Finally, the rendered template is placed into an HTTP response, and the response is sent back to the client.
Of course, one major question that we still need to resolve is “how does the web framework look at a web request and determine what code to execute?” To do that, most web frameworks introduce the concept of routing.
In a web framework, a route is usually a mapping from a path to a particular function in a controller.
For example, a simple web framework might match the path /, representing the top level page on the server, to a function called getIndex() in one of the controllers in the web application itself.
So, when an incoming HTTP GET request asks for the page at path /, the web framework will call the code in our getIndex() function, which will usually return a model and a template to render. Then, the framework will render that template using the data in the model, and send that as a response back to the user’s client web browser.
Routes in our web application can be much more complex than mapping simple paths to functions. For example, the route could specify one function when the path is requested using an HTTP GET request, and an entirely different function when the path is requested using an HTTP POST request, which includes some additional data.
A great example is logging in to a website. If the user sends an HTTP GET request to the /login path, it could call a function named getLoginPage() to render a login page that asks the user for a username and password.
When the user enters that information on the page and clicks the “submit” button, it will send an HTTP POST request to the same /login path, along with the username and password that the user entered. In that case, the web framework can be configured to send that request to a different function, postLogin() that will determine if the username and password match an existing user account. If so, the user will be logged in and the website will send an appropriate response. If not, it can even direct the web framework to render the same login template as before, including an extra message to let the user know that the information submitted was invalid.
Finally, routes can also include placeholders for data, similar to wildcards. This is most commonly used in RESTful routing, short for “Representation State Transfer,” which we’ll cover in a later chapter.
For example, a web application might be configured with a route that matches the path /title/<id>, where <id> is a placeholder for some data that is provided as part of the path. So, if the user requests the item at path /title/123, the web framework will know that the user is requesting information about the title with the ID of 123.
In fact, if you look closely at many websites today, you’ll see this pattern all over! A great example is IMDb (the “Internet Movie Database”), where the url https://www.imdb.com/title/tt0076759/ takes you to this page about the original Star Wars movie. In that URL, we see the RESTful route /title/tt0076759, where tt0076759 is the identifier for Star Wars.
We can even explore this by changing the identifier a bit and seeing where that takes us. If we increment the identifier by 1, we get https://www.imdb.com/title/tt0076760/, which takes us to the page about the movie Starship Invasions, released in the same year as Star Wars. In fact, by trying several similar identifiers, we can quickly guess that some of the data on IMDb from movies was loaded alphabetically by year of release!
While RESTful routes using sequential identifiers such as this one are really useful, they can also cause issues. One common cause of this is attaching sequential identifiers to user uploaded data. In this way, any user who uses the platform can upload a piece of data, and then use the identifier attached to that piece of data to guess the identifier of data from other users. This is referred to as an Insecure Direct Object Reference or IDOR. If the website doesn’t properly limit access to this data, it could result in private data being publicly available.
This was most recently in the news when it was revealed that the data from the Parler social network was downloaded by exploiting this bug, among others. Wired does a good job describing how it happened.
One thing you may have also noticed is that many web applications use the same layout across many different pages. Since each page in a web framework requires a different template, it could be very difficult to make sure that each of those pages includes the same information, and updating them would be a major hassle if there were several hundred or thousands of pages in the application.
Thankfully, most web frameworks also include the ability for templates to be composed of other templates. In that way, we can create a hierarchical structure of templates, and even create smaller templates that we can reuse over and over again in our code.
One of the most common ways to accomplish this is through the use of a top-level layout template, which defines the overall layout of the pages used by the web application. This could include specific CSS and JavaScript files, metadata, and even a common header, navigation bar, and footer for each page.
For example, here is a short layout template for the Jinja2 template engine used with Flask in Python, which would be stored in the file layout.html:
<!doctype html>
<html lang="en">
<head>
<meta charset="utf-8">
<title>{% block title %}{% endblock %} - Web Application</title>
</head>
<body>
<header>
<nav>
<a href="/">Homepage</a>
</nav>
</header>
<main>
{% block content %}{% endblock %}
</main>
<footer>
<div>
<span>© 2021 Web Application</span>
</div>
</footer>
</body>
</html>This layout includes a header with a title and some metadata. In addition, the body includes both a header and a footer with some information that should be included on every page in the application. Between those, we see a main section.
In Jinja2, the sections surrounded by curly braces and percent signs {% %} define blocks that can be replaced by other content. So, when we use this layout template, we can replace the title and content block with information specific to that page.
To use this layout template, we can just specify it as part of another template. For example, here is a template for a home page, titled index.html:
{% extends "layout.html" %}

{% block title %}Home Page{% endblock %}

{% block content %}

<p>Hello World!</p>

{% endblock %}
Pretty simple, isn’t it? This template basically defines the content to be placed in the title and content blocks, and at the top it specifies that it will use the template in layout.html as it’s layout template. So, when the template is rendered, we receive the following HTML:
<!doctype html>
<html lang="en">
<head>
<meta charset="utf-8">
<title>Home Page - Web Application</title>
</head>
<body>
<header>
<nav>
<a href="/">Homepage</a>
</nav>
</header>
<main>
<p>Hello World!</p>
</main>
<footer>
<div>
<span>© 2021 Web Application</span>
</div>
</footer>
</body>
</html>This use of template inheritance can be done in most template engines used in web frameworks.
In addition, we can place other templates inside of our page template. We’ll see how to do that in the example project for this chapter.
In this chapter, we covered the background content for working with web applications. We learned about HTML, CSS and JavaScript, the three core technologies used on the World Wide Web today. We also learned about HTTP, the protocol used to request a website from a web server and then receive a response from that server.
We then explored static web pages, which made up the majority of the World Wide Web in the early days. However, as the web became more commonplace, the need for dynamic web pages increased. Initially, that process was very rudimentary, but eventually many web frameworks were created to simplify that process.
A web framework follows the same request-response model used by HTML. However, it uses the path of the web request, along with any additional data included in the request, to determine what page to render. This is a process called routing.
Finally, we saw how many template engines today support template inheritance, allowing us to define a hierarchical set of templates that make each page in our web application include the same basic information and structure.
With this information in hand, we can start building a web application as part of our semester project.
Check your understanding of the new content introduced in this chapter below - this quiz is not graded and you can retake it as many times as you want.
HTML Form Data and Sensible URL Schemes!
Much of the content in this page was adapted from Nathan Bean’s CIS 400 course at K-State, with the author’s permission. That content is licensed under a Creative Commons BY-NC-SA license.
Now that we have explored some ideas about getting data from the web server, let’s turn our attention to sending data to the web server. One of the earliest approaches for doing so is to use a HTML form sent as a HTTP Request, which we’ll take a look at in this chapter.
Some key terms to learn in this chapter are:
Much of the content in this page was adapted from Nathan Bean’s CIS 400 course at K-State, with the author’s permission. That content is licensed under a Creative Commons BY-NC-SA license.
One of the earliest (and still widely used) mechanisms for transferring data from a browser (client) to the server is a form. The <form> is a specific HTML element that contains input fields and buttons the user can interact with.
<input> ElementPerhaps the most important - and versatile - of these is the <input> element. By setting its type attribute, we can represent a wide range of possible inputs, as is demonstrated by this table adapted from a similar one on the MDN Web Docs:
| Type | Description | Basic Examples |
|---|---|---|
| button | A push button with no default behavior displaying the value of the value attribute, empty by default. | <input type="button" name="button" value="Button" /> |
| checkbox | A check box allowing single values to be selected/deselected. | <input type="checkbox" name="checkbox" /><label for="checkbox" style="display: inline">Checkbox</label> |
| color | A control for specifying a color; opening a color picker when active in supporting browsers. | <input type="color" name="color" style="width: 40px; height: 40px;" /> |
| date | A control for entering a date (year, month, and day, with no time). Opens a date picker or numeric wheels for year, month, day when active in supporting browsers. | <input type="date" name="date"/> |
| datetime-local | A control for entering a date and time, with no time zone. Opens a date picker or numeric wheels for date- and time-components when active in supporting browsers. | <input type="datetime-local" name="datetime-local"/> |
A field for editing an email address. Looks like a text input, but has validation parameters and relevant keyboard in supporting browsers and devices with dynamic keyboards. |
<input type="email" name="email"/> |
|
| file | A control that lets the user select a file. Use the accept attribute to define the types of files that the control can select. | <input type="file" accept="image/*, text/*" name="file"/> |
| hidden | A control that is not displayed but whose value is submitted to the server. There is an example in the next column, but it’s hidden! | <input id="hidden_id" name="hidden_id" type="hidden" value="f0e1d2c3b4"> ← It’s here! |
| image | A graphical submit button. Displays an image defined by the src attribute. The alt attribute displays if the image src is missing. |
<input type="image" name="image" style="height: 40px;" src="..." alt="Submit"/> |
| month | A control for entering a month and year, with no time zone. | <input type="month" name="month"/> |
| number | A control for entering a number. Displays a spinner and adds default validation when supported. Displays a numeric keypad in some devices with dynamic keypads. | <input type="number" name="number"/> |
| password | A single-line text field whose value is obscured. Will alert user if site is not secure. | <input type="password" name="password"/> |
| radio | A radio button, allowing a single value to be selected out of multiple choices with the same name value. | <input type="radio" name="radio"/> <label style="display: inline" for="radio">Radio</label> |
| range | A control for entering a number whose exact value is not important. Displays as a range widget defaulting to the middle value. Used in conjunction with min and max to define the range of acceptable values. | <input type="range" name="range" min="0" max="25"/> |
| reset | A button that resets the contents of the form to default values. Not recommended. | <input type="reset" name="reset"/> |
| search | A single-line text field for entering search strings. Line-breaks are automatically removed from the input value. May include a delete icon in supporting browsers that can be used to clear the field. Displays a search icon instead of enter key on some devices with dynamic keypads. | <input type="search" name="search"/> |
| submit | A button that submits the form. | <input type="submit" name="submit"/> |
| tel | A control for entering a telephone number. Displays a telephone keypad in some devices with dynamic keypads. | <input type="tel" name="tel"/> |
| text | The default value. A single-line text field. Line-breaks are automatically removed from the input value. | <input type="text" name="text"/> |
| time | A control for entering a time value with no time zone. | <input type="time" name="time"/> |
| url | A field for entering a URL. Looks like a text input, but has validation parameters and relevant keyboard in supporting browsers and devices with dynamic keyboards. |
<input type="url" name="url"/> |
| week | A control for entering a date consisting of a week-year number and a week number with no time zone. | <input type="week" name="week"/> |
Regardless of the type, the <input> element also has a name and value property. The name is similar to a variable name, in that it is used to identify the input’s value when we serialize the form (more about that later), and the value is the value the input currently is (this starts as the value you specify in the HTML, but it changes when the user edits it).
<textarea> ElementThe <textarea> element represents a multi-line text input. Similar to terminal programs, this is represented by columns and rows, the numbers of which are set by the cols and rows attributes, respectively. Thus:
<textarea cols=40 rows=5></textarea>Would look like:
As with inputs, a <textarea> has a name and value attribute.
<select> ElementThe <select> element, along with <option> and <optgroup> make drop-down selection boxes. The <select> takes a name attribute, while each <option> provides a different value. The <options> can further be nested in <optgroup>s with their own labels. The <select> also has a multiple attribute (to allow selecting multiple options), and size which determines how many options should be displayed at once (with scrolling if more are available).
For example:
<select id="dino-select">
    <optgroup label="Theropods">
        <option>Tyrannosaurus</option>
        <option>Velociraptor</option>
        <option>Deinonychus</option>
    </optgroup>
    <optgroup label="Sauropods">
        <option>Diplodocus</option>
        <option>Saltasaurus</option>
        <option>Apatosaurus</option>
    </optgroup>
</select>
Displays as:
<label> ElementA <label> element represents a caption for an element in the form. It can be tied to a specific input using its for attribute, by setting its value to the id attribute of the associated input. This allows screen readers to identify the label as belonging to the input, and also allows browsers to give focus or activate the input element when the label is clicked.
For example, if you create a checkbox with a label:
<fieldset style="display:flex; align-items:center;">
  <input type="checkbox" id="example"/>
  <label for="example">Is Checked</label>
</fieldset>Clicking the label will toggle the checkbox!
<fieldset> ElementThe <fieldset> element is used to group related form parts together, which can be captioned with a <legend>. It also has a for attribute which can be set to the id of a form on the page to associate with, so that the fieldset will be serialized with the form (this is not necessary if the fieldset is inside the form). Setting the fieldset’s disabled attribute will also disable all elements inside of it.
For example:
<fieldset>
  <legend>Who is your favorite muppet?</legend>
  <input type="radio" name="muppet" id="kermit">
    <label for="kermit">Kermit</label>
  </input>
  <input type="radio" name="muppet" id="animal">
    <label for="animal">Animal</label>
  </input>
  <input type="radio" name="muppet" id="piggy">
    <label for="piggy">Miss Piggy</label>
  </input>
  <input type="radio" name="muppet" id="gonzo">
    <label for="gonzo">Gonzo</label>
  </input>
</fieldset>
Would render:
<form> ElementFinally, the <form> element wraps around all the <input>, <textarea>, and <select> elements, and gathers them along with any contained within associated <fieldset>s to submit in a serialized form. This is done when an <input type="submit"> is clicked within the form, when the enter key is pressed and the form has focus, or by calling the submit() method on the form with JavaScript.
There are a couple of special attributes we should know for the <form> element:
action - the URL this form should be submitted to. Defaults to the URL the form was served from.enctype - the encoding strategy used, discussed in the next section. Possible values are:
application/x-www-form-urlencoded - the defaultmultipart/form-data - must be used to submit filestext/plain - useful for debuggingmethod - the HTTP method to submit the form using, most often GET or POSTWhen the form is submitted, the form is serialized using the enctype, and submitted using the HTTP method to the URL specified by the action attribute. Let’s take a deeper look at this process next.
Much of the content in this page was adapted from Nathan Bean’s CIS 400 course at K-State, with the author’s permission. That content is licensed under a Creative Commons BY-NC-SA license.
Form data is simply serialized key/value pairs pulled from a form and encoded using one of the three possible encoding strategies. Let’s look at each in turn.
The default encoding method is application/x-www-form-urlencoded, which encodes the form data as a string consisting of key/value pairs. Each pair is joined by a = symbol, and pairs are in turn joined by & symbols. The key and value strings are further encoded using percent encoding (URL encoding), which replaces special characters with a code beginning with a percent sign (i.e. & is encoded to %26). This prevents misinterpretations of the key and value as additional pairs, etc. Percent encoding is also used to encode URL segments (hence the name URL encoding).
Thus, the form:
<form>
    <input type="text" name="Name" value="Grover"/>
    <select name="Color">
        <option value="Red">Red</option>
        <option selected="true" value="Blue">Blue</option>
        <option value="Green">Green</option>
    </select>
    <input type="number" name="Age" value="36"/>
</form>
Would be encoded as:
Name=Grover&Color=Blue&Age=36URL-Encoded form data can be submitted with either a GET or POST request. With a GET request, the form data is included in the URL’s query (search) string, i.e. our form above might be sent to:
www.sesamestreet.com/muppets/find?Name=Grover&Color=Blue&Age=36Which helps explain why the entire serialized form data needs to be URL encoded - it is included as part of the url!
When submitted as a post request, the string of form data is the body of the request.
The encoding for multipart/form-data is a bit more involved, as it needs to deal with encoding both regular form values and binary file data. It deals with this challenge by separating each key/value pair by a sequence of bytes known as a boundary, which does not appear in any of the files. This boundary can then be used to split the body back into its constituent parts when parsing. Each part of the body consists of its own head and body sections, with the body of most elements simply their value, while the body of file inputs is the file data encoded in base64. Thus, the form:
<form>
    <input type="text" name="Name" value="Grover"/>
    <select name="Color">
        <option value="Red">Red</option>
        <option selected="true" value="Blue">Blue</option>
        <option value="Green">Green</option>
    </select>
    <input type="number" name="Age" value="36"/>
    <input type="file" name="Image" value="Grover.jpg" />
</form>
Would be encoded into a POST request as:
POST /test HTTP/1.1
Host: foo.example
Content-Type: multipart/form-data;boundary="boundary"

--boundary
Content-Disposition: form-data; name="Name"

Grover
--boundary
Content-Disposition: form-data; name="Color"

Blue
--boundary
Content-Disposition: form-data; name="Age"

36
--boundary
Content-Disposition: form-data; name="Image"; filename="Grover.jpg"

/9j/4AAQSkZJRgABAQEAYABgAAD/2wBDAAgGBgcGBQgHBwcJCQgKDBQNDAsLDBkSEw8UHRofHh0aHBwgJC4nICIsIxwcKDcpLDAxNDQ0Hyc5PTgyPC4zNDL/2wBDAQkJCQwLDBgNDRgyIRwhMjIyMjIyMjIyMjIyMjIyMjIyMjIyMjIyMjIyMjIyMjIyMjI...
--boundary--
Files can only be submitted using multipart/form-data encoding. If you attempt to use application/x-www-form-urlencoded, only the file name will be submitted as the value. Also, as multipart/form-data is always submitted as the body of the request, it can only be submitted as part of a POST request, never a GET. So a form containing a file input should always specify:
<form enctype="multipart/form-data" method="POST">
The HTML 5 specification also includes a new form encoding strategy called text/plain. This strategy is exactly what it sounds like - it provides no encoding for the form data, and is meant to be more human readable, but may not be as reliably formatted for computers to interpret. So, it is not recommended for use in most web applications.
Once we’ve built a website that can send form data using an HTTP POST request to our web application, we need some way to access that information in our controller. Let’s look at how we would accomplish this in Spring.
In a previous example, we saw how we can create a route that includes variables directly in the path itself:
@GetMapping("/greeting/{name}")
public String greetingWithName(@PathVariable String name, Model model) {
    model.addAttribute("name", name);
    return "greeting";
}
In this example, we include the annotation @PathVariable before one of the parameters in our method. Spring will automatically match the name of that parameter to the name of one of the path variables in the route, and fill in the value when it calls the function.
When dealing with data sent in a POST request via an HTML form, we can use a similar method to add those variables to our method. In this case, we’ll use the @RequestParam annotation, which includes some options we can configure as well:
@PostMapping("/advancedsearch")
public String advancedSearchResults(
        @RequestParam(name = "text", required = true, defaultValue = "") String text,
        @RequestParam(name = "checkbox", defaultValue = "false") boolean checkbox,
        @RequestParam(name = "value", required = true, defaultValue = "-1") double value,
        Model model) {
    model.addAttribute("text", text);
    model.addAttribute("checkbox", checkbox);
    model.addAttribute("value", value);
}
The example above shows three different types of request parameters: String values from text entry fields, boolean values from checkboxes, and numerical values from number input fields. Spring will automatically convert the data to the requested type if possible, making it easy to use.
One thing to note is that the value of a checkbox will only be included along with the form if it is checked. If the checkbox is unchecked, that value will not be present in the form data. So, for boolean values, we don’t want to list them as required but should always include a default value of "false" in case they are not included in the form data.
Spring also includes some handy methods for filling out form data based on the values in the template model. This is really helpful for times when we want to allow a user to submit a form but immediately redirect the user back to the same page with the form already completed, as well as some additional data. In addition, as we’ll see in a later chapter, if we have any form validation issues, we can help the user by making it easy to fix the error without having to restart filling out the form.
<input type="text" name="text" placeholder="Enter text here..." th:value="${text}">
<input type="checkbox" name="checkbox" th:checked="${checkbox}">
<input type="number" name="value" placeholder="Number" step="0.1" min="0" max="10" th:value="${value}">
In our HTML templates, we can use the th:value attribute in our input tags to fill the form input based on the given value. For checkboxes, we can use a special th:checked attribute, which will set the checked attribute on the checkbox if the value is present in the model and set to true.
Once we’ve built a website that can send form data using an HTTP POST request to our web application, we need some way to access that information in our controller. Let’s look at how we would accomplish this in Flask.
In a previous example, we saw how we can create a route that includes variables directly in the path itself:
@route('/greeting/<name>/')
def greeting_with_name(self, name):
    """Display greeting with name."""
    return render_template("greeting.html", name=name)
In this example, we simply include the path variable <name in the route, and a corresponding parameter in our controller function. Flask will automatically match the name of that parameter to the name of one of the path variables in the route, and fill in the value when it calls the function.
When dealing with data sent in a POST request via an HTML form, Flask uses a slightly different approach. Part of the Flask library is the requests object, which can be used to access information about the request sent to the server. Part of that object is a dict named form, which includes all of the form data. So, we can access the data from an HTML form by accessing the elements in the form dictionary:
@route("/advancedsearch/", methods=['POST'])
def advanced_search_results(self):
    """Search results page."""
    # don't use request.form['text'] - raises exceptions!
    text: str = request.form.get('text', None)
    checkbox: bool = bool(request.form.get('checkbox', False))
    try:
        value: float = float(request.form.get('value', "-1"))
    except ValueError:
        value = -1
    return render_template(
        "advanced_search.html",
        text=text,
        checkbox=checkbox,
        value=value)
The example above shows three different types of request parameters: String values from text entry fields, boolean values from checkboxes, and numerical values from number input fields. Since they are all sent as text, we have to use the various methods in Python to convert them to the data type we need.
However, there are a few important things to note in this code. First, instead of directly accessing the elements in the form dictionary, as in request.form['text'], we are using the get() method as described in the Python documentation. This is because directly accessing the elements will raise an exception if they are not present, which we’ll have to handle. Instead, we can use the get method to access them if they are present. If not, we can provide a second parameter which will be the “default” value used if no value is present. This makes it much easier to handle situations where we can’t guarantee that all values would be present in the form.
Likewise, for some numerical values, we may still need to use a try-except statement to safely convert them, as shown in the example above. We are using a default value of -1 in the case that the value is not provided, but also in the except clause if the value provided cannot be properly converted to a numerical value.
Finally, one thing to note is that the value of a checkbox will only be included along with the form if it is checked. If the checkbox is unchecked, that value will not be present in the form data. So, for boolean values, we should always include a default value of "false" in case they are not included in the form data.
Flask also includes some handy methods for filling out form data based on the values in the template model. This is really helpful for times when we want to allow a user to submit a form but immediately redirect the user back to the same page with the form already completed, as well as some additional data. In addition, as we’ll see in a later chapter, if we have any form validation issues, we can help the user by making it easy to fix the error without having to restart filling out the form.
<input type="text" name="text" placeholder="Enter text here..." value="{{ text }}}">
<input type="checkbox" name="checkbox" {{ "checked" if checkbox else "" }}>
<input type="number" name="value" placeholder="Number" step="0.1" min="0" max="10" value="{{ value }}">
In our HTML templates, we can use the value attribute in our input tags to fill the form input based on the given value. For checkboxes, we can use a short Python ternary if statement, which will set the checked attribute on the checkbox if the value is present in the model and set to true.
Much of the content in this page was adapted from Nathan Bean’s CIS 400 course at K-State, with the author’s permission. That content is licensed under a Creative Commons BY-NC-SA license.
Many web applications deal with some kind of resource, i.e. people, widgets, records. Much like in object-orientation we have organized the program around objects, many web applications are organized around resources. And as we have specialized ways to construct, access, and destroy objects, web applications need to create, read, update, and destroy resource records (we call these CRUD operations).
In his 2000 PhD. dissertation, Roy Fielding defined Representational State Transfer (REST), a way of mapping HTTP routes to the CRUD operations for a specific resource. This practice came to be known as RESTful routing, and has become one common strategy for structuring a web application’s routes. Consider the case where we have an online directory of students. The students would be our resource, and we would define routes to create, read, update and destroy them by a combination of HTTP action and route:
| CRUD Operation | HTTP Action | Route |
|---|---|---|
| Create | POST | /students |
| Read (all) | GET | /students |
| Read (one) | GET | /students/[ID] |
| Update | PUT or POST | /students/[ID] |
| Destroy | DELETE | /students/[ID] |
Here the [ID] is a unique identifier for the individual student. Note too that we have two routes for reading - one for getting a list of all students, and one for getting the details of an individual student.
REST is a remarkably straightforward implementation of very common functionality, no doubt driving its wide adoption. Many web application frameworks support REST, either explicitly through special code structures or shortcuts, or implicitly through the use of route parameters.
When we use a RESTful route to create or update new resources, we often want to take an additional step - validating the supplied data.
Much of the content in this page was adapted from Nathan Bean’s CIS 400 course at K-State, with the author’s permission. That content is licensed under a Creative Commons BY-NC-SA license.
Validation refers to the process of making sure the submitted data matches our expectations. Validation can be done client-side or server-side. For example, we can use the built-in HTML form validation properties to enforce rules, like a number that must be positive:
<input type="number" min="0" name="Age" required>If a user attempts to submit a form containing this input is submitted, and the value is less than 0, the browser will display an error message instead of submitting. In addition, the psuedo-css class :invalid will be applied to the element.
We can also mark inputs as required using the required attribute. The browser will refuse to submit the form until all required inputs are completed. Inputs with a required attribute also receive the :required pseudo-class, allowing you to assign specific styles to them.
You can read more about HTML Form validation on MDN.
Client-side validation is a good idea, because is minimizes invalid requests against our web application. However, we cannot always depend on it, so we also need to implement server-side validation. We can write custom logic for doing this, but many web application frameworks also have built-in support for validation.
In this chapter we looked at how data is handled in web applications. We saw how forms can be used to submit data to our server, and examined several common encoding strategies. We also saw how we can retrieve this data in our web application by examining the routes or the form data submitted. We also explored the concept of RESTful routes. Finally, we discussed validating submitted values, on both the client and server side of a HTTP request.
You should now be able to handle creating web forms and processing the submitted data.
Not all web applications are built to be viewed in a browser. Many are built to be used by other programs. We call these web applications APIs (Application Programming Interfaces). These also make HTTP or HTTPS requests against our applications, but usually instead of serving HTML, we serve some form of serialized data instead - most commonly XML or JSON.
Check your understanding of the new content introduced in this chapter below - this quiz is not graded and you can retake it as many times as you want.
Making data openly available and easily accessible!
In this chapter, we’re going to take a higher-level look at Web APIs and their place in the larger ecosystem. Web APIs have become a ubiquitous part of technology today, and it is very likely that most developers will be tasked with either writing their own API or using another API at some point in their career. Therefore, a larger understanding of Web APIs is a very useful skill to build.
We’ll look at some of the other aspects of Web APIs beyond just the RESTful architectural style, including how to handle authentication, documentation, and more.
Some of the key concepts and terms that will be introduced in this chapter are:
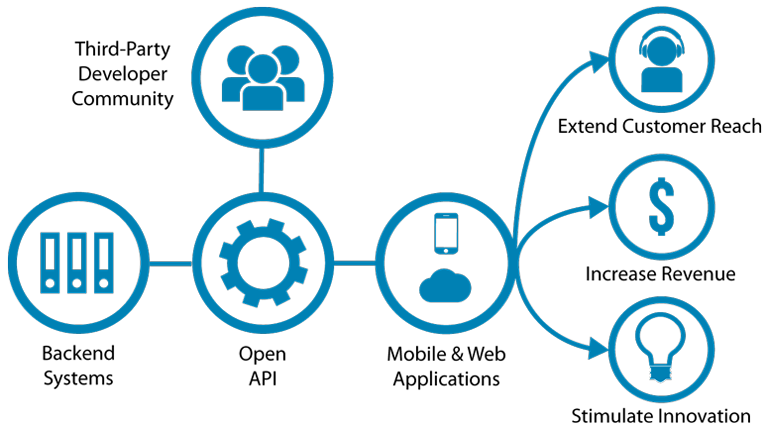
As the name implies, a web API is simply an interface for accessing and modifying resources stored on a web server. So, from a certain point of view, we could think of the basic HTTP itself as a web API. However, traditionally web APIs are meant to be built on top of HTTP itself – HTTP defines how web servers and web clients can communicate in general, but a web API uses additional information in the structure of the request, such parameters included as part of the URL or the body of the request, to specify exactly what resources should be affected and the action to be performed on those resources.
Web APIs are popular because they decouple the resources stored on the server from the client-side application that is designed to only interact with the web API. So, if an organization has some data or resources they’d like to make available, they can create a web API to make those resources available, and then other developers can build tools that interface with that web API to use those resources in some unique way.
A great example of this can be found by looking at online tools such as Twilio and Discord. Both of these tools are communication platforms – Twilio focuses on communication between a company and its customers and clients, while Discord is more focused on providing a chat and discussion platform for social groups.
What makes these companies similar is that they both provide a very robust web API for interacting with their platforms. In the case of Twilio, the web API is the only way to really use their product, which is primarily targeted at developers themselves. For Discord, they provide the core application for interacting with their platform that is used by most users, but their web API allows developers to make use of their platform in a variety of unique ways. Of course, these are just two examples from a very large number of web APIs available on the internet today, and that number continues to grow.
Let’s look at a quick example from the Twilio API Documentation, sending an SMS, or Short Message Service, message to a particular phone number. Many users would commonly refer to these as “text messages.”
First, let’s look at how to send this message using curl - a Linux terminal tool for making raw HTTP requests to web servers and web APIs:
EXCLAMATION_MARK='!'
curl -X POST https://api.twilio.com/2010-04-01/Accounts/<TWILIO_ACCOUNT_SID>/Messages.json \
--data-urlencode "Body=Hi there" \
--data-urlencode "From=+15017122661" \
--data-urlencode "To=+15558675310" \
-u <TWILIO_ACCOUNT_SID>:<TWILIO_AUTH_TOKEN>
Even without knowing exactly how curl works, we should be able to learn quite a bit about how this API works just by examining this command. First, we can guess that it is using an HTTP POST request, based on the -X POST portion of the command. Following that, we see the URL https://api.twilio.com/2010-04-01/Accounts/<TWILIO_ACCOUNT_SID>/Messages.json, which gives us the endpoint for this command. Just like programming APIs include classes and functions that we can call and get return values from through message passing, web APIs have endpoints which we can send requests to and receive responses. In fact, web APIs really reinforce the concept that “message passing” and calling a function are similar.
Below that, we see three lines of data prefixed by --data-urlencode. We can guess that these three lines construct the data that will be sent as the payload of the HTTP POST request. In fact, this data is structured nearly identically to the data that is generated when an HTML form is submitted using a POST request and the application/x-www-form-urlencoded encoding method.
Finally, the last portion -u <TWILIO_ACCOUNT_SID>:<TWILIO_AUTH_TOKEN> provides the user authentication information for this request. The first part before the colon : is the username, and the second part is the password. So, when this information is sent, it will also include a username and password to authenticate the request. That way, Twilio will know exactly which user is sending the request, and it prevents unauthorized users from sending spam text messages through their system.
Finally, notice that many parts of this command are enclosed by angle brackets <>. This simply means that those are meant to be variables, so it is up to the developer to replace those variables with the correct values, either by setting them as shown on the first line, or by some other means.
So, it looks like this curl command is just sending an HTTP POST request to a specific endpoint in the Twilio API. It will include three data elements, as well as some authentication information.
When we send that request to Twilio, their documentations says we should expect a response that looks like the following:
{
  "account_sid": "ACXXXXXXXXXXXXXXXXXXXXXXXXXXXXXXXX",
  "api_version": "2010-04-01",
  "body": "Hi there",
  "date_created": "Thu, 30 Jul 2015 20:12:31 +0000",
  "date_sent": "Thu, 30 Jul 2015 20:12:33 +0000",
  "date_updated": "Thu, 30 Jul 2015 20:12:33 +0000",
  "direction": "outbound-api",
  "error_code": null,
  "error_message": null,
  "from": "+14155552345",
  "messaging_service_sid": null,
  "num_media": "0",
  "num_segments": "1",
  "price": null,
  "price_unit": null,
  "sid": "SMXXXXXXXXXXXXXXXXXXXXXXXXXXXXXXXX",
  "status": "sent",
  "subresource_uris": {
    "media": "/2010-04-01/Accounts/ACXXXXXXXXXXXXXXXXXXXXXXXXXXXXXXXX/Messages/SMXXXXXXXXXXXXXXXXXXXXXXXXXXXXXXXX/Media.json"
  },
  "to": "+14155552345",
  "uri": "/2010-04-01/Accounts/ACXXXXXXXXXXXXXXXXXXXXXXXXXXXXXXXX/Messages/SMXXXXXXXXXXXXXXXXXXXXXXXXXXXXXXXX.json"
}
We won’t dig too deeply into this response, but we can easily see that it includes lots of useful information about the request itself. We can see when it was sent, what it contained, any if it caused any errors, all directly from the response. The Twilio API Documentation describes each of these in detail.
With this little bit of information, it is very simple to figure out how to send these requests from nearly any programming language. As long as it can construct a valid HTTP POST request and receive the response, it can be used. Thankfully, Twilio has also developed many helper libraries for different programming languages that greatly simplify this process.
We’ll mostly be looking at these web APIs without digging into how to use them from a specific programming language, but you should understand that it can be easily done in just about any language you choose.
Thus far, we’ve mainly discussed the REST architectural style for web APIs, since it has become commonly used on the internet today. However, let’s briefly look at one other architectural style for web APIs and see how it compares to REST.
The Simple Object Access Protocol, or SOAP, is a standardized protocol for exchanging information between web servers and clients that was first developed in 1998 (a few years before REST was first written about). So, unlike REST, which is simply an architectural style without an underlying standard, SOAP was designed to have a specific standard and implementation.
SOAP was designed to use XML to transfer data between the client and the server, and includes a specific three-part message structure consisting of an envelope, a set of encoding rules, and a way to represent the actual endpoint requests (function calls) and responses. It uses a specific XML Schema to define the structure of those messages.
Wikipedia includes a short example showing how to use SOAP to request the stock price for a stock symbol:
POST /InStock HTTP/1.1
Host: www.example.org
Content-Type: application/soap+xml; charset=utf-8
Content-Length: 299
SOAPAction: "http://www.w3.org/2003/05/soap-envelope"

<?xml version="1.0"?>
<soap:Envelope xmlns:soap="http://www.w3.org/2003/05/soap-envelope" xmlns:m="http://www.example.org">
  <soap:Header>
  </soap:Header>
  <soap:Body>
    <m:GetStockPrice>
      <m:StockName>T</m:StockName>
    </m:GetStockPrice>
  </soap:Body>
</soap:Envelope>
Notice that it includes a SOAPAction header in the HTTP request, as well as lots of XML in the body of the request. The server would respond with a similarly structured message containing the current stock price of the stock.
While SOAP does have several advantages, such as defining a standardized protocol that can be used with any web service that properly implements it, it also has several disadvantages. Most notably, the data must be encoded into XML, and the resulting XML must be parsed before it can be used. While XML and JSON are both well structured representations of data, the verbosity of XML compared to JSON makes it slower to send, receive and parse.
Likewise, since SOAP requires additional structure and rules to be added to the HTTP request itself, it makes it more difficult to work with than it seems. Unlike REST, SOAP itself doesn’t specify the structure of the endpoints and how to manage state - each application implementing SOAP may use an entirely different structure for the various endpoints used to access, update, and delete resources. REST, on the other hand, doesn’t specify exactly how it must be done, but it does lead toward a simple, more usable model for interacting with the server.
Because of this, most web APIs today follow a RESTful architectural style built directly upon HTTP, instead of using SOAP, even though SOAP is an officially supported web protocol.
Web APIs are very useful parts of the internet today, but their usefulness can be limited if they aren’t properly documented. Thankfully, there are many standards available for documenting how to use and interact with RESTful web APIs.
Wikipedia has a list of RESTful API Description Lanuages, or DLs, that are meant to provide a formal way for documenting the structure and usage of a web API. This is very similar to the standard format we use for documentation comments in our code - if they are structured correctly, we can use other tools such as javadoc or pdoc to generate additional resources for us, such as developer documentation.
These DLs follow a similar concept - by standardizing the structure of the documentation for the web API, we can build additional tools that use that information for a variety of different uses. For example, it could generate a website containing all of the documentation required to interact with the library, just like we are able to do with our existing source code comments.
However, another great use of these tools would be to build software libraries that can be used to interface directly with the web API itself. The library would include functions that match each API endpoint, including the expected parameters and values. Then, when we call the functions in our code, the library would handle constructing the request, sending it to the API endpoint, and receiving and even parsing the response for us. This would allow us to even quickly develop libraries that can interact with our API in a variety of programming languages.
One of the most common RESTful API DLs used today is the OpenAPI Specification. It is supported by a large number of both open-source and enterprise tools for constructing the document itself, as well code generators for a variety of languages.
Let’s look at the structure of a single endpoint to see what it looks like in the OpenAPI Specification. This example comes from their Getting Started document.
This diagram shows how the OpenAPI Specification follows a hierarchical structure for each API endpoint, called a “path” in OpenAPI, is documented. Each path can have multiple operations defined, such as GET, PUT, POST, DELETE, which easily correspond to various HTTP methods. Each of those operations contains additional information about the data expected in the request and possible HTTP responses that could be returned.
For example, here is a short snippet of an OpenAPI Specification document for a web API for playing the classic Tic Tac Toe game:
openapi: 3.1.0
info:
  title: Tic Tac Toe
  description: |
    This API allows writing down marks on a Tic Tac Toe board
    and requesting the state of the board or of individual squares.
  version: 1.0.0
paths:
  # Whole board operations
  /board:
    get:
      summary: Get the whole board
      description: Retrieves the current state of the board and the winner.
      responses:
        "200":
          description: "OK"
          content:
            $ref: "#/components/schemas/status"
So, this API contains an endpoint with the URL ending in /board, which can be used to get the whole board. Further in the document, it describes what that status message could contain:
  schemas:
    ...
    status:
      type: object
      properties:
        winner:
          $ref: "#/components/schemas/winner"
        board:
          $ref: "#/components/schemas/board"
So, we know that the status message would contain the winner of the game, if any, as well as the board. Those two objects are described as:
  schemas:
    ...
    board:
      type: array
      maxItems: 3
      minItems: 3
      items:
        type: array
        maxItems: 3
        minItems: 3
        items:
          $ref: "#/components/schemas/mark"
    winner:
      type: string
      enum: [".", "X", "O"]
      description: Winner of the game. `.` means nobody has won yet.
      example: "."
So, the board is just a 3 by 3 array, and the winner message is the character of the winning player.
As we can see, this document clearly describes everything a developer would need to know about the /board enpoint, including how to use it and what type of response would be returned.
The full Tic Tac Toe example is full of additional information about the entire API itself.
Another important concept related to web APIs is handing authentication. First, let’s review a bit about what authentication is and why it is important.
In computer security, we commonly use two related terms to describe limits placed on access to a particular resource.
So, a user must first be authenticated to determine their identity. Then, the application must determine if that user is authorized to use the resource requested.
In this discussion, we are only concerned with authentication.
One simple form of authentication that can be used for a web API is already built in to HTTP itself. The HTTP standard allows the webserver to ask for authentication credentials when accessing a given URL. So, the client can provide those credentials within the HTTP headers of a request, and the server will confirm that they are correct before providing the response.
This method is simple and easy to use, and we saw it earlier in this chapter already. However, it does have one major caveat - these authentication schemes require placing the secure information directly in the HTTP headers of an HTTP request. Since HTTP is a text-based protocol, anyone who sees that request (such as an internet service provider or a malicious user performing a man in the middle attack) can obtain the authentication information from it and then use it themselves.
So, HTTP authentication should only be used when combined with another encryption method, such as the use of HTTPS to create a secure connection between the client and the server.
Due to the limitations of HTTP authentication, many web APIs, especially RESTful APIs, use an authentication method known as API keys. In this method, a user registers with the provider of the API, and along with their user account is given a special key, called an API key, to identify themselves. This key is usually a very long string of alphanumeric data, and should be protected just like any password.
When making a request to the API, the user should include the API key along with the request. The server will then check that the API is key valid before returning the response.
Unfortunately, as with HTTP authentication, API keys are also included directly in the HTTP request, so they should be combined with encryption such as HTTPS to prevent them from being compromised.
Finally, many APIs today use a variety of other methods for authentication. One popular choice is the OAuth, which is a way for users of a web API to request authentication through a 3rd-party service, and then pass the results of that authentication request to the web API.
Many users on the internet today are familiar with websites that present the option to log in using a different service, such as Facebook or Google, instead of registering an account directly with the site itself. This authentication method similar to OAuth, and sometimes is actually implemented using OAuth, such as OpenID.
Applications that use a web API can follow a similar process. The application first requests authentication via the 3rd-party service by submitting information such as a password or API key, and then it will receive a response. That response is their “ticket” to access other resources. So, when the application sends a request to the web API, it sends along the “ticket” to prove its identity.
Finally, now that we’ve covered all of the aspects related to web APIs and how they are implemented, let’s look at a quick example for how we can use a web API to interact with resources stored on the web.
There are many great resources that can be used to locate a particular web API on the internet. Using search engines such as Google is one option, but there have also been many attempts to generate a directory of the most used and most useful web APIs such as the Public APIs project on GitHub.
There are also many scientific and research organizations that make their data available publicly via a web API. One of the most well-known is NASA, which provides several APIs for developers to use. This includes everything from the Astronomy Picture of the Day to information about the current weather conditions on Mars.
For this example, we’ll use the Astronomy Picture of the Day API. It is a very simple API - all we have to do is send a request to https://api.nasa.gov/planetary/apod and provide an API key. For testing, NASA provides the API key DEMO_KEY that can be used up to 30 times per hour and 50 times per day per IP address to test the APIs and explore what types of data they provide. So, we can use that.
To make a request to the API, simply open a Linux terminal, such as the one in Codio, and enter the following command:
curl -X GET https://api.nasa.gov/planetary/apod?api_key=DEMO_KEYAlternatively, in most web browsers you can simply visit the url https://api.nasa.gov/planetary/apod?api_key=DEMO_KEY to view the response in a browser. Since we are using a GET request, it is really simple to access.
If done correctly, the API should send back a response formatted in JSON. The response itself may be just a blob of text, but if we reformat it a bit we can see that it has a simple structure:
{
   "date":"2021-04-19",
   "explanation":"What does the center of our galaxy look like?  In visible light, the Milky Way's center is hidden by clouds of obscuring dust and gas. But in this stunning vista, the Spitzer Space Telescope's infrared cameras, penetrate much of the dust revealing the stars of the crowded galactic center region. A mosaic of many smaller snapshots, the detailed, false-color image shows older, cool stars in bluish hues. Red and brown glowing dust clouds are associated with young, hot stars in stellar nurseries. The very center of the Milky Way has recently been found capable of forming newborn stars. The galactic center lies some 26,700 light-years away, toward the constellation Sagittarius. At that distance, this picture spans about 900 light-years.",
   "hdurl":"https://apod.nasa.gov/apod/image/2104/GalacticCore_SpitzerSchmidt_6143.jpg",
   "media_type":"image",
   "service_version":"v1",
   "title":"The Galactic Center in Infrared",
   "url":"https://apod.nasa.gov/apod/image/2104/GalacticCore_SpitzerSchmidt_960.jpg"
}
As we can see, the API returned the picture for April 19th, 2021, along with the title, URL, and description of the image. So, if we make this request in an application, we can use the JSON response to download the image and display it, along with the title and description. That image is shown below.
It’s really that simple! For more advanced APIs, we may have to include additional information in our request, as seen in the Twilio example earlier in this chapter, but, in general, using a RESTful web API is meant to be a simple and powerful way to interact with resources on the web.
In this chapter, we covered some more information about web APIs. We discovered how they are structured and how we can interact with them in our applications. We even learned a bit about how they handle documentation and authentication.
Of course, this merely scratches the surface of information related to web APIs. A later course in the Computational Core curriculum, CC 515, covers web application development and goes in-depth about how to build and use web APIs using a RESTful architecture.
For this course, we’ll simply focus on making a small REST API for a portion of our ongoing project. This allows us to learn a bit about how we could construct our own web APIs and make them available for others.
Check your understanding of the new content introduced in this chapter below - this quiz is not graded and you can retake it as many times as you want.
Saving today’s data for tomorrow!
Earlier in this course, we learned that an object-oriented program can be thought of as two different parts, the state of the program, and the behavior in the program. In this chapter, we’re going to discuss ways that we can save the program’s state while it is running. By doing so, we can then resume the program at a later time by simply loading that state back into memory.
This is a process generally known as serialization, though other languages may use other terms. Most notably, the process that Python uses is known as pickling in the Python documentation. Other documents may refer to this process as marshalling.
At its core, this is simply the process of taking either the whole or a part of a program’s state and converting it into a format that can be stored and/or transmitted, and then read back into memory to create a semantically identical state of the program.
Thankfully, we don’t have to worry about the behavior of the program, since that is already present in the program’s source code and any associated files that are created by compiling or executing the code. As long as the code hasn’t changed since the state was saved, we’ll be able to completely reconstruct the program, including both state and behavior.
First, let’s quickly review the state of a program. Recall from an earlier chapter that the state of a program consists of all of the variables and objects stored in memory. So, any time we create a new variable or instantiate a new object in our code, that adds to the overall state of the program.
In the diagram above, we can visualize an object in object-oriented programming as the state, with a set of variables in the center, and the behaviors around those variables defining how we can use, interact with, and modify that state. For example, we could represent a bicycle’s state and behavior as shown below:
In this diagram, we see that the bicycle is traveling at 18 miles per hour (MPH) and the wheels are rotating at 90 revolutions per minute (RPM). The bicycle itself is in 5th gear.
However, in most programs, the only things we are really concerned with are the objects stored in memory that represent the core data that the program is using. Consider the example of a word processing program, such as Microsoft Word or Google Docs. In this program, we might consider the document itself as the core part of the program’s state that we are really concerned with saving.
Other items in memory, such as the list of recent changes that can be used to “undo” those changes, and the various view settings such as the current page and the “zoom” of the document, are all still part of the state of the program, but we might choose to not serialize that part of the state when saving the document.
In effect, it is an important design decision to make when developing an application - what parts of the state should be serialized as “persistent state”, and which parts are “ephemeral state” that can be easily reconstructed by the user as needed.
Going back to the bicycle example, perhaps we consider the fact that the bicycle is in 5th gear as persistent state that we need to store, but perhaps we don’t need to store the current speed.
So, now that we understand state, let’s talk about how we can serialize it in a way that is easy to parse and understand. There are really two major options we can choose from: a textual representation of the data, and a binary representation. Let’s look at text formats first.
There are many different ways that we can serialize data into a textual format. In fact, we’ve already covered how to read data from and write data to text files many times throughout this curriculum, and it is probably one of first things most programmers learn how to do.
At its core, the concept of serialization to a text file is pretty much the same as writing any data to a text file. We simply must write all the data stored in the program to a text file in an organized way. Then, when we need to load that file back into our program’s state, we can simply read and parse the data, storing it in objects and variables as needed.
So, let’s look at a simple example and explore the various ways that we could store this data in a textual format. Consider a Person object that has a name and age attribute. In addition, that object stores an instance of Pet, which also has a name, a breed and an age attribute.

With that structure in mind, there are several different formats we could use to store the data.
For many novice programmers, the first choice might be to simply create a custom text format to store the data. Here is one possible approach:
Person
Name = Willie Wildcat
Age = 42
Pet
Name = Reggie
Age = 4
Breed = Shorkie
This format definitely stores all of the data in the program’s state, and it looks like it can easily be read and parsed back into the program without too much work. However, such a custom text format has several disadvantages:
Of course, all of these concerns can be addressed by adding either additional rules to the structure or additional complexity to the code for reading and writing these files. However, let’s look at some other widely used formats that already address some of these concerns and see how they compare. Many of them also already have pre-written libraries we can use in our code as well.
The Extensible Markup Language, or XML, is a great choice for data serialization. XML uses a format very similar to HTML, and handles all sorts of data structures and formats very easily. Here’s an example of the same state translated into an XML document:
<state>
    <person>
        <name>Willie Wildcat</name>
        <age>42</age>
        <pet>
            <name>Reggie</name>
            <age>4</age>
            <breed>Shorkie</breed>
        </pet>
    </person>
</state>
As we can see, each object and attribute becomes its own tag in XML. We can even place the Pet object directly inside of the Person object, showing the hierarchical structure of the data.
XML also supports the use of a document type definition, or DTD, which provide rules about the structure of the XML document itself. So, using XML along with a DTD will make sure that the document is structured exactly like it should be, and it will be very easy to parse and understand.
In fact, most programming languages include libraries to easily create and parse XML documents, making them a great choice for data serialization. XML is also defined as a standard by the World Wide Web Consortium, or W3C, making it widely used on the internet. Many websites make use of AJAX, short for asynchronous JavaScript and XML, to send and receive data between a web application and a web server.
Another option that is very popular today is JavaScript Object Notation, or JSON. JSON originally started as a way to easily represent the state of objects in the JavaScript programming language, but it has since been adapted to a variety of different uses. Similar to XML, JSON is widely used on the internet today to share data between web applications and web servers, most notably as part of RESTful APIs.
A JSON representation of the state shown earlier is shown below:
{
    "Person": {
        "Name": "Willie Wildcat",
        "Age": 42,
        "Pet": {
            "Name": "Reggie",
            "Age": 4,
            "Breed": "Shorkie"
        }
    }
}
JSON and XML share many structural similarities, and in many cases it is very straightforward to convert data between XML and JSON representations. However, JSON tends to require less storage space than similar XML data, making it a good choice if storage space is limited or fast data transfer is required. Finally, JSON can be natively parsed by many programming languages such as JavaScript and Python, and libraries exist for most other languages such as Java.
Another choice that is commonly used is YAML, a recursive acronym for “YAML Ain’t Markup Language.” YAML is very similar to JSON in many ways, and in fact JSON files can be considered valid YAML files themselves.
Here is a YAML representation of the same state:
Person:
  Name: Willie Wildcat
  Age: 42
  Pet:
      Name: Reggie
      Age: 4
      Breed: Shorkie
YAML uses indentation to denote the hierarchical structure of the document, very similar to Python code. As we can see, the structure of a YAML document is very similar to the custom text format we saw earlier.
However, while this YAML document seems very simple, the YAML specification includes many features that are omitted in JSON, such as the ability to include comments in the data. Unfortunately, YAML also suffers from many of the same problems as Python code, such as the difficulty of keeping track of the indentation when manually editing a file, and the fact that truncated files may be interpreted as complete since there are no termination markers.
We already know that all the data stored by a computer is in a binary format. So, it of course makes sense to also look at ways we can store a program’s state using a binary file format.
Many programming languages, including Java and Python, include libraries that can be used to generate binary files containing the state of an object in memory. Each language, and indeed each version of the language, may use a different format for storing the binary data in the file.
In this course, we won’t dig into the actual format of the binary file itself, since that can quickly become very complex. However, we will discuss some of the pros and cons related to using a binary file format for serialization compared to a text format.
One major advantage to the binary file format is that they are typically smaller in size than a comparable textual representation. This depends a bit on the language itself, but in general the binary structure doesn’t need to store the name of each object and attribute in the file, just values they contain.
Likewise, reading and writing binary files is often very efficient, since the data doesn’t have to be parsed to and from strings, which is an especially costly process for numeric data.
Finally, since the binary files are generally not readable or editable by humans, they could prevent a user from intentionally or accidentally editing the data. Of course, this should not be thought of as any sort of a security mechanism, since any technically adept user could easily reverse-engineer the file format.
A major downside of using binary files to store state is the fact that those files are only readable by the programming language they were created by, and in many cases they are locked to a particular version of the language. In some instances, even small changes to the source code of an object itself may invalidate any previously stored state when stored in a binary format.
Compare this to a textual format such as JSON, which can be easily read by any programming language. In fact, many times the JSON produced by a web server is created by a language other than JavaScript, and then the JavaScript running in the web application can easily parse and use it, no matter which language originally constructed it.
Another major downside is the fact that the files cannot be easily read or edited by a human. In some instances, the ability to manually edit a text file, such as a configuration file for a large application, is a very handy skill. We’ve already looked at several different configuration files for the applications we’ve built in this course, and the ability to edit them quickly helps us make major changes to the structure of our application.
The choice of textual or binary files for storing state is a tricky one. There are many reasons to choose either type, and it really comes down to how the data will be used. Many applications recently have moved from a proprietary, binary format to a more open format. For example, Microsoft Office documents are now stored in an XML format (docx, xlsx, pptx), making it easy for other tools to read and edit those documents. On the other hand, many computer games still prefer to store state and assets in binary, both to make them load quickly but also to prevent users from easily cheating by modifying the files.
On the next few pages, we’ll quickly look at how to generate and read some of these file formats in both Java and Python. As always, feel free to read the page for the language you are studying, but each page might contain useful information.
There are many different methods for serializing data in Java. We’ll quickly look at three of them.
Java includes a special API known as the Java Architecture for XML Binding, or JAXB, for mapping Java objects to XML.
To use it, we can add a few annotations to our objects:
import javax.xml.bind.annotation.*;

@XmlRootElement
public class Person {

    // other code omitted

}
In the simplest form, we simply add the @XmlRootElement annotation above the class to denote that it can be treated as a root element. If the class contains any lists or other collections, there are a few annotations that are needed for those element as well. The Pet class is similar.
With these annotations in place, reading and writing the XML file is very simple:
import java.io.*;
import javax.xml.bind.*;

public class SaveXml {

    public static void main(String[] args) throws Exception {

        Person person = new Person("Willie Wildcat", 42, new Pet("Reggie", 4, "Shorkie"));
        System.out.println("Saving person:");
        System.out.println(person);

        File file = new File("person.xml");

        JAXBContext jaxbContext = JAXBContext.newInstance(Person.class);
        Marshaller jaxbMarshaller = jaxbContext.createMarshaller();
        jaxbMarshaller.setProperty(Marshaller.JAXB_FORMATTED_OUTPUT, true);
        jaxbMarshaller.marshal(person, file);

    }
}
To write an XML file, we create a JAXBContext based on the Person class, and then create a Marshaller that actually handles converting the Java data to XML. We can then simply write it’s output to a file.
import java.io.*;
import javax.xml.bind.*;

public class LoadXml {

    public static void main(String[] args) throws Exception {

        File file = new File("person.xml");

        JAXBContext jaxbContext = JAXBContext.newInstance(Person.class);
        Unmarshaller jaxbUnmarshaller = jaxbContext.createUnmarshaller();
        Person person = (Person) jaxbUnmarshaller.unmarshal(file);

        System.out.println("Loading person:");
        System.out.println(person);

    }
}
Reading an XML file is very similar. The only major difference is that we use an Unmarshaller in place of the Marshaller.
For more information on using JAXB, refer to these resources. The full source code can be found on GitHub:
To handle JSON data in Java, we can use the Jackson library. It can be installed in Gradle by adding a few items to build.gradle:
// Required to match Jackson versions in Spring
ext['jackson.version'] = '2.12.2'

dependencies {
    // other sections omitted

    implementation 'com.fasterxml.jackson.core:jackson-databind:2.12.2'
}
Then, the process for saving and loading JSON data is very similar to working with XML:
import java.io.*;
import com.fasterxml.jackson.databind.ObjectMapper;

public class SaveJson {

    public static void main(String[] args) throws Exception {

        Person person = new Person("Willie Wildcat", 42, new Pet("Reggie", 4, "Shorkie"));
        System.out.println("Saving person:");
        System.out.println(person);

        File file = new File("person.json");

        ObjectMapper mapper = new ObjectMapper();
        mapper.writeValue(file, person);

    }
}
import java.io.*;
import com.fasterxml.jackson.core.type.TypeReference;
import com.fasterxml.jackson.databind.ObjectMapper;
public class LoadJson {
public static void main(String[] args) throws Exception {
File file = new File("person.json");
ObjectMapper mapper = new ObjectMapper();
Person person = mapper.readValue(file, new TypeReference<Person>(){});
System.out.println("Loading person:");
System.out.println(person);
}
}In both cases, we simply create an ObjectMapper class from Jackson, and then use it to read and write the JSON data. It’s that simple.
For more information on using Jackson, refer to these resources. The full source code can be found on GitHub:
Java also includes a built-in mechanism for serialization. All that is really required is to implement the Serializable interface on any objects to be serialized.
import java.io.*;

public class Person implements Serializable {

    // other code omitted

}
The Pet class is similarly updated. Once that is done, we can use the built-in ObjectInputStream and ObjectOutputStream to read and write objects just like we do any other data types in Java.
import java.io.*;

public class SaveBinary {

    public static void main(String[] args) throws Exception {

        Person person = new Person("Willie Wildcat", 42, new Pet("Reggie", 4, "Shorkie"));
        System.out.println("Saving person:");
        System.out.println(person);

        File file = new File("person.ser");

        ObjectOutputStream out = new ObjectOutputStream(new FileOutputStream(file));
        out.writeObject(person);

    }
}
import java.io.*;
public class LoadBinary {
public static void main(String[] args) throws Exception {
File file = new File("person.ser");
ObjectInputStream in = new ObjectInputStream(new FileInputStream(file));
Person person = (Person) in.readObject();
System.out.println("Loading person:");
System.out.println(person);
}
}By convention, we use the .ser file extension for serialized data from Java.
For more information on Java serialization, refer to these resources. The full source code can be found on GitHub:
There are many different methods for serializing data in Python. We’ll quickly look at three of them.
Python includes the ElementTree library for processing XML. Unfortunately, due to the way that Python handles objects, we have to write some of the processing ourselves. There are some external libraries that will automatically explore Python objects and build the XML based on its attributes.
To write an XML file in Python, we can use code similar to this:
import xml.etree.ElementTree as ET


person = Person("Willie Wildcat", 42, Pet("Reggie", 4, "Shorkie"))
print("Saving person:")
print(person)

person_elem = ET.Element("person")
ET.SubElement(person_elem, "name").text = person.name
ET.SubElement(person_elem, "age").text = str(person.age)
pet_elem = ET.SubElement(person_elem, "pet")
ET.SubElement(pet_elem, "name").text = person.pet.name
ET.SubElement(pet_elem, "age").text = str(person.pet.age)
ET.SubElement(pet_elem, "breed").text = person.pet.breed

with open("person.xml", "w") as file:
    file.write(ET.tostring(person_elem, encoding="unicode"))
To construct an XML document, we simply must construct each element and set the parent element, tag, and data of each element, as shown in the example above.
import xml.etree.ElementTree as ET


xml_tree = ET.parse("person.xml")
person_elem = xml_tree.getroot()

for child in person_elem:
    if child.tag == "name":
        name = child.text
    if child.tag == "age":
        age = child.text
    if child.tag == "pet":
        for subchild in child:
            if subchild.tag == "name":
                pet_name = subchild.text
            if subchild.tag == "age":
                pet_age = subchild.text
            if subchild.tag == "breed":
                pet_breed =subchild.text

person = Person(name, age, Pet(pet_name, pet_age, pet_breed))

print("Loading person:")
print(person)
Then, to parse that data, we can simply iterate through the tree structure and find each tag, loading the text data into a variable and using those variables to reconstruct our objects.
For more information on using UML, refer to these resources. The full source code can be found on GitHub:
To handle JSON data in Python, we can use the json library.
Then, the process for saving and loading JSON data is very similar to working with XML:
import json


person = Person("Willie Wildcat", 42, Pet("Reggie", 4, "Shorkie"))
print("Saving person:")
print(person)

person_dict = dict()
person_dict['name'] = person.name
person_dict['age'] = person.age
person_dict['pet'] = dict()
person_dict['pet']['name'] = person.pet.name
person_dict['pet']['age'] = person.pet.age
person_dict['pet']['breed'] = person.pet.breed

with open("person.json", "w") as file:
    json.dump(person_dict, file)
For JSON, it is easiest to construct a dictionary containing the structure and data to be serialized. This could easily be done as a method within the class itself, but this example shows it outside the class just to demonstrate how it works.
To read the serialized data, we can do the reverse:
import json


with open("person.json") as file:
    person_dict = json.load(file)

person = Person(
    person_dict['name'],
    person_dict['age'],
    Pet(
        person_dict['pet']['name'],
        person_dict['pet']['age'],
        person_dict['pet']['breed']))

print("Loading person:")
print(person)
For more information on using JSON in Python, refer to these resources. The full source code can be found on GitHub:
Python also includes a built-in mechanism for serialization. All that is required is the Pickle library.
person = Person("Willie Wildcat", 42, Pet("Reggie", 4, "Shorkie"))
print("Saving person:")
print(person)

with open("person.p", "wb") as file:
    pickle.dump(person, file)
with open("person.p", "rb") as file:
person = pickle.load(file)
print("Loading person:")
print(person)All we have to do is open the file in a binary format by adding b to the open command.
For more information on Java serialization, refer to these resources. The full source code can be found on GitHub:
Another important concept to keep in mind when serializing data is that there are some items that don’t serialize very well, and others that can be omitted. Let’s review a few of those now.
One example of things that don’t serialize well are objects provided by the operating system itself. This includes things such as open files, input and output streams, and threads. In each case, these objects rely on data provided by the operating system, making it difficult to serialize the object directly.
Instead, we can externally save the state, such as the current position we are reading from in the file, or the current object the thread is manipulating, and then use that to recreate the object later on.
The other type of data that you may not wish to serialize is data that is dependent on other data. For example, a program might contain multiple copies of the same class, or have a class where one attribute is computed from other attributes. In order to save space, you may choose to only serialize the data that is required to reconstruct the rest, and perform the reconstruction when loading the data from the file. This will save storage space, but may cost additional computation time. So, we must evaluate the tradeoff and determine which option fits our use case the best.
Finally, we really cannot talk about data serialization without briefly mentioning what might be the penultimate example of serialization - databases.
A database is a specialized piece of software that is designed to store and retrieve large amounts of data. For many applications, especially web applications, a database is the primary method for storing data long-term, and takes the place of any data serialization to a file.
While most database systems are thought of as stand-alone applications that we connect to from our application, there are also smaller databases that can be stored and accessed from a single file, such as SQLite, which is supported directly in Python
Many databases can also store text or binary values directly, so it is possible to use the serialization methods we’ve already discussed to transform objects in memory and store them in a database.
Finally, there are many object-relational mapping, or ORM, tools available that will easily map data from a database into objects that can be used in an object-oriented manner. These can help bridge the gap between the data structures most commonly used in a database and the object-oriented data structures we are familiar with.
We won’t work with databases in this class, as that is well outside of the scope of what we can cover quickly. There are later courses in the Computational Core program that cover both databases and web development in much greater detail. We simply felt that it was worth mentioning the fact that, in practice, a large amount of data serialization is actually done with databases instead of files on a file system.
In this chapter, we learned about how to serialize the state of our applications into a file for storage, and then how to read that state back into memory.
We explored different formats we can use, including JSON, XML, and a binary format. Each of those comes with various pros and cons, so we have to choose wisely.
Then, we saw some examples of how to work with each format in our chosen programming language. In each case, it isn’t too difficult to do.
Finally, we discussed some of the things we might not want to serialize, and the fact that, in practice, we might want to use a database instead of a text file for storing large amounts of data, especially in a web application.
Thankfully, we’ll be able to put this skill to use as we wrap up our semester project.
Check your understanding of the new content introduced in this chapter below - this quiz is not graded and you can retake it as many times as you want.
Everything that didn’t fit anywhere else!
We’ve covered lots of new topics in this course, but there are always important ideas that get left out or don’t fit anywhere else. So, in this final chapter of the book, we’ll look at some one-off topics and concepts that we feel are important to cover in this course. For many students, this course serves as a capstone programming course, and we want to make sure you are well prepared as a programmer in the future.
Each page in this chapter covers a different topic, with links to additional resources and reading material where possible. More information will continually be added to this chapter as new topics are considered, so if you have a topic in mind that hasn’t been already covered in this course, please contact your course instructor and share your idea. It might just end up in an future version of this book.
One major topic in the Java programming language that we’ve made use of but haven’t really explained is the use of generic types. A generic type is a class or interface that can accept a parameter for the type of object that it stores. A great example is the LinkedList class that we are very familiar with. When working with a class that supports generic types, we provide the type parameter in angle brackets <> as in this example:
LinkedList<Person> personList = new LinkedList<>();So, as we know, this LinkedList object will only allow us to store objects compatible with the Person type. If we try to add anything else to that list, the compiler will raise an error before we even can execute our code. Likewise, when we access an element in the list, it will automatically be given to us as a Person object, without any casting required.
Person person = new Person("Willie", 42);
personList.add(person);

Person personOut = personList.get(0);  // no cast required!

Integer intObject = new Integer(5);
personList.add(intObject);             // COMPILER ERROR!
Compare that with a non-generic version of a List class, such as the one you probably created as part of a data structures course:
public class MyArrayList {

    private Object[] array;
    private int size;

    public MyArrayList() {
        this.array = new Object[10];
        this.size = 0;
    }

    public Object get(int i) {
        return this.array[i];
    }

    public void add(Object obj) {
        this.array[size++] = obj;
    }

}
If we wish to use the simple class above, we can instantiate it using this code:
MyArrayList myPersonList = new MyArrayList();This class stores objects using the top-level Object class. So, it can store every possible type of object, but it doesn’t have any way of enforcing types at all. Consider the same code example:
Person person = new Person("Willie", 42);
myPersonList.add(person);           // Person is a subtype of Object

Person personOut = myPersonList.get(0);         // COMPILER ERROR!
Person personOut = (Person) personList.get(0);  // requires a cast

Integer intObject = new Integer(5);
myPersonList.add(intObject);        // Integer is a subtype of Object

Person secondOut = (Person) personList.get(1);  // EXCEPTION!
                                    // Integer cannot be cast as a Person
Here, we see that we can add any object to the list, and the compiler will allow it. However, when we access those items, we’ll have to cast them back to the type we need to use, and if we make a mistake, we’ll encounter an exception. So, this is definitely not ideal.
Of course, one easy solution would be to rewrite our MyArrayList class to accept only Person objects instead of the base Object type. This isn’t that difficult to do.
public class MyPersonList {

    private Person[] array;
    private int size;

    public MyPersonList() {
        this.array = new Person[10];
        this.size = 0;
    }

    public Person get(int i) {
        return this.array[i];
    }

    public void add(Person obj) {
        this.array[size++] = obj;
    }
}
In effect, we can just replace the Object type in the code with the Person type, and it works just fine. If we want to create a list to store a different type, we can just duplicate this class, update a few types, and we are good to go, right?
Hopefully by now we are well trained enough in object-oriented programming that our intuition is telling us that there must be a simpler way to do this. This seems to violate the Don’t Repeat Yourself (DRY) principle, since we are creating a bunch of classes that do the same thing with slightly different types. Thankfully, there is a great solution for this in Java.
To create a class that uses a generic type, we simply can replace each instance of the type with a variable. So, in our class itself, we can update it to handle generic types as shown in this example:
public class MyGenericList<T> {

    private T[] array;
    private int size;

        public MyGenericList() {
        this.array = new T[10];
        this.size = 0;
    }

    public T get(int i) {
        return this.array[i];
    }

    public void add(T obj) {
        this.array[size++] = obj;
    }
}
It’s really that simple. We add a generic parameter list to our class declaration, <T> in this example, and then replace all instances of the type with that parameter. Traditionally, we use T for the generic type variable, and most generic classes use single uppercase letters to represent type variables, making it clear which variables are types and which ones are other variables.
Then, when we wish to use this class, we can treat it just like any other generic class:
MyGenericList<Person> genericList = new MyGenericList<>();

Person person = new Person("Willie", 42);
genericList.add(person);

Person personOut = genericList.get(0);  // no cast required!

Integer intObject = new Integer(5);
genericList.add(intObject);             // COMPILER ERROR!
With that code, we’ve definitely followed the Don’t Repeat Yourself (DRY) principle, since there will only be one instance of the class in our code, and it can now support any generic type we choose.
One major topic in the Python programming language that we’ve made use of but haven’t really explained is the use of generic types. A generic type is a class or interface that can accept a parameter for the type of object that it stores. A great example is the List class that we are very familiar with. When providing type hints for a list class, we can provide the type that should be stored in the class in square brackets []:
person_list: List[Person] = list()So, as we know, this List object will only allow us to store objects compatible with the Person type. If we try to add anything else to that list, the type checker will raise an error. Of course, since we are working in a dynamically-typed language, there is nothing that will prevent us from doing so in practice, but using a type checker such as Mypy will help us find these errors in our code. Likewise, when we access an element in the list, it will automatically be given to us as a Person object, without any casting or type inference required.
person: Person = Person("Willie", 42)
person_list.append(person)

person_out: Person = person_list[0]  # no cast or type check required

person_list.append("Test")                # TYPE CHECK ERROR!
Compare that with a non-generic version of a List class, such as the one you probably created as part of a data structures course:
from typing import List


class MyArrayList:

    def __init__(self) -> None:
        self.__array: List[Object] = list()

    def append(self, obj: Object) -> None:
        self.__array.append(obj)

    def get(self, i: int) -> Object:
        self.__array[i]
If we wish to use the simple class above, we can instantiate it using this code:
my_person_list: MyArrayList = MyArrayList()This class stores objects using the top-level Object class. So, it can store every possible type of object, but it doesn’t have any way of enforcing types at all. Consider the same code example:
person: Person = Person("Willie", 42)
my_person_list.append(person)  # Person is a subtype of Object

person_out: Person = my_person_list[0]       # TYPE CHECK ERROR
if isinstance(my_person_list[0], Person):    # requires a type cast
    person_out: Person = my_person_list[0]

my_person_list.append("Test")       # str is a subtype of Object

second_out: Person = my_person_list[1]       # TYPE CHECK ERROR
                                    # It will be a string, but type checker
                                    # can't tell what type it should be
Here, we see that we can add any object to the list, and the type checker will allow it. However, when we access those items, we’ll have to cast them back to the type we need to use, and if we make a mistake, we might run into issues. So, this is definitely not ideal.
Of course, one easy solution would be to rewrite our MyArrayList class to accept only Person objects instead of the base Object type. This isn’t that difficult to do.
from typing import List


class MyPersonList:

    def __init__(self) -> None:
        self.__array: List[Person] = list()

    def append(self, obj: Person) -> None:
        self.__array.append(obj)

    def get(self, i: int) -> Person:
        self.__array[i]
In effect, we can just replace the Object type in the code with the Person type, and it works just fine. If we want to create a list to store a different type, we can just duplicate this class, update a few types, and we are good to go, right?
Hopefully by now we are well trained enough in object-oriented programming that our intuition is telling us that there must be a simpler way to do this. This seems to violate the Don’t Repeat Yourself (DRY) principle, since we are creating a bunch of classes that do the same thing with slightly different types. Thankfully, there is a great solution for this in Python.
To create a class that uses a generic type, we simply can replace each instance of the type with a variable. So, in our class itself, we can update it to handle generic types as shown in this example:
from typing import List, TypeVar, Generic


T = TypeVar('T')

class MyGenericList(Generic[T]):

    def __init__(self) -> None:
        self.__array: List[T] = list()

    def append(self, obj: T) -> None:
        self.__array.append(obj)

    def get(self, i: int) -> T:
        self.__array[i]
It’s really that simple. We first create a TypeVar to represent our generic type. Traditionally, we use T for the generic type variable, and most generic classes use single uppercase letters to represent type variables, making it clear which variables are types and which ones are other variables. Then, we subclass the Generic[T] base class to show that this is a generic class, and then replace all instances of the type with that parameter.
Then, when we wish to use this class, we can treat it just like any other generic class:
generic_list: MyGenericList[Person] =  MyGenericList()

person: Person = Person("Willie", 42)
generic_list.append(person)

person_out: Person = generic_list[0]         # Properly Type Checked

my_person_list.append("Test")                # TYPE CHECK ERROR
With that code, we’ve definitely followed the Don’t Repeat Yourself (DRY) principle, since there will only be one instance of the class in our code, and it can now support any generic type we choose.
One major topic that this course doesn’t cover is software engineering. Software engineering is all about applying practices from the field of engineering to the development of software. So, while it also includes things such as program architecture, programming paradigms, and design patterns, which we do cover in this course, software engineering also includes many other topics related to the process of developing, operating, testing, and maintaining software.
One of the major topics in software engineering is the Software Development Life Cycle, sometimes abbreviated as SDLC or referred to as the Software Development Process. This is all about how we actually design and build software, going from the initial idea, all the way through design, development, testing, maintenance, updates, and more. There are entire courses and books dedicated to this topic, and it is an area of constant study and improvement for software developers of all skill levels.
On this page, we’ll give a brief overview of the major concepts and how they all fit together.
 1
Right-click and open image in new tab for larger version
1
Right-click and open image in new tab for larger version
The software development life cycle consists of many steps, and each of the methodologies discussed below may use a slightly different list of steps, adding or omitting them as needed. However, they generally fit into a few major groupings:
The first step is generally to determine the requirements of the piece of software. At this step, a developer might ask questions about who the software is for, what it should do, how it will store and access data, and what type of hardware it will be running on. All of these questions help build the list of requirements for the software. Throughout most of your academic career, this is usually provided to you as the description of the programming project. It clearly states what the finished product should do and how it should work.
Once the requirements are determined, developers will start working on the overall design of the application. This usually involves creating some UML diagrams to help describe the structure of the application itself, and it may also include discussions of external libraries to be used, software design patterns to apply, and more. Again, this is usually given to you as part of the assignment description, though in this class you were tasked to develop your own software design as part of your final project.
This step is the obvious one - it involves actually developing the software! In this step, developers refer back to the design documents and original requirements list to make sure the code being developed meets those needs. In your academic career, this is the step that most classes, up to this point, have focused on teaching you. As a programmer in a large organization, or working on your own personal project, this is really the core step of the process that you’ll work with. However, throughout your career you may find yourself branching out a bit and working more on gathering requirements and designing software that others will help you build.
Once the software is developed, it needs to be tested. In this course, we introduced unit testing, which makes up the bulk of software testing. As we discussed before, this could also include items such as regression tests, integration tests, and more. In fact, the test-driven development paradigm turns this around by requiring tests to be developed before the software itself, effectively combining both the testing and development steps into a single step.
When the software is ready to be released, the last step in its life cycle is to be deployed to the end-users. However, once they have access to the software, they are bound to find bugs to be fixed. So, many software projects also must include some maintenance steps here to fix bugs and provide updates to the program even after it is released.
Another core concept of software engineering are the software development methodologies, which are different ways of moving through the steps of the software development life cycle listed above. Each methodology follows its own unique pattern through those steps, and may add additional constraints or processes as needed. There are many different methodologies in use today, but let’s look at a few of the more common ones that you might come across.
The Waterfall Model is a software development methodology that basically works through the software development lifecycle one step at a time. So, in the waterfall model, developers cannot start working on code until both the requirements and design steps are fully complete. And, at any time, if the developers realize that the design is not feasible, development must be paused while the design is reconsidered.
The waterfall model is seen as a more traditional model, since it has its roots in the early days of software development in the 1950s and 1960s. Many large corporations and government projects still follow this model today. However, there are many drawbacks to this model, such as the fact that it can be very rigid and inflexible, especially as the requirements and design of a software project may change over time.
The Iterative and Incremental Development model builds upon the waterfall model by using the same basic steps, but repeated over and over again. Instead of developing the project all at once, this model focuses on building a small part of the project first, and then slowly adding to it (incremental). That process is repeated multiple times (iterative), until the full project is complete. Through this model, it is much easier to build small prototypes of the software, get feedback, and continually adapt the design and requirements as more information is acquired.
This model has been used successfully in a variety of contexts, including as part of the Mercury and Space Shuttle programs at NASA.4
Closely related to the iterative and incremental development model, the Spiral Model also focuses on a repeated set of steps that start with a small concept and prototype, working outwards toward a final project. In a spiral model, however, developers and teams analyze the “risk” that comes with any change to the software or new concept to be added, and aims to minimize that risk as much as possible. For example, if the team decides to add a new feature to a project, but they are worried that it may not be well received by users, they may decide to only spend a little bit of time working on that feature before getting feedback from the users. If it is well received, the next cycle may devote more time to that feature. If the users don’t like it, they will have saved themselves lots of wasted time by not spending too much time on it in the first place.
Agile Software Development is one of the newer and most popular software development methodologies today. Agile software development actually comes in many forms, but they all focus on rapid prototyping, continual improvement, and quickly responding to changes in requirements and design. It all started with the publication of the Manifesto for Agile Software Development, which contains the statements:
… we have come to value: Individuals and interactions over processes and tools Working software over comprehensive documentation Customer collaboration over contract negotiation Responding to change over following a plan
Therefore, most implementations of the agile software development methodology involve very short development cycles, commonly measured by days or even hours instead of weeks or months. In addition, there is a large focus on automation at all levels, such as continuous integration and automated unit testing, and many developers are encouraged to use standard structures and techniques such as software design patterns and clean code to make their code easy to understand and maintain.
There are lots of great resources for learning more about agile software development on line, including many free courses. For developers considering working in the industry, we highly recommend learning more about agile due to its popularity in all levels of the industry today.
https://commons.wikimedia.org/w/index.php?title=File:Systems_Development_Life_Cycle.gif&oldid=534019806 ↩︎
https://commons.wikimedia.org/w/index.php?title=File:Waterfall_model.svg&oldid=453496509 ↩︎
https://commons.wikimedia.org/w/index.php?title=File:Iterative_development_model.svg&oldid=484829875] ↩︎
https://www.computer.org/csdl/magazine/co/2003/06/r6047/13rRUxBJhpL ↩︎
https://commons.wikimedia.org/w/index.php?title=File:Spiral_model_(Boehm,_1988).svg&oldid=480509142] ↩︎
On the previous page, we discussed the software development life cycle. One of the most important, and often overlooked, steps in those processes is requirements elicitation. Requirements elicitation is all about determining what the users or customers want from a piece of software that is being developed. While this might sound simple, it can actually be one of the most difficult steps in the whole process. In addition, since it is generally the first step in any new software development task, getting this step right can make everything work smoothly, whereas even a small problem at this step can cause the entire project to fail.
One of the major issues with gathering requirements is that many times the users or customers themselves are not well trained in technology or programming themselves, and therefore they don’t have a good idea of what is possible, impossible, or even impractical, when developing a new piece of software. Likewise, they may not be able to fully articulate exactly what they want from a new piece of software, or they might ask for something that they think is achievable without discussing the actual problem they’d like to solve.
This problem is well summed up by the following XKCD comic:
Here, we see a user asking for two things that seem similar - when the user takes a picture using a mobile application, can we determine where it was taken and what is in the picture? Sounds simple, right?
However, to a programmer, those two questions are actually asking for vastly different things. On the one hand, most phones today support GPS, so the mobile app can simply capture the user’s current GPS coordinates when the picture is taken, and then check to see if those GPS coordinates lie within a defined national part boundary. So, this can be easily done with just a little bit of work.
On the other hand, how can we determine if there is a bird in a picture? This is a computer vision problem, and is definitely still an unsolved problem as of 2021. There are some very advanced algorithms available today that can perform facial recognition on people, but they require massive amounts of data for training and testing, and even then they aren’t perfect. Our ability to recognize other objects is even more limited, but it is slowly getting better. Projects such as Google Lens demonstrate what can be done currently in this field. So, expecting a mobile app to perform this task is not really feasible at the current time, but perhaps in the future it could be done.
There are many ways to approach the process of gathering requirements for a project. This could involve brainstorming ideas, holding focus groups, collecting surveys and user feedback, producing prototypes and allowing users to interact with them, and more. Once again, the topic of requirements elicitation is large enough for an entire course in itself.
So, if you do find yourself in a position where you need to gather requirements from users or customers, it is worth doing a bit of reading to discover the various approaches and methods that you may be able to put to use. Below are a few resources you may find helpful.
Another major concept to be aware of as a programmer is security. Computer systems today store large amounts of sensitive data, and hackers are always trying to access data and resources they should not have access to. Many times, their ability to access that data is due to a mistake or oversight on the part of a programmer, sometimes made months or even years prior. It could even have been due to some completely new situation that wasn’t at all a concern when the program was originally written.
Therefore, programmers should also have a basic understanding of some of the concerns related to computer security and how they can do their best to avoid them.
A major area of study is Defensive Programming. In effect, defensive programming involves writing programs that will behave in expected ways, even if it receives unexpected or malicious inputs from the user. By learning to write programs in a defensive way, developers can limit the number of vulnerabilities a program has, while easily detecting or preventing malicious input from actually causing a problem.
In some programming languages, such as C and C++, the memory for storing data is handled directly by the user, and misuse of this can lead to all sorts of vulnerabilities in the code. We won’t cover those here, but if you do decide to learn to program in those languages, it is definitely recommended to also build a strong understanding of how to properly manage memory and avoid these problems. This is known as secure coding.
Thankfully, both Java and Python generally handle memory for us, and are much less susceptible to these issues. That doesn’t mean that they are immune, and there are situations where a developer can inadvertently expose data, but generally it is difficult to do so.
As we already learned throughout this course, we can write code to carefully handle errors as they arise. For example, if the input to this function should be a string that must be at least 1 character and no longer than 10 characters, we could do something like this in our code:
public void getString(String input) {
    if (input == null) {
        throw new NullPointerException();
    }
    if (input.length < 1 || input.length > 10) {
        throw new IllegalArgumentException();
    }
    // more code here
}
def get_string(self, input: str) -> None:
if input is None or not isinstance(input, str):
raise TypeError()
if len(input) < 1 or len(input) > 10:
raise ValueError()
# more code hereIn both of these examples, we carefully check the input variable to make sure that it is properly instantiated and that it meets the criteria we expect, before ever actually using it in our code. We are raising exceptions here, but we could also include some logging code to track these errors. In addition, we should write unit tests that test each of these checks and make sure they are working properly, and these tests will help us make sure we don’t accidentally remove this code in a later version.
Another important concept in security is writing programs and designing systems that will fail in a safe manner. This can be especially important for software that controls parts of our physical environment, such as medical device software.
For example, if we are writing software that is used to lock a safe, what should happen when the software fails to recognize the input? Should it allow the door to be opened? In this case, probably not, since we want the items in the safe to be protected even if the software fails.
On the other hand, if the software is used to lock the doors on a car, it should probably be programmed to unlock the doors in certain situations, such as when an accident occurs. In that case, it could be more important to allow emergency responders to open the door than protecting the occupants of the car.
There are many more techniques and concepts related to security and defensive programming. See the resources listed below for more information.
Now that you have some programming knowledge and skill, you might consider looking for a job that makes use of those skills. So, let’s take a look at some related information that might be useful to you in that path.
A résumé for a technical career field such as programming can be quite a bit different from résumés in other fields. This is mainly because a technical résumé should cover more than just work experience, including projects, programming skills, technical knowledge, and more. While there are many guides online for building a technical résumé, here are a few things that you might want to consider including:
Either as part of your work experience, a separate section, or sometimes both, you’ll want to talk about any programming projects you have worked on, even in your own time. For example, you could definitely include the restaurant project from this semester as a guided project, as well as your final project as an example of your own independent work. When discussing your projects, be clear about what programming language and technologies you used to build the project, as well as your contribution if you were working as part of a team. This gives the reader a clear understanding of the types of projects you’ve worked on, the languages and technologies you are likely to be familiar with, and your level of contribution to the project itself.
This résumé section is somewhat unique to programmers, but it is one of the most important sections to include. In this section, you’ll want to list all of the programming languages, technologies, frameworks, platforms, and more than you are familiar with. This can sometimes read like a “buzzword-compliant” list of items, but for a recruiter it can hold valuable information. Many times, an organization is looking for a programmer with experience or familiarity with a particular set of languages and technologies, and if you can quickly show that you’ve worked with them, you’ll become a top contender for the job.
For example, consider all of the tools you’ve worked with just in this course. Here’s a short list of things that you could list on your résumé, depending on what you used in this course:
Of course, you may know some of these more than others, and it is definitely recommended to be honest about your level of skill with each of these, but you already have quite an impressive list of skills and technologies you are familiar with.
Another possible path would be to earn some certifications. A certification is usually given by some organization based on earning a passing score on an exam, and can serve as further proof of your knowledge as a programmer.
Within the field of programming, certifications are viewed with somewhat mixed feelings. For programmers with little experience, earning a certification can help demonstrate proficiency with a language or technology that would be otherwise difficult to prove, but many jobs either don’t look for certifications from new hires, or there are simply too many certifications to know which one would be useful, if any.
In general, we don’t direct students toward earning a certification as a next step after this course, but we don’t discourage it either. Depending on your chosen career path, there may be certifications available that could help you.
We recommend doing some research, either by talking to companies and others in the field you are interested in, or meeting with an advisor or career counselor to explore your options. There are definitely some good certifications out there covering both the Java and Python programming languages that would be easily achievable after completing this course (with a bit more study).
We’ve been using Codio as our development environment throughout this program, mainly because it is purposely designed to provide a great educational experience for novice programmers, while allowing instructors easy access to help students when they get stuck. We have also made use of the automated grading features available in Codio throughout this program.
However, outside of these courses, you won’t have access to Codio and will instead need to find another tool to help you develop your programs. These tools are collectively called Integrated Development Environments, or IDEs, and are the primary tool in a programmer’s toolbox. Let’s look at a few options you might want to consider using in the future.
Visual Studio Code is a free IDE from Microsoft, and uses many of the same concepts and features present in their Visual Studio IDE for professionals. It supports many languages, including both Java and Python, and is also available for Windows, Mac and Linux.
To develop Java on your own computer, you’ll first need to install a Java Development Kit. There are many different IDEs available for Java, but the three most popular are:
Python can be easily installed on just about any system. The Python Website contains download-able installers for many different versions of Python.
For Python, one of the most well known IDEs is PyCharm. Also developed by JetBrains and available in both paid and “Community” versions, PyCharm fits the bill as one of the more feature-rich IDEs for working with Python.
On many platforms the IDLE “Integrated Learning and Development Environment” is installed by default along with Python, and is a great choice for working with smaller Python projects.
Many Python developers also prefer to write code in a simple text editor, so tools such as Atom from GitHub are also popular.
There are many other tools that programmers can use to do their work. Here are just a few of them that we are familiar with and have used in the past.
Finally, it is very important for programmers to always stay on top of new developments and technologies, and it can seem like a daunting task to even know where to look. Let’s review some of the resources that are commonly used by programmers to keep up with the latest news and learn about technologies that they may want to use.
There are many news sites on the web that focus specifically on news related to technology and programming. We encourage you to search around and find sites that are relevant to you and your interest, but here are a few of the more well-known sites:
Likewise, there are many sites that focus on social media and discussion, including some great places to ask questions and get answers to even the most difficult technical questions:
Finally, each many resources are language-specific as well. Here are a few worth noting for each language:
If there are other resources that you’ve found useful, please feel free to share them! Contact the course instructor and share your sites, and you can earn some extra-credit points for a bug bounty!
This chapter covers many helpful topics in programming that don’t fit neatly anywhere else in the book. We hope that a few of these items will be useful to you as you continue to build your programming skill.
Check your understanding of the new content introduced in this chapter below - this quiz is not graded and you can retake it as many times as you want.