Player Input
Need Input!

Need Input!
By this point you have probably built a lot of programs with user interfaces. Most, or possibly all, were written in an event-driven fashion, i.e. you created a method to serve as an event handler, i.e.:
public void OnButtonPress(object sender, EventArgs e)
{
    // Your logic here...
}
This approach is a good fit for most productivity desktop applications. After all, most of the time your text editor is just waiting for you to do something interesting - like move the mouse or type a letter. During this waiting period, it doesn’t need to do anything else - what is on-screen isn’t changing, what it has stored internally isn’t changing. It basically spends most of its time waiting.
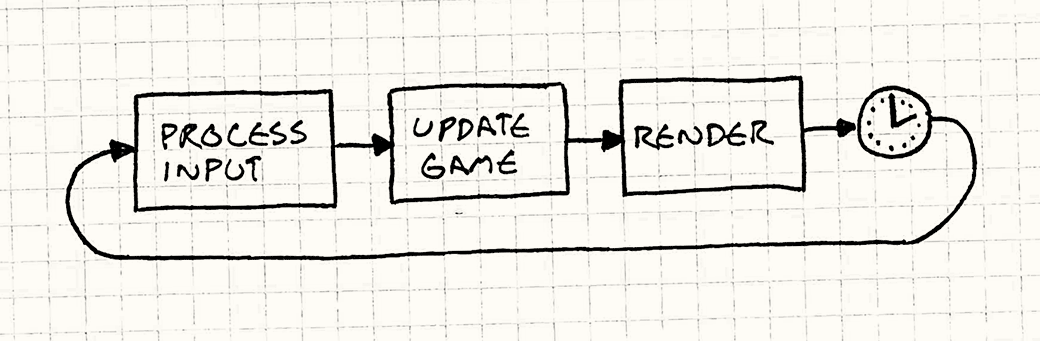
Most games, on the other hand, are never waiting. They are real-time simulations of a world. The Goomba will keep walking, the Bullet Bill flying, and the Piranha Plant popping in and out of pipes whether or not Mario moves. Hence the game loop - each update and render cycle updates the state of the game world, and then renders that updated world.
While event-driven programming is extremely efficient in a desktop application that waits on user input most of the time, it is problematic in a real-time game. Hence, the process input stage in the game loop from Game Programming Patterns:
But what exactly does that step entail? Let’s find out.
Instead of letting the OS tell us when an input event occurs (as we do with event-driven programming), in the game loop we use device polling with the input devices. This means that we ask the device for its current state when we start processing user input.
Consider a gamepad with a button, A. We can represent such a button with a boolean value; true if it is pressed, and false if it is not. Thus, the classic NES controller could be represented by a struct composed entirely of booleans:
public struct NESPad
{
    // The D-Pad
    public bool Up;
    public bool Down;
    public bool Left;
    public bool Right;

    // The Buttons
    public bool A;
    public bool B;
    public bool Start;
    public bool Select;
}
At the start of each iteration of the game loop, we could gather the current state and assign it to a copy of this struct, say PlayerOneInput. We would then use it in the Update() method:
public void Update(GameTime gameTime)
{
    if(PlayerOneInput.Left)
    {
        PlayerPosition.X += Speed * gameTime.ElapsedGameTime.TotalSeconds;
    }
}
That works well for continuous actions like walking, but what about discrete ones like jumping? Remember, your game is updating at 1/30th or 1/60th of a second. No player is so fast that they only hold down a button for 1/60th of a second. Instead, they’ll hold it down for several frames, even when they meant to just tap it. If our jump logic is something like:
if(PlayerOneInput.A) Jump();We’ll end up calling that Jump() method multiple frames in a row!
The solution is to keep two structs: one with the current frame’s input, and one with the prior frames, i.e.:
NESPad currentPlayerOneInput;
NESPad priorPlayerOneInput;

public void Update()
{
    if(currentPlayerOneInput.A && !priorPlayerOneInput.A) {
        // The A button was just pressed this frame, so Jump!
        Jump();
    }
}
That wraps up using the input, but how about getting it in the first place? That’s what the process input stage in the game loop is about. But you’ve probably noticed that your MonoGame Game class doesn’t have a corresponding method…
This is because XNA was built to handle four XBox 360 gamepads (as you would see on an XBox 360), as well as keyboard and mouse input out of the box. And MonoGame added support for Joysticks and expanded the number and kind of gamepads that could be used. The process input stage is there - we just don’t need to see it. Instead, we can grab the already-polled input data with one of the static input classes. We’ll take a look at each of these next.
Let’s start with the keyboard. MonoGame uses the KeyboardState struct to represent the state of a keyboard. It is essentially a wrapper around an array of bits - one for each key in a standard keyboard. The indices of each key are represented by the Keys enumeration (you can find a complete listing in the docs).
We get the current state of the keyboard with the static Keyboard’s GetState() method, which returns the aforementioned KeyboardState struct. Thus, if we wanted to have current and prior keyboard states, we’d add fields to hold them:
private KeyboardState priorKeyboardState;
private KeyboardState currentKeyboardState;
And within our Update(GameTime gameTime) method, we’d first copy the current (but now old) state to the prior variable, and then grab the updated state for the current variable:
public override void Update(GameTime gameTime)
{
    priorKeyboardState = currentKeyboardState;
    currentKeyboardState = Keyboard.GetState();

    // TODO: Your update logic goes here...

    base.Update(gameTime);
}
The KeyboardState struct contains properties:
Keys - an array of 256 bits, with each bit corresponding to a particular keyCapsLock - a boolean indicating if the caps lock is onNumLock - a boolean indicating if the num lock is onBut more often, we’ll use its method IsKeyDown(Keys key) or IsKeyUp(Keys key), both of which take a Keys value. For example, we can check if the escape key is pressed with:
    if(currentKeyboardState.IsKeyDown(Keys.Escape))
    {
        // Escape key is down
    }
And, if we need to determine if a key was just pressed this frame, we would use:
    if(currentKeyboardState.IsKeyDown(Keys.I) &&
         priorKeyboardState.IsKeyUp(Keys.I))
    {
        // The I key was just pressed this frame
    }
Similarly, to see if a key was just released this frame, we would reverse the current and previous conditions:
    if(currentKeyboardState.IsKeyUp(Keys.I) &&
        priorKeyboardSate.IsKeyDown(Keys.I))
    {
        // The I key was just released this frame
}Note that part of the reason we use a struct instead of a Class for our state is that a struct is a value type, i.e. it allocates exactly the space need to store its data, and when we set it equal to a different struct instance, i.e.:
priorKeyboardState = currentKeyboardState;What actually happens is we copy the bits from currentKeyboardState over the top of priorKeyboardState. This is both a fast operation and it allocates no additional memory - ideal for the needs of a game. This is also why so many of MonoGame’s data types are structs instead of classes.
Mouse input works much like keyboard input - we have a MouseState struct that represents the state of the mouse, and we can get the current state from the static Mouse class’s GetState() method. You’ll also want to use the same caching strategy of a current and prior state if you want to know when a button goes down or comes up, i.e.:
    MouseState currentMouseState;
    MouseState priorMouseState;

    public override void Update(GameTime gameTime)
    {
        priorMouseState = currentMouseState;
        currentMouseState = Mouse.GetState();

        // TODO: Add your update logic here

        base.Update(gameTime);
    }
However, the MouseState struct has a different set of properties:
X - the horizontal position of the mouse as an integer in relation to the window.Y - the vertical position of the mouse as an integer in relation to the window.LeftButton - a ButtonState indicating if the left button is downMiddleButton - a ButtonState indicating if the middle button is downRightButton - a ButtonState indicating if the right button is downScrollWheelValue - an integer representing the cumulative scroll wheel value since the start of the gameHorizontalScrollWheelValue - an integer representing the cumulative scroll wheel value since the start of the gameXButton1 - a ButtonState indicating if the XButton1 button is downXButton2 - a ButtonState indicating if the XButton2 is downNote that instead of booleans, buttons are represented by the ButtonState enumeration. This allows the internal representation of the MouseState buttons to be a single bitmask, making copy operations on the MouseState much faster (and the struct itself to take up less space).
Thus, to check if the LeftButton is down, we’d need to use:
if(currentMouseState.LeftButton == ButtonState.Pressed)
{
    // left mouse button is pressed.
}Note that not all mice have all of these possible inputs - the Horizontal scroll wheel and X buttons, especially, but many mice also lack the middle button and scroll wheel. In those cases these values will be ButtonState.Released or false.
You can set what cursor the mouse should use with the Mouse.SetCursor(MouseCursor cursor), and supply the cursor of your choice, i.e. MouseCursor.Crosshair. A full list of cursors can be found in the documentation.
You can also create a cursor from a texture with MouseCursor.FromTexture2D(Texture2D texture, int originX, int originY). The Texture2D is loaded with a ContentManager, just as we did in our HelloGame example. The originX and originY describe where the mouse pointer is in relation to the upper-left-hand corner of the image.
You can also hide the mouse cursor by setting the Game.IsMouseVisible property to false.
MonoGame handles gamepad input in a similar fashion to Keyboard and Mouse input. For example, there is a static GamePad class and a GamePadState struct.
However, XNA was originally designed to work with the XBox 360, which supported up to four players connected through XBox 360 gamepads. Thus, instead of using GamePad.GetState() we would use GamePad.GetState(PlayerIndex playerIndex), where the PlayerIndex enumeration value corresponded to which player’s gamepad we wanted to poll.
However, MonoGame can (in theory) support more than four gamepads, so it also added a GamePad.GetState(int index). You can find out how many gamepads are supported on your system with the property GamePad.MaxiumumGamePadCount.
Thus, to get the first gamepad’s state, we would:
    GamePadState currentGamePadState;
    GamePadState priorGamePadState;

    public override void Update(GameTime gameTime)
    {
        priorGamePadState = currentGamePadState;
        currentGamePadState = GamePad.GetState(1);

        // TODO: Add your update logic here

        base.Update(gameTime);
}Also, the XBox controller had a standardized number of buttons and triggers, but MonoGame supports a wider variety of gamepads. You can check the capabilities of any connected pad with GamePad.GetCapabilities(int index), which returns a GamePadCapabilities struct, i.e.:
GamePadCapabilities capabilities = GamePad.GetCapabilities(1);The GamePadType property is one of the GamePadType enumeration values, which include options like the various Rock band/Guitar hero instruments, dance pads, arcade sticks, flight sticks, and wheels. Note that each of these types still provide their input through standard button and axis properties.
The various other properties of the GamePadCapabilities are booleans corresponding to different types of buttons pads, and sticks. You can see them all listed in the documentation.
The GamePadState is actually implemented as a partial struct, so additional data can be added based on the platform. The various buttons, pads, and sticks are broken out into individual sub-structs.
For example, the GamePadState.Buttons property is a GamePadButtons struct representing the traditional buttons (those that are either pressed or not - A, B, X, Y, Start, Back, Big Button, Left Shoulder, Right Shoulder, Left Stick, Right Stick). As with the mouse buttons we saw before, these are represented using the ButtonState enum. Thus, to determine if the A button is pressed, we would use:
    if(currentGamePadState.Buttons.A == ButtonState.Pressed)
    {
        // A button is pressed
    }
And to determine if the X button was _just pressed this frame:
    if(currentGamePadState.Buttons.X == ButtonState.Pressed
    && priorGamePadState.Buttons.X == ButtonState.Released)
    {
        // X button was just pressed this frame
}The GamePadState.DPad property is a GamePadDPad struct, also composed of ButtonValues for the four directions of the DPad (Up, Down, Left, Right). I.e. to check if the right direction pad button is pressed:
    if(currentGamePadState.DPad.Right == ButtonState.Pressed)
    {
        // Right Dpad button is pressed
}The GamePadState.Triggers property is a GamePadTriggers struct representing the two triggers (Left and Right). Unlike other buttons, these measure the travel, or the amount of pull that has been applied to them. Thus, they are represented by a single floating point number between 0 and 1.
To see if the left trigger is pulled back 3/4 of the way, we might use:
    if(currentGameState.Triggers.Left > 0.75)
    {
        // Left Trigger is pulled at least 3/4 of the way back
}The GamePadState.Thumbsticks property is a GamePadThumbSticks struct representing the two thumbsticks (Left and Right). These are represented by Vector2 values with the X and Y falling between -1 and 1.
Thus, to get where the right thumbstick is pointing, we might use:
Vector2 direction = GamePad.Thumbsticks.Right;The GamePadState also implements convenience functions IsButtonUp(Button button) and IsButtonDown(Button button) that operate like the keyboards’ equivalents.
Many gamepads come equipped with two vibration-inducing motors (left and right). These are exposed through the GamePad.SetVibration(int index, single left, single right) method, where you can set a vibration in either motor using a floating point value between 0 and 1.
Thus, to start vibration in both of player one’s gamepad’s motors at half-strength, you would use:
GamePad.SetVibration(0, 0.5f. 0.5f);To stop them you would need to send:
GamePad.SetVibration(0, 0, 0);At this point, you may be noticing that our input processing could quickly dominate our Game class, and can be very messy. Especially if we want to support multiple forms of input in the same game. Consider if we wanted to do a platformer - we might want the player to be able to use the keyboard or a gamepad.
One technique we can employ is an input manager, a class that handles polling the input and abstracts it to just the commands we care about. I.e. for a simple platformer, we might want the four directions and “jump”.
We can create a class called InputManager that would provide those:
using Microsoft.Xna.Framework;
using Microsoft.Xna.Framework.Input;

/// <summary>
/// Manages input for a simple platformer
/// </summary>
public class InputManager
{
    /// <summary>
    /// The player's direction
    /// </summary>
    public Vector2 Direction { get; private set; }

    /// <summary>
    /// If the player pressed jump this frame
    /// </summary>
    public bool Jump { get; private set; }
}
Note that we use public auto-properties, but override the set to be private. This way outside code can access these boolean properties, but only the code in this class can set them.
We’ll also need to declare our state variables:
    /// Input state variables
    private KeyboardState currentKeyboardState;
    private KeyboardState priorKeyboardState;
    private GamePadState currentGamePadState;
    private GamePadState priorGamePadState;
And, we’ll process these in an update method:
    /// <summary>
    /// Update the input object
    /// </summary>
    /// <param name="gameTime">The game time</param>
    public void Update(GameTime gameTime)
    {
        // Update input state
        priorKeyboardState = currentKeyboardState;
        currentKeyboardState = Keyboard.GetState();
        priorGamePadState = currentGamePadState;
        currentGamePadState = GamePad.GetState(0);

        // TODO: Assign actions based on input
    }
This looks just like how we updated state before. The next step is to abstract the input into the properties we defined. We’ll start with the Direction, which we are using a Vector2 to represent. This conveniently matches with our gamepad’s thumbstick representation, so we can assign it directly:
    // Right thumbstick
    Direction = currentGamePadState.Thumbsticks.Right;
If there is no gamepad available, this will be the vector $ (0,0) $. Then we can check the WASD keys, and assign a corresponding value
    // WASD keys:
    if (currentKeyboardState.IsKeyDown(Keys.W)) Direction += new Vector2(0,-1);
    if (currentKeyboardState.IsKeyDown(Keys.A)) Direction += new Vector2(-1, 0);
    if (currentKeyboardState.IsKeyDown(Keys.S)) Direction += new Vector2(0,1);
    if (currentKeyboardState.IsKeyDown(Keys.D)) Direction += new Vector2(1, 0);
Note that we are adding a unit vector to the (supposedly zero) existing vector. This does mean that a player using both keyboard and mouse could double the direction vector length, so if this is important in your game you’ll need additional logic to prevent it.
For the jump, we want that to be a discrete push, i.e. it is only true the frame the button is pushed. So we’ll first need to reset it to false (in case it was true in a prior frame):
    // reset jump
    Jump = false;
Now we can check if the “A” button is pressed:
    if(currentGamePadState.IsButtonDown(Buttons.A) &&  priorGamePadState.IsButtonUp(Buttons.A))
        Jump = true;
Similarly, we can check for the spacebar:
    if(currentKeyboardState.IsKeyDown(Keys.Space) && priorKeyboardState.IsKeyUp(Keys.Space))
        Jump = true;
Now, we just need to construct an instance of InputManager in our game, invoke its Update() at the start of our game class’ Update() method, and then we can use the Direction and Jump properties to determine what should happen in our game.
This idea can be adapted to any game you want to make - but it will always be specific to the game, as what the controls need to do will vary from game to game. It also makes it easier to allow for multiple forms of input, and to also do user-controlled input mapping, where users can reassign keys/buttons to corresponding actions.
The Game State Management Sample provides a contrasting approach to the input manager. Instead of being tailored to a specific game, it seeks to provide generic access to all input information. It also handles multiplayer input, and can be used to manage when a player switches gamepads. A simplified form (which does not handle gestural input) is provided below.
In particular, the IsButtonPressed(Buttons button, PlayerIndex? controllingPlayer, out PlayerIndex playerIndex) can check for a key press on any connected keyboard, or identify what player’s keyboard was the source of the input. And the IsNewButtonPress(Buttons button, PlayerIndex? controllingPlayer, out PlayerIndex playerIndex) is handled the same way, but detects new button presses.
There are also equivalents for keyboard input.
// Helper for reading input from keyboard, gamepad, and touch input. This class
// tracks both the current and previous state of the input devices, and implements
// query methods for high level input actions such as "move up through the menu"
// or "pause the game".
public class InputState
{
    private const int MaxInputs = 4;

    public readonly KeyboardState[] CurrentKeyboardStates;
    public readonly GamePadState[] CurrentGamePadStates;

    private readonly KeyboardState[] _lastKeyboardStates;
    private readonly GamePadState[] _lastGamePadStates;

    public readonly bool[] GamePadWasConnected;

    public InputState()
    {
        CurrentKeyboardStates = new KeyboardState[MaxInputs];
        CurrentGamePadStates = new GamePadState[MaxInputs];

        _lastKeyboardStates = new KeyboardState[MaxInputs];
        _lastGamePadStates = new GamePadState[MaxInputs];

        GamePadWasConnected = new bool[MaxInputs];
    }

    // Reads the latest user input state.
    public void Update()
    {
        for (int i = 0; i < MaxInputs; i++)
        {
            _lastKeyboardStates[i] = CurrentKeyboardStates[i];
            _lastGamePadStates[i] = CurrentGamePadStates[i];

            CurrentKeyboardStates[i] = Keyboard.GetState();
            CurrentGamePadStates[i] = GamePad.GetState((PlayerIndex)i);

            // Keep track of whether a gamepad has ever been
            // connected, so we can detect if it is unplugged.
            if (CurrentGamePadStates[i].IsConnected)
                GamePadWasConnected[i] = true;
        }
    }

    // Helper for checking if a key was pressed during this update. The
    // controllingPlayer parameter specifies which player to read input for.
    // If this is null, it will accept input from any player. When a keypress
    // is detected, the output playerIndex reports which player pressed it.
    public bool IsKeyPressed(Keys key, PlayerIndex? controllingPlayer, out PlayerIndex playerIndex)
    {
        if (controllingPlayer.HasValue)
        {
            // Read input from the specified player.
            playerIndex = controllingPlayer.Value;

            int i = (int)playerIndex;

            return CurrentKeyboardStates[i].IsKeyDown(key);
        }

        // Accept input from any player.
        return IsKeyPressed(key, PlayerIndex.One, out playerIndex) ||
                IsKeyPressed(key, PlayerIndex.Two, out playerIndex) ||
                IsKeyPressed(key, PlayerIndex.Three, out playerIndex) ||
                IsKeyPressed(key, PlayerIndex.Four, out playerIndex);
    }

    // Helper for checking if a button was pressed during this update.
    // The controllingPlayer parameter specifies which player to read input for.
    // If this is null, it will accept input from any player. When a button press
    // is detected, the output playerIndex reports which player pressed it.
    public bool IsButtonPressed(Buttons button, PlayerIndex? controllingPlayer, out PlayerIndex playerIndex)
    {
        if (controllingPlayer.HasValue)
        {
            // Read input from the specified player.
            playerIndex = controllingPlayer.Value;

            int i = (int)playerIndex;

            return CurrentGamePadStates[i].IsButtonDown(button);
        }

        // Accept input from any player.
        return IsButtonPressed(button, PlayerIndex.One, out playerIndex) ||
                IsButtonPressed(button, PlayerIndex.Two, out playerIndex) ||
                IsButtonPressed(button, PlayerIndex.Three, out playerIndex) ||
                IsButtonPressed(button, PlayerIndex.Four, out playerIndex);
    }


    // Helper for checking if a key was newly pressed during this update. The
    // controllingPlayer parameter specifies which player to read input for.
    // If this is null, it will accept input from any player. When a keypress
    // is detected, the output playerIndex reports which player pressed it.
    public bool IsNewKeyPress(Keys key, PlayerIndex? controllingPlayer, out PlayerIndex playerIndex)
    {
        if (controllingPlayer.HasValue)
        {
            // Read input from the specified player.
            playerIndex = controllingPlayer.Value;

            int i = (int)playerIndex;

            return (CurrentKeyboardStates[i].IsKeyDown(key) &&
                    _lastKeyboardStates[i].IsKeyUp(key));
        }

        // Accept input from any player.
        return IsNewKeyPress(key, PlayerIndex.One, out playerIndex) ||
                IsNewKeyPress(key, PlayerIndex.Two, out playerIndex) ||
                IsNewKeyPress(key, PlayerIndex.Three, out playerIndex) ||
                IsNewKeyPress(key, PlayerIndex.Four, out playerIndex);
    }

    // Helper for checking if a button was newly pressed during this update.
    // The controllingPlayer parameter specifies which player to read input for.
    // If this is null, it will accept input from any player. When a button press
    // is detected, the output playerIndex reports which player pressed it.
    public bool IsNewButtonPress(Buttons button, PlayerIndex? controllingPlayer, out PlayerIndex playerIndex)
    {
        if (controllingPlayer.HasValue)
        {
            // Read input from the specified player.
            playerIndex = controllingPlayer.Value;

            int i = (int)playerIndex;

            return CurrentGamePadStates[i].IsButtonDown(button) &&
                    _lastGamePadStates[i].IsButtonUp(button);
        }

        // Accept input from any player.
        return IsNewButtonPress(button, PlayerIndex.One, out playerIndex) ||
                IsNewButtonPress(button, PlayerIndex.Two, out playerIndex) ||
                IsNewButtonPress(button, PlayerIndex.Three, out playerIndex) ||
                IsNewButtonPress(button, PlayerIndex.Four, out playerIndex);
    }
}In this chapter we learned about input polling and how it is implemented in XNA using structures representing input state and static GetState() methods. We saw the three primary forms of input we use in the MonoGame framework - the keyboard, the mouse, and the gamepad.
We also saw how a variety of game controllers (i.e. RockBand gear, steering wheels, flight sticks, etc.) are mapped to the standard gamepad; how its state struct is actually composed of several sub-structs; and how to turn on and off the vibration motors.
Finally, we discussed how we can use two copies of a state struct - one from the prior frame and one from the current frame - to determine if a button was just pressed or released.