Content Pipeline
Get Your Assets into the Game!
Get Your Assets into the Game!
The creation of assets (textures, audio, models, etc) is a major aspect of game development. In fact, asset creators account for most of a game development team (often a 90/10 split between asset creators and programmers). So creating and using assets is a very important part of creating games!
To make this process manageable, most assets are created with other software tools - editors specific to the kind of asset we are dealing with. Asset creators become quite proficient with these tools, and provide their assets in a save file form specific to one of these tools.
We can load these files directly in our game, especially if our game targets Windows, where we have a lot of available supporting libraries. But those file formats are tailored towards the needs of the editor program - they often contain data we don’t need, or format it in a way that must be transformed to use in our games. And the processing involved in loading can be a lot more involved than we like, causing long load times.
One way around this is the use of a Content Pipeline which transforms assets from an editor-specific file format to one optimized for our games. This happens during the build process, so the transformed asset files are bundled with our executable, ready to be utilized.
This chapter will describe the content pipeline approach specific to XNA.
As we described in the introduction, the XNA Content Pipeline’s purpose is to transform asset files (content) into a form most readily usable by our games. It is implemented as a separate build step that is run every time we compile our game. In fact, each XNA game is actually two projects - the Content project, and the Game project.
The pipeline is broken up into several steps:
You can see the process here:
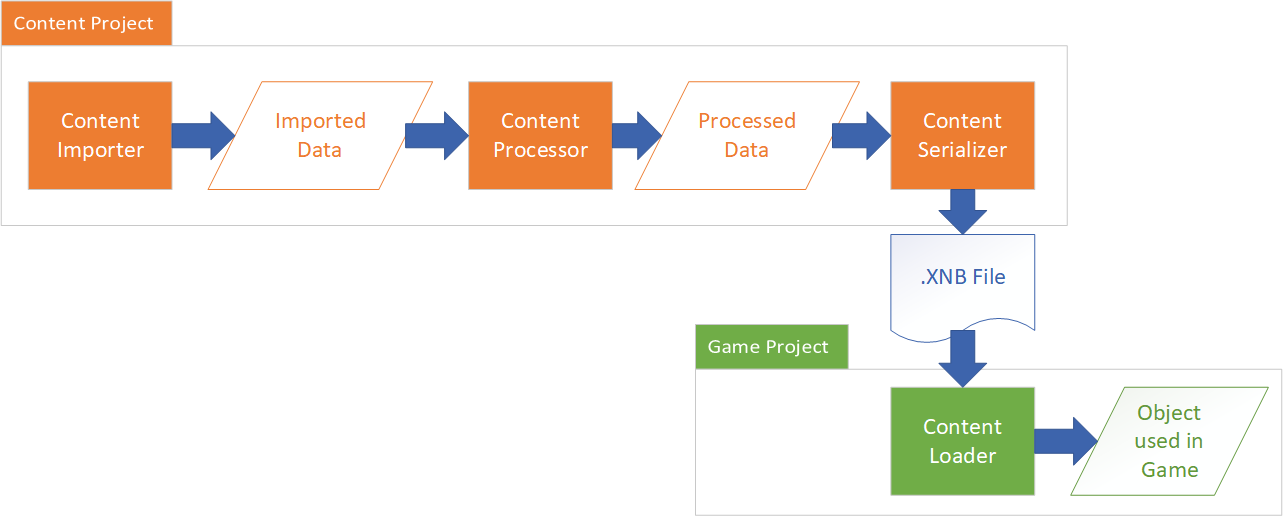
Each of these steps is accomplished by a different class, and the data passed between the steps is also typically done as an object (defined by a class).
The two projects share a single file - the .xnb file generated from the content. This is essentially an object that has been serialized as binary data by the content serializer class, and will be deserialized back into an object by the content loader class.
An important aspect of the serialization process is that the object that is serialized into a .xnb file and the one deserialized from it don’t have to be the defined by the same class! For example, in the content pipeline simple 2d textures are represented by a Texture2DContent instance, while in runtime projects we load the serialized data into a Texture2D instance. The key is that the serialized data is the same for both.
You might be wondering why the content pipeline in XNA was created this way - with importers, processors, content writers, and content readers. The answer is simple - modularity. If you want to load a new image format that the TextureImporter does not handle, you can write your own custom importer to load its data into a TextureContent object, and then still use the existing TextureProcessor and serialization process.
Alternatively, you may want to handle a new content type that has no associated classes in XNA at all. In this case, you will need to write a custom importer, processor, writer, and reader.
The basic tilemap we worked with in the previous chapter is a good candidate for learning how to create our own custom content importers and processors. We’re already familiar with it, and it has just the right amount of complexity to show off important ideas about customizing the content pipeline without becoming unwieldy.
We’ll start by thinking about what data we really need in our game - this defines our runtime class. Basically, we need to keep our Draw() method and any information needed within it. But the Load() method we can get rid of entirely! Our stripped-down class might look something like:
namespace ExampleGame
{
    public class BasicTilemap
    {
        /// <summary>
        /// The map width
        /// </summary>
        public int MapWidth { get; init; }

        /// <summary>
        /// The map height
        /// </summary>
        public int MapHeight { get; init; }

        /// <summary>
        /// The width of a tile in the map
        /// </summary>
        public int TileWidth { get; init; }

        /// <summary>
        /// The height of a tile in the map
        /// </summary>
        public int TileHeight { get; init; }

        /// <summary>
        /// The texture containing the tiles
        /// </summary>
        public Texture2D TilesetTexture { get; init; }

        public Rectangle[] Tiles { get; init; }

        public int[] TileIndices { get; init; }

        public void Draw(GameTime gameTime, SpriteBatch spriteBatch)
        {
            for(int y = 0; y < MapHeight; y++)
            {
                for(int x = 0; x < MapWidth; x++)
                {
                    // Indices start at 1, so shift by 1 for array coordinates
                    int index = TileIndices[y * MapWidth + x] - 1;

                    // Index of -1 (shifted from 0) should not be drawn
                    if (index == -1) continue;

                    // Draw the current tile
                    spriteBatch.Draw(
                        TilesetTexture,
                        new Rectangle(
                            x * TileWidth,
                            y * TileHeight,
                            TileWidth,
                            TileHeight
                            ),
                        Tiles[index],
                        Color.White
                        );
                }
            }

        }
    }
}
We also need to provide a content pipeline version of our tilemap class. For this one, we won’t need any of the functionality of our Draw() or Load() methods (as we don’t need to draw in the pipeline, and we’ll move responsibility for loading into our content importer and processor). So really, we only need to provide a class to contain all the data contained within our tilemap file. To keep things simple, we’ll use the same file format we did in the previous chapter, but we’ll give the file a new extension: .tmap (it will still be a text file). Such a class might look like:
namespace BasicTilemapPipeline
{

    [ContentSerializerRuntimeType("ExampleGame.BasicTilemap, ExampleGame")]
    public class BasicTilemapContent
    {
        /// <summary>Map dimensions</summary>
        public int MapWidth, MapHeight;

        /// <summary>Tile dimensions</summary>
        public int TileWidth, TileHeight;

        /// <summary>The tileset texture</summary>
        public Texture2DContent TilesetTexture;

        /// <summary>The tileset data</summary>
        public Rectangle[] Tiles;

        /// <summary>The map data</summary>
        public int[] TileIndices;

        /// <summary>The map filename</summary>
        [ContentSerializerIgnore]
        public string mapFilename;

        /// <summary> The tileset image filename </summary>
        [ContentSerializerIgnore]
        public String TilesetImageFilename;
    }
}
Note the use of the attributes [ContentSerializerRuntimeType] on the class, and [ContentSerializerIgnore]. By using these attributes and following a few simple rules, we avoid the need to write a custom content serializer and loader to write and read our specific .xnb file.
The [ContentSerializerRuntimeType] identifies what the runtime version of this class will be, as a string containing the fully-qualified class name (the class name with all its namespaces), followed by a comma and the namespaces of the class. This is specified as a string so that our content project doesn’t need to have a reference to our game project (or a separate library project) where the class is defined.
The [ContentSerializerIgnore] attribute identifies attributes (properties and fields) of the content pipeline version that do not have a corresponding attribute in the runtime version. Thus, these will not be written to the .xnb file. For all other attributes, they need to be declared in the same order in both classes. For the most part, they also need to be the same Type (with the exception of any classes that have distinct content pipeline/runtime forms, like the Texture2DContent/Texture2D).
Also, all members that will be serialized/deserialized need to be declared public. They can be either fields or properties, and you can mix-and-match. Here in the runtime I am using properties with an init accessor so that each property can only be set once, during the deserialization process. In the pipeline version I am using fields. This is mostly to demonstrate the flexibility - feel free to use whatever you feel most comfortable with.
An importer is a class that extends the ContentImporter<T> class and overrides its Import() method. Notice the class is a template class (the <T> in the definition). When we define our own class, we need to replace that T with the specific class we want the importer to populate. In our case, this is the BasicTilemapContent we defined in the previous page.
All importers need to override the Import() method. This method takes a filename (the filename of the asset) as an argument, and returns the class specified in the template. The purpose of an importer is to read the important parts of the asset file and load them into an object that gets passed down the pipeline, to the content processor.
For our example, let’s revisit our tilemap file, now named example.tmap:
tileset.png
64,64
10,10
3, 3, 3, 3, 3, 3, 3, 3, 3, 3, 4, 4, 4, 2, 2, 2, 2, 2, 2, 3, 3, 2, 4, 4, 1, 4, 2, 2, 2, 3, 3, 2, 2, 2, 2, 4, 4, 4, 2, 3, 3, 2, 2, 2, 2, 2, 2, 1, 2, 3, 3, 3, 1, 3, 2, 2, 2, 4, 4, 3, 3, 2, 2, 3, 2, 3, 2, 2, 4, 4, 3, 2, 2, 3, 2, 3, 2, 2, 2, 3, 3, 3, 3, 3, 3, 3, 2, 2, 2, 3, 3, 3, 3, 3, 3, 3, 3, 3, 3, 3
To quickly review, the first line is the name of our tileset image file, the second is the dimensions of a single tile (in the form width,height), the third is the size of our map in tiles (again, width,height), and the fourth is the indices of the individual tiles (with a 0 representing no tile).
Now we want to load that file’s information into a TilemapContent object in our importer:
using System.IO;
using System.Linq;
using Microsoft.Xna.Framework.Content.Pipeline;
using Microsoft.Xna.Framework.Content.Pipeline.Graphics;

namespace BasicTilemapPipeline
{
    /// <summary>
    /// An importer for a basic tilemap file. The purpose of an importer to to load all important data
    /// from a file into a content object; any processing of that data occurs in the subsequent content
    /// processor step.
    /// </summary>
    [ContentImporter(".tmap", DisplayName = "BasicTilemapImporter", DefaultProcessor = "BasicTilemapProcessor")]
    public class BasicTilemapImporter : ContentImporter<BasicTilemapContent>
    {
        public override BasicTilemapContent Import(string filename, ContentImporterContext context)
        {
            // Create a new BasicTilemapContent
            BasicTilemapContent map = new();

            // Read in the map file and split along newlines
            string data = File.ReadAllText(filename);
            var lines = data.Split('\n');

            // First line in the map file is the image file name,
            // we store it so it can be loaded in the processor
            map.TilesetImageFilename = lines[0].Trim();

            // Second line is the tileset image size
            var secondLine = lines[1].Split(',');
            map.TileWidth = int.Parse(secondLine[0]);
            map.TileHeight = int.Parse(secondLine[1]);

            // Third line is the map size (in tiles)
            var thirdLine = lines[2].Split(',');
            map.MapWidth = int.Parse(thirdLine[0]);
            map.MapHeight = int.Parse(thirdLine[1]);

            // Fourth line is the map data (the indices of tiles in the map)
            // We can use the Linq Select() method to convert the array of strings
            // into an array of ints
            map.TileIndices = lines[3].Split(',').Select(index => int.Parse(index)).ToArray();

            // At this point, we've copied all of the file data into our
            // BasicTilemapContent object, so we pass it on to the processor
            return map;
        }
    }
}
We decorate the class with the [ContentImporter] attribute, which specifies a file extension this importer applies to (which is why we used the .tmap extension instead of the .txt we did previously), a name used by the MonoGame Content Editor to identify the importer, and also the suggested Content Processor to use next in the pipeline.
The bulk of the Import() method is just the parts of the Load() method from our original tilemap project that populated variables based on the contents of the file. The loading of the texture and the determination of tile bounds we save for the content processor (though we save the image filename so we will have it then). The populated BasicTilemapContent object will be passed to it next.
A processor is a class that extends the ContentProcessor<TInput, TOutput>class and overrides its Process() method. Like the importer, this is a template class, but with two templates! The TInput identifies the class coming into the Process() method as an argument, and the TOutput identifies the class being returned from the method. Not that these don’t have to be different classes - in our case, we’ll continue using the TilemapContent class we defined earlier, and just populate a few more of its properties:
namespace SimpleTilemapPipeline
{
    /// <summary>
    /// Processes a BasicTilemapContent object, building and linking the associated texture
    /// and setting up the tile information.
    /// </summary>
    [ContentProcessor(DisplayName = "BasicTilemapProcessor")]
    public class BasicTilemapProcessor : ContentProcessor<BasicTilemapContent, BasicTilemapContent>
    {
        public override BasicTilemapContent Process(BasicTilemapContent map, ContentProcessorContext context)
        {
            // We need to build the tileset texture associated with this tilemap
            // This will create the binary texture file and link it to this tilemap so
            // they get loaded together by the ContentProcessor.
            //map.TilesetTexture = context.BuildAsset<Texture2DContent, Texture2DContent>(map.TilesetTexture, "Texture2DProcessor");
            map.TilesetTexture = context.BuildAndLoadAsset<TextureContent, Texture2DContent>(new ExternalReference<TextureContent>(map.TilesetImageFilename), "TextureProcessor");

            // Determine the number of rows and columns of tiles in the tileset texture
            int tilesetColumns = map.TilesetTexture.Mipmaps[0].Width / map.TileWidth;
            int tilesetRows = map.TilesetTexture.Mipmaps[0].Height / map.TileWidth;

            // We need to create the bounds for each tile in the tileset image
            // These will be stored in the tiles array
            map.Tiles = new Rectangle[tilesetColumns * tilesetRows];
            context.Logger.LogMessage($"{map.Tiles.Length} Total tiles");
            for(int y = 0; y < tilesetRows; y++)
            {
                for(int x = 0; x < tilesetColumns; x++)
                {
                    map.Tiles[y * tilesetColumns + x] = new Rectangle(
                        x * map.TileWidth,
                        y * map.TileHeight,
                        map.TileWidth,
                        map.TileHeight
                        );
                }
            }

            // Return the fully processed tilemap
            return map;
        }
    }
}
Something very interesting happens here. The processor builds and loads the tilemap texture into the Texture2DContent member. This means that when we use Content.Load<T>() to load the .xnb file, it will already contain the texture. We don’t need any additional steps in our game to load dependent assets. This makes complex, multi-file assets much easier to work with!
This is one of the most important abilities of the ContentProcessorContext object supplied to each processor - it allows them to build additional assets (External References in XNA lingo) without requiring those assets to be explicitly added to the content project. We can also supply content processor parameters, or even specify a different importer and processor to use for that dependant asset to the build method.
In this example, we used a Texture2DContent variable and the context.BuildAndLoadAsset<Texture2DContent>() method to build and load the asset. This approach embeds the dependent asset into the resulting map object. But what if we wanted to use the same texture in multiple maps? In that case, we could change our member to be a ExternalReference<Texture2DContent> and use the context.BuildAsset<Texture2D>() method to build it. The benefit of this approach is that the texture is not embedded in the map’s xnb file, but rather gets its own file. That way the ContentProcessor only needs load its data once - it’s basically the flyweight pattern for external resources!
The other task our processor does is determine the source bounds for each of our four tiles - this code is directly taken from the earlier tilemap example’s Load() method.
As with our importer and content class we are also using an attribute - in this case [ContentProcessor]. It simply defines a name for the MonoGame Content Builder to display for the processor.
Using our newly-created custom pipeline in a game we are building is not terribly complicated, but does require some understanding of how projects in Visual Studio interact. Perhaps most important to this is understanding that the Content.mgcb file in your game solution is actually another Visual Studio project! As such, it can reference other project, just like the C# projects you are used to. This can be done through the MGCB Editor. Just select the content project itself, and scroll down in the properties until you find the References value:
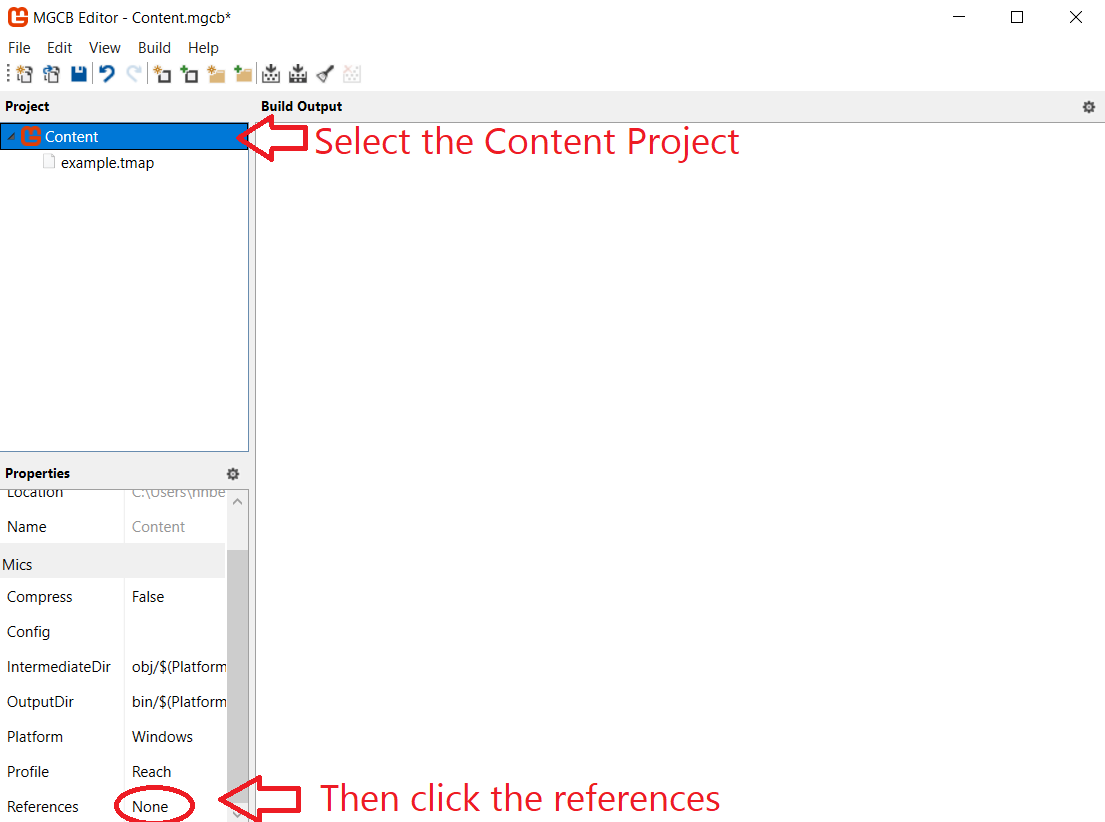
This opens a dialog you can use to add custom pipeline projects as references to your MGCB content project (in the form of .DLL files). Just browse to their location (and remember, they need to be inside your solution folder if you want them committed to your repository).
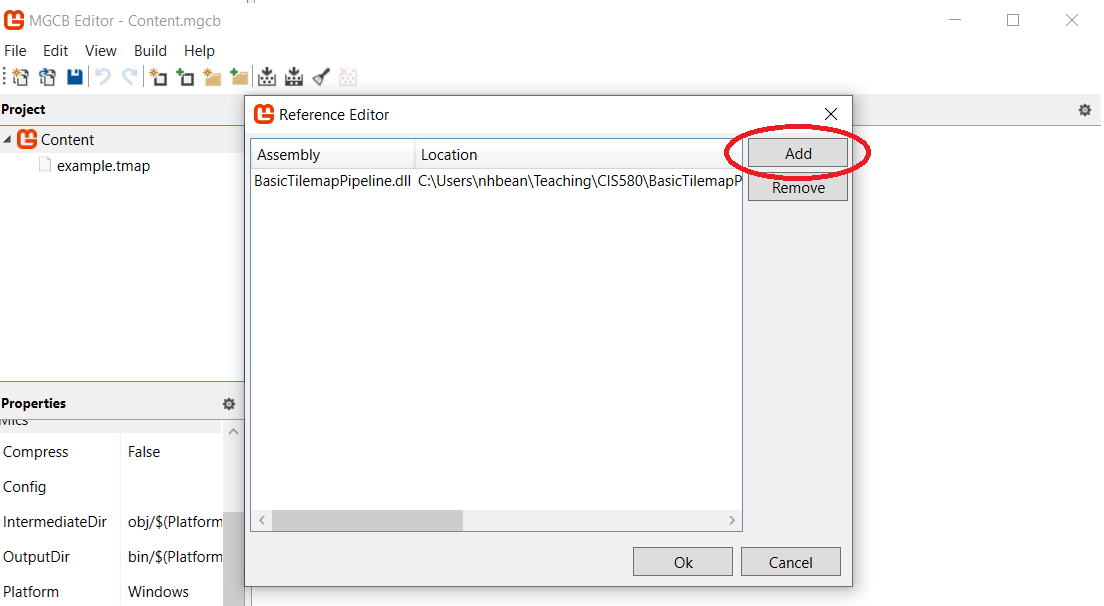
If your content pipeline project is in the same solution as your game project, you can browse to your content pipeline’s /bin folder to find it.
Alternatively you can set your content project as a dependency of your game project, which will ensure the custom pipeline project built and the DLL is copied into your game project’s /bin folder before the content project is built. This will keep everything up-to-date, but you don’t need the DLL to run your game (so your /bin folder is slightly bloated by this approach). This extra reference can be removed before releasing though, and it is often worth it to ensure changes to your custom pipeline are being applied in development.
You can also manually add the reference to your Content.mgcb file (it is just a text file, after all). The one for our example looks like:
#----------------------------- Global Properties ----------------------------#
/outputDir:bin/$(Platform)
/intermediateDir:obj/$(Platform)
/platform:Windows
/config:
/profile:Reach
/compress:False
#-------------------------------- References --------------------------------#
/reference:..\..\BasicTilemapPipeline\bin\Debug\net6.0\BasicTilemapPipeline.dll
#---------------------------------- Content ---------------------------------#
#begin example.tmap
/importer:BasicTilemapImporter
/processor:BasicTilemapProcessor
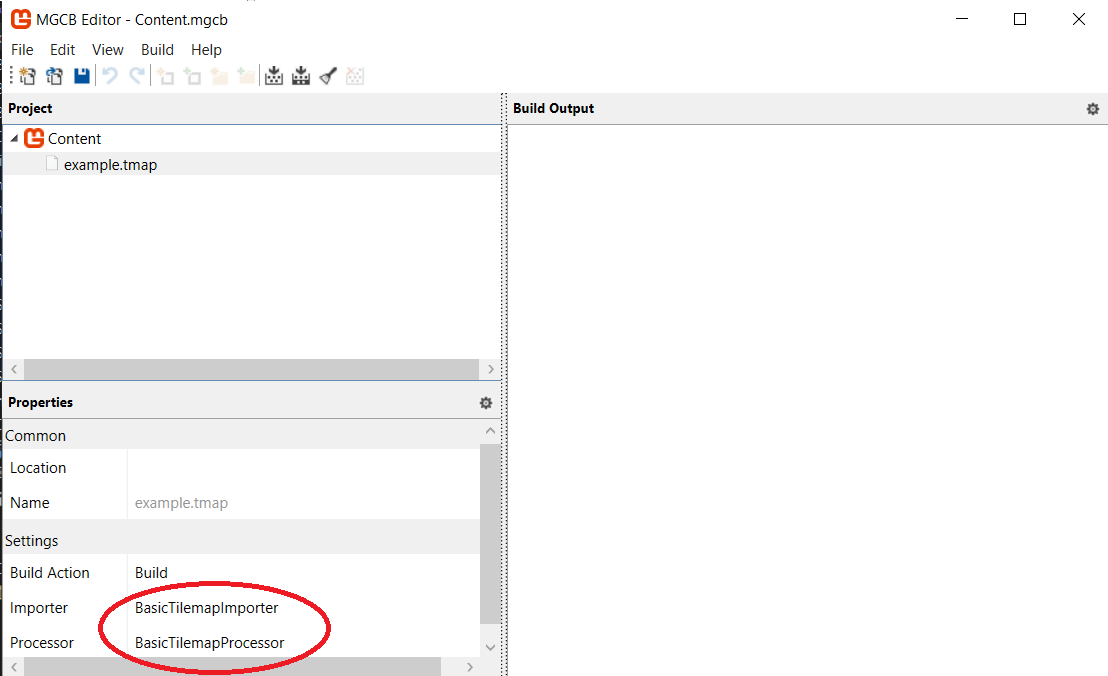
/build:example.tmapOnce the reference is added using any of these methods, you can add your .tmap file to the content project, and it should automatically select the BasicTilemapImporter and BasicTilemapProcessor (You can also manually specify it in the .mgcb project file as shown above):
Once added, you can build the project, and an example.xnb file will be built and deposited in the /bin/Content folder.
Using it in our game simply requires using Content.Load<BasicTilemap>("example.tmap") to load the tilemap into a variable, and invoking its Draw() method to render it.
You probably noticed that we supply a context object to both our importer and processor - a ContentImporterContext for the importer and a ContentProcessorContext for the processor.
They both contain a Logger property, which allows us to log messages during the build process of our assets. This is important, as we can’t use breakpoints in a content project. So instead, we often use context.Logger.LogMessage(), context.Logger.LogImportantMessage(), and context.Logger.LogWarning() to let us expose the inner workings of our context pipeline.
We also used the ContentProcessorContext to build an external reference - the texture. In addition to this important functionality, it also exposes a dictionary of parameters supplied to the content processor. Essentially, any public property will be exposed as a processor parameter. For example, if we add this to our processor class:
/// <summary>
/// Applies a scaling factor to tiles while processing the tilemap
/// </summary>
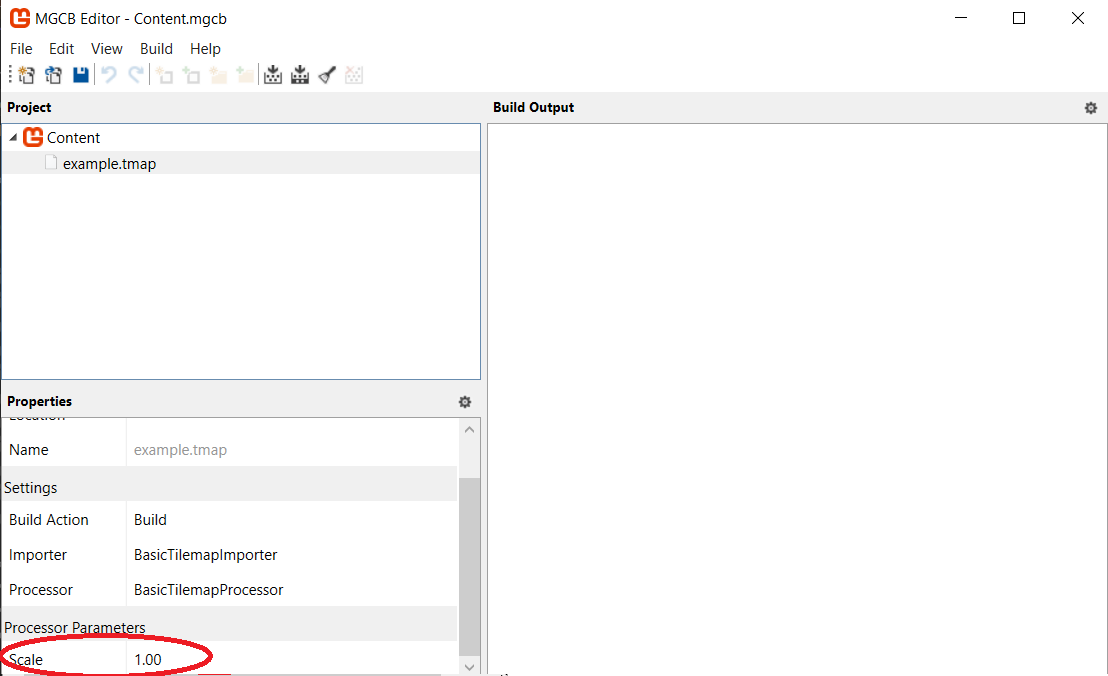
public float Scale { get; set; } = 1.0f;The Scale property will now appear in the MGCB Editor:
And, if we were to set it in the editor, the new value would be accessible in the processor, so we can use it in our Process() method. Here’s the revised processor:
namespace SimpleTilemapPipeline
{
    /// <summary>
    /// Processes a BasicTilemapContent object, building and linking the associated texture
    /// and setting up the tile information.
    /// </summary>
    [ContentProcessor(DisplayName = "BasicTilemapProcessor")]
    public class BasicTilemapProcessor : ContentProcessor<BasicTilemapContent, BasicTilemapContent>
    {
        /// <summary>
        /// A scaling parameter to make the tilemap bigger
        /// </summary>
        public float Scale { get; set; } = 1.0f;

        public override BasicTilemapContent Process(BasicTilemapContent map, ContentProcessorContext context)
        {
            // We need to build the tileset texture associated with this tilemap
            // This will create the binary texture file and link it to this tilemap so
            // they get loaded together by the ContentProcessor.
            //map.TilesetTexture = context.BuildAsset<Texture2DContent, Texture2DContent>(map.TilesetTexture, "Texture2DProcessor");
            map.TilesetTexture = context.BuildAndLoadAsset<TextureContent, Texture2DContent>(new ExternalReference<TextureContent>(map.TilesetImageFilename), "TextureProcessor");

            // Determine the number of rows and columns of tiles in the tileset texture
            int tilesetColumns = map.TilesetTexture.Mipmaps[0].Width / map.TileWidth;
            int tilesetRows = map.TilesetTexture.Mipmaps[0].Height / map.TileWidth;

            // We need to create the bounds for each tile in the tileset image
            // These will be stored in the tiles array
            map.Tiles = new Rectangle[tilesetColumns * tilesetRows];
            context.Logger.LogMessage($"{map.Tiles.Length} Total tiles");
            for(int y = 0; y < tilesetRows; y++)
            {
                for(int x = 0; x < tilesetColumns; x++)
                {
                    // The Tiles array provides the source rectangle for a tile
                    // within the tileset texture
                    map.Tiles[y * tilesetColumns + x] = new Rectangle(
                        x * map.TileWidth,
                        y * map.TileHeight,
                        map.TileWidth,
                        map.TileHeight
                        );
                }
            }

            // Now that we've created our source rectangles, we can
            // apply the scaling factor to the tile dimensions - this
            // will have us draw tiles at a different size than their source
            map.TileWidth = (int)(map.TileWidth * Scale);
            map.TileHeight = (int)(map.TileHeight * Scale);

            // Return the fully processed tilemap
            return map;
        }
    }
}In this chapter we explored the XNA Content Pipeline in more detail, and saw how to extend the pipeline with new custom importers and processors. We saw how these can offload preparing assets for inclusion in our game to the build step, rather than performing that work while running the game. We also saw how to add custom parameters to our content processors, allowing us to tweak how assets are prepared. Taken together, this is a powerful tool for getting assets into our game in and efficient and robust manner.