Models
Rendering Complex 3D Objects
Rendering Complex 3D Objects
With some experience building our own triangle meshes, let’s turn our attention to those that have been built for us by artists working with modeling software. These meshes are typically organized into a model - a collection of triangle meshes and transformations that collectively define a complex 3D shape.
Like our earlier examples, we’ll start from a starter project with our assets pre-loaded. In addition, we’ll include the ICamera interface and the CirclingCamera we created in the lesson on Lights and Cameras, and the Terrain class and IHeightMap interface from our exploration of Heightmap Terrain. It is also preloaded with public-domain content assets, including a heightmap from Wikimedia and a ground texture from arikel’s on OpenGameArt’s [Seamless Textures]https://opengameart.org/content/seamless-textures).
You can find the starter project here: https://github.com/ksu-cis/model-starter.
A model is a collection of the information that defines a 3D object. Rather than being hand-created or hard-coded (as we have done in our previous work), a model is usually created using 3D modeling software (i.e. Blender, 3D Studio, Maya, etc). Instead of exposing the raw data of the meshes, these software packages provide an abstraction, often based on real-world sculpting techniques or constructive geometry transformations that assist artists in creating complex three-dimensional shapes.
As programmers, our interaction with models typically begins with the data exported from one of these programs as a file. In our starter project’s Content folder, we have one of these files, tank.fbx. This particular format is text-based (not binary), so you can open it up in a text editor and look at its contents. There are 3388 lines in the file - definitely more than we want to write.
There are many possible file formats for storing models, and each may include different information in different ways. However, most will contain:
In addition, model files may contain alternative meshes to swap in and out (like different armors for a fantasy knight), and animations.
The XNA Framework provides a Model class that is an relatively basic implementation of the main features we just discussed (it captures points 1-4, but no animation data). As with most content files, it is instantiated through the content pipeline using the FBXImporter and ModelProcessor.
Unfortunately, the only file format directly supported by the core XNA Framework is the Autodesk FBX exchange format, and only the a handful of specific versions that were in existance when XNA was first created. This is not to say that you cannot write custom importers and/or processors to handle other file formats, but the FBX format remains the only one supported by the core MonoGame install.
Let’s try loading a model in our example game. We’ll need to add a Model field to our Game1 class:
    // A class representing our tank model
    Model tank;
Load the model in our Game1.LoadContent() method:
    // Create the tank
    tank = Content.Load<Model>("tank");
And render it in our Game1.Draw() method:
    // Draw the tank
    tank.Draw(Matrix.Identity, camera.View, camera.Projection);
Note we need to provide a world, view, and projection matrix to the model to draw it.
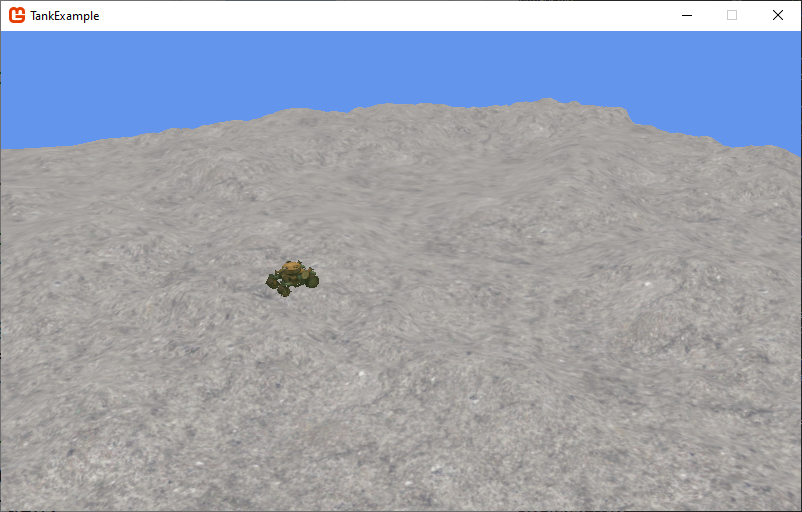
If we run the game now, you should see the tank on (actually a bit in) the terrain:

But, that is about the extent of the functionality offered to us by the Model class. Much like the Texture2D, it is simply providing us with the data from a content file in a more manageable format. But as with the Texture2D, we will only use that as a starting point for doing some really interesting things.
Let’s start that exploration by defining our own class to use this model.
Instead of using the Model class directly, let’s wrap it in our own custom class, Tank. As with many of our classes, let’s hold onto a Game reference. In addition, let’s have a reference to the Model of the tank, and its position and orentation in the world:
/// <summary>
/// A class representing a tank in the game
/// </summary>
public class Tank
{
    // The game this tank belongs to
    Game game;

    // The tank's model
    Model model;

    // The tank's position in the world
    Vector3 position = Vector3.Zero;

    // The direction the tank is facing
    float facing = 0;

}
We set the initial position to (0,0,0) and facing to 0. Alternatively, we could pass the intial values for these fields through the constructor.
As the last comments suggests, we’re going to allow our tank to move through the world. We might add a Speed property so our game can control how fast it moves:
    /// <summary>
    /// Gets or sets the speed of the tank
    /// </summary>
public float Speed { get; set; } = 0.1f;Constructing the tank is rather simple - just saving the Game instance and loading the model:
    /// <summary>
    /// Constructs a new Tank instance
    /// </summary>
    /// <param name="game">The game this tank belongs to</param>
    public Tank(Game game)
    {
        this.game = game;
        model = game.Content.Load<Model>("tank");
}In our update, let’s control our movement with the WASD keys. Let’s also assume the tank has a zero turning radius, so it can effectively spin in place. Accordingly, we’ll handle rotation and forward/backward movement separately.
    /// <summary>
    /// Updates the tank, moving it based on player input
    /// </summary>
    /// <param name="gameTime">The current GameTime</param>
    public void Update(GameTime gameTime)
    {
        var keyboard = Keyboard.GetState();

        // TODO: Forward/Backward Movement

        // TODO: Rotation Movement
}Before we can move forward or backward, we first need to determine just what direction that is. An easy way to do so is to rotate a unit vector facing forward by the facing angle:
var direction = Vector3.Transform(Vector3.Forward, Matrix.CreateRotationY(facing));We can then subtract this facing vector, multiplied by our speed, to the tank’s position when it is moving forward:
    if (keyboard.IsKeyDown(Keys.W))
    {
        position -= Speed * direction;
    }
And add it when we’re moving backward:
    if (keyboard.IsKeyDown(Keys.S))
    {
        position += Speed * direction;
}Rotation is even more straightforward; we’ll just add or subtract the speed from the facing angle, depending on which key is pressed:
    if(keyboard.IsKeyDown(Keys.A))
    {
        facing += Speed;
    }
    if(keyboard.IsKeyDown(Keys.D))
    {
        facing -= Speed;
}For now, we’ll stick with using the Model.Draw() method. We’ll need to supply it with the View and Projection matrices from our camera, and the World matrix will be determined by the facing angle and position vector:
    /// <summary>
    /// Draws the tank in the world
    /// </summary>
    /// <param name="camera">The camera used to render the world</param>
    public void Draw(ICamera camera)
    {
        Matrix world = Matrix.CreateRotationY(facing) * Matrix.CreateTranslation(position);

        Matrix view = camera.View;

        Matrix projection = camera.Projection;

        model.Draw(world, view, projection);
}Of course, to see our tank in action, we’ll need to refactor Game to use it. Change the tank field to have type Tank:
    // A class representing our tank model
    Tank tank;
Swap Content.Load<Model>("tank") for our constructor in the Game1.LoadContent() method:
    // Create the tank
    tank = new Tank(this);
We’ll need to add a call to Tank.Update() in our Game1.Update() method to process user input:
    // Update the tank
    tank.Update(gameTime);
And switch the arguments to Tank.Draw() in our Game1.Draw() method to the camera:
    // Draw the tank
    tank.Draw(Matrix.Identity, camera.View, camera.Projection);
If you run the game now, you should be able to drive your tank through the terrain. Quite literally through.
Rather than have our tank plow through the ground unrelistically, let’s get it to set on top of the terrain. To do so, we’ll need to have access to the terrain from within our Tank class. Let’s add a HeightMap property to it:
    /// <summary>
    /// Gets or sets the IHeightMap this tank is driving upon
    /// </summary>
    public IHeightMap HeightMap { get; set; }
We can then use the IHeightMap.GetHeightAt() method in our Tank.Update() to set the tank to the height of the terrain where it is currently at:
    // Set the tank's height based on the HeightMap
    if (HeightMap != null)
    {
        position.Y = HeightMap.GetHeightAt(position.X, position.Z);
    }
Of course, we don’t want to do this if the HeightMap property hasn’t been set.
That setting is accomplished in Game1.LoadContent, after we’ve created both the tank and the terrain:
tank.HeightMap = terrain;Now if you run the game, the tank rises and falls with the land it travels over:
Now that we can see our tank clearly, let’s see if we can’t get that turret to aim. Doing so requires us to explore the concept of skeletal animation. If you remember in our discussion of models, we said most models include both triangle meshes and bones. These “bones” are really just transformation matrices, which are applied to a specific mesh in the model. Often they also are arranged in a hierarchy, often referred to as a skeleton. The transformations represented by bones earlier in the hierarchy are concatenated with those lower to compute a final transformation to apply to that mesh.
In our tank, the turret bone is a child of the tank body. Thus, the turret is transformed by both by the bone of the tank body and the bone of the turret. Thus, if the tank body moves through the world, the turret comes along for the ride. Without using this hierarchical approach, we would have to calculate the turret transform based on where the tank currently is, a more challenging proposition.
To take advantage of skeletal animation, we’ll need to manage the transformations ourselves. We’ll start by declaring an array in the Tank class to hold them:
    // The bone transformation matrices of the tank
    Matrix[] transforms;
We’ll initialize this array in our constructor, after we’ve loaded the model:
transforms = new Matrix[model.Bones.Count];And in our Tank.Draw() method, we’ll apply the model’s transforms.
model.CopyAbsoluteBoneTransformsTo(transforms);This method walks down the skeleton, concatenating the parent transforms with those of the children bones. Thus, the transformation matrices in the transforms array after this point are the final transformation that will be applied to the mesh in question.
Then, instead of simply invoking model.draw(), we’ll iterate over each mesh, applying its bone transform manually:
    // draw the tank meshes
    foreach(ModelMesh mesh in model.Meshes)
    {
        foreach(BasicEffect effect in mesh.Effects)
        {
            effect.EnableDefaultLighting();
            effect.World = bones[mesh.ParentBone.Index] * world;
            effect.View = camera.View;
            effect.Projection = camera.Projection;
        }
        mesh.Draw();
    }
At this point, our tank will appear exactly as it did before. These nested loops are pretty much exactly the code that was invoked by model.draw(). But the default model.draw() does not perform the absolute bone transformation - instead it uses precalculated defaults. Thus, we must implement this double-loop if we want to use skeletal animation.
We can rotate the turret by applying a transformation to the bone corresponding to its mesh. This requires us to add some fields to our Tank class. First, a reference to the bone we want to transform:
    // The turret bone
    ModelBone turretBone;
We also need to know its original transformation, so let’s create a matrix to store that:
    // The original turret transformation
    Matrix turretTransform;
And we’ll also create an angle field to track the turret rotation:
    // The rotation angle of the turret
    float turretRotation = 0;
We still need to know the bone we want to transform. If we look through the tank.fbx file, we can find it is named “turret_geo”. The model.Bones property can be accessed with either an index, or a key string (like a dictionary).
Thus, after the model is loaded in the constructor we can get a reference to our bone from its name, and from that bone get its original transformation:
    // Set the turret fields
    turretBone = model.Bones["turret_geo"];
    turretTransform = turretBone.Transform;
Then in our Tank.Update(), let’s use the left and right arrow keys to rotate the turret.
    // rotate the turret
    if(keyboard.IsKeyDown(Keys.Left))
    {
        turretRotation -= Speed;
    }
    if(keyboard.IsKeyDown(Keys.Right))
    {
        turretRotation += Speed;
    }
Now in the Tank.Draw() method, we need to set the turretBone.Transform to include our rotation:
    // apply turret rotation
    turretBone.Transform = Matrix.CreateRotationY(turretRotation) * turretTransform;
Now if you run the game, you should be able to rotate the turret left and right with the arrow keys!
We can allow the player to tilt the canon barrel using the up and down keys in much the same fashion. We’ll start by adding corresponding fields to the Tank class: an angle of rotation, the canon bone, and default canon transform:
    // Barrel fields
    ModelBone canonBone;
    Matrix canonTransform;
    float canonRotation = 0;
And we can populate these in the constructor, once the model is loaded:
    // Set the canon fields
    canonBone = model.Bones["canon_geo"];
    canonTransform = canonBone.Transform;
In our Tank.Update(), we can increase or decrease the rotation much like we did with the turret:
    // Update the canon angle
    if(keyboard.IsKeyDown(Keys.Up))
    {
        canonRotation -= Speed;
    }
    if(keyboard.IsKeyDown(Keys.Down))
    {
        canonRotation += Speed;
    }
However, we probably don’t want an unlimited amount of rotation - or the cannon will rotate right through the turret and tank body! So let’s clamp the final value to a reasonable limit:
    // Limit canon rotation to a reasonable range
    canonRotation = MathHelper.Clamp(canonRotation, -MathHelper.PiOver4, 0);
Finally, we can add the canon rotation to the Tank.Draw() method:
canonBone.Transform = Matrix.CreateRotationX(canonRotation) * canonTransform;Now you can drive around the terrain, aiming your cannon wherever you like!
At this point, we have a pretty impressive tank, but it can be kind of difficult to see. Let’s implement a new kind of camera, which will stay close to the tank, and follow as it moves. Of course, to do so, we need to know where the tank is.
Let’s create an interface to declare the properties we would need to be able to follow an arbitrary game object - basically, its position in the world, and the direction it is facing:
public interface IFollowable
{
    /// <summary>
    /// The IFollowable's position in the world
    /// </summary>
    Vector3 Position { get; }

    /// <summary>
    /// The angle the IFollowable is facing, in radians
    /// </summary>
    float Facing { get; }
}
By creating this interface, we can have our camera follow not just the tank, but any class that implements the interface.
We’ll need to make our tank implement this interface:
public class Tank : IFollowable
{
    ...
And add the properties it requires. This boils down to just exposing existing private fields with a getter:
    /// <summary>
    /// The position of the tank in the world
    /// </summary>
    public Vector3 Position => position;

    /// <summary>
    /// The angle the tank is facing (in radians)
    /// </summary>
    public float Facing => facing;
Now our tank is ready to be followed. Let’s define our camera next.
Our ChaseCamera needs to implement the ICamera interface:
    /// <summary>
    /// A camera that chases an IFollowable
    /// </summary>
    public class ChaseCamera : ICamera
    {
    }
For fields, we’ll keep an instance of the Game we belong to, as well as private backing variables for the projection and view matrices:
    Game game;

    Matrix projection;

    Matrix view;
And for properties, we’ll need to implement the View and Projection properties of the ICamera interface. Plus, we’ll add a property for our IFollowable and an offset vector defining where the camera should be in relation to its target.
    /// <summary>
    /// The target this camera should follow
    /// </summary>
    public IFollowable Target { get; set; }

    /// <summary>
    /// The positon of the camera in relation to its target
    /// </summary>
    public Vector3 Offset { get; set; }

    /// <summary>
    /// The camera's view matrix
    /// </summary>
    public Matrix View => view;

    /// <summary>
    /// The camera's projection matrix
    /// </summary>
    public Matrix Projection => projection;
For the constructor, we’ll initialize the game and offset vector, as well as our matricies:
    /// <summary>
    /// Creates a new ChaseCamera
    /// </summary>
    /// <param name="game">The game this camera belongs to</param>
    /// <param name="offset">The offset the camera should maintian from its target</param>
    public ChaseCamera(Game game, Vector3 offset)
    {
        this.game = game;
        this.Offset = offset;
        this.projection = Matrix.CreatePerspectiveFieldOfView(
            MathHelper.PiOver4,
            game.GraphicsDevice.Viewport.AspectRatio,
            1,
            1000
        );
        this.view = Matrix.CreateLookAt(
            Vector3.Zero,
            offset,
            Vector3.Up
        );
    }
Finally, we’ll need an Update() method to move the camera into position each frame:
    /// <summary>
    /// Updates the camera, placing it relative to the target
    /// </summary>
    /// <param name="gameTime">The GameTime</param>
    public void Update(GameTime gameTime)
    {
        if (Target == null) return;

        // calculate the position of the camera
        var position = Target.Position + Vector3.Transform(Offset, Matrix.CreateRotationY(Target.Facing));

        this.view = Matrix.CreateLookAt(
            position,
            Target.Position,
            Vector3.Up
        );
    }
If we have no target, there’s no need to move the camera. But if there is, we calculate the camera by rotating the offset vector by the target’s facing, and adding it to the target’s position. We then create our LookAt matrix.
To use the new camera implementation, change the CirclingCamera camera property to a ChaseCamera:
    // The camera
    ChaseCamera camera;
And swap the camera constructor in Game1.LoadContent():
    // Create the camera
    camera = new ChaseCamera(this, new Vector3(0, 10, -30));
In the same method, after both the camera and tank have been created, set the tank as the camera’s target:
camera.Target = tank;The rest of the existing camera code (in the Update() and Draw() methods) doesn’t need changed.
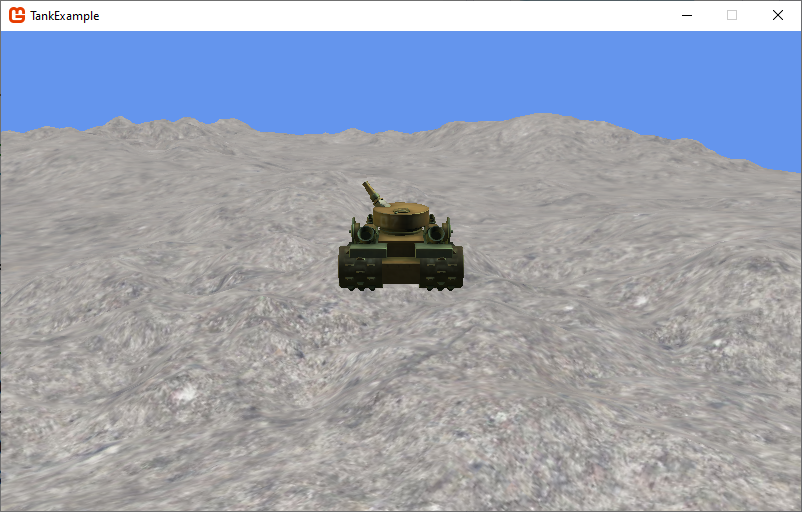
If you run the game now, you should see the backside of your tank:
Now that you have a closer view of your tank, you might want to make the individual wheels rotate. I’ll leave that as an exercise for the reader, but the bones you’d be interested in are “r_back_wheel_geo”, “l_back_wheel_geo”, “r_front_wheel_geo”, and “l_front_wheel_geo”. The front wheels are also set up to be rotated, using the “r_steer_geo” and “l_steer_geo” bones.
Clearly there is a lot more you could do just with the tank model. You can also “reskin” the tank by swapping out the texture it is using. You could add particle systems to each of those exhaust pipes on the rear of the tank. And, you could use the transformation matrix for the cannon to transform a forward vector into a projectile trajectory, to fire shells into the distance.
More importantly, you’ve seen the basics of how a model is loaded and used in XNA. While the current importer is limited, you could also write your own custom importer for other 3D model formats. As long as it is organized similarly, you could use the existing ModelContent as the target of your importer, and the existing ModelProcessor to convert the loaded data into an xnb file to be loaded as a Model. Or you could also develop your own model processor and possibly class as well.