Introduction to MonoGame
One Framework to Rule them All
One Framework to Rule them All
In this class we are using the MonoGame framework to build our game projects. MonoGame is an open-source, cross-platform framework built on C# and .NET. I like to use it for this course because it is truly a framework, not a game engine. Rather, it supplies tools that provides abstractions for some of the more technically challenging details of developing game software in a non-opinionated manner.
From the developer standpoint, there are several clear benefits:
MonoGame is the open-source descendant of Microsoft’s XNA. In fact, the first builds of MonoGame were direct ports of XNA, and MonoGame still uses the Microsoft.Xna namespaces. XNA was created by Microsoft to encourage indie and community game development for the Xbox 360, Windows PCs, and the Windows Phone. From the developer perspective, it was an extremely successful program; many classic games were developed using XNA, and the XBox 360 had a thriving marketplace for independent games. Moreover, if you owned an XBox 360, you could deploy your XNA game directly to it using only a network cable; effectively any XBox 360 could be used as a dev kit!
However, the Windows phone was not a market success, and as the XBox One neared development, Microsoft chose not to spend the resources necessary to adapt XNA to it, instead encouraging the indie developer community to adopt the Unity Game Engine. Eventually, Microsoft announced the official retirement of XNA related technologies on April 1, 2014.
MonoGame was one of several attempts to re-implement the XNA 4 API and provide a successor to the XNA platform. Thus it has most of the XNA functionality, plus a few additions. Moreover, it can be targeted at a wide range of platforms, though for this class we’ll stick with Windows.
You can find the documentation for MonoGame at https://docs.monogame.net/. This includes Articles discussing MonoGame and the published API.
See the Getting Started section for details on installing MonoGame and starting your first project.
MonoGame’s libraries are now loaded as a Nuget package, which means the first time you create a MonoGame app on your computer, it will need to download these packages. This happens automatically, but takes a moment. Until they finish downloading, your game will report that items in the Microsoft.XNA.Framework namespace cannot be found.
Additionally, MonoGame uses the dotnet mgcb command-line tool to build content. As Nuget downloads its packages under your user account, and Visual Studio places projects in your user account, this means your user account will be in the path to both. If your user folder has spaces in the name, i.e. “C:/Users/Bob Test”, the space will cause an error when the build process attempts to build the content. The only fix I am aware of for this is to create another user account that does not contain spaces, and run your builds from there.
At the heart of an XNA project is a class that inherits from Game. This class handles initializing the graphics device, manages components, and most importantly, implements the game loop.
As you saw in the Game Loop Chapter of Game Programming Patterns:
A game loop runs continuously during gameplay. Each turn of the loop, it processes user input without blocking, updates the game state, and renders the game. It tracks the passage of time to control the rate of gameplay.
This is precisely what the Game class implements for us - a loop that 1) processes user input, 2) updates the game state, and 3) renders the game.
As a MonoGame developer, you create a new class that inherits from Game (if you use one of the MonoGame templates, this class will probably be named Game1, but feel free to rename it). Then, you can write code to execute during steps 2 and 3 of the loop by overriding the virtual methods: Update(GameTime gameTime) and Draw(GameTime gameTime). These methods are invoked by Game each time it executes the game loop. In software engineering parlance, we call this kind of method a “hook,” as we can use it to pull new functionality into the existing class.
Time in the MonoGame framework is typically measured using System.TimeSpan struct. While this struct has many general uses, for games we almost totally rely on the TimeSpan.TotalSeconds property, which is a double representing the full length of time the TimeSpan represents as a double measured in seconds.
You probably noticed that both methods have a GameTime object as a parameter. This is a class used to store measurements of time in the game. It is basically a data object with three properties:
GameTime.ElapsedGameTime is a TimeSpan measuring the time that elapsed between this and the previous call to Update(GameTime). In other words, it is the time between passes in the game loop.GameTime.TotalGameTime is a TimeSpan measuring the total time since the game was started.IsRunningSlowly is a Boolean indicating that the game is lagging (more on this shortly)As you saw in the Game Programming Patterns, the game loop can be clamped (fixed), or run as fast as possible. MonoGame allows you to choose either strategy. You can specify the strategy you want by changing the Game.IsFixedTimeStep boolean property. When using a fixed time step, you can specify the desired time step (the time between game loop passes) by setting the Game.TargetElapsedTime property to a TimeSpan of the desired duration.
By default, MonoGame adopts the fixed update time step, variable rendering strategy from Game Programming Patterns. If a pass through the game loop takes too long, it skips rendering (the Game.Draw() is not invoked), and the TimeSpan provided to the Game.Update() method has its IsRunningSlowly property set to true. The game will continue to drop rendering frames until the Game.MaximumElapsedTime value is reached, at which point it will invoke Game.Draw(). 1
Setting the Game.IsFixedTimeStep property to false instead runs the game loop as fast as possible.
You might be wondering what timestep you should use. It’s a tricky question, but there are some easy parameters you can use to frame it:
Fast enough to provide the illusion of motion The human brain begins to translate quickly changing images to motion around 16 frames per second. That’s a timestep of $ 0.0625 $
At a multiple of 30 frames per second At least, in the Americas and parts of Asia televisions and monitors refresh at a multiple of 30, as AC power is delivered at 60 hertz cycles (other parts of the world use 50 hertz). Cheaper monitors run at 30 frames per second (a timestep of $ 0.03\overline{3333} $), while most modern monitors and televisions run at 60 frames per second (a timestep of $ 0.01\overline{6666} $) and high-end devices might run at 120 frames per second (a timestep of $ 0.008\overline{3333} $).
Slow enough your game doesn’t lag This speed will vary depending on the hardware in question. But if your game is consistently slow, you need to either increase the timestep or optimize your code.
By default, the Game.TargetElapsedTime is set to the refresh rate of your monitor - which in most cases will be the ideal rate (as drawing frames more often gives no benefit).
While MonoGame does support 3D rendering, we’re going to start with 2D games. When working in 2D, MonoGame uses a coordinate system similar to the screen coordinates you’ve seen in your earlier classes. The origin of the coordinate system $ (0, 0) $, is the upper-left corner of the game window’s client area, and the X-axis increases to the right and the Y-axis increases downward.
The part of the game world that appears on-screen is determined by the active viewport, represented by a Viewport struct - basically a rectangle plus a minimum and maximum depth. From the game class, the active viewport is normally reached with GraphicsDevice.Viewport. It defines the portion of the game world drawn on-screen with four measurements:
Viewport.X the farthest left range of the viewport along the X-axisViewport.Y the upper range of the viewport along the Y-axisViewport.Width the farthest right range of the viewport along the X-AxisViewport.Height the lower range of the viewport along the Y-axisYou can set the viewport to a subsection of the screen to render into only a portion of the screen - useful for split-screen games, radar systems, missile cameras etc. We’ll explore this technique in a later chapter.
In addition to these measurements, the Viewport class has a AspectRatio property which returns the aspect ratio (the width/height) of the window (or full screen). XNA was originally developed during the transition from the old 3:1 television standard to the newer 16:9 widescreen television resolution, so aspect ratio was an important consideration.
Along with this is the idea of a title safe region - a part of the screen that you could expect to be visible on any device (where titles and credits should be displayed, hence the name). Televisions often have a bit of overscan, where the edges of the displayed image are cut off. Further, if a 3:1 aspect ratio video is displayed on a 16:9 screen, and the player doesn’t want to have black bars on the left and right edges of the screen, one of the possible settings will scale the image to fill the space, pushing the top and bottom of the scene into the overscan regions. Filling a 3:1 screen with a 16:9 image works similarly, except the sides are pushed into the overscan area.
Thus, the Viewport also has a TitleSafeArea which is a Rectangle defining the area that should always be shown on a television. It is a good idea to make sure that any UI elements the player needs to see fall within this region.
The window itself is exposed through the GameWindow class. There should ever only be one instance of the GameWindow class for a given game. It is created by the Game and assigned to the Game.Window property during initialization. It exposes properties for working with the window. For example, you can set your game title with:
Window.Title = "My Cool Game Title";This will update what Windows displays in the title bar of the window, as well as when hovering over the icon in the start bar, in the task manager, etc.
The GameWindow class handles much of the work of embedding the game within the host operating system. For example, when the game looses focus, the Window.Active property is false, and the game loop stops updating (effectively pausing the game).
You shouldn’t need to use most of its properties.
If you want to specify the size of the window for your game, you can do so by setting the BackBufferWidth and BackBufferHeight properties of the Graphics object. For example to set the window to 760 x 480, you would add the following code to the Game.Initialize() method (assuming you used the latest MonoGame project template):
    _graphics.PreferredBackBufferWidth = 760;
    _graphics.PreferredBackBufferHeight = 480;
    _graphics.ApplyChanges();
You can make the window any size you like - but if it is larger than your screen resolution, you won’t be able to see all of it. To make your game fullscreen and exactly the size of your monitor, use:
    _graphics.PreferredBackBufferWidth = GraphicsDevice.DisplayMode.Width;
    _graphics.PreferredBackBufferHeight = GraphicsDevice.DisplayMode.Height;
    _graphics.IsFullScreen = true;
_graphics.ApplyChanges();Be sure that you have a means to exit full screen before you run a game in debug mode! Otherwise, you may not be able to reach VisualStudio’s window to stop the debugger. The default template includes code to close the game window when ESC is pressed. Also, the default GameWindow configuration uses ALT+ F4 to close the window.
Before we actually move into the game loop, we need to initialize the game - load all of its needed parts and set all initial values. The MonoGame Game class provides two virtual hook methods for doing this: Game.Initialize() and Game.LoadContent().
You might be wondering why we have two methods, or asking why the constructor is not included in this count. These are all good questions. First, in the documentation we see that Initialize():
Initializes attached GameComponent instances and calls LoadContent().
And, if we look at the template-generated Game.Initialize() method:
protected override void Initialize()
{
    // TODO: Add your initialization logic here

    base.Initialize();
}
We can see that the Game.Initialize() is only invoked after our own initialization logic. Thus, it is largely a matter of controlling timing. We only want content (i.e. sounds, textures, etc.) to be loaded once the game is fully initialized.
This is largely because we are using the 3D hardware, which has its own RAM (video memory). Ideally, textures should be stored there for the fastest and most efficient rendering. So we want to delay loading our graphics until we have finished configuring the graphics device. Thus, we do any graphics card configuration in the Initialize() method, before invoking base.Initialize().
And why not the constructor? What if we want the player to be able to, upon losing, immediately restart the game? If our initialization logic is in Initialize(), we can simply re-invoke that method. We can’t re-construct the Game class though, as it is tied to the life of our application.
Finally, the Game.LoadContent() is invoked after both our Initialze() and the base.Initialize() methods have finished. This means the graphics card is fully initialized, and we can now transfer graphics assets into its memory.
Let’s look at a super-simple example demonstrating the game loop. We’ll have a ball that moves a bit each frame and bounces off the sides of the window.
First, we need to know the ball’s position and velocity. In a two-dimensional game, we would probably use a Vector2 Struct to represent these. We also need a Texture2D to be the image of the ball:
// The ball's information
private Vector2 _ballPosition;
private Vector2 _ballVelocity;
private Texture2D _ballTexture;
Add these lines to the top of the Game1 class definition, along with the other field declarations.
Then, in our Initialize() method, let’s center the ball on the screen:
    // Position the ball in the center of the screen
    _ballPosition.X = GraphicsDevice.Viewport.Width / 2;
    _ballPosition.Y = GraphicsDevice.Viewport.Height / 2;
We’ll also give it a random velocity:
    // Give the ball a random velocity
    System.Random rand = new System.Random();
    _ballVelocity.X = (float)rand.NextDouble();
    _ballVelocity.Y = (float)rand.NextDouble();
    _ballVelocity.Normalize();
    _ballVelocity *= 100;
For now we’ll use the System.Random class you are used to. For some game purposes, it is sufficient, though its randomness is not as random as we’ll need for some kinds of games. Also, note that because Random.NextDouble() returns a double, and Vector2 uses floats, we need to implicitly cast the result. Finally, Vector2.Normalize() will shorten our velocity vector to be of length $ 1 $, which the _ballVelocity *= 100; line scales up to a length of $ 100 $. Eventually this will mean our ball will be traveling 100 pixels per second.
As we said above, LoadContent() is where we load our assets. For now, we just need an image of a ball. However, getting this image into our game takes a bit of doing.
First, we need to find an image to use - a .jpeg, .gif, or .png will work fine. Feel free to use this one  .
.
Look in the Content folder of your solution explorer in Visual Studio. You should also notice a file, Content.mgcb in the same folder. This is a listing of all content to bring into the game. Go ahead and open it; it will look something like:

If instead of the editor program a text file is loaded in your VisualStudio instance, try right-click the file and choose “open with”. From the dialog, choose the mgcb-editor-wpf. If it is not listed, you may need to install it. From the command line:
> dotnet tool install --global dotnet-mgcb-editor
> mgcb-editor --register
Click the “Add Existing Item” toolbar button:

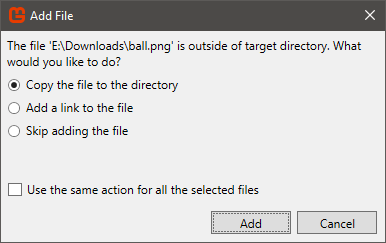
In the Open dialog that appears, select the ball image and click “Open”. Then in the next dialog, choose “Copy the file to the directory”:
Finally, save the .mgcb file:

Now the image will be built into a game-specific binary format as part of the build process. We’ll delve deeper into how this works in the chapter on the Content Pipeline.
To bring the ball texture into the game, we need to load it with a ContentManager class by invoking the ContentManager.Load<T>() method with the name of our content. The Game class has one already created and ready in the Game.Content property; we’ll use it:
_ballTexture = Content.Load<Texture2D>("ball");Add this line just below the #TODO: use this.Content to load your game content here line in the LoadContent() method.
Note that we use the filename (sans extension) to identify the content file to load, and that we also specify the type of object it should be loaded as (in this case, Texture2D).
At this point, if we were to run the game everything would be initialized. Now we need to handle updating and rendering the game world.
As we mentioned before, the virtual Game.Update(GameTime gameTime) method is a hook for adding your game’s logic. By overriding this method, and adding your own game logic code, you fulfill the update step of the game loop.
This is where you place the simulation code for your game - where the world the game is representing is updated. Here, all your actors (the parts of the game world that move and interact) are updated.
Note the GameTime parameter - it provides us with both the total time the game has been running, and the time that has elapsed between this and the previous step through the game loop (the frame). We can use this in our physics calculations.
So in our example, we want the ball to move around the screen, according to its velocity. If you remember your physics, the velocity is the change in position over time, i.e.:
$ \overrightarrow{p'} = \overrightarrow{p} + \overrightarrow{v} * t $We can express this in C# easily:
_ballPosition += _ballVelocity * (float)gameTime.ElapsedGameTime.TotalSeconds;Add this code to the Update() method, just below the // TODO statement. Note that MonoGame provides operator overrides for performing algebraic operations on Vector2 structs, which makes writing expressions involving vectors very much like the mathematical notation. Also, note again that we have to cast the double TotalSeconds into a float as we are loosing some precision in the operation.
Also, note that because we multiply the velocity by the elapsed time, it does not matter what our timestep is - the ball will always move at the same speed. Had we simply added the velocity to the position, a game running with a 60fps timestep would be twice as fast as one running at 30fps.
You may encounter advocates of using a hard-coded fixed time step to avoid calculations with elapsed time. While it is true this approach makes those calculations unnecessary (and thus, makes your code more efficient), you are trading off the ability of your game to adjust to different monitor refresh rates. In cases where your hardware is constant (i.e. the Nintendo Entertainment System), this was an easy choice. But with computer games, I would advocate for always calculating with the elapsed time.
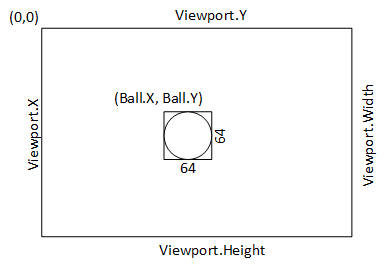
We need to handle when the ball moves off-screen. We said we wanted to make it bounce off the edges, which is pretty straightforward. First, we need to determine if the ball is moving off-screen. To know when this would happen, we need to know two things:
For 1, we have _ballPosition. Let’s assume this is the upper-right corner of the ball image. We’ll also need to factor in the size of the ball. The image linked above is 64 pixels, so I’ll assume that is the size of the ball we’re using. Feel free to change it to match your asset.
For 2, we can use GraphicsDevice.Viewport to get a rectangle defining the screen.
It can be very helpful to draw a diagram of this kind of setup before you try to derive the necessary calculations, i.e.:
To check if the ball is moving off the left of the screen, we could use an if statement:
if(_ballPosition.X < GraphicsDevice.Viewport.X) {
    // TODO: Bounce ball
}
We could then reverse the direction of the ball by multiplying its velocity in the horizontal plane by $ -1 $:
_ballVelocity.X *= -1;Moving off-screen to the right would be almost identical, so we could actually combine the two into a single if-statement:
    // Moving offscreen horizontally
    if (_ballPosition.X < GraphicsDevice.Viewport.X || _ballPosition.X > GraphicsDevice.Viewport.Width - 64)
    {
        _ballVelocity.X *= -1;
    }
Note that we need to shorten the width by 64 pixels to keep the ball on-screen.
The vertical bounce is almost identical:
    // Moving offscreen vertically
    if (_ballPosition.Y < GraphicsDevice.Viewport.Y || _ballPosition.Y > GraphicsDevice.Viewport.Height - 64)
    {
        _ballVelocity.Y *= -1;
}Our bounce here is not quite accurate, as the ball may have moved some pixels off-screen before we reverse the direction. In the worst case, it will go so far off-screen that it might be off-screen next frame as well (a problem exacberated by floating-point rounding error). When this happens the ball gets stuck, bounding back and forth off-screen as we change its direction each frame. But as long as our ball is traveling less than its dimensions each frame, we should be okay.
Other ways to solve this problem include moving the ball back to the position where it would have collided with the edge, or calculating how many pixels it moved off-screen and adding double that distance in the opposite direction.
Now we just need to draw our bouncy ball.
The Game.Draw(Game.Update(GameTime gameTime) method is a another hook, this one for adding your game’s rendering code. By overriding this method, and adding your own rendering code, you fulfill the draw step of the game loop.
MonoGame uses the graphics hardware to render the scene, along with double buffering. Thus, when we render, we are drawing into a back buffer, and once that drawing is complete, we flip the buffers so that the one we just finished is what ends up being rendered on-screen, and we now can start drawing into the next back buffer.
This is why we request a certain window size by setting Game.PreferredBackBufferWidth and Game.PreferredBackBufferHeight. It is an acknowledgement that we are working with the back buffer (all buffers end up this size). If our window’s client area is a different size, then the texture the back buffer contains is scaled to fit the client dimensions. If this is not the same aspect ratio, our game will appear squished in one dimension and stretched in the other.
This is why resizing the window is disabled by default in MonoGame. If you let the user resize the window, you’ll want to also adjust your buffers to compensate.
Our game is two-dimensional. Since MonoGame uses the 3D rendering hardware, this means we’re really pretending a 3D scene is two-dimensional. You might think of it as a bunch of cardboard cut-outs all facing the audience. To make life easier for us, MonoGame provides the SpriteBatch class to manage all of those cut-outs.
We’ll dig deeper into how it works in a later chapter. But for now, know that we can render any number of images on-screen by invoking SpriteBatch.Draw() between a SpriteBatch.Begin() and a SpriteBatch.End() invocation.
For our simple ball, this breaks down to:
    _spriteBatch.Begin();
    _spriteBatch.Draw(_ballTexture, _ballPosition, Color.White);
    _spriteBatch.End();
Effectively, we’re saying we want to draw our texture _ballTexture at _ballPosition, and apply a white color to the image (i.e. leave it the color it already is).
This should be placed after the // TODO in the Base We're going to be rendering with the SpriteBatch` class.
That wraps up our simple exercise. You should be able to run the game now, and see the ball bounce around the screen.
In this chapter we looked at how MonoGame implements the Game Loop pattern within its Game class. We also saw how the Game class interacts with the GameWindow class, which provides an abstraction of the operating system’s window representation. We saw how we can add our own custom code into the MonoGame game loop by overriding the Game.Update() and Game.Draw() methods, as well as the overriding Game.Initialize() and Game.LoadContent() to set up the game world.
We briefly explored ideas about performing physics calculations within that game world, as well as representing position and velocity of game actors with Vector2 objects. We also touched on how MonoGame renders 2D games with 3D hardware, and used a SpriteBatch instance to render a Texture2D to the screen. Finally, we animated a bouncing ball using all of these ideas. The one aspect of the game loop we did not cover though, is input, which we’ll take a look at in the next chapter.