Attributes
Of course, our classes are not very useful at this point because they don’t include any attributes or methods. Including attributes in a class is one of the simplest uses of classes, so let’s start there.
Adding Attributes
To add an attribute to a class, we can simply declare a variable inside of our class declaration:
public class Student{
  String name;
  int age;
  String student_id;
  int credits;
  double gpa;
}
That’s really all there is to it! We can also add default values to these attributes by assigning a value to the variable in the same line as the declaration:
public class Student{
  String name = "name";
  int age = 19;
  String student_id = "123456987";
  int credits = 0;
  double gpa= 0.0;
}
However, it is very important to note that we cannot declare an attribute and then set the default value on a separate line. So, code such as this is not allowed:
public class Student{
  String name;
  name = "test";
}
If we try to compile that code, we’ll get the following error:
java/school/Student.java:3: error: <identifier> expected
  name = "test";
      ^
1 error
This is because the code inside of a class declaration that is outside of any method is not directly executed. Instead, it defines the structure of the class only. So, the line name = "test"; makes no sense to the compiler, because it is only expecting variable or function declarations, not executable code such as variable assignments.
Finally, we can add the public keyword to the beginning of each of these attributes to make them available to code outside of this class:
public class Student{
  public String name = "name";
  public int age = 19;
  public String student_id = "123456987";
  public int credits = 0;
  public double gpa= 0.0;
}
We’ll see how to access and use these attributes later in this chapter. In addition, we’ll discuss other keywords we can place in front of these attributes to make them more secure.
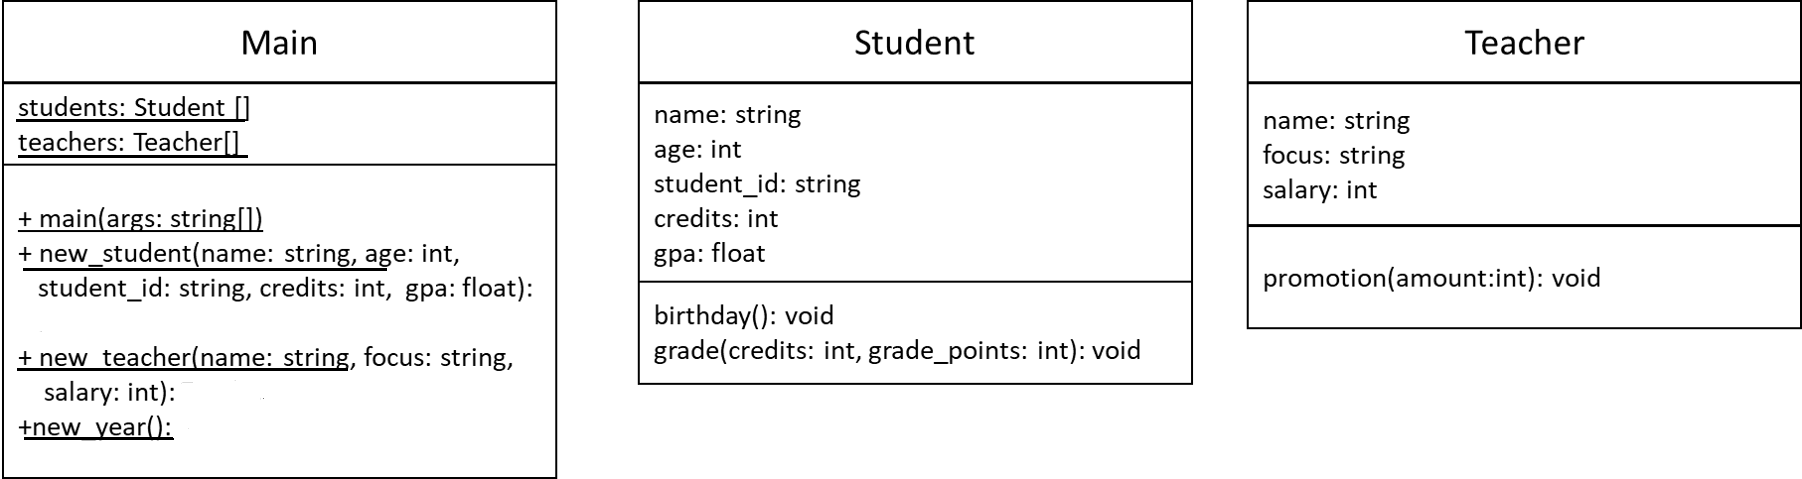
For now, let’s go ahead and add the correct attributes to the Student.java, Teacher.java and Main.java files. Feel free to refer to the UML diagram below to find the correct attributes for each class. We can choose to add default values if we’d like to, but we won’t be able to add values to the arrays in Main.java yet, so we can just declare them for now.
At this point, if we try to compile Main.java all by itself, we’ll get error messages like the following:
java/school/Main.java:2: error: cannot find symbol
  public Student[] students;
         ^
  symbol:   class Student
  location: class Main
java/school/Main.java:3: error: cannot find symbol
  public Teacher[] teachers;
         ^
  symbol:   class Teacher
  location: class Main
2 errors
This is because the compiler doesn’t know where to find the Student and Teacher classes. So, we’ll need to include all three classes in the same compiler command in order to compile Main.java. The graded assessments do this for you automatically, but if you want to test your code, you’ll need to compile those files manually. Unfortunately, the buttons at the top of the window in Codio are not as well suited to this use.
To do so, simply open the terminal, then change the current directory to where your files are stored. Finally, use the javac command, followed by all of the files that you want to compile. Here’s an example of what these commands would look like for this exercise:
cd java/school
javac Student.java Teacher.java Main.java
As a shortcut, if you’d like to compile all the .java source files in that directory, you can also use the command javac *.java as the second step.