A Worked Example
Now that we’ve learned all about how to make our own classes and objects, we can practice our skills by building an example program together. This will be a larger program than many of the programs we’ve worked with so far, but hopefully it will actually be easier to follow since the code is separated into several classes.
Problem Statement
For this example, we’ll build a program to play a version of the game of Blackjack, also known as Twenty-One. The rules of this simplified game are fairly straightforward:
- The game consists of a single player playing against the dealer, played by our program in this example.
- Each player is initially dealt two cards from a standard 52 card deck. Each card’s value is its face value, with face cards valued 10 and aces valued 11.
- The object of the game is to get a higher total value than the other player, without going over 21.
- The game consists of several steps:
- Both the player and the dealer review the two cards they are dealt. Both the player and the dealer can see the opponent’s hand as well.
- The player is given the option to draw additional cards. The player may continue to draw cards until she or he chooses to stop, or their total value is greater than 21.
- If the player stops before going over 21, the dealer must draw cards to try to beat the player. The dealer stops drawing cards when the dealer’s total beats the player’s or exceeds 21.
- At the end, the participant with the greatest card value that is less than or equal to 21 wins the game. If it is a tie, the dealer wins. As you may be able to tell, this game differs a bit from the rules of traditional Blackjack. Those changes mainly help to simplify the program a bit, so we can focus on the structure of the classes we need to build instead of on the rules.
You can find the full rules to Blackjack on Wikipedia.
Program Structure
In order to build this program, we’ll need to implement several classes to represent the objects needed for the game. For now, we’ll follow this UML diagram to help guide the design of this program. In later chapters, you’ll learn the skills needed to design your own program structures from scratch, but when learning to program it is sometimes easier to first read different program structures before writing your own.
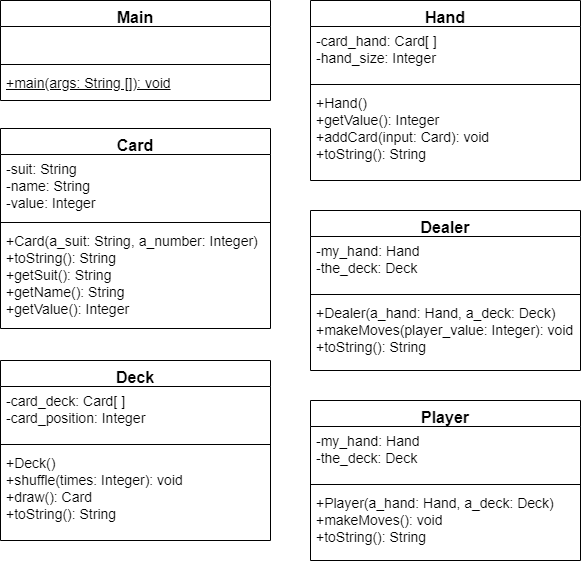
This program will contain several classes:
- Card—This class represents a single card in a deck, containing a suit and a value.
- Deck—This class represents the entire deck of cards, consisting of 52 cards.
- Hand—This class represents a single player’s hand of cards from the deck.
- Dealer—This class implements the dealer’s actions.
- Player—This class implements the player’s actions.
- Main—This class controls the program and contains the
main()function.
To build this program, we’ll address each class individually. That allows us to build the program one piece at a time, and allows us to test it at each step to make sure it is working correctly.
Card Class
The first and simplest class we can build is the Card class. This class represents a single card from a deck of cards, and contains the suit, name, and value attributes. Since we don’t want those values to be edited outside of this class, we can use private attributes paired with getter methods for them. For the value, we’ll use an integer to make the rest of the program simpler.
public class Card{
  //Attributes
  private String suit;
  private String name;
  private int value;

  //Getters
  public String getSuit(){ return suit; }
  public String getName(){ return name; }
  public int getValue(){ return value; }
}
In this code, notice that we can actually write our simple getter methods as a single line of code. While this may violate some code formatting practices, it may also be easier to read and minimize the number of lines in our file. We’ll use this format here to save space.
We’ll also need to create a simple constructor for this class. It can accept a suit and a card number as input, and then populate the attributes as needed:
public class Card{
  //Attributes
  private String suit;
  private String name;
  private int value;

  //Getters
  public String getSuit(){ return suit; }
  public String getName(){ return name; }
  public int getValue(){ return value; }

  public Card(String a_suit, int a_number){
    this.suit = a_suit;
    if(a_number == 1){
      this.name = "Ace";
      this.value = 11;
    }else if (a_number == 11){
      this.name = "Jack";
      this.value = 10;
    }else if (a_number == 12){
      this.name = "Queen";
      this.value = 10;
    }else if (a_number == 13){
      this.name = "King";
      this.value = 10;
    }else{
      this.name = a_number + "";
      this.value = a_number;
    }
  }
}
Finally, we can add some additional code to our constructor to validate the supplied parameter arguments, just to avoid any unforeseen errors. In this case, we’ll make sure that the suits and numbers provided are all valid values:
import java.lang.IllegalArgumentException;

public class Card{
  //Attributes
  private String suit;
  private String name;
  private int value;

  //Getters
  public String getSuit(){ return suit; }
  public String getName(){ return name; }
  public int getValue(){ return value; }

  public Card(String a_suit, int a_number){
    if(!(a_suit.equals("Spades") || a_suit.equals("Hearts") || a_suit.equals("Clubs") || a_suit.equals("Diamonds"))){
      throw new IllegalArgumentException("The suit must be one of Spades, Hearts, Clubs, or Diamonds");
    }
    if(a_number < 1 || a_number > 13){
      throw new IllegalArgumentException("The card number must be an integer between 1 and 13, inclusive");
    }
    this.suit = a_suit;
    if(a_number == 1){
      this.name = "Ace";
      this.value = 11;
    }else if (a_number == 11){
      this.name = "Jack";
      this.value = 10;
    }else if (a_number == 12){
      this.name = "Queen";
      this.value = 10;
    }else if (a_number == 13){
      this.name = "King";
      this.value = 10;
    }else{
      this.name = a_number + "";
      this.value = a_number;
    }
  }
}
To do this, we’ve added a couple of If-Then statements to the constructor that can throw Exceptions if the inputs are invalid.
Finally, to make debugging our programs very simple, we’ll add a special method, toString() to this class. The toString() method is actually a part of every class in Java because of inheritance, something we’ll learn more about in a later chapter. For now, we can add that method as shown below:
import java.lang.IllegalArgumentException;

public class Card{
  //Attributes
  private String suit;
  private String name;
  private int value;

  //Getters
  public String getSuit(){ return suit; }
  public String getName(){ return name; }
  public int getValue(){ return value; }

  // constructor omitted here //

  @Override
  public String toString(){
    return this.name + " of " + this.suit;
  }
}
Above the toString() method, we have to include the @Override method decorator. This let’s Java know that we are replacing the existing toString() method with our own version. Again, we’ll learn more about what this means in a later chapter, but for now, it will be very useful as we build our program!
That should complete the Card class! The assessments below will confirm that the code structure and functionality is correct before moving on.
Deck Class
Next, we’ll need a class that can represent an entire deck of cards. This class will contain an array of cards, as well as some helpful methods we can use to shuffle the deck and deal individual cards.
First, we’ll need to add a private array to represent a deck of cards:
public class Deck{

  private Card[] card_deck;

}
In this class, we won’t include any getters or setters for the deck of cards itself because our program shouldn’t be able to change the deck in any way. In the constructor, however, we’ll include the code to create our deck of cards:
public class Deck{

  private Card[] card_deck;

  public Deck(){
    this.card_deck = new Card[52];
    String[] suits = {"Spades", "Hearts", "Diamonds", "Clubs"};
    int card_number = 0;
    for(String suit : suits){
      for(int i = 1; i <= 13; i++){
        this.card_deck[card_number] = new Card(suit, i);
        card_number++;
      }
    }
  }

}
Hopefully that code is pretty straightforward. It creates a new array of 52 cards, then an array of Strings representing the suits. It also uses the card_number variable to keep track of the position of the last card added to the deck. Finally, we have two For loops to go through each suit and each card number from 1 to 13, creating the full deck of 52 cards.
Next, we can add a method to print out the entire deck of cards. Once again, we’ll just override the toString() method:
public class Deck{

  private Card[] card_deck;

  public Deck(){
    this.card_deck = new Card[52];
    String[] suits = {"Spades", "Hearts", "Diamonds", "Clubs"};
    int card_number = 0;
    for(String suit : suits){
      for(int i = 1; i <= 13; i++){
        this.card_deck[card_number] = new Card(suit, i);
        card_number++;
      }
    }
  }

  @Override
  public String toString(){
    String output = "";
    for(Card a_card : this.card_deck){
      output += a_card.toString() + "\n";
    }
    return output;
  }
}
At this point, let’s test it out! That’s one of the most important steps in writing programs like this one—we’ll want to test each little bit of the program and see how it works.
So, we can add the following code to our Main class for testing:
public class Main{

  public static void main(String[] args){
    Deck a_deck = new Deck();
    System.out.println(a_deck.toString());
  }
}
Then, we can compile and run that code using these commands in the terminal:
cd java/example
javac Main.java Card.java Deck.java
java Main
When we run those commands, we should see output similar to this:
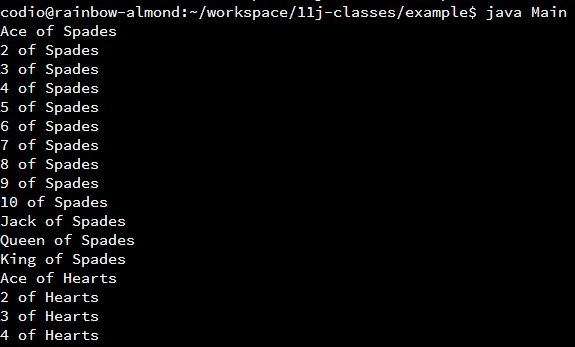
As we can see, we are creating a full deck of cards, but they aren’t in a random order. While we could just implement a method to draw cards randomly from the deck, it might be just as useful to implement a method to shuffle the deck. So, let’s do that now!
import java.util.Random;
import java.lang.IllegalArgumentException;

public class Deck{

  private Card[] card_deck;

  // other methods omitted here //

  public void shuffle(int times){
    if(times <= 0){
      throw new IllegalArgumentException("The deck must be shuffled a positive number of times");
    }
    Random rando = new Random();
    for(int i = 0; i < times; i++){
      int first = rando.nextInt(52);  // get a number [0...51]
      int second = rando.nextInt(52); // get a number [0...51]
      if(first != second){  // swap first and second cards
        Card temp = this.card_deck[first];
        this.card_deck[first] = this.card_deck[second];
        this.card_deck[second] = temp;
      }
    }
  }
}
This is a very simple shuffle method, which simply gets two random numbers using the java.util.Random class. Then, it will swap the cards in the deck at those two locations. It is slow and simple, but thankfully a computer can do thousands of those operations in a few milliseconds, so it works just fine for our needs.
Now, we can update the code in our main() function to see that it is working correctly:
public class Main{
public static void main(String[] args){
Deck a_deck = new Deck();
a_deck.shuffle(1000);
System.out.println(a_deck.toString());
}
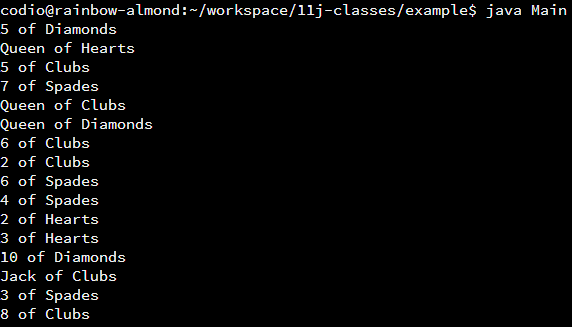
}That should produce a random deck, as shown in this screenshot:
Finally, we can add a method to deal a card from the deck to a player. To do this, we’ll add another private attribute to keep track of the position we are dealing from in the deck. Then, we can return the appropriate card from our method.
import java.util.Random;
import java.lang.IllegalArgumentException;

public class Deck{

  private Card[] card_deck;
  private int card_position;

  // other methods omitted here //

  public Deck(){
    // other constructor code omitted here //
    this.card_position = 0;
  }

  public Card draw(){
    Card output = this.card_deck[this.card_position];
    this.card_position++;
    return output;
  }
}
There we go! This method will simply return the front-most card from the deck that hasn’t already been used. We aren’t actually removing the cards from the list, but rather just incrementing a variable keeping track of the position in the list to remember which cards we’ve already dealt.
That should complete the Deck class! The assessments below will confirm that the code structure and functionality is correct before moving on.
Hand Class
Next, we can create a simple class that represents a hand of cards. So, it will need an array of Card objects just like the Deck class. Since we don’t know how many cards would be in the largest hand, we’ll just use 52 as the size of this array as well. In a later chapter, we’ll learn about resizable arrays and other data structures so that we don’t have to worry about having enough room to store our data in a statically-sized array.
To start, we can create our array of cards and a constructor, as well as an integer to keep track of how many cards we have in our hand:
public class Hand{

  private Card[] card_hand;
  private int hand_size;

  public Hand(){
    this.card_hand = new Card[52];
    this.hand_size = 0;
  }
}
Then, we can also create a getValue() method to return the value in our hand, as well as a toString() method to print out the contents of our hand:
public class Hand{

  private Card[] card_hand;
  private int hand_size;

  public Hand(){
    this.card_hand = new Card[52];
    this.hand_size = 0;
  }

  public int getValue(){
    int value = 0;
    for(int i = 0; i < this.hand_size; i++){
      value += this.card_hand[i].getValue();
    }
    return value;
  }

  @Override
  public String toString(){
    String output = "";
    for(int i = 0; i < this.hand_size; i++){
      output += this.card_hand[i].toString() + "\n";
    }
    return output;
  }
}
These methods are very similar to each other. In essence, we use a For loop to loop through the cards in our hand, and then either sum up the values or get the string representation of each card. Notice that we are using a For loop with an iterator variable that goes from 0 to the number of cards in the hand, instead of using an Enhanced For loop. This is because the array itself will probably never be completely full, so we only want to print out the cards that we are actually using in our hand.
Lastly, we need to create a method that allows us to add a card to our hand. So, we can implement the addCard() method as well:
public class Hand{

  private Card[] card_hand;
  private int hand_size;

  // other methods omitted here //

  public void addCard(Card input){
    this.card_hand[this.hand_size] = input;
    this.hand_size++;
  }
}
That should do it for the Hand class. The assessments below will confirm that the code structure and functionality is correct before moving on.
Dealer Class
Now that we have implemented the classes needed to keep track of the cards, we can create the classes that will actually perform the actions for each player. First, we can implement the code for the Dealer class. This class is actually pretty simple, since it will only consist of a couple of methods: makeMoves(), which will perform all the actions needed for the dealer, and a toString() method to print the contents of the dealer’s hand. In addition, the dealer will need an attribute to store a hand, which can be populated in the constructor by a parameter:
public class Dealer{

  private Hand my_hand;

  public Dealer(Hand a_hand){
    this.my_hand = a_hand;
  }

  public void makeMoves(int player_value){
    while(my_hand.getValue() < player_value && my_hand.getValue() <= 21){
      // we need to draw a card here!
    }
  }

  @Override
  public String toString(){
    String output = "The dealer currently holds: \n";
    output += this.my_hand.toString();
    output += "for a total of " + this.my_hand.getValue();
    return output;
  }
}
At this point, we notice a flaw in our design! The Dealer class needs to be able to draw a card from the deck, but we’ve provided no way for it to do so. In addition, we’ll need to do the same thing for our Player class as well. So, how can we accomplish this?
Option 1: Make Deck Static
One way we can accomplish this is to make the methods in our Deck class static. In this way, we can access them from anywhere in the program, even without having access to a Deck object. For this, we’d modify our Deck class to look similar to this:
import java.util.Random;
import java.lang.IllegalArgumentException;

public class Deck{

  // card_deck and card_position now static variables
  private static Card[] card_deck;
  private int card_position;

  // Constructor changed to static `init` function
  // `this` keyword removed
  public static void init{
    card_deck = new Card[52];
    String[] suits = {"Spades", "Hearts", "Diamonds", "Clubs"};
    int card_number = 0;
    for(String suit : suits){
      for(int i = 1; i <= 13; i++){
        card_deck[card_number] = new Card(suit, i);
        card_number++;
      }
    }
    card_position = 0;
  }

  // shuffle is now static
  public static void shuffle(int times){
    // same code with `this` removed
  }

  // draw is now static
  public static Card draw(){
    // same code with `this` removed
  }


  // toString now renamed to getString and made static
  // since toString cannot be static
  // removed `@Override` since it is no longer the same name
  public static String getString(){
    // same code with `this` removed
  }
}
In the code above, all of the methods and instance attributes are now static. In addition, the constructor was renamed to init() since we won’t actually be using the constructor to build an object. Finally, we also have to rename the toString() method to getString() since the toString() method cannot be static. We’ll see why that would be a problem in a later chapter as we learn about method inheritance.
Then, once we’ve made that choice, we can draw a new card from the deck in our code anywhere simply by using the Deck.draw() method.
This approach has several advantages and disadvantages. It requires very few changes in our code, and once the Deck class is modified, we can use the methods from that class anywhere in our code, which can be very helpful.
Unfortunately, the major downside of this approach is that we can now only have a single deck of cards in our entire game. For most games, that won’t be an issue, but it could be a limitation in other programs. In addition, as we may learn in a later class, there are some standard ways to accomplish this, such as the singleton design pattern, that are more familiar to developers.
So, for this example, we won’t be using a Deck class that contains entirely static methods and attributes.
Option 2: Pass Deck Object to Dealer Class
The second way this could be handled is to create an object from the Deck class in our Main class, then pass that object as a parameter to the constructor for the Dealer object. In that way, the dealer has a reference to the deck that is stored in our main class (recall that all objects are handled in a call by reference manner).
So, we can update the constructor for our Dealer class to accept a Deck object, and then we’ll store it as a private variable in the class:
public class Dealer{

  private Hand my_hand;
  private Deck the_deck;

  public Dealer(Hand a_hand, Deck a_deck){
    this.my_hand = a_hand;
    this.the_deck = a_deck;
  }

  public void makeMoves(int player_value){
    while(my_hand.getValue() < player_value && my_hand.getValue() <= 21){
      // now we can draw our own cards
      Card new_card = this.the_deck.draw();
      System.out.println("The dealer draws a " + new_card.toString());
      this.my_hand.addCard(new_card);
    }
  }

  // other methods omitted here
}
Then we can place this code in our Main class:
public class Main{

  public static void main(String[] args){
    Deck the_deck = new Deck();
    the_deck.shuffle(1000);
    Hand dealer_hand = new Hand();
    dealer_hand.addCard(the_deck.draw());
    dealer_hand.addCard(the_deck.draw());
    Dealer a_dealer = new Dealer(dealer_hand, the_deck);
    System.out.println(a_dealer);
  }
}
With this code, we are instantiating a single Deck object in our Main class, then passing it as a reference to the Dealer class when we instantiate it. This gives the Dealer class a reference to the deck that we are using, allowing it to draw cards as needed.
This approach also has several pros and cons. First, we don’t have to modify our Deck class at all, meaning that it can remain a simple object. Instead, we are modifying how we use it by including a reference to it in our other classes. This is a more standard approach for programs written in an object-oriented style, in Java and other languages.
As a downside, this does mean that we’ll have to make sure our other classes all are given a reference to a Deck object. In larger programs, handling all of these object references can become very cumbersome and time-consuming. Again, in a future course we can learn about design patterns that help simplify this process, too.
We’ll use this approach in our example program here.
That should complete the Dealer class! The assessments below will confirm that the code structure and functionality is correct before moving on.
Player Class
The player class is nearly identical to the Dealer class. The only difference is that the player class will ask the player to decide whether to draw more cards. In addition, the player may draw until their value is greater than 21, without regard to the score from the dealer. This is the one interactive part of the entire program:
import java.util.Scanner;

public class Player{

  private Hand my_hand;
  private Deck the_deck;

  public Player(Hand a_hand, Deck a_deck){
    this.my_hand = a_hand;
    this.the_deck = a_deck;
  }

  public void makeMoves(){
    try(Scanner reader = new Scanner(System.in)){
      while(my_hand.getValue() <= 21){
        System.out.println("You currently have a value of " + this.my_hand.getValue());
        System.out.print("Would you like to draw another card (y/n)?: ");
        String input = reader.nextLine().trim();
        if(input.equals("y") || input.equals("Y")){
          Card new_card = this.the_deck.draw();
          System.out.println("You draw a " + new_card.toString());
          this.my_hand.addCard(new_card);
        }else if (input.equals("n") || input.equals("N")){
          break;
        }else{
          System.out.println("Invalid input!");
        }
      }
      System.out.println("You end your turn with a value of " + this.my_hand.getValue());
    }catch(Exception e){
      System.out.println("An exception occurred!\n" + e);
      return;
    }
  }

  @Override
  public String toString(){
    String output = "The player currently holds: \n";
    output += this.my_hand.toString();
    output += "for a total of " + this.my_hand.getValue();
    return output;
  }
}
As we can see in the makeMoves() method, we’ve simply added the code to create a Scanner object to handle user input. THen, we can ask the user at each step whether they would like to draw another card.
That should complete the Player class! The assessments below will confirm that the code structure is correct before moving on. We won’t worry about testing the functionality here, since that is really best done by a live player!
Main Class
Finally, we can work on implementing our Main class. This class is very simple, only containing the main() method for the program. The main method will set up the deck and deal a hand for each player, then allow both the player and the dealer to make moves before finally getting the result to see who wins:
public class Main{

  public static void main(String[] args){
    Deck the_deck = new Deck();

    System.out.println("Shuffling the deck...");
    the_deck.shuffle(1000);

    System.out.println("Dealing the player's hand...");
    Hand player_hand = new Hand();
    player_hand.addCard(the_deck.draw());
    player_hand.addCard(the_deck.draw());
    Player a_player = new Player(player_hand, the_deck);
    System.out.println(a_player.toString());

    System.out.println("Dealing the dealer's hand...");
    Hand dealer_hand = new Hand();
    dealer_hand.addCard(the_deck.draw());
    dealer_hand.addCard(the_deck.draw());
    Dealer a_dealer = new Dealer(dealer_hand, the_deck);
    System.out.println(a_dealer.toString());

    System.out.println("Starting player's turn...");
    a_player.makeMoves();
    System.out.println(a_player.toString());

    System.out.println("Starting dealer's turn...");
    a_dealer.makeMoves(player_hand.getValue());
    System.out.println(a_dealer.toString());

    if(player_hand.getValue() <= 21 && dealer_hand.getValue() > 21){
      System.out.println("The player wins!");
    }else if(player_hand.getValue() <= 21 && player_hand.getValue() > dealer_hand.getValue()){
      System.out.println("The player wins!");
    }else if(dealer_hand.getValue() <= 21){
      System.out.println("The dealer wins!");
    }else{
      System.out.println("There is no winner");
    }
  }
}
Looking at this code, we see that the main method consists of several steps:
- First, the deck is initialized and shuffled.
- Then, the player’s hand is dealt, and the
Playerobject is initialized. Once that is done, it prints the contents of the player’s hand. - Similarly, the
Dealeris initialized, given a hand, and the contents are printed. - Then, it proceeds to the player’s turn. The player can then draw cards until she chooses to stop or go over the value of 21.
- Next, the dealer is given a turn. The dealer is also given the value of the player’s hand, so the dealer only has to match or beat the player’s value to win.
- Finally, the game determines the winner.
Here is a sample of this program’s output when run in the terminal:
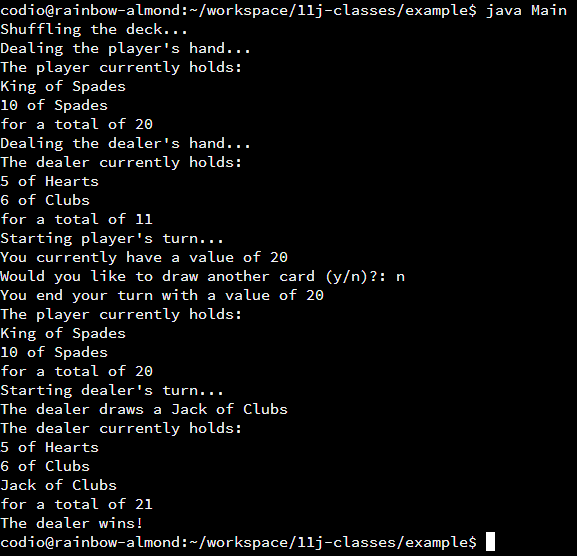
There we go! We were able to build a program that plays a simple version of Blackjack. While it took a bit of work to get all of the required classes developed, each one was pretty straightforward and easy to use. Then, in our main() method, we simply had to pull all those resources together into a working program.
The assessments below will verify that the entire example program works as intended, except for the Main and Player classes. This is because it can be very difficult to complete those classes in a way that is easy to test automatically. They exist mainly to allow us to interact with the objects we’ve created.