Java Assertions
Like most testing frameworks, the JUnit framework provides a host of specialized assertions. They are all created as static methods within the Assertions class, and many of them are described in the JUnit 5 User Guide.
Boolean Assertions
For example, JUnit provides two boolean assertions:
assertTrue(condition)- asserts that the value supplied istrueassertFalse(condition)- asserts that the value supplied isfalse
As with any assertion statements in JUnit, we can also optionally supply a message string as an additional parameter to these assertion statements. That message will be present in the error message when this assertion fails.
Equality Assertions
The workhorse of the JUnit assertion library are the assertEquals() and assertNotEquals() methods. That method is overloaded, with implementations that accept many different data types. These are all listed in the Assertions documentation, but they all follow the same basic form:
assertEquals(expected, actual)assertNotEquals(expected, actual)
For floating-point values such as the double data type, you can also specify a delta value, such that the values are considered equal as long as their positive difference is less than delta
assertEquals(expected, actual, delta)assertNotEquals(expected, actual, delta)
Floating-Point Arithmetic Error
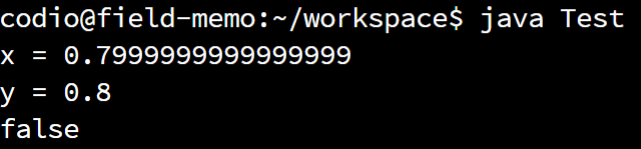
Why do we need to include a delta value? This is because floating-point values are by their nature imprecise, and can sometimes lead to strange errors. Consider this example from GeeksforGeeks:
public static void main(String[] args)
{
    double a = 0.7;
    double b = 0.9;
    double x = a + 0.1;
    double y = b - 0.1;

    System.out.println("x = " + x);
    System.out.println("y = " + y );
    System.out.println(x == y);
}
While we would expect both x and y to store the same value, they are actually slightly different.
So, we may need to account for this imprecision in our unit tests. We could also rewrite our code to avoid the use of floating point values. For example, many programs that deal with monetary values actually store them as integers based on cents instead of dollars, and simply add the decimal point only when the value is printed.
Array Assertions
JUnit also includes assertions for arrays. These methods are also overloaded to handle many different data types:
assertArrayEquals(expected, actual)
This method is really handy when we need to check that the contents of an entire array match the values we expect it to contain.
For lists of strings (List<String> data type), JUnit also includes a special method to confirm that each line matches what is expected.
assertLinesMatch(expectedLines, actualLines)
This is very handy for checking that multiple lines of output produced by a program match the expected output.
Reference Assertions
JUnit also includes several helpful assertion methods that allow us to determine if two objects are the same actual object in memory (the same reference), as well as if an object is null:
assertNull(actual)assertNotNull(actual)assertSame(expected, actual)assertNotSame(expected, actual)
Catching Exceptions
JUnit also includes a special type of assertion that can be used to catch exceptions. This allows us to assert that a particular piece of code being tested should, or should not, throw an exception.
To do this, JUnit uses a lambda expression, which we haven’t covered yet in this course. We’ll discuss lambdas more in a later chapter. Thankfully, the syntax is very simple. Here’s an example, taken from the JUnit 5 User Guide:
@Test
void exceptionTesting() {
    Exception exception = assertThrows(ArithmeticException.class, () ->
        calculator.divide(1, 0));
    assertEquals("/ by zero", exception.getMessage());
}
The assertThrows(expectedType, executable) method is used to assert that the calculator.divide() method will throw an exception, specifically an ArithmeticException. If that method call does not throw an exception, then the assertion will fail.
The second argument to the assertThrows() method is a lambda expression. In Java, a lambda expression can be thought of as an anonymous function - we are defining a block of code that acts like a function, but we’re not giving it a name. That allows us to pass that block of code as a parameter to another method, where it can be executed. See Anonymous Function on Wikipedia for a deeper explanation. As we mentioned before, we’ll learn more about lambda expressions later in this course.
We can also write code to assert that a method does not throw an exception using the assertDoesNotThrow() assertion:
@Test
void noExceptionTesting() {
    assertDoesNotThrow(() ->
        calculator.multiply(1, 0));
}
Fail
JUnit includes one other assertion that is used to simply fail a test:
fail(message)
By including the fail() method in our unit test, we can cause a test to fail immediately. This allows us to build conditional statements to test complex values that are difficult to express in the provided assertion methods, and then fail a test if the conditional expression reaches the wrong branch. Here’s a quick example:
@Test
void testFail() {
    if(calculator.multiply(1, 0) > calculator.multiply(0, 1)){
        fail("Commutative property violated!");
    }
}
Checking Output
One task we may want to be able to perform in our unit tests is capturing output printed by the program. By default, any output that is printed using System.out is immediately sent to the terminal, but we can actually redirect that output without our tests in order to capture it and examine its contents.
We already saw how to do this in the “Hello Real World” project. Here’s that code once again:
@Test
public void testHelloWorldMain() {
    HelloWorld hw = new HelloWorld();
    final PrintStream systemOut = System.out;
    ByteArrayOutputStream testOut = new ByteArrayOutputStream();
    System.setOut(new PrintStream(testOut));
    hw.main(new String[]{});
    System.setOut(systemOut);
    assertEquals(testOut.toString(), "Hello World\n", "Unexpected Output");
}
In that code, we start by storing a reference to the existing System.out as a java.io.PrintStream named systemOut. This will allow us to undo our changes at the end of the test.
Then, we create a new java.io.ByteArrayOutputStream called testOut to store the output printed to the terminal, and use the System.setOut method to redirect System.out to a new PrintStream based on our testOut stream. So, anything printed using System.out will be sent to that PrintStream and captured in our testOut variable.
Once we’ve done those changes, we can then execute our code, calling any functions and including any assertions that we’d like to check. When we are finished, we can then reset System.out back to the original reference using the System.setOut(systemOut) line.
Then, to check the output we received, we can use testOut.toString() to get the output it captured as a single string. If multiple lines of output were printed, they would be separated by \n character, so we could use String.split() to split that single string into individual lines if needed.