Write Hello World
Now, let’s write the basic source code for our “Hello Real World” application. Thankfully, we can adapt some of the code that is provided by the Gradle init command, but we’ll simplify it a bit to meet our needs.
Rename App.java
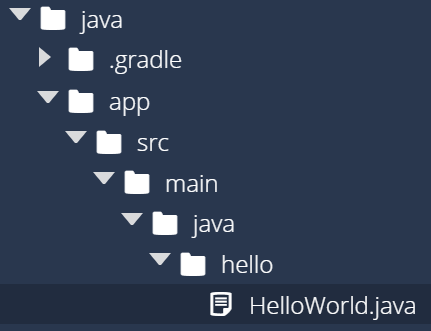
First, let’s rename the App.java file in app/src/main/java/hello to HelloWorld.java. This filename is a better representation of what we want our class to be. Recall that the filenames of .java files must exactly match the name of the Java class contained in the file.
Let’s do this through the Codio interface. Use the file tree to the left to navigate to the file App.java, and then right-click and choose Rename. You can then enter HelloWorld.java in the box. Once you have completed this task, you should now see the following structure in the file tree:
Write Code in HelloWorld.java
The Gradle init command created some sample code that is still in the renamed HelloWorld.java file. Let’s replace it with this code:
package hello;

public class HelloWorld
{

    public static void main(String[] args)
    {
        System.out.println("Hello World");
    }
}
This is a pretty standard “Hello World” application, and all the code here should be pretty familiar. The only new line of code that you may not have seen before is the very first line, package hello;. That line is used to denote what package this file belongs to, and it corresponds to the folder named hello that contains this file. We’ll discuss what a package is later in this course, but in essence packages are a way to organize large programs by grouping similar classes together.
Write Code in AppTest.java
We’ll also need to update the code in the AppTest.java file, which can be found in app/src/test/java/hello. We’ll change it later, but for now we’ll just replace it with some blank code so that it will compile:
package hello;

public class AppTest {

}
Unfortunately, Gradle will not allow our application to compile if the tests won’t also compile! So, we’ll fix that for now until we get to that part of the project.
Update Gradle Settings
Also, since we changed the name of the main class in our application, we’ll also need to change it in the build.gradle file. To do this, open the file app/build.gradle and look for the following section:
application {
    // Define the main class for the application.
    mainClass = 'hello.App'
}
We’ll need to update it to use our new HelloWorld class. So, replace that section with the following:
application {
    // Define the main class for the application.
    mainClass = 'hello.HelloWorld'
}
Recall that our HelloWorld class is in the hello package, so we use the name hello.HelloWorld to refer to the class.
Compile Hello World
Now we can start to explore what Gradle is really used for - easily compiling and executing our program. Recall that previously we’d need to use the javac command to compile our program, and then java to run it. For small programs, that can be pretty simple. However, as programs become larger and larger, and include more packages and external libraries, it can be extremely difficult to write the correct javac and java commands to get it all working.
Gradle is able to analyze the project’s structure and its configuration files and do this work for us automatically. Let’s see how it works!
First, we’ll need to make sure our terminal is still in the java folder:
cd ~/workspace/javaThen, we can run the Gradle build command to compile our program:
gradle buildThe first time you run this command, it may take a little while as Gradle downloads libraries that it needs. Once it has completed, if everything works correctly you should get the following output:

That means that Gradle has now compiled our program! We should now see a new app/build folder, which contains all of the output of the compilation process:
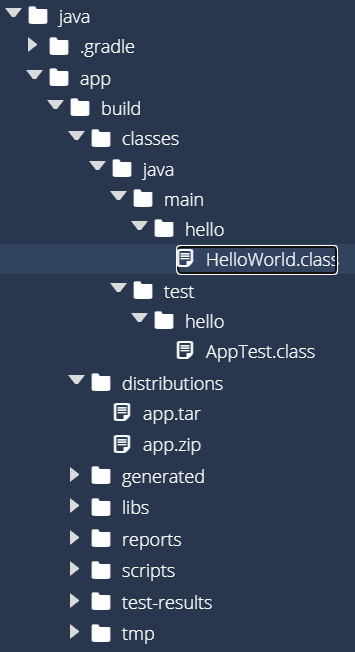
There is a lot of new stuff here that we’ll cover later in this example, but for now there are two folders that we really care about:
app/build/classes- This contains all of the compiled Java class files for both the application and the unit tests.app/build/distributions- This folder contains distributable versions of our application, both as a.zipfile and a Java.jarfile. If we want to share the compiled version of our application with others, these are the files they’d need.
As we can see, Gradle already does a lot more than we could do on our own with just a couple of commands. That’s the power of using a build tool such as Gradle!
Execute Hello World
Once we’ve compiled our application, we can execute it using the Gradle run command. As before, we’ll do this from inside of the java folder:
gradle runIf everything is set up correctly, we should see the following output:
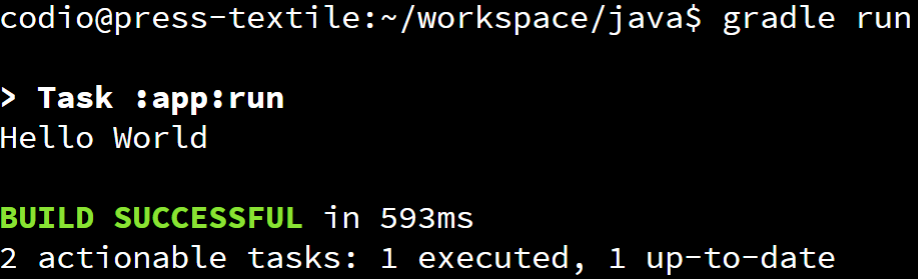
There we go! We’ve successfully built and run our first application in Gradle! If you want, you can test different messages in HelloWorld.java to make sure the program is working correctly.
Other Gradle Commands
There are a couple other Gradle commands we should learn. First, from within the java folder, use the following command:
gradle cleanThis command will delete the entire build folder, basically clearing out anything that Gradle created in the previous commands. This is helpful if you want to completely recompile your application from scratch. Gradle is an intelligent build tool that will only compile files that have changed since the last time it compiled the program, but sometimes it can get confused, so using gradle clean is a way to reset it and force it to compile the entire application again.
Now, once we’ve completely cleared out our project, try this command again:
gradle runDoes that work? You might think that Gradle will give you an error saying that you have to build the application before you can run it. However, Gradle is an intelligent build tool, so it will automatically compile the application before running it. In effect, you can simply tell Gradle what you’d like to do, and it will perform any intermediate steps to get you there. It’s really handy!
Finally, if you want to see all the commands that Gradle can perform, use the following command:
gradle tasksThere are lots of other commands available in Gradle that we won’t cover in this course. Feel free to explore the documentation and try them out!