Python Assertions
Unlike many testing frameworks, the pytest framework by default only uses the built-in assert statement in Python. It doesn’t include a large number of specialized assertions, and instead relies on the developer to write Boolean logic statements to perform the desired testing. More information can be found in the pytest documentation
The pytest framework can leverage the assertions already present in other Python unit testing libraries such as the built-in unittest library. So, for developers familiar with that approach, those assertions can be used.
For this course, we’ll discuss how to use the built-in assert statement, as well as the Hamcrest assertion library.
Simple Assertions
In general, an assert statement for pytest includes the following structure:
assert <boolean expression>For example, to test if the variable actual is equal to the variable expected, we would write the following assertion:
assert actual == expectedWe can optionally add an error message describing the assertion, as in this example:
assert actual == expected, "The value returned is incorrect"This allows us to provide additional information along with the failure. However, by including a message in this way, it may reduce the amount of information that pytest gives us when the test fails. So, we may find it easier to omit these messages, or include them as comments in the code near the assertion, instead of as part of the assertion itself.
Let’s look at some examples to see how we can use the assert statement in various ways.
- Boolean Assertions:
assert actual == Trueassert actual == False
- Equality Assertions
assert acutal == expectedassert actual != expected
- Approximate Floating-Point Values
assert actual == pytest.approx(expected)
- Reference Assertions
assert actual is expected- true if bothactualandexpectedare the same object in memoryassert actual is None- true ifactualis the valueNone
Floating-Point Arithmetic Error
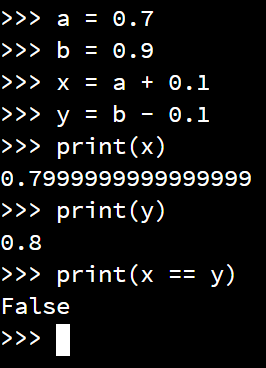
Why do we need to deal with approximate floating-point values? This is because floating-point values are by their nature imprecise, and can sometimes lead to strange errors. Consider this example from GeeksforGeeks:
a = 0.7
b = 0.9
x = a + 0.1
y = b - 0.1
print(x)
print(y)
print(x == y)
While we would expect both x and y to store the same value, they are actually slightly different.
So, we may need to account for this imprecision in our unit tests. We could also rewrite our code to avoid the use of floating point values. For example, many programs that deal with monetary values actually store them as integers based on cents instead of dollars, and simply add the decimal point only when the value is printed.
Catching Exceptions
The pytest framework also includes a special method that can be used to catch exceptions. This allows us to assert that a particular piece of code being tested should, or should not, throw an exception.
Here’s an example, taken from the pytest documentation:
def test_zero_division():
    with pytest.raises(ZeroDivisionError):
        calculator.divide(1, 0)
The with pytest.raises(ZeroDivisionError) statement is used to assert that the calculator.divide() method will throw an exception, specifically a ZeroDivisionError. If that method call does not throw an exception, then the assertion will fail. We can include multiple lines of code within the with block as well.
Fail
pytest includes one other assertion that is used to simply fail a test:
fail(message)
By including the fail() method in our unit test, we can cause a test to fail immediately, such as when we reach a state that should be unreachable.
Checking Output
One task we may want to be able to perform in our unit tests is capturing output printed by the program. By default, any output that is printed using print() is immediately sent to the terminal, but we can actually redirect that output without our tests in order to capture it and examine its contents.
We already saw how to do this in the “Hello Real World” project. Here’s that code once again (with full type annotations):
from pytest import CaptureFixture
from _pytest.capture import CaptureResult
from typing import Any
from src.hello.HelloWorld import HelloWorld

def test_hello_world(self, capsys: CaptureFixture[Any]) -> None:
    HelloWorld.main(["HelloWorld"])
    captured: CaptureResult[Any] = capsys.readouterr()
    assert captured.out == "Hello World\n", "Unexpected Output"
In that code, we start by adding a parameter named capsys to the test method declaration. capsys is an example of a fixture in pytest. Fixtures allow us to do build more advanced test functions. The capsys fixture is described in the pytest documentation.
So, by including that parameter in our test function, we’ll gain access to all of the features of the capsys fixture. When we execute our code, we can then use capsys.readouterr() to get a CaptureResult object that contains the text that was output by our program. Then, using captured.out, we can check that text and make sure it matches our expectation in an assertion.