Python tkinter
Now let’s dive into Python tkinter and see how to make our very first GUI application in Tk.
Imports
At the top of our applications, we’ll need to import the tkinter library:
import tkinter as tkThis allows us to refer to the tkinter library as tk throughout our application.
For some more advanced elements, such as the combo box, we may also need to import the themed Tk (ttk) package as well:
from tkinter import ttkMain Window
One of the easiest ways to build a program using tkinter is to simply inherit from the tk.Tk class, which usually represents the main window in an application. In that way, our program has access to all of the features of the topmost container in tkinter, and we can use it just like any other component in the GUI.
Then, within the constructor of that class, we can add elements to our GUI using our chosen layout manager. Let’s look at an example program first, and then we’ll review each part in more detail.
import sys
import tkinter as tk
from typing import List
class MainWindow(tk.Tk):
def __init__(self) -> None:
"""Initializer for GUI."""
# Initialize the parent class
tk.Tk.__init__(self)
# Set the window size
self.minsize(width=200, height=100)
# Allow the grid to expand horizontally to fill the space
self.grid_rowconfigure(0, weight=1)
self.grid_rowconfigure(1, weight=1)
self.grid_columnconfigure(0, weight=1)
# Create a label and add it to the GUI
self.__label = tk.Label(master=self, text="Hello World!")
self.__label.grid(row=0, column=0)
# Create a button and add it to the GUI
self.__button = tk.Button(master=self, text="Close",
command=lambda:
self.action_performed("close"))
self.__button.grid(row=1, column=0)
def action_performed(self, text: str) -> None:
"""Event handler for GUI events.
Args:
text: the text of the event
"""
if text == "close":
sys.exit(0)
@staticmethod
def main(args: List[str]) -> None:
"""Main method."""
MainWindow().mainloop()
# Main Guard
if __name__ == "__main__":
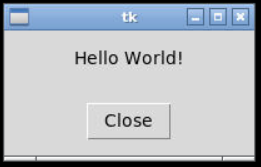
MainWindow.main(sys.argv)When we run this code, then open the Codio viewer, we should see this window:
Let’s go through this code and explore what it does. We’ll also cover most of this content in the example project for this chapter.
Object-Oriented tkinter
This example uses a very object-oriented format, which is different than many other tutorials you may find online for learning tkinter.
The main reason for this is to show you how to build more complex GUIs by taking advantage of object-oriented programming concepts and inheritance. In addition, this example was written to be very similar to the Java Swing example on the previous page.
Since Python doesn’t really have a standard way to do object-oriented GUIs, we figured it was best to at least try to match the Java standard. In that way, the concepts will carry over between languages very easily.
Inheritance
This application includes one instance of inheritance
class MainWindow(tk.Tk):In this example, our MainWindow class is inheriting from the built-in Tk class in tkinter, which is the root class that represents the main window.
While we don’t necessarily have to use inheritance here, and in fact many Python guides don’t use it at all, this help us build our GUI in an object-oriented way. In addition, by using inheritance, we can make our own custom version of elements such as buttons and panels that we can use in our larger GUI projects later on.
Window Setup
Next, we have a few lines of code that help us set up the window for this application and configure the layout manager.
# Initialize the parent class
tk.Tk.__init__(self)

# Set the window size
self.minsize(width=200, height=100)

# Allow the grid to expand horizontally to fill the space
self.grid_rowconfigure(0, weight=1)
self.grid_rowconfigure(1, weight=1)
self.grid_columnconfigure(0, weight=1)
First, we have to explicitly call the constructor of the class we are inheriting from so that Python will actually construct it.
Then, we are setting the minimum size of the window using the minsize() method. This will allow us to make the window bigger, but it won’t go any smaller than 200 pixels wide and 100 pixels tall.
Lastly, we are configuring the rows and columns to each have a weight of 1. This is used to adjust how the rows and columns are resized as the application window is resized. In this case, by setting them each to have the same weight, they will occupy the same amount of space within our application. This has the effect of centering each element within the window itself.
Adding a Label
Once we’ve set up our window, we can add a few components. The first component is a Label
# Create a label and add it to the GUI
self.__label = tk.Label(master=self, text="Hello World!")
self.__label.grid(row=0, column=0)
First, we create a new instance of tk.Label and set a few properties:
master- themasterproperty defines which container this element is placed in. In this case, we want it to be placed in the main window represented by this object, so we useself.text- this is the text that is contained in the label
Once we’ve created an element, we can place it on our GUI using the grid() method. As expected, the grid() method requires two parameter, the row and column that we’d like to place the element within.
Adding a Button
Now we can also add a Button to our window.
# Create a button and add it to the GUI
self.__button = tk.Button(master=self, text="Close",
                          command=lambda:
                          self.action_performed("close"))
self.__button.grid(row=1, column=0)
Constructing a button is very similar to constructing a label, but in this case we are populating one additional property - command. The command property is meant to be a function that is called when this button is clicked. In this case, we’ve chosen to use a lambda expression to call a function in this class called action_performed. We provide an argument "close" to help identify the button that was clicked.
The major reason we use a lambda expression here is that it allows us to bind other variables and use them in our function call. We’ll see how to do this in the example project for this chapter.
Action Performed Method
To handle any events generated when the user interacts with the GUI, we can configure all of our elements to call the action_performed method. Or, if we so choose, we can create any number of methods to handle different actions - it is entirely up to the developer! The parameter to this method is a string, which we can use to determine which element was used and react appropriately.
def action_performed(self, text: str) -> None:
    """Event handler for GUI events.

    Args:
        text: the text of the event
    """
    if text == "close":
        sys.exit(0)
In this example, we simply check to see if the action command associated with that event is the "close" action we added to our button earlier. If so, we use sys.exit(0) to terminate our program. Notice that we simply can’t use return here, since the application will continue to run even after this method is called. Instead, we have to shut down the entire application itself, and the simplest way to do this in Python is to use the sys.exit() method. We provide a 0 as a parameter to indicate that our program terminated normally. If we provide a non-zero value, it indicates that our program crashed in some way - we can even use different values to represent different error conditions!
Main Method
Finally, we need a main method to actually launch our application.
@staticmethod
def main(args: List[str]) -> None:
    """Main method."""
    MainWindow().mainloop()
This method does two things. First, it creates a new instance of our MainWindow class, which is inheriting from the Tk class that is the base window class in Tk. Then, we are calling the mainloop() method, which actually handles starting a thread that is listening for and reacting to any user interactions with the GUI. We haven’t covered threading and parallel programming yet in this course, so don’t worry if you don’t quite understand at this point. A thread is simply like having another application running at the same time, but within our program itself. By doing so, this allows our GUI to run in a different thread than the rest of our application, so they can run side by side. This prevents the GUI from locking up each time our program has to perform a complex task.
For more information on how this works, consult the Event Loop page in the TkDocs website.