Create New Project
Once we have Gradle installed, we can use Gradle to create a scaffold for our new Java project. This is a great starting point for any Java application, but we’ll customize it a bit to suit our needs.
For this part of the project, we’ll loosely follow this guide on Building Java Applications from the Gradle documentation.
Gradle Init
First, we’ll run the Gradle init command. This handy script allows us to create a scaffold for all sorts of different programming languages and frameworks supported by Gradle.
When we run this command, we’ll want to be in the java folder. So, let’s open the Linux terminal and change our directory to that location:
cd ~/workspace/javaOf course, if you are already in the ~/workspace folder, you can just use cd java to get there. In the code above, we include the whole path so that it will always work, regardless of the current working directory.
Next, we’ll run the Gradle init command:
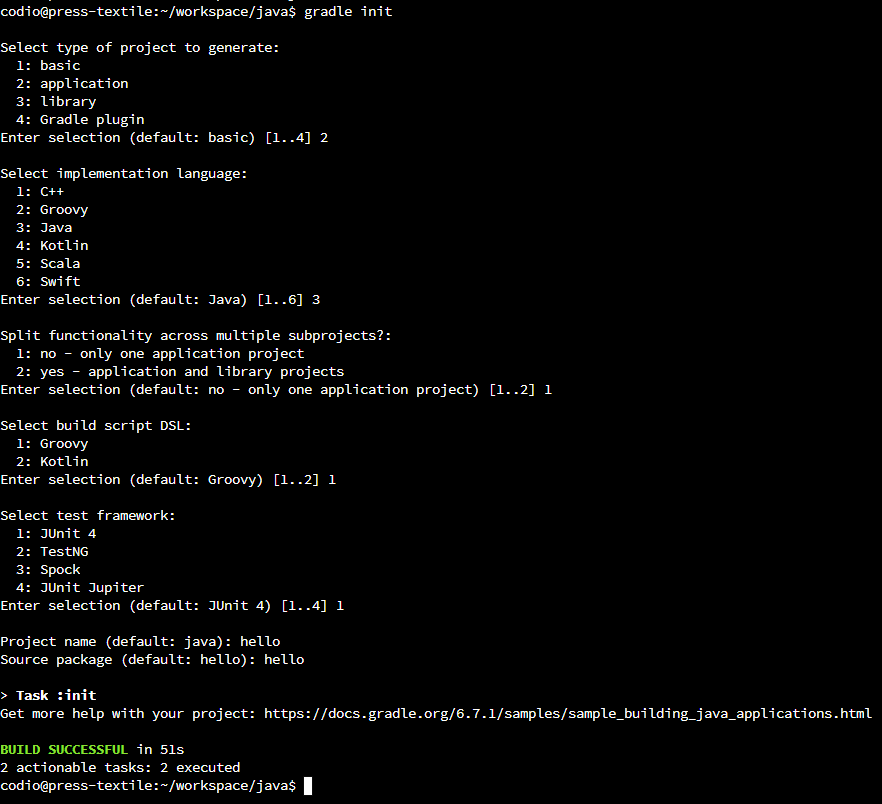
gradle initThis script will ask a few questions about what type of project we’d like to create. We’ll choose the following options:
- Type of project -
2: application - Implementation language -
3: Java - Split functionality across multiple subprojects -
1: no - only one application project - Build script DSL -
1: Groovy - Generate build using new APIs -
no - Test Framework -
4: JUnit Jupiter - Project name -
hello - Source package -
hello
If done correctly, your output should look like this:
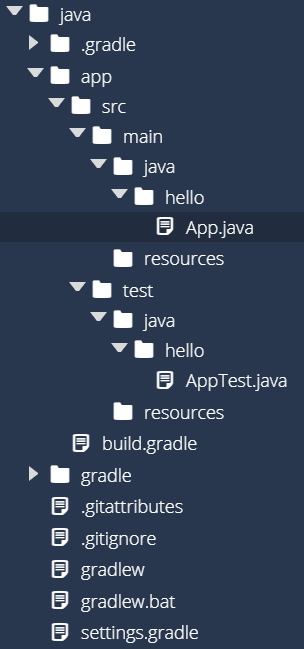
You should also now see a whole bunch of files and directories inside of the java directory, as shown in this screenshot:
This is already looking quite a bit more complicated than our previous “Hello World” app! Let’s see if we can go through it and clear up a few things.
Project Structure
Here is a quick description of the contents of the java folder that were added by the Gradle init command:
.gradle- This is a working folder for Gradle, and contains information Gradle uses when running commands. You shouldn’t have to do anything with this folder. However, if you run into issues with Gradle, you can safely delete this folder to “reset” Gradle, similar to clearing the cache in a web browser.app- This folder contains the source code for both the application itself as well as its unit tests.app/build.gradle- This file contains the settings for Gradle for this application. This is the file we’ll need to edit to add additional features to Gradle for this application.app/src/main/java- This folder contains the main source code for the application.app/src/test/java- This folder contains the unit tests for this application.
gradle- This folder contains the Gradle “wrapper” that can be distributed along with this project. It allows you to run Gradle quickly and easily on other systems that develop this project. You can leave this folder alone for now..gitattributes- This is a settings file for the Git tool, which we’ll discuss later in this module. For now, we can just leave it as is.gitignore- This is a settings file for the Git tool, which we’ll discuss later in this module. For now, we can just leave it as is.gradlew- This is a script file that can be used to download and install Gradle on a Linux-based system that doesn’t currently have Gradle installed. It is useful for deploying this code on a different system. For now, we won’t worry about it.gradlew.bat- This is the same asgradlew, but for Windows-based systems.settings.gradle- This file tells Gradle what projects to include in our various build tasks. For now, we only have one project, so we can leave it alone. However, for larger applications that contain multiple projects, we’ll edit this file to include those as well.
So, as you can see, the files we’ll mostly be concerned about are the ones in the app directory. On the next page, we’ll start working with those files to build our new “Hello Real World” application.
JCenter Deprecated
The JCenter package repository was sunset in May 2021, and stopped serving packages in early 2022. Some older versions of Gradle will set the JCenter repository as the default location to find packages, but that should be updated to use Maven Central instead.
To make sure your project will continue to work properly, open the build.gradle file in the app folder and look for the following section:
repositories {
    // Use JCenter for resolving dependencies.
    jcenter()
}
If that section contains jcenter() as shown above, update it to use mavenCentral() instead:
repositories {
    // Use Maven Central for resolving dependencies.
    mavenCentral()
}
This will ensure that the project will continue to work properly after JCenter is shut down.