Code Coverage
We’ve now written our program, as well as a unit test that runs our program and make sure it works. But, how can we be sure that our unit tests are adequately testing every part of our program? For that, we have to rely on another tool to help us calculate the code coverage of our unit tests.
Install JaCoCo in Gradle
Thankfully, there are many easy to use tools that will compute the code coverage of a set of tests. For Java, one of the most commonly used tools is JaCoCo. JaCoCo is a free code coverage library designed for Java, and it easily integrates with Gradle via the JaCoCo Plugin.
To install that plugin, all we have to do is open our build.gradle file, which can be found in the app directory. First, find the plugins section at the top of the file:
plugins {
    // Apply the application plugin to add support for building a CLI application in Java.
    id 'application'
}
To install a plugin, we can simply add a new id line to that section, followed by the name of the plugin. For JaCoCo, we would update this section to the following:
plugins {
    // Apply the application plugin to add support for building a CLI application in Java.
    id 'application'
    // JaCoCo plugin for code coverage
    id 'jacoco'
}
Once we’ve added the plugin, we may also want to add some additional information to the build.gradle file to help configure the plugin. In this case, we’ll add a few things. Most of these are taken directly from the JaCoCo Plugin documentation from Gradle. At the bottom of the build.gradle file, add the following sections:
// Configure Jacoco plugin
test {
    finalizedBy jacocoTestReport // report is always generated after tests run
}

jacocoTestReport {
    dependsOn test // tests are required to run before generating the report
    reports {
        xml.enabled false
        csv.enabled false
        html.destination file("${buildDir}/reports/jacoco")
    }
}
As described in the documentation, this will ensure that the JaCoCo report is generated each time the tests are run. In addition, we have configured the reports generated by JaCoCo to only include the HTML version of the report, and it will be placed in the reports folder in a folder called jacoco.
Compute Code Coverage with JaCoCo
Now that we’ve installed and configured the JaCoCo plugin, let’s use Gradle to run our tests again and see what happens. So, from within the java folder, we can run the following command:
gradle testOnce we do that, Gradle will install everything it needs to use JaCoCo, and in the app/build/reports folder, we should see a new folder called jacoco appear:
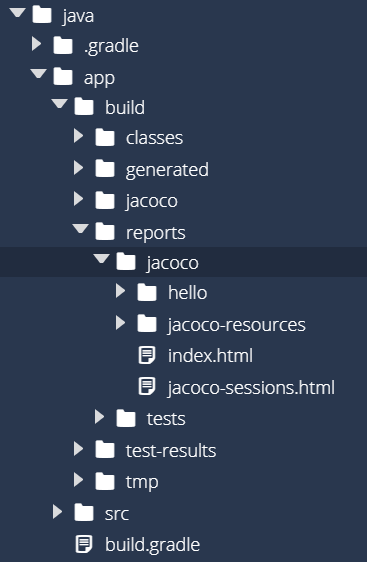
Inside of that folder is another index.html file. So, let’s right-click it and select Preview Static to open it as a webpage. Hopefully we should see something like this:
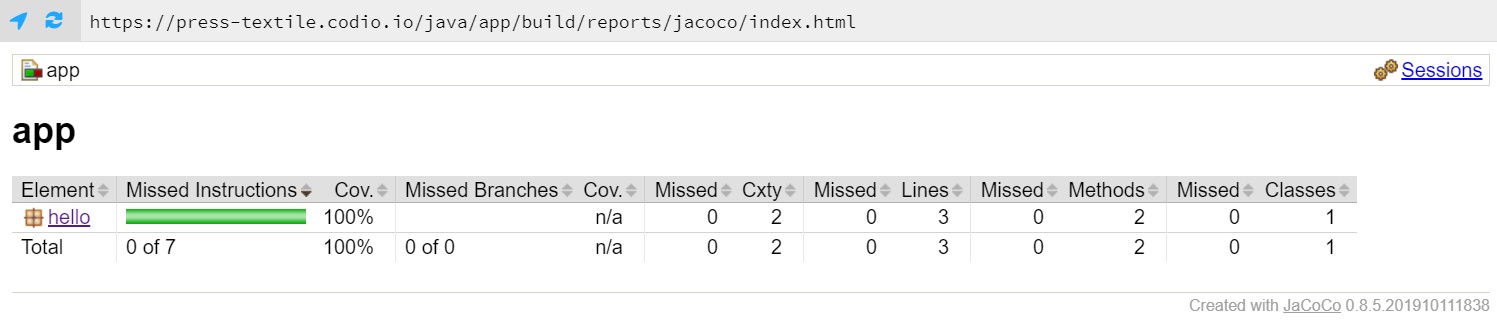
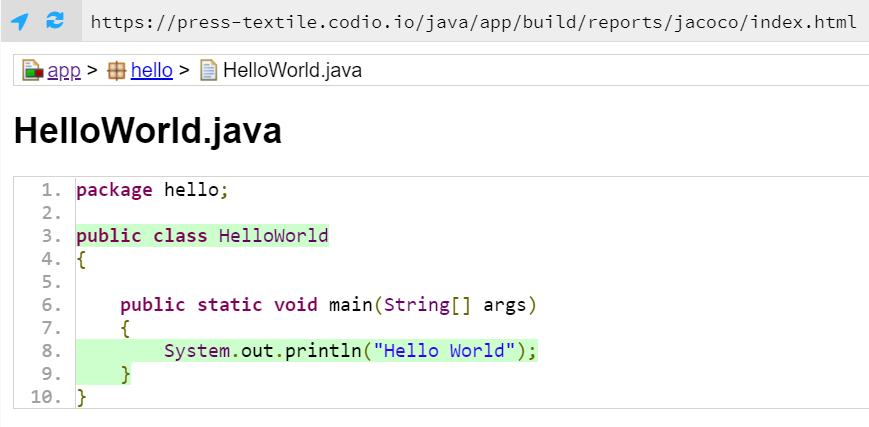
That tells us that we achieved 100% code coverage with our tests! That’s the goal, though it was pretty easy to achieve when our application really only contains one line of code. By clicking the links on the page, we can even see which lines are tested by our program, as shown below:
More Complex Code
Let’s modify our application a bit and see how we can use JaCoCo to make sure we are really testing everything our application can do. In the HelloWorld.java file, found in app/src/main/java/hello, replace the existing code with this code:
package hello;

public class HelloWorld
{

    public static void main(String[] args)
    {
        if(args.length == 1)
        {
            System.out.println("Hello " + args[0]);
        }
        else
        {
            System.out.println("Hello World");
        }
    }
}
This program will now print “Hello World” if executed without any command line arguments, but if one is provided it will use that argument in the message instead. So, let’s run our program again using this command from within the java folder:
gradle testOnce the tests have finished, we can open the JaCoCo report stored in app/build/reports/jacoco/index.html and we should find that it no longer achieves 100% coverage:
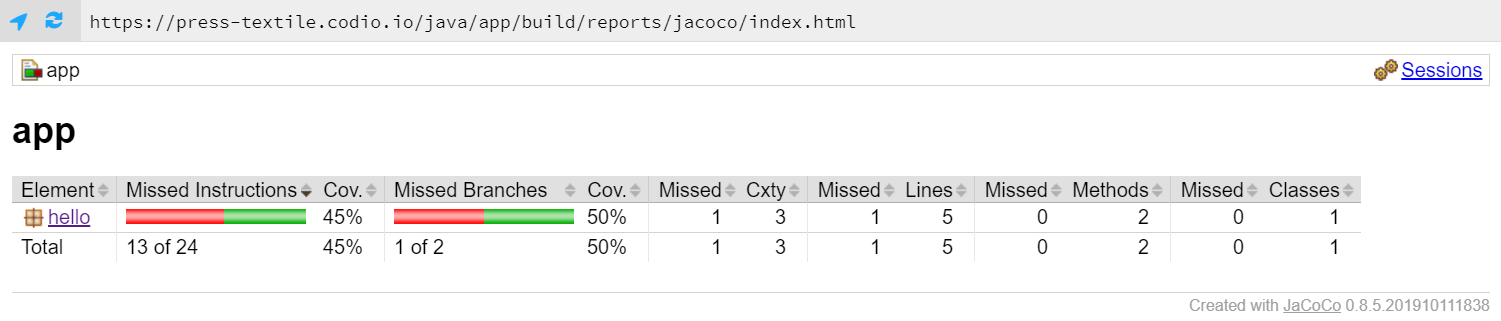
If we drill down deeper, we can find the lines of code that aren’t covered by our tests:
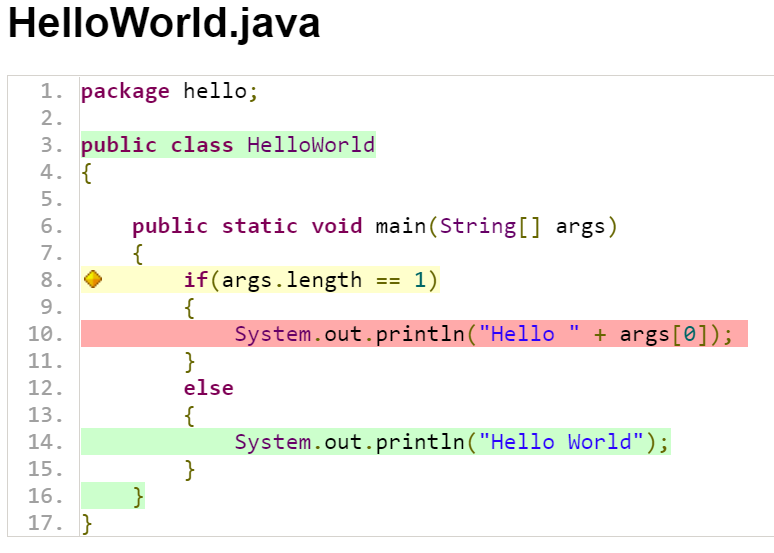
As we expected, our single unit test is not able to test each and every line of code in our application. That’s not good! So, we’ll need to update our tests to account for the change in our code.
Test-Driven Development
As a quick aside, if we were engaging in test-driven development, we would write the new unit test before changing the code. We won’t model that behavior right now, but it is worth noting that you don’t have to do these steps in the order presented here.
Update Unit Tests
So, let’s update our unit tests to account for this new code. There are a couple of ways we can do this:
- We can add more code to our existing
testHelloWorldMainmethod to call the method multiple times, both with and without arguments. - We can add additional test methods to test different behaviors.
In general, when working with unit tests, it is always preferred to add additional test methods to test additional functionality in the program. We want to keep our tests as simple and focused as possible, so that we can easily find the source of any errors it finds. If we simply added more code to the existing test, it would be difficult to tell exactly what caused the error. We’ll cover this in more detail when we formally discuss unit testing later in this course.
For now, let’s open the HelloWorldTest.java file stored in app/src/test/java/hello and add the following method to the HelloWorldTest class:
    @Test
    public void testHelloWorldMainArgument() {
        HelloWorld hw = new HelloWorld();
        final PrintStream systemOut = System.out;
        ByteArrayOutputStream testOut = new ByteArrayOutputStream();
        System.setOut(new PrintStream(testOut));
        hw.main(new String[]{"CC 410"});
        System.setOut(systemOut);
        assertEquals("Hello CC 410\n", testOut.toString(), "Unexpected Output");
    }
Notice that this is nearly identical to the previous unit test method - we simply changed the arguments that are provided to the main method, and also updated the assertion to account for the changed output we expect to receive. As discussed earlier, there are things we can do to prevent duplication of code like this in our unit tests, but we won’t worry about that for now.
Once again, let’s rerun our tests using this command:
gradle testOnce that is done, we can open the JaCoCo report and see if we are back to 100% coverage:
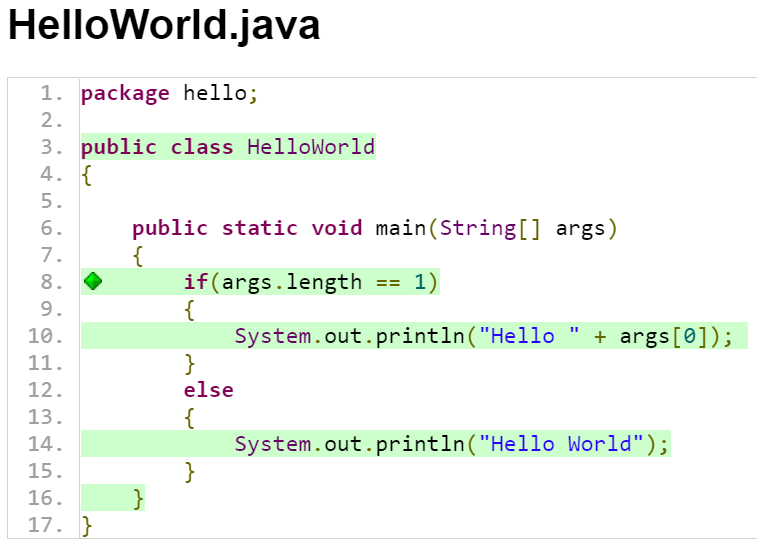
If everything is working correctly, we should see that we are back at 100% coverage, and each line of code in our program is tested.
Of course, achieving 100% code coverage does not mean that you’ve completely tested everything that your application could possibly do - it simply means that you are at least testing every line of code at least once. It’s a great baseline to start with!
Git Commit and Push
This is a good point to stop and commit our code to our Git repository. So, like before, we’ll start by checking the status of our Git repository to see the files we’ve changed:
git statusIn that list, we should see everything we’ve updated listed in red. Next, we’ll add them to our index using this command:
git add .And then we can review our changes using the status command again:
git statusIf we are satisfied that everything looks correctly, we can commit our changes using this command:
git commit -m "Unit Tests and Code Coverage"And finally, we can push those changes to the remote repository on GitHub using this command:
git pushAs you can quickly see, this is a pretty short set of 5 commands that we can use to quickly store our code in our local Git repository and on GitHub. We just have to carefully pay attention to the files we commit and make sure it is correct.