Documentation
The next step in writing good code is adding proper documentation and comments to describe the code and what it does. By writing good documentation, we can pass on helpful information to other developers who need to maintain this code, including our future selves!
Python Docstrings
Unlike most other programming languages, which specify that documentation for classes and functions should be in a large comment above the class or function, Python uses a different documentation structure known as docstrings. A docstring is a comment that is surrounded by three sets of double quotation marks """ and can be found starting on the first line of the class or function declaration.
The Python programming language specification doesn’t include a whole lot of information about the specific structure of docstrings, but there are a few resources that developers can look to for examples. The original docstring format was specified in PEP 257. However, many Python developers prefer to follow the Python Style Guide published by Google, which includes examples and specifications for docstrings.
PEPs
In Python documentation, many times you’ll see references to various “PEP” documents. “PEP” is short for “Python Enhancement Proposal,” and the collected set of PEP documents form the basis for the Python programming language. If you are familiar with the Requests for Comment, or RFCs, that provide the technical information underpinning much of the Internet, PEPs serve a very similar purpose for Python. The full archive of PEPs can be found in PEP 0.
So, let’s explore how to create this documentation for our code.
File Docstring
First, let’s look at a docstring that would be placed at the top of a source code file for Python. This is a sample docstring that we would place at the top of our HelloWorld.py file in the src/hello directory:
"""Sample HelloWorld Program.

This is a sample HelloWorld program to demonstrate proper
Python coding style, testing, documentation, and more.

Author: Russell Feldhausen russfeld@ksu.edu
Version: 0.1
"""
There are lots of new things in this block of comments, so let’s look at each part individually:
- Each docstring in Python is surrounded by three pairs of double quotation marks
""". - Immediately following the opening quotation marks, we include a short description for the file. It should be a single line summary of the file, with a period at the end.
- After the summary, there should be a single blank line.
- Then, any additional paragraphs can be included to further explain the code.
- While not required as part of the Google style guide, it is a good practice to place both the author and the version in this docstring, as shown in the example above.
In most cases, it is recommended that every Python source file contain a docstring at the top of the file that describes its purpose. So, let’s look at a few other docstrings we may want to include in our program:
src/__init__.py
"""Meta package for all project packages.

This is the __init__ file for this package.

Typically this file can be left blank, but for this example we have
included a print statement so we can see what it does and when.

Usage:
    python3 -m src - execute this program (when run from project root).

Author: Russell Feldhausen russfeld@ksu.edu
Version: 0.1
"""
src/__main__.py
"""Sample Main Project File.

This file is executed when the entire src directory is run using Python
and serves as the main entry point for the application.

Usage:
    python3 -m src - execute this program (when run from project root).

Author: Russell Feldhausen russfeld@ksu.edu
Version: 0.1
"""
src/conftest.py
"""Sample test configuration file.

This file is used to configure testing parameters for PyTest. It is included
as a hack to get PyTest to recognize and include this directory in the Python
path. See https://stackoverflow.com/q/34466027.

Author: Russell Feldhausen russfeld@ksu.edu
Version: 0.1
"""
src/hello/__init__.py
"""hello Package.

This is the __init__ file for this package.

Typically this file can be left blank, but for this example we have
included a print statement so we can see what it does and when.

Author: Russell Feldhausen russfeld@ksu.edu
Version: 0.1
"""
If you haven’t already, go ahead and include the above docstrings in the files specified. Don’t forget to update the author and version information as needed.
Class Docstring
Next, we should also include a docstring at the beginning of each class. This will include information about the class itself, including any attributes stored at the class level. Here’s an example of a class docstring for our HelloWorld class:
class HelloWorld:
    """Simple HelloWorld Class.

    Prints "Hello World" to the terminal when the main function is executed.
    """
    # code goes here
It follows the same structure as the file docstring - a one line description first, followed by a period and a blank line, then additional paragraphs as required.
Function Docstring
Finally, we should also include a docstring at the beginning of most functions. Here’s an example of a docstring for the main function in our HelloWorld class:
    @staticmethod
    def main(args):
        """Prints a hello message.

        This method prints the standard "Hello World" message to the terminal.

        Args:
            args: The command-line arguments provided to the program.
        """
        # code goes here
Notice that this docstring has a section named “Args:” that describes the parameters for the method. The Google Style Guide describes three sections that could be included in a function docstring:
- Args - list and describe each parameter by name
- Returns - describe the value returned by the function
- Raises - list all exceptions which could be raised by this code and why
Feel free to refer to the Google Style Guide for examples as well.
Other Comments
Finally, individual variables and tricky sections in the source code can also be documented using comments. Typically any attributes or fields stored directly within the class itself are documented in this way. We don’t have any attributes in our current program, so we won’t worry about this part for now.
We’ll discuss the creation of Python docstrings in more detail later in this course. For now, feel free to refer to these resources for additional information:
- PEP 257
- Google Style Guide
- Example Google Style Python Docstrings from Sphinx
- Python Fire Source Code - Many of these source files contain Google style docstrings
Documenting Tests
Let’s briefly look at a documented version of our unit test code as well, just to see what that looks like. Some of the code has been omitted so we can just focus on the comments:
test/hello/__init__.py
"""test package for hello.

This is the __init__ file for this package.

Typically this file can be left blank, but for this example we have
included a print statement so we can see what it does and when.

Author: Russell Feldhausen russfeld@ksu.edu
Version: 0.1
"""
test/hello/test_HelloWorld.py
"""Test Class for HelloWorld.

Author: Russell Feldhausen russfeld@ksu.edu
Version: 0.1
"""

# imports omitted

class TestHelloWorld():
    """Test Class for `src.hello.HelloWorld`."""

    def test_hello_world(self, capsys):
        """Test Method for `src.hello.HelloWorld.main`.

        This will test the main method with no arguments.

        Args:
            capsys: PyUnit fixture to capture output.
        """
        # code omitted

    def test_hello_world_arg(self, capsys):
        """Test Method for `src.hello.HelloWorld.main`.

        This will test the main method with 1 argument.

        Args:
            capsys: PyUnit fixture to capture output.
        """
        # code omitted
Go ahead and place comments similar to what you see above in the appropriate files in the test folder. As before, don’t forget to change the author to your name!
Generating Documentation with pdoc3
One of the most powerful uses of the docstrings is to generate documentation for users and developers automatically based on the comments stored in the docstrings. This can make it much easier for developers to understand how the code works, even without exploring the code itself.
One of the best tools to create documentation for Python is pdoc3. [pdoc3] makes it quick and easy to generate easy to read documentation based on the docstrings in the source code, and it supports Google style docstrings and even markdown!
To install pdoc3, we’ll simply add it to our requirements.txt file:
coverage
pdoc3
pytest
pytest-html
tox
Make sure it is pdoc3 and not pdoc, which is an older version that pdoc3 is based on.
Once it is there, we can install it by going to the python directory in a Linux terminal and running this command:
pip3 install -r requirements.txtAs before, if everything works correctly we should see that pdoc3 was installed:

Once we’ve installed pdoc3, we can use the following command from within the python directory to generate our documentation:
python3 -m pdoc --html --force --output-dir reports/doc .Let’s look at that command to understand what it does:
python3 -m pdoc- like always, we are running pdoc as a module usingpython3.--html- this tells pdoc to create HTML documentation.--force- this tells pdoc to overwrite any existing documentation if needed.--output-dir reports/doc- this tells pdoc where to place the completed documentation..- the period at the end.represents the current directory in Linux. So, it is telling pdoc to generate documentation starting at the current directory, which should bepython. This will make sure that both oursrcandtestfolders and all the code they contain are included.
Once it has been executed, we should now see a new directory called doc in our reports folder:
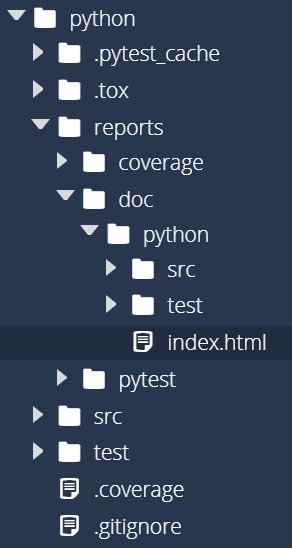
To open the report, we can right-click on the reports/doc/python/index.html file and choose Preview Static. We should see a webpage that looks like this:
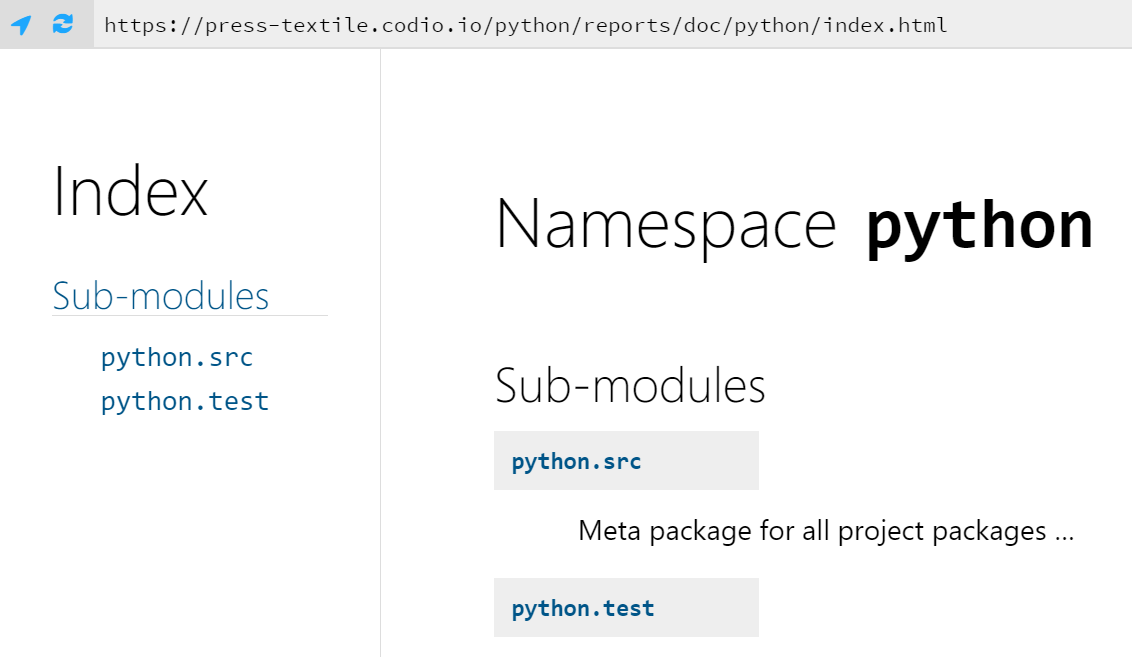
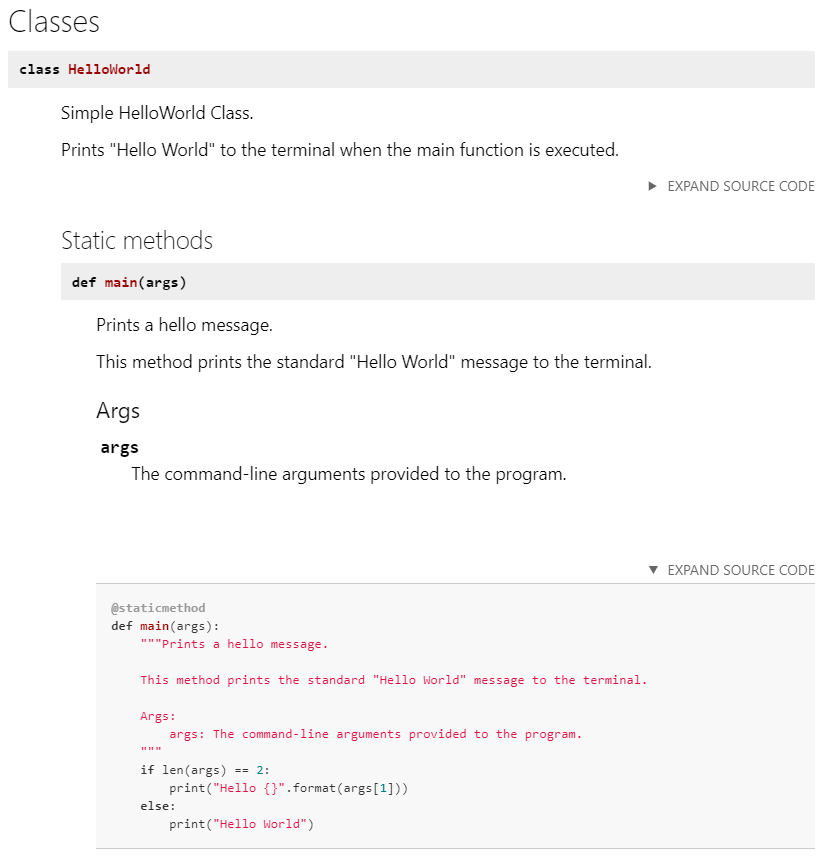
We can follow the links on that page to explore the entirety of our project. For example, if we drill down to the main method in the HelloWorld class, we can see the “Args” section and how it appears in the documentation. We can even show the original source code for the method directly from the documentation:
As we can see, this documentation would be very valuable to anyone who wants to explore and learn more about our code. So, we’ll need to make sure we always include helpful docstrings in our Python code!
Integrating with tox
Integrating pdoc into tox is simple! We’ll just add the command we used above to our commands list in tox.ini. Once we’ve done that, it should look like this:
commands = python3 -m coverage run --source src -m pytest --html=reports/pytest/index.html
           python3 -m coverage html -d reports/coverage
           python3 -m pdoc --html --force --output-dir reports/doc .
Then, we can execute it by using the tox command. Since we’ve installed a new library and updated our requirements file since the last time we executed tox, we’ll need to use the -r flag so it will rebuild its virtual environment:
tox -rOnce we run that command, it should successfully update our documentation.