Quicksort
The last sorting algorithm we will review in this module is quicksort. Quicksort is another example of a recursive, divide and conquer sorting algorithm, and at first glance it may look very similar to merge sort. However, quicksort uses a different process for dividing the array, and that can produce some very interesting results.
The basic idea of quicksort is as follows:
- Choose a pivot value, called
pivotValue. This value could be any random value in the array. In our implementation, we’ll simply use the last value. - Partition the values in the container into two parts:
- the left part contains all the elements less than or equal to the value of
pivotValue - the right part contains all the elements greater than the value of
pivotValue
- the left part contains all the elements less than or equal to the value of
- Place
pivotValuein between those two parts. We’ll call the index ofpivotValuethepivotIndex. - Recursively sort the two parts by calling the quicksort procedure again:
- the first call sorts the values in the container from start to
pivotIndex – 1 - the second call sort the values in the container from
pivotIndex + 1to the end
- the first call sorts the values in the container from start to
- Once the recursive calls are complete, the entire container should be sorted.
As with all of the other examples we’ve looked at in this module, Wikipedia provides yet another excellent animation showing this process.
 ^[File:Sorting quicksort anim.gif. (2019, July 30). Wikimedia Commons, the free media repository. Retrieved 01:14, March 24, 2020 from https://commons.wikimedia.org/w/index.php?title=File:Sorting_quicksort_anim.gif&oldid=359998181.]
Quicksort Example
Let’s look at an example of the quicksort algorithm in action to see how it works. Unlike the other sorting algorithms we’ve seen, this one may appear to be just randomly swapping elements around at first glance. However, as we move through the example, we should start to see how it achieves a sorted result, usually very quickly!
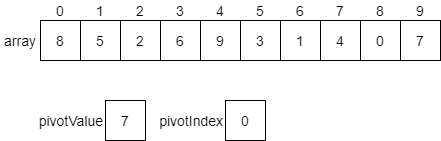
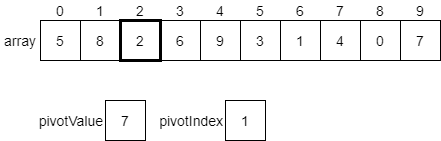
We can start with our same initial array, shown below.

The first step is to choose a pivot value. As we discussed above, we can choose any random value in the array. However, to make it simple, we’ll just use the last value. We will create two variables, pivotValue and pivotIndex, to help us keep track of things. We’ll set pivotValue to the last value in the array, and pivotIndex will initially be set to 0. We’ll see why in a few steps.
Now, the algorithm will iterate across each element in the array, comparing it with the value in pivotValue. If that value is less than or equal to the pivotValue, we should swap the element at pivotIndex with the value we are looking at in the array. Let’s see how this would work.

We’d start by looking at the value at index 0 of the array, which is 8. Since that value is greater than the pivotValue, we do nothing and just look at the next item.
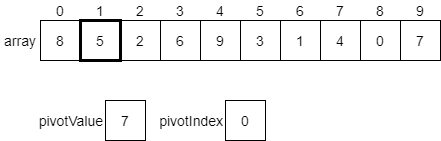
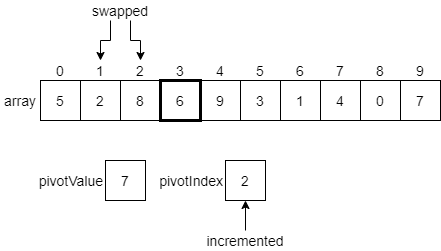
Here, we are considering the value 5, which is at index 1 in the array. In this case, that value is less than or equal to the pivotValue. So, we want to swap the current element with the element at our pivotIndex, which is currently 0. Once we do that, we’ll also increment our pivotIndex by 1. The diagram below shows these changes before they happen.
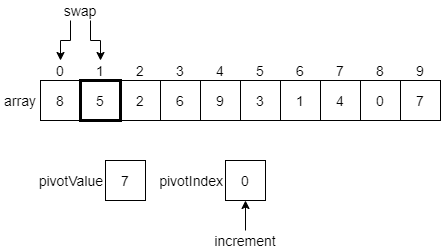
Once we make those changes, our array should look like the following diagram, and we’ll be ready to examine the value at index 2.
Once again, the value 2 at index 2 of the array is less than or equal to the pivot value. So, we’ll swap them, increment pivotValue, and move to the next element.
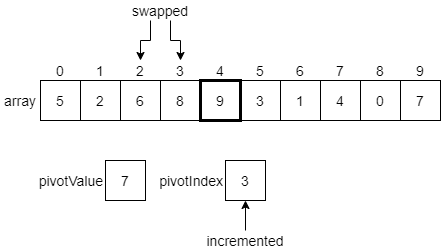
We’ll continue this process, comparing the next element in the array with the pivotValue, and then swapping that element and the element at the pivotIndex if needed, incrementing the pivotIndex after each swap. The diagrams below show the next few steps. First, since 6 is less than or equal to our pivotValue, we’ll swap it with the pivot index and increment.
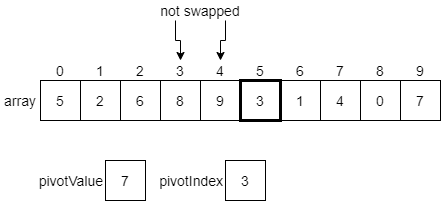
However, since 9 is greater than the pivot index, we’ll just leave it as is for now and move to the next element.
3 is less than or equal to the pivot value, so we’ll swap the element at index 3 with the 3 at index 5.
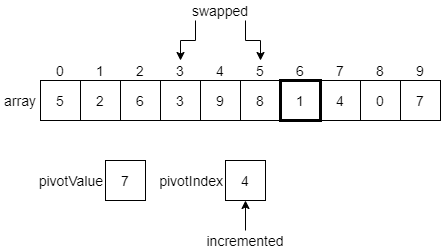
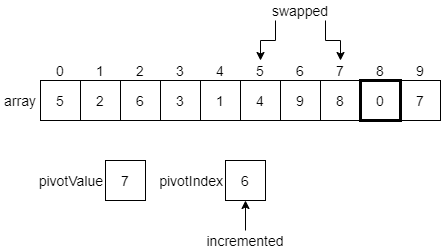
We’ll see that the elements at indexes 6, 7 and 8 are all less than or equal to the pivot value. So, we’ll end up making some swaps until we reach the end of the list.

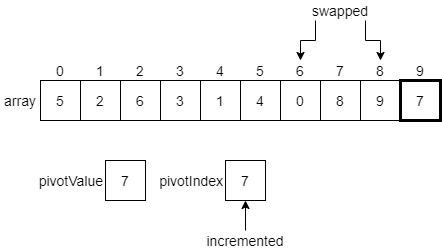
Finally, we have reached the end of the array, which contains our pivotValue in the last element. Thankfully, we can just continue our process one more step. Since the pivotValue is less than or equal to itself, we swap it with the element at the pivotIndex, and increment that index one last time.
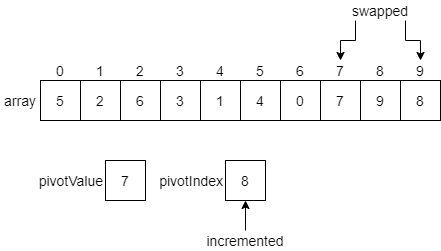
At this point, we have partitioned the initial array into two sections. The first section contains all of the values which are less than or equal to the pivot value, and the second section contains all values greater than the pivot value.
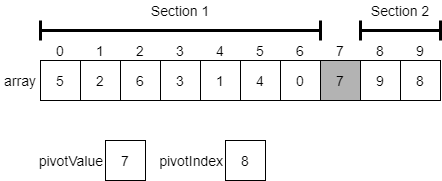
This demonstrates the powerful way that quicksort can quickly partition an array based on a pivot value! With just a single pass through the array, we have created our two halves and done at least some preliminary sorting. The last step is to make two recursive calls to quicksort, one that sorts the items from the beginning of the array through the element right before the pivotValue. The other will sort the elements starting after the pivotValue through the end of the array.
Once each of those recursive calls is complete, the entire array will be sorted!