Game Initialization
Before we actually move into the game loop, we need to initialize the game - load all of its needed parts and set all initial values. The MonoGame Game class provides two virtual hook methods for doing this: Game.Initialize() and Game.LoadContent().
You might be wondering why we have two methods, or asking why the constructor is not included in this count. These are all good questions. First, in the documentation we see that Initialize():
Initializes attached GameComponent instances and calls LoadContent().
And, if we look at the template-generated Game.Initialize() method:
protected override void Initialize()
{
    // TODO: Add your initialization logic here

    base.Initialize();
}
We can see that the Game.Initialize() is only invoked after our own initialization logic. Thus, it is largely a matter of controlling timing. We only want content (i.e. sounds, textures, etc.) to be loaded once the game is fully initialized.
This is largely because we are using the 3D hardware, which has its own RAM (video memory). Ideally, textures should be stored there for the fastest and most efficient rendering. So we want to delay loading our graphics until we have finished configuring the graphics device. Thus, we do any graphics card configuration in the Initialize() method, before invoking base.Initialize().
And why not the constructor? What if we want the player to be able to, upon loosing, immediately restart the game? If our initialization logic is in Initialize(), we can simply re-invoke that method. We can’t re-construct the Game class though, as it is tied to the life of our application.
Finally, the Game.LoadContent() is invoked after both our Initialze() and the base.Initialize() methods have finished. This means the graphics card is fully initialized, and we can now transfer graphics assets into its memory.
A Simple Example
Let’s look at a super-simple example demonstrating the game loop. We’ll have a ball that moves a bit each frame and bounces off the sides of the window.
Variable Declarations
First, we need to know the ball’s position and velocity. In a two-dimensional game, we would probably use a Vector2 Struct to represent these. We also need a Texture2D to be the image of the ball:
// The ball's information
private Vector2 _ballPosition;
private Vector2 _ballVelocity;
private Texture2D _ballTexture;
Add these lines to the top of the Game1 class definition, along with the other field declarations.
Initialize() Additions
Then, in our Initialize() method, let’s center the ball on the screen:
    // Position the ball in the center of the screen
    _ballPosition.X = GraphicsDevice.Viewport.Width / 2;
    _ballPosition.Y = GraphicsDevice.Viewport.Height / 2;
We’ll also give it a random velocity:
    // Give the ball a random velocity
    System.Random rand = new System.Random();
    _ballVelocity.X = (float)rand.NextDouble();
    _ballVelocity.Y = (float)rand.NextDouble();
    _ballVelocity.Normalize();
    _ballVelocity *= 100;
For now we’ll use the System.Random class you are used to. For some game purposes, it is sufficient, though its randomness is not as random as we’ll need for some kinds of games. Also, note that because Random.NextDouble() returns a double, and Vector2 uses floats, we need to implicitly cast the result. Finally, Vector2.Normalize() will shorten our velocity vector to be of length
$ 1 $, which the _ballVelocity *= 100; line scales up to a length of
$ 100 $. Eventually this will mean our ball will be traveling 100 pixels per second.
Adding the Image to the Project
As we said above, LoadContent() is where we load our assets. For now, we just need an image of a ball. However, getting this image into our game takes a bit of doing.
First, we need to find an image to use - a .jpeg, .gif, or .png will work fine. Feel free to use this one  .
.
Look in the Content folder of your solution explorer in Visual Studio. You should also notice a file, Content.mgcb in the same folder. This is a listing of all content to bring into the game. Go ahead and open it; it will look something like:

If instead of the editor program a text file is loaded in your VisualStudio instance, try right-click the file and choose “open with”. From the dialog, choose the mgcb-editor-wpf. If it is not listed, you may need to install it. From the command line:
> dotnet tool install --global dotnet-mgcb-editor
> mgcb-editor --register
Click the “Add Existing Item” toolbar button:

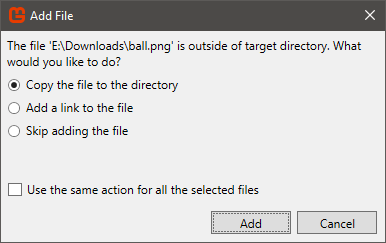
In the Open dialog that appears, select the ball image and click “Open”. Then in the next dialog, choose “Copy the file to the directory”:
Finally, save the .mgcb file:

Now the image will be built into a game-specific binary format as part of the build process. We’ll delve deeper into how this works in the chapter on the Content Pipeline.
LoadContent() Additions
To bring the ball texture into the game, we need to load it with a ContentManager class by invoking the ContentManager.Load<T>() method with the name of our content. The Game class has one already created and ready in the Game.Content property; we’ll use it:
_ballTexture = Content.Load<Texture2D>("ball");Add this line just below the #TODO: use this.Content to load your game content here line in the LoadContent() method.
Note that we use the filename (sans extension) to identify the content file to load, and that we also specify the type of object it should be loaded as (in this case, Texture2D).
At this point, if we were to run the game everything would be initialized. Now we need to handle updating and rendering the game world.